I guess it makes sense. After all, I’m the dessert girl. But every now and then, could I bring a bottle of tequila instead? Sharing is caring, ya know.
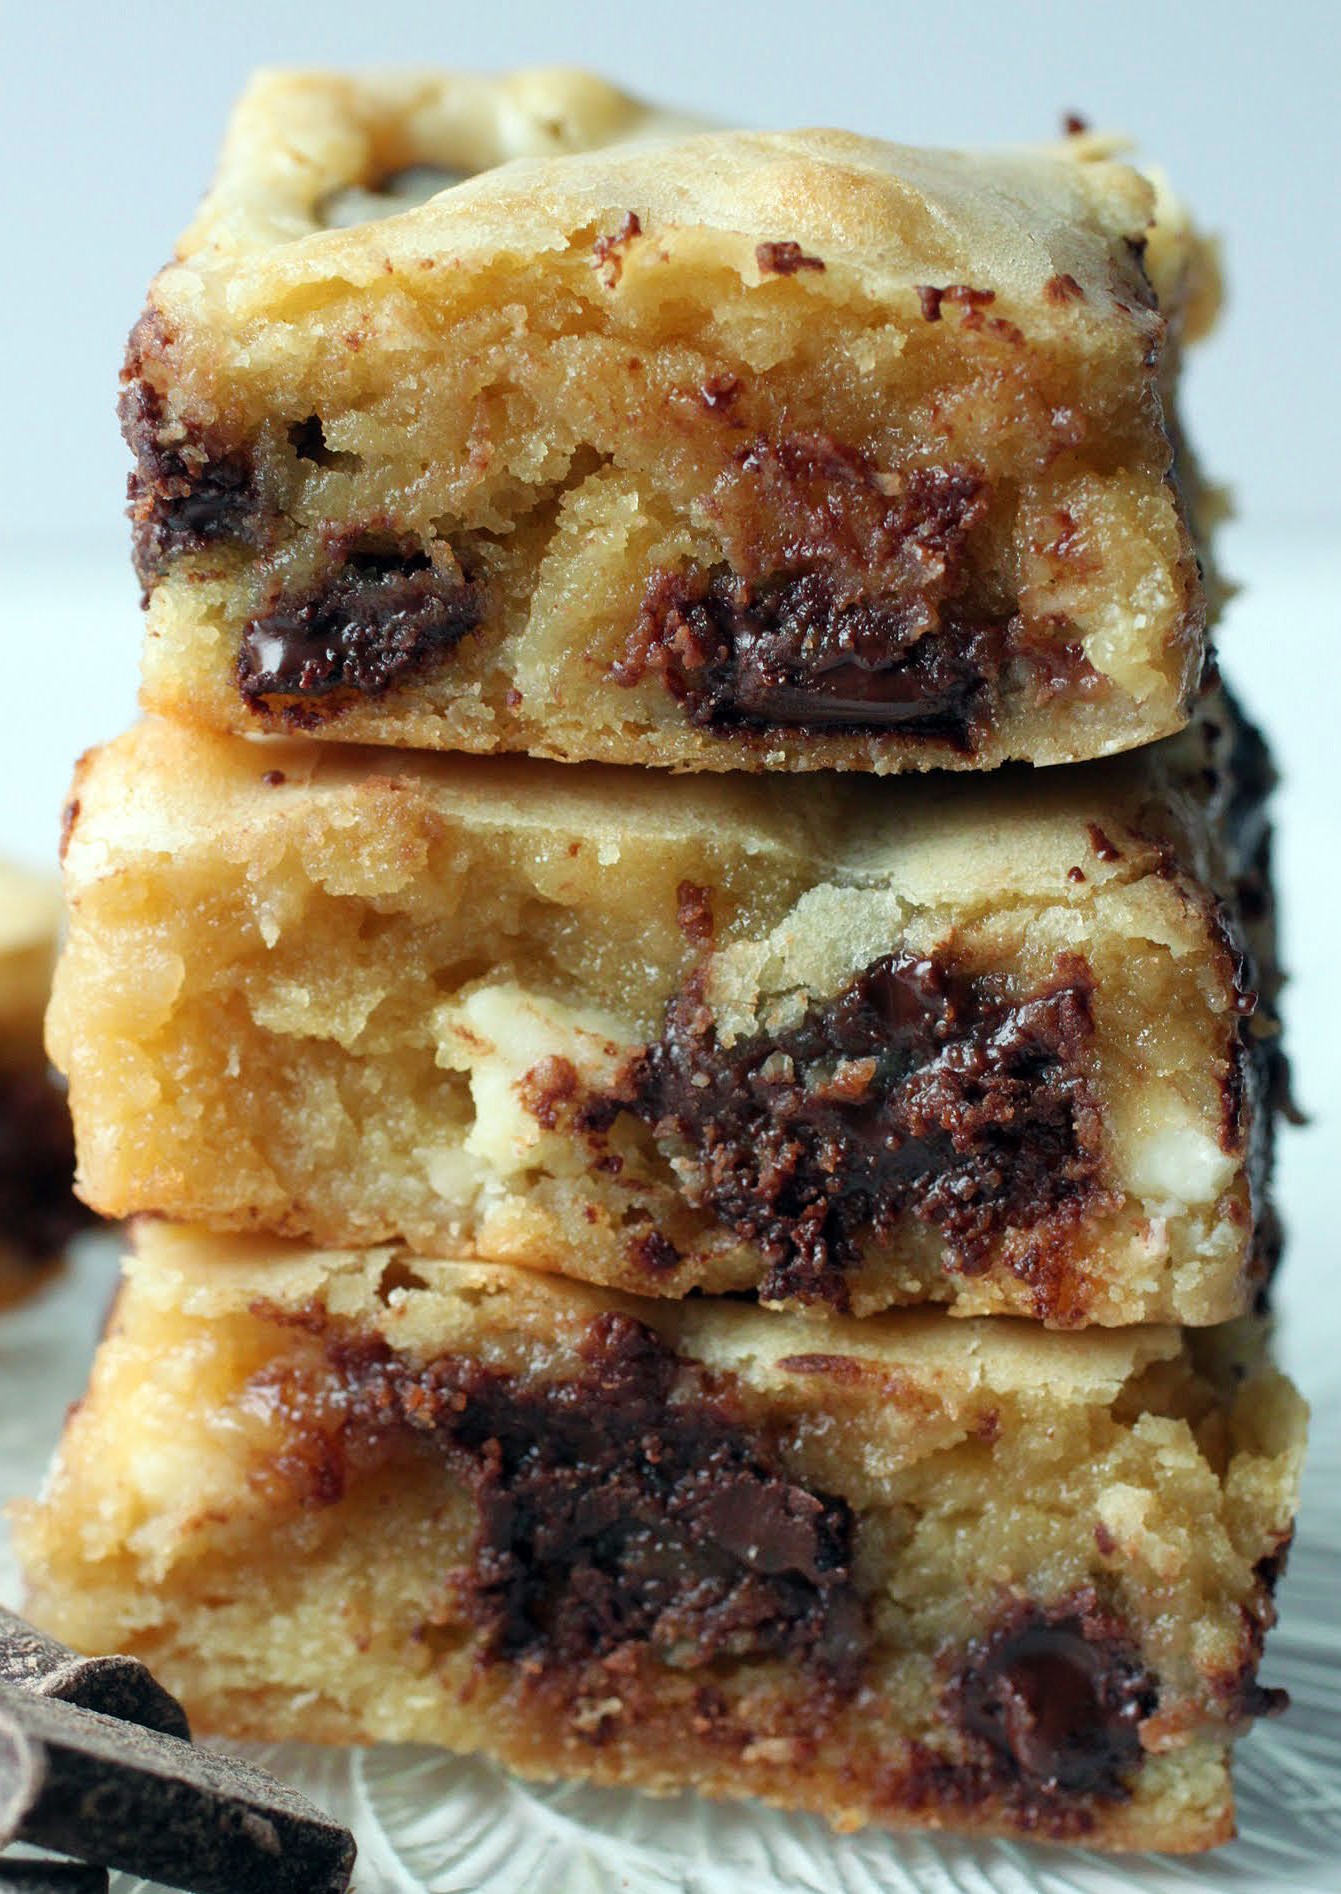
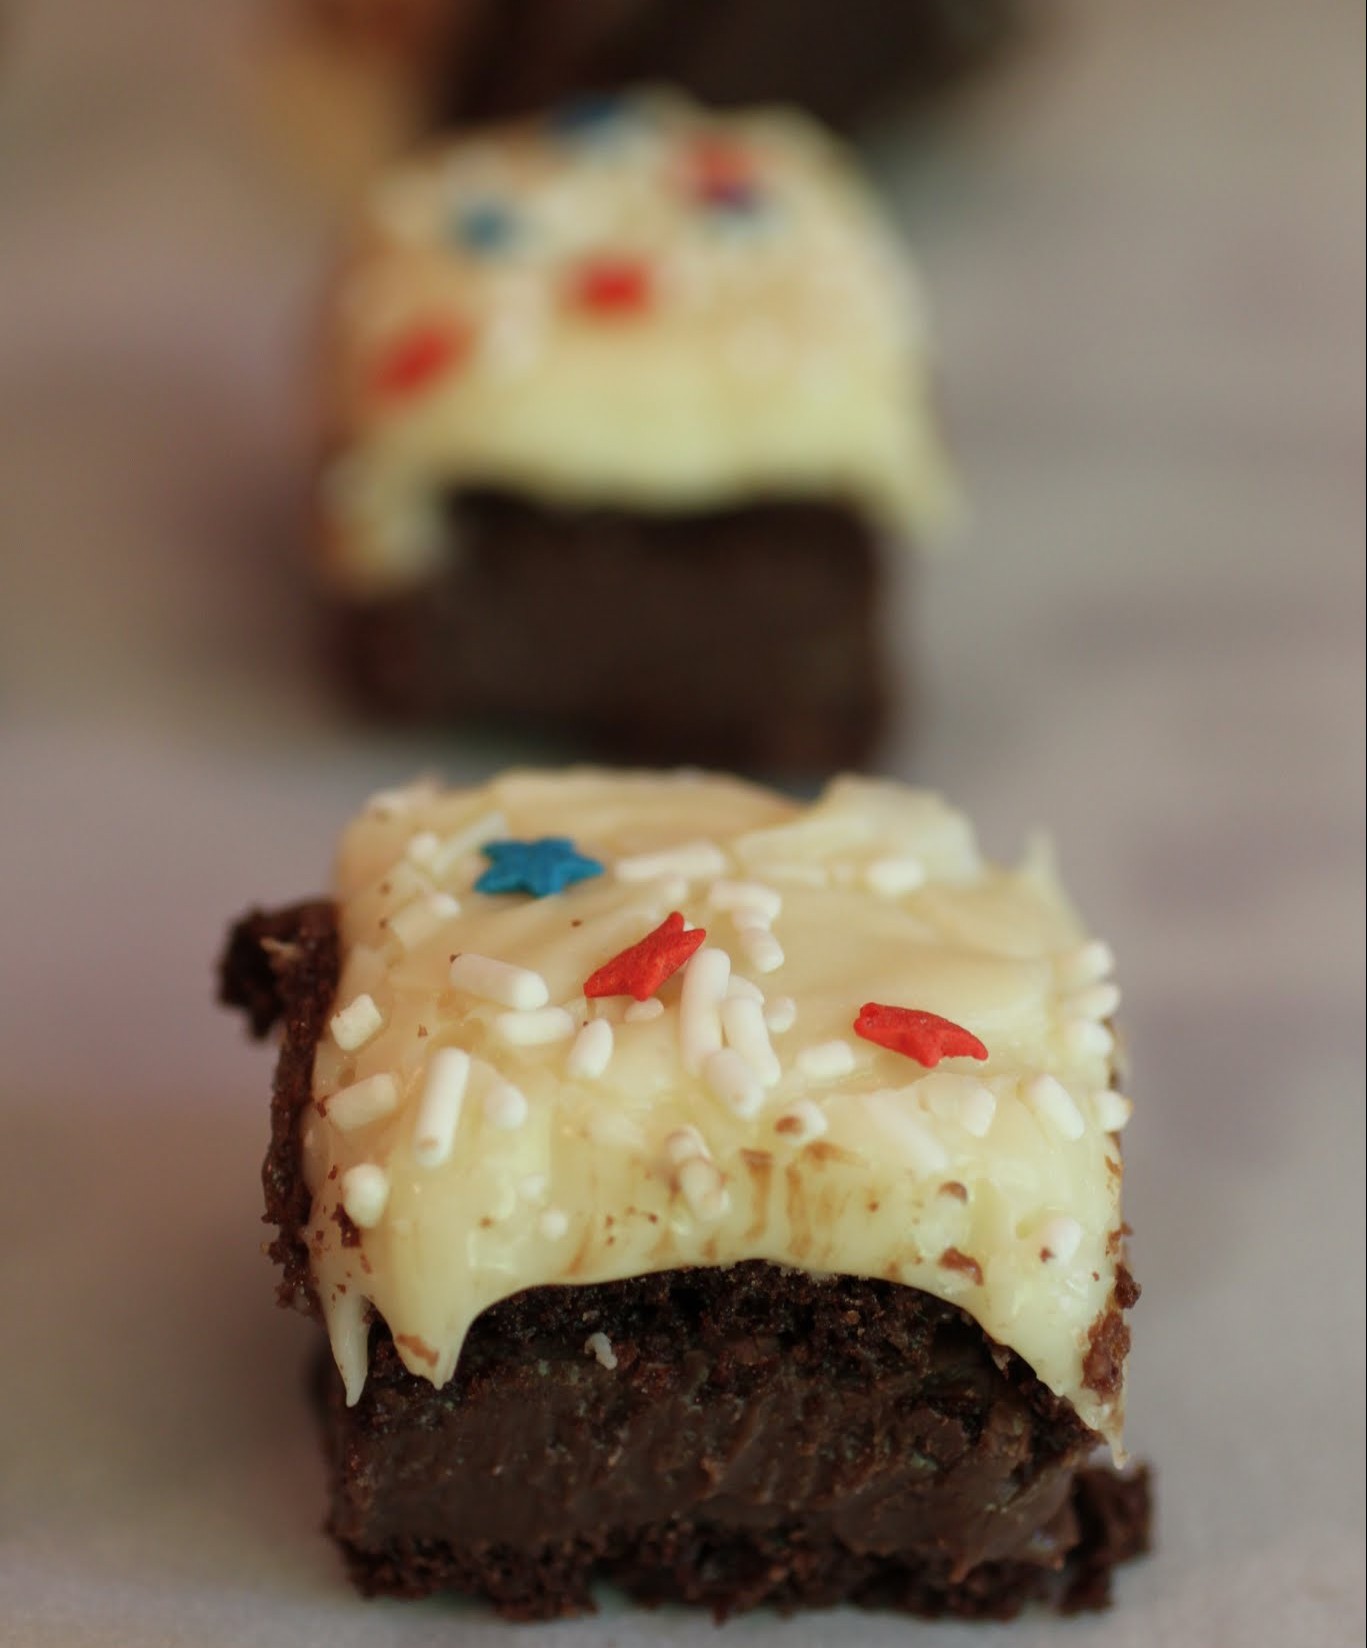
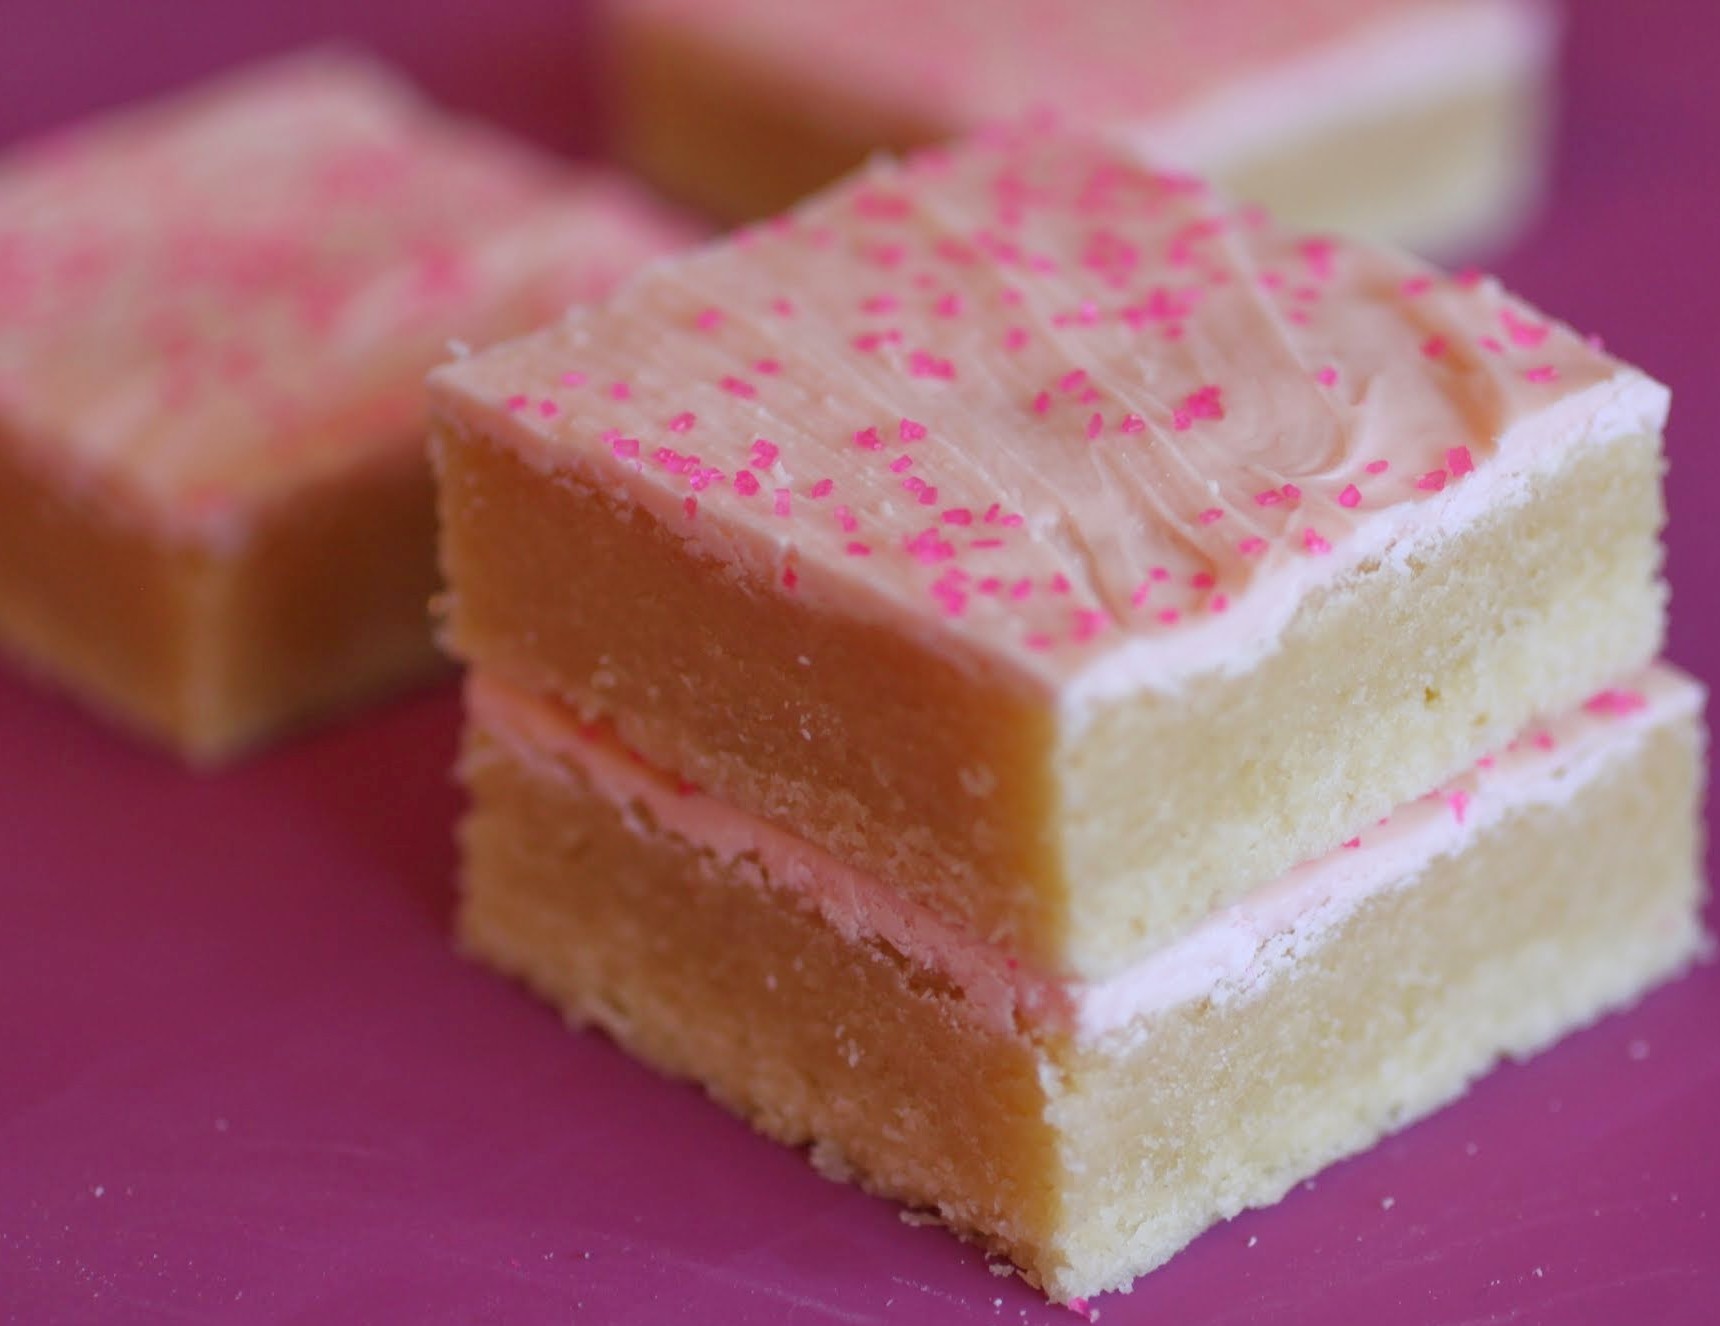
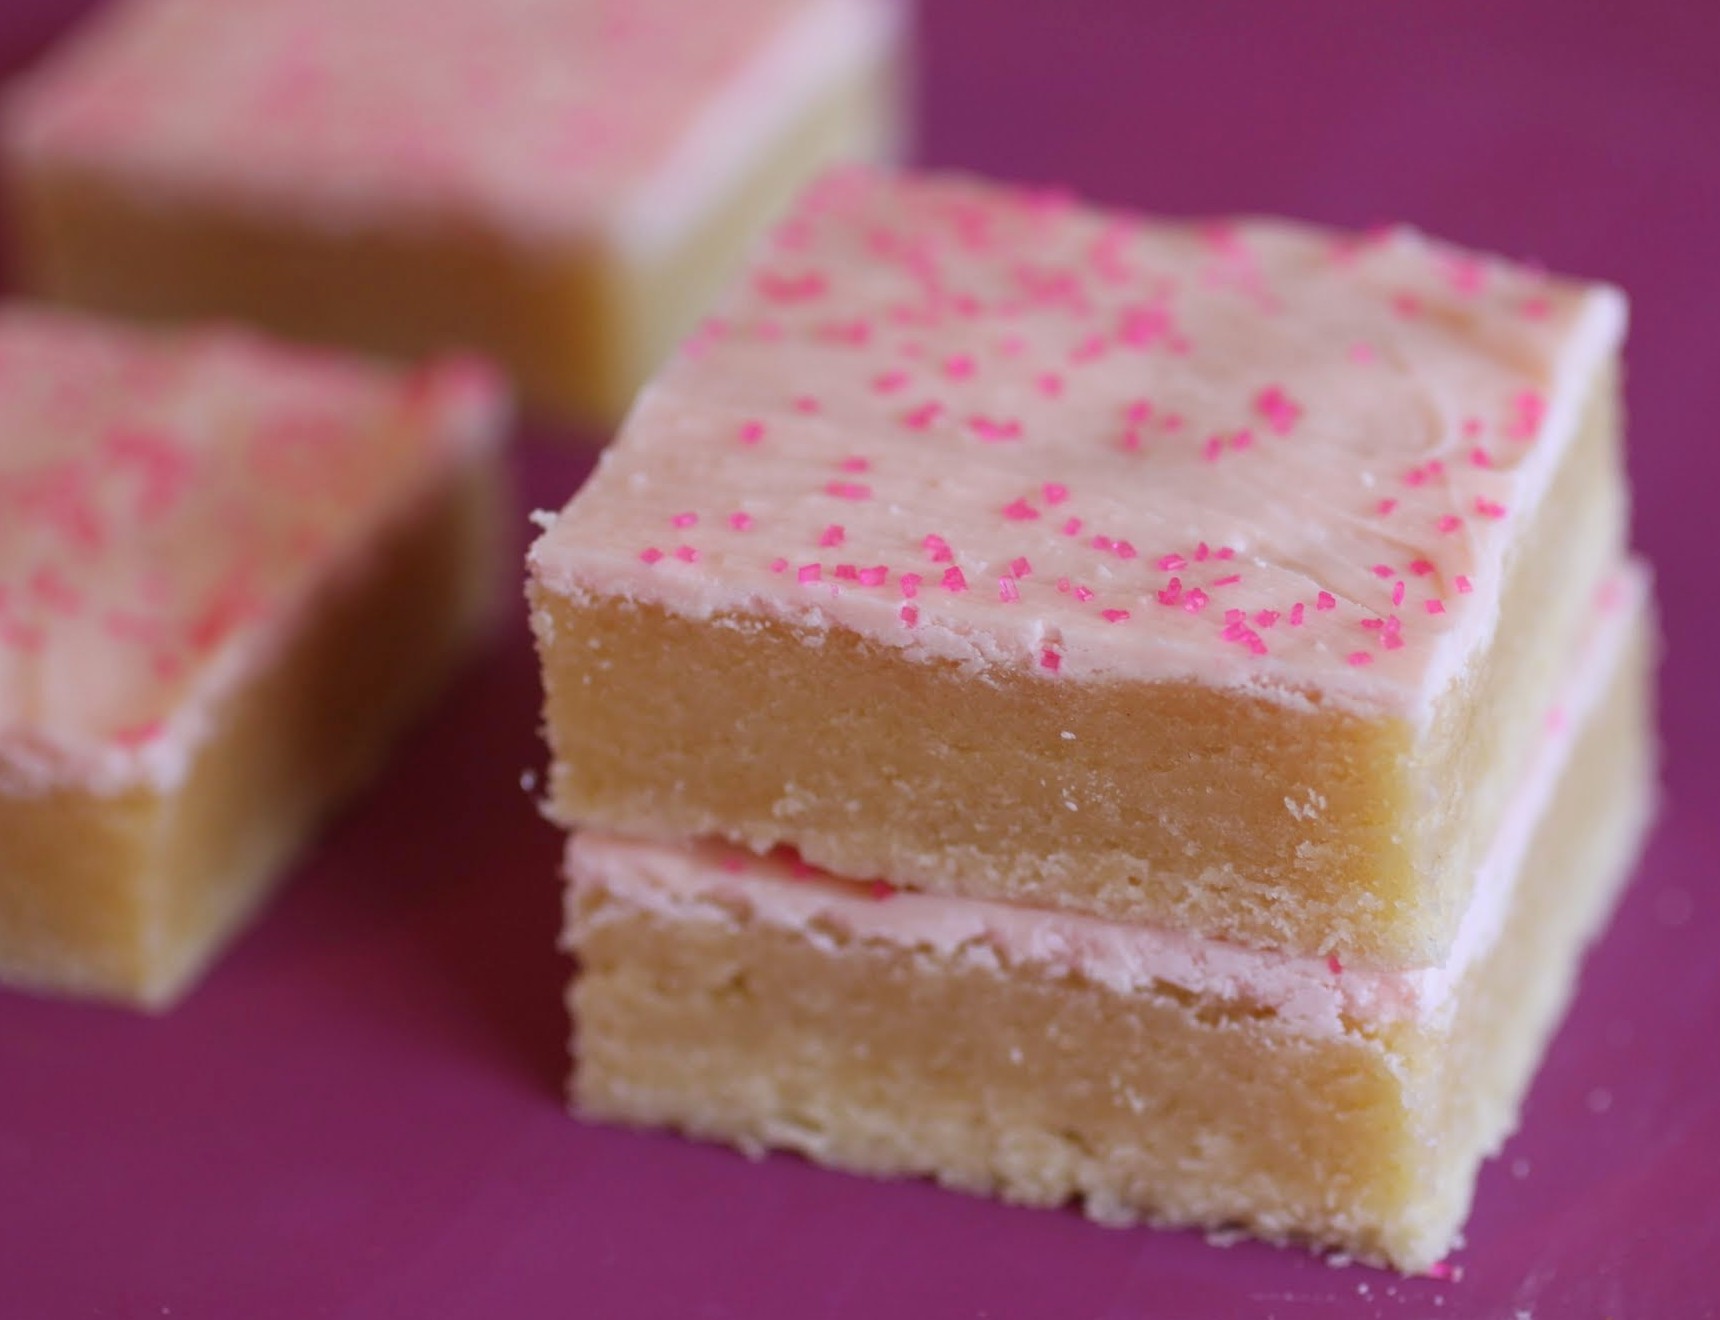
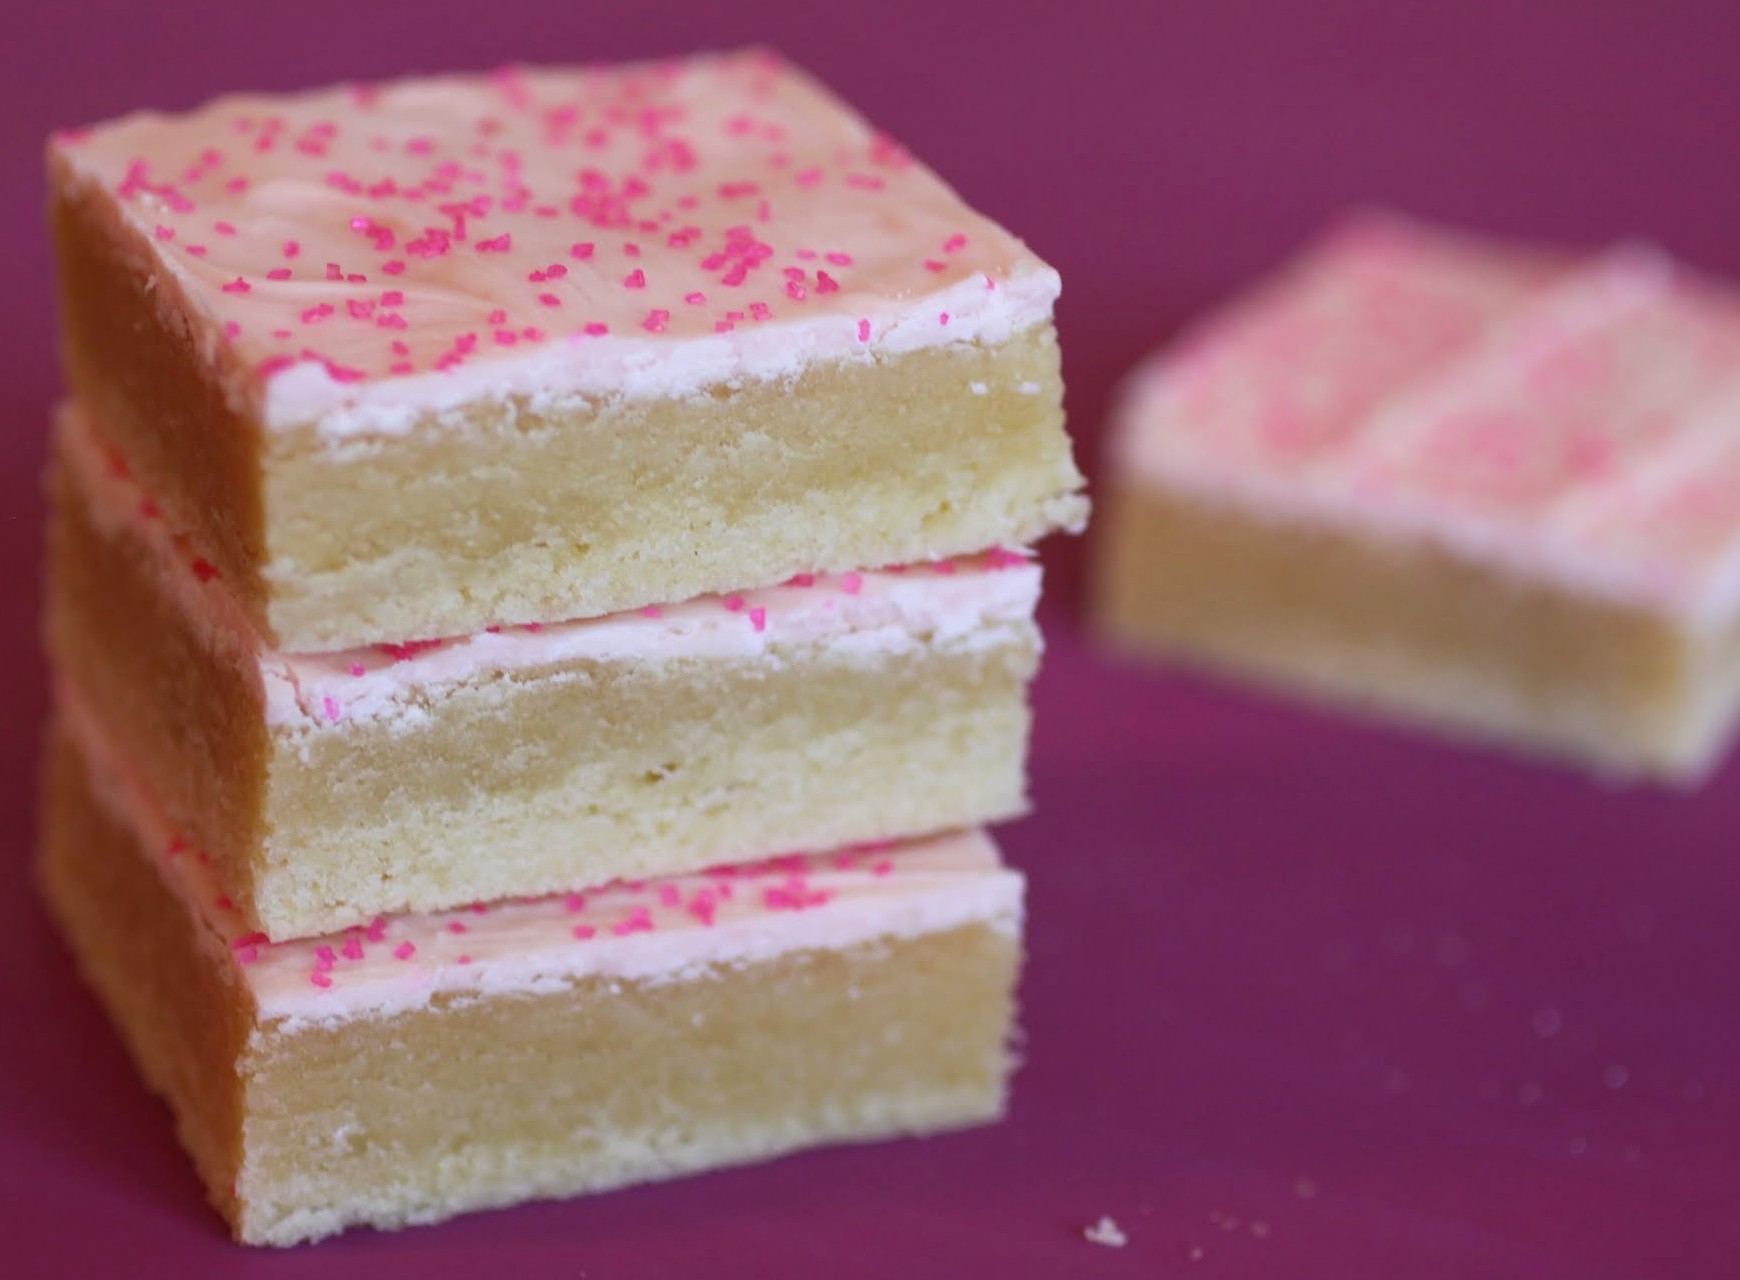
Oh, well. When I’m asked last-minute to bring a dessert somewhere, an old faithful recipe is the one to save me every time. No, I’m not talking about passing off slice and bake as my own, though that’s tempting. I’m talking about an easy bar cookie. These blondies are chewy, thick, easily customized and, most important, fast.
With all the stuff that gets thrown at us, we need easy solutions. After my flu drama of last week, I woke up with pinkeye a few days ago. On a scale of 1-10 of gross ailments that can inflict a human being with 10 being the highest, I’d rate pinkeye about a 5. On the one hand, it’s pretty yucky. On the other hand, I’ve seen much worse. Mainly on TV in zombie movies, but in real life as well.
While we’re on the subject, I’m not down with this whole zombie trend that seems to be stretching into oblivion. I had just gotten used to vegetarian vampires when zombie stuff started popping up everywhere. It’s been a few years now and people are still obsessed. When is there going to be a cute kitten and rainbow trend? Can someone get behind that?

See, I’m a very visual person, and I have a somewhat photographic memory. Once I see an image, it gets burned into my brain for all time. If it’s a scary image, I can’t drive it out of my head. That’s why I avoid horror movies, the evening news, and medical shows on TV. I really don’t want to be lying in the dark with disturbing images doing a loop in my head.
Maybe that’s the reason dessert is so appealing to me. It tastes good, sure, but it’s also a feast for the eyes. I always take a moment to appreciate how beautiful my blondie is before I eat it. That is the opposite of being scared senseless by a zombie.
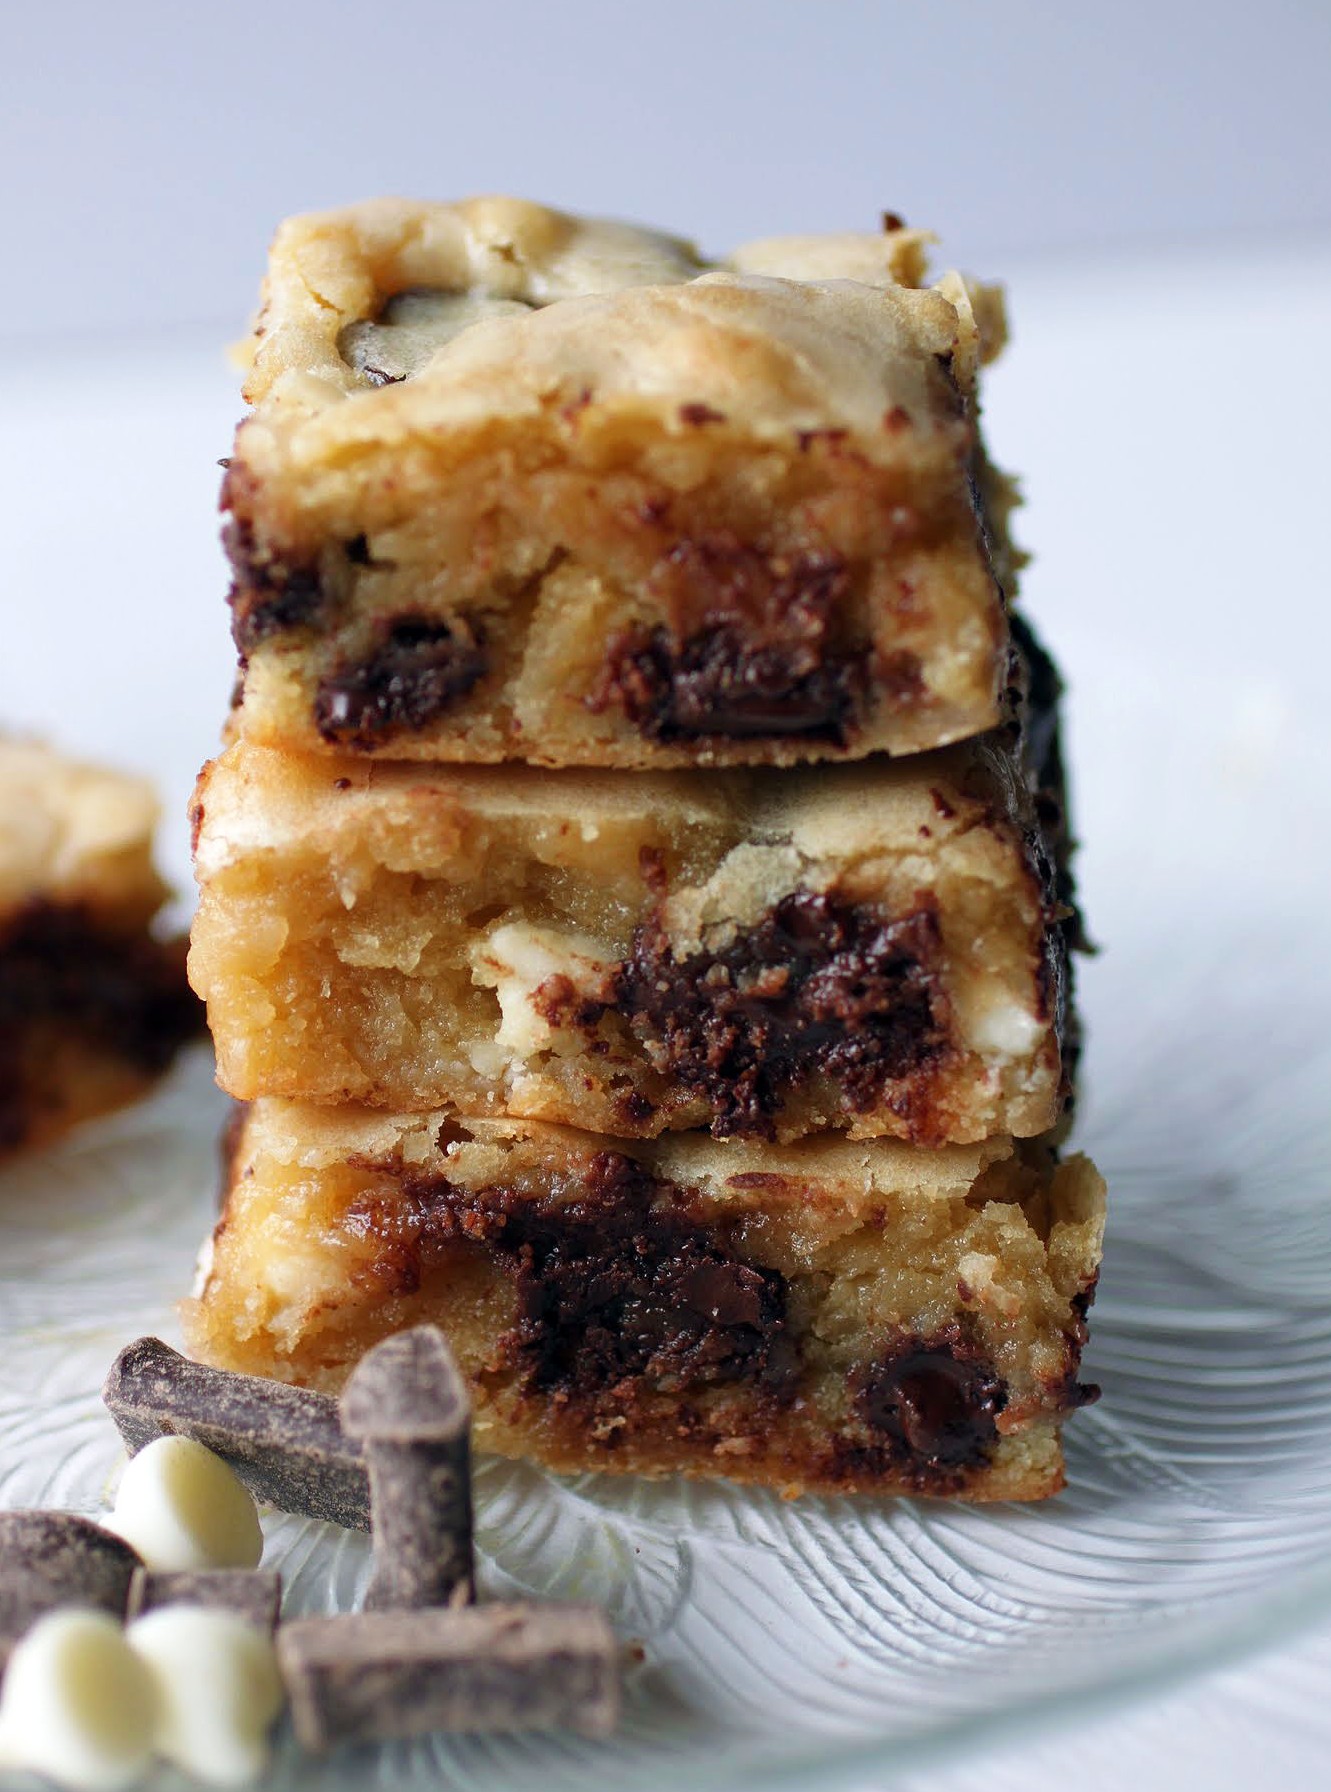
The base here is easy to make. I had a video, but my camera died during filming. Saddest story ever. So you have to imagine seeing that, and also understand that you can put in any old thing you’d like. Well, mix-ins, that is. I wouldn’t be dumping wine in there. Drink it on the side!
Nothing is more convenient than having a bunch of go-to recipes for when people assume you want to make dessert on short notice. That way you can rise to the occasion. Also, you can keep the bottle of tequila at home and enjoy it as you bake. Just don’t watch The Walking Dead at the same time!
Ingredients
Instructions
- Preheat the oven to 350. Line an 8 x 8 pan with foil, leaving enough to overhang the sides, and coat in cooking spray.
- In a medium-sized bowl, combine the flour, baking powder, and salt. Set aside.
- Take a larger bowl and mix the brown sugar, melted butter, eggs and vanilla until just blended. Add the dry ingredients gradually and mix until incorporated. Fold in the mix-ins.
- Spread the batter in the prepared pan.
- Bake for 25-30 minutes until the edges are browned. The middle might jiggle slightly, but it will harden as the bars cool. Do not overbake. Cut into squares with a sharp knife and store in an airtight container
Well, my world, anyway. There are certain days (or weeks) when facing the day is just hard. Maybe I have to work a 12-hour day before heading home to my kids, or maybe a student of mine has been going through something rough and I’m absorbing the pain. It’s not always cake!
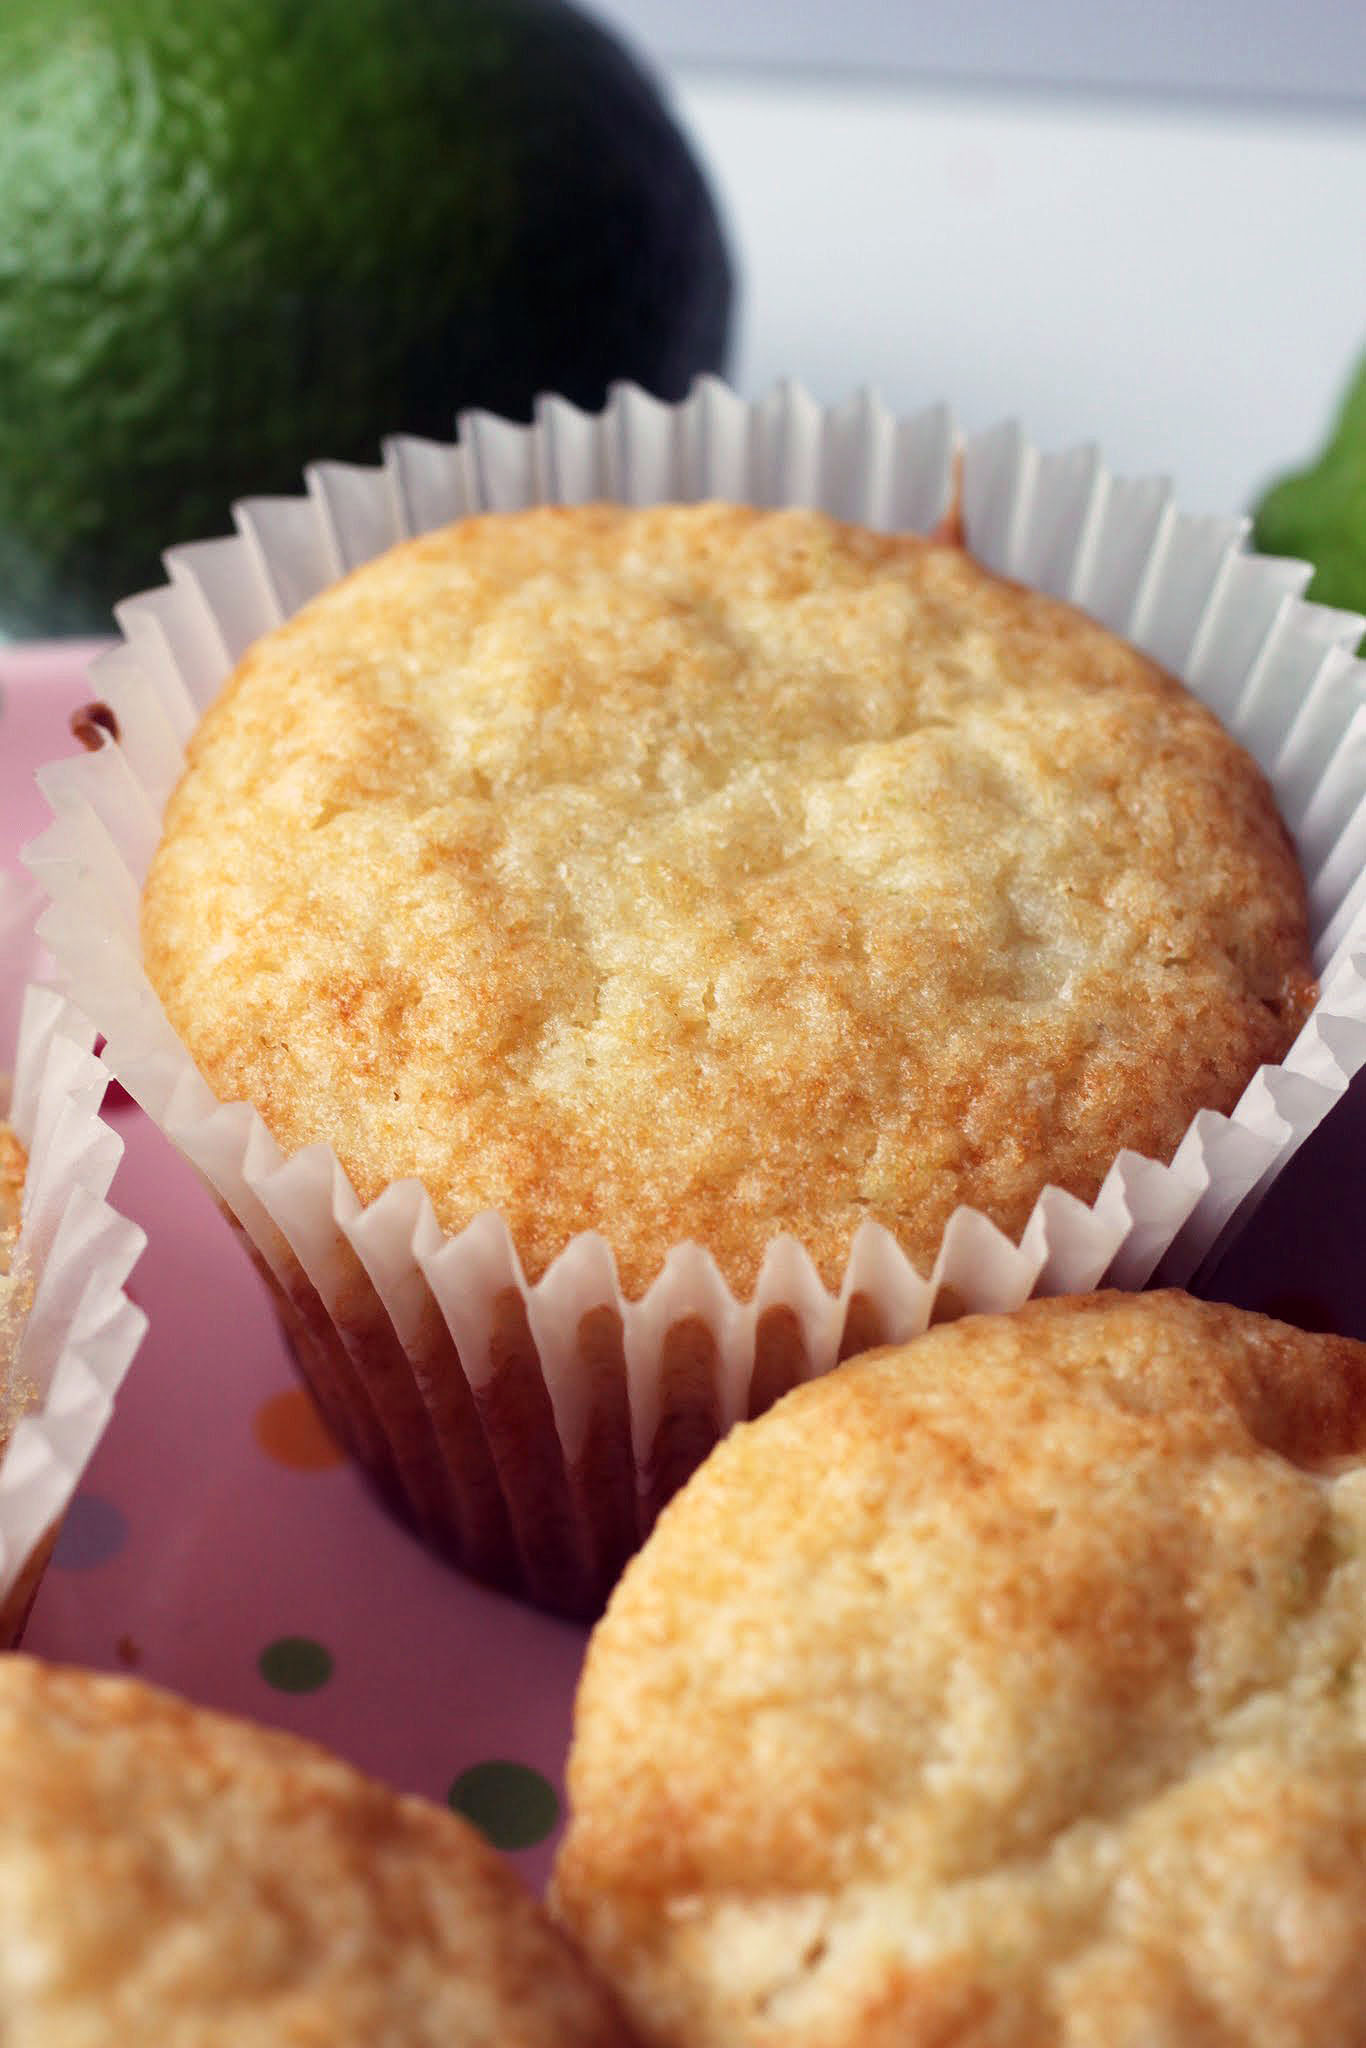
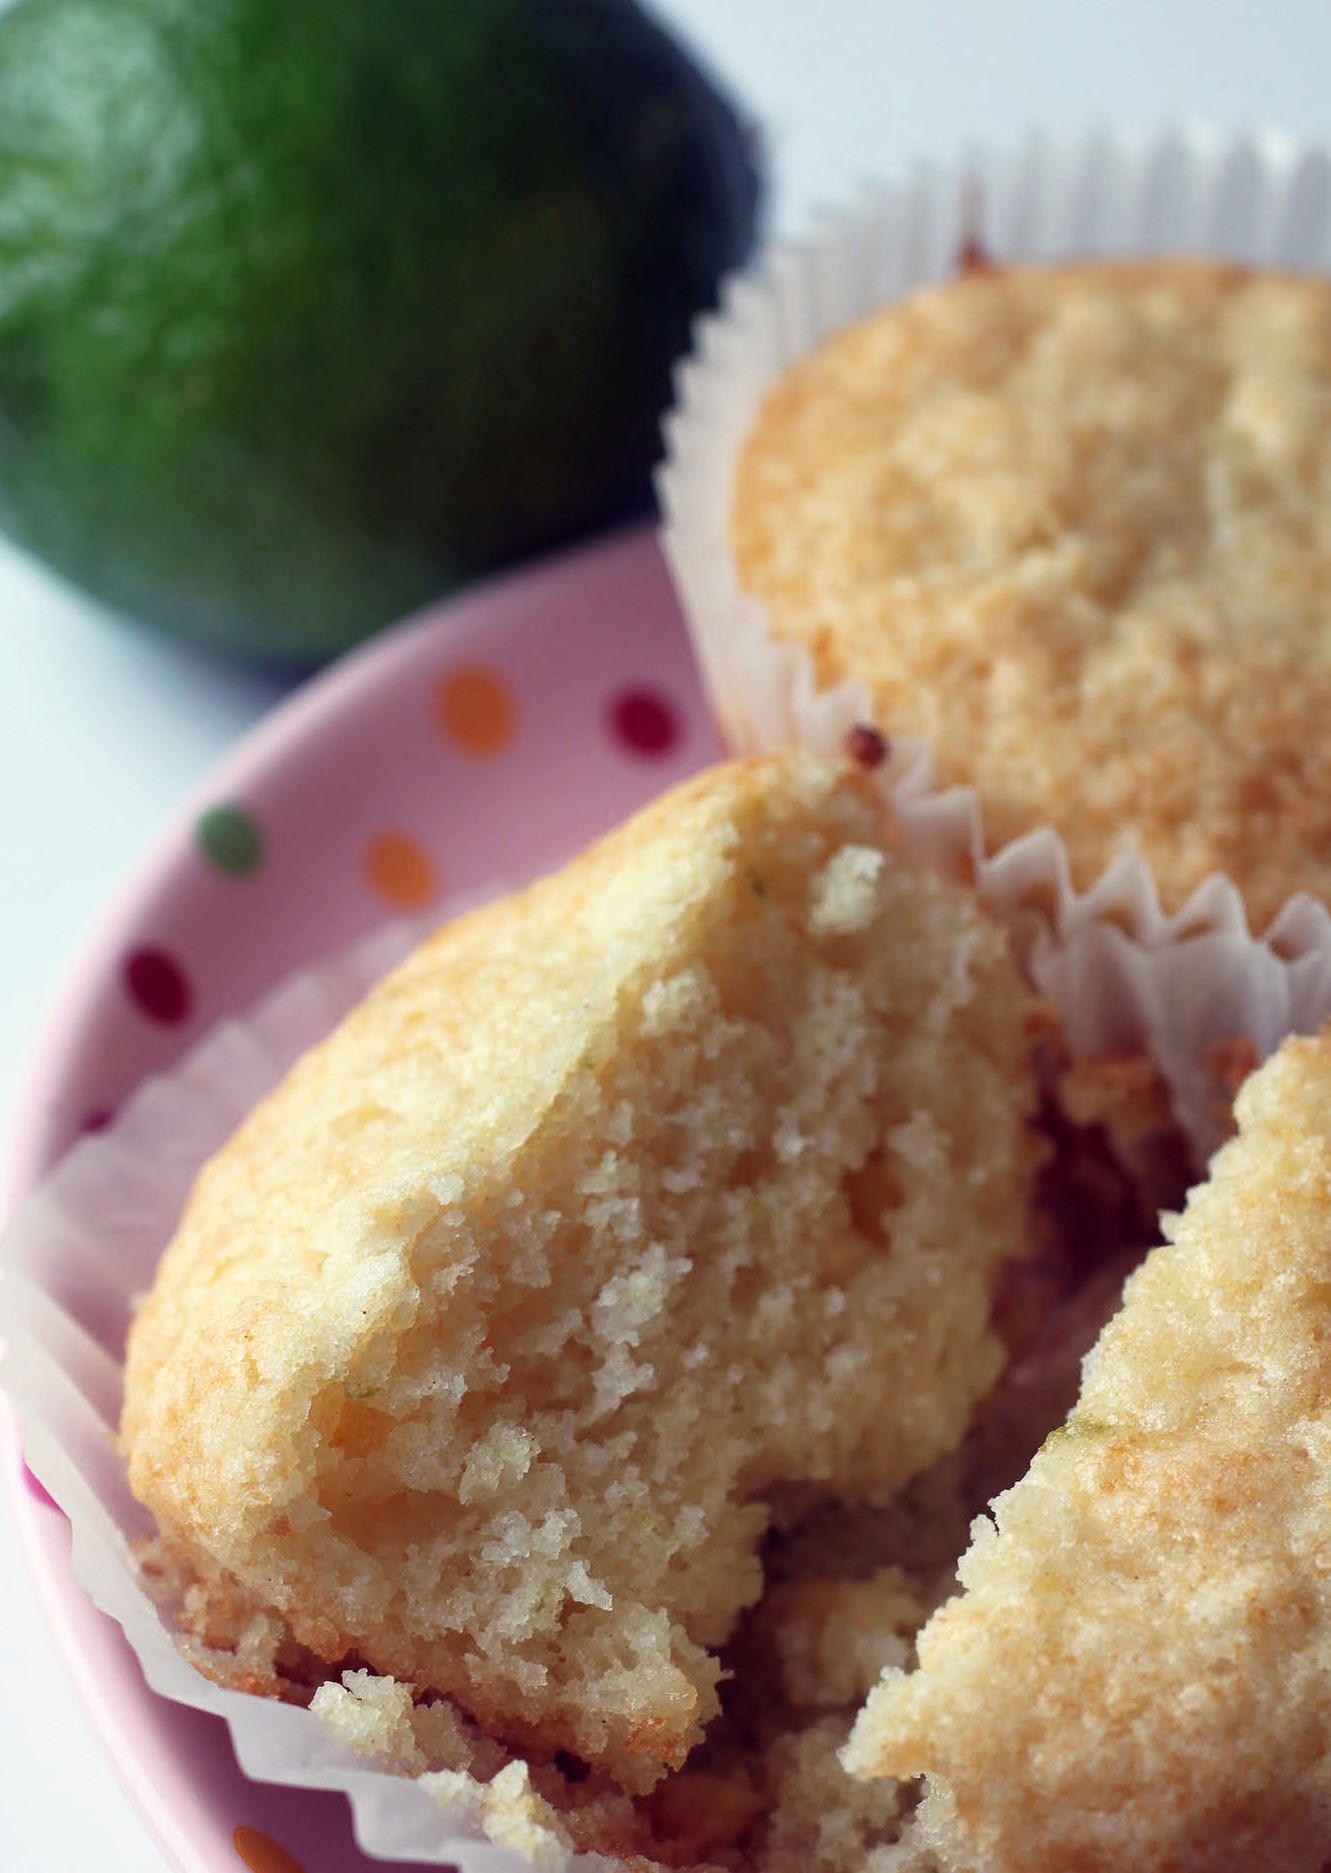
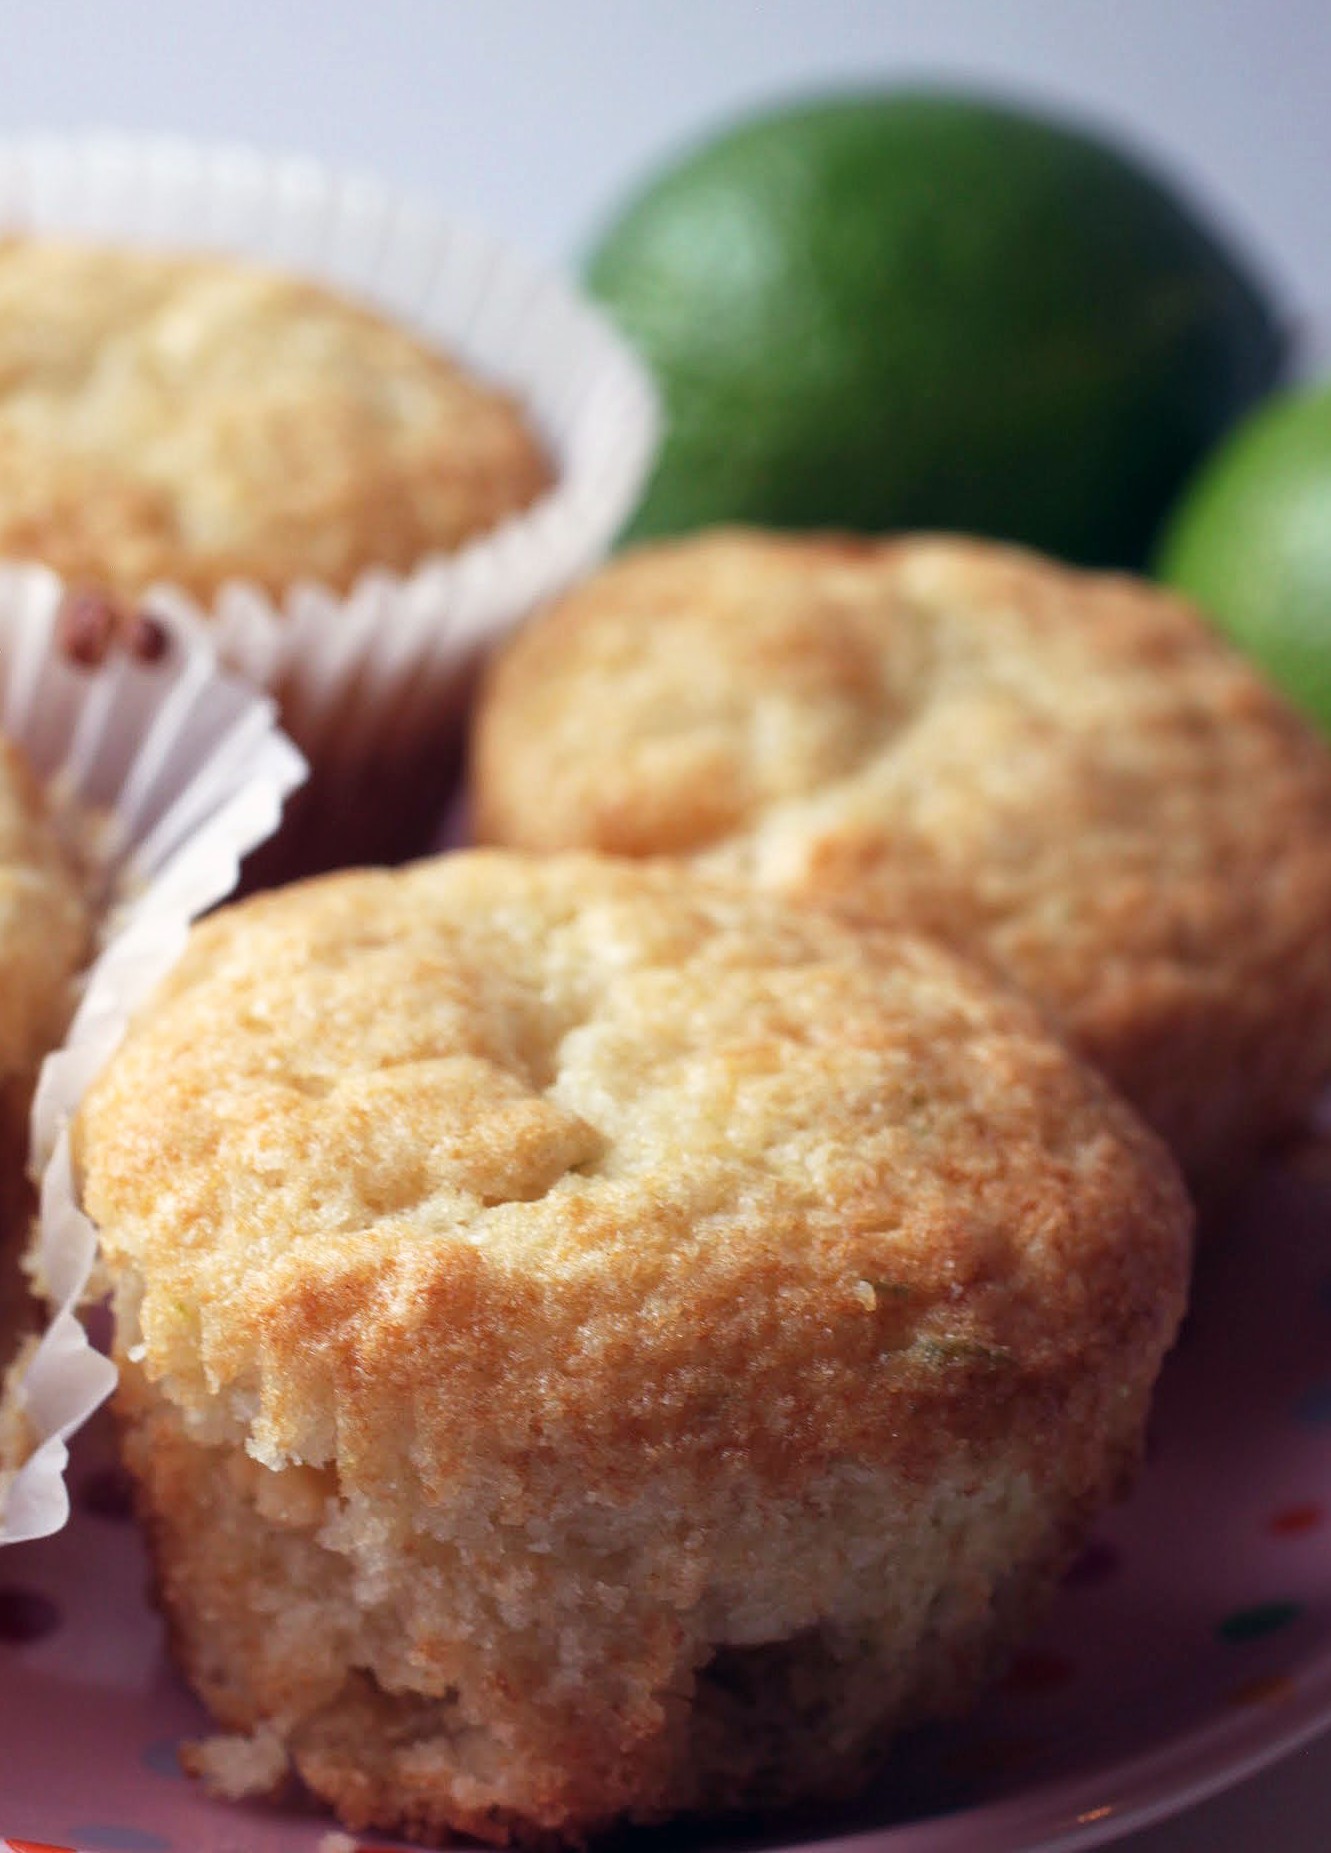
On days like that, I need an easy breakfast to throw together. This muffin base is simple, butter-free (and therefore a health food, of course), and easily customized. I chose lime zest (a.k.a. summer in a whiff) and white chocolate chips, but you can use any old mix-ins. It’s all about making your mornings as happy as possible!
I know it’s pretty common for people to whine about winter, so I try not to do it a lot. But being honest here, this time of year is an endless struggle for me. You see, I have an autoimmune disorder that restricts the blood vessels all over my body. In warm weather, my blood flows freely and I feel energetic, vibrant and positive.
But when winter hits, I range from a partial lack of feeling in my arms and legs (and even other parts of me on bad days) to a continuous ache in those areas. It’s totally manageable, but there is a tangible difference between the person I am in warm weather and the person I am right now. I’m just waiting for the seasons to shift so that things can get better.
And I don’t even mean to complain (though it reads that way, I know), because I’m really lucky. At least my problem is seasonable and it’s workable. A lot of people suffer with chronic pain and exhaustion and there’s not anything they can do to make it better.
While I like to think of the Sylvia Plath quotation that there’s not a whole lot that a good book and a good bath doesn’t fix, we all know what happened to her. So I think it’s really important to focus on self-pampering when possible. That could be wrapping yourself up in a cozy heated blanket at work with a mug of tea, or taking a bubble bath at night, or taking a 20-minute power nap, or having muffins for breakfast. Or why not do it all?
Well, time often gets in the way, but that’s why I love these muffins. They take no time at all to make (the video will show you!) since it’s a simple matter of mixing dry ingredients with wet ones, and then you’re done. Check it out!
This time of year, I start baking with citrus more, especially lime. Lime to me is summer. When I zest a lime and the aroma reaches my nose, I feel sunny days and sand and margaritas. These muffins reached me at the heart of my winter blah feelings and really helped alleviate some of the grayness everywhere.
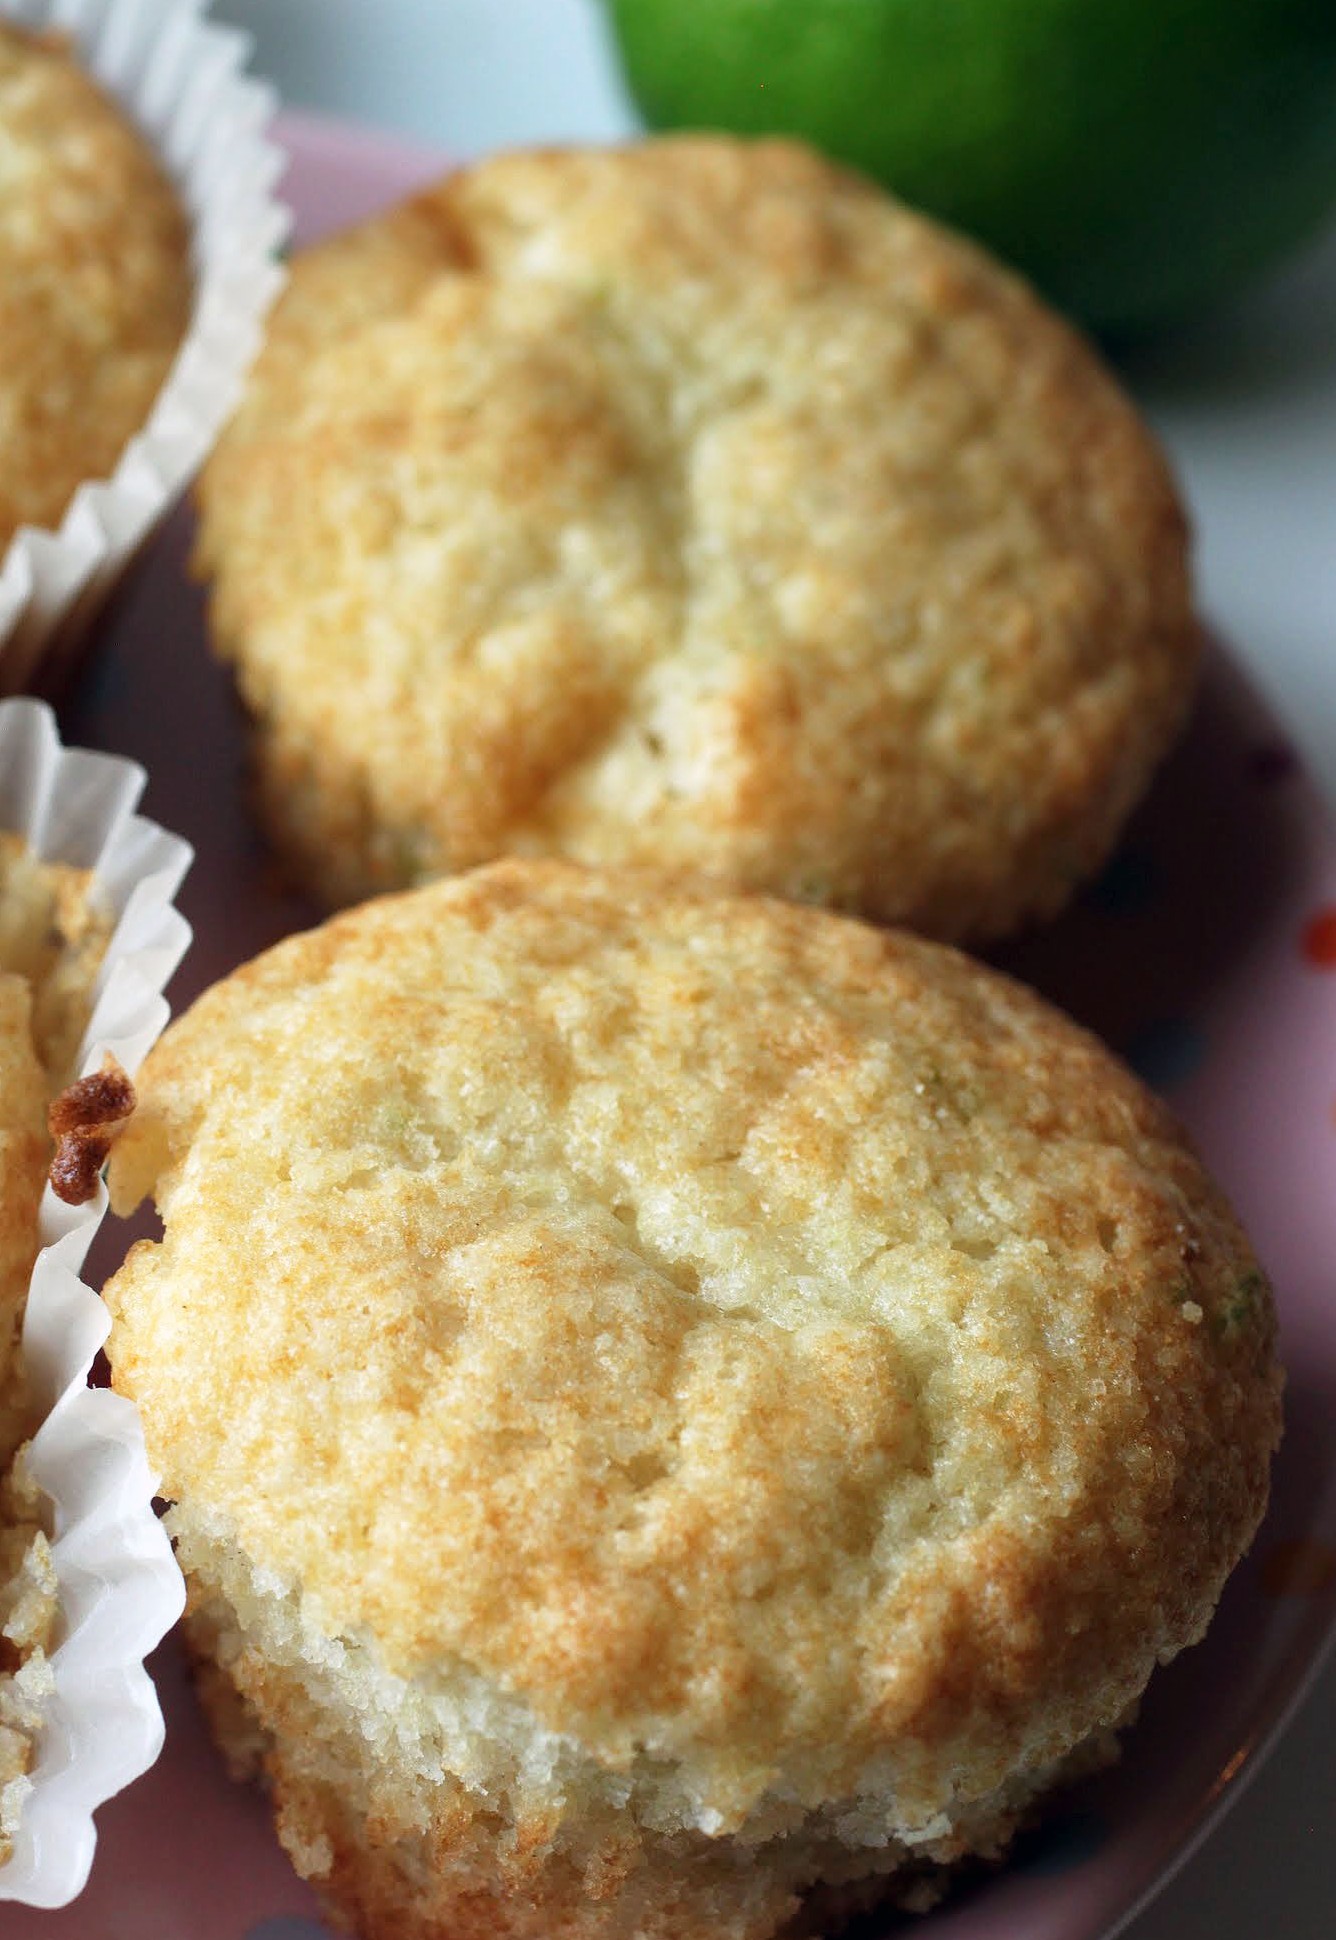
And white chocolate with lime is the best. If you haven’t gone for that tangy-sweet combo, try it now!
It’s totally okay to hate on a season for whatever reason, but just be sure to self-pamper. After all, there’s no guarantee than anyone else will do it for you. Make some muffins, grab some tea and have a moment!
Ingredients
Instructions
- Preheat the oven to 400. Line a 12-yield muffin pan with cupcake liners. Set aside.
- In a bowl, combine the flour, baking powder and salt. Set aside.
- In a medium bowl, combine the next three wet ingredients. Add the sugar and mix well. The add the dry ingredients and stir until all is combined. The batter will be lumpy.
- Add your desired mix-ins (I used the lime zest and white chocolate chips). Using an ice cream scoop, fill each muffin liner about two-thirds of the way full.
- Bake the muffins for 20-25 minutes until golden. Cool and enjoy!
It’s hard not to, when it’s so easy to make people happy by giving the gift of fudge for very little effort. I’d rather put the hard work into maintaining friendships and being a good person rather than standing over a stove top with a candy thermometer. Not that the two are necessarily mutually exclusive, of course.
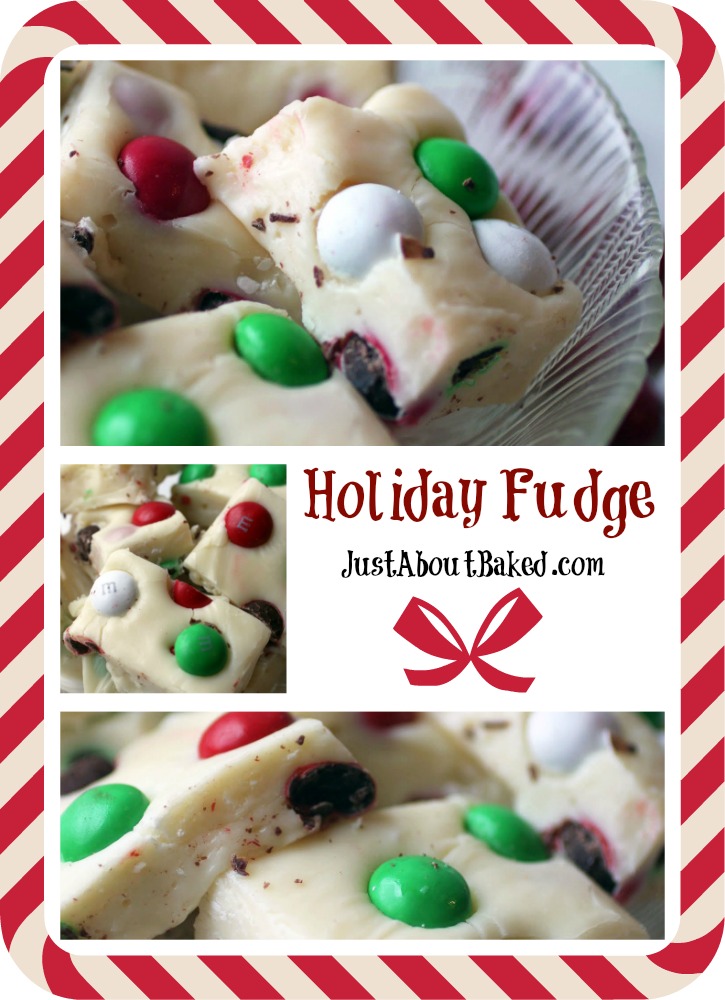
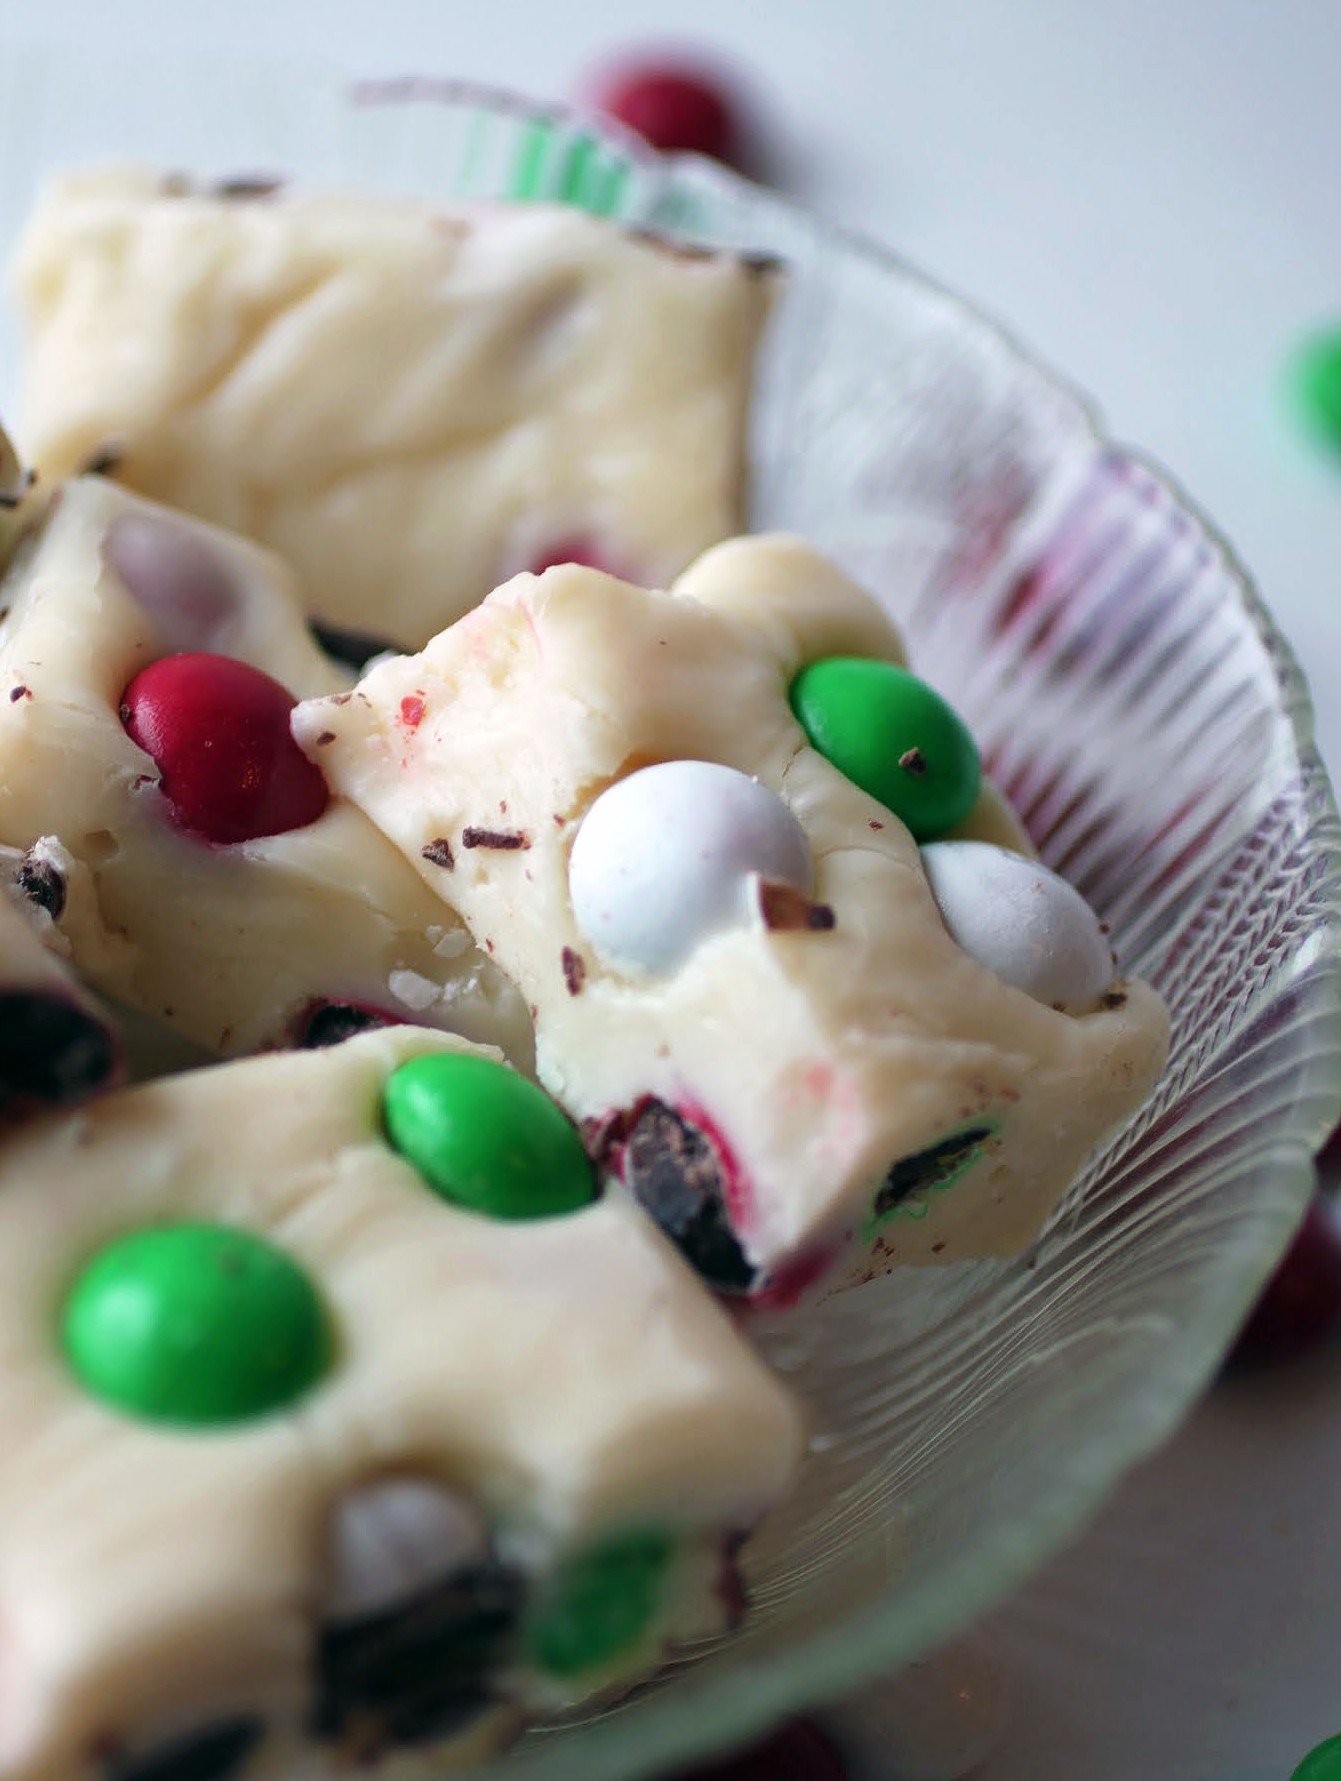
As my wise brother pointed out to me last week, there is something about the combo of white chocolate and mint that is just meant to be. So in honor of him, here’s a white chocolate fudge filled with holiday mint-flavored M & Ms. In one bite, you get both crunchy and creamy sweetness. It’s the best!
It’s important to move with the times, and in case you haven’t noticed, food blogs are all about incorporating video now. That means that just as I’m starting to figure out this whole photography thing, I am now going to have to become a cinematographer as well. It’s cool. I hope you enjoy my first effort, which took me far too many hours to complete!
Yep, it’s a first try, so don’t be too harsh. I’ll get better at it, okay? Film editing software ain’t no joke.
But you know, it’s important to learn new things. It’s good for our minds, which need to be exercised and challenged, and it’s also protection against our kids making fun of us for being out of the loop.
Since I teach high school, I’m more up-to-date than most adults about fashion, slang, and popular trends. In my deluded mind, this awareness keeps me young. But even with that added edge, I still feel like getting older is something to resist, both physically (who doesn’t love the gym?) and mentally (let’s make a video!).
Seriously, all the kids today make videos. It’s like they absorbed the skill in utero. When I was struggling to edit a clip, my son looked over my shoulder and shook his head. “No, Mommy. You have to press ‘split’ and then ‘detach.'” And he’s all of seven and a half. As far as I know, nobody’s taught him how to do this. He just knows, somehow.
Luckily, some of my knowledge transcends age, and making fudge is part of that. The best part about fudge is that it’s really hard to mess up. Unless, that is, the whole pan tips off the fridge shelf while setting. Yep. We’d best not speak of that.
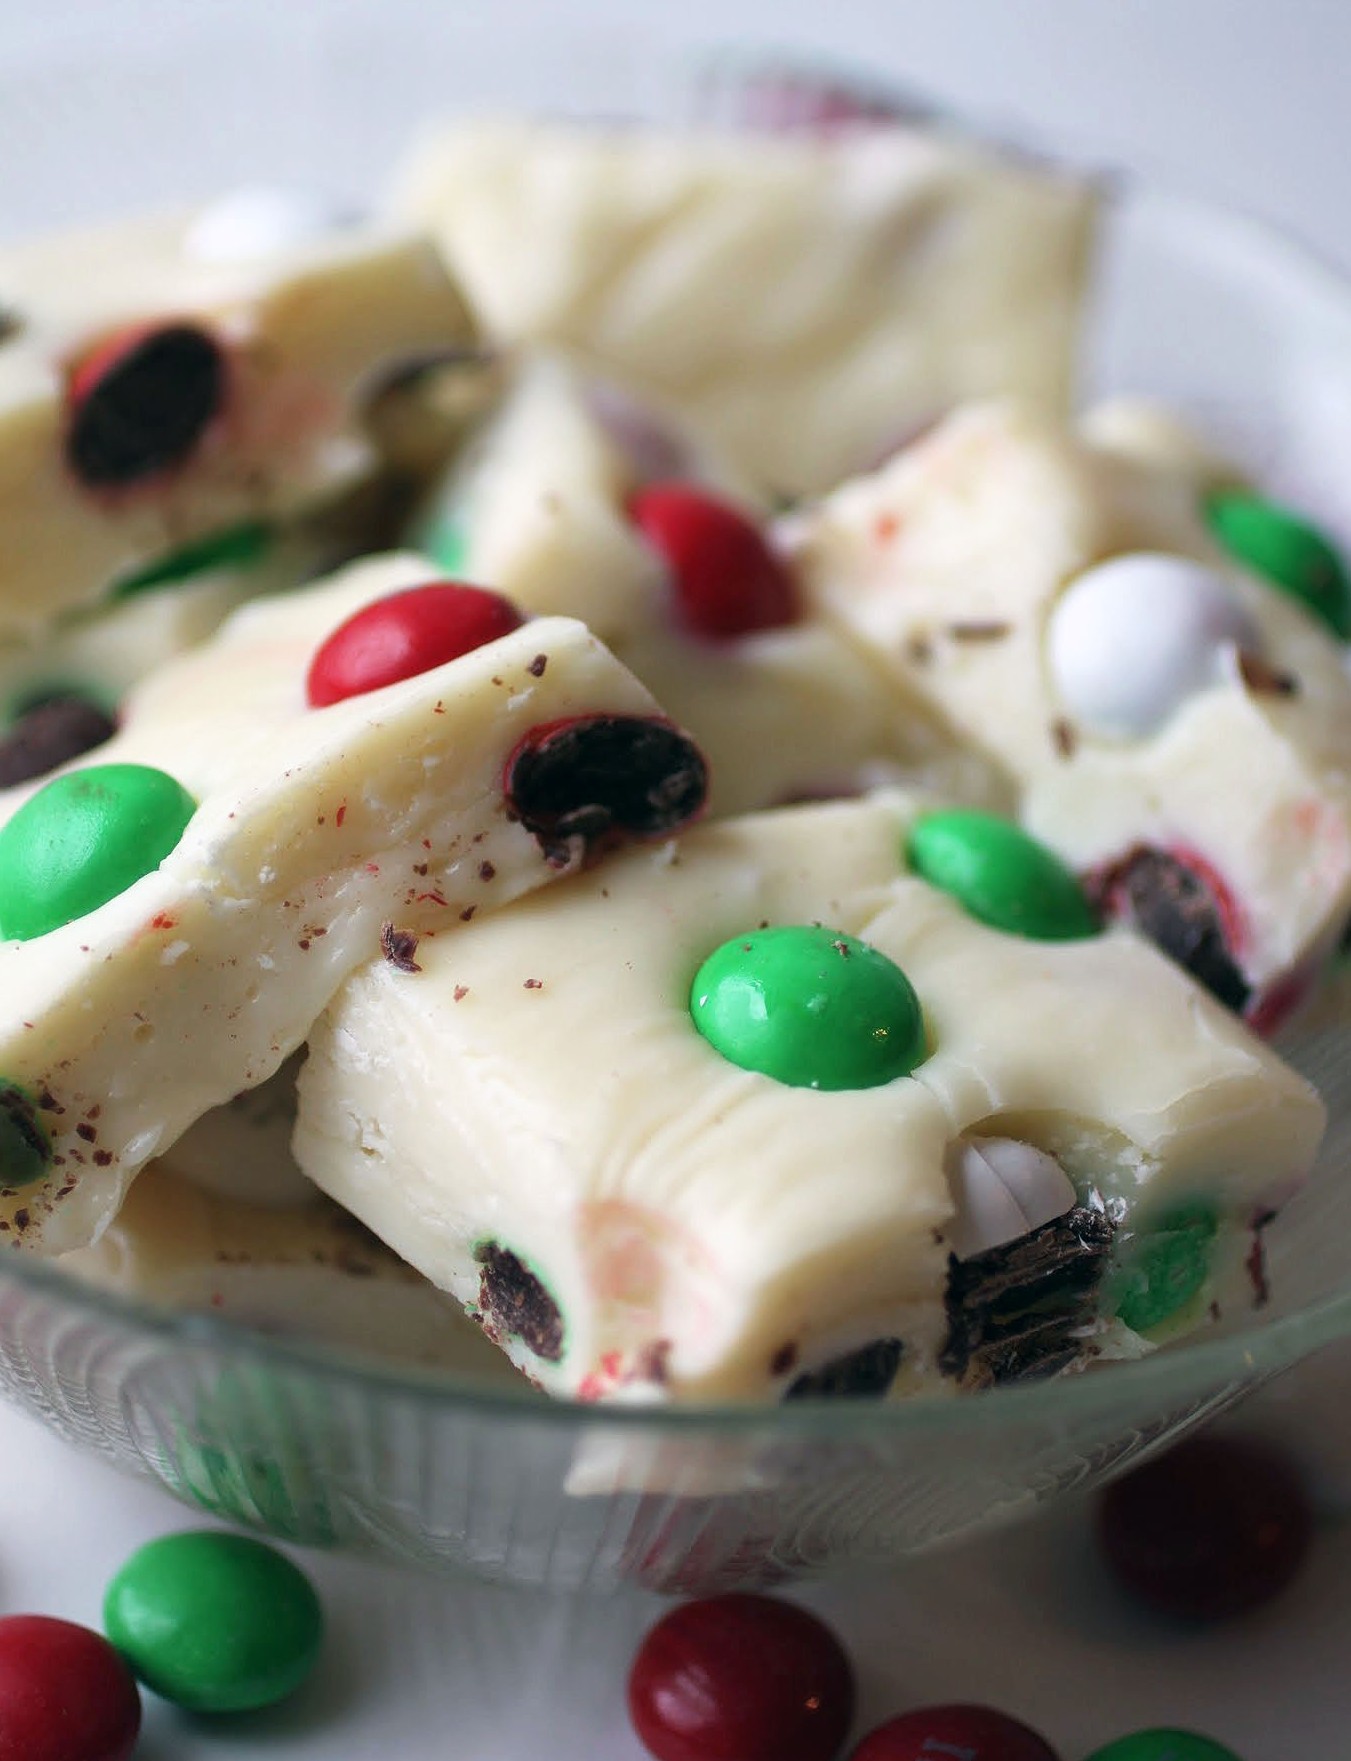
The only caution I’ll issue is that when you’re working with white chocolate, you can’t overheat it. It’s much fussier than regular chocolate and will seize up if you look at it funny. Its feelings are very tender. So in the recipe below, follow the instructions to the word. That’s right, creative soul out there who wants to tweak it! Do that next time. For now, just follow the leader.
I’m getting older, but I hope that means I’m getting wiser, too. I’m definitely learning as I go, and I hope that you feel the same. Life should be full of lessons, even the ones that are best left to the next generation to master. Let’s learn all we can while we have the chance!
Ingredients
Instructions
- Line an 8 x 8 pan with aluminum foil, using enough to hang over the sides. Coat with cooking spray. This will allow your fudge to release easily once it's set.
- In a microwave-safe bowl, melt the white chocolate chips and sweetened condensed milk together for exactly one minute. Remove the bowl from the microwave and stir the chocolate into the condensed milk vigorously until everything is melted and smooth.
- Add the M & Ms and mix them in gently, or the color will streak.
- Pour the mixture into your prepared pan. Even out the top with a spatula.
- Chill for three hours until set.
- Using a sharp knife, cut into small squares. Serve or store in an airtight container.
Here’s the ultimate perk of being a teacher. For two unpaid months (yep, I inserted that word on purpose), I get a taste of what it’s like to be a stay at home mom. It’s great for these two months. I would not be able to do it year-round and maintain my sanity. Especially if there was no camp.
But for now, I’m remembering what life was like when I could just while away the day. Like, spend the whole day eating dark chocolate chocolate chip cookie chips without having to share with grubby hands. And fudge. Oh, the fudge I eat in summer. Summer is a fudge season.
If you doubt me, look no further than the beach. Every beach town worth its saltwater has fudge shops. Believe me. I’ve been to every single one. If a beach town has five fudge shops, I’ll visit all five, pressing my nose against the glass cases while taking inner notes. It’s my favorite kind of research!
Once upon a time, I would wake up in the summer, eat a leisurely breakfast complete with newspaper reading, work out, and go back to bed. I’d emerge sometime in the late morning to run errands, or meet a friend for lunch, or lie out on the deck with a cold drink. After lunch naps were always an option, along with TV watching and crossword puzzle time.
Plus, I had my projects. For a few summers I took tap dancing. Another summer, voice lessons. One year I sat down and wrote a 250-page novel just for the heck of it. I like to keep busy. And this summer, I still have my projects.
But I also have my leisure time back. Sure, I get up super early and exercise before getting the kids bundled off to camp with their swimsuits and hats and sunscreen and lunches. Sure, I have to pick them up after it’s all over. But those in-between hours are golden. I have more time to sit and think, to run errands without having to appease grouchy kids, to write in a quiet space. And of course, more time to eat fudge.
This fudge especially. My intense fondness for Hannah Max Cookie Chips has brought us here. As you know if you read regularly, I contacted the company a while back to ask to work with them. That’s how much I love their addictive product. And today’s recipe comes from one of my favorite flavors: the dark chocolate chocolate chip.
To make this fudge, you line the bottom of a pan with a layer of cookie chips. Then, chocolate fudge gets poured on top. It gets wilder after that. Another layer of cookie chips goes on top of that chocolate fudge before a white chocolate layer gets piled on. And for the season, July 4th sprinkles!

This fudge is crunchy. It’s creamy. It’s amazing. And I dare any beach town fudge shop to come up with something as completely satisfying. If you’ve never had cookie chips before, that’s a shame, but it can be remedied. Trying it in this black and white cookie chips fudge is a great place to start!
As I sit here, relishing the temporary solitude and the equally short summer (its lease hath all too short a date and all that, ya know), I’m glad that fudge is here to keep me company in these quiet, productive hours. It’s a great companion!
A product for this post was provided by Hannah Max Cookie Chips. All opinions are my own.
Ingredients
Instructions
- Line an 8 x 8 pan with aluminum foil, using enough to hang over the sides. Coat with cooking spray.
- Place one layer of cookie chips on the bottom of the pan, covering the area completely with a combination of whole and broken cookie chip pieces.
- In a microwave-safe bowl, melt the chocolate chips and sweetened condensed milk together for 2 minutes.
- Remove and stir until smooth. Spread the fudge carefully over the cookie chips in the pan. Press another layer of cookie chips on top of the chocolate fudge. Set aside.
- Make the white chocolate layer. On the stove over low heat, melt the white chocolate chips with the condensed milk, stirring constantly, until the mixture is melted and smooth.
- Remove from the heat. Spread gently over the bottom layer. Add the sprinkles.
- Chill for 2-3 hours until set. Allow to come to room temperature. Cut into squares. Store in an airtight container.
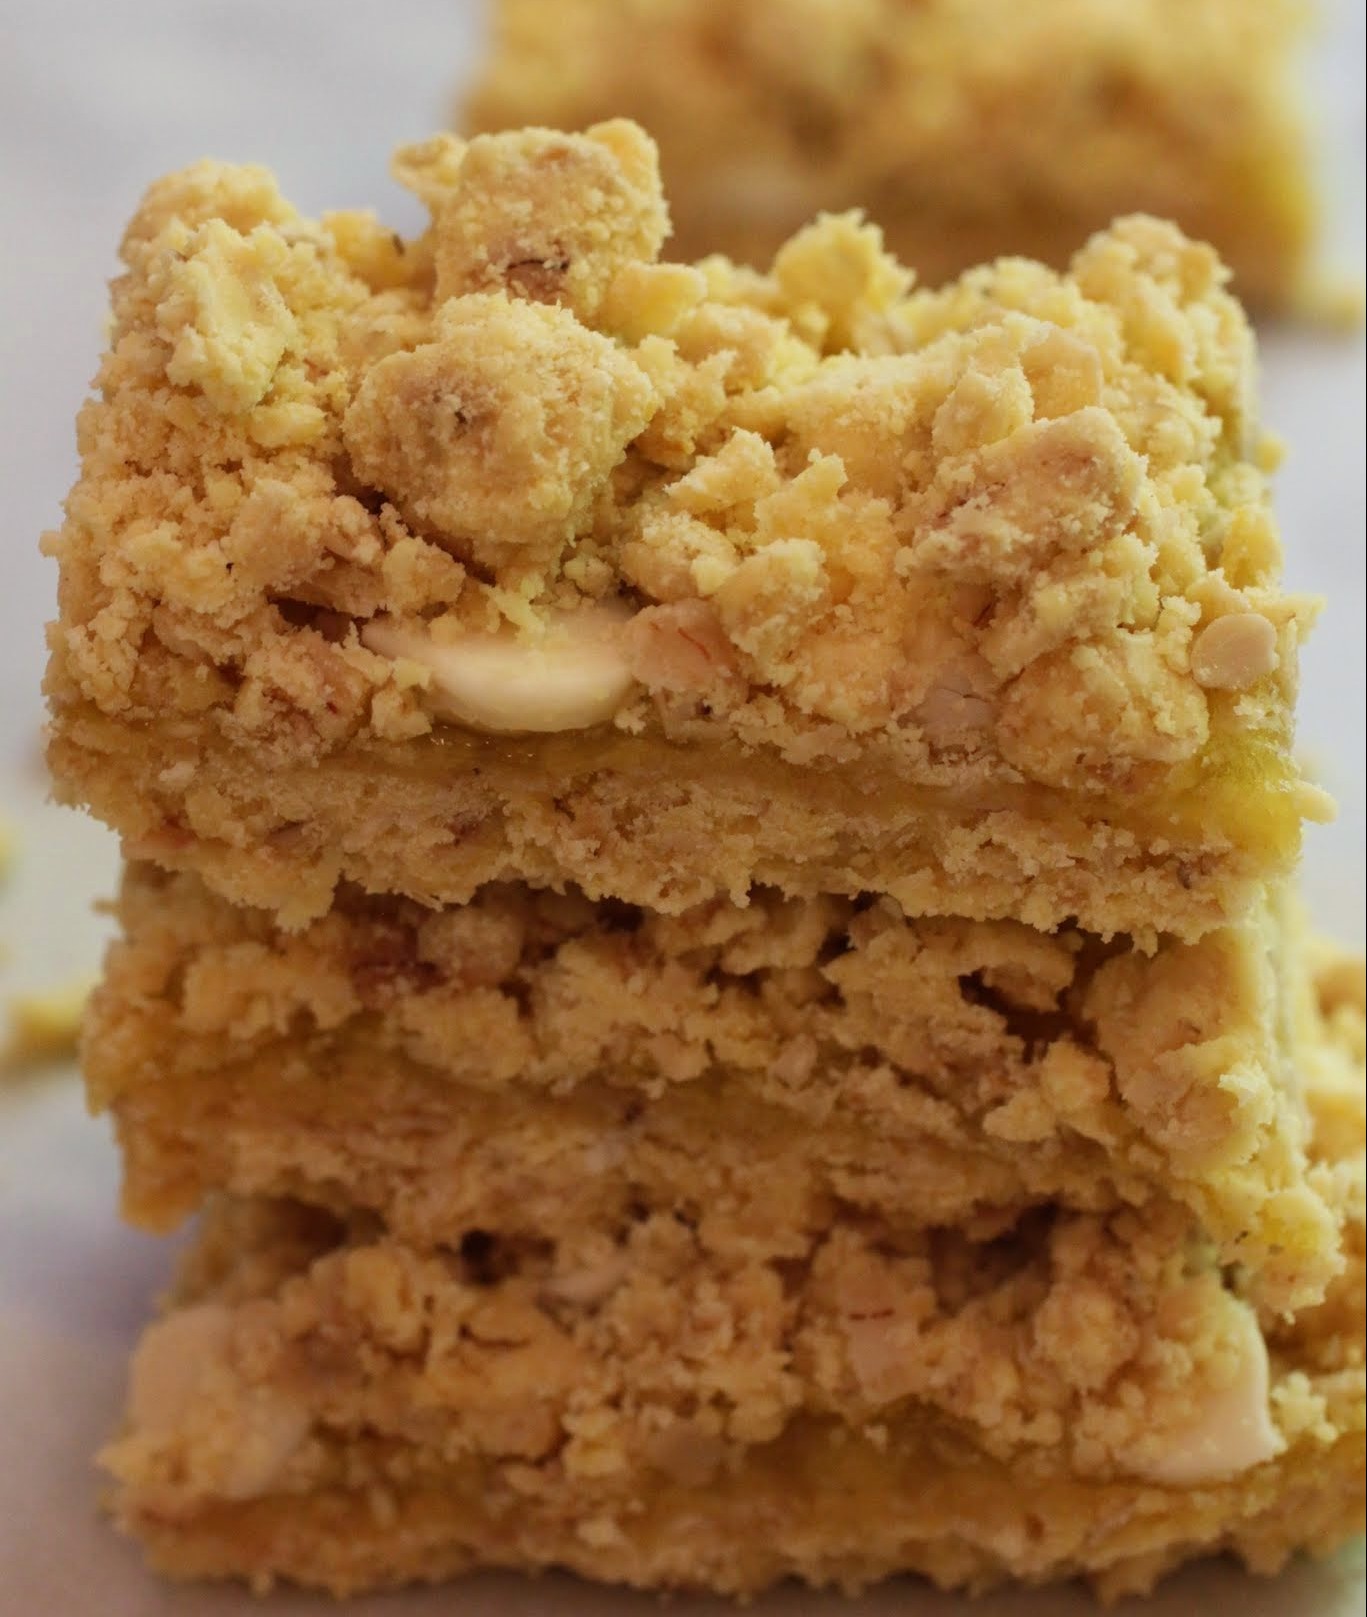
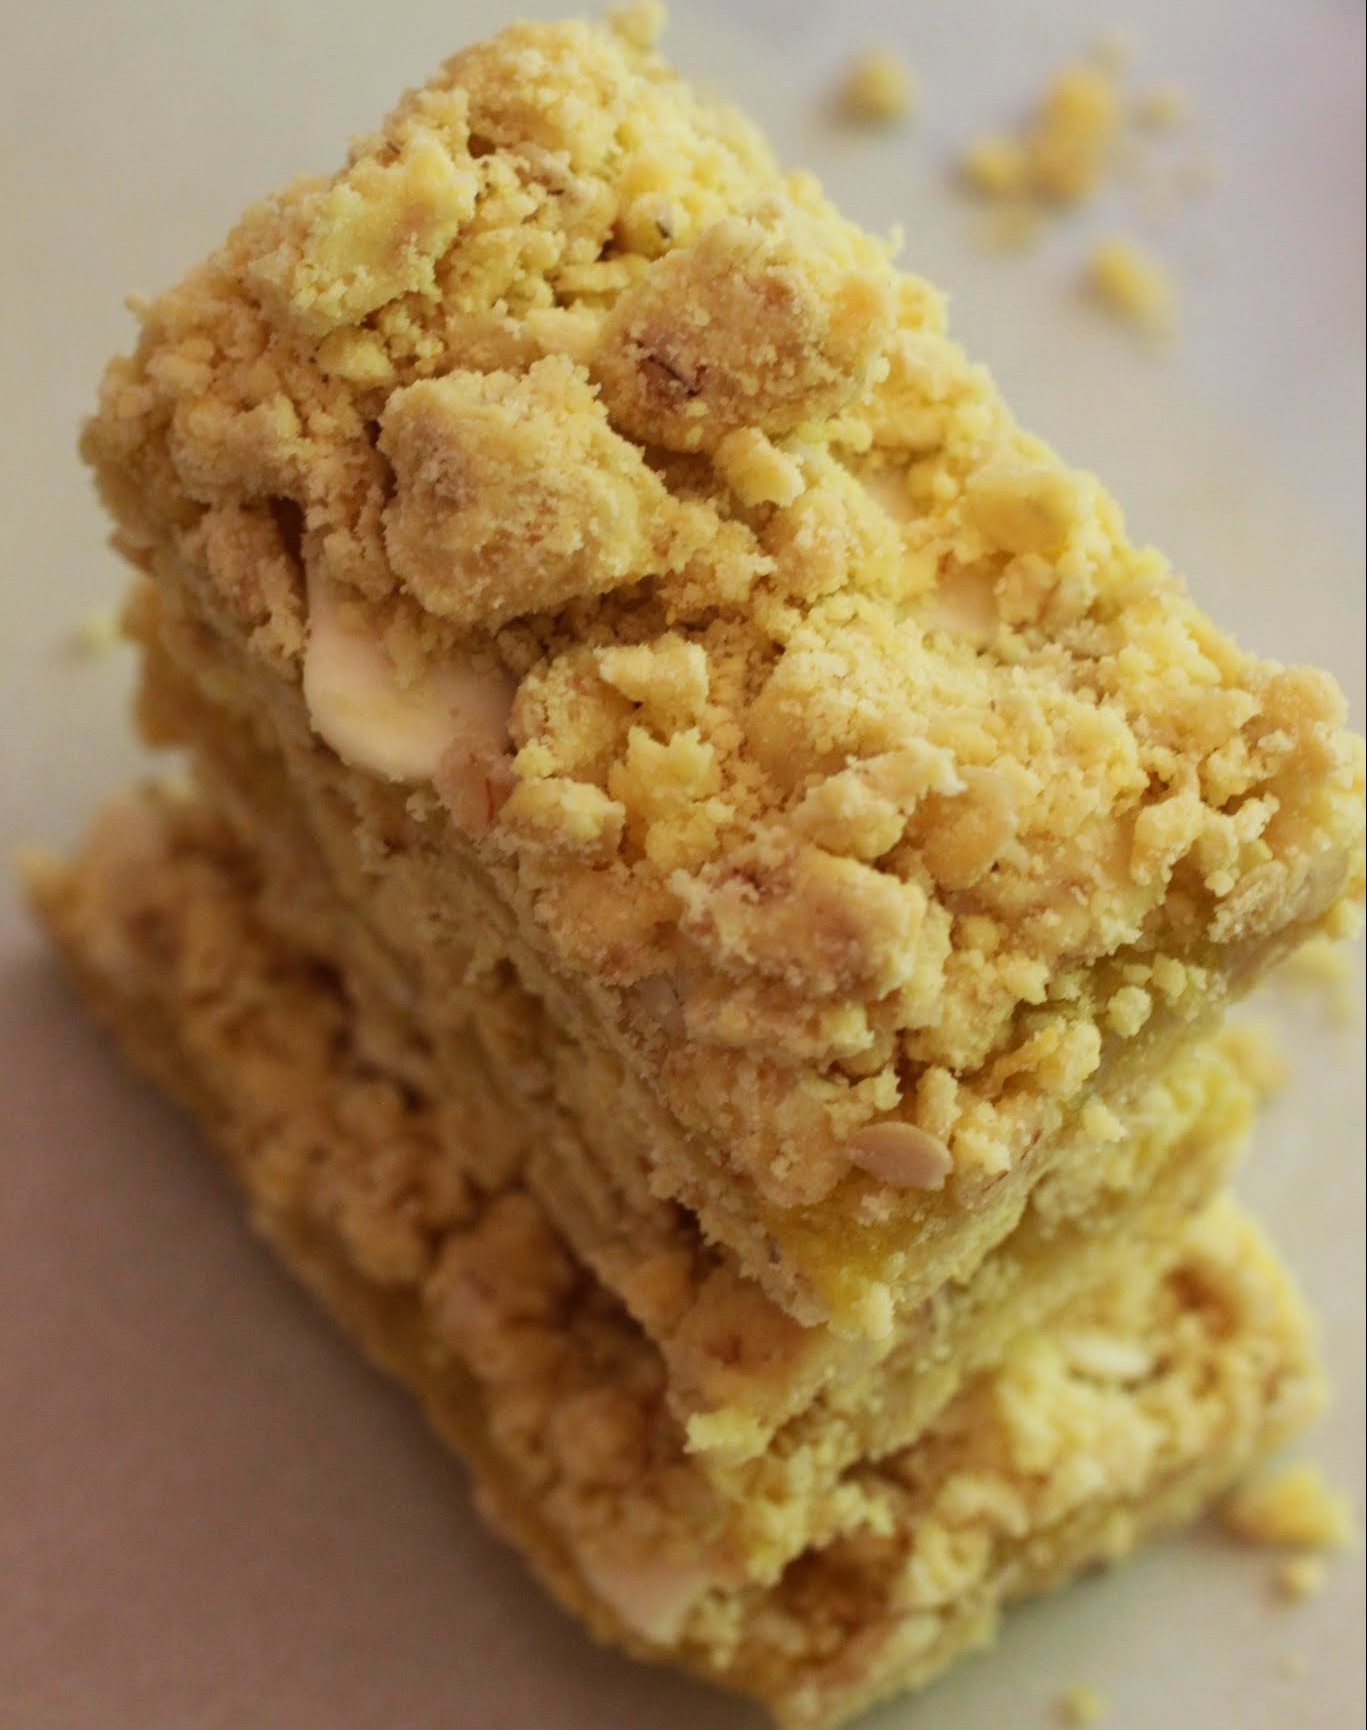
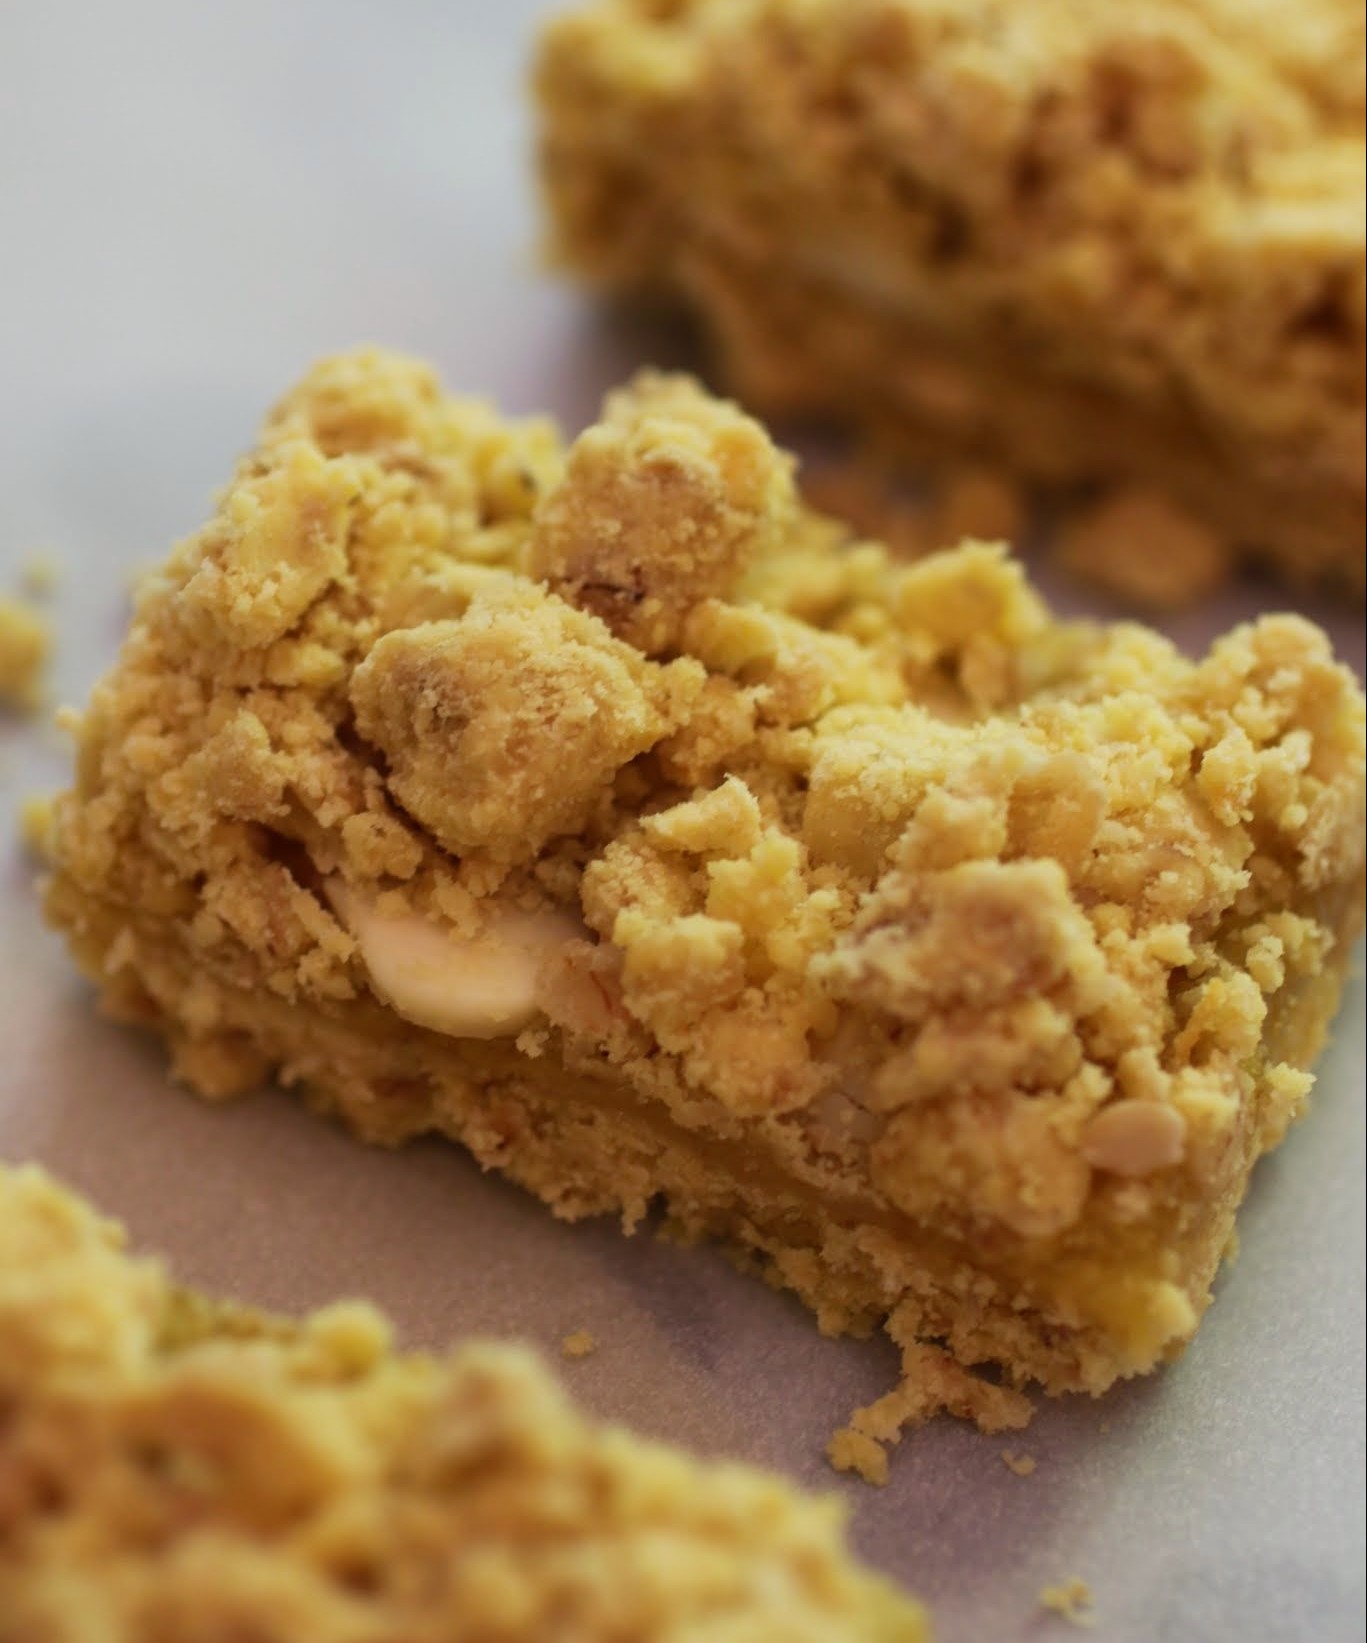
Besides, if you’re going for ease, you should probably pick a finger food. Pie is easy to eat if you have plates and forks, but I cannot tell you how often someone brings a pie into the office and there are no implements with which to consume said pie. When given the choice, I turn my pie into bars. And when given further choice, I make lemon pie bars. With endless crumbs on top!
See, kids, mama loves lemon. More than chocolate (shh) in certain weather and situations. And I had a brother’s birthday to bake for this past week who reallyreally loves lemon, so I figured this was as good an excuse as any.
I’ve never had a sister, but I hit the jackpot with brothers. They taught me a whole lot: how to nerd out on Star Trek (original series, please), how to have a good backyard water fight, how to build with Legos, how to make an architecturally impressive Thanksgiving leftover sandwich, and how to pull off boy clothes with ironic flair. Honestly, they taught me a lot more than that. And so I bake for them.
Kind of a sexist construct, the little sister baking for the older brothers. But heck, I am all about being the one who does that. And in return, I get my legal questions answered, my children played with (yay for energetic uncles!) and access to the pool deck in a certain cool brother’s condo building.
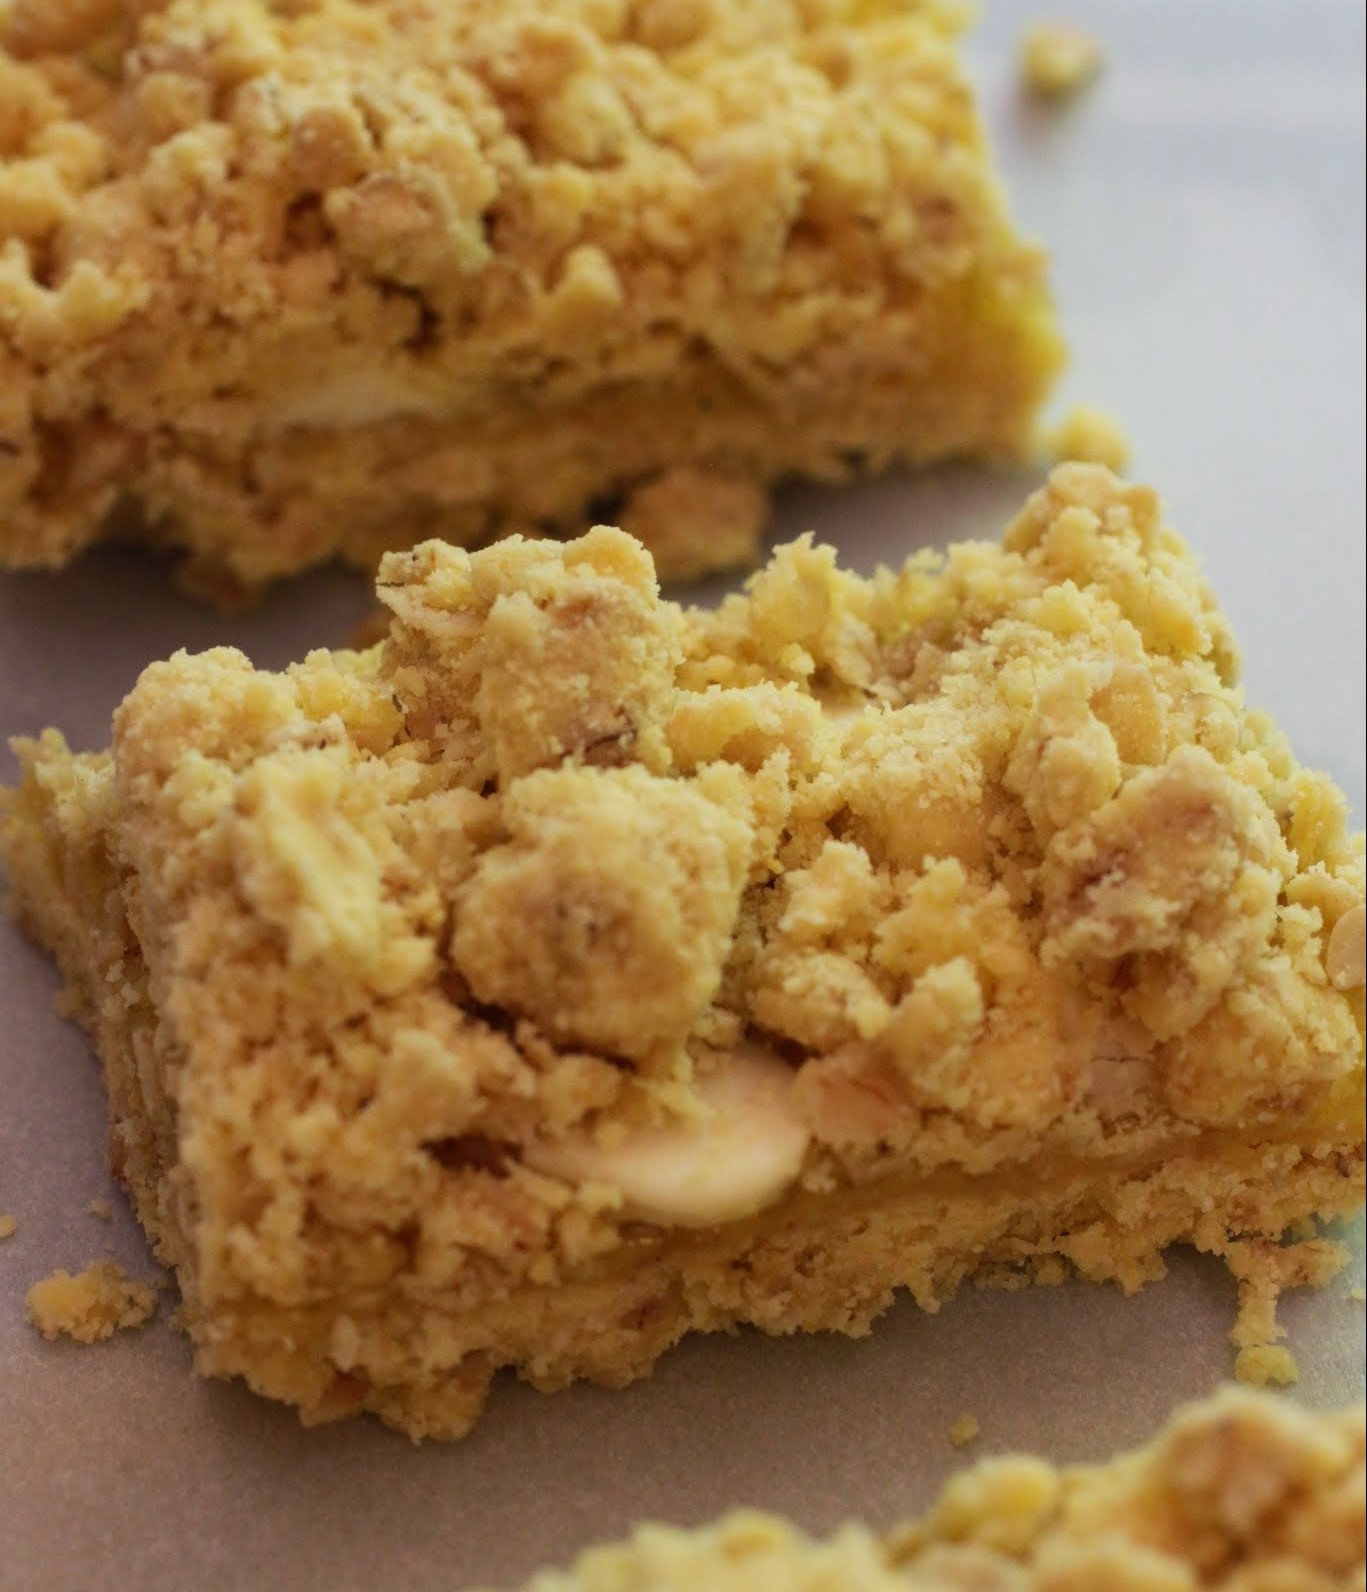
These bars are easy, quick, and lemony. Like, VERY lemony. The base is actually a lemon cake mix, which gets combined with quick oats and butter for a fuss-free crumb. I added a healthy dose of lemon zest as well to give it extra zing.
The crumb mixture forms both the base for the bars and the topping, and the middle is simply lemon pie filling and white chocolate chips. My three year-old made this with me. It must be easy as pie.
So that expression exists for a reason, then. And so does pie. And so do big brothers. And that reason is to make life better. If you’re a kid reading this, your big brothers will stop torturing you someday and then you’ll love them like crazy, if you don’t already. And maybe, just maybe, they’ll introduce you to Star Trek.
Ingredients
Instructions
- Preheat the oven to 350. Line a 9 x 13 pan with foil and coat with cooking spray. Set aside.
- In a bowl, combine the lemon cake mix and quick oats. Stir in the lemon zest. Add the melted butter and mix with your hands until large crumbs start to form.
- Press half of the mixture into the bottom of the prepared pan. Spread on the lemon pie filling and sprinkle the white chocolate chips evenly over the filling. Pinching the crumb mixture to get differently-sized crumbs, scatter the remaining crumbs over the pan.
- Bake for 25-30 minutes until the crumbs are golden. Cool completely. Cut into squares and serve.
]]>
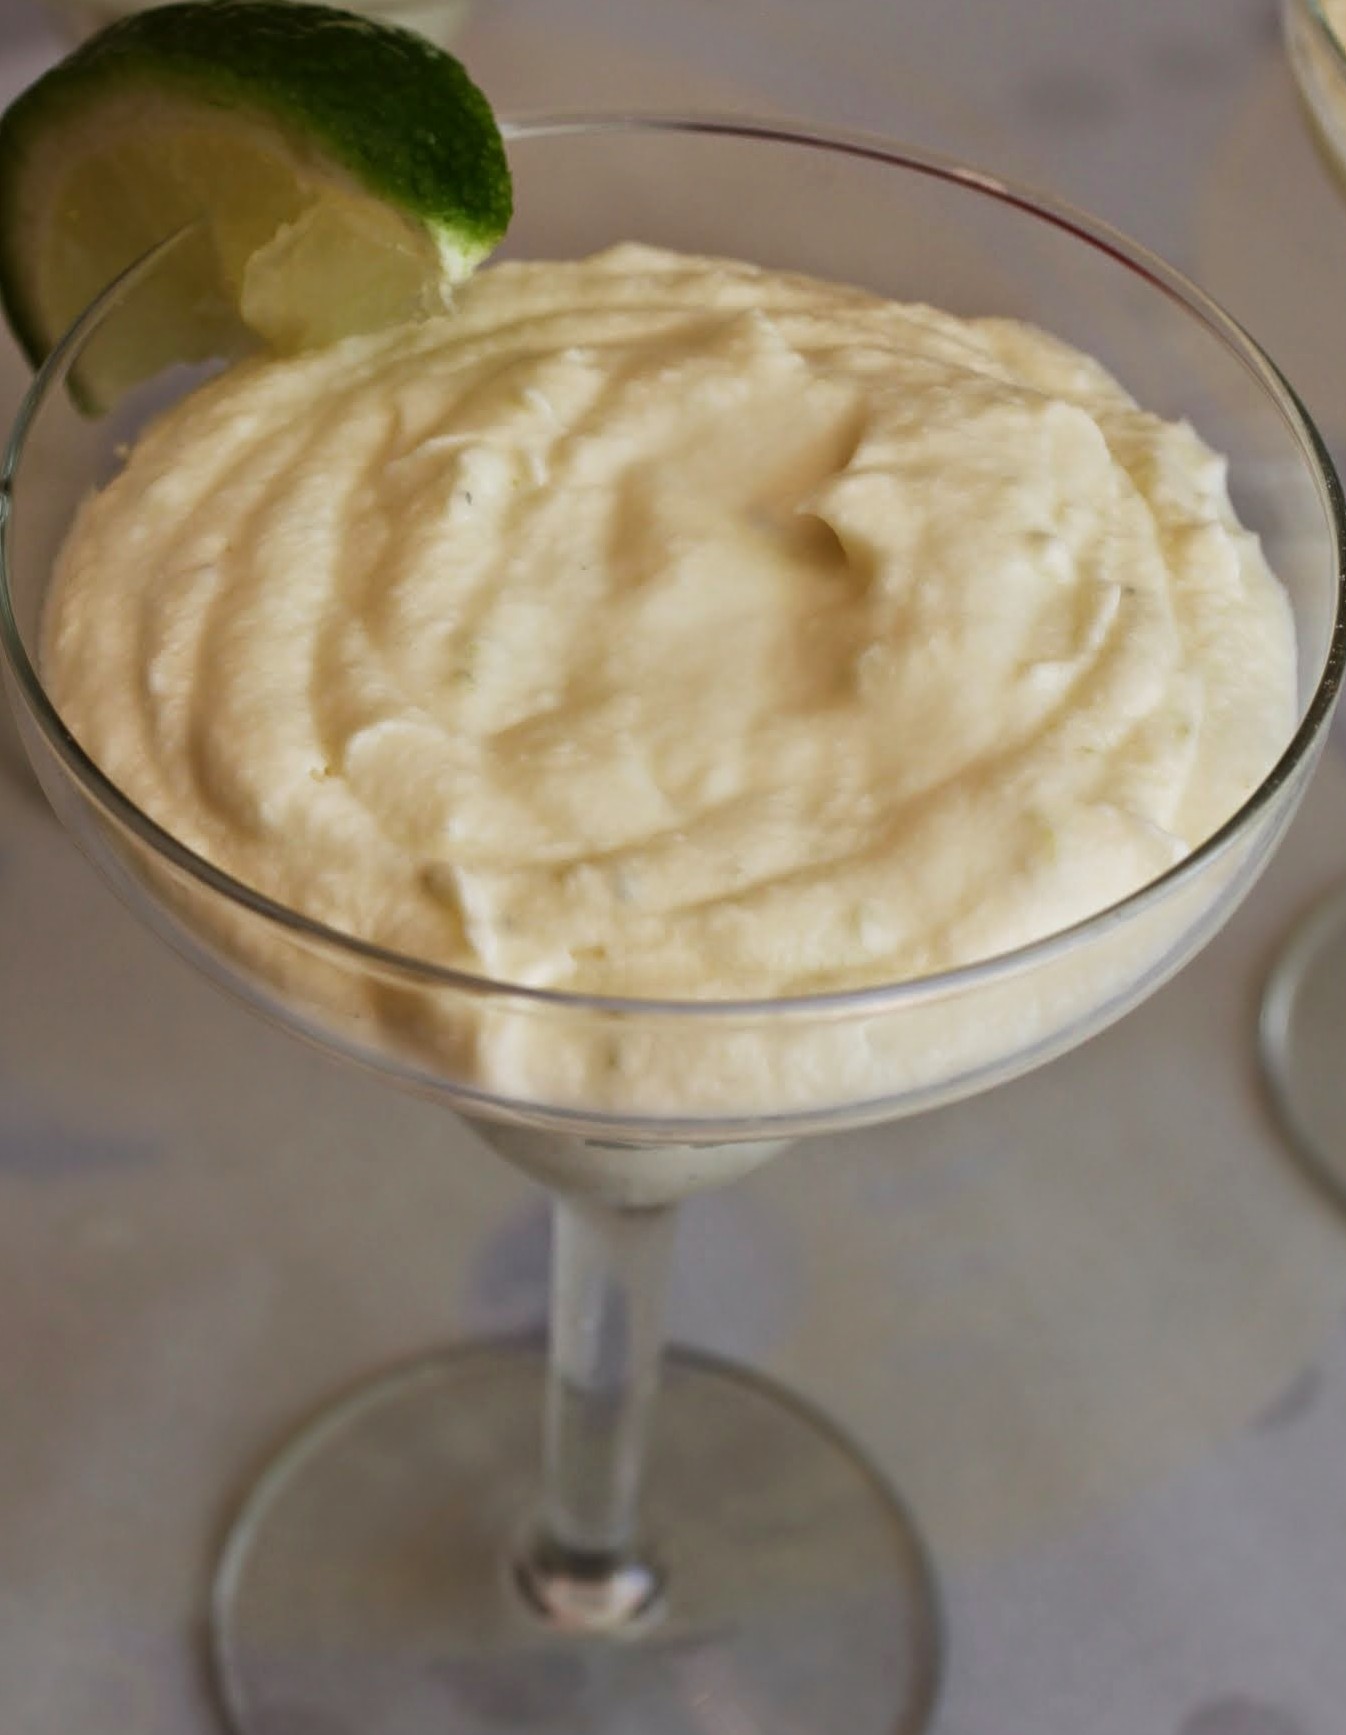
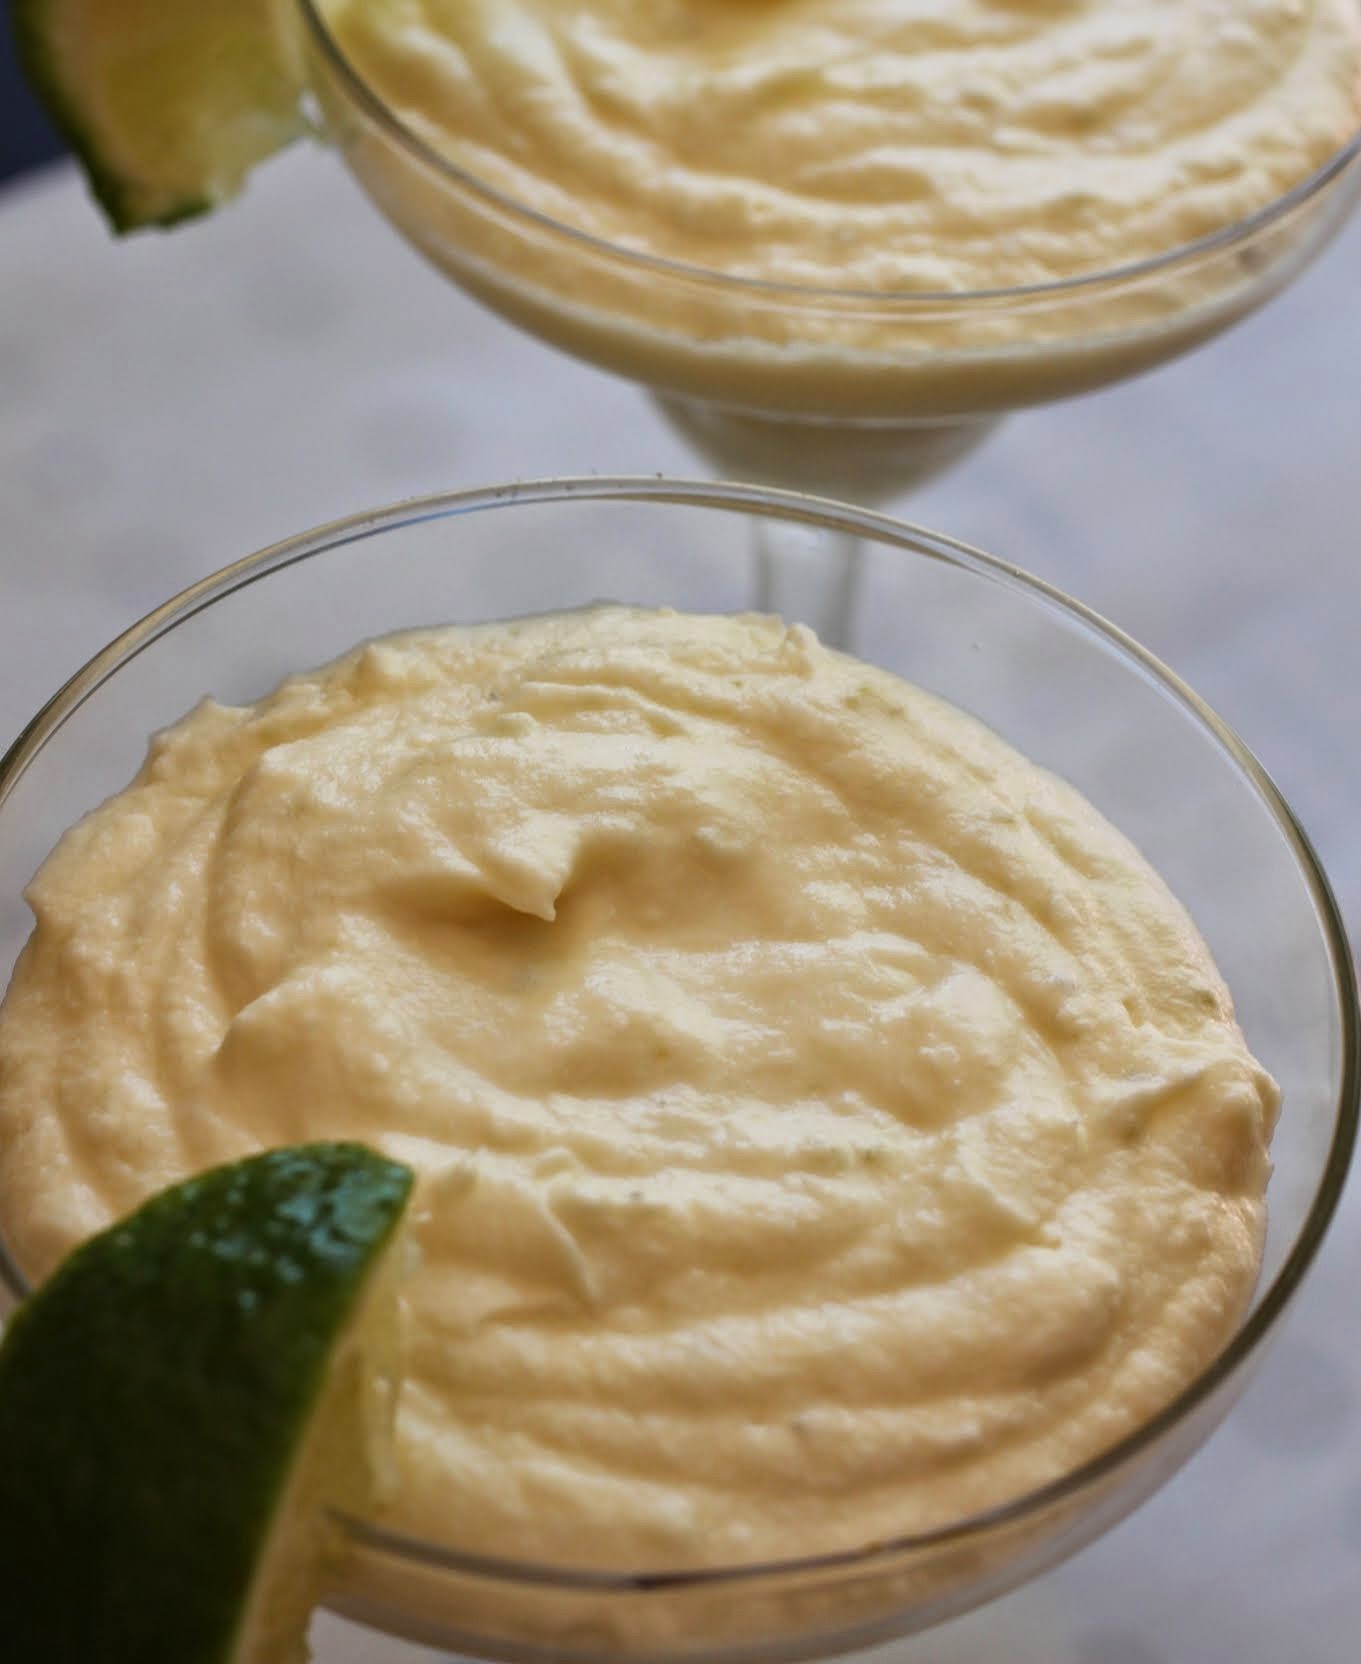
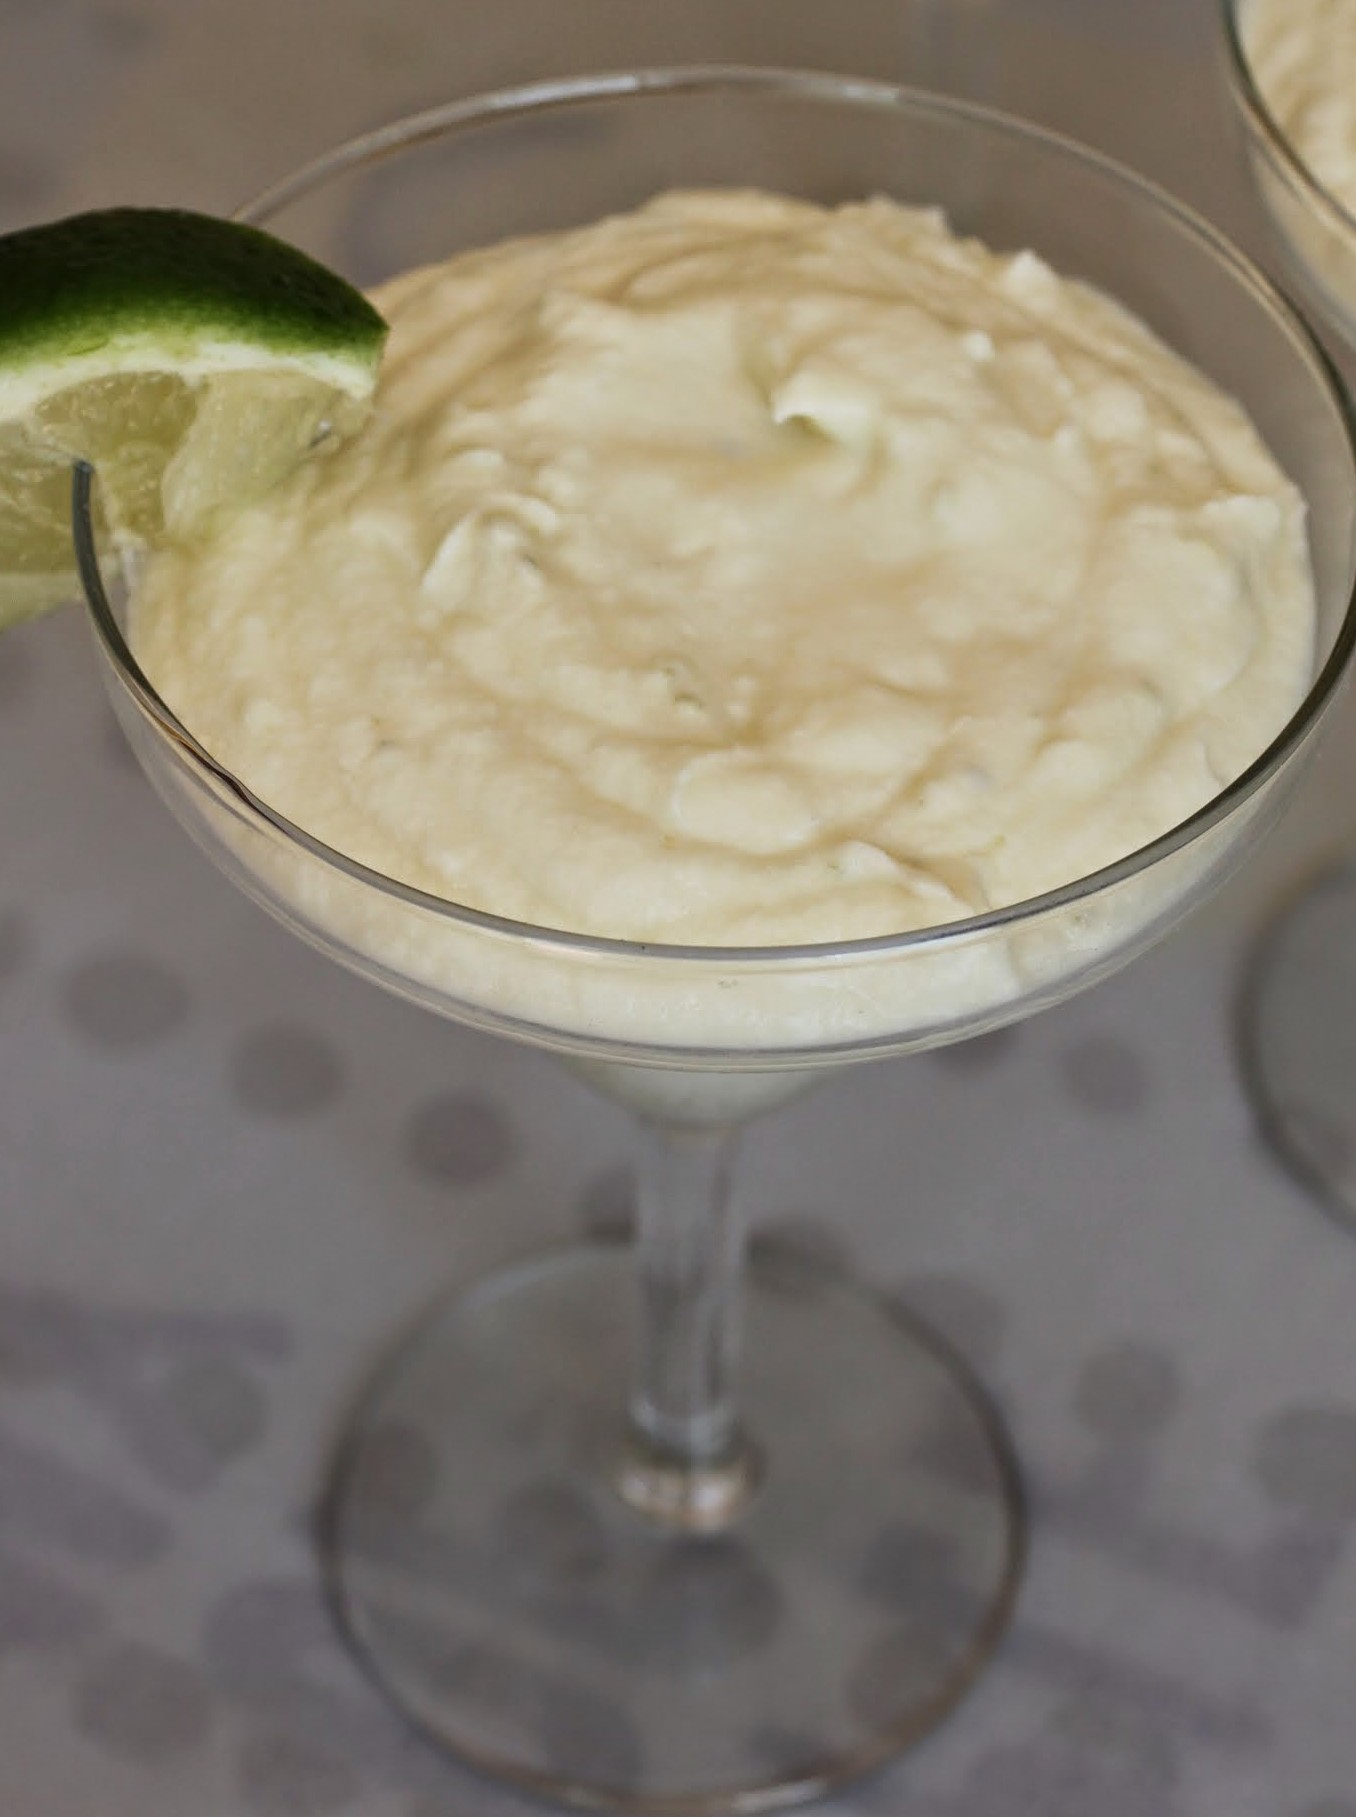
Nothing screams Cinco de Mayo more than lime. Or key lime. So I’m doing it up today with this mousse! As it turns out, key lime isn’t just about pie.
This past week has been all about prepping kids for the upcoming AP tests. If you have a teenager in an AP class, you know what I’m talking about. If you don’t, then you clearly don’t care. And that’s fine! I didn’t care either, once upon a time.

When I was in high school, I made a choice to put aside overachievement in favor of socializing. You see, I come from a family of academic, high-achieving people, and they are a pretty intellectual bunch. Growing up, I thought I was stupid because I didn’t fit into that construct. It took years for me to understand that I was smart in a different way.
It’s hard to outgrow your childhood, that’s for sure. We all get slotted into roles fairly early in life: the geek, the emotional one, the sweet one. Do we ever stop being those people, deep down? I doubt it.

These roles are often assigned accidentally, but that almost makes it worse. Two kids can’t be the smartest, after all. So one of them inevitably becomes the one who is good with people, or the one who plays a better game of basketball. And unless you’re a very determined or confident person, there you stay, in that role.
I don’t have any answers. As hard as I try not to fit my own kids into roles, I can’t stop certain natural processes. I can only control what I do with dessert. You see, key lime is accustomed to being put into pie. That is key lime’s designated function. And I’ve turned it into mousse!
In case you didn’t hear about my raw egg aversion in this cappuccino mousse post, I make it a point not to make my mousse with egg. Instead, I whip heavy cream into stiff peaks, fold in my flavors, and call it a day. You could use Cool Whip, but the heavy cream tastes a little better. Or a lot, depending on your taste discernment.
This Cinco de Mayo, change up the book a little bit. Don’t be afraid to try a dessert you’ve only known in another role. And don’t be averse to embracing an identity you didn’t grow up with. We can’t stay the people we were as children, for better or worse. So let’s embrace the people we’ve become!
Ingredients
Instructions
- Place the white chocolate chips in a heatproof bowl. Set aside.
- In a small saucepan, heat the sugar, key lime zest, and key lime juice on low until the sugar dissolves, about two to three minutes. Remove from the heat.
- Pour the sugar mixture over the white chocolate chips. Wait 1 minute, and then stir until the white chocolate is melted and the mixture is smooth.
- In the bowl of a stand mixer, whip the heavy cream until stiff peaks form. Fold the white chocolate mixture into the whipped cream until all is smoothly incorporated.
- Spoon the mousse into margarita glasses or bowls. Chill until set, at least one hour. Garnish with lime wedges and serve.
]]>
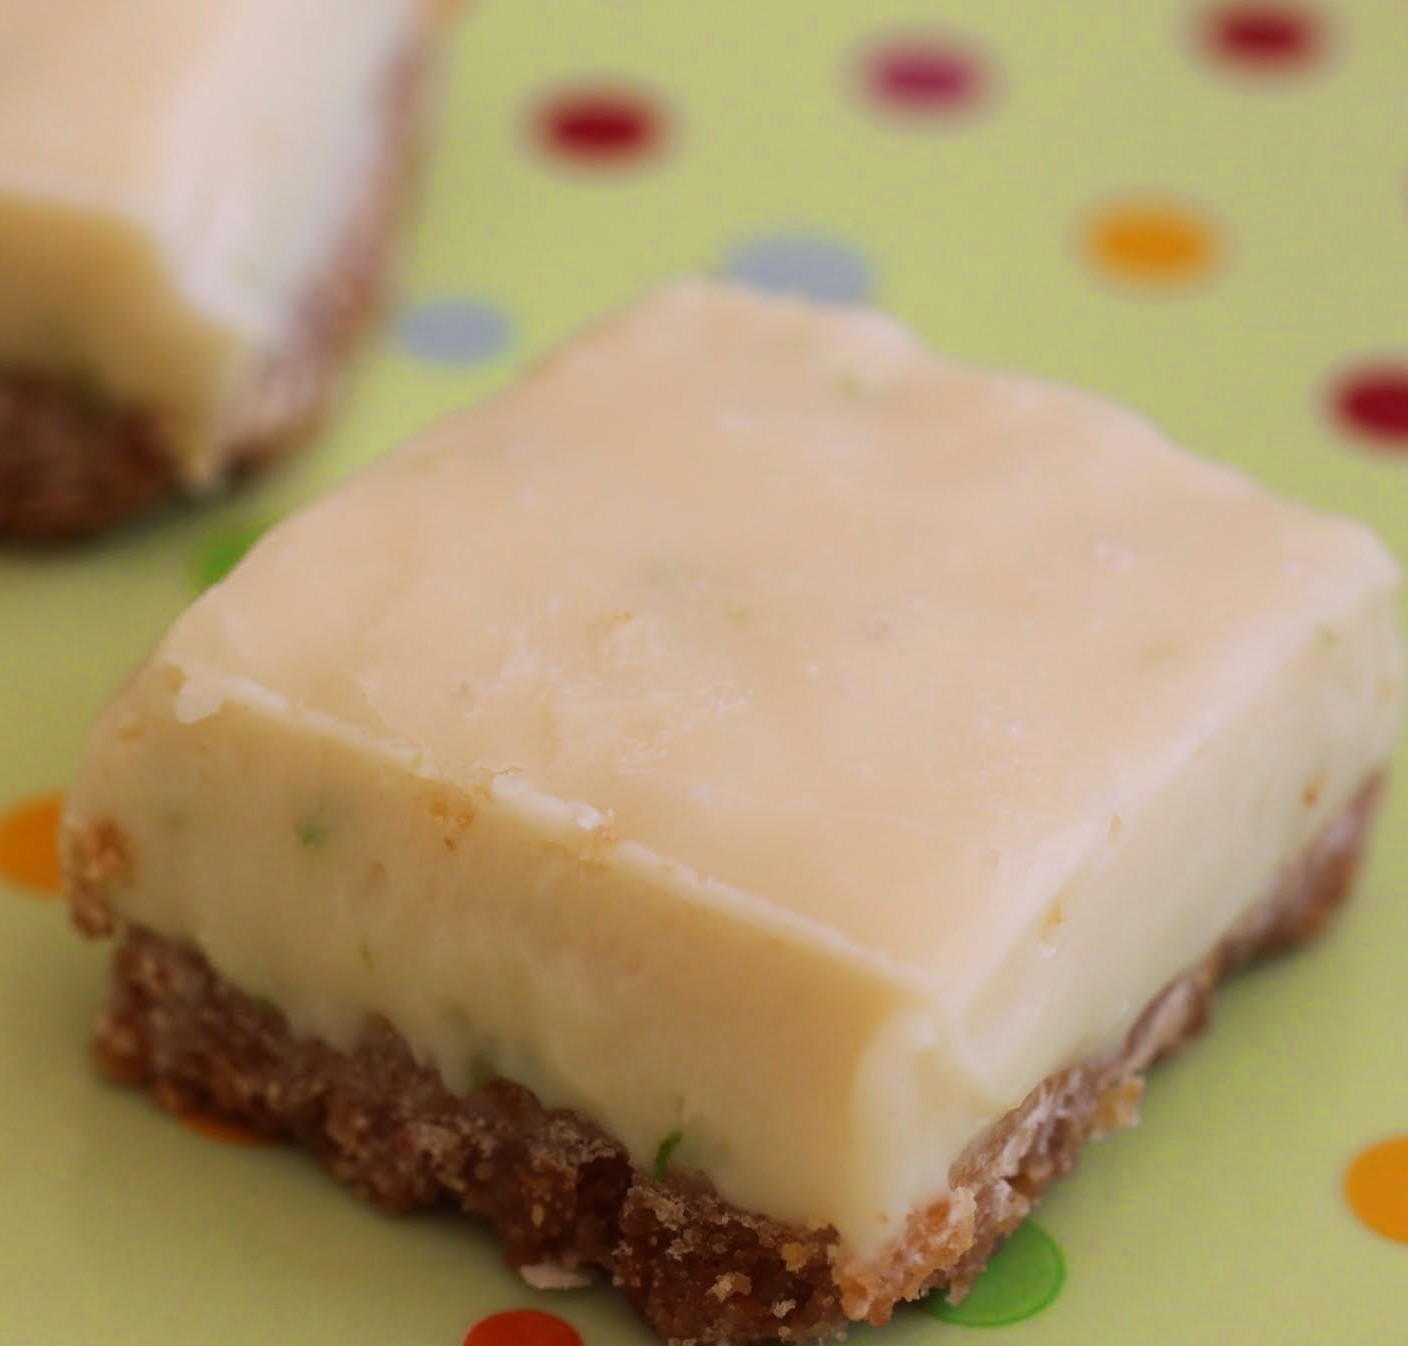
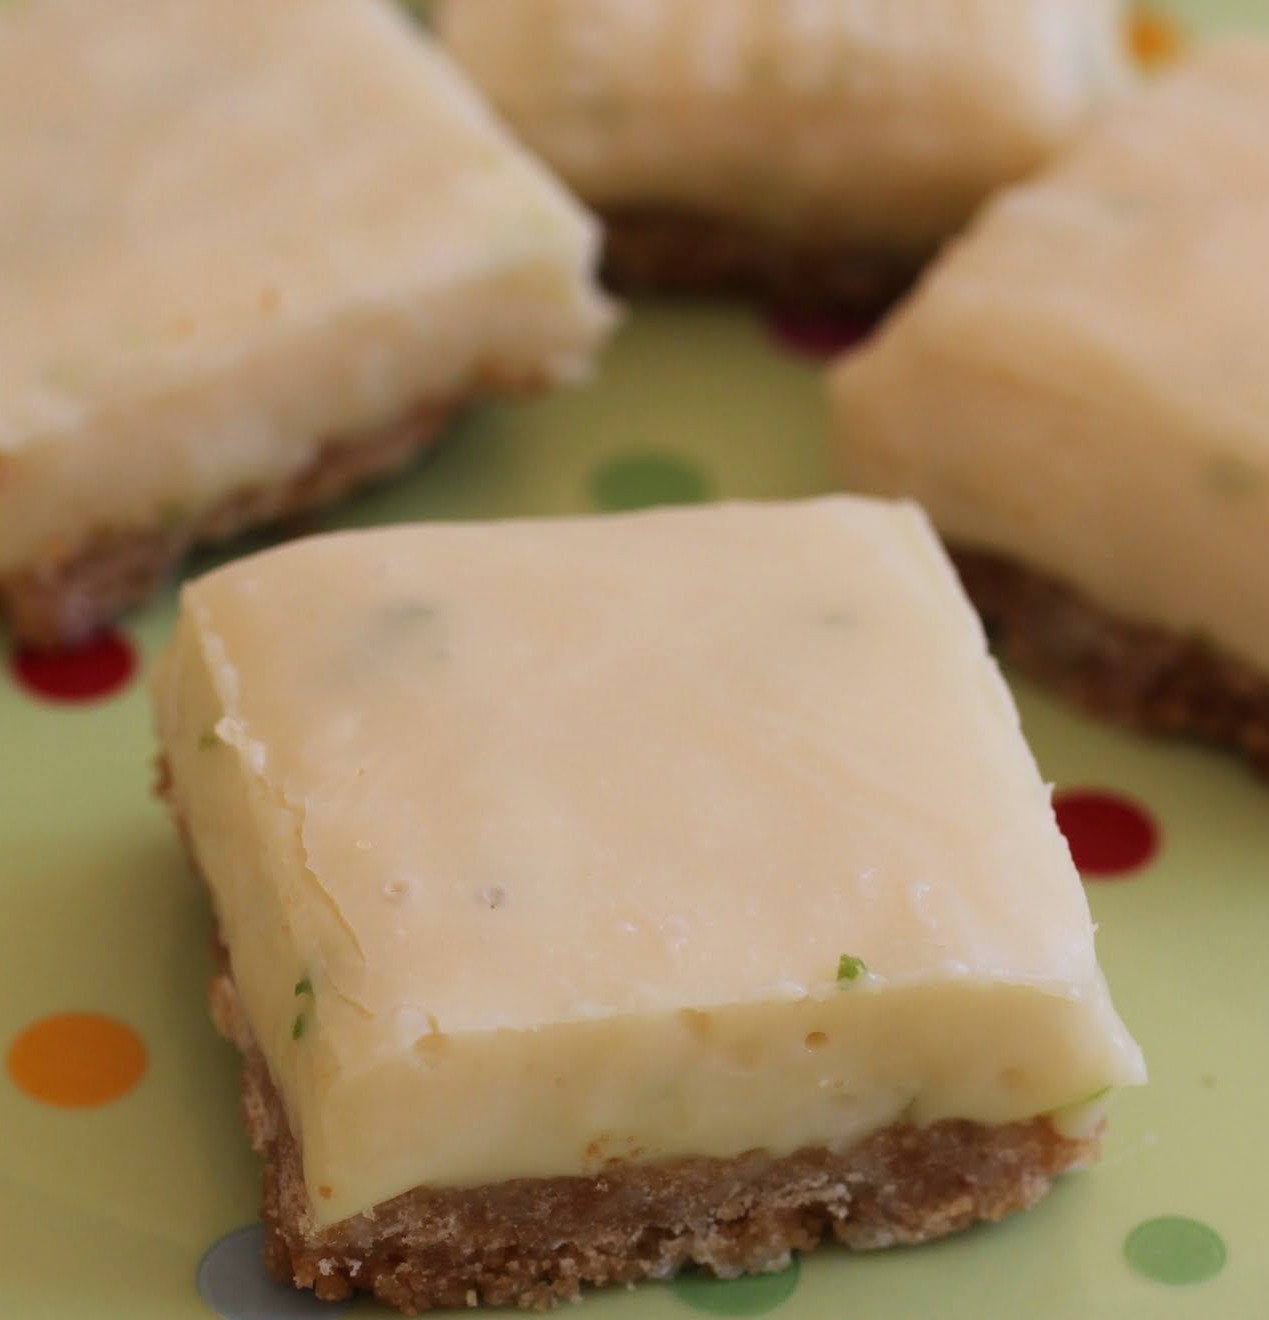
Or bless the day? I’m not really sure. All I know is that I have become totally okay with adding crust to my fudge, and now life will never be the same. And this key lime pie fudge is off the chain!
I’m going to mix business with pleasure here for a minute and rant about standardized testing. May I? Please?
Without getting into specifics right now because I’m a teacher and I value my job, I wish to all the powers above that our nation’s politicians would just back the heck off when it comes to testing kids. It does nobody any favors. Not the kids who are being given terrible tests created by businesses and not teachers, not the teachers who have to cut down on instructional time to administer the tests, and not the parents who don’t get a full picture of what their kids are in for.
The problem is, people don’t trust teachers, even highly qualified ones. It’s part of a cultural attitude toward a female-dominated profession, and I don’t know how to undo any of it. All I know is that unless people give teachers a little more credit for knowing what we’re doing, these tests will continue and children will cease to know what it means to think critically.
I have so much more to say, but that’s the tip of the iceberg, baby. And instead of going farther right now, I’ll just say that one of the things I love most about teaching is creativity. And that’s what I love most about baking, too.
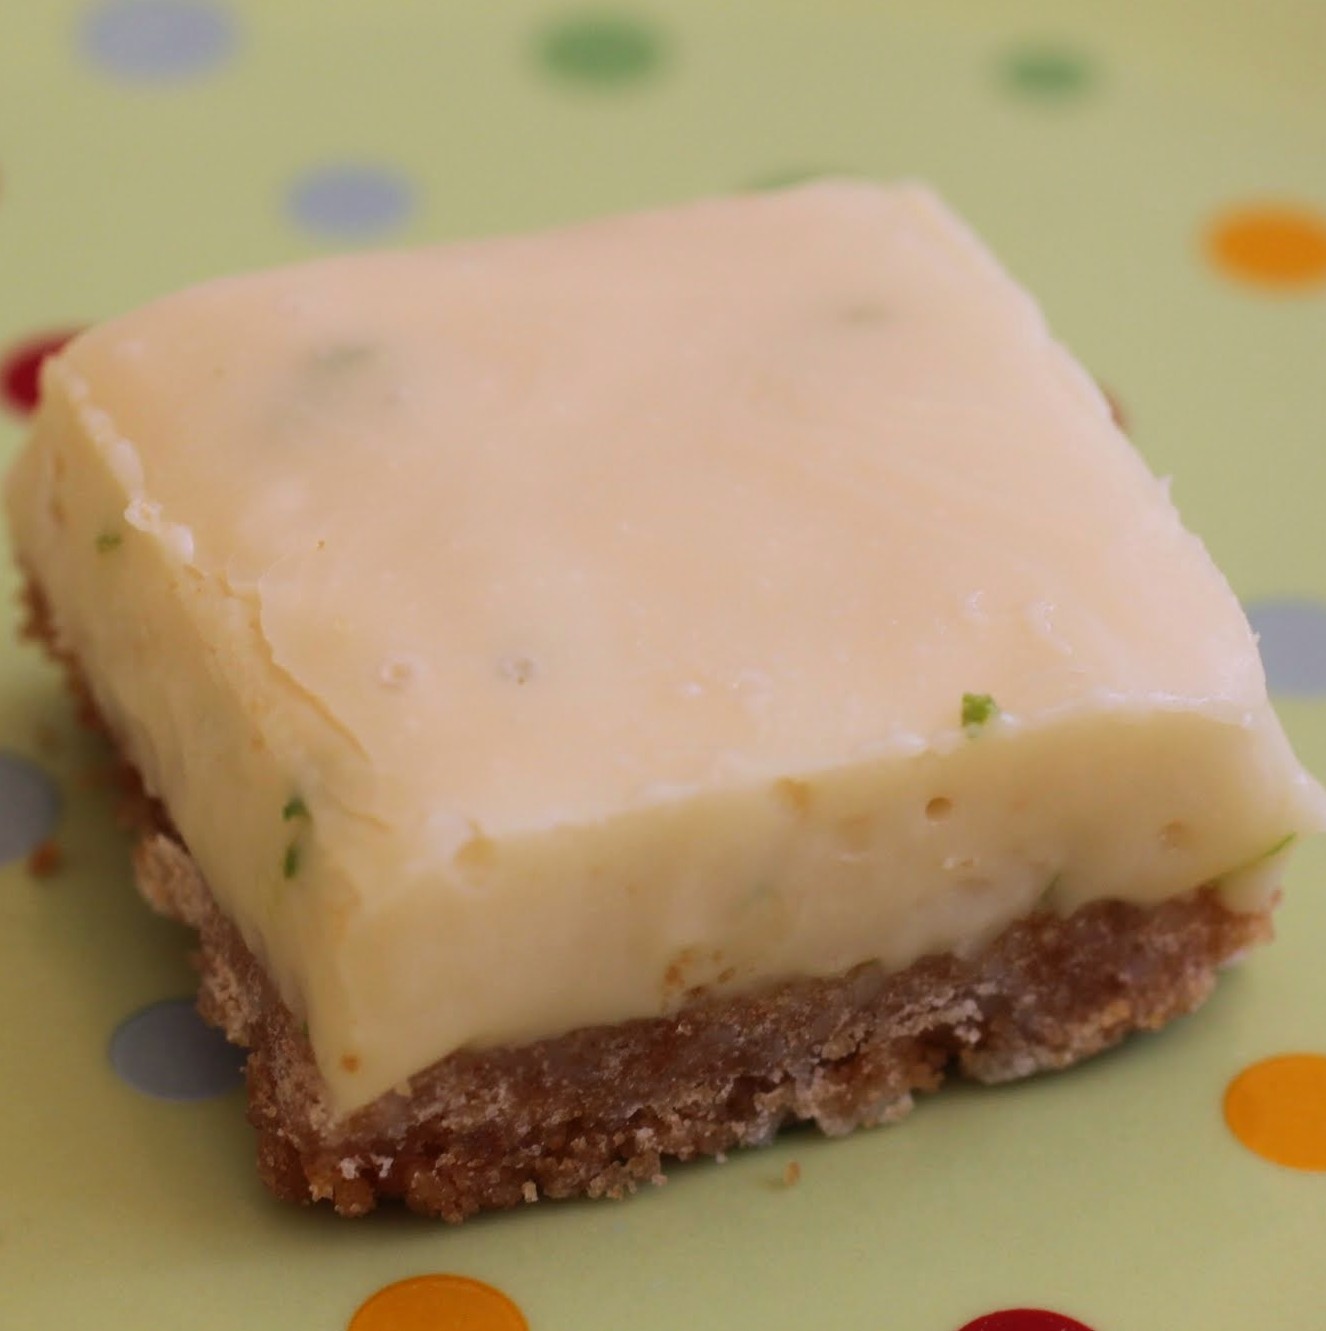
What is more fun than creating new desserts? This key lime pie fudge became part of my consciousness in the middle of a solitary stroll, and now that I’ve made and eaten it (way too much of it, honestly), I can tell you that it’s an experience you need to have.
This fudge has the exact same flavor as key lime pie, but from there the experience differs. While you can probably eat a couple of slices of key lime pie without feeling an unbearable sugar rush, this fudge packs a powerful punch. A little goes a long way, which is why I immediately put half on a plate and gave it away. The other half is all mine to eat my way through slowly!
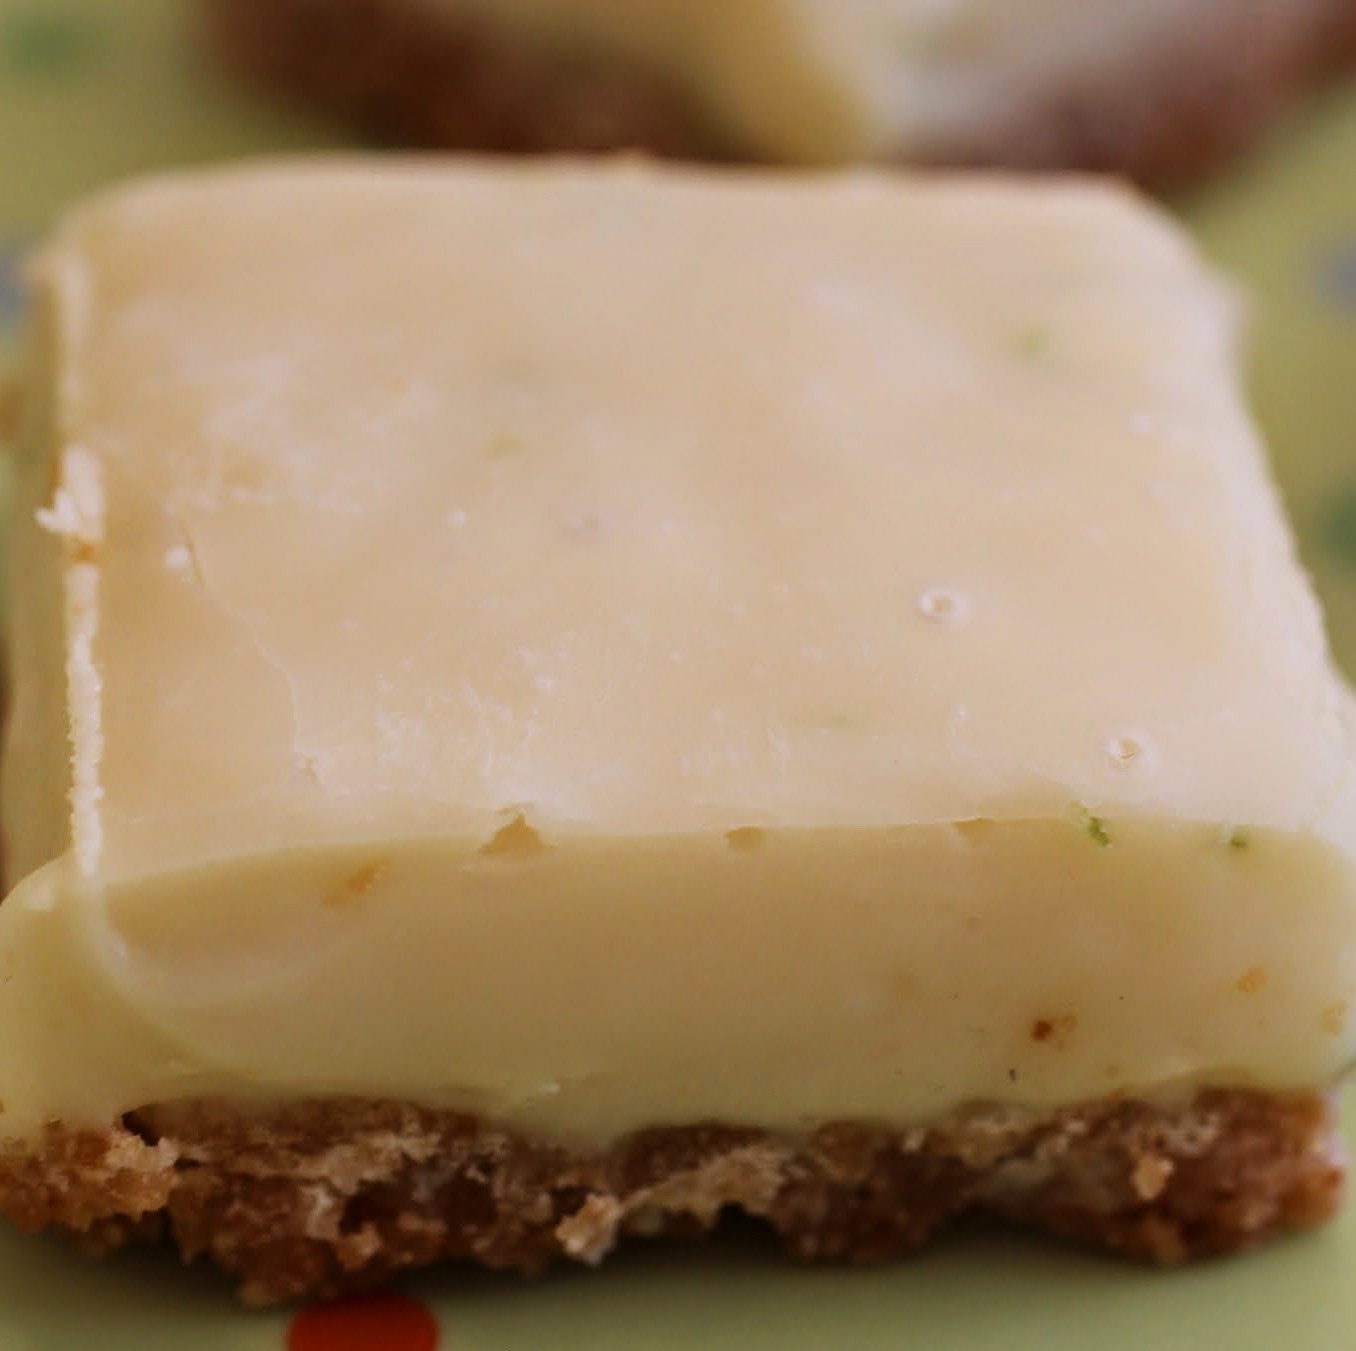
Yes, I’m greedy. But those flecks of lime zest in the fudge are irresistible. And the whole dessert lends a bright spot to an otherwise dreary time in my work life, when I have to stop teaching and proctor tests. I love teaching. It’s the best. So why does standardized testing keep ruining it?
At least I can control this fudge and keep my dessert experience pure. I recommend you do the same!
Ingredients
Instructions
- Preheat the oven to 350. Line an 8 x 8 pan with foil, leaving enough to hang over the sides. Spray with cooking spray. Set aside.
- In a microwave-safe bowl, melt the peanut butter chips and butter for 1 minute. Stir until smooth. Add the brown sugar and graham cracker crumbs, stirring until moistened.
- Press the crumbs tightly and evenly into the prepared pan with a spatula. Bake the crust for 15 minutes.
- While the crust is baking, make the fudge. On the stove over low heat, melt the white chocolate chips with the condensed milk, stirring constantly, until the mixture is melted and smooth. Stir in the lime juice and lime zest.
- Remove from the heat.
- Pour the mixture over the baked graham cracker crust, spreading carefully to even out the top.
- Chill for 3 hours. Let the fudge come to room temperature. Cut into squares with a sharp knife and store in an airtight container.
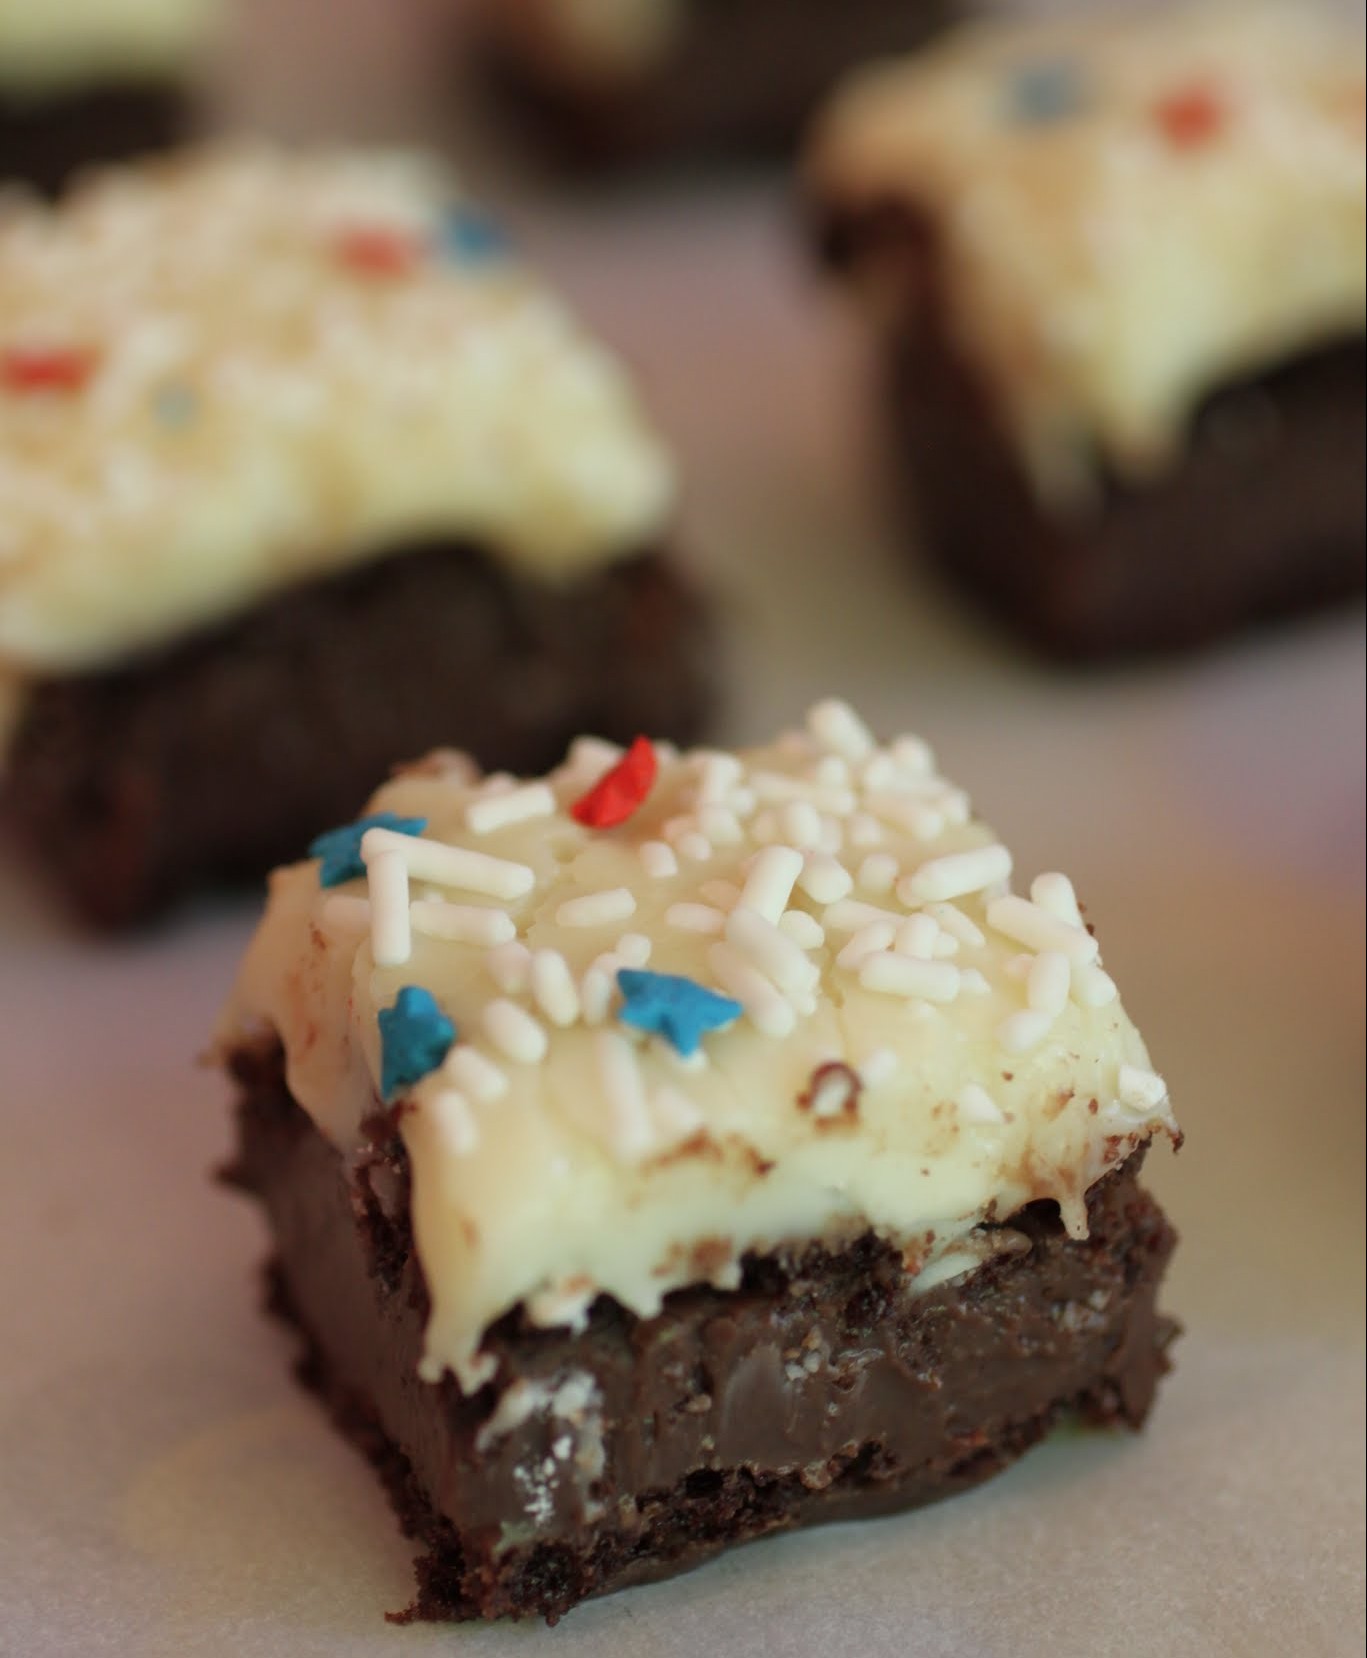
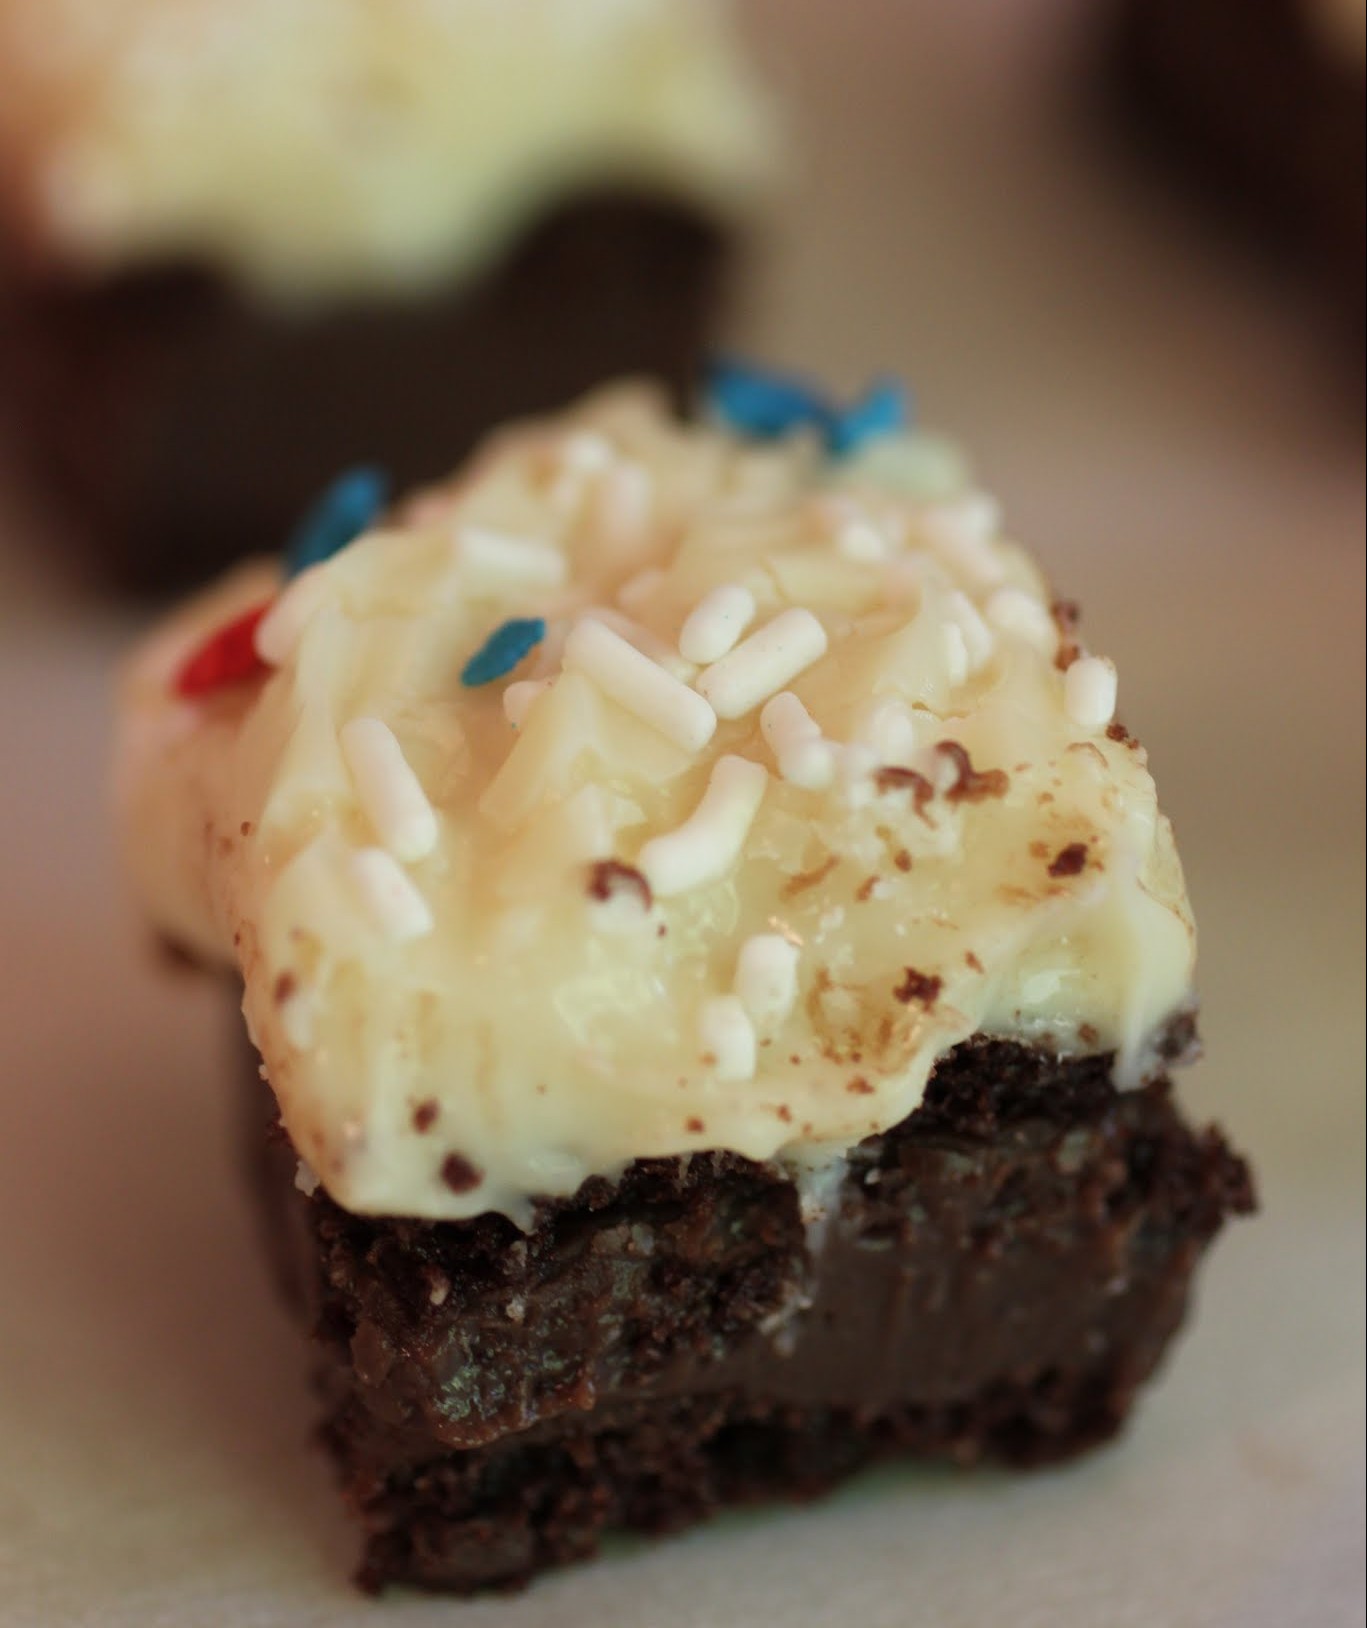
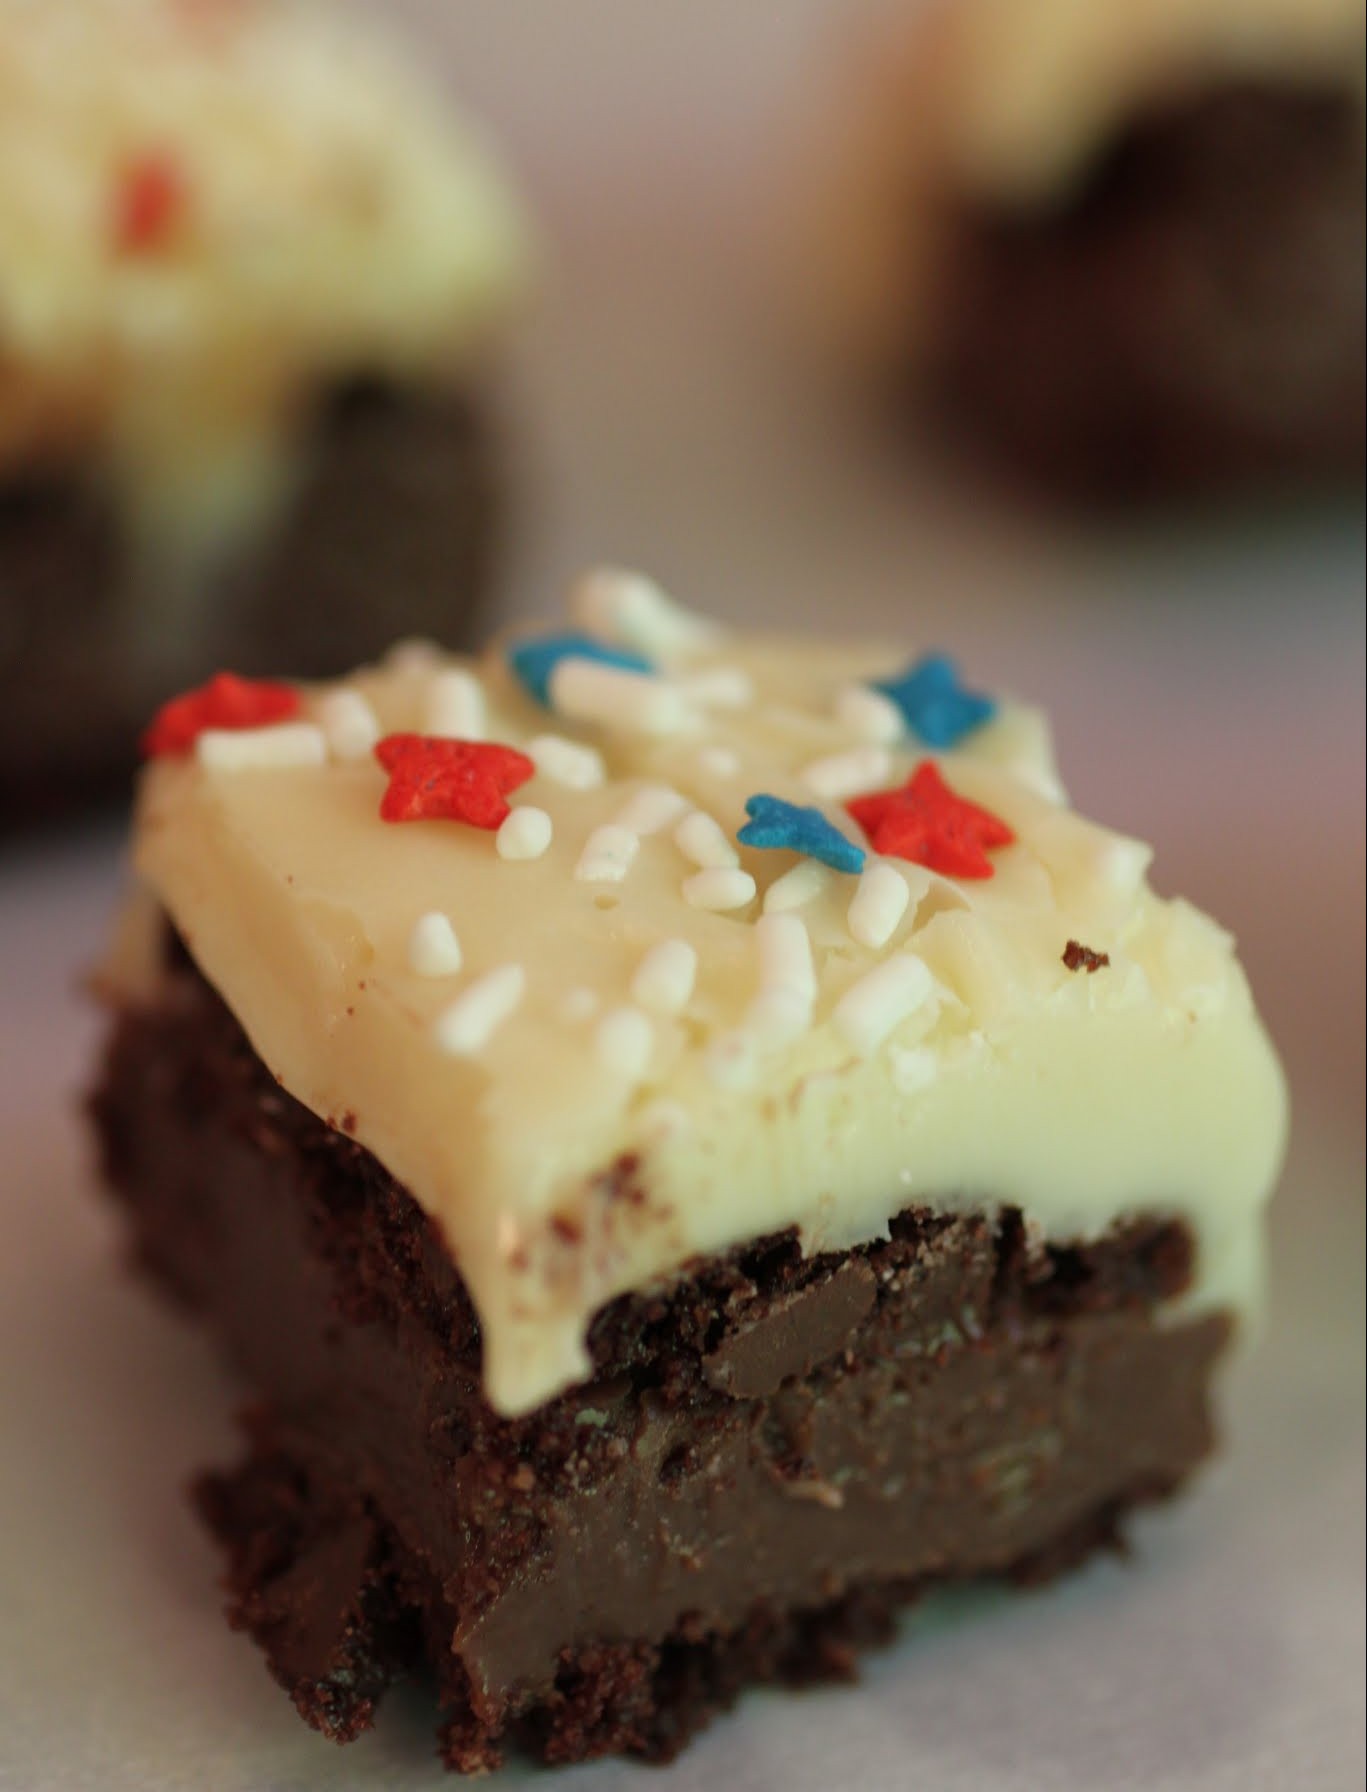
Some days, my kitchen is humming. Bread dough rises as it should, pie crust comes together without complaining, and frosting practically pipes itself. Those are great days.
Then, there was last Sunday. I ran out of butter without realizing it, my husband couldn’t find the chocolate candy melts at the store, and my heavy cream was suspiciously gloppy, even though it was not at its sell-by date yet. As I watched one baking project tank after another, I wondered why in the heck I do this.
Rather than ponder that very complicated question fully, I decided to try and do some disaster control. Instead of making frosting for the sugar cookie bars with butter I didn’t have, I would melt white chocolate, dye it pink, and spread it on top. I didn’t have chocolate melts, so I added some vegetable oil to chocolate chips and made the melts from scratch. And as for the heavy cream? Well, that one had no out. I had to hightail it to the store.

When the day’s baking was done and the photos safely shot before losing the best of the daylight, I was tired. And proud. Because every single recipe I’d planned for that day had some kind of issue, and all turned out delicious. And as for those cookie bars, covered in white chocolate instead of frosting?
As you can see, they turned out okay in the end! In fact, more than okay. The white chocolate top is gentler than a buttercream frosting, really allowing the cookie underneath to shine.

Plus, they were far more portable without frosting going every which way. These definitely traveled to hungry mouths outside of my house, and I didn’t have to worry about finding a mess when I opened the container. They pack up beautifully.
When I was a kid and miserable all the time because little girls are mean, my mom told me that every problem presents an opportunity. Time and time again, I learn that lesson. Sure, it sucks to have a bad baking day, or any kind of a bad day, for that matter. But boy, do we learn from that. And in the end, we come out stronger. Let’s just hope it’s with sugar cookie bars!
Ingredients
Instructions
- Preheat the oven to 350. Line an 8 x 8 pan with foil, leaving enough to hang over the sides. Coat with cooking spray. Set aside.
- In the bowl of a stand mixer, cream the butter and sugar until light and fluffy. Add the eggs one at a time, beating after each addition. Stir in the vanilla and almond extracts. Finally, add the dry ingredients and mix until a thick cookie dough forms.
- Spread the dough in the prepared pan and bake for 15-20 minutes until the edges are just golden. Do not overbake.
- In a microwave-safe bowl, melt the white chocolate chips for one minute. Stir until smooth. If needed, heat for an additional 30 seconds to melt.
- Working quickly, mix one drop of red food gel coloring into the melted chocolate, stirring until a light pink color emerges consistently.
- Spread the melted chocolate in a thin layer over the bars. Add sprinkles.
- Allow the chocolate to harden for anywhere between 2-3 hours. Cut into squares and store in an airtight container.
Boy, did that come out rude, especially to my (very valued) readers who are not American and have no idea what this stupid Girl Scout cookie craze is about, anyway. I do apologize. And I can always suggest substitutes if you can’t get the cookies. But you have to understand something.
Girl Scout cookies are America, people. And I’m an American food blogger. If I were a French food blogger, I’d be doing a lot more with delicate pastry dough and awesome macarons.
Another American phenomenon I’m all about: the mashup. It’s where you take two things that have not previously gone together (a song, a dessert) and you combine them. Some people find them too intense, too much. I call mashups a multitasker’s dream come true. Mashups prevent difficult choices from having to be made. Instead of choosing between the cookie or the pie, have a pookie! Why pick just one?
That view, of course, is quite American. We Americans like to think we can have it all, and perhaps we can, but I have to cry foul. I think trying to have it all is the first step to failure, or at the very least, disappointment. It might be easier to have all of one or two things, and then little bits of the rest.
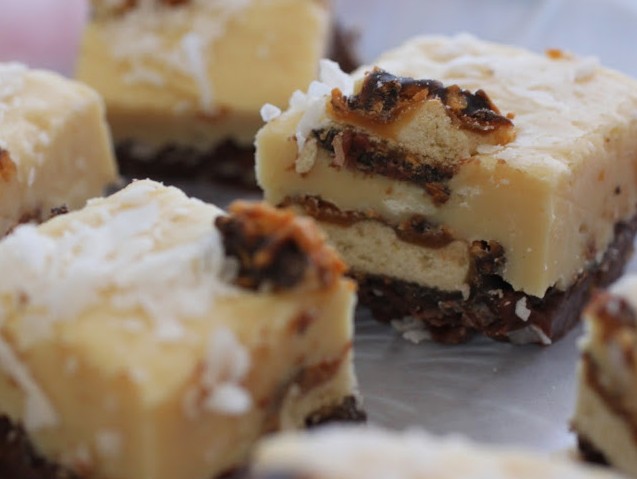
If you see someone who does seem to have it all, take another look. What seems like perfection from the outside is usually a mask. Unless, of course, we’re talking about fudge. Because this fudge has everything, and it’s no illusion.
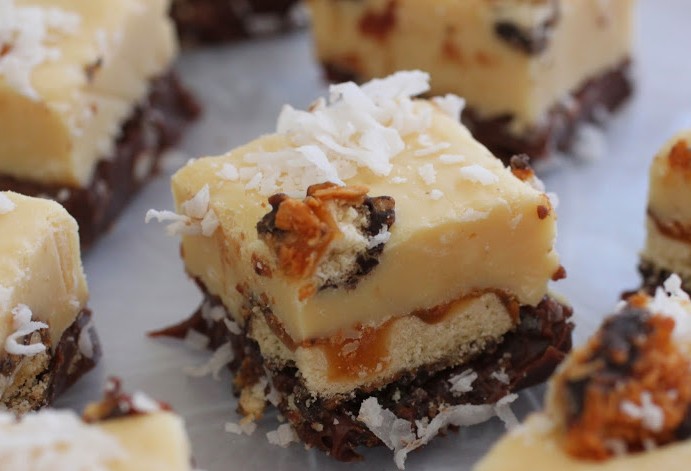
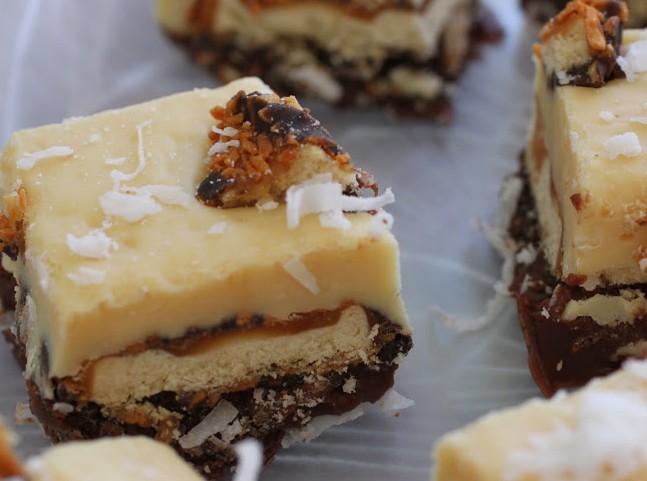
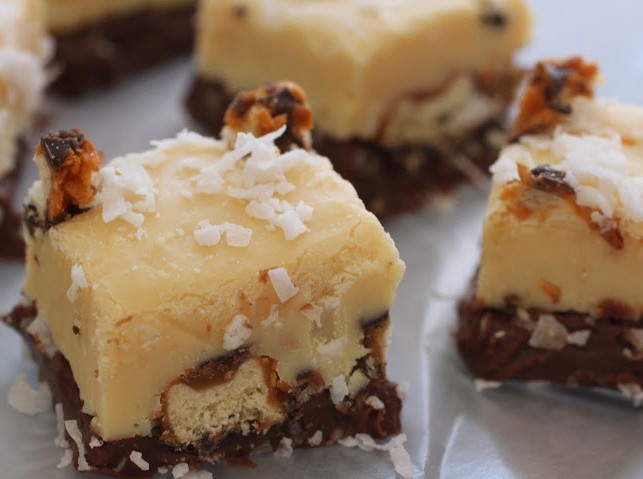
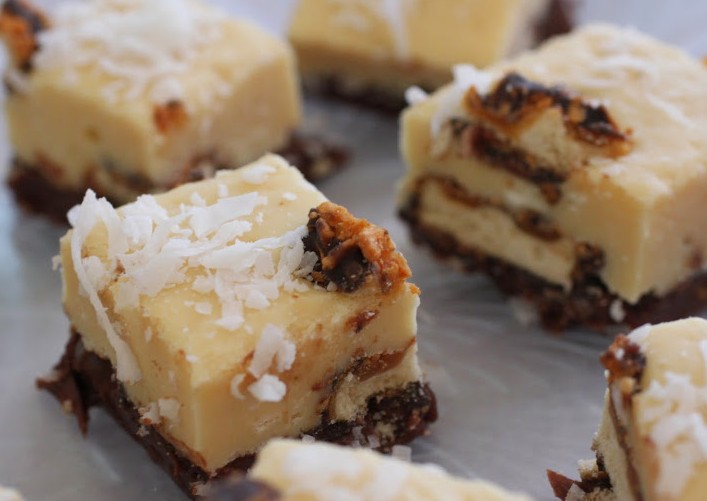
For some reason, I couldn’t decide whether to use regular or white chocolate in this fudge. So what did I do? I decided to have it all. And nestled between the layers and on top of the fudge are the Samoas themselves, along with sweetened coconut.
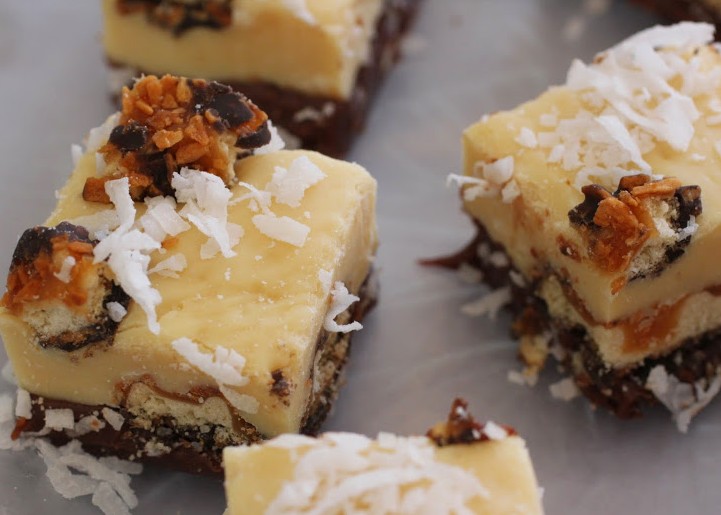
I consider this fudge in the mashup category because, well, it’s cookies and fudge. Cookies inside of fudge is pretty much always a good idea.
For those of you who are sick of all this Girl Scout madness, I’m done. I think. I do have one more box of Tagalongs to play with. But remember, this is America. We want it all, and we want it now. The least I can do is give our Girl Scouts my baking best.
Ingredients
Instructions
- Line an 8 x 8 pan with aluminum foil, using enough to hang over the sides. Spray it with cooking spray and set aside.
- In a microwave-safe bowl, melt the chocolate chips and sweetened condensed milk together for 2 minutes.
- Remove and stir until smooth.
- Spread the fudge evenly in the prepared pan. Sprinkle on 1/3 cup coconut. Layer the Samoas (reserving 3-4) on top of the fudge in even intervals. Set aside.
- Make the white chocolate layer. On the stove over low heat, melt the white chocolate chips with the condensed milk, stirring constantly, until the mixture is melted and smooth.
- Remove from the heat. Spread gently over the bottom layer.
- Take the remaining Samoas and break them into small pieces. Scatter along the top at even intervals. Sprinkle the remaining coconut on top.
- Chill for 2 hours until set. Allow to come to room temperature. Cut into squares. Store in an airtight container.
Every now and then, I also like to bake a summery dessert to raise the brightness in the kitchen. Nothing is more summery to me than citrus, especially anything yellow. So these Meyer lemon pie bars are perfect for cheering up the landscape!

If you’ve never used a Meyer lemon, you need to try it out. They’re rounder, smaller and sweeter than regular lemons, with a much thinner skin. And while they don’t have as high an acidity level as regular lemons, they can still be used in savory dishes. I made a Cornish hen the other night and put half a Meyer lemon in its cavity while squeezing the other half over the skin. It turned out really well.
For baking, of course, Meyer lemons are ideal. If you can’t find any, though, don’t sweat it. This recipe can be made with regular lemon. But when given the choice, go Meyer!
These bars are a riff on a classic key lime pie. If you’ve had a good key lime pie, then just picture that filling, but with Meyer lemons. I also prefer my pie in bar form. It’s easier to eat, more portable, and you can have more servings without feeling like you’re overdoing it.
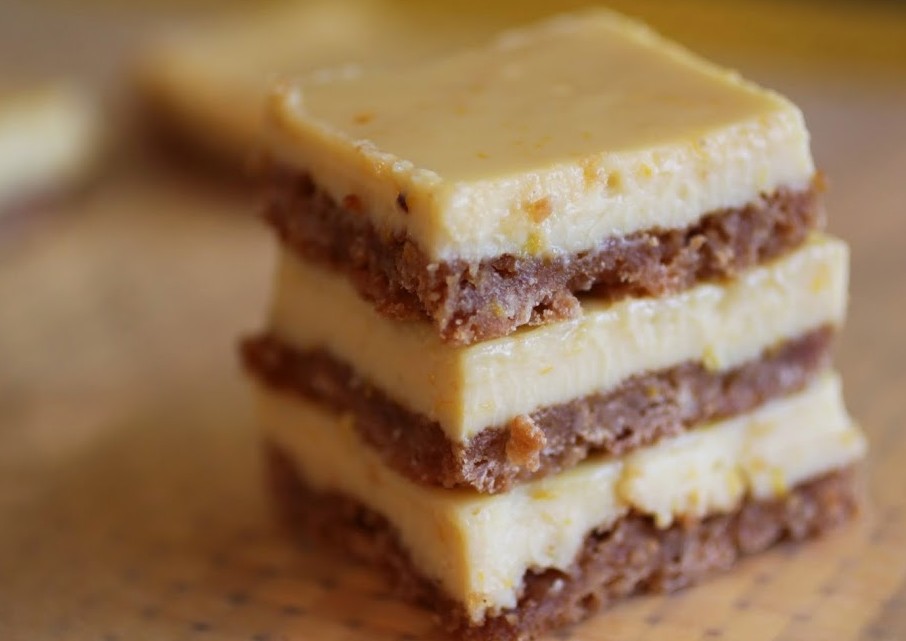
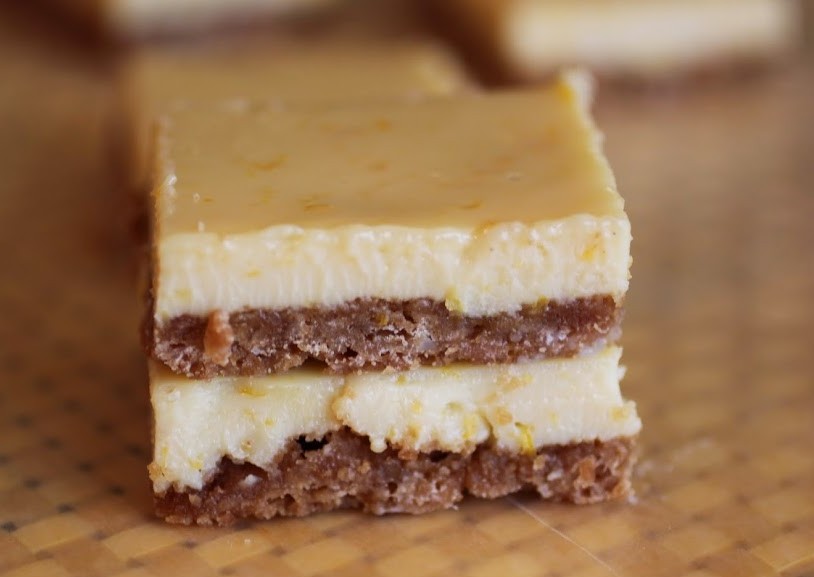
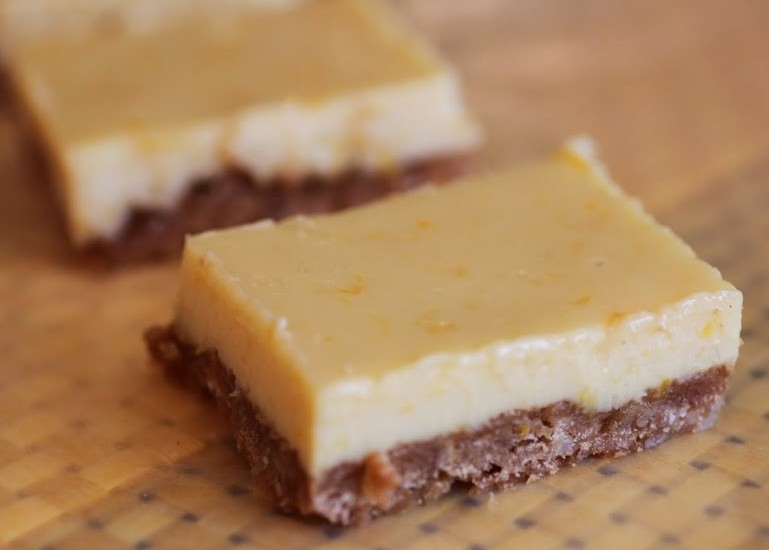
When it comes to the graham cracker crust, I melt white chocolate into the base to contrast more sharply with the tang of the citrus. The sweetness of the crust against the filling is pretty dramatic.
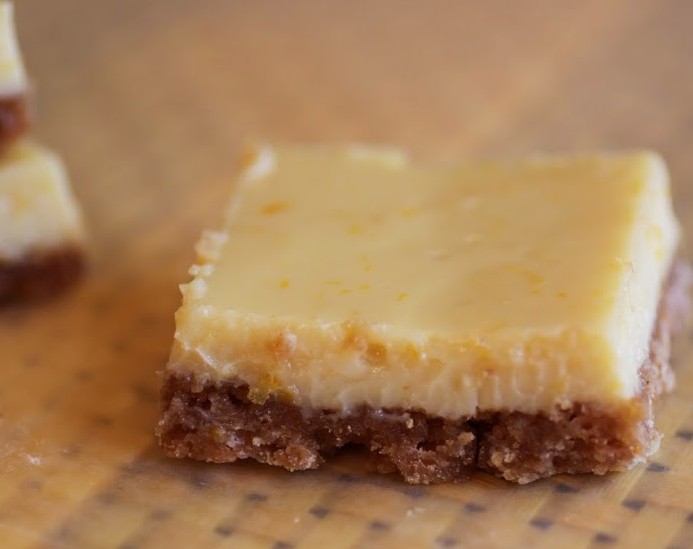
And this recipe is astonishingly easy, not to mention a real crowd-pleaser. Lemon is the dark horse of baking. It’s more addictive than chocolate, though nobody realizes that until they’re eating their third lemon pie bar square. I dare you to eat just one!
Ingredients
Instructions
- Preheat the oven to 350. Line an 8 x 8 square pan with foil, using enough to hang over the sides. Coat with cooking spray and set aside.
- In a microwave-safe bowl, melt the butter and white chocolate. Stir until smooth. Mix in the graham cracker crumbs and brown sugar until the crumbs are moist. Press the crumb mixture into the bottom of the prepared pan, being sure that you pack the crust tightly with your fingers.
- Bake for 5-10 minutes until set.
- While the crust is baking, prepare the filling. Combine the zest, Meyer lemon juice, and egg yolks. Stir in the condensed milk and mix until thoroughly combined. Pour the filling into the crust and bake for 20-25 minutes until set.
- Allow the bars to cool completely. Refrigerate for at least two hours (overnight is better). When you’re ready to serve, cut into squares!
]]>