You know that I can’t go more than a week or so without doing something PB-related. It’s the ABCs of me, baby, and I’ve embraced it. Just like I’ve embraced the role of sugar in my life. More on that in a bit.
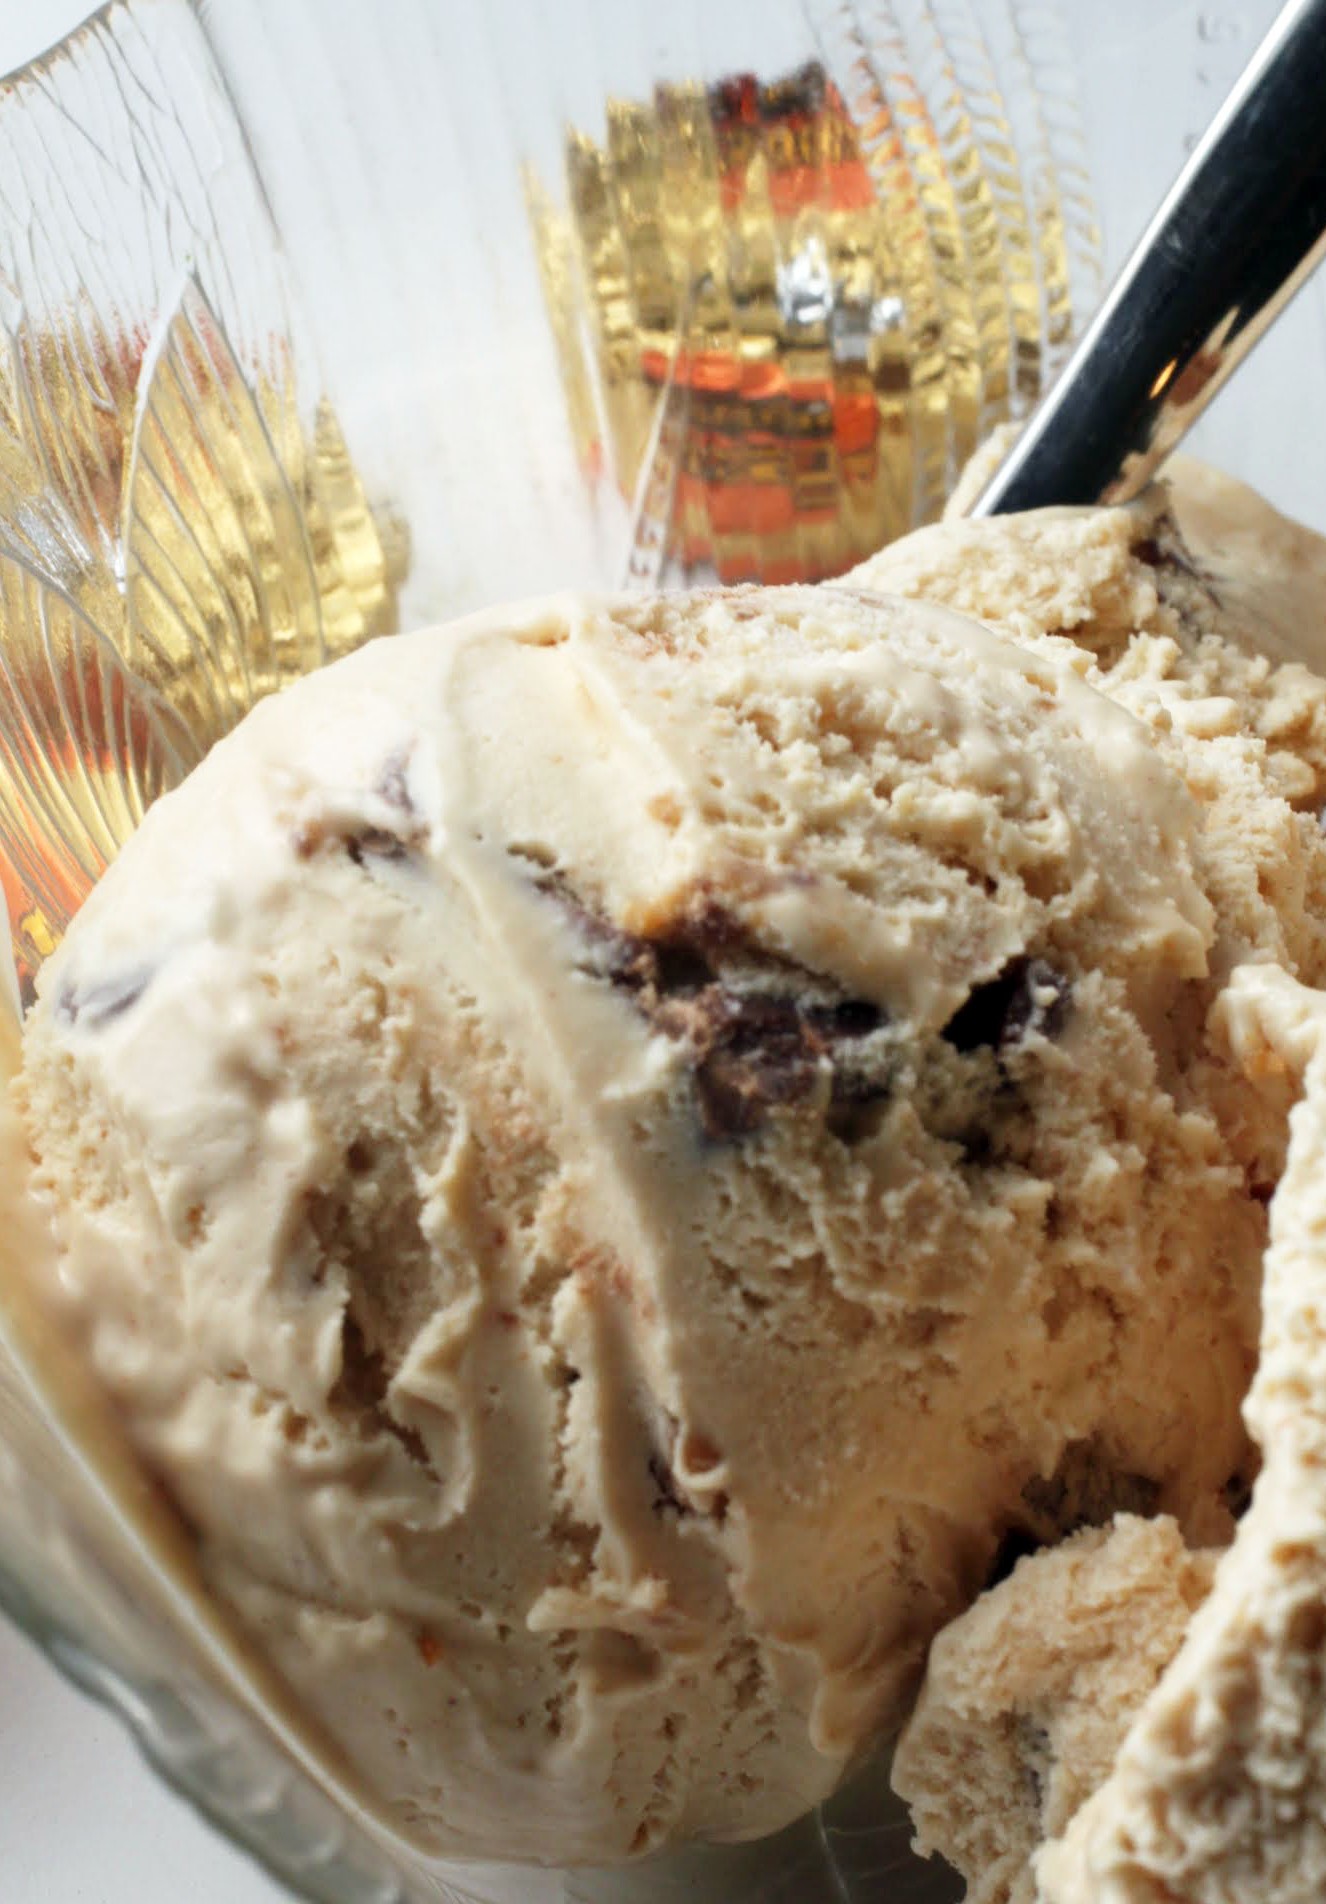
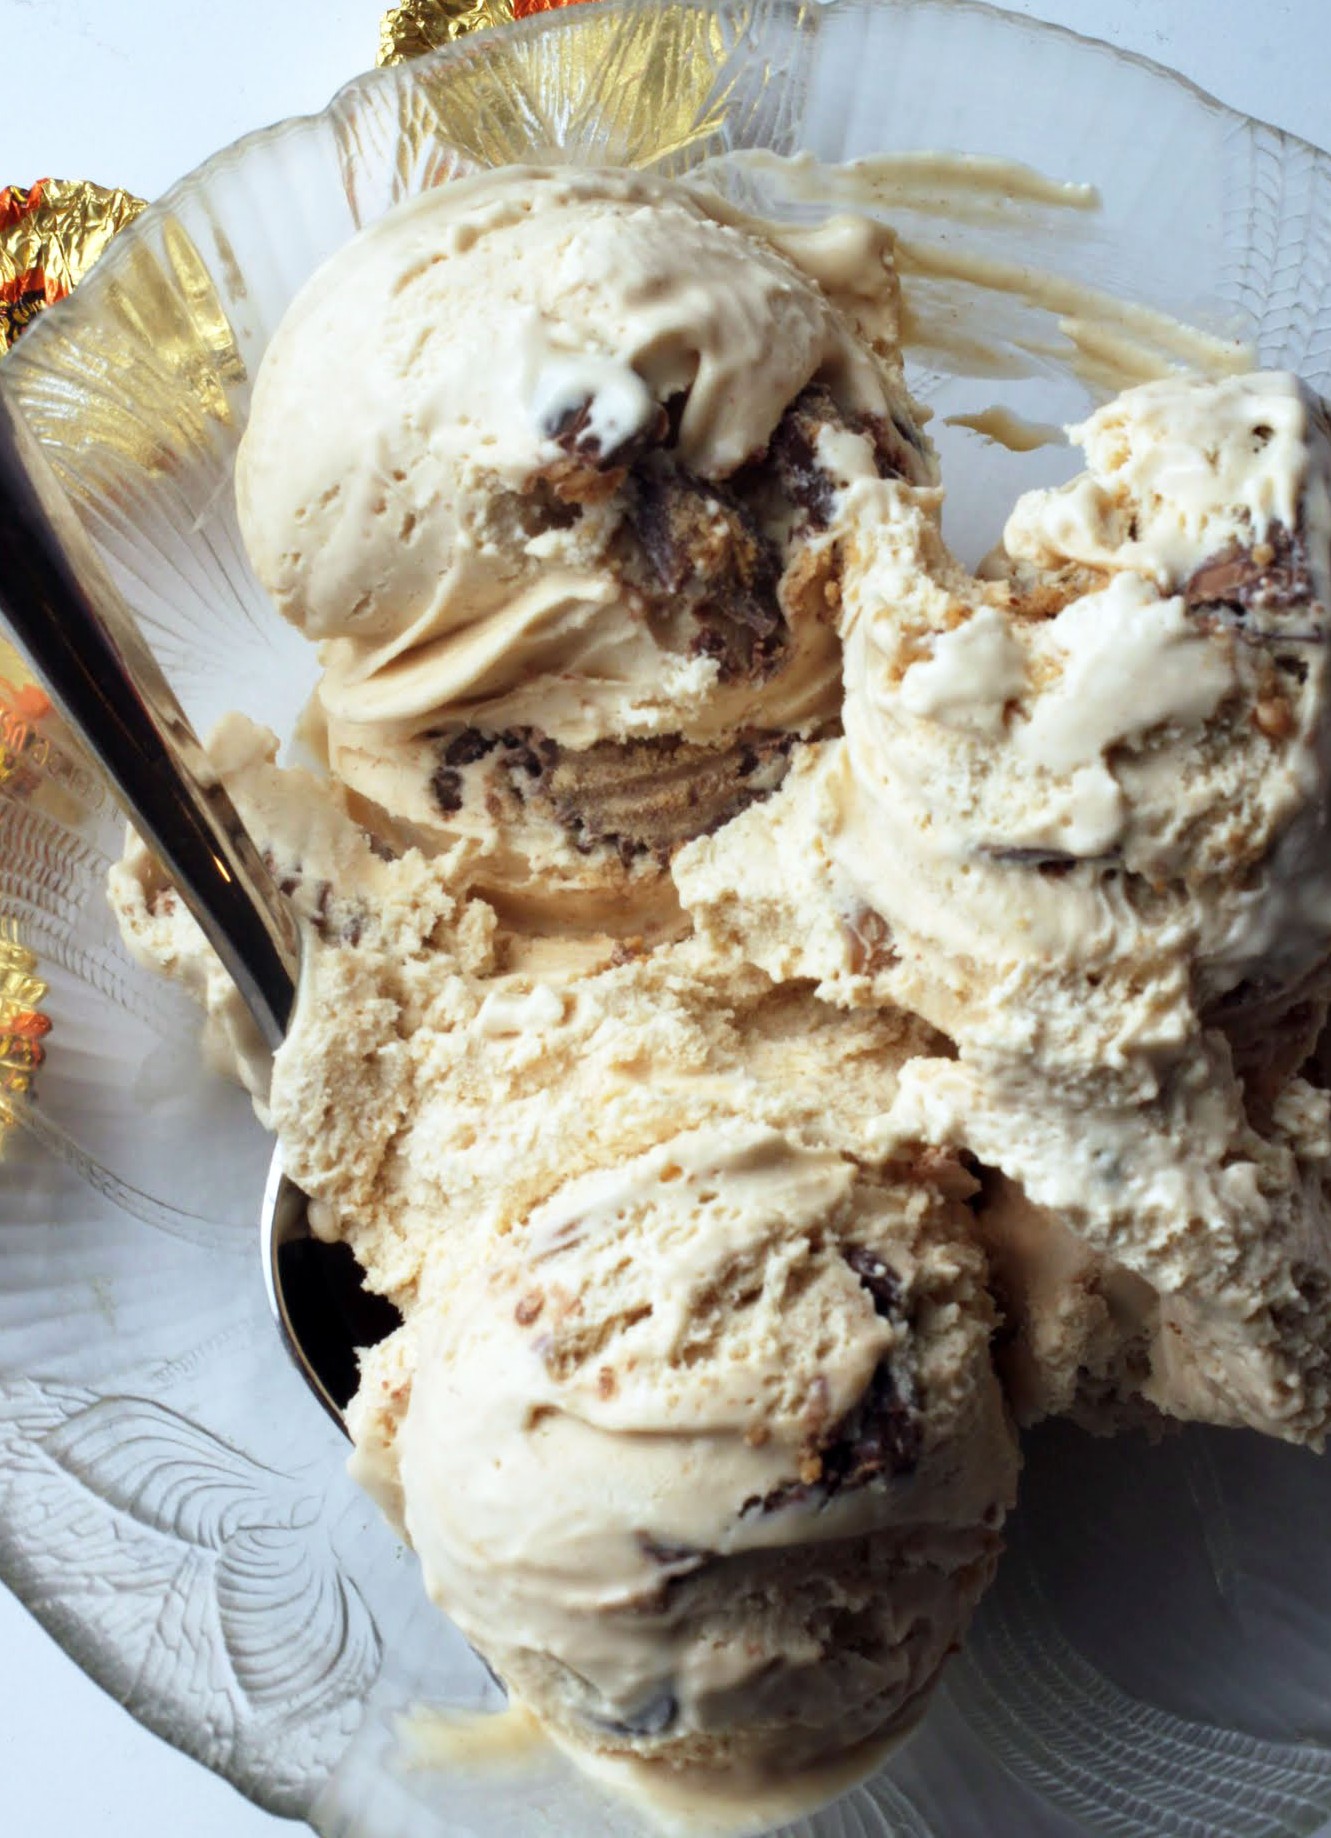
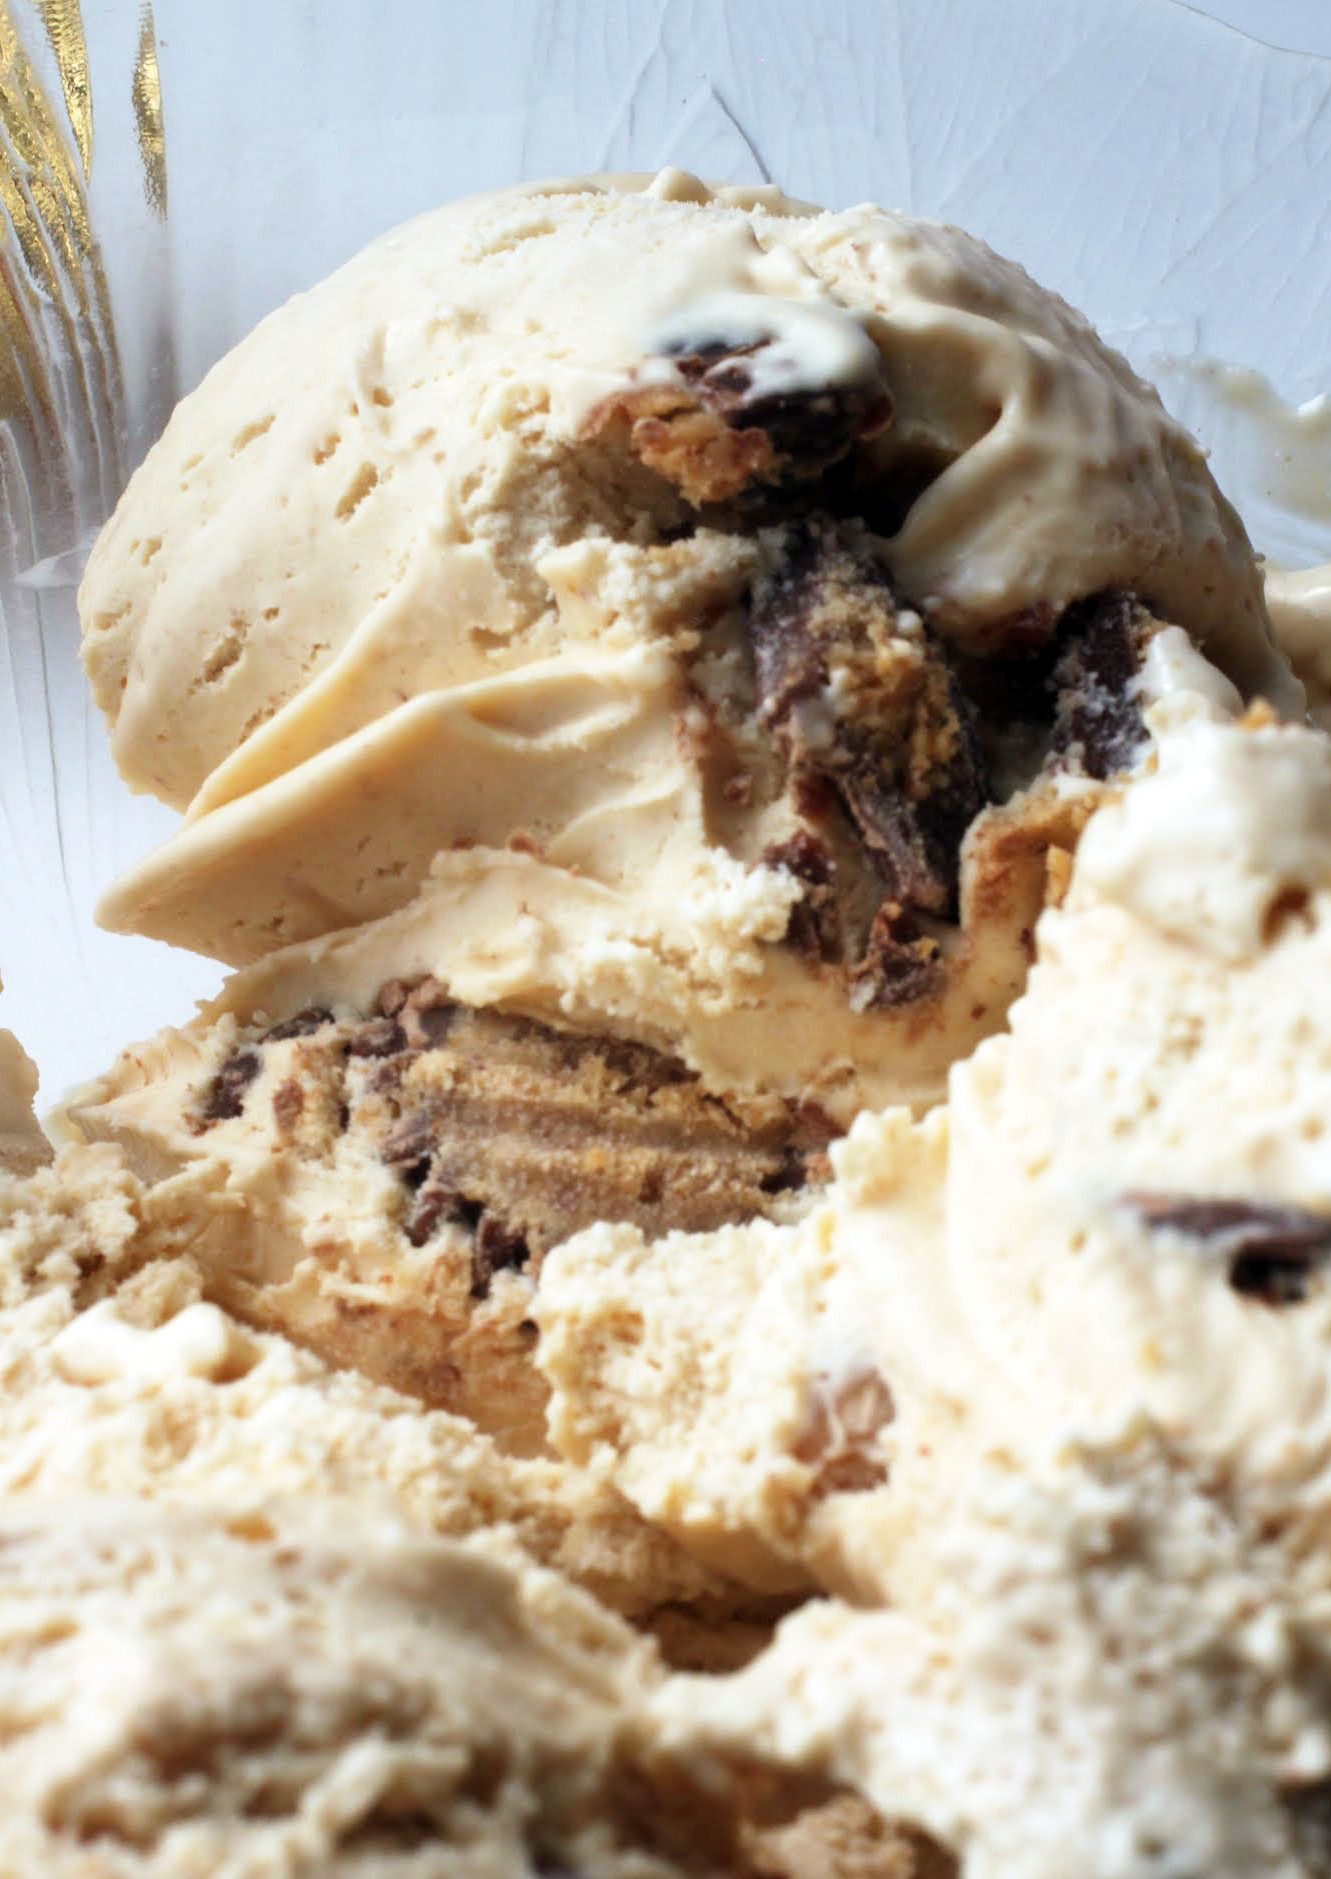
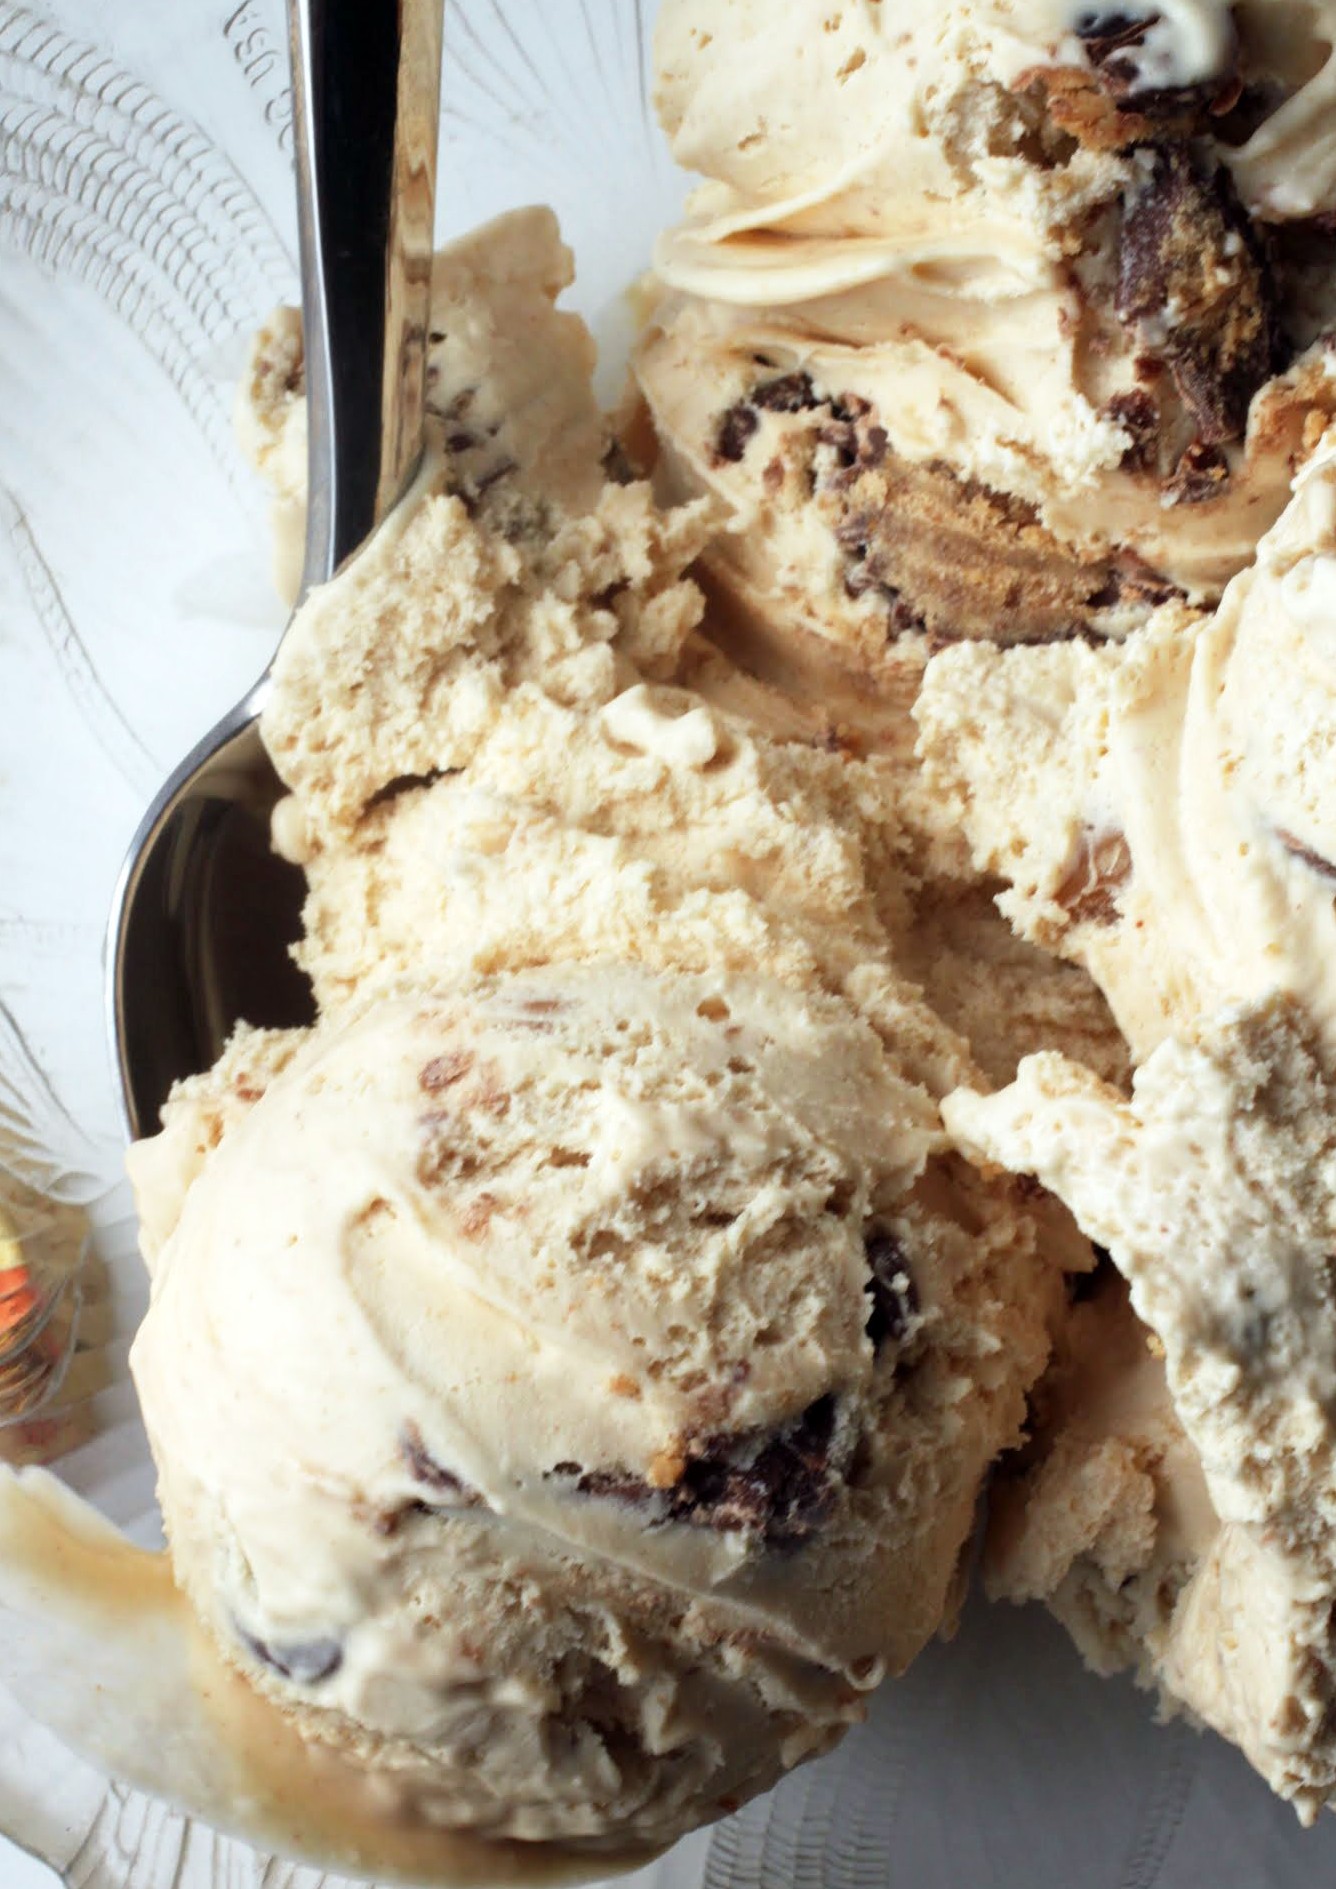
If you get frustrated because your peanut butter ice cream isn’t peanut buttery enough, or because it doesn’t include enough mix-ins, look no further. This no-churn option will satisfy all of your frozen peanut butter dreams!
I’m tired of the war on sugar. Yes, I realize I’m a baking blogger and so my credibility is lessened here, but I’m going to be very real with you.
First of all, a qualifier: the following thoughts do not apply to anyone who cannot have sugar for medical reasons or anyone who has disordered eating habits. I’m not a doctor or a nutritionist (clearly), so the following thoughts are just opinion.
A few years ago, after reading endless articles about the evils of sugar, I tried it cutting out. To call it a disaster would be fair. It’s not that I had withdrawal (I didn’t, shockingly) or any other noticeable symptoms. People told me I’d feel better, and that didn’t happen. I felt no different. Life was a little more boring, and I had to say no a lot, but that was about it.
What prompted the disaster was a lot of sudden weight loss. I’ve always been petite, and I have always worn sizes in the low range of the spectrum. But with the cancellation of sugar, I quickly lost 20 pounds and became very obsessed with maintaining what I now see was an unsustainable diet. I spent a lot of time chopping veggies, eating lean protein, and feeling virtuous.
Along with that came insecurity, doubt, a constant nagging hunger and the desire to eat everything in sight. I didn’t realize it at the time because it all seemed so healthy, but I was depriving my body of essential nutrients. What looked like fitness and health was really dysfunction.
Thankfully, I pulled myself back from the brink. As a result of this experience, I refuse to cut out food groups anymore. Did I put the weight back on? Yes. And I’m grateful for it, for my muscles (thanks, barre workouts!) and for whatever curves I like to think that I have.
When I see people turning sugar into the enemy, I get angry. It’s not sugar that’s the problem. It’s the extreme approach to food and the lack of emphasis our society puts on balance. I haven’t mastered balance, and I might not ever. But I’m sure gonna keep trying.
There’s your PSA. Now let’s get our sugar on!
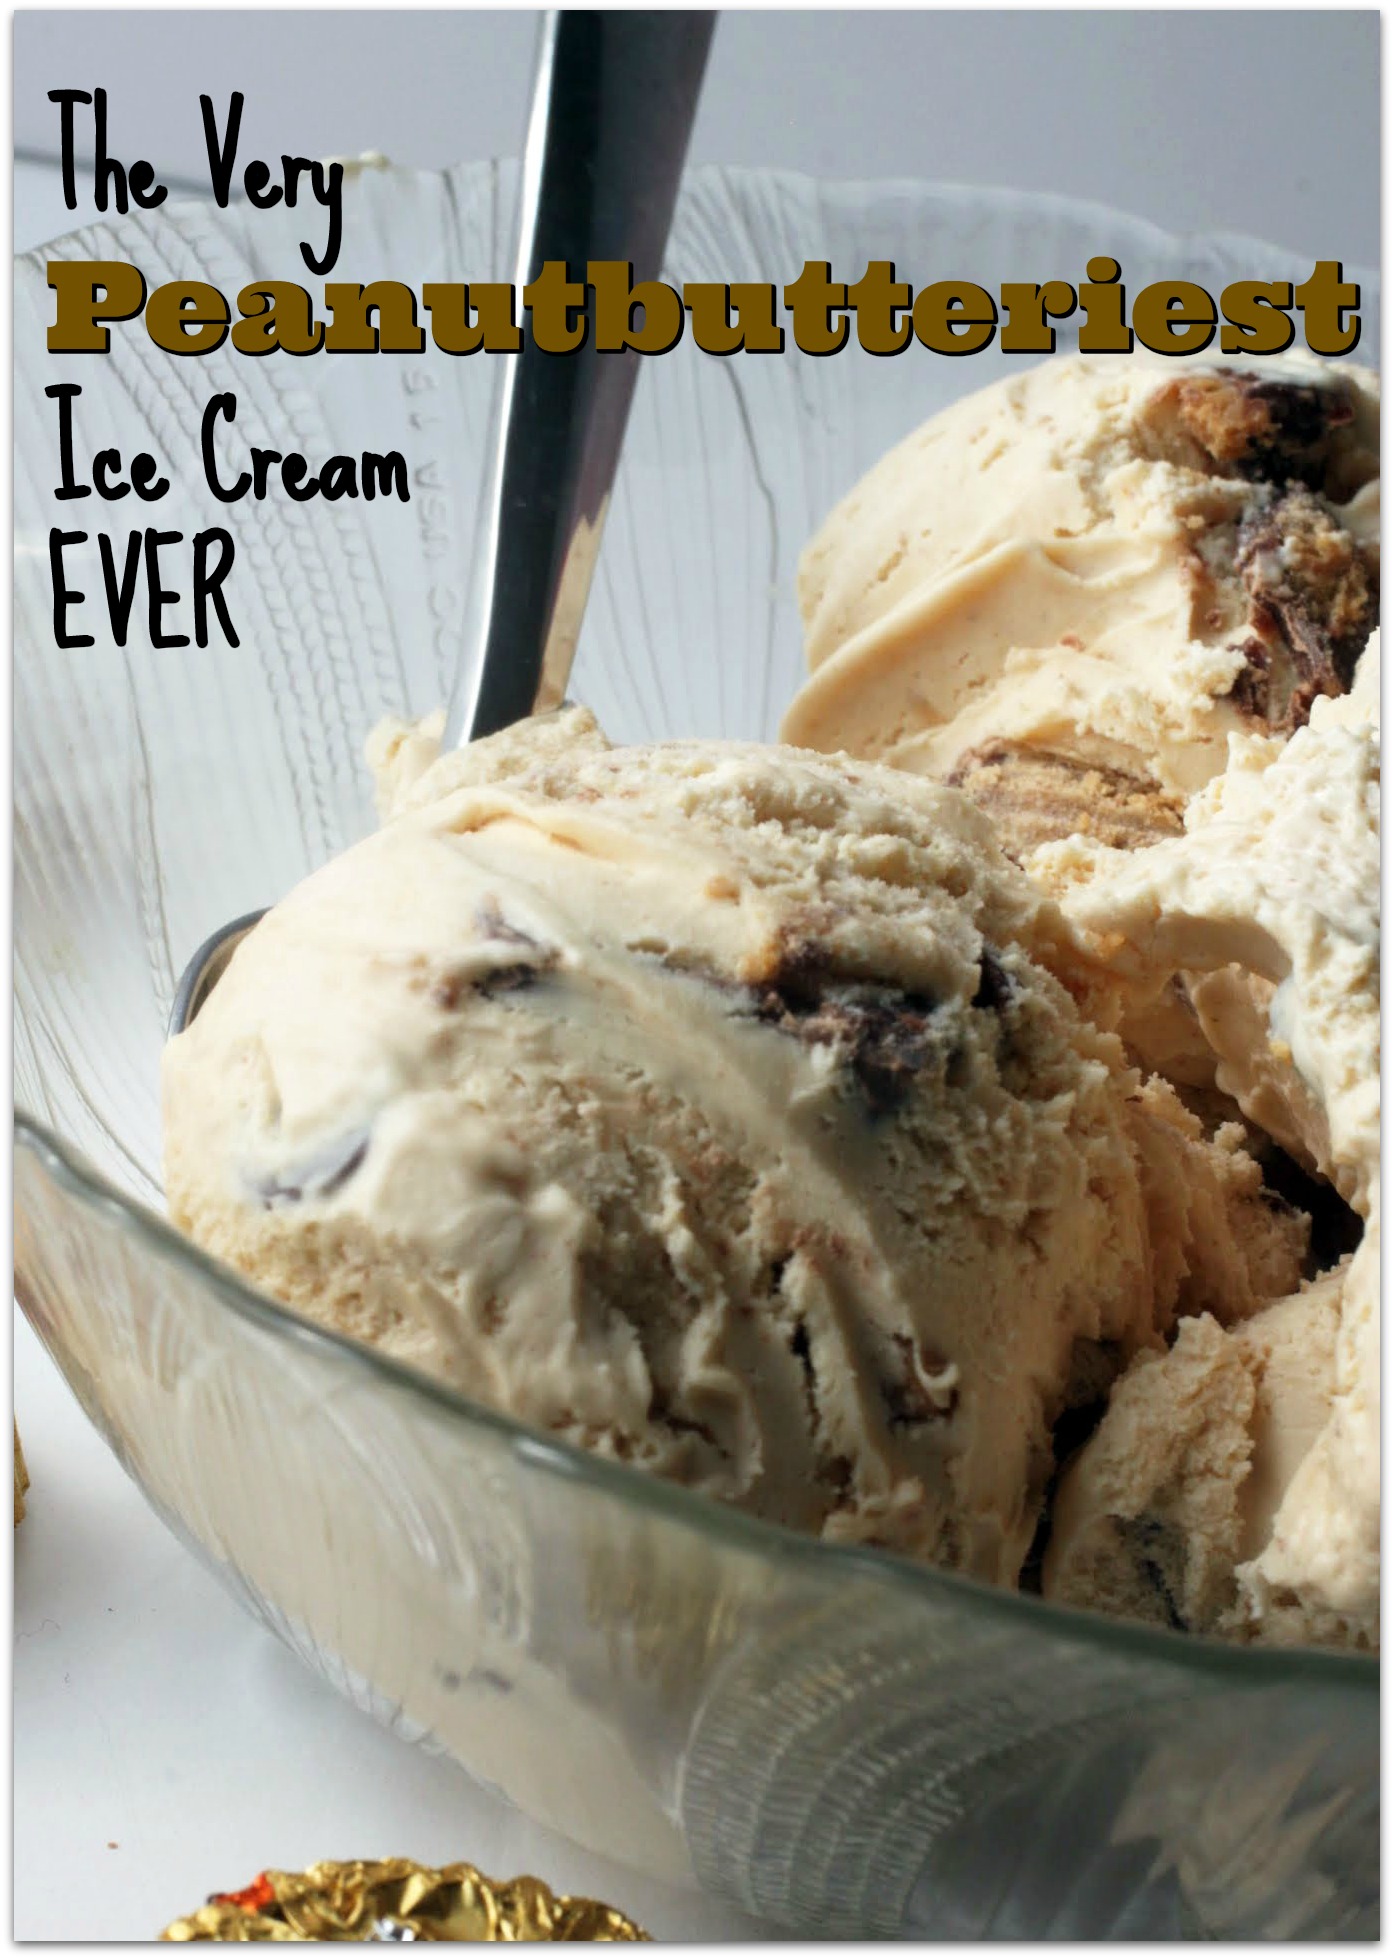
This ice cream is full of it, not gonna lie. It’s got peanut butter, sweetened condensed milk, and whipped cream. You can be lazy and use Cool Whip (no judgement), but I like the less chemical taste of the whipped cream. And then I loaded the whole thing down with peanut butter cups, peanut butter chips and milk chocolate chips.
Suffice it to say, I’ll be eating a lot of this ice cream later. Probably a little more than I should. But you know, that’s life. And I’m happy that I don’t have to say no to anything anymore!
Ingredients
Instructions
- In a large bowl, combine the condensed milk, vanilla and peanut butter until smooth.
- In the bowl of a stand mixer using the whisk attachment, beat the whipping cream on high until stiff peaks form.
- Fold the whipped cream into the peanut butter mixture gradually, making sure that no streaks are left in the mixture. Gently add the mix-ins and stir again.
- Place in a freezer-safe container or pan and freeze overnight.
- Store covered in the freezer.
]]>
Not me, unfortunately. My beloved Indianapolis Colts exited the season before the playoffs, so I selfishly stopped caring too much about the outcome of any games, except to hope that the Patriots don’t once again take it all. Tom Brady must’ve made a deal with Satan a long time ago to be both talented and good looking. I have issues with that man.
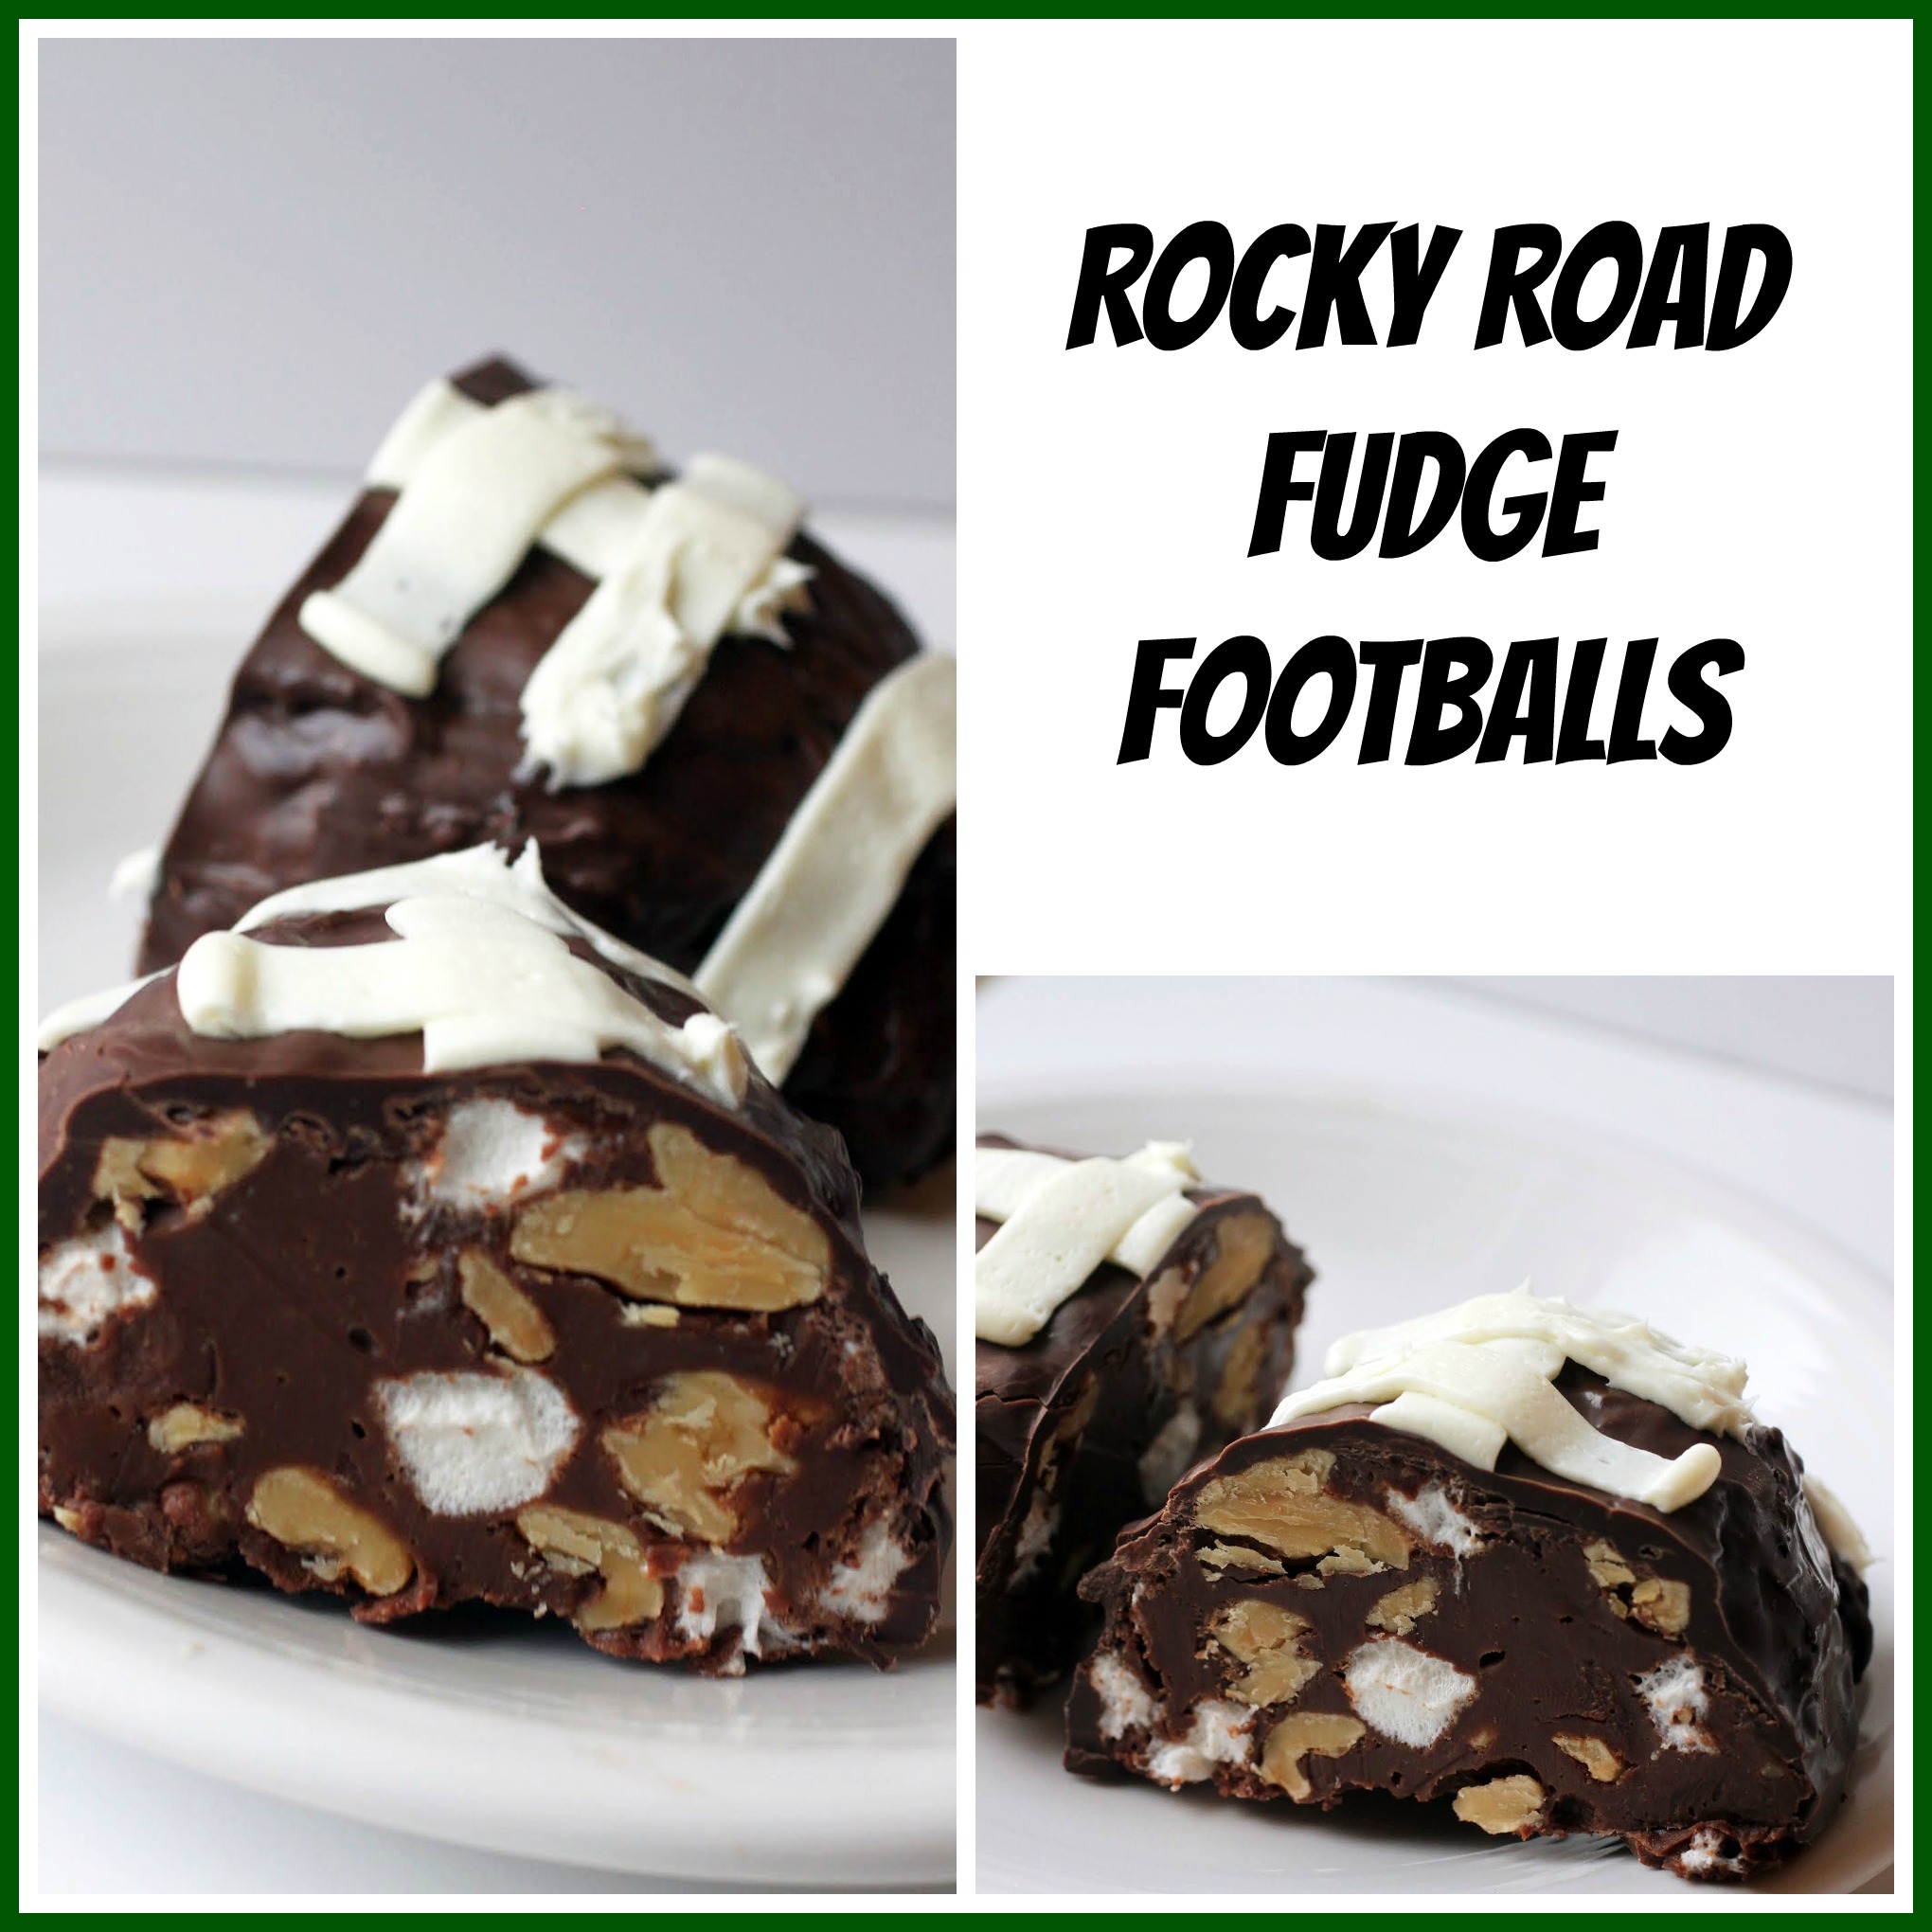
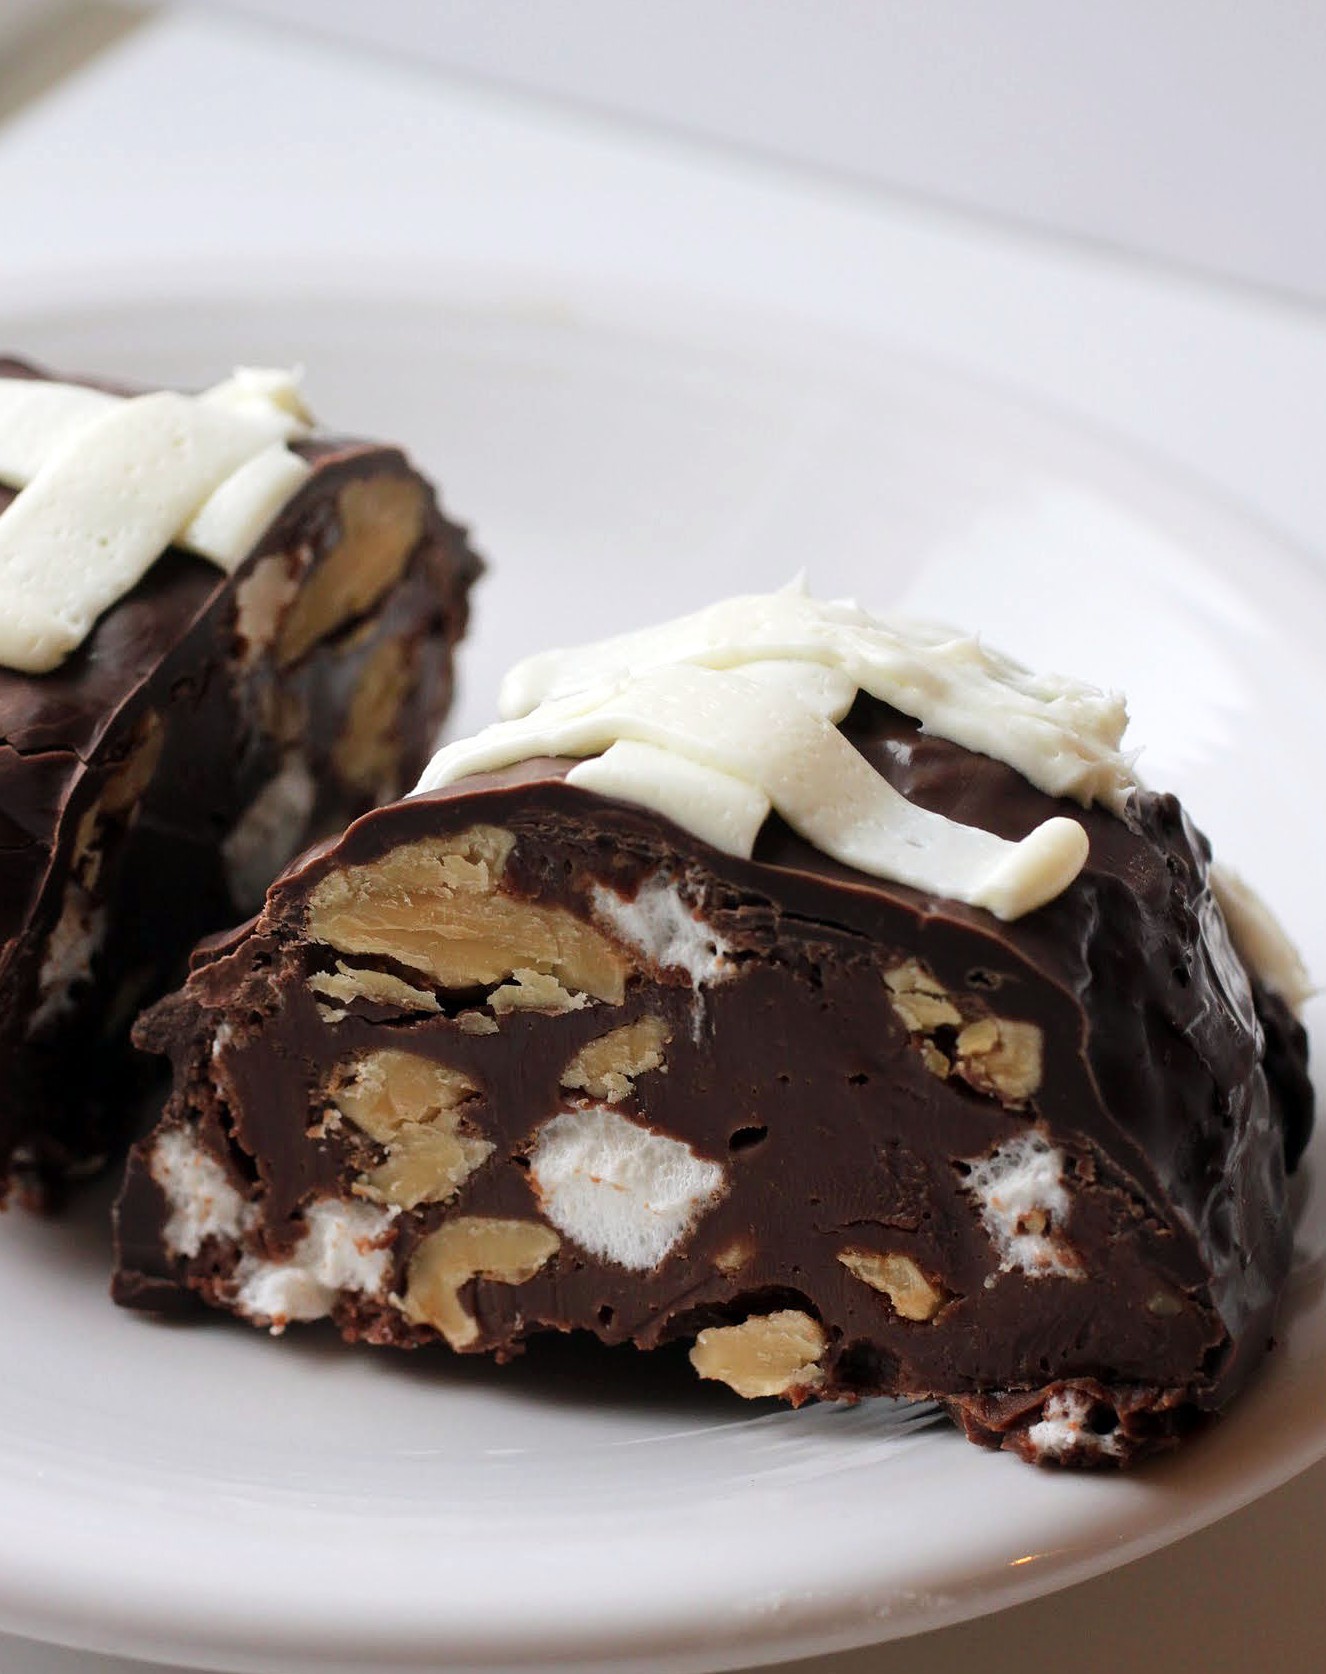
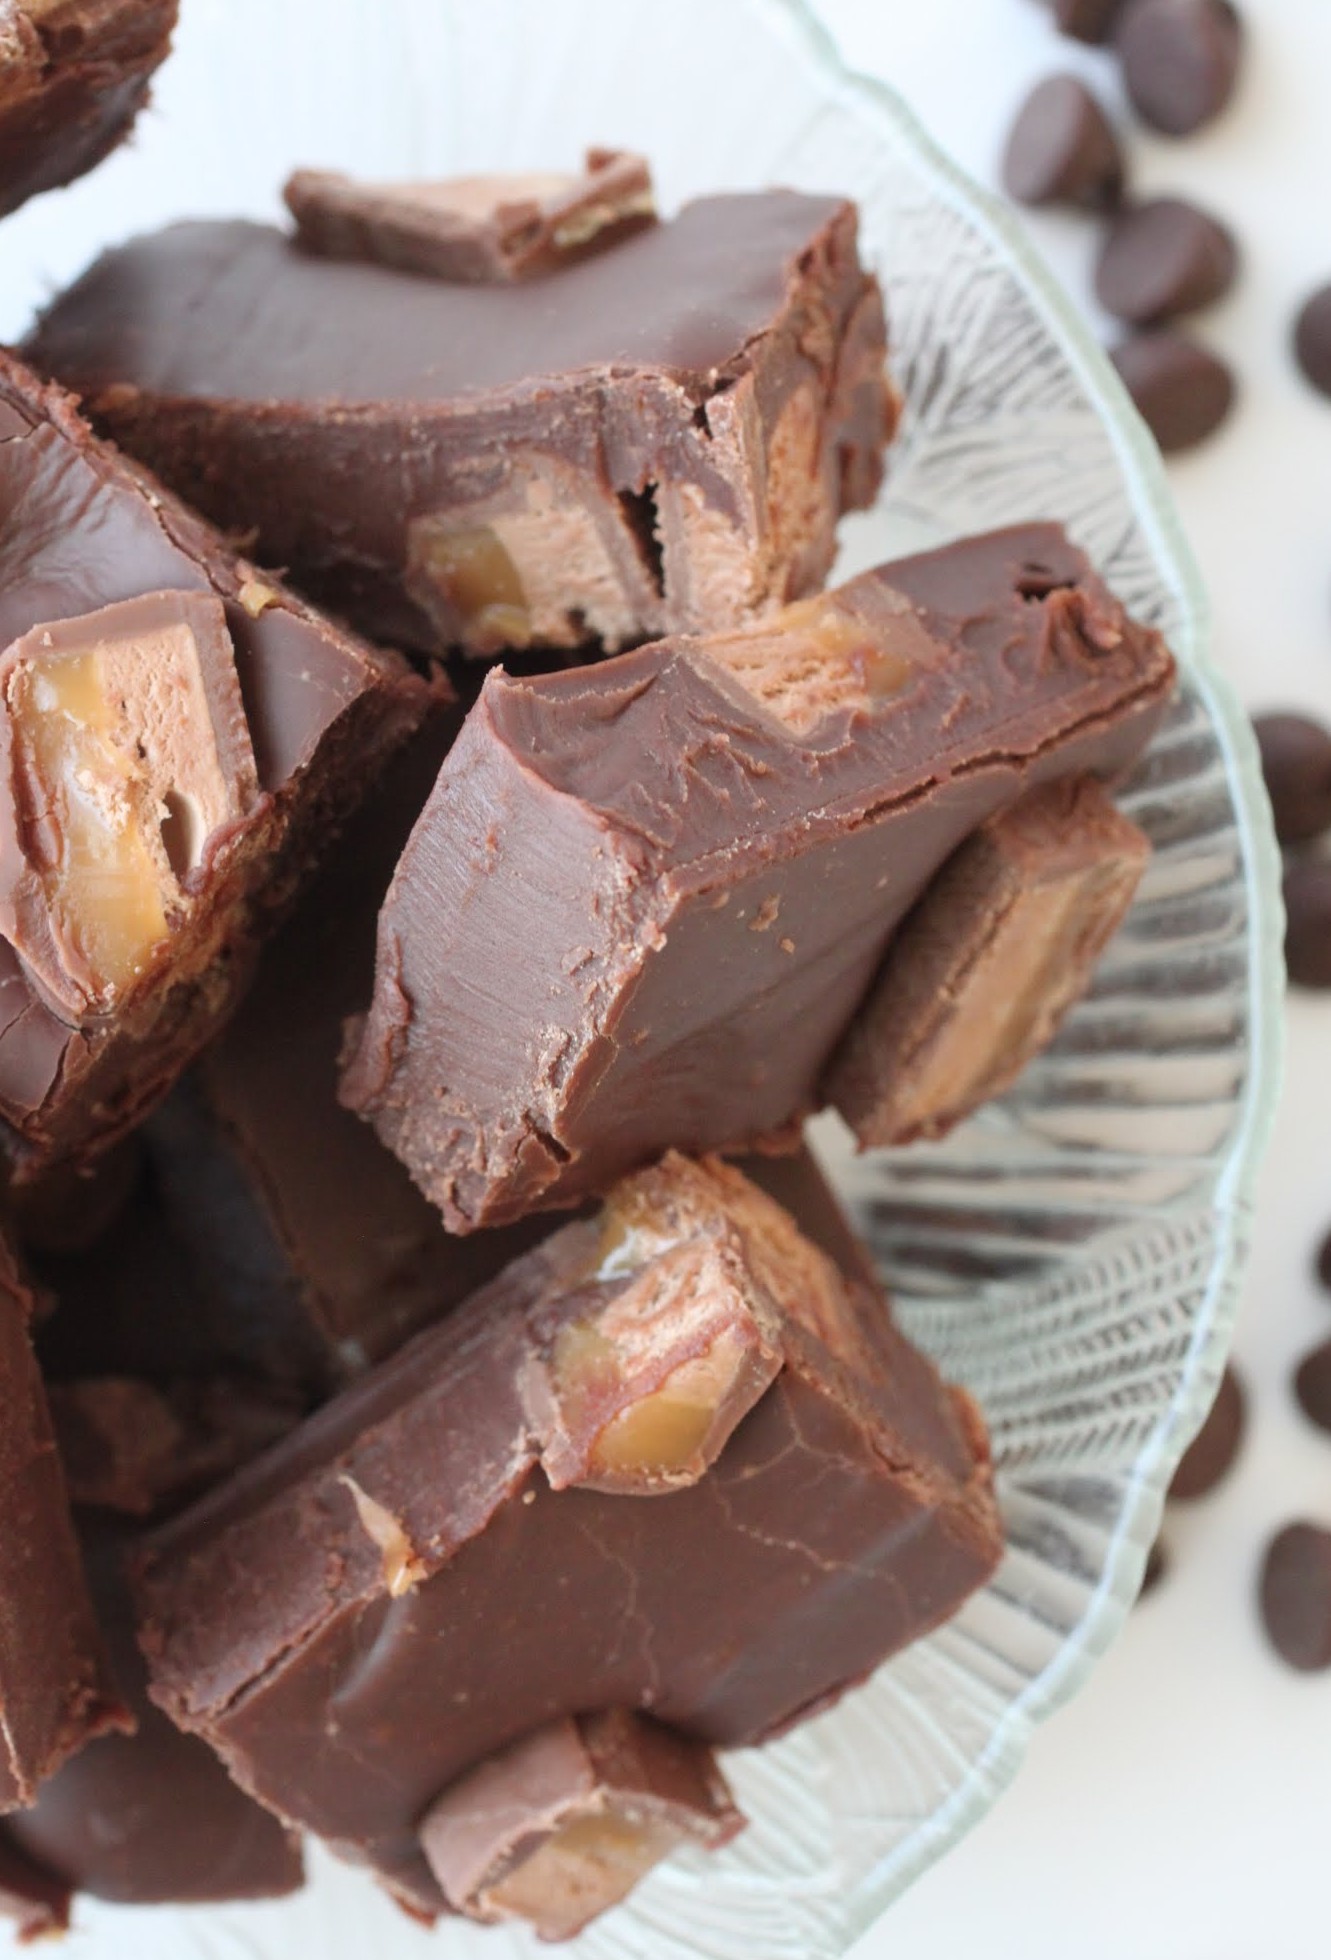
But no matter what happens with the actual game, I never pass up a chance to make amazing football food. And what better than a giant hunk of fudge shaped like a football? Nothing, I tell you. It’s the best!
This past weekend we had Monday off, so we bundled everyone up and drove out to the Baltimore Inner Harbor to their world-famous aquarium. It’s an amazing place set right over the water, and the building is ingenious. The whole building basically mimics the levels of the ocean with visitors descending via ramps as they fish-watch (or shark-watch) into darker depths.
And of course, there’s the dolphin show. Kids love a good dolphin show, and actually, so do I, as long as we stay out of the splash zone. Do you ever wonder why people like sitting in the splash zone and getting purposely doused with dirty, fishy water? And the day we went, it was about 10 degrees outside. Why would you do that to yourself? Then you could turn to a fishy water popsicle if you venture back outside.
The only bone anyone has to pick with the Baltimore Aquarium is its price tag. It’s $40 a ticket for adults and $25 for kids. We’re a family of five, so do the math. Let’s just say that we had to make sure we saw every inch of that aquarium, or we would feel that our money was not well spent. And we also were mean parents and refused to buy anyone a stuffed dolphin. The little angelic children were really mad about that.
When we got home, I wanted two things: a blanket and some fudge. Luckily, both were readily available. As you know by now, fudge is not hard to make. Watch!
My only caution to you would be to be much smarter than I was. For the football molds, I used a plastic candy mold. MISTAKE. I should have used something bendy, like silicone. Live and learn. Getting that fudge out of the mold was sheer hell. That’s why it’s not featured in my video.
We can survive any number of freezing cold aquarium trips if there’s fudge at the other end of the rainbow, so bear that in mind. And if you care about the Super Bowl outcome, good luck to your team! Unless it’s the Patriots. They don’t need no more help.
Ingredients
Instructions
- Pour the milk chocolate chips and condensed milk into a microwave-safe bowl. Heat for two minutes and stir. If needed, heat for another 30 seconds and stir until smooth.
- Mix in the mini marshmallows and walnuts. Pour the mixture into a silicone football mold (this mixture will make two medium-sized footballs and a small bowl's worth of fudge).
- Chill for three hours until set.
- When ready, pipe football stripes onto the footballs with vanilla frosting.
- Store in an airtight container.
]]>
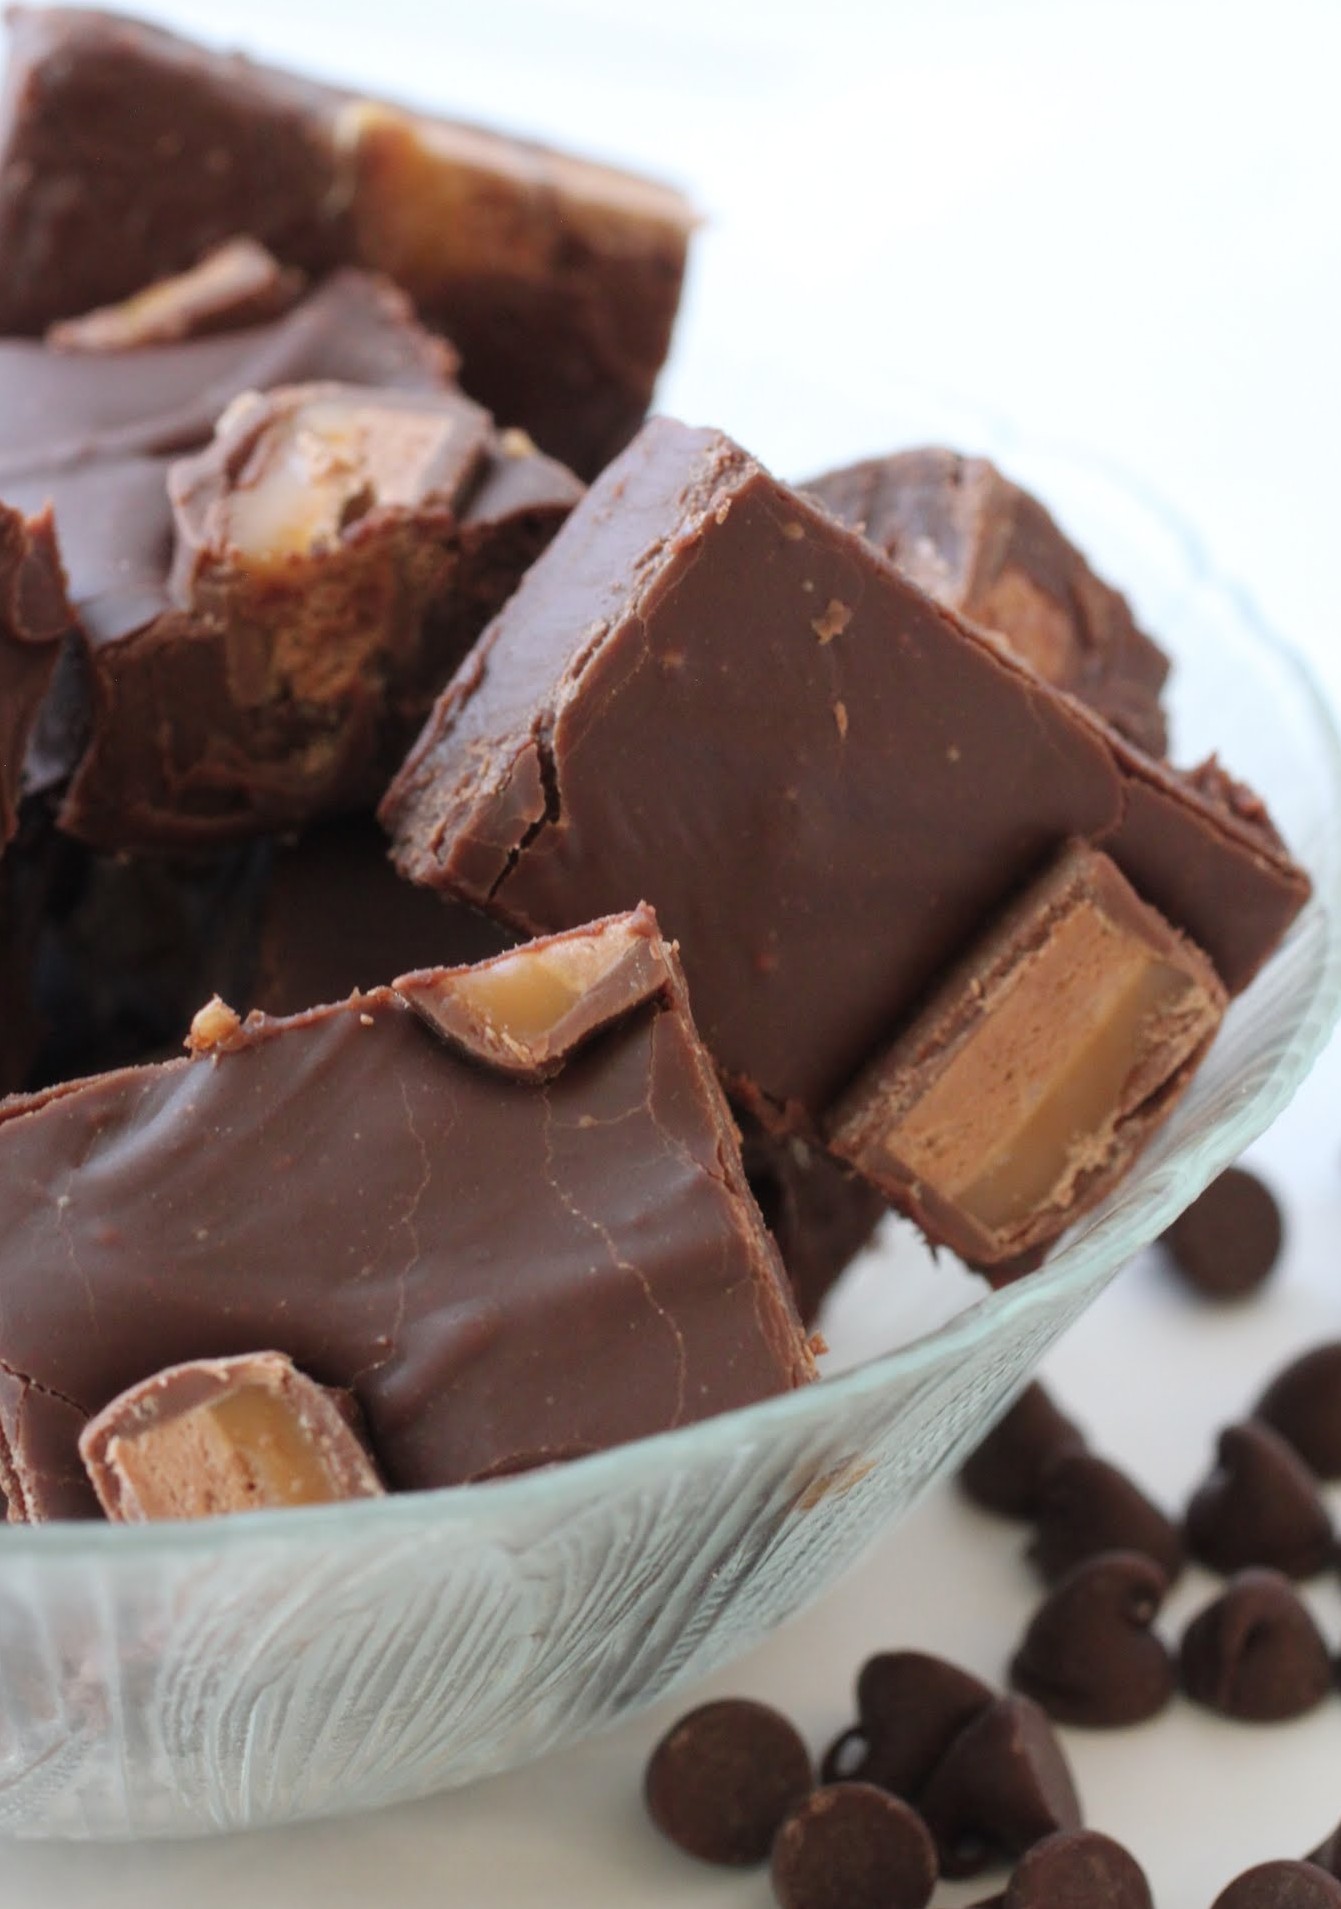
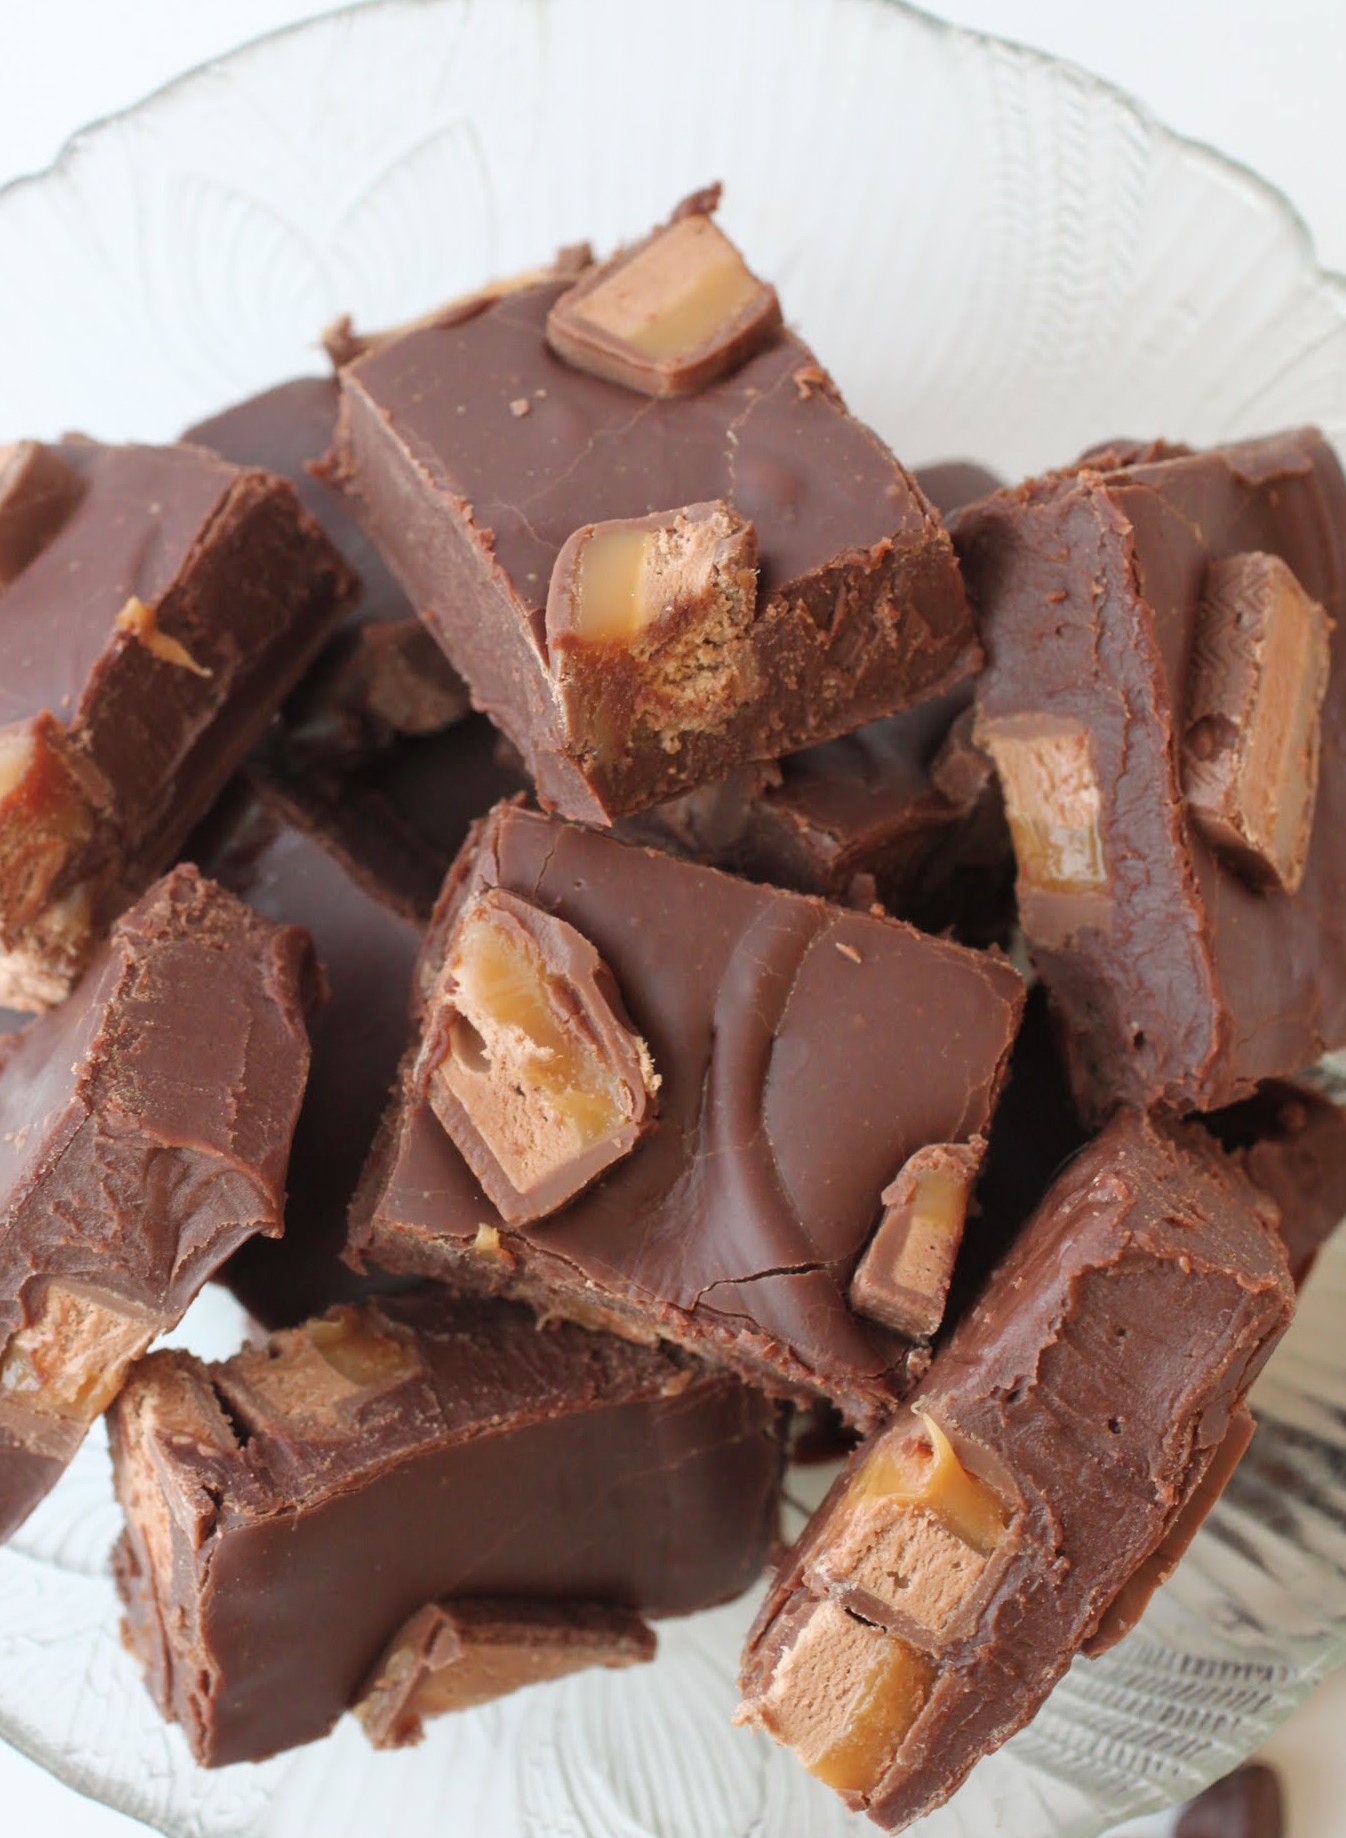
In a week or so, my kitchen will be overflowing with pans of fudge. I’ve been known to have 20 pans sitting on my counters, getting sliced up and mixed into assortments for family and friends. Somehow, everyone always looks forward to fudge with so much excitement that I have a hard time gifting anything else.
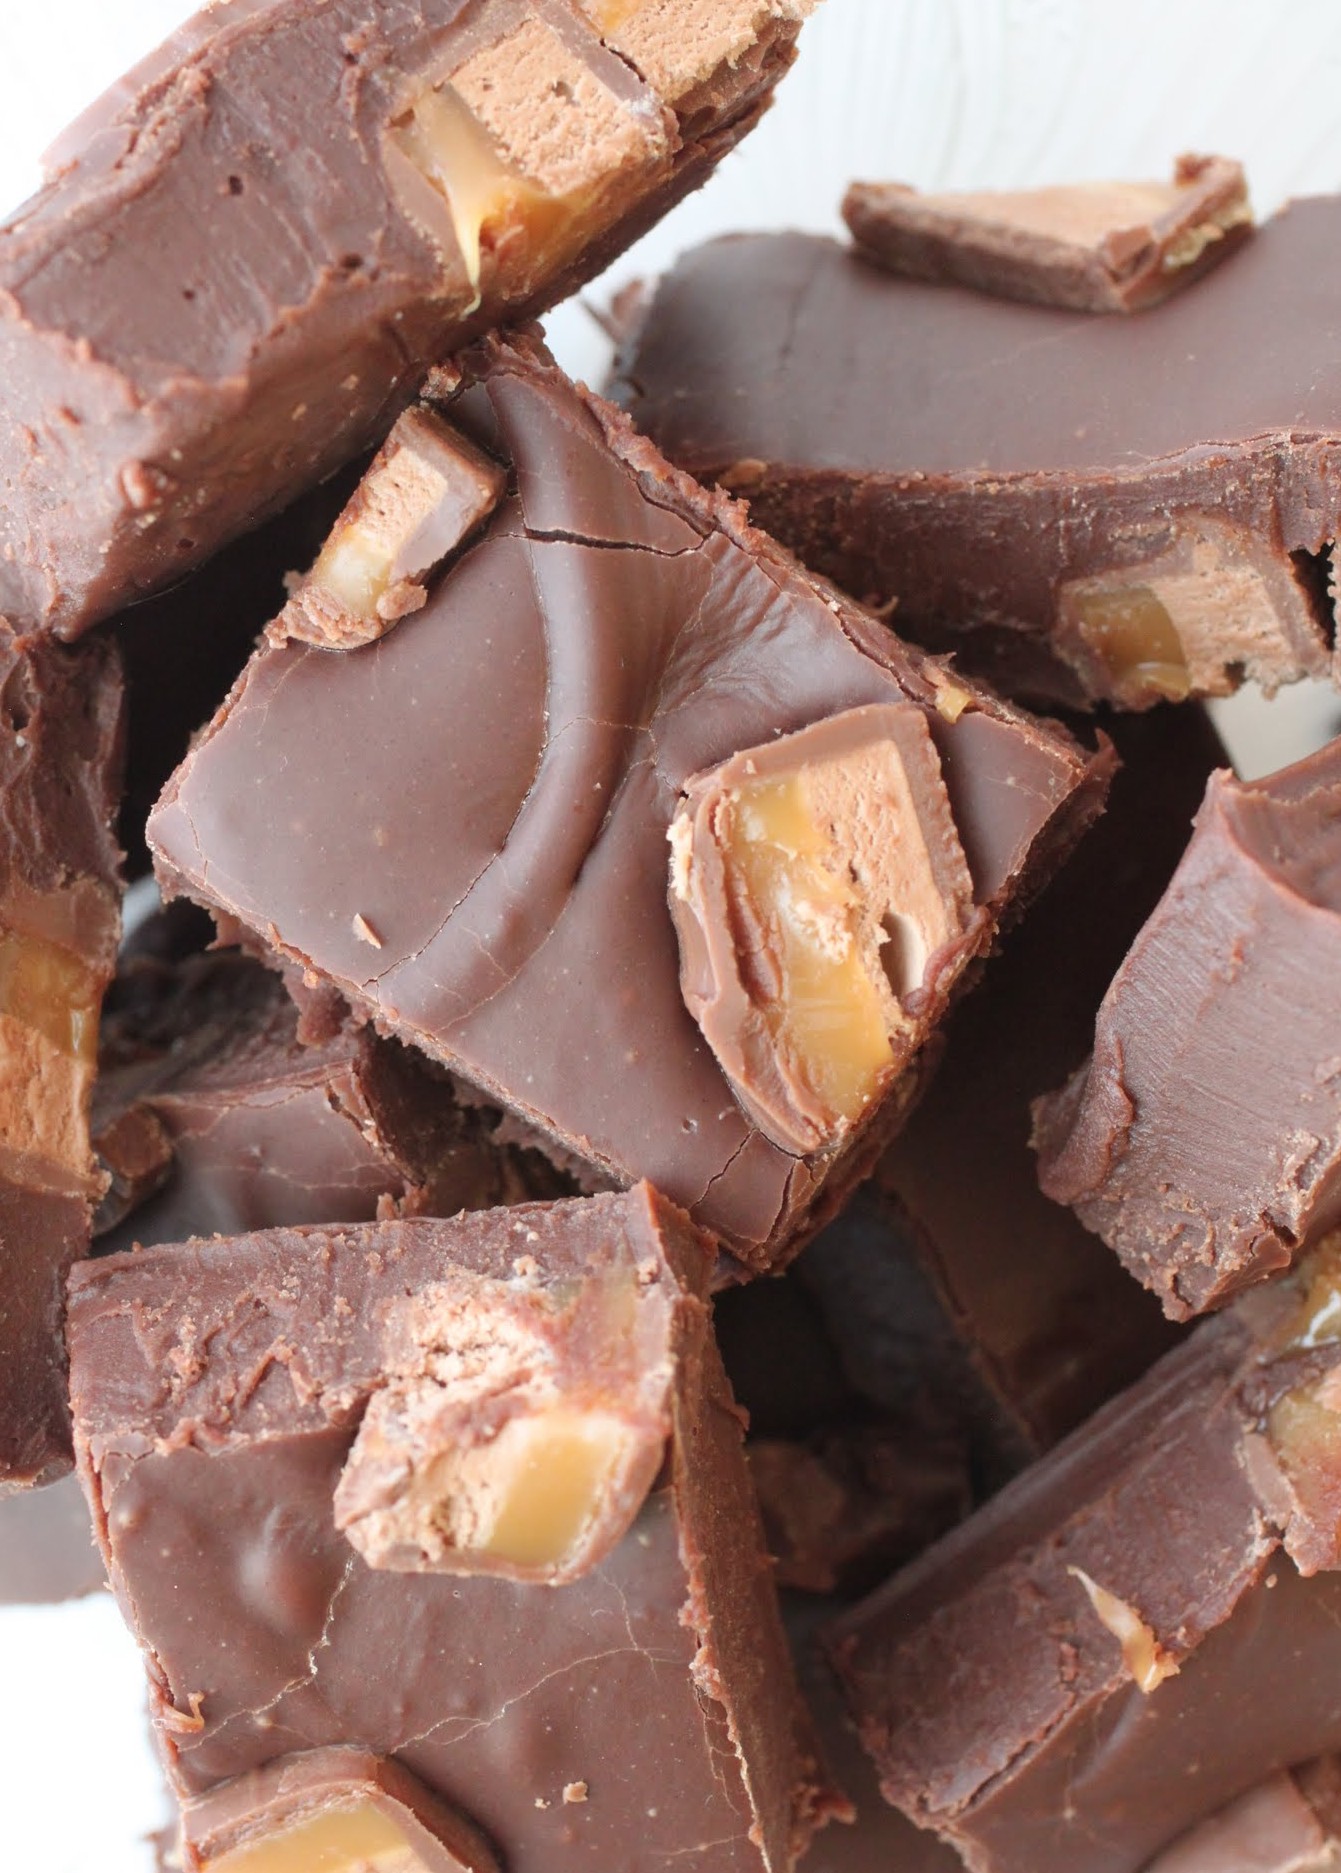
As long as we’re talking holidays, I might as well admit that I have some leftover Milky Way bars left over from Halloween. Or I should say, I had some. Now they’re all in this fudge!
Yesterday I had the most epic of baking fail days. We’ve all had them, and we pray that they’re few and far between. With this one, I actually wound up on the kitchen floor sobbing, while my daughter patted my back and said, “Mommy, just do it again.”
The “it” she was referring to was the cake I made three times in one day. Three. And it was a delicious cake all three times, but it seemed reluctant to get out of the pan without crumbling. On the final try, I was smart enough to use a different pan.
Still, by the time all was said and done, I was covered in a bag of flour (which exploded without any provocation whatsoever), there was a sink piled high with spatulas and mixing bowls, and I’d gone through a couple of pounds of butter. Thank heaven I know people who will eat the failed cakes so they don’t go to waste.
At the end of the day, the kitchen was clean, I had two packaged cakes ready to head to work, and one that didn’t fail. While I was proud of myself for not giving up, it was still way too tempting to stay on the kitchen floor and eat chunks of ugly failed cake.
We all have bad days, and I’m just lucky that when they happen, I have kids to pat me on the back and Kenny to play with them so I can keep on keeping on. Otherwise, the whole operation might fold and crumble.
In all my years of baking, fudge has never let me down, and I don’t expect it to. I love it too much, and I hope the feeling is mutual.
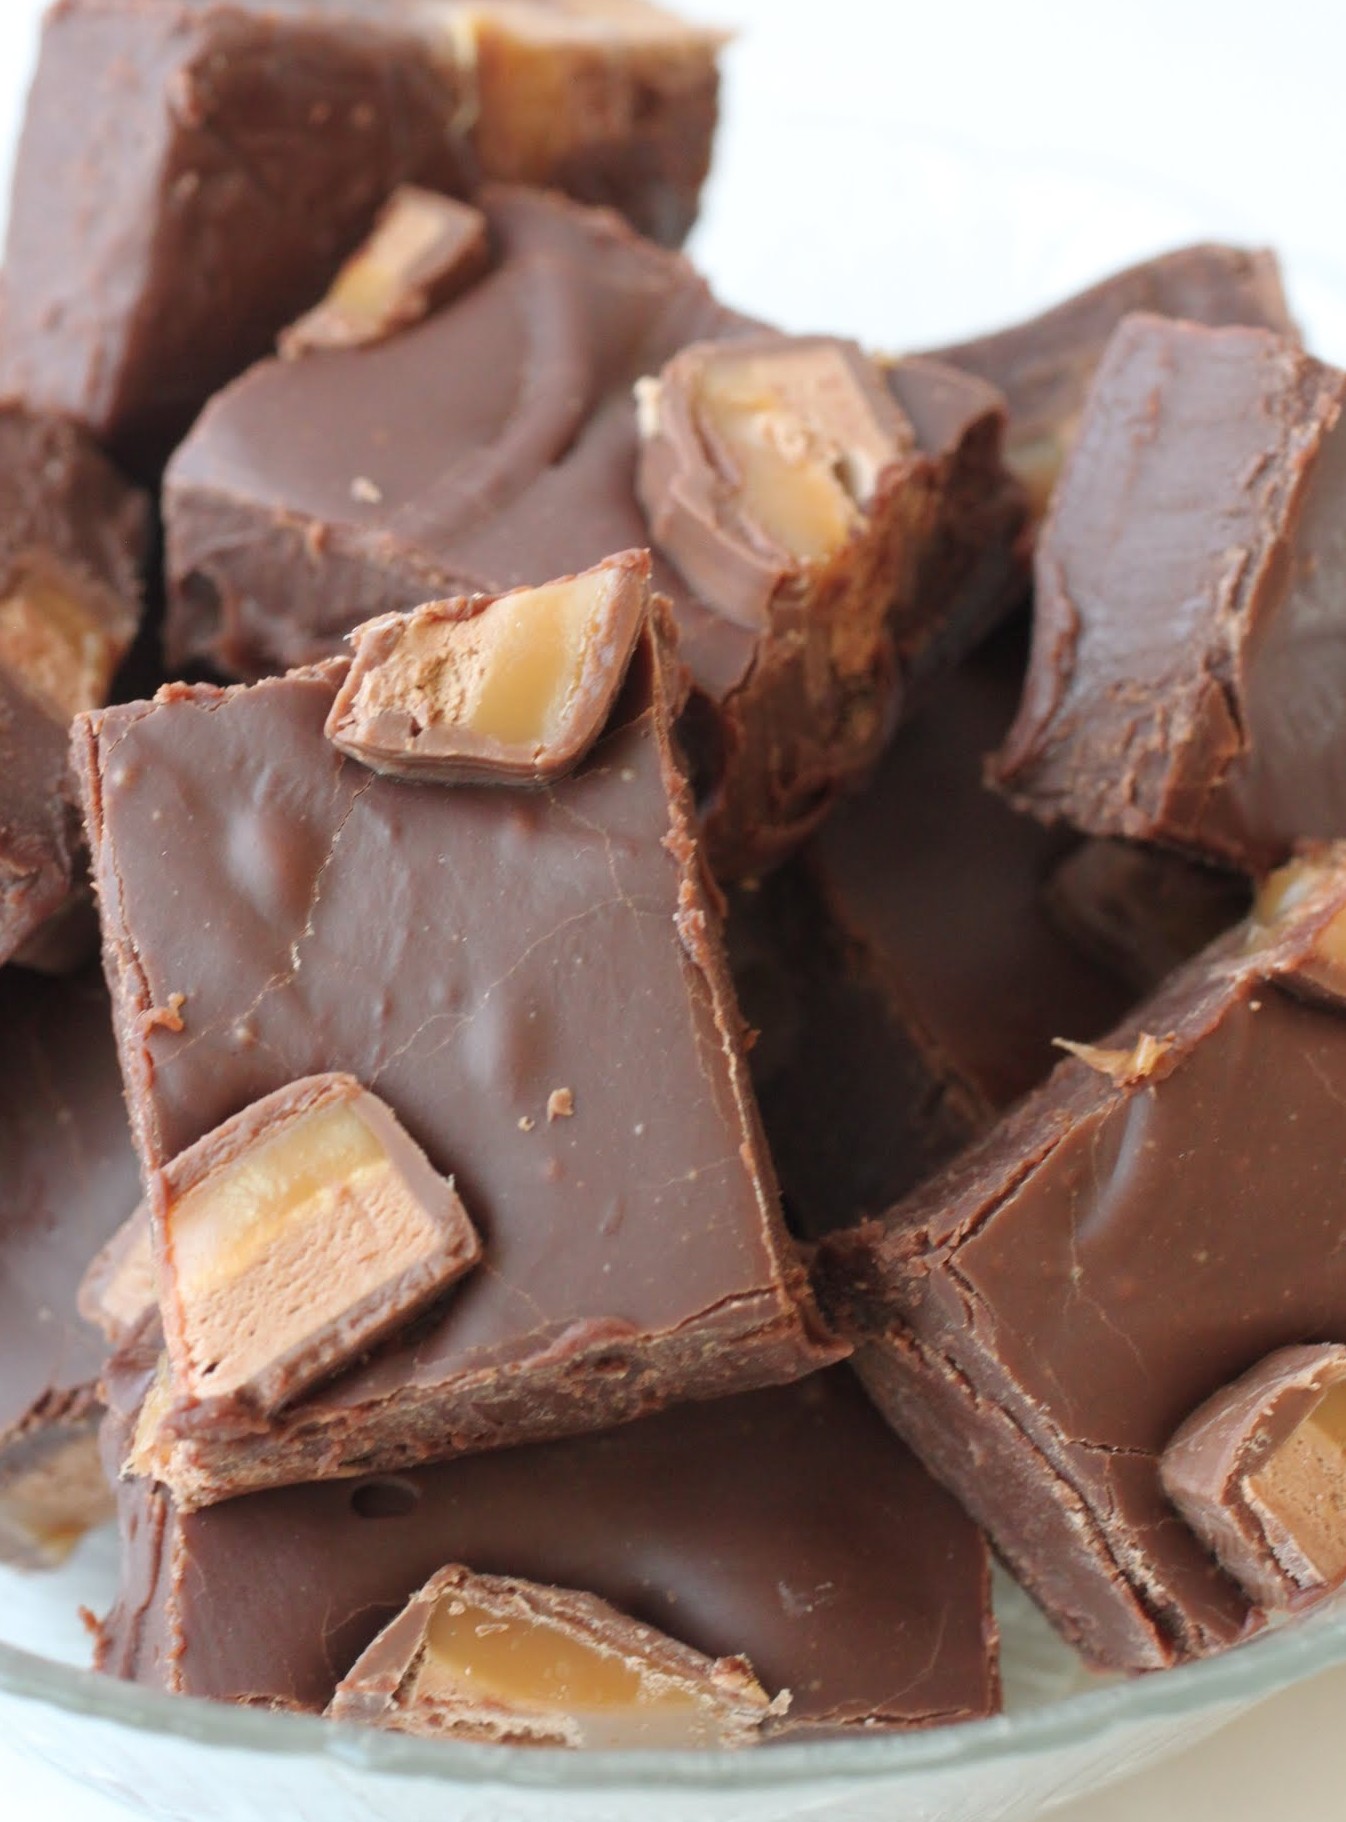
When you make this, be sure to use milk chocolate chips. Anything darker wouldn’t work as well with the creaminess of the Milky Way bars. And also be sure to layer half of the candy bars on the bottom evenly, to ensure a wonderful bite of Milky Way from top to bottom.
As the holidays near and our baking frenzies reach fever pitch, we’re all bound to have a few failures. I hope it doesn’t happen, but if it does, roll with it. Or cry on the kitchen floor, whichever suits you. The important thing is to eventually get up and keep baking!
Ingredients
Instructions
- Line an 8 x 8 pan with aluminum foil, using enough to hang over the sides. Coat with cooking spray.
- Layer half of the chopped Milky Way bars evenly along the bottom of the pan. Set aside.
- In a microwave-safe bowl, melt the chocolate chips and sweetened condensed milk together for two minutes.
- Remove and stir until smooth. Spread the fudge carefully over the Milky Way bars in the pan. Press another layer of Milky Ways on top of the chocolate fudge.
- Chill for 2-3 hours until set. Allow to come to room temperature. Cut into squares. Store in an airtight container.
]]>
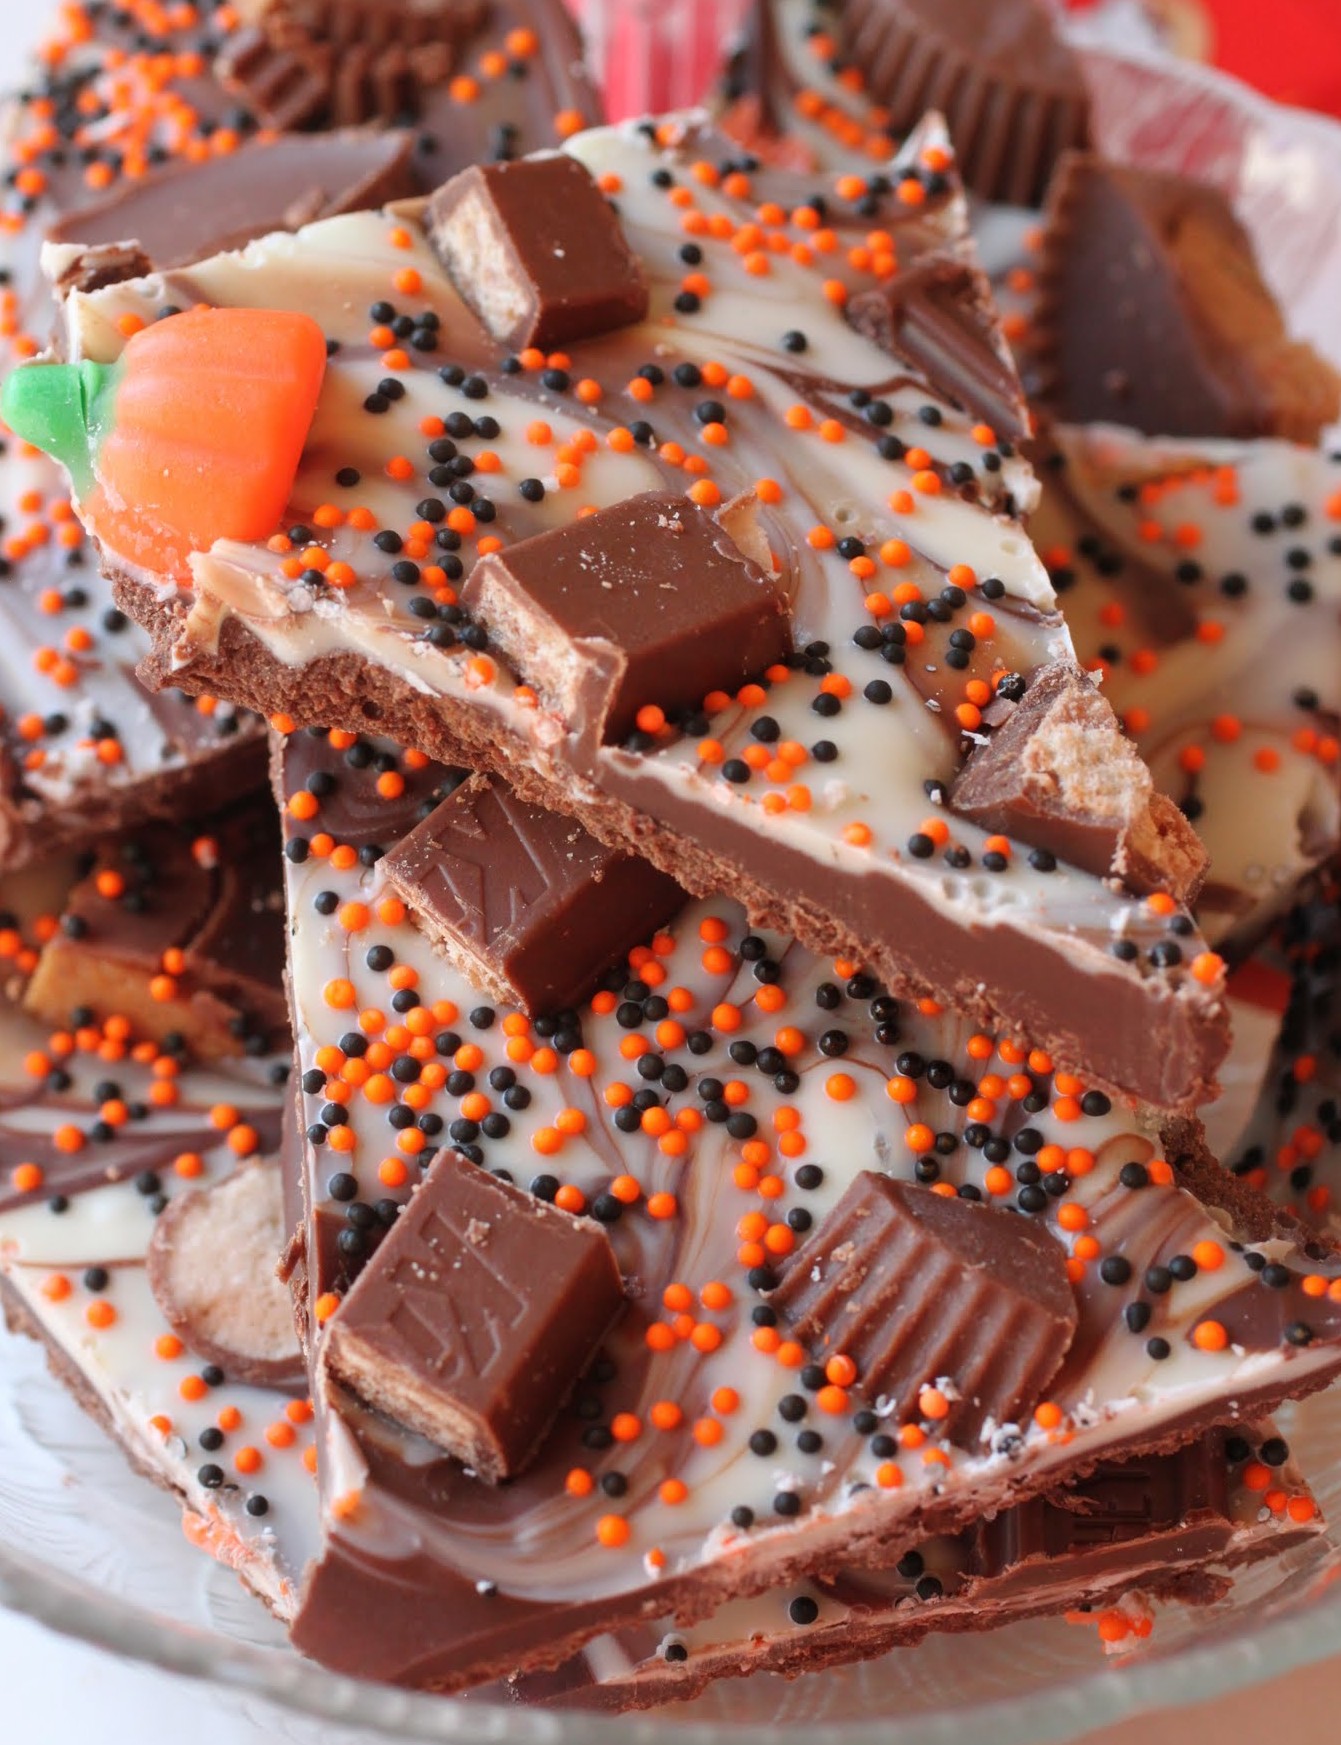
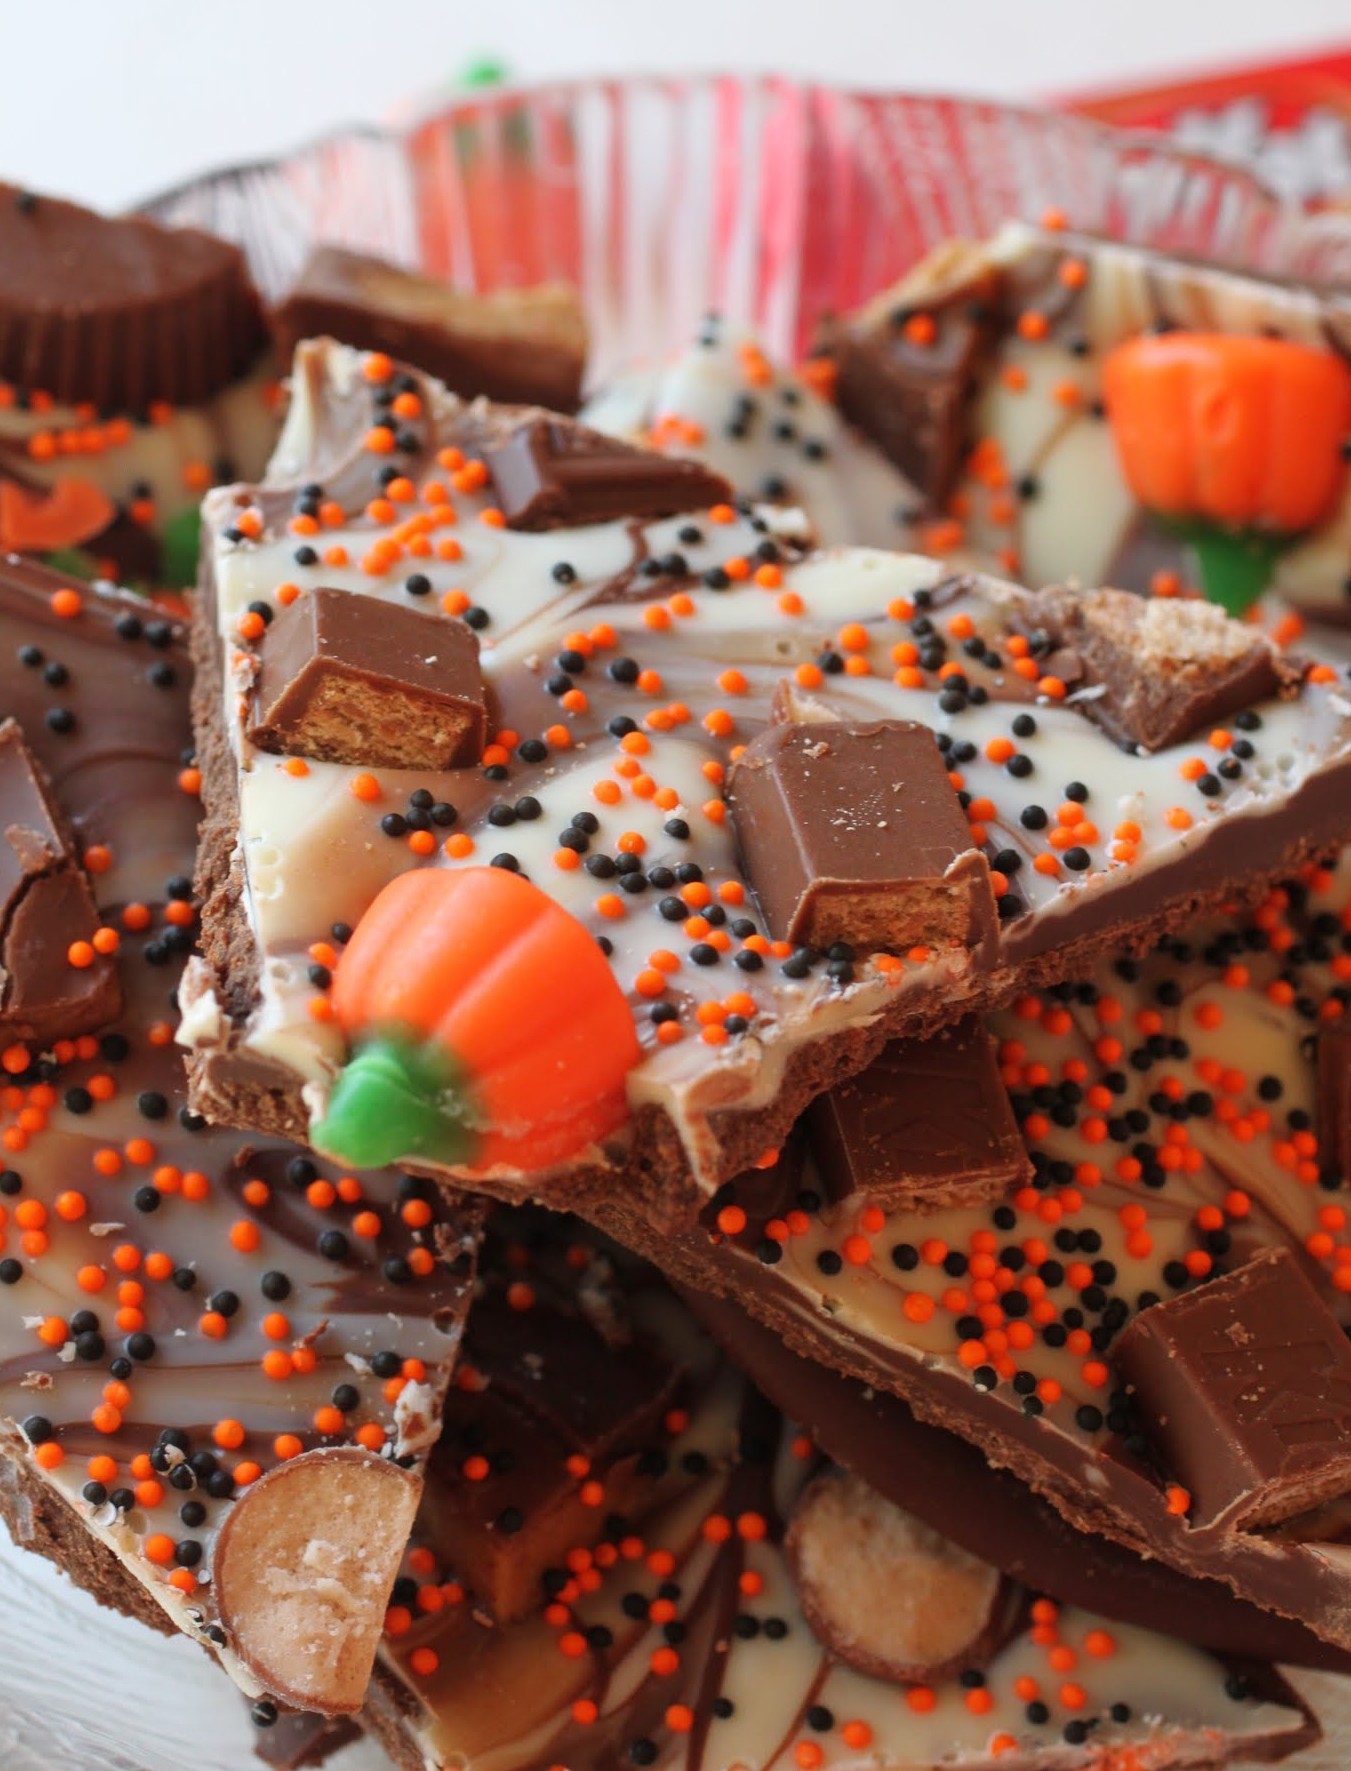
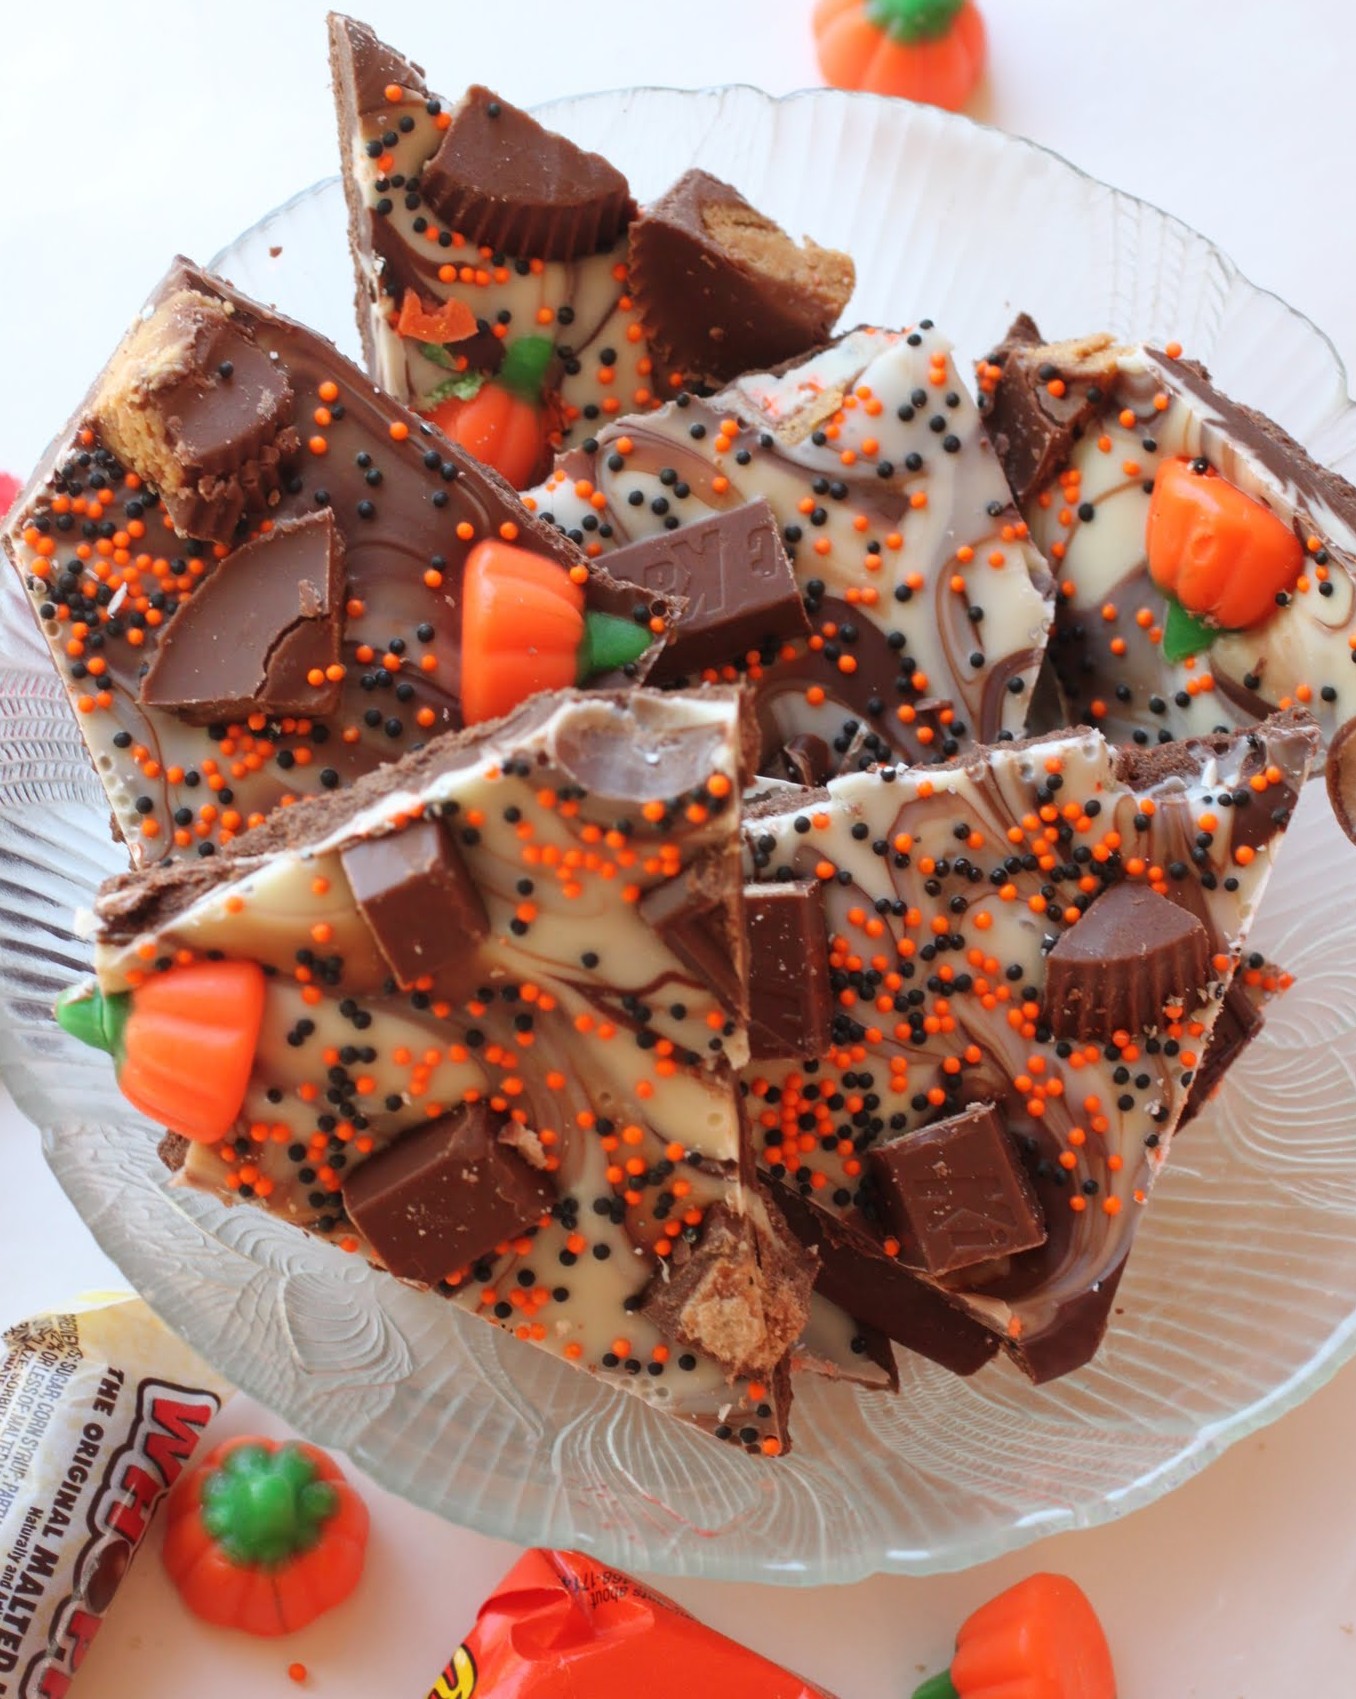
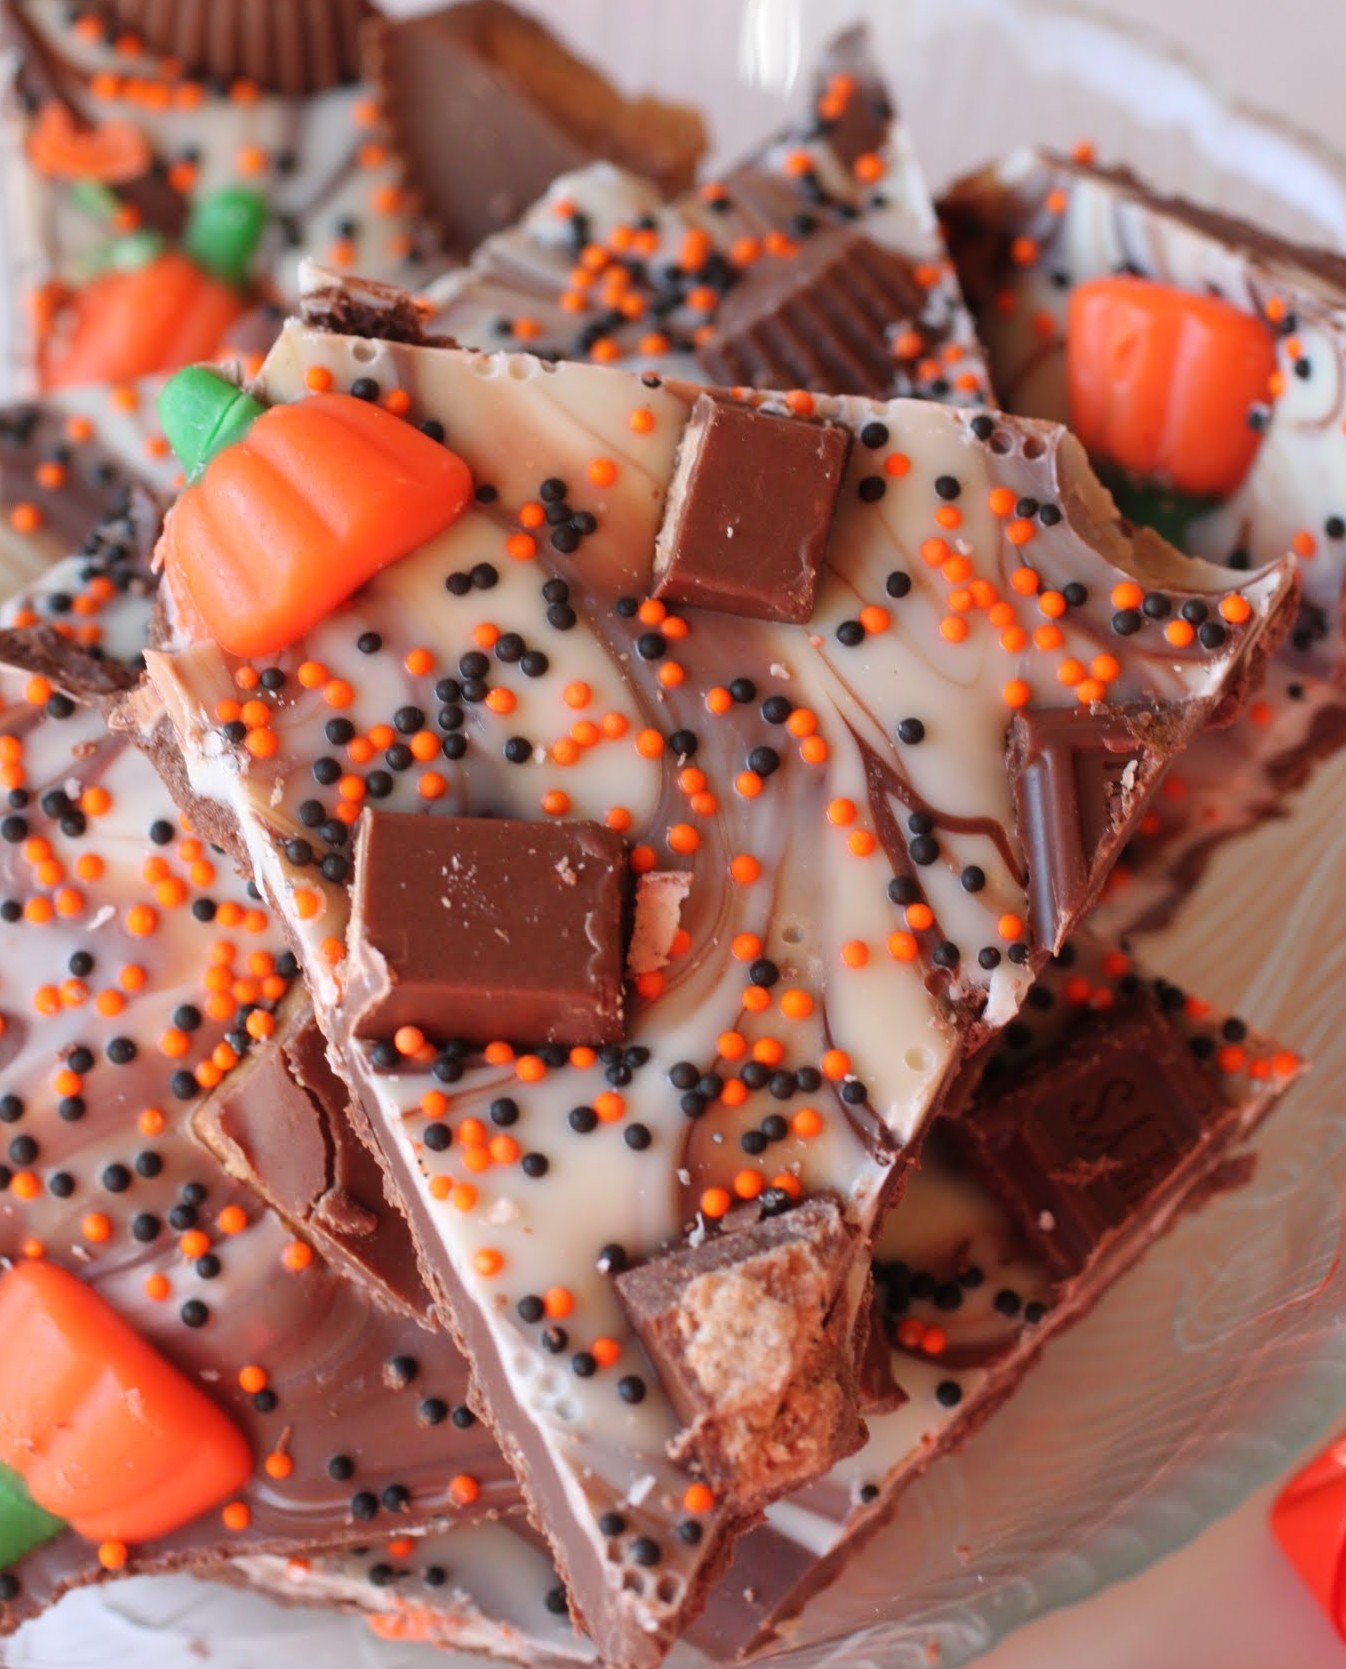
But if you use Halloween as an excuse, up the ante with some fabulous bark. It’s easy to make, not to mention easier to eat. And it’s full of Halloween candy!
Yep, you’ve got that right. Candy pumpkins, check. Kit Kats, check. Reese’s PB cups, check. Hershey bars, check. Whoppers, check. Oh, and let’s not forget about the lovely sprinkles. Or the milk and white chocolate swirly base. Now do I have your attention?
My attention has been wandering of late. It’s kind of hard to stay focused on any one thing. I read an article a few years back that tried to prove that while men like to focus on one thing at a time, women are more cognitively apt to try and do many things at the same time. In other words, women are natural multitaskers. Which means that as I’m writing this, I have a pie in the oven, a pile of laundry next to me that I fold between sentences, and a child asking me questions in my right ear that I may or may not be answering.
Any number of experts will inform us that when we try to do several things at the same time, none of them get done well. Those experts can kiss my a$$. Ask them how daily to-do lists can get accomplished by doing one thing at a time, and see what they say. Unless your daily list has about three items on it, I don’t see how that can work.

Before we had children (i.e., B.C.), Kenny and I would talk around 11:30 each workday morning. Our phone conversations would go like this:
Kenny: How’s your day going?
Mir: It’s cool. I’m getting a ton done. I’m so tired.
Kenny: Really? It’s only 11:30!
Mir: It’s my lunchtime. I’ve already taught for four straight hours, paid the bills and made a doc appointment. What are you up to?
Kenny: Um…I took a shower.
Yep, those were the days. But Kenny, in all his manly glory, never felt bad about easing into his day and not getting each item duly checked off the to-do list that, admittedly, I created for him. And he still doesn’t really mind. I’m pretty jealous.
One thing I wonder about is whether doing so many things at one time is bad for the attention span. I do know that I’m very guilty of only half-listening to anything a child of mine is asking at any given time. Which is why these conversations happen:
Boy, Age Seven: Mommy, can I take the bag of lollipops upstairs to my room?
Mir: (absently) Sure, honey. (a minute passes) Wait, what?!
See? Not paying full attention is dangerous. Or if you’re my kid, it’s pretty great. The Boy had a whole bag of Dum-Dums up in his room (and was partway into his second) before I realized I’d been checked out.
Whenever I eat dessert, though, I try to make mindfulness a priority. I really focus on whatever is going into my mouth, and then it’s an even better experience. To be completely clear, I had no trouble whatsoever focusing on this Halloween candy bark. How could I think about anything else?
The base of this bark is milk chocolate (my personal favorite, so my apologies to you foodies who love the 90% dark), swirled with some white chocolate. On top, I piled all of my favorite chocolate bar goodness, plus those cute little candy pumpkins. I can never resist adorable.
Bark is a really great solution to the question, “I’ve got five minutes and fifty things to do, and I need to produce a treat for my kid’s class/my office party/my own sanity. What can I bake?”
In other words, this stuff comes together fast. Chill time is another matter, but 30 minutes in the fridge and you’re good to go.
My older daughter just walked up to me and asked me for tape. I have no idea why she wanted tape, but I was distracted, so I gave it to her. Why do I feel like my divided attention is going to result in my getting very upset in just a few minutes’ time? But that’s the price of multitasking!
At least I can focus on dessert. That’s really the important thing, anyway. Everything else can get done with little bits of my focus. It’s all about priorities!
Ingredients
Instructions
- Line a cookie sheet with parchment paper or a silicone baking mat. Set aside.
- In a microwave-safe bowl, heat the chocolate chips for one minute. Stir. If not smooth and melted, heat an additional 20 seconds. Stir until smooth.
- Spread out the milk chocolate to about 1/2-inch thickness. Don't go too thin, or the bark won't be as good.
- In a separate bowl, heat the white chocolate chips for 40 seconds. Stir, and if not melted, heat an additional 20 seconds. Stir until smooth.
- Drop the white chocolate by spoonfuls gently onto the milk chocolate. Using a knife, swirl the melted white chocolate gently into the milk chocolate. Do not overdo it, or your bark will become one uniform muddy color.
- Sprinkle the chopped candy bars evenly over the bark, being sure to distribute each kind of candy bar equally over the top. Add the sprinkles.
- Chill the bark for 30 minutes. Break into pieces. Store in an airtight container. If you're worried about melting, keep it in the refrigerator until shortly before serving.
]]>
If you are getting excited, join me. I’m pretty psyched about these. You see, I’ve never been much of a muffin girl. To me, a muffin is a cupcake without frosting. Yes, I know that’s technically wrong, but whatever.
When a muffin gets to emulate one of my favorite dessert bars, though, I’m down. These are the best dang muffins I’ve had in many a day.
Breakfast is very much about sweet cravings for me. I went through a period of making little egg muffins that were super-healthy and packed with veggies for my morning meal. They were definitely satiating, but there is a huge difference between being full and being satisfied.
Ever wonder why you eat when you’re full? It’s because you’re not satisfied, and that is very much an in-your-head kind of problem. I spent years chomping on sugar-free gum to get that sweet fix after a meal when it would have been much more practical to eat some chocolate. It just took me a while to realize that being full doesn’t mean that I should automatically be happy with my meal.
Every day, I see people at work eating the lunches they think they should eat, not the lunches they want to eat. The result? A lack of satisfaction, of course, which leads to after-work snacking and dinners that are less than ideal. We’re so busy thinking about what we should be eating that we’ve forgotten to listen to our own bodies.
My body wants sugar in the morning, so I finally gave up the egg muffins and usually, breakfast is a protein bar that has either chocolate or peanut butter flavors, if not both. The protein bar is processed, but it fills me up and, more important, I don’t feel like running toward the nearest cookie after it’s eaten.
Not that I don’t eventually get my cookie. I’ve learned that listening to my cravings is essential for keeping things in balance. But if I can have a cookie with lunch, and some chocolate between lunch and dinner, I don’t need that gum.
Believe me, I’m no dietary expert or nutritionist. But common sense dictates that saying no to food will send you rushing toward forbidden fruit faster than a Kardashian rushes to a plastic surgeon.
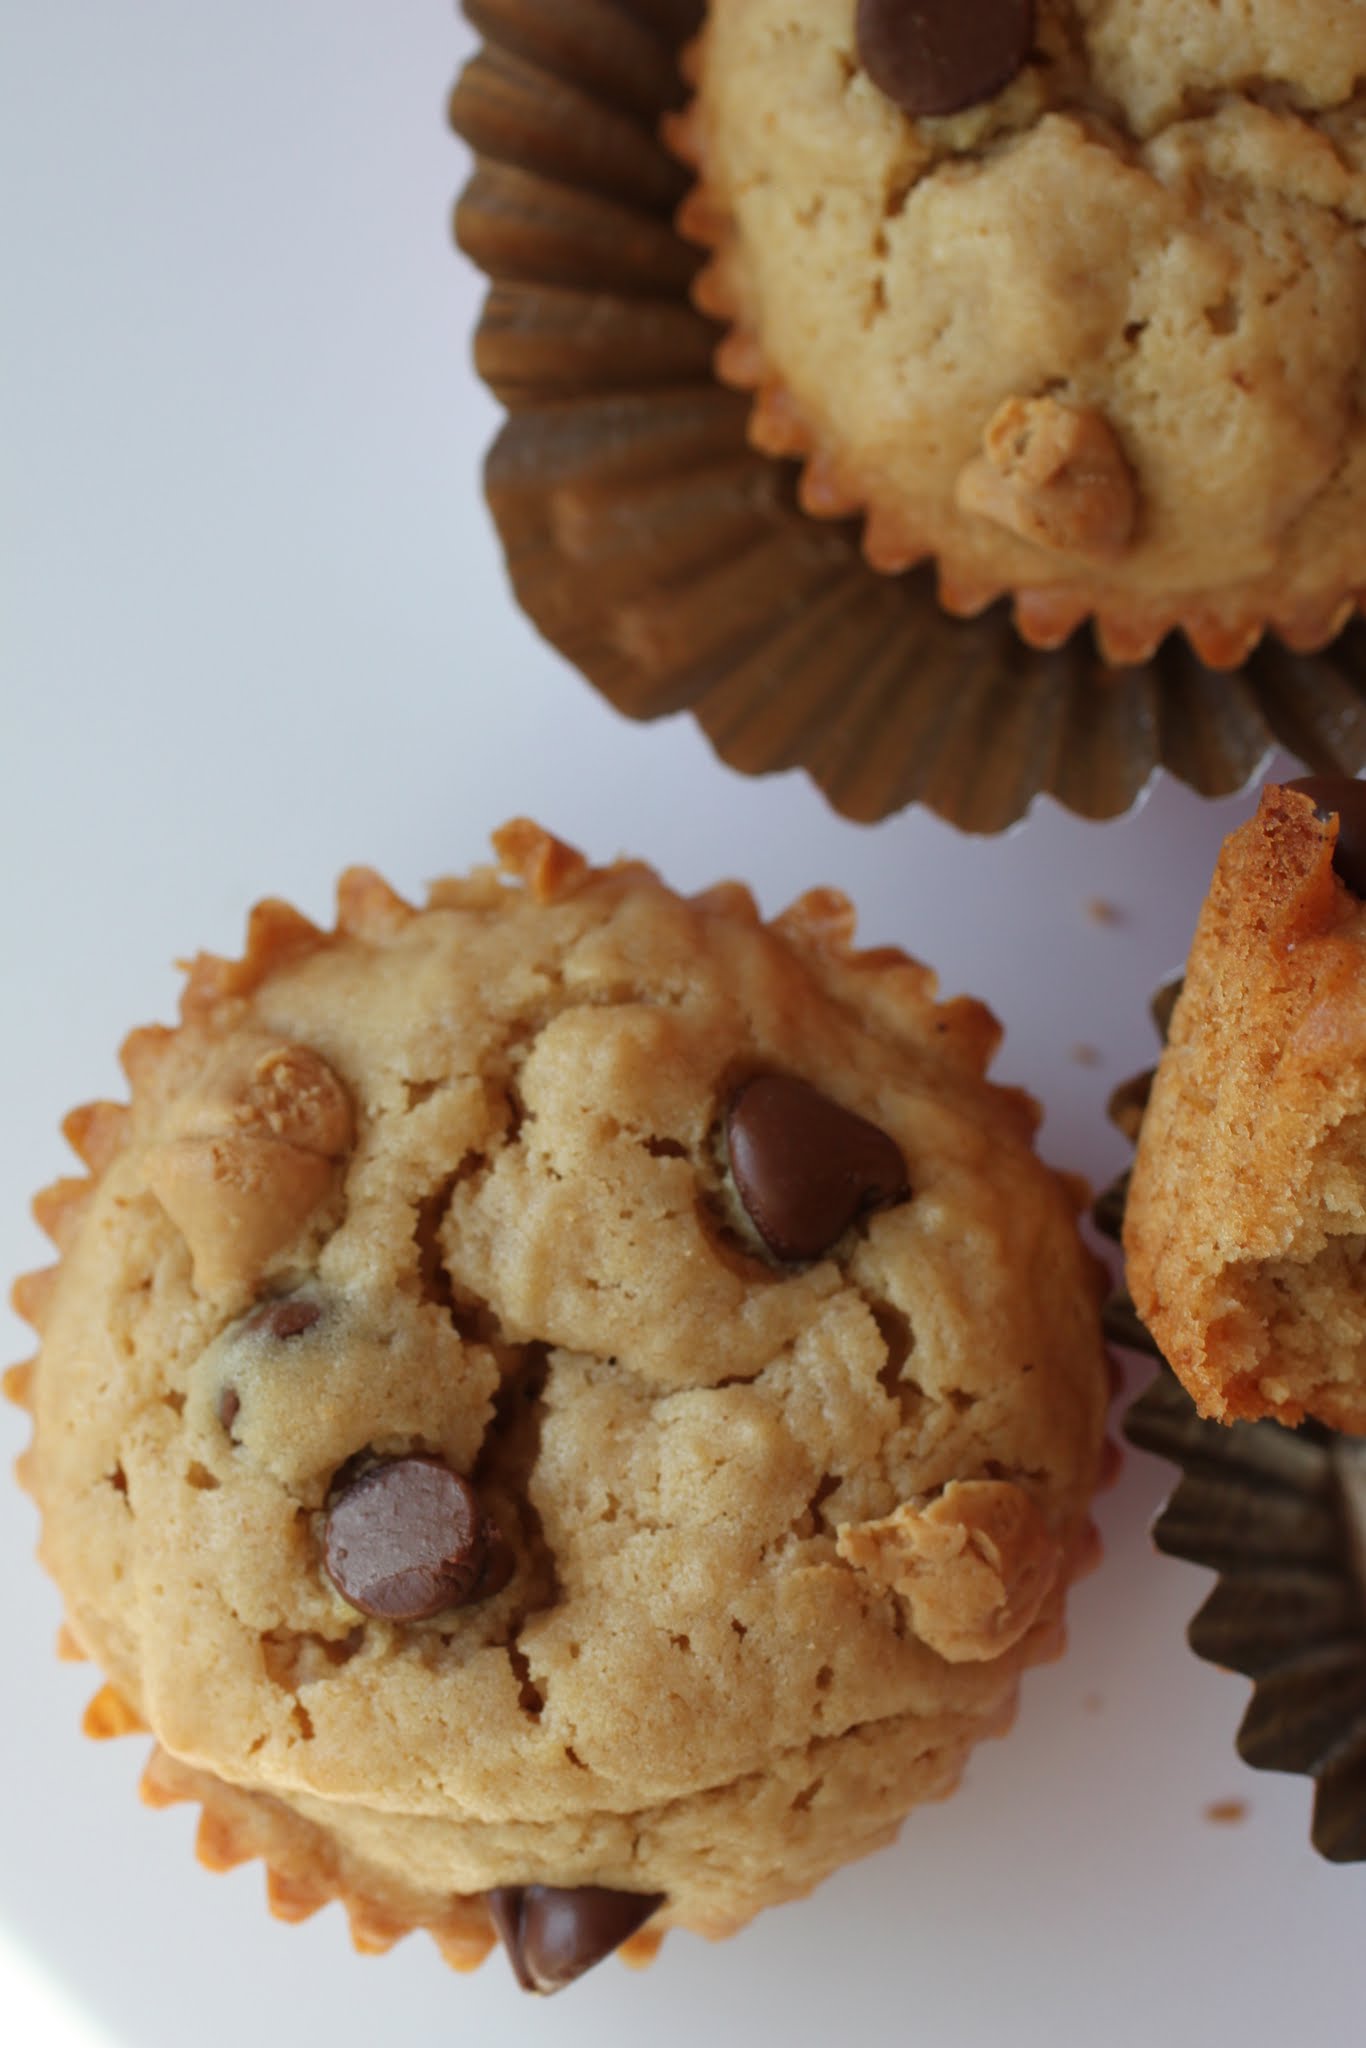
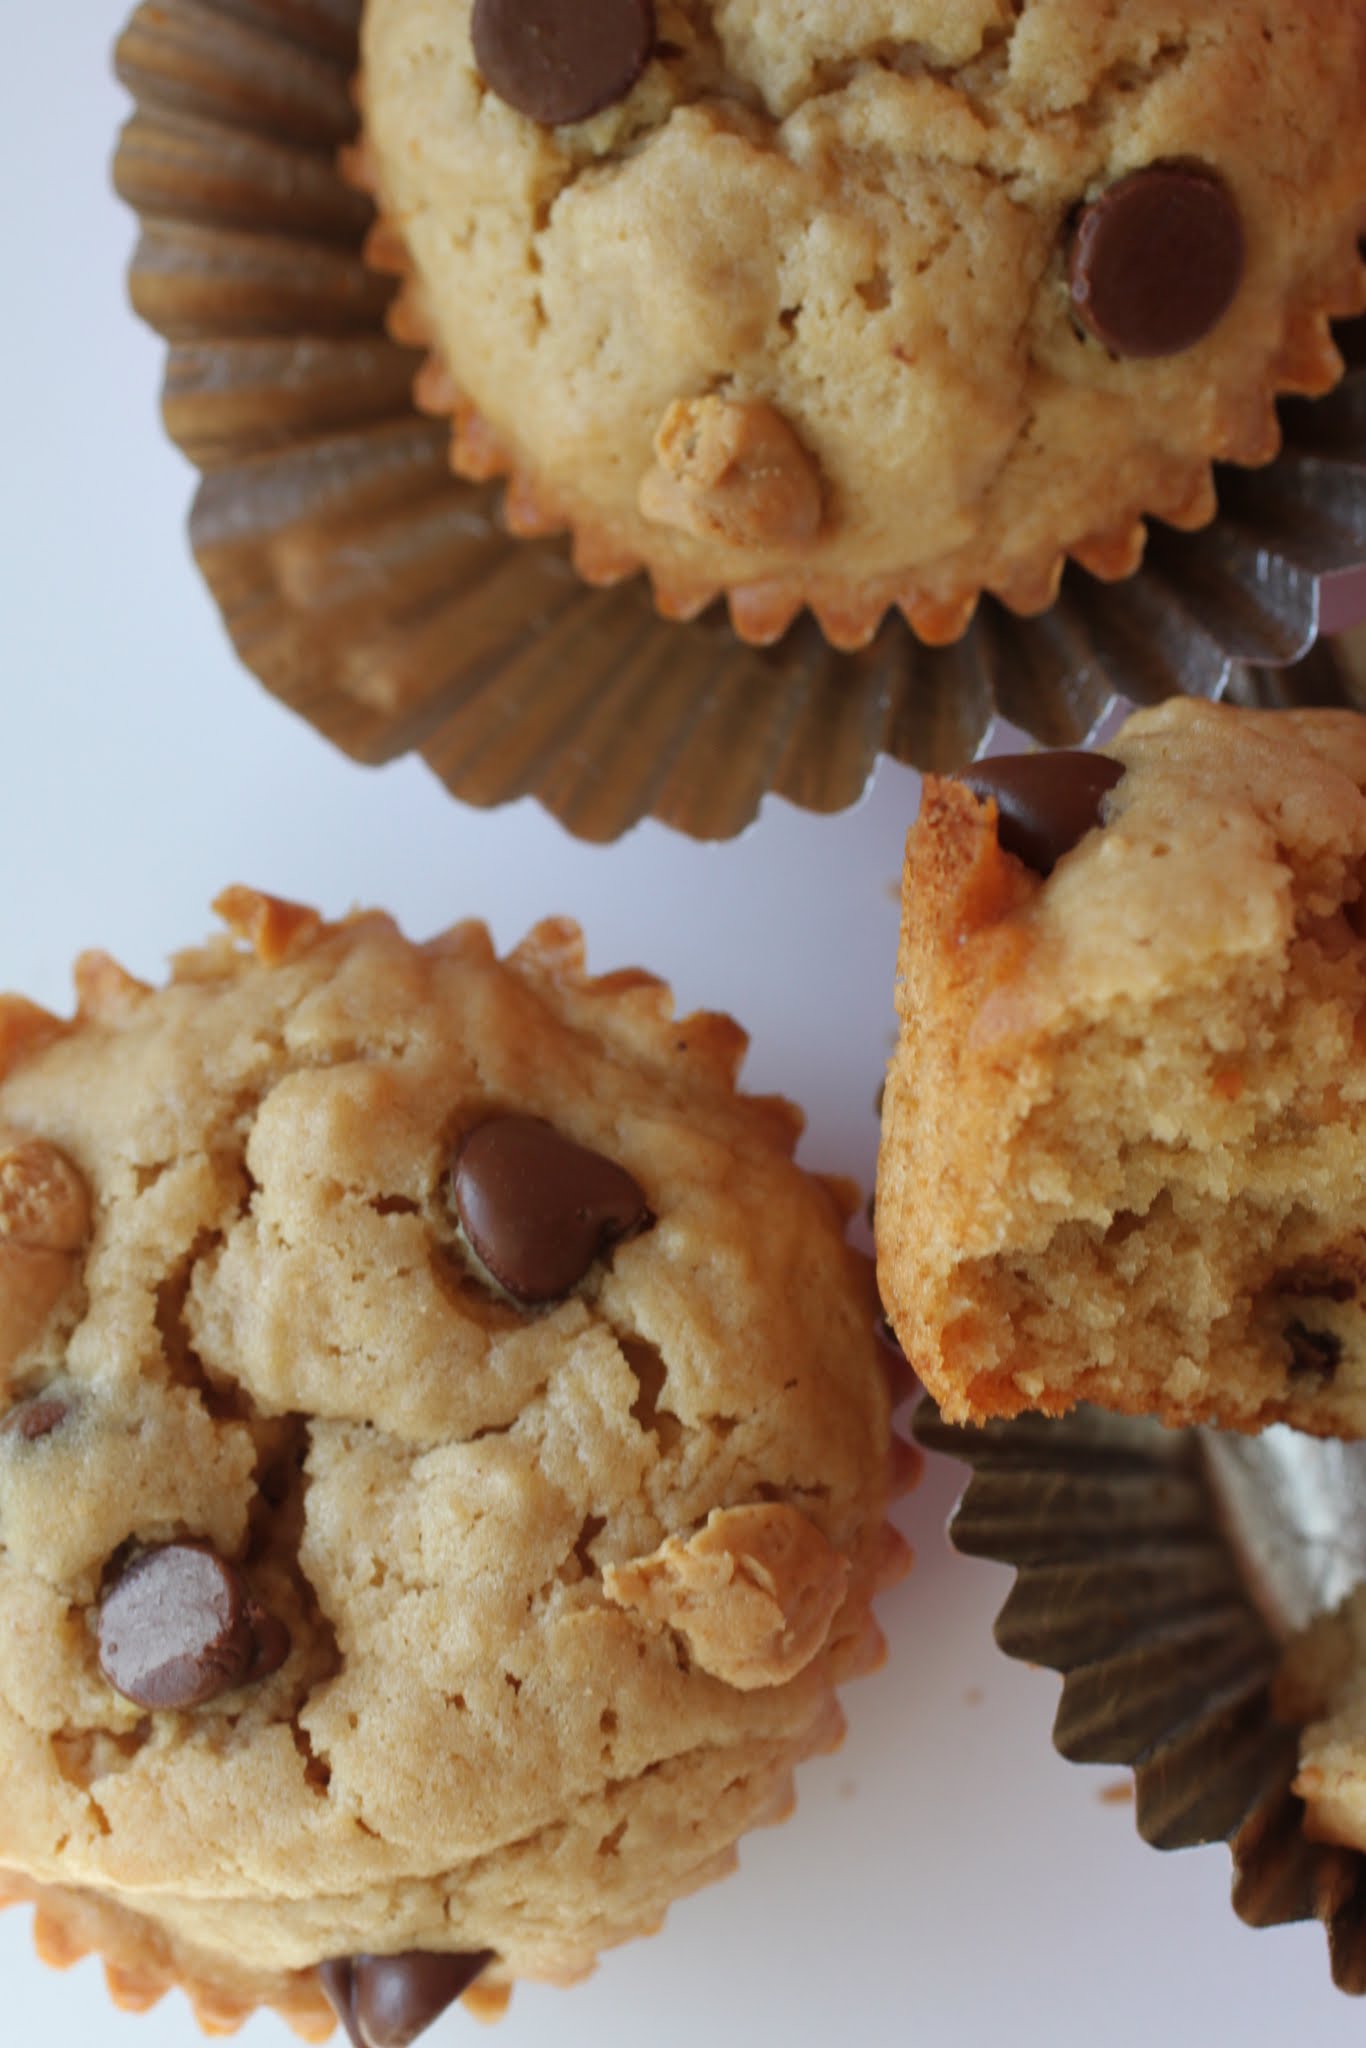
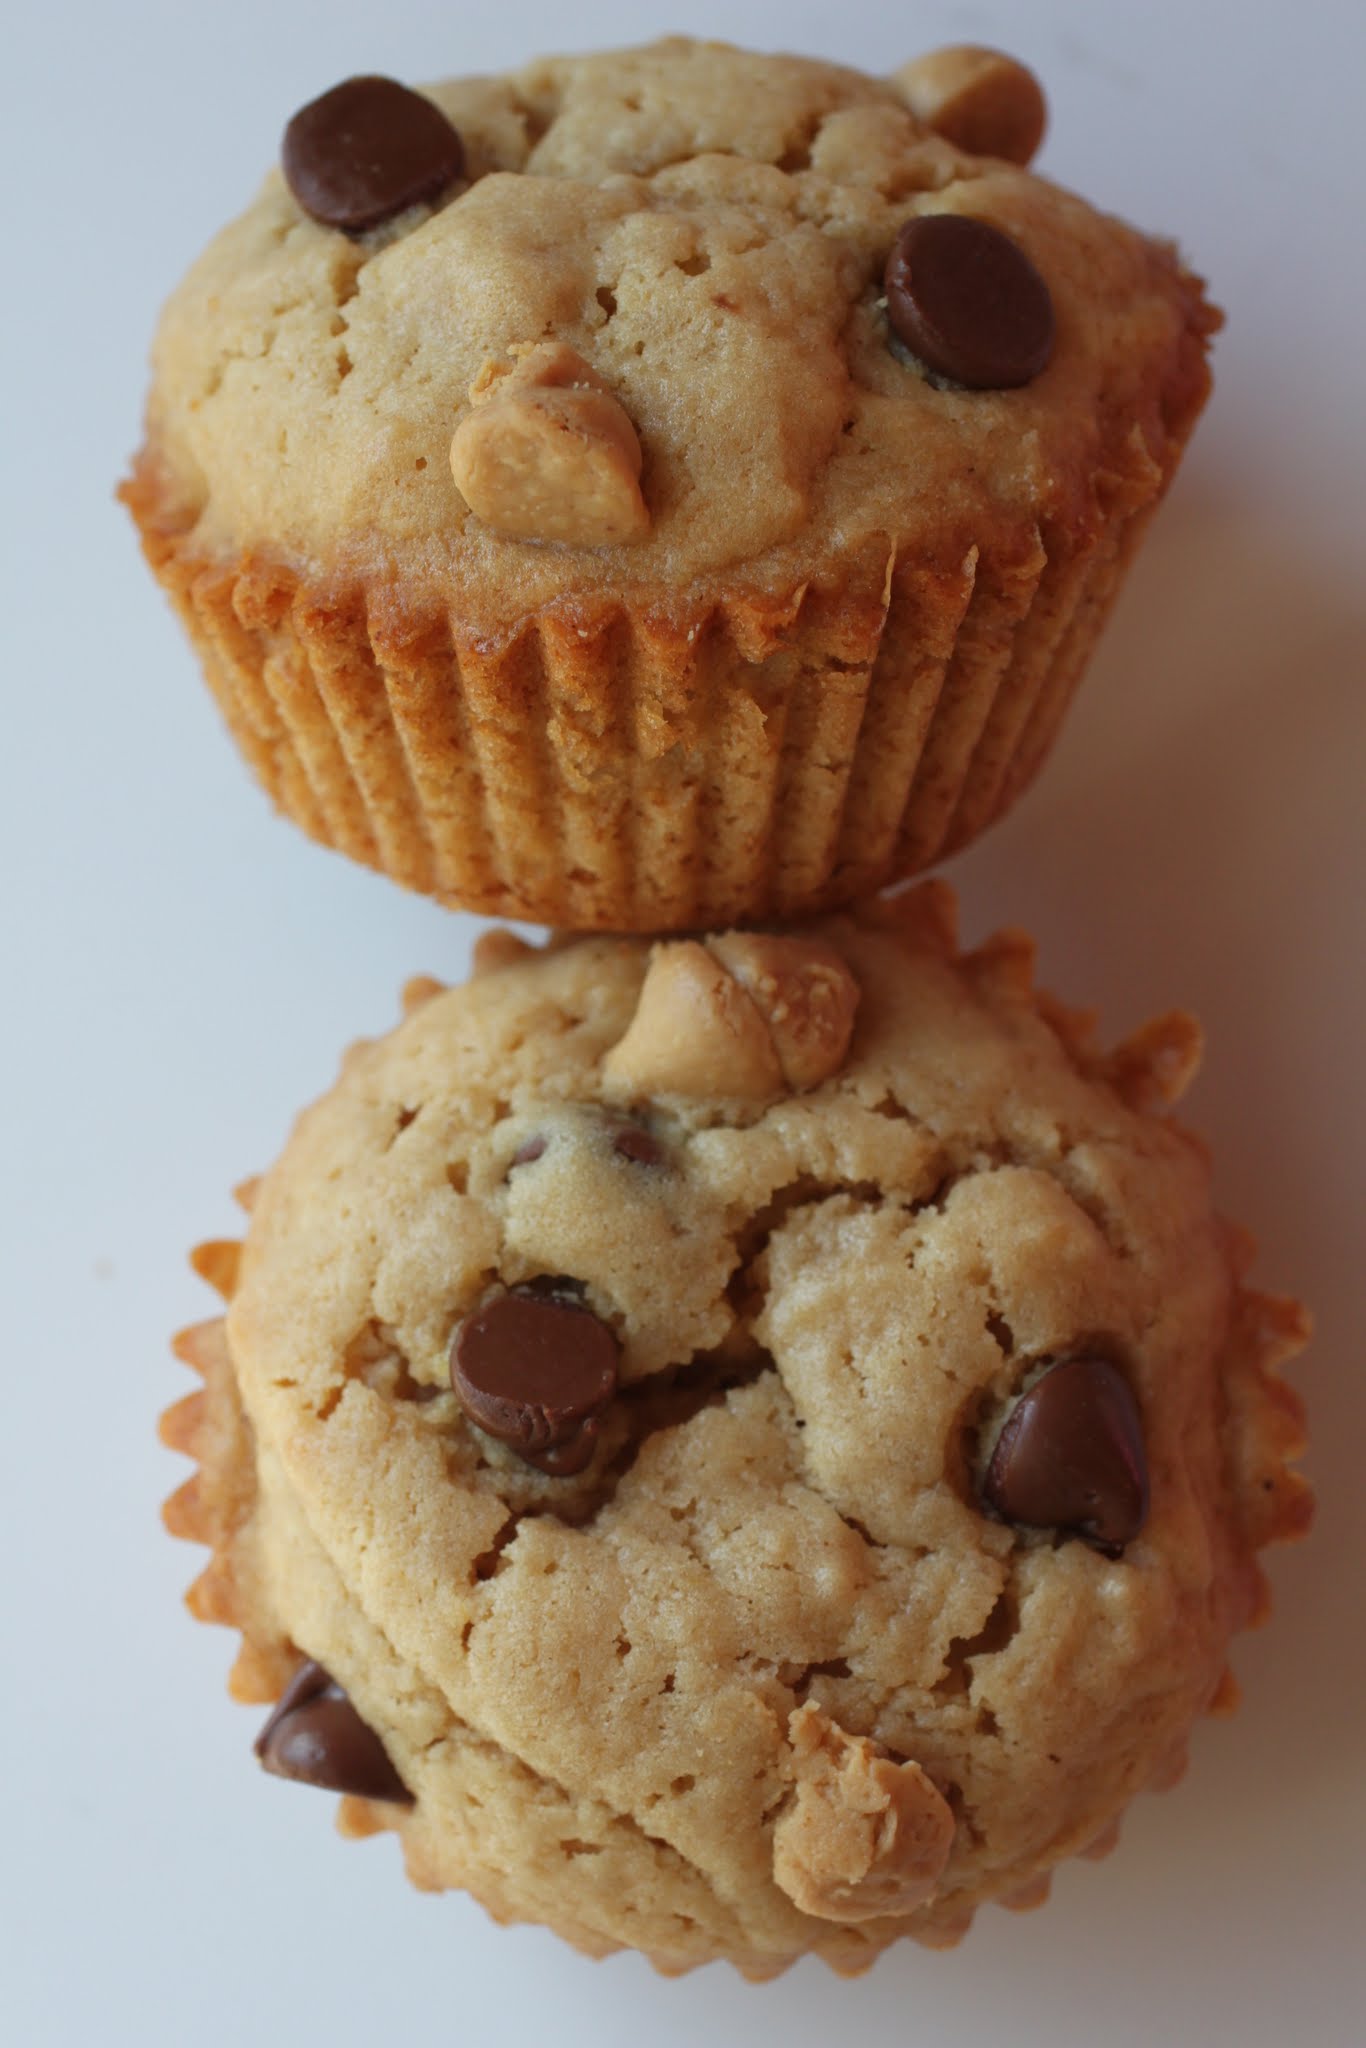
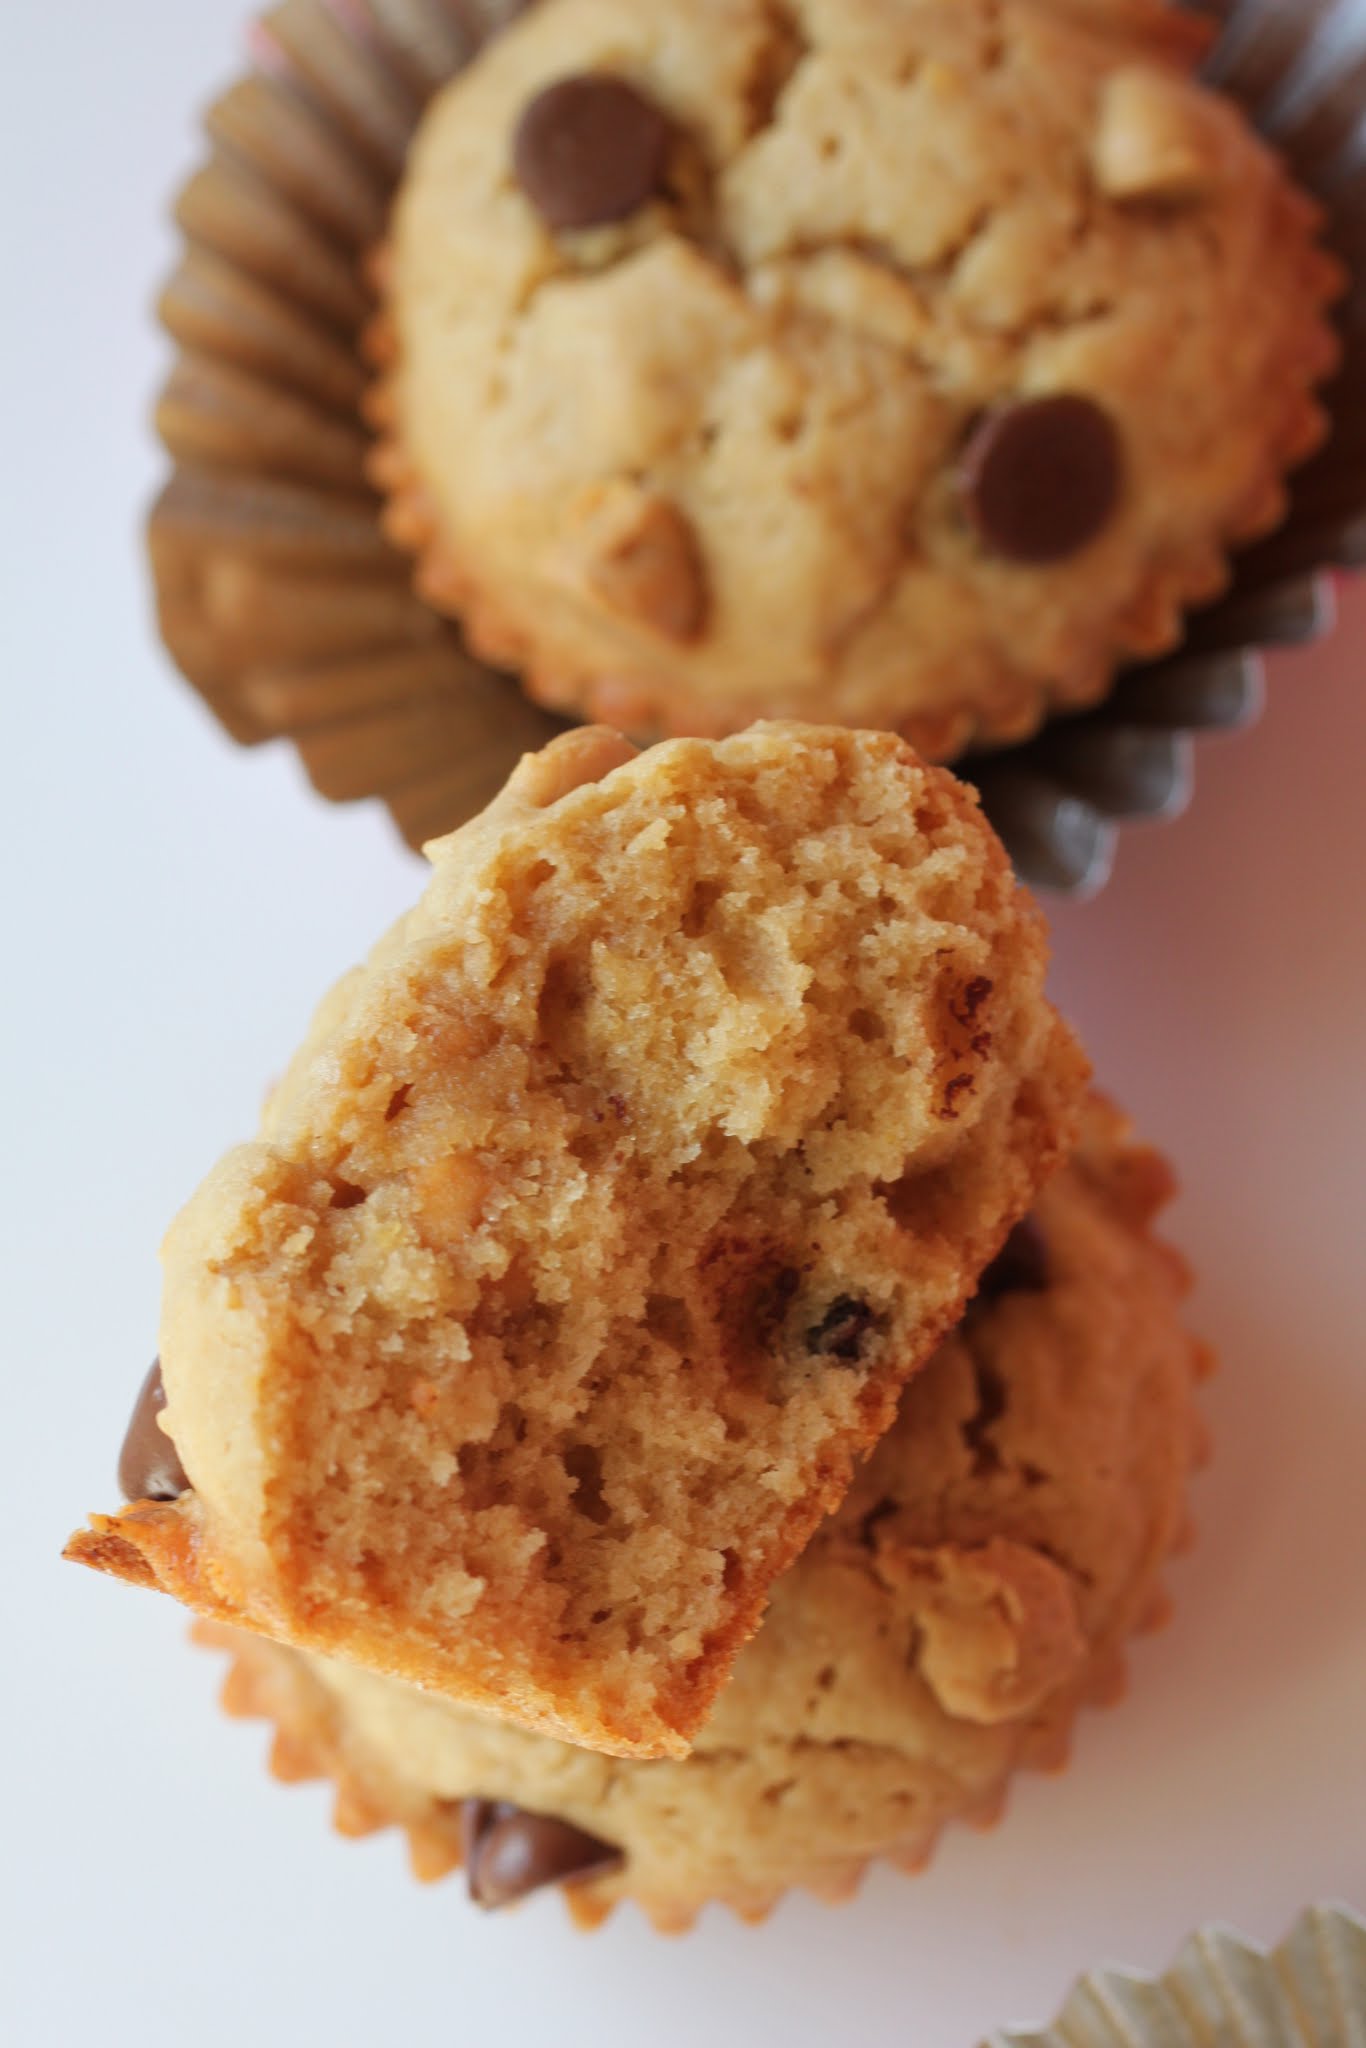
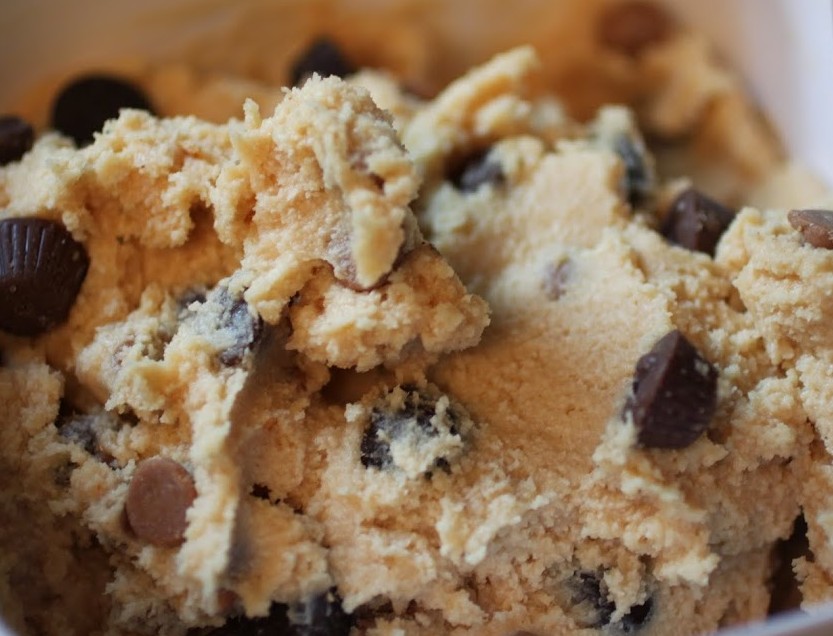
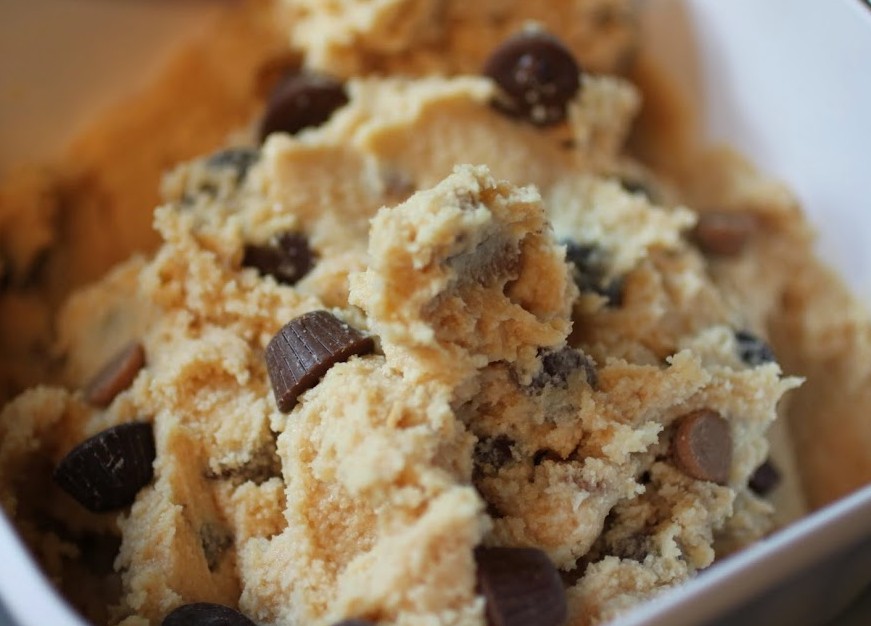
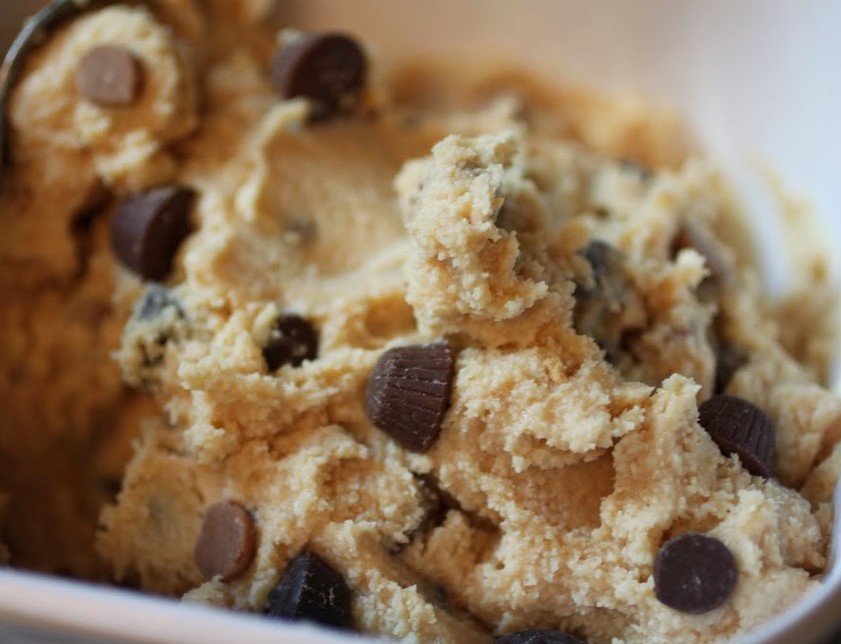
And I can’t say no to all the food I make. These peanut butter blondie muffins are a classic example. I bake them and think they’ll be great but resistible, and then I try them. Needless to say, when I shared these at work, they went fast. One coworker kept trying to eat pieces, and then she threw in the towel and ate the whole muffin. And maybe another one. Because that’s what dessert demands!
These are a one-bowl deal, and about as easy as it gets. But be advised: these muffins are not healthy. They are based in peanut butter chips, not peanut butter. So don’t for a second think that you’re getting your daily protein. Nope. That’s for your meals. This is dessert!
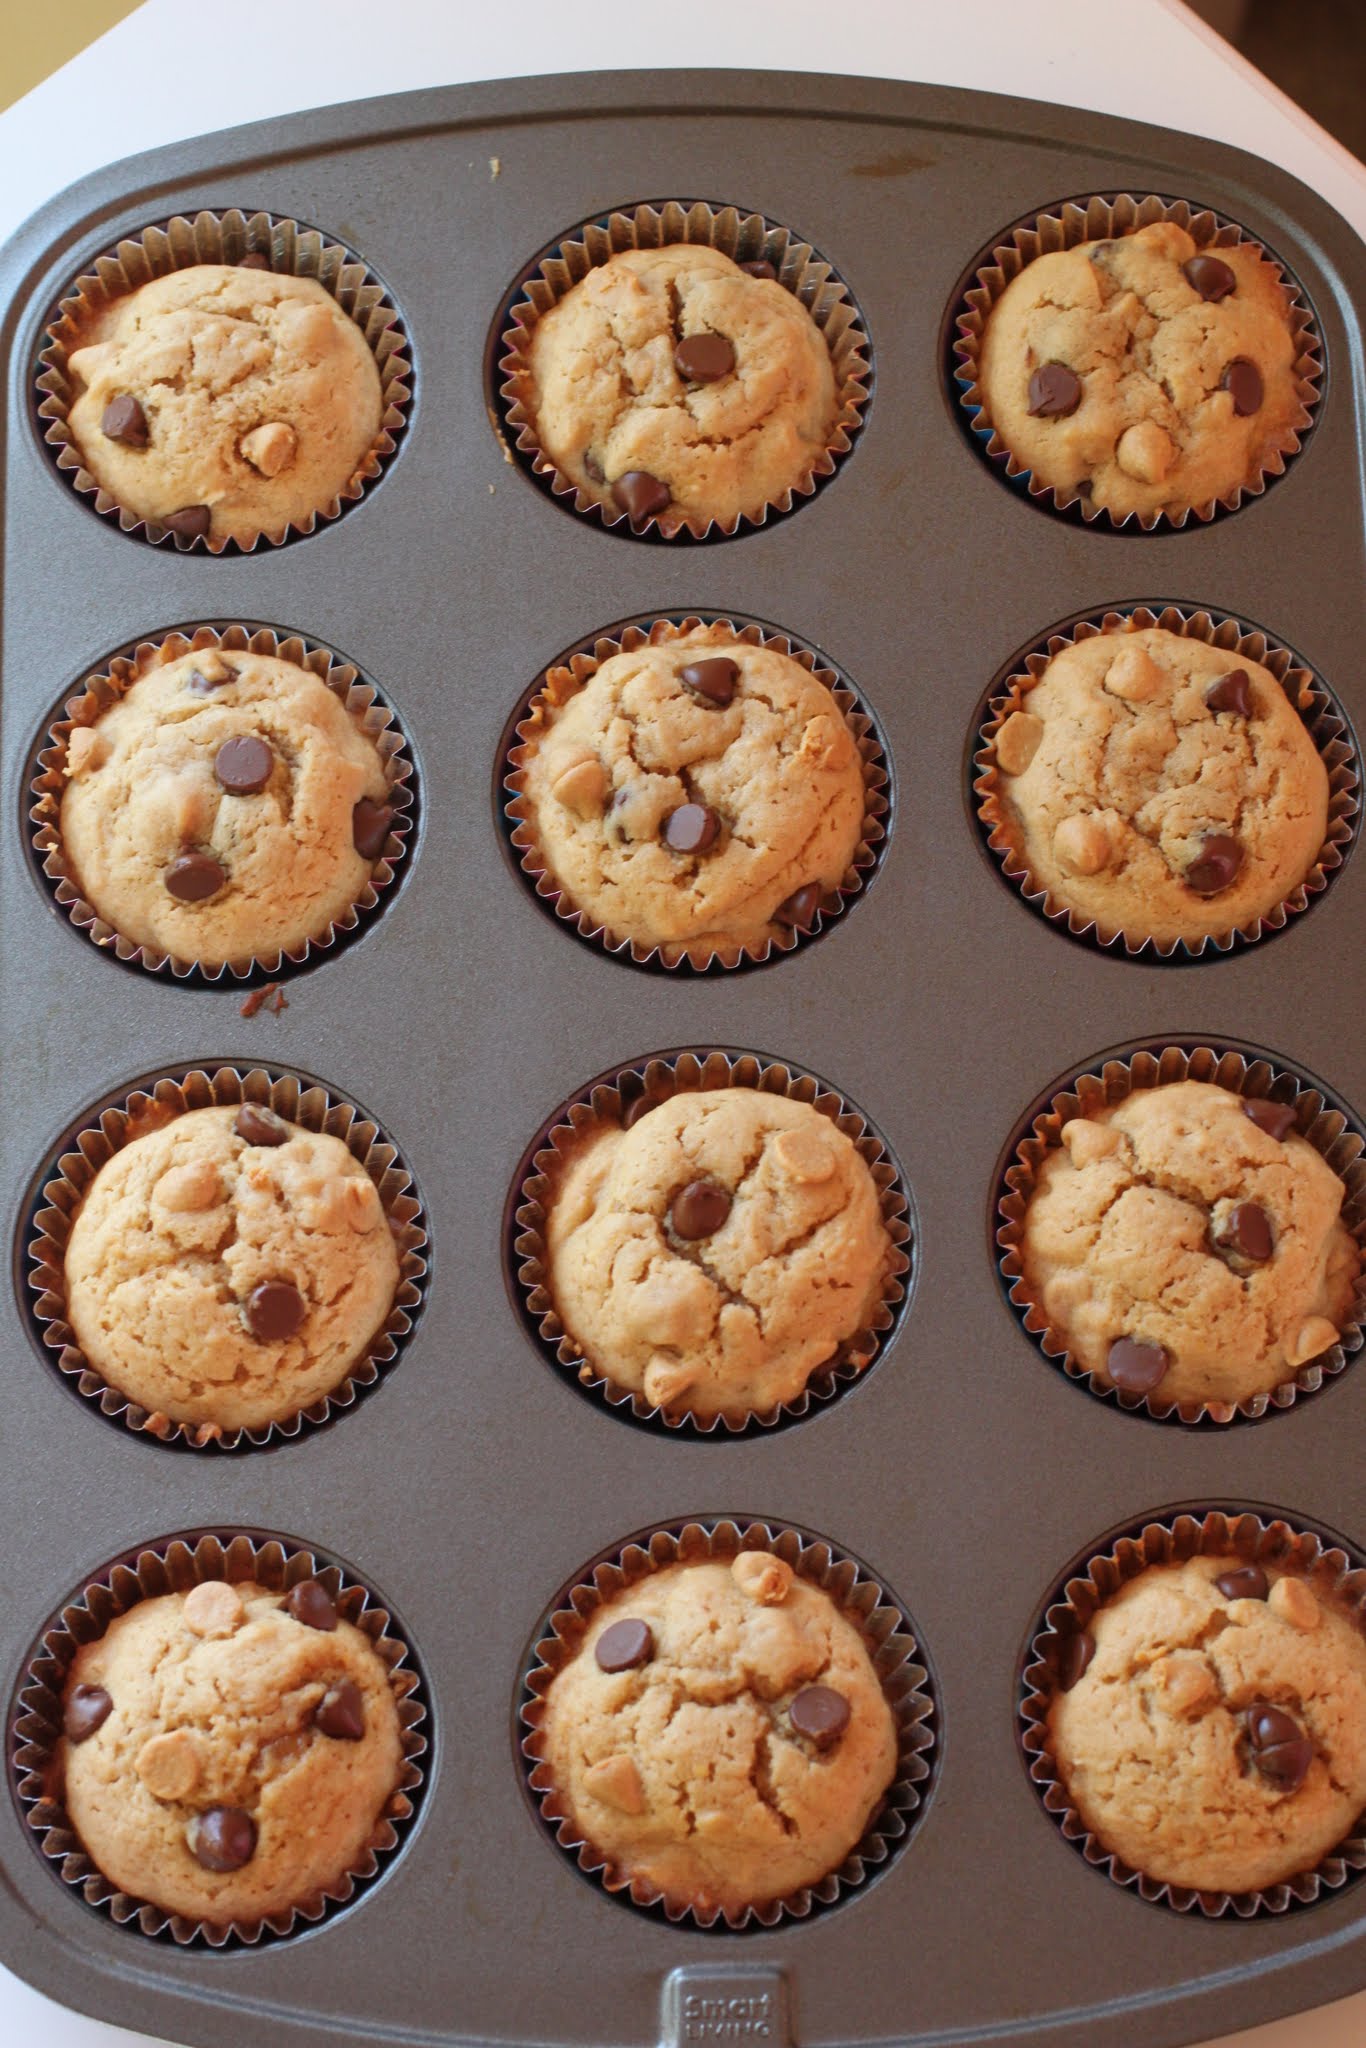
If I’d frosted these, they would have been cupcakes, maybe. But they also would’ve been too much. These have just the right amount of sweetness, and they’re packed with both milk chocolate and peanut butter chips. If you can stop at one half, you have more self-control than I do.
Eating is a delicate balance, but I have to believe that the right way to begin is by saying yes. Yes to being satisfied, yes to being happy, yes to being open to possibilities. Otherwise, the joy of food disappears. And that is just a shame.
Ingredients
Instructions
- Preheat the oven to 350. Line a muffin tin with cupcake liners. Set aside.
- In a microwave-safe bowl, melt the butter and 1 and 1/2 cups of peanut butter chips for 40 seconds. Stir. If not melted, heat another 25 seconds and stir again until smooth. Cool for a few minutes.
- In a small bowl, combine the brown sugar with the eggs and mix until smooth. Stir in the vanilla.
- Add the egg mixture to the butter mixture and mix until well combined. Add the flour, baking powder and salt and stir until a smooth batter forms. Fold in the milk chocolate chips and the remaining 1/2 cup of peanut butter chips.
- Spoon the batter into the prepared pan, filling each cupcake liner 3/4 of the way. Bake until golden, anywhere between 18-22 minutes.
- Cool and enjoy!
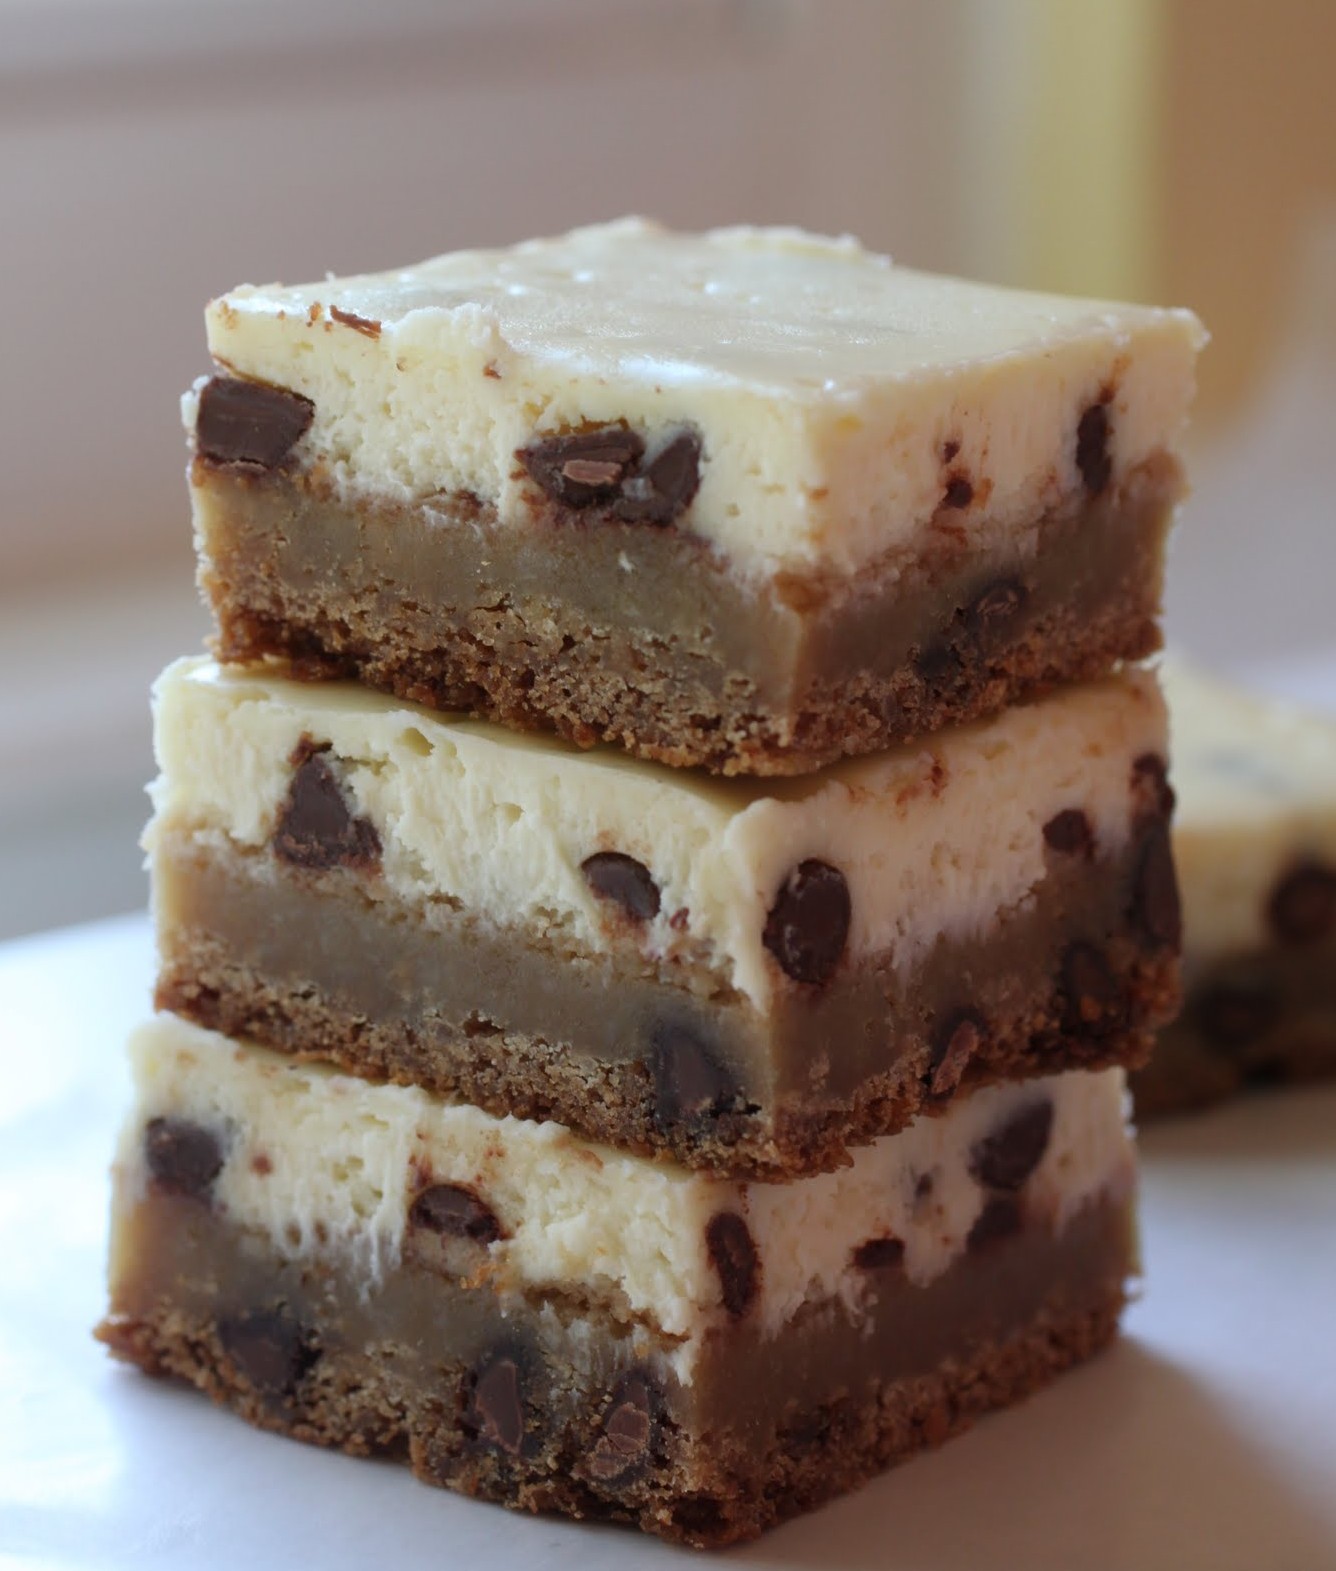
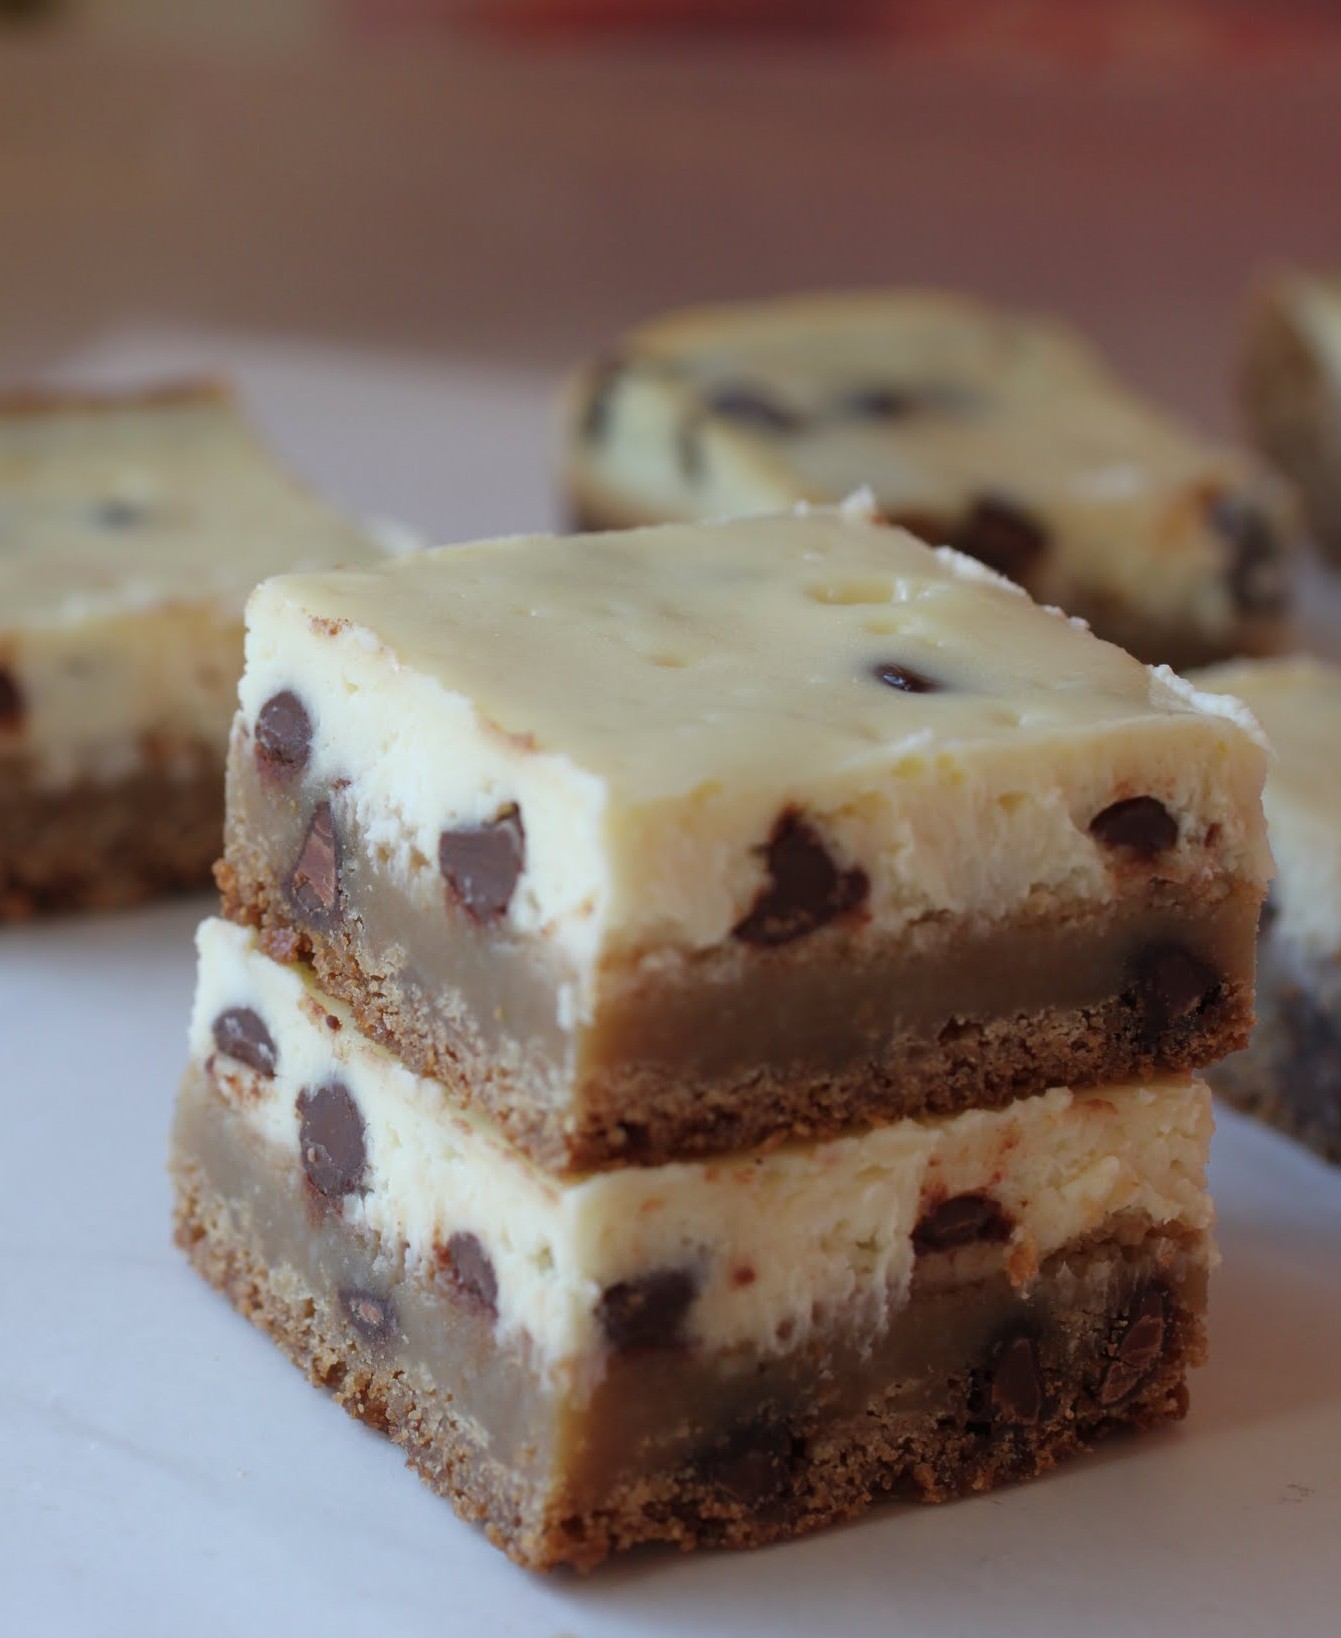
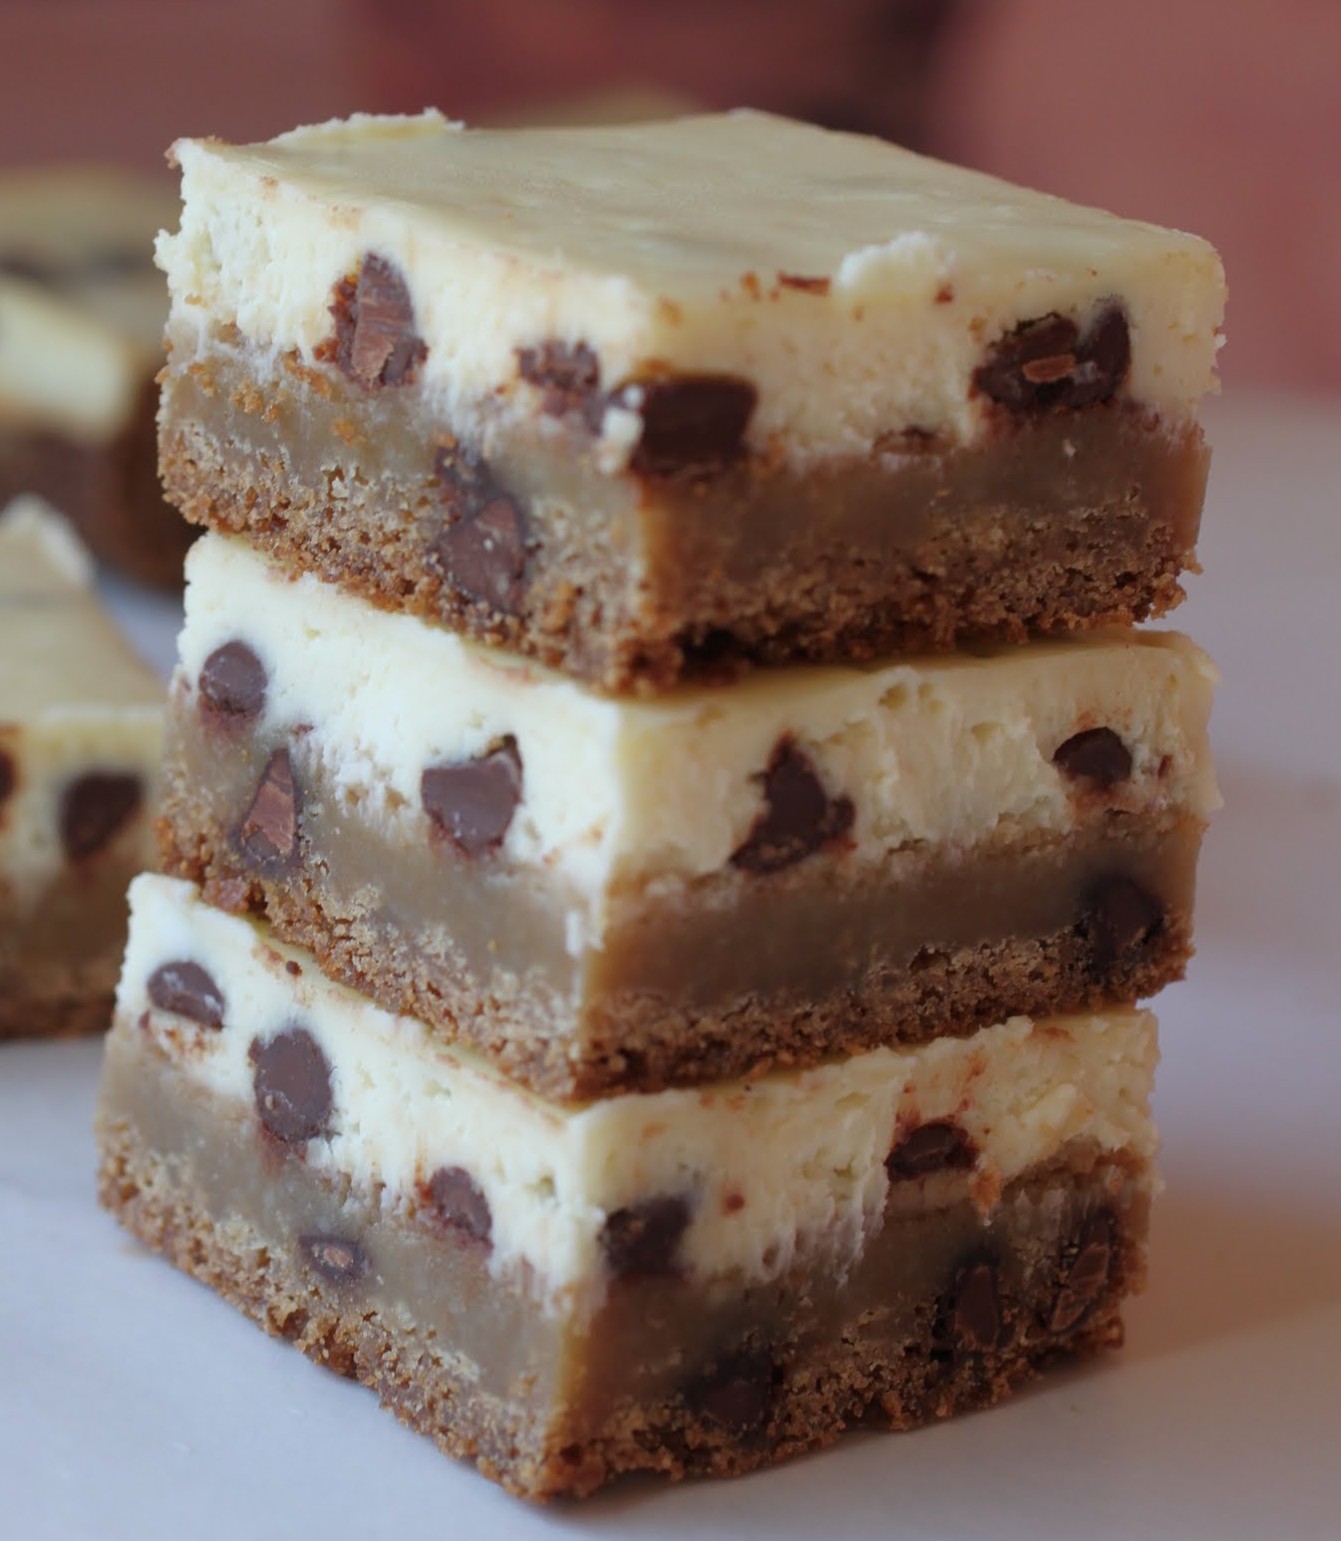
Seriously, when you love something, you don’t set it free. You keep it in your life and obsess over it. I’ve never been able to turn down cheesecake, especially if it’s packed with milk chocolate chips. I’ve never been able to turn down a chocolate chip cookie, unless something is majorly wrong in my life.
Putting them together just equals total happiness. If anyone wants to be unhappy, stop reading.
I’m not sure what’s going on with this year, but my stress level has been through the roof lately. I’ve informed everyone at work to schedule my nervous breakdown for November. If I warn them in advance, will it be okay to take to my bed and stare at the walls?
On a daily basis, I find myself juggling way too much. It’s inevitable that some balls will drop, and then I feel guilty. After all, aren’t women supposed to somehow handle it all without freaking out?
I’m not saying that men have less to handle, necessarily. But when Kenny has a huge to-do list, he gives himself a few weeks to get to what needs to be done, and the piling amount of work doesn’t seem to faze him that much. But with me, I need to get through my lists daily, or it all comes crumbling down.
This week, I have the usual five classes to teach every day and the resultant large stack of essays to grade. On top of that, I’m finishing up college recommendations for the students I teach who are doing what’s known as “early action,” which means they get into college before everyone else. I admire their drive. It just makes for a lot of letter-writing on my part.
I’m also doing a project proposal for making the literary magazine I run at work have its own app. I don’t know how to make an app, but I’m hoping someone in the building can help me. And I’m taking a leadership course this fall that comes with 18 hours of homework.
Oh, and then I run this blog, which I love, not to mention how much I love eating the desserts I show you all. So I’ll do my best to hold off on that breakdown if you let me eat all these chocolate chip cookie cheesecake bars myself. Are we agreed?
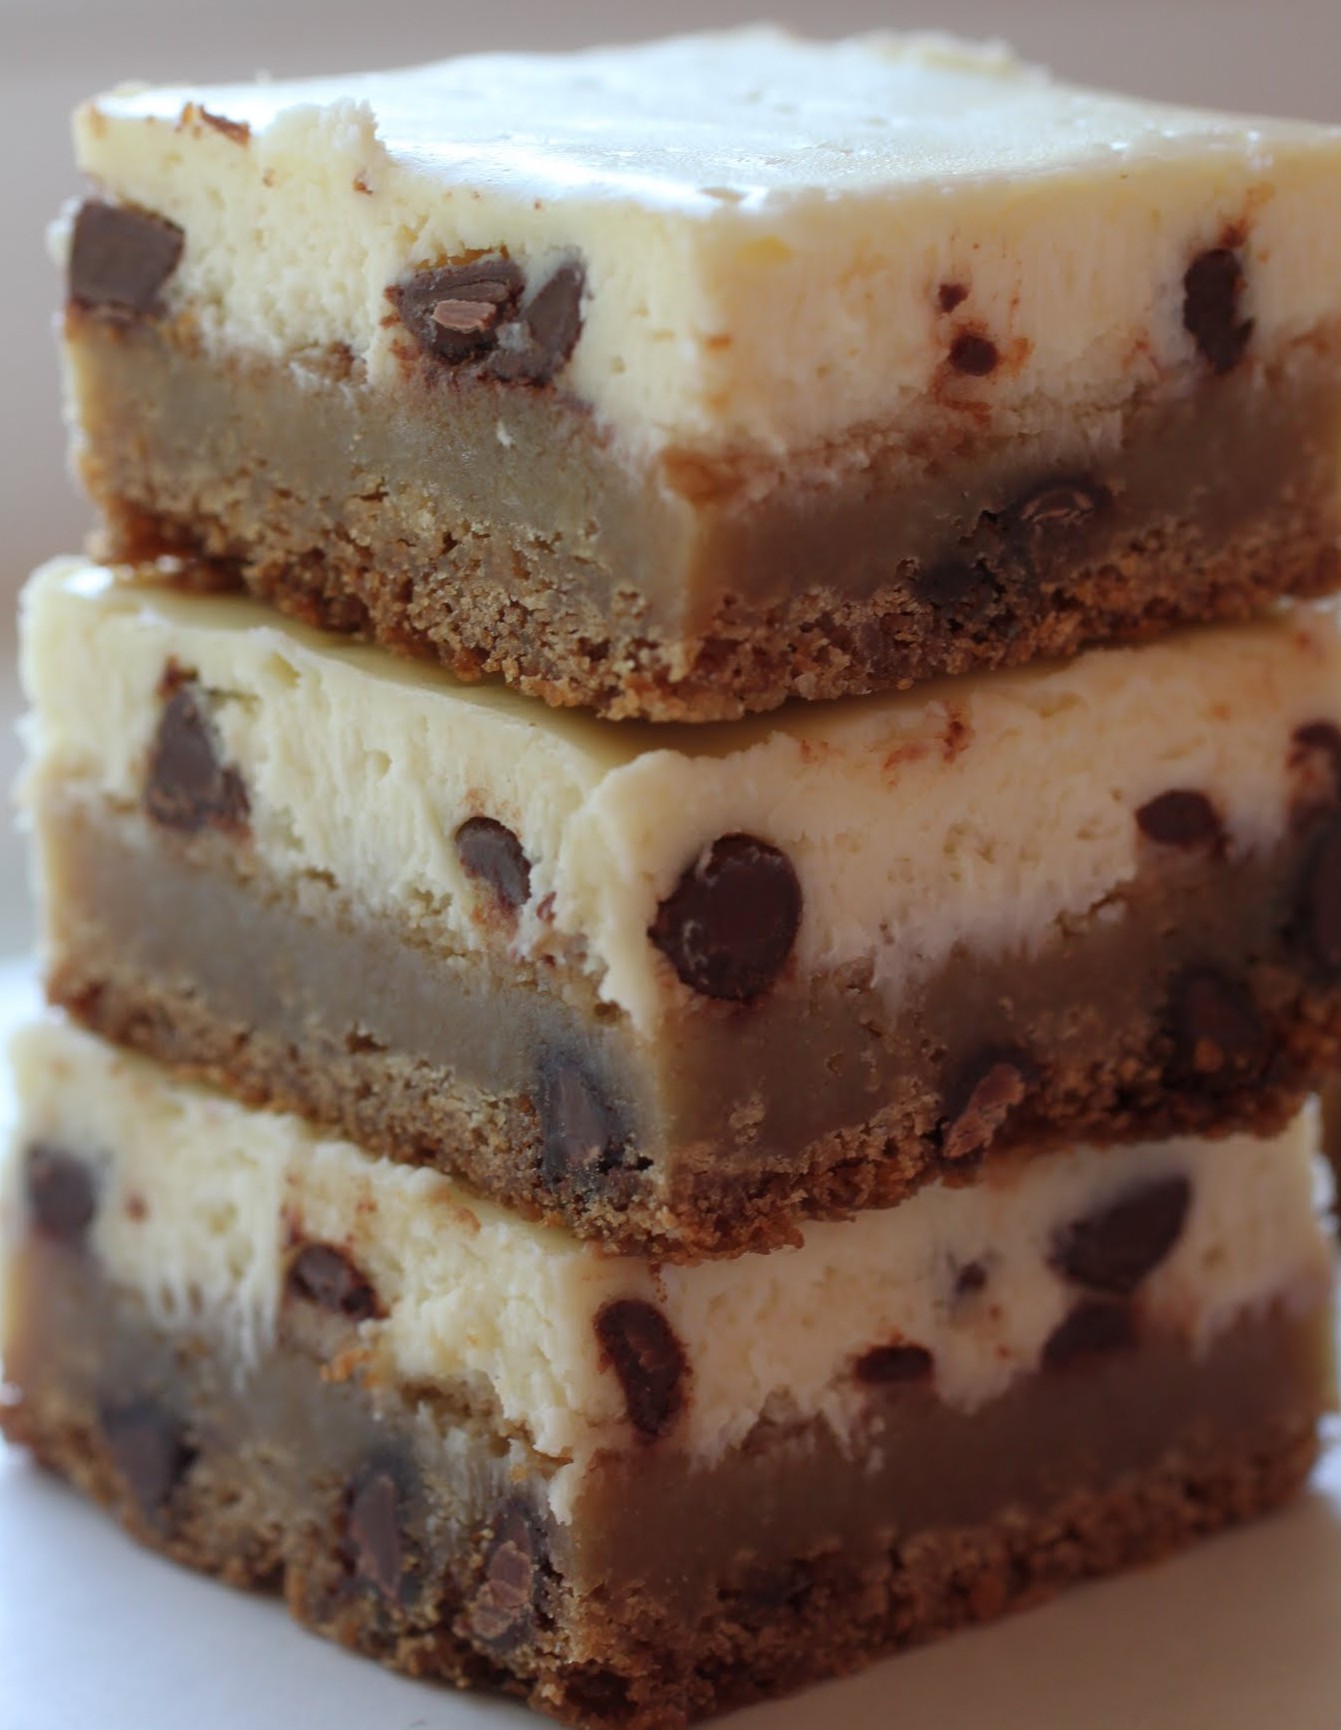
The base of these bars is a standard chocolate chip cookie dough which gets mostly baked before the cheesecake layer is added to the top. When I make cheesecake for bars, I keep the batter very low in sugar. The fact that the cheesecake is rich and full of chocolate chips coupled with the cookie base means that you don’t need the extra sweetness.
There’s really no way that these won’t become a household favorite. Even though I admit that my stress level is way out of whack lately, sharing desserts like this gives me unending pleasure. Whether you just gaze at the pics or decide to make some yourself, enjoy whatever stolen moments the day can bring. Calm breathing, everyone!
Ingredients
Instructions
- Preheat the oven to 350. Line an 8-inch square pan with foil, leaving enough to hang over the sides. Coat with cooking spray. Set aside.
- In a small bowl, combine the flour, baking soda, and salt. Set aside.
- In the bowl of a stand mixer, beat the butter and brown sugar until light and fluffy. Add the eggs one at a time, and then mix in the vanilla. Add the dry ingredients and mix until just incorporated. Mix in the chocolate chips.
- Spread the dough into the prepared pan and bake for 20-25 minutes until mostly baked. The center can still be a little jiggly.
- While the bottom layer is baking, make the cheesecake batter. In a medium bowl, mix the softened cream cheese with the sugar until smooth. Add the egg and vanilla and stir again until completely incorporated. Mix in the milk chocolate chips.
- Pour the cheesecake batter onto the chocolate chip cookie layer. Spread the batter out evenly.
- Bake for 20-25 minutes until golden at the edges and set. Cool completely.
- Refrigerate overnight and cut into squares.
]]>
But then I realized that New Year’s Eve is tonight, and what better to ring in the year than my favorite combination in all the world? I mean, really. It had to be peanut butter and chocolate.
So cocoa will be back Friday. For now, I’m all about this dip. This fantastic dessert dip is perfect for a New Year’s party and a guaranteed crowd-pleaser. It’s also easy and it can be made without gluten. So don’t stop yourself this time!
Since I’m being honest right now, I’ll admit that my New Year’s plans are pretty low-key this year. It’s going to be me, Kenny, and this dip with any associated dippers. Maybe sushi or a gluten-free pizza. And definitely some Netflix.
Possible dippers can include anything from pretzels to apples. Think about what flavors you like with peanut butter and then just run with it! If you want to get really crazy, make a chocolate martini to toast the new year while you’re shoveling this dip into your mouth.

Happy New Year! I started this blog in 2014, and I’m really hoping to keep the ball rolling in the coming year. Thanks for reading, and have a lovely holiday!
Ingredients
Instructions
- In a saucepan over medium heat, melt the butter. Stir in the brown sugar until it liquefies. Set the mixture aside to cool.
- When the butter mixture is cool, beat the cream cheese, powdered sugar, vanilla and peanut butter in the bowl of a stand mixer until smooth and creamy. Add the butter mixture and beat on low until fully combined. Fold in the peanut butter cups, chocolate chips and peanut butter chips.
- Scrape the dip into a bowl and cover with plastic wrap. Refrigerate until thick and spreadable, but not hard, about 30 minutes.
- If you're not using the dip immediately, store in the refrigerator and take out a half hour before serving.
If you’ve been reading Gayle’s posts, she opted to make her fudge this week with three different kinds of milk. I love that, and because we might be baking soul mates, I had kind of a similar idea. Each of the fudge options you’re getting this week from me involves a different kind of chocolate.
Monday’s choice, Smoky Salted Almond Fudge, had a dark chocolate base. Today’s fudge is made with milk chocolate. And Friday’s…well, you can probably guess, but wait and see anyway!
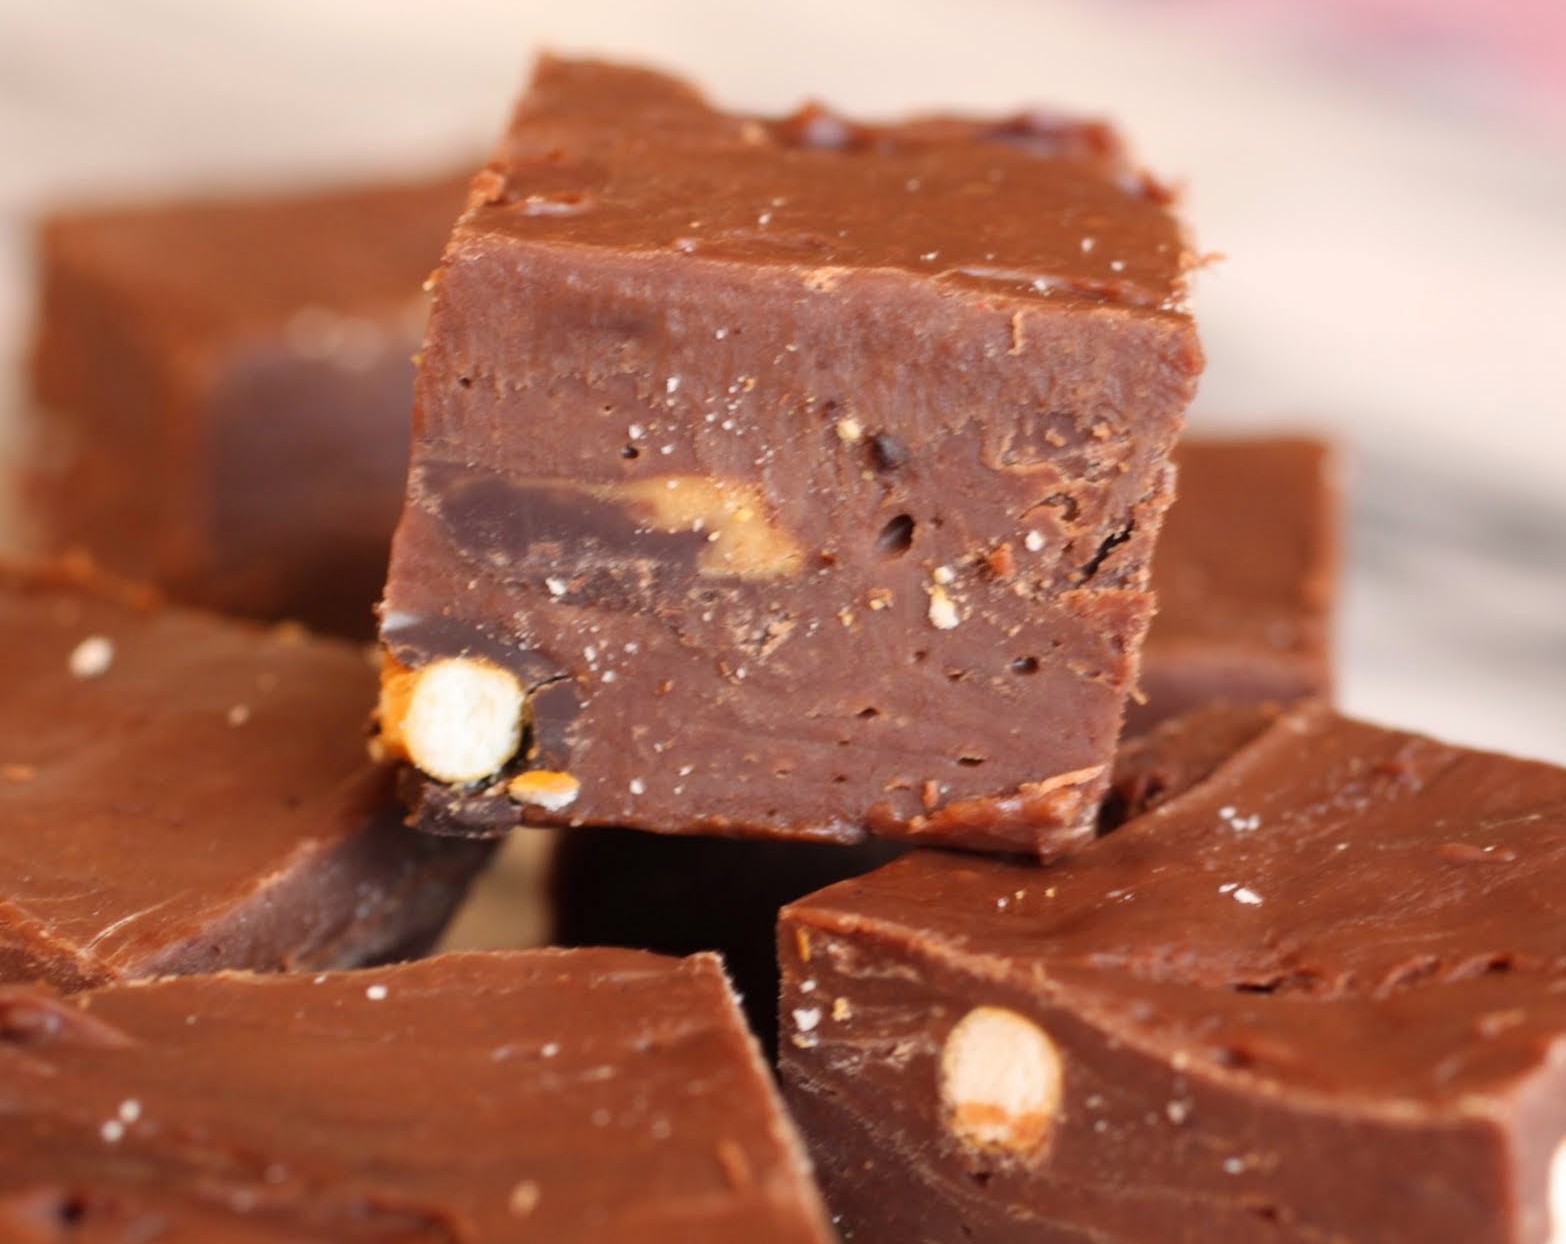
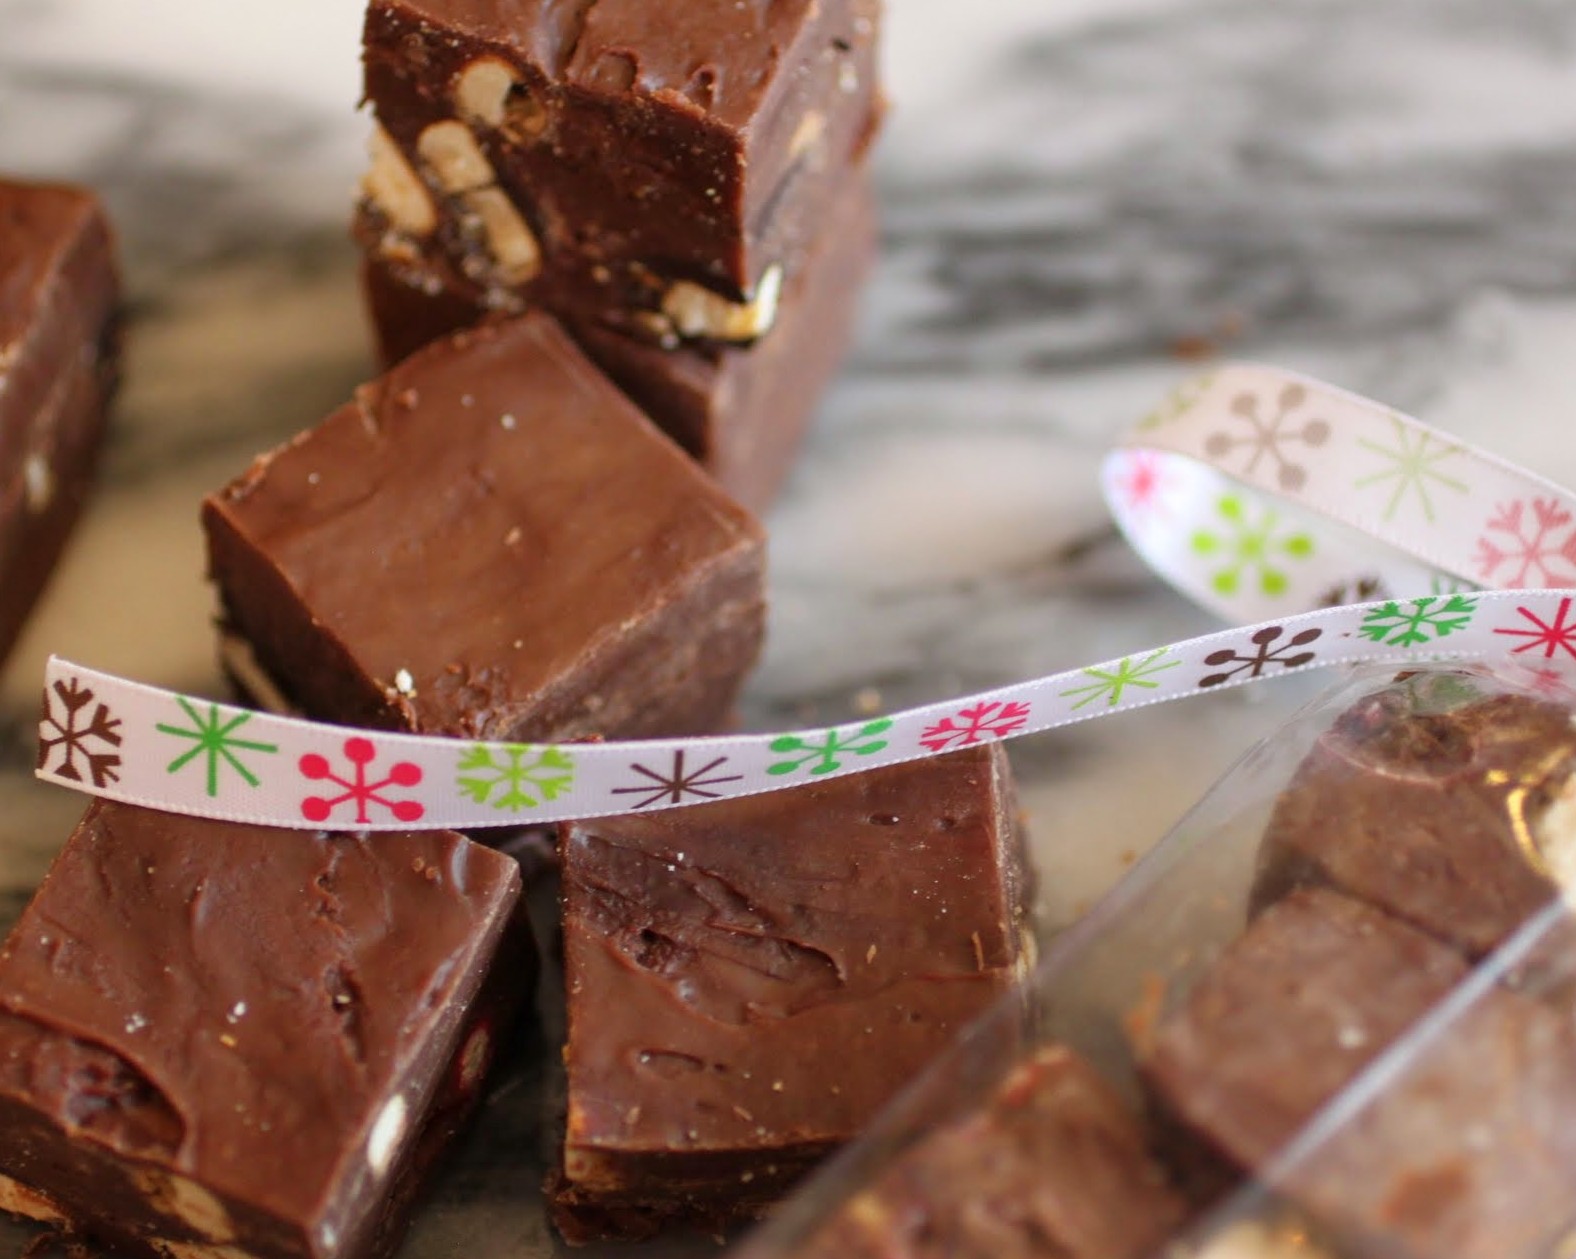
This fudge is made with my number one favorite Trader Joe’s product. It’s seasonal, so if you live near a TJs, you have to get there immediately, if not sooner. It’s called Jingle Jangle, and it’s magic. MAGIC.
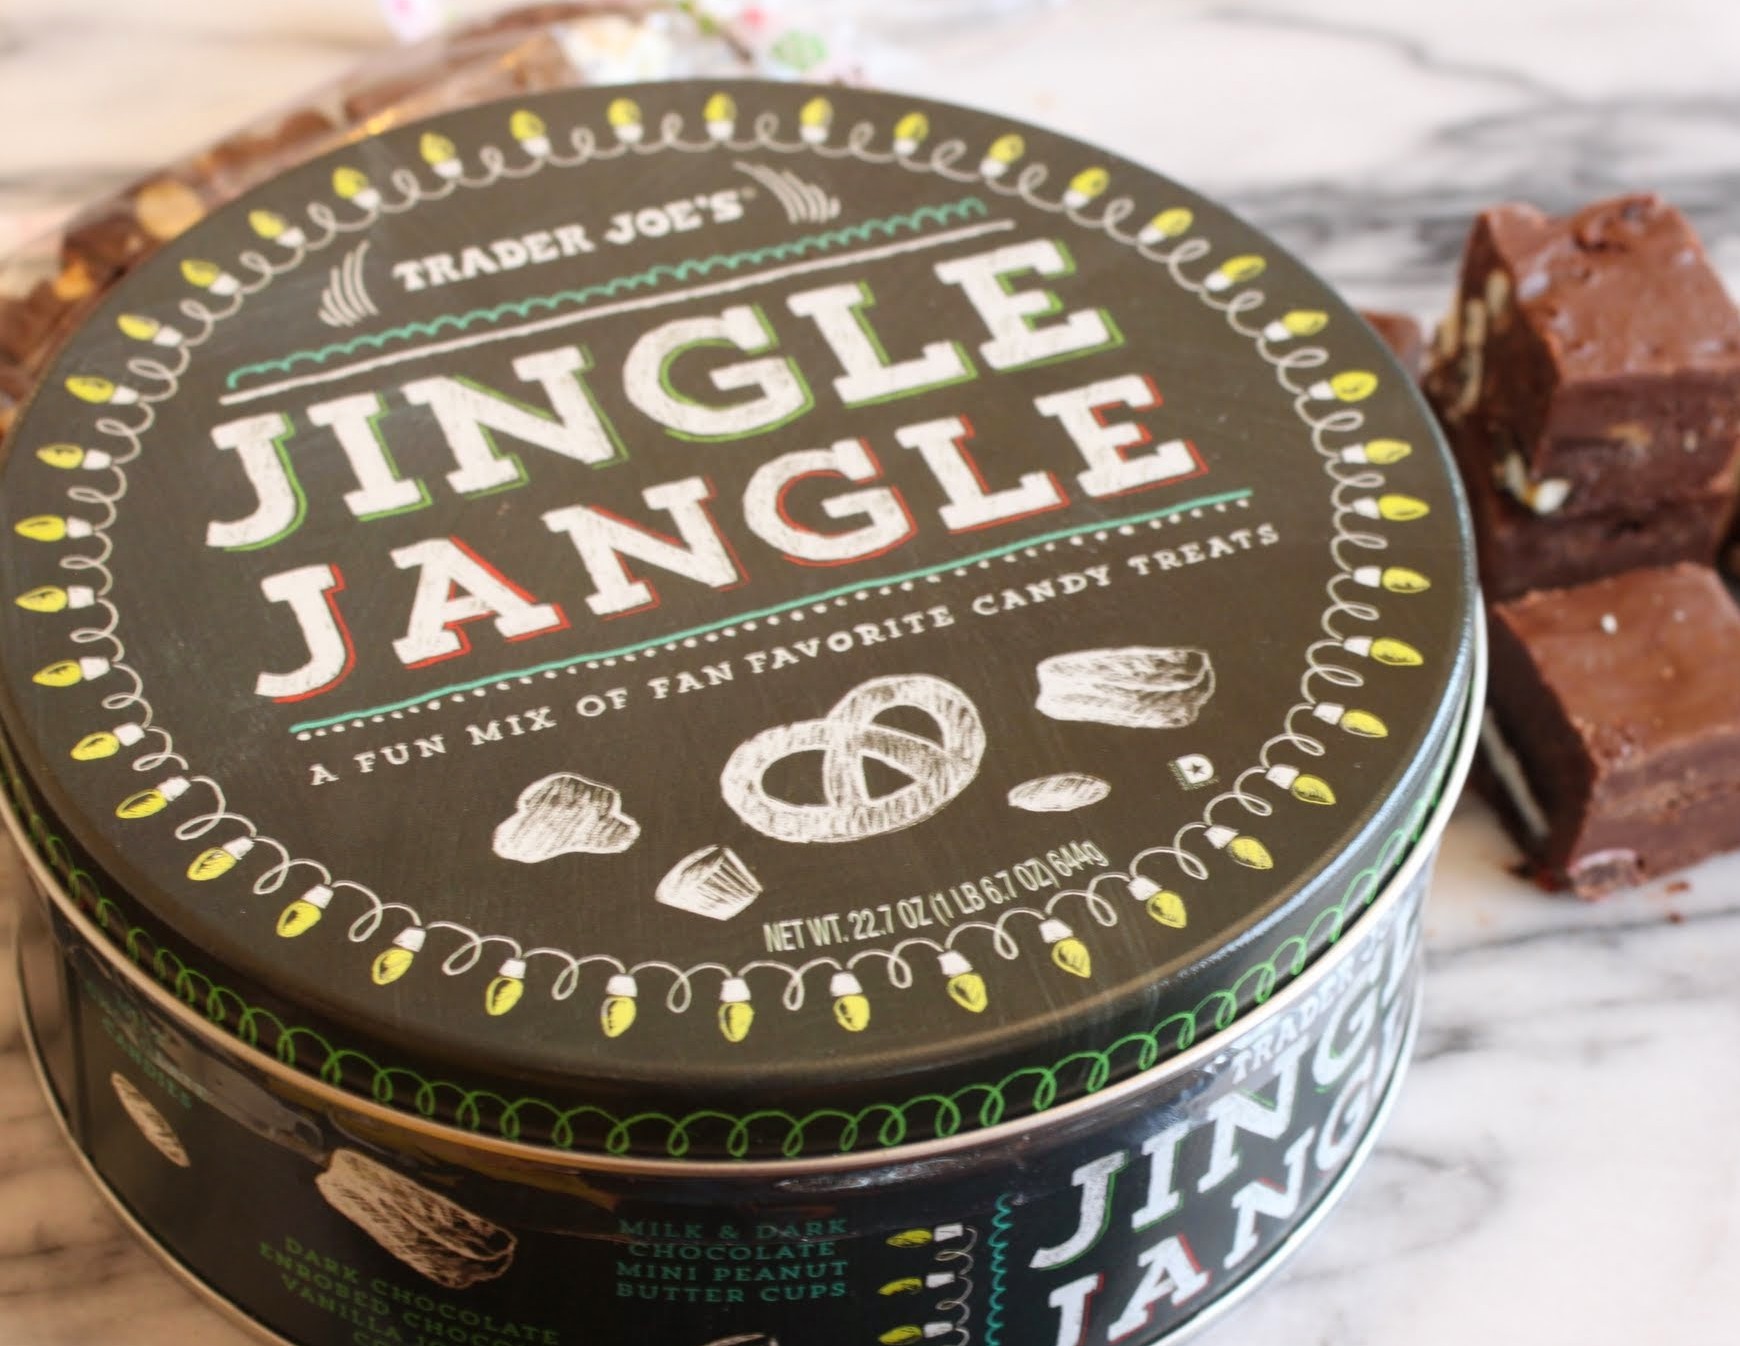
Jingle Jangle is made up of the following: chocolate-covered pretzels (both milk and dark), mini peanut butter cups (both milk and dark), chocolate-covered popcorn, chocolate drops, and best of all, chocolate-dipped Joe Joes, which are their version of Oreos. Can we say irresistible? I thought not.

Well, I put all that goodness into a milk chocolate fudge base, and voila! The best fudge ever. It’s rich, and chunky, and creamy, and full of mix-ins. This is the Ben and Jerry’s of fudge, y’all.
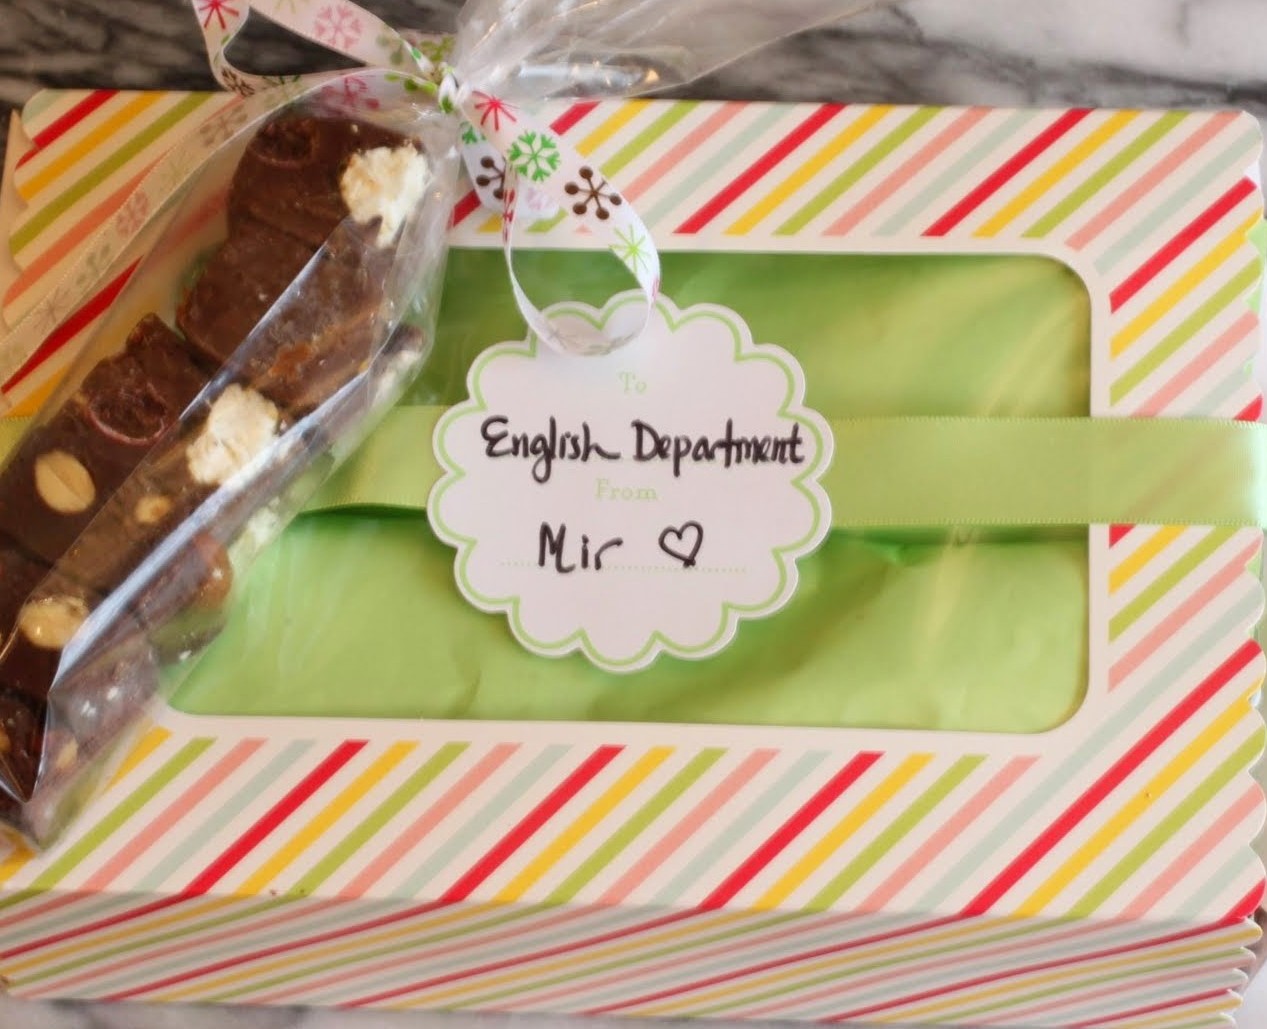
I give fudge as holidays gifts every year, so I boxed it up all nice for my department. I also wrapped some fudge in cellophane bags and tied them with ribbon for individual gifts. I’m not crafty, but once a year, I can swing it!
This fudge is easy, quick and addictive. If you don’t have Jingle Jangle where you live, you can easily reconstruct the pieces with chocolate-covered pretzels, mini Reese’s, caramel corn, Oreo chunks and M & Ms. It’ll be similar. And either way, you won’t be able to stop eating it!
Ingredients
Instructions
- Line an 8 x 8 pan with aluminum foil, using enough to hang over the sides. Spray it with cooking spray and set aside.
- In a microwave-safe bowl, melt the chocolate chips and sweetened condensed milk together for 2 minutes.
- Remove and stir until smooth.
- At the bottom of the pan, spread some Jingle Jangle around. I like to break the pretzels into pieces so they distribute better.
- Mix the rest of the Jingle Jangle into the fudge, stirring quickly to avoid melting the chocolate-covered candy too much.
- Spread the fudge evenly in the prepared pan. Chill for 2 hours until set. Remove from the refrigerator and let the fudge come to room temperature.
- Cut into squares with a sharp knife. Store in an airtight container.
Sometimes I don’t have to do any thinking. The wonderful food manufacturers do it for me. And I love them for it!
This past Sunday, I was embroiled in our weekly grocery trip. Translation: I was hoisting my 2 year-old on one hip, dragging my 4 year-old by the hand through the aisles, and snapping at my 6 year-old to stop touching everything he saw. That’s why I prefer to shop alone, but whatever. It’s usually not an option.
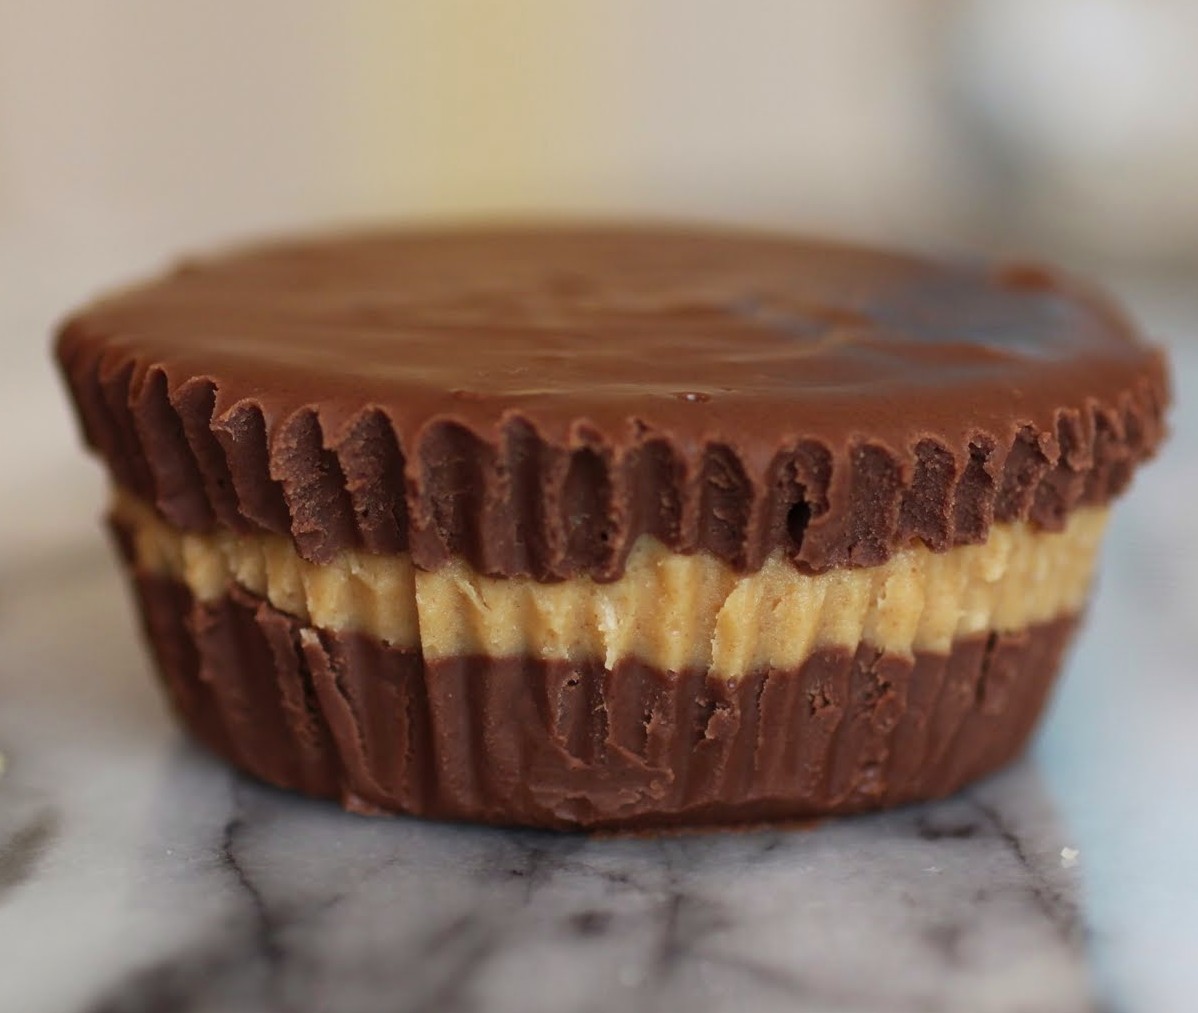
Anyway, I was rounding the aisle when I glimpsed a display of pumpkin-themed products. And right in the middle, with its own halo shining down, was Jif whipped pumpkin spice peanut butter.

I swear, the heavens opened and angels sang. I’d been meaning to make peanut butter cups that day, but the plan shifted instantly. These babies were born instead.
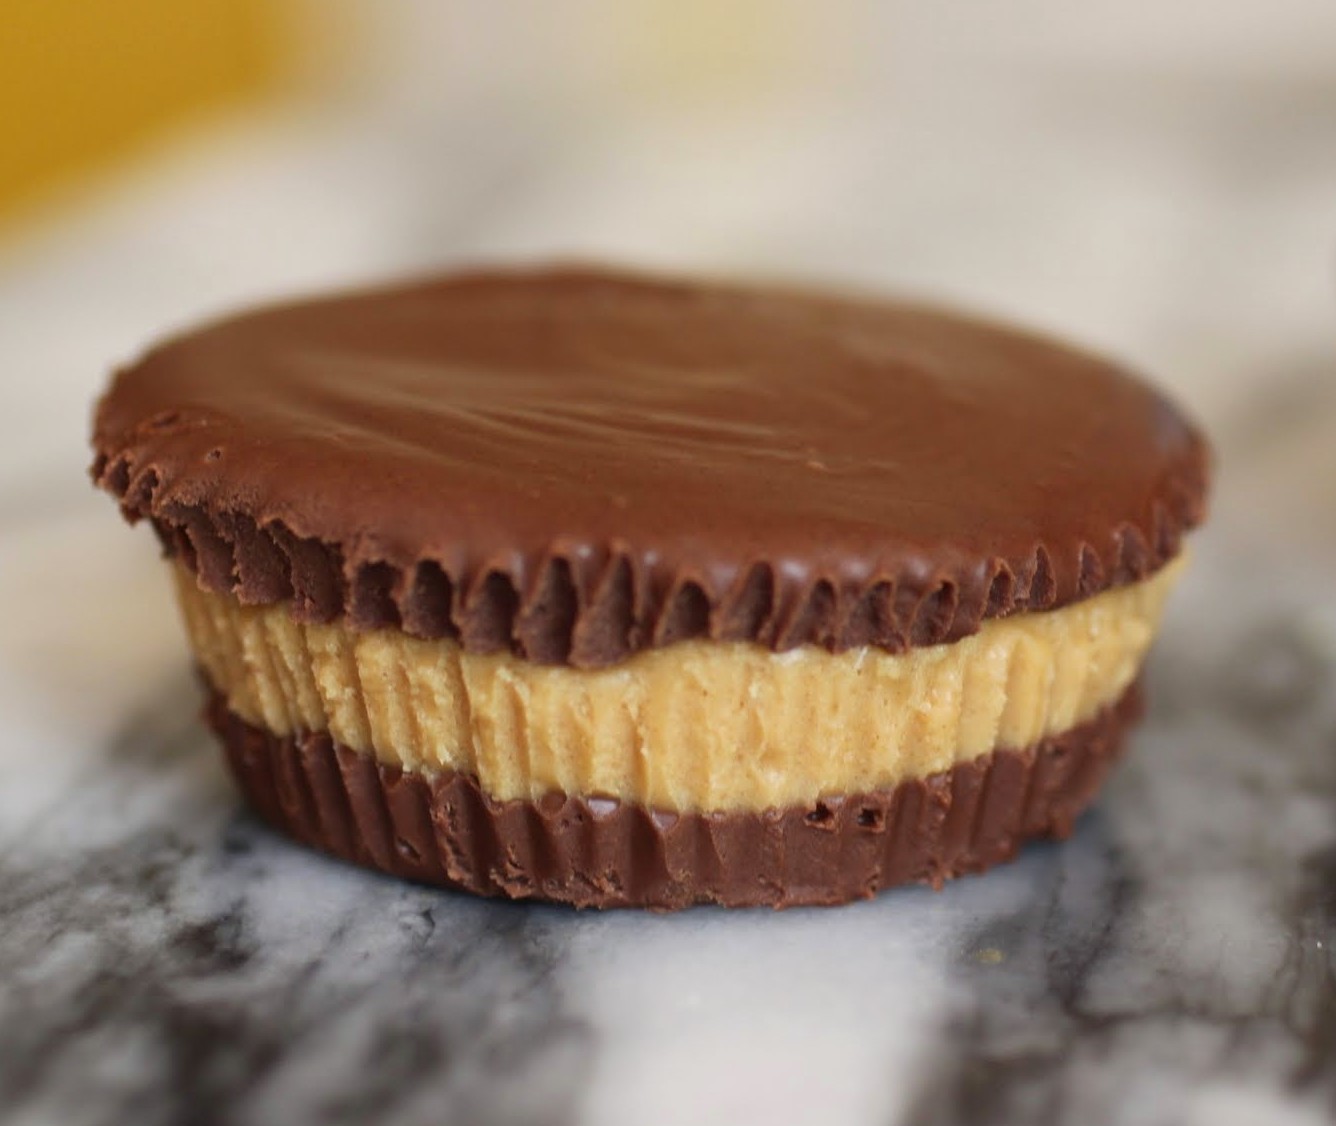
And boy, does peanut butter go with everything. No, that’s not a question. It does. These cups are both unexpected and joyfully delicious. They work so well, and I am totally into them.
So into them, in fact, that I had to give them away pretty fast. Though I did save a few for Kenny, since these are accidentally gluten-free. I love it when that happens!
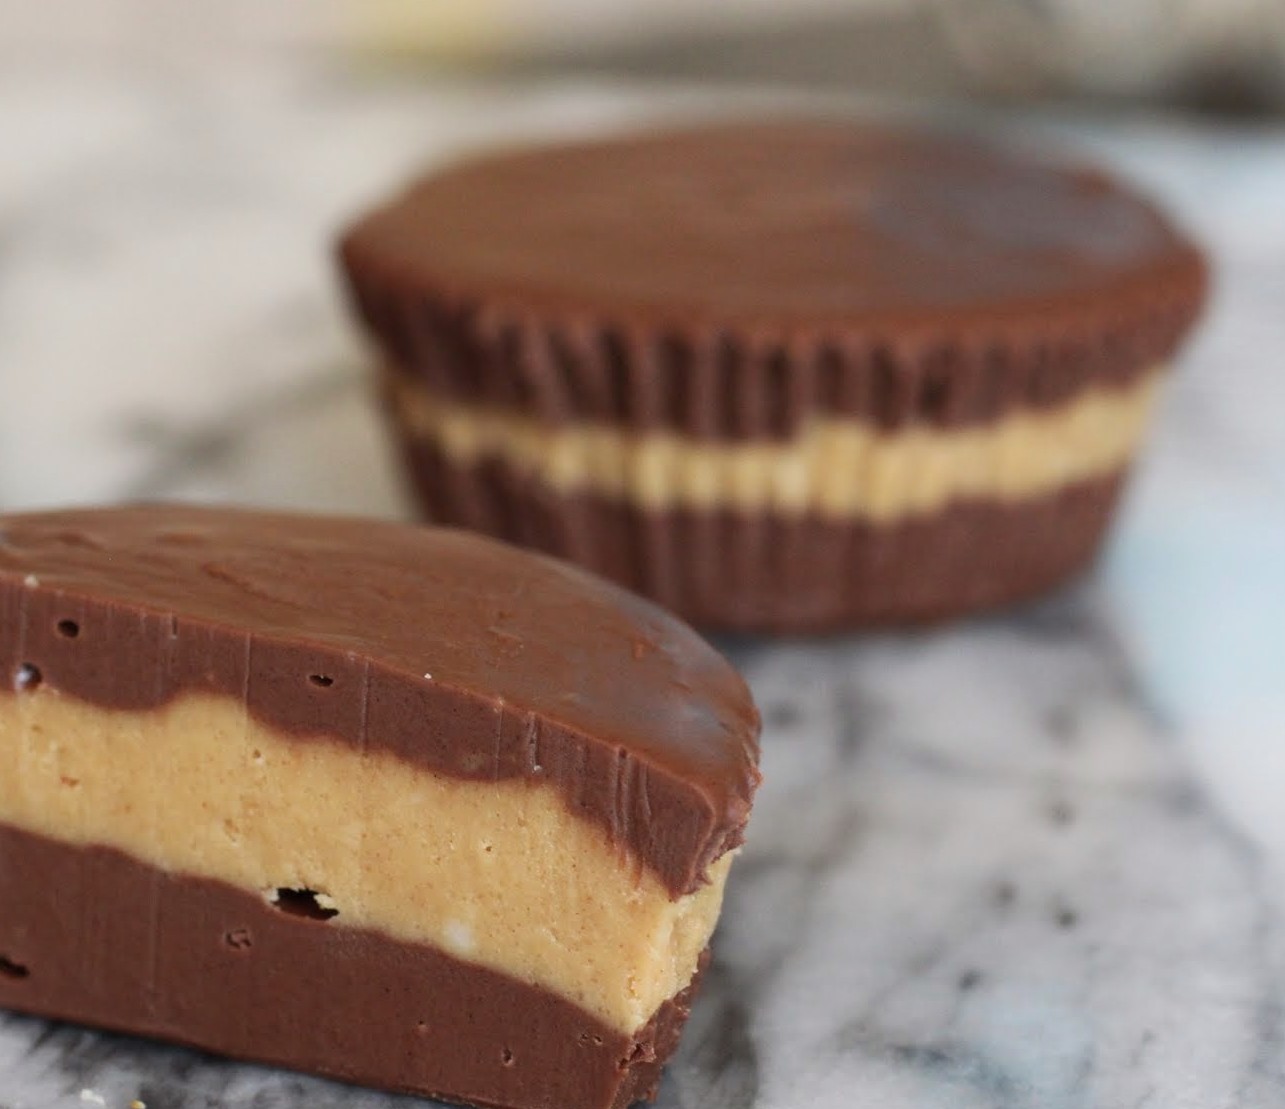
Your candy-eating ways just went up a notch. These are easy, no-bake, and very rewarding. Time to shake up the peanut butter cup!
Ingredients
Instructions
- Line a 12-muffin tin with paper liners and spray lightly with cooking spray. Set aside.
- In a microwave-safe bowl, melt one package of the milk chocolate chips for 2 minutes and 30 seconds. Stir until smooth.
- Using a spoon, evenly divide the melted chocolate among the paper liners. Put the chocolate in the refrigerator to harden.
- While the chocolate is chilling, make the filling. On the stovetop, melt the butter over low heat. Add the brown sugar, peanut butter, powdered sugar, vanilla and salt. Stir until the mixture is combined and smooth.
- Evenly distribute the peanut butter mixture over the hardened chocolate, being sure to level out the peanut butter as much as you can. Place in the refrigerator to harden for 30 minutes.
- When you're ready, melt the second bag of chocolate in the same manner as the first. Once again, spread the chocolate carefully over the peanut butter layer, taking care to smooth out the tops.
- Chill for an hour until fully hardened and set.
- Pumpkin spice peanut butter cups can be stored in the refrigerator or in an airtight container at room temperature, depending on taste.
]]>
Sorry, I’m gloomy. When this kind of mood strikes, only one thing can help. Lots and lots of peanut butter. In a bar. With chocolate.
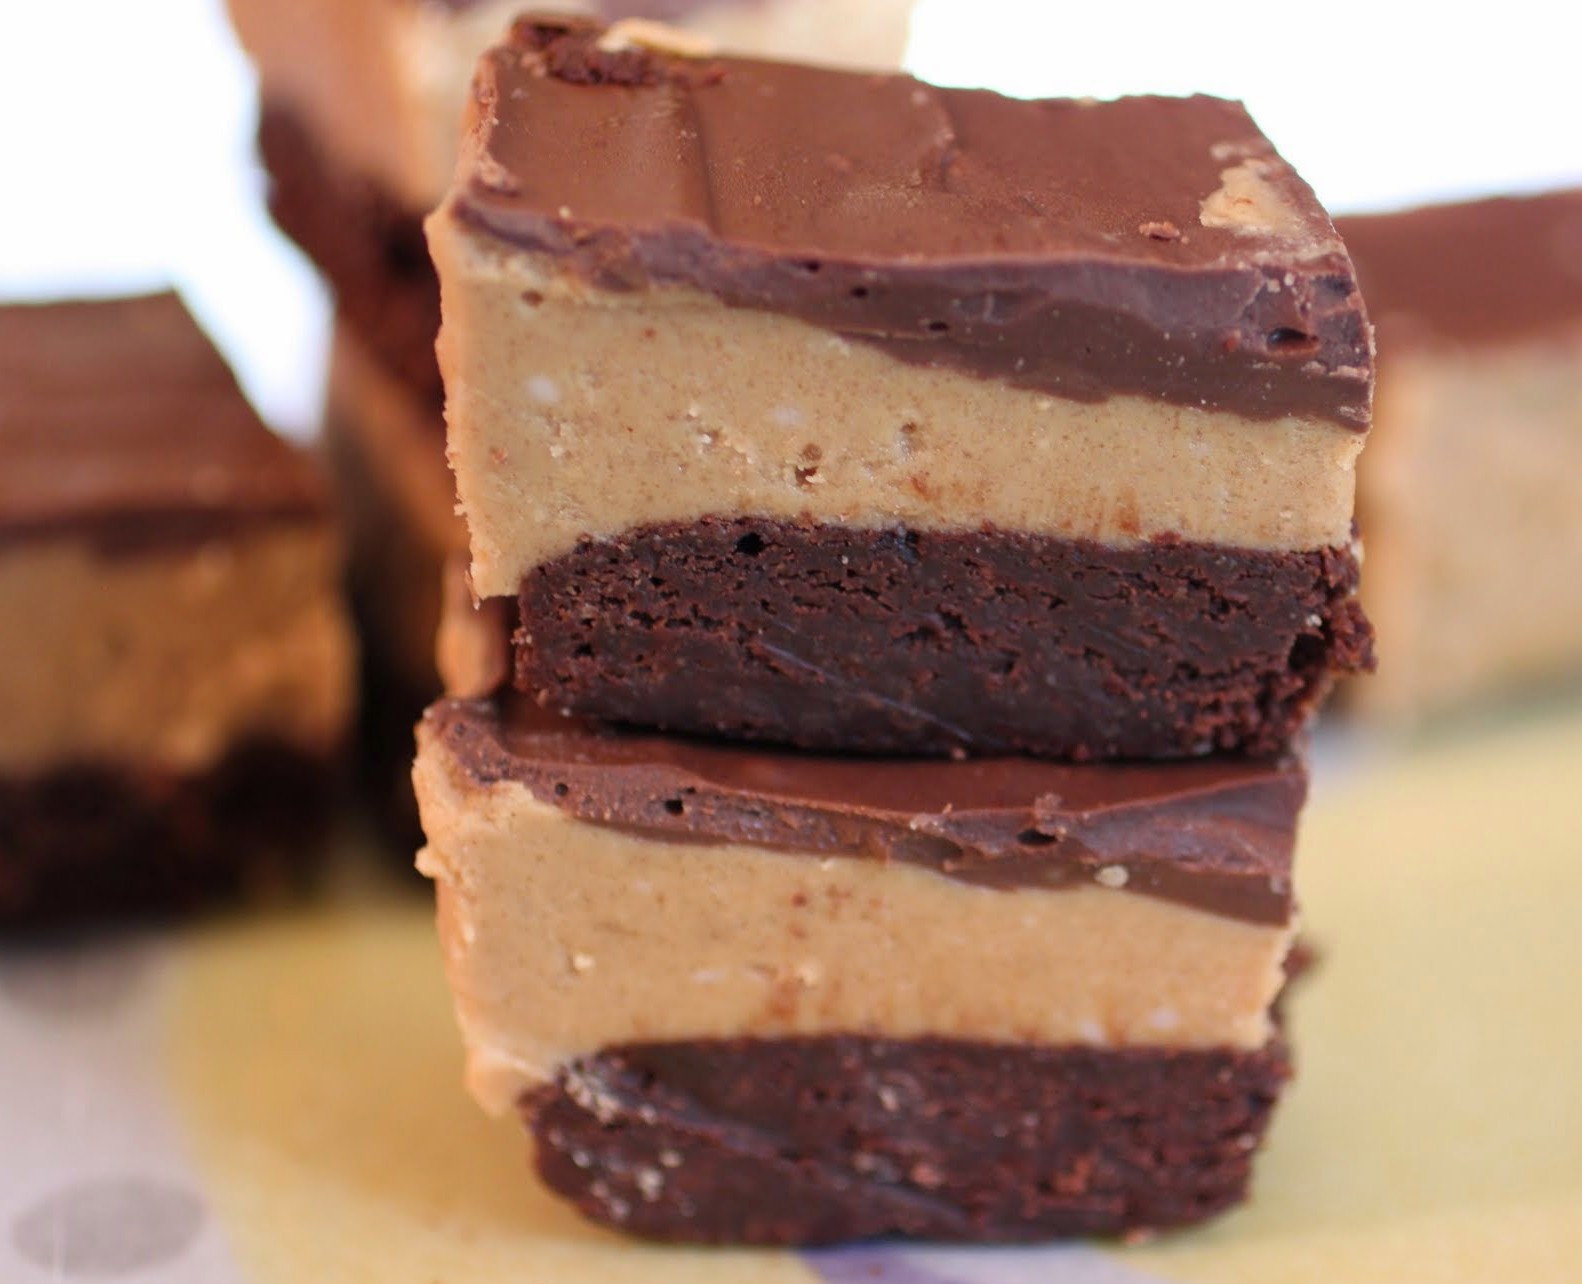
And even though my husband is off tomorrow, it’s not his fault. So these are gluten-free! Don’t worry, you’ll never know.
I made a much less crazy version of these a few months back, so if you’re into something simpler, try my GF peanut butter bars. But if you’re like me and enjoy taking things up a notch, add a layer of amazing brownie underneath!
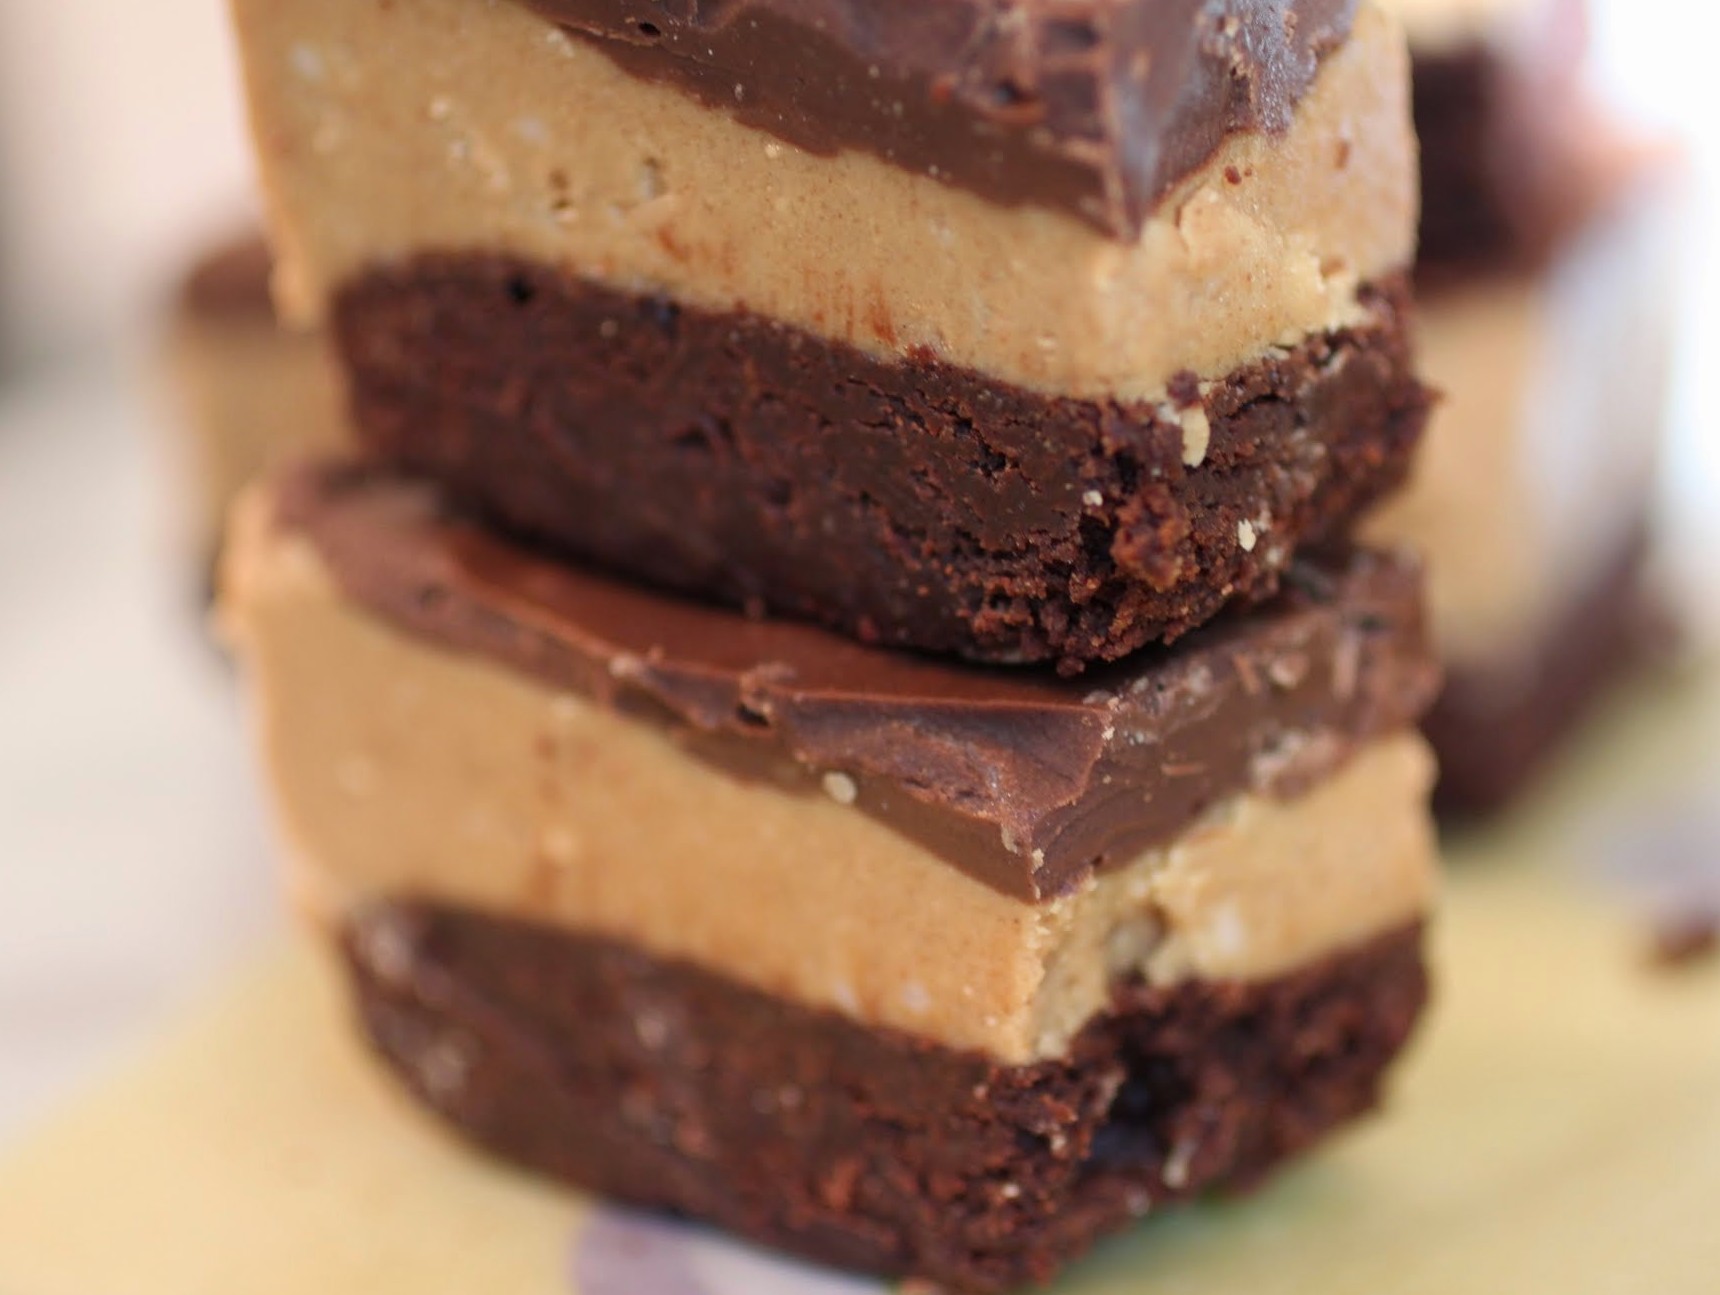
Yep, that’s the setup. A layer of brownie, made with oat flour. A layer of peanut butter filling which, I swear to all the powers above, tastes like a peanut butter cup, but better. And then, a nice thick layer of milk chocolate.
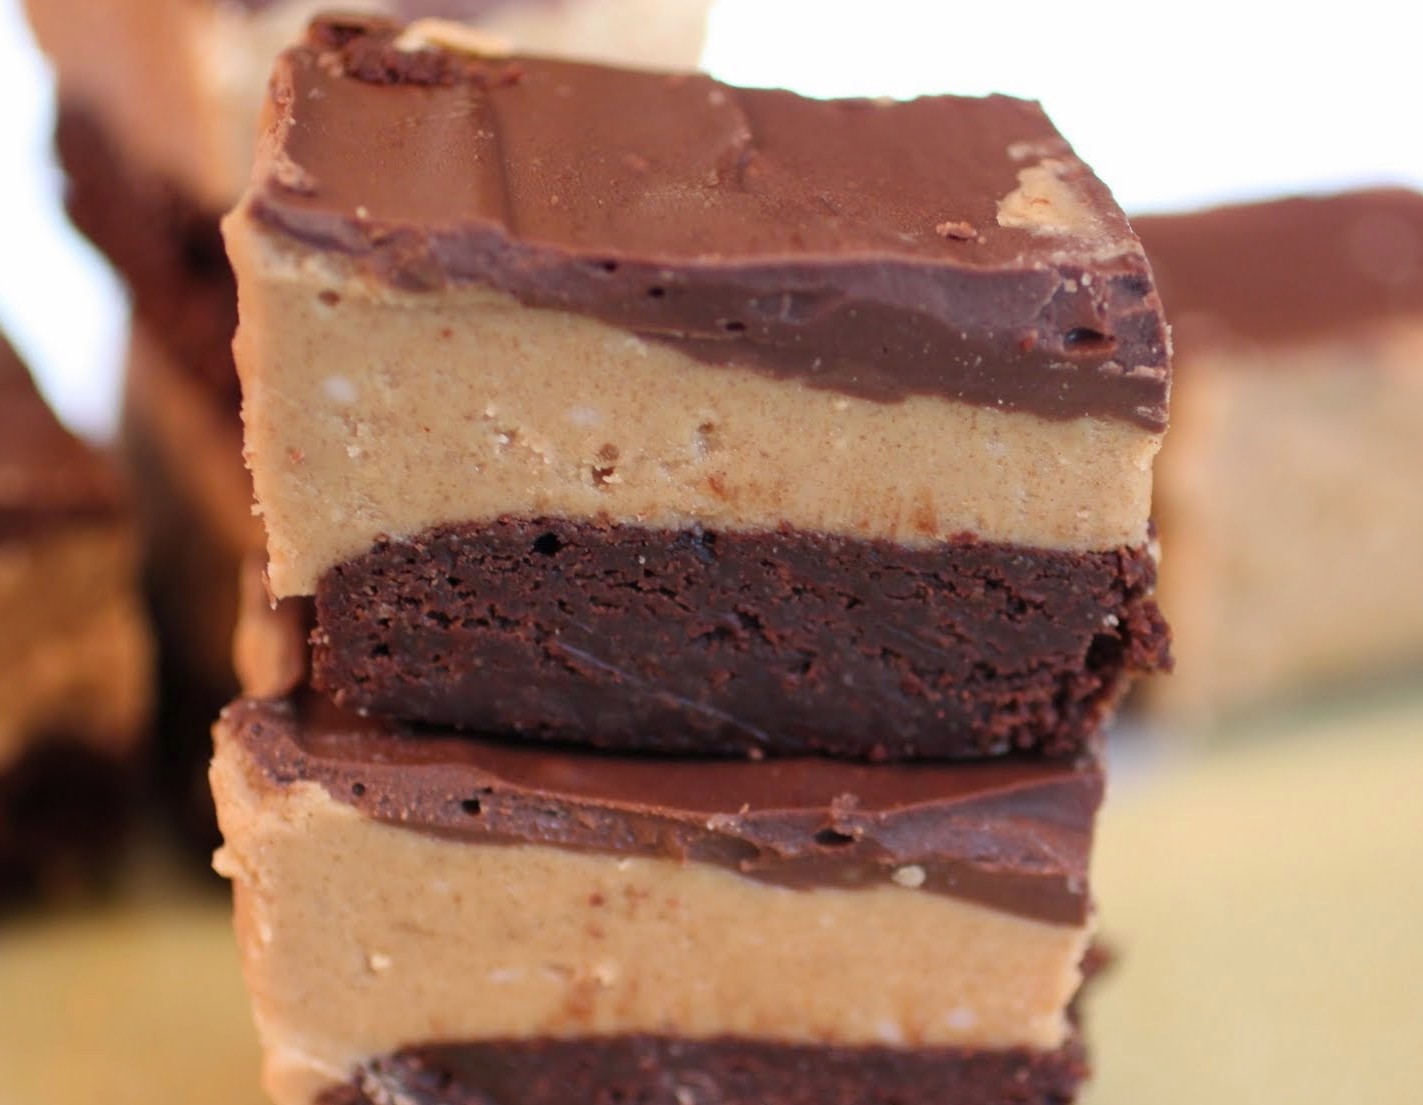
Instead of testing this out with my husband, I actually brought this to a friend’s house. She has to eat a GF diet, and I was thrilled that not only did she eat hers up, but so did everyone there. And most of those people eat gluten. So I guess they couldn’t tell!
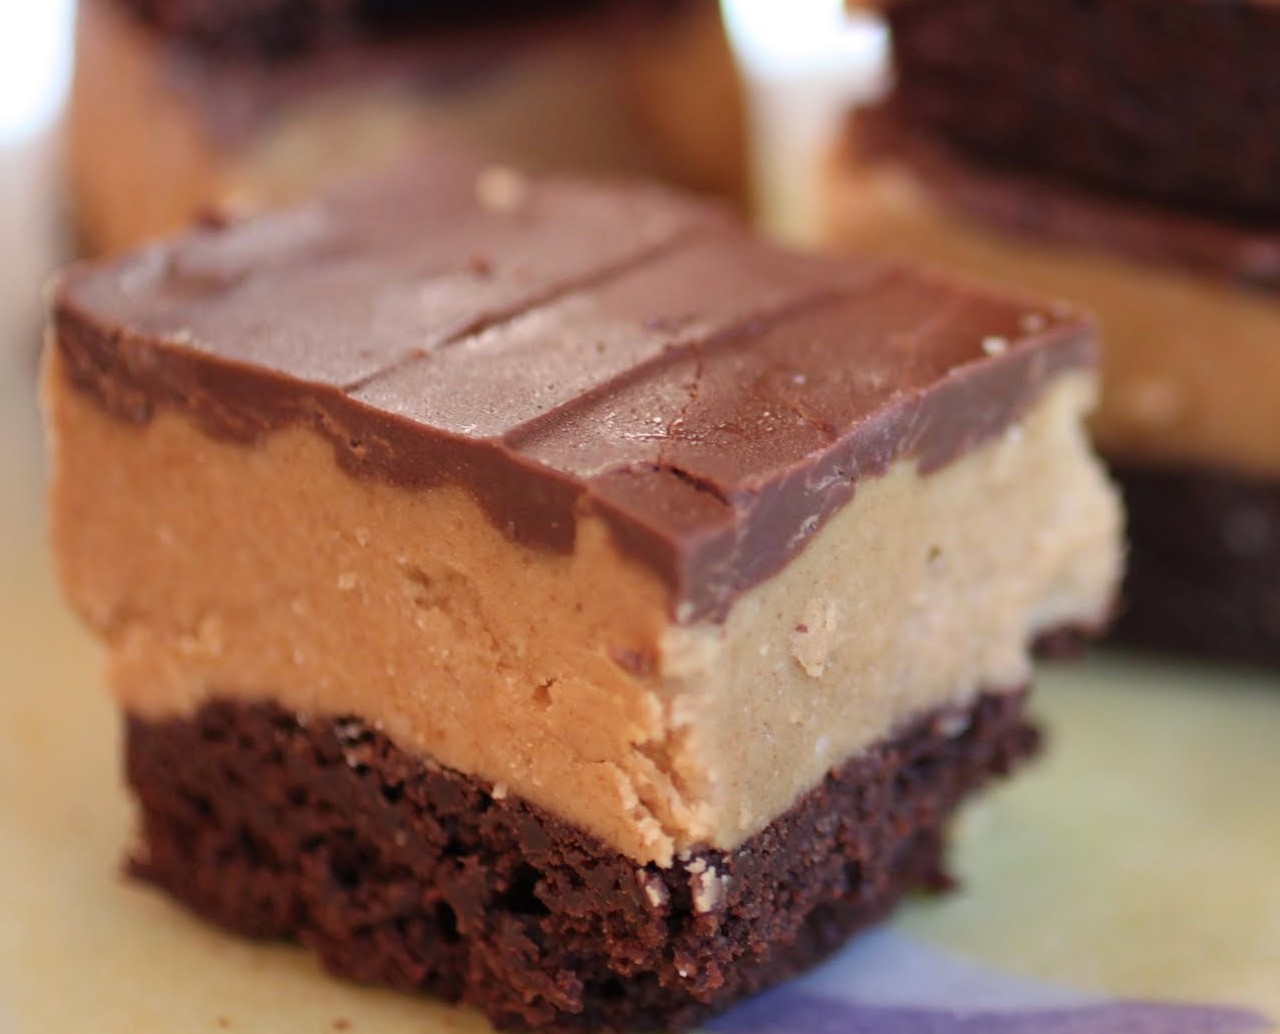
If you’re having a bad Sunday night or just need that everlasting PB/chocolate fix, step right up! The antidote for any blah moment is right here!
Ingredients
Instructions
- Preheat the oven to 350. Line an 8 X 8 pan with foil and spray it with cooking spray. Set aside.
- In a medium-sized bowl, mix the cocoa into the melted butter until it dissolves. Add the sugar and stir again. When the sugar is incorporated, mix in the vanilla and eggs. Add the salt and flour, mixing until just combined.
- Spread the batter in the prepared pan. Bake for 25-30 minutes until the top is set.
- While the brownies are baking, make the peanut butter filling. On the stovetop, melt the butter over low heat. Add the brown sugar, peanut butter, powdered sugar, vanilla and salt. Stir until the mixture is combined and smooth.
- Press the peanut butter mixture lightly on top of the brownies, doing your best to make an even layer. Sprinkle the chocolate chips on top and wait five minutes. Using a spatula, spread the melted chocolate over the peanut butter layer.
- Chill for about 30 minutes until the chocolate is set. Let the bars come to room temperature and cut into small squares.