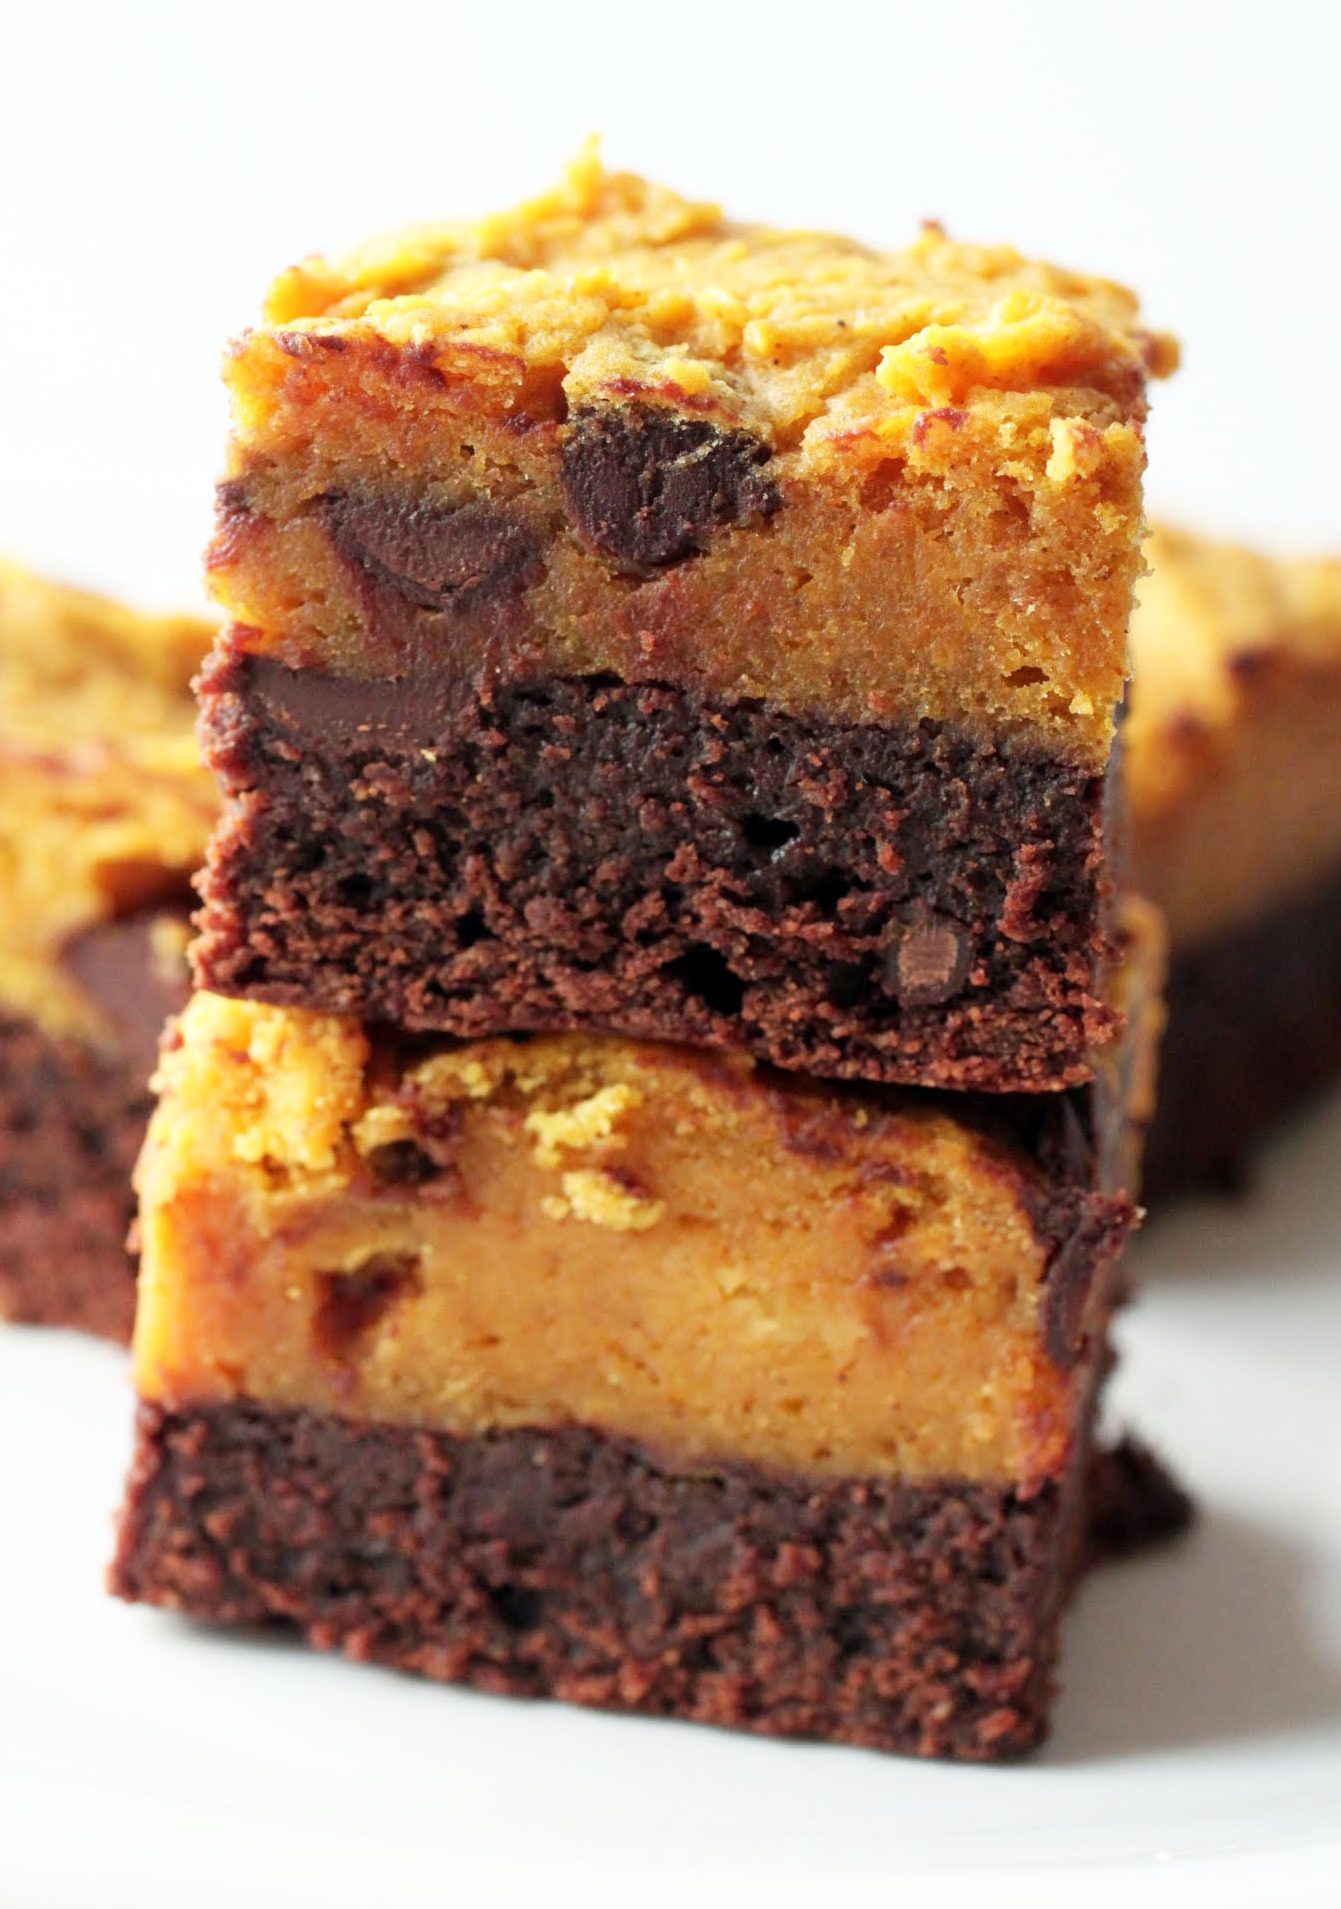
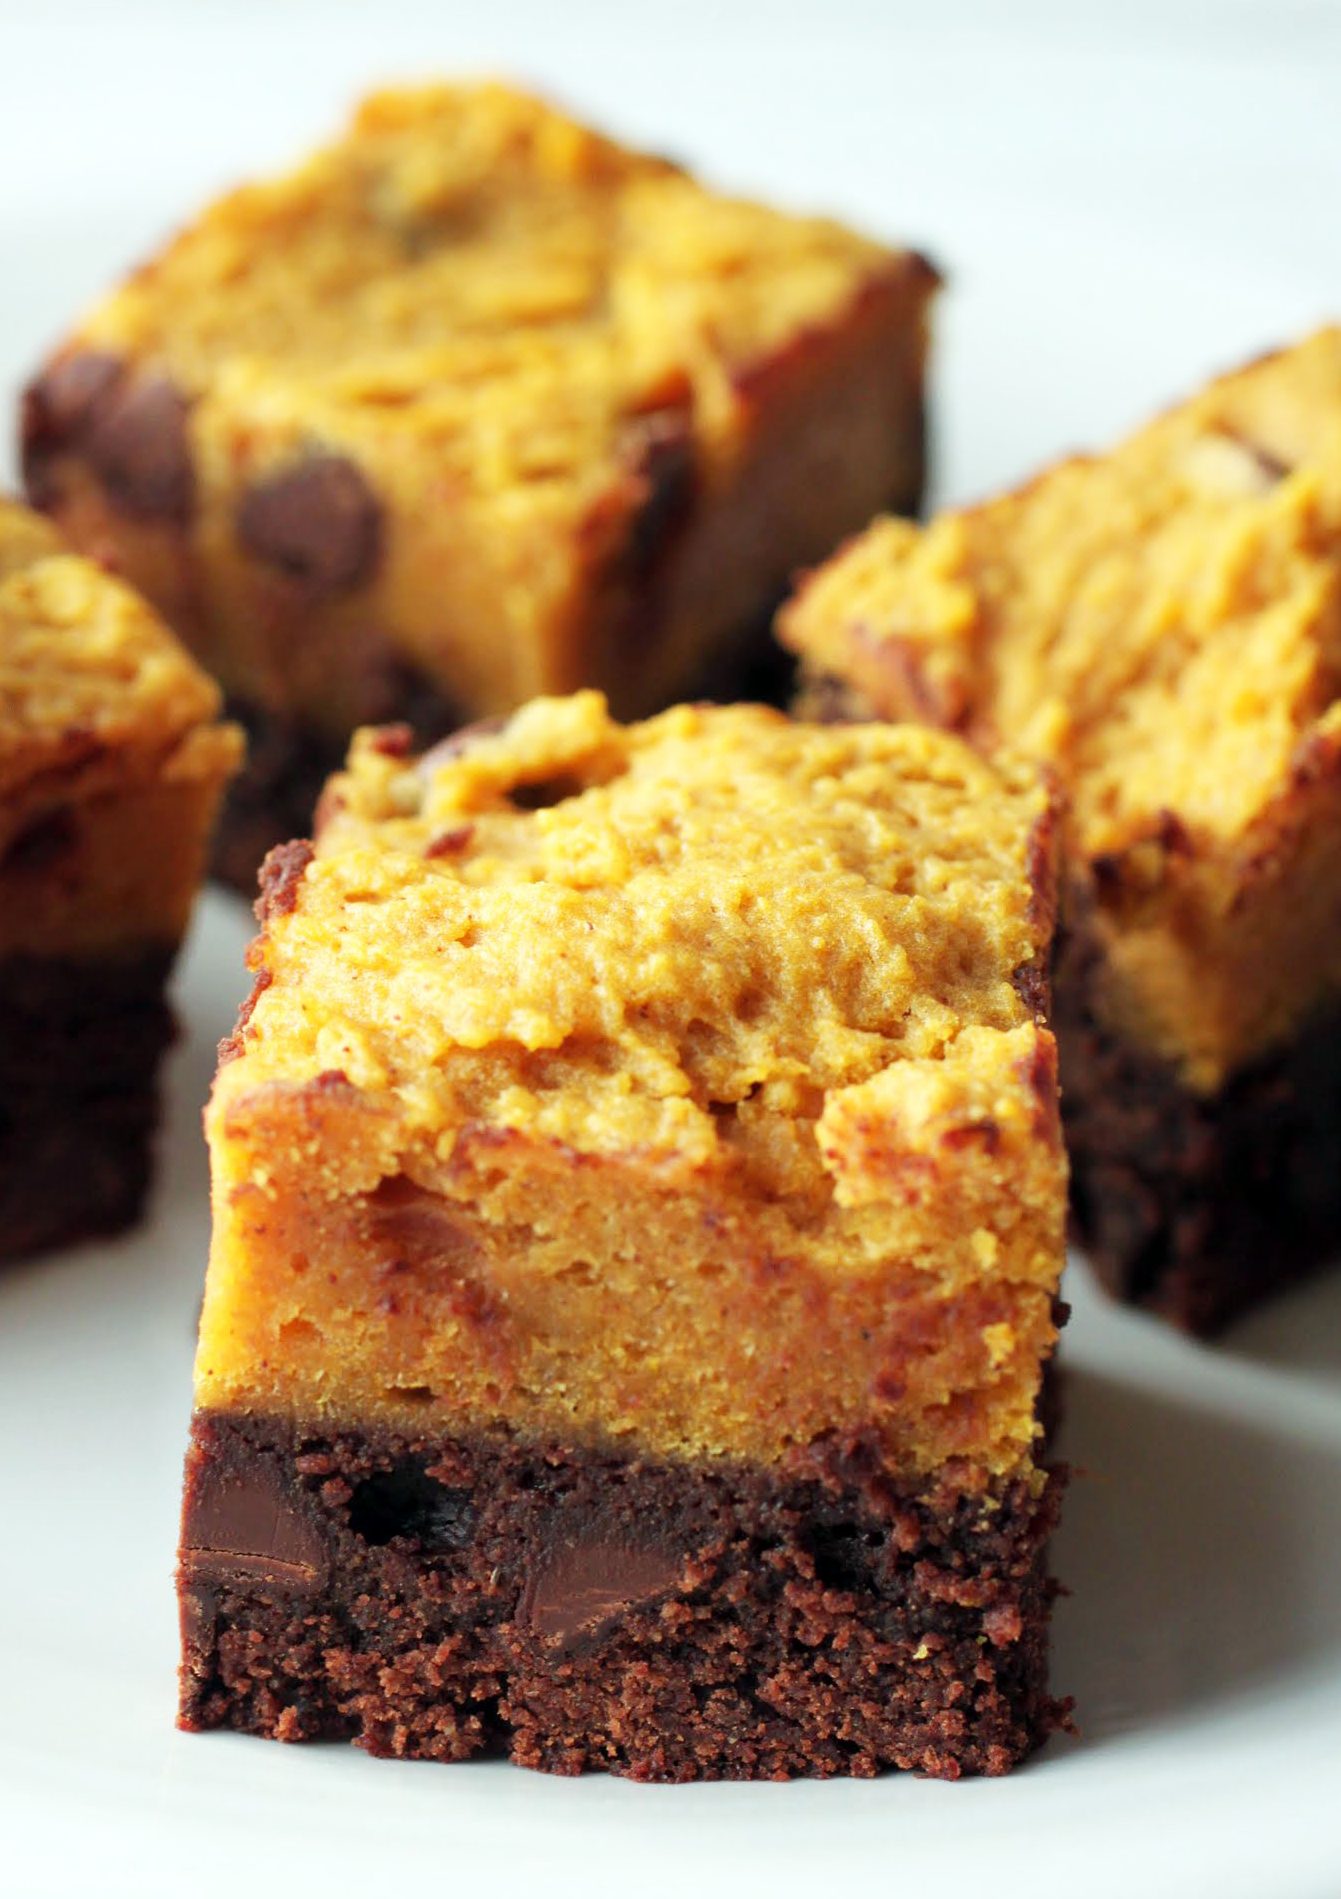
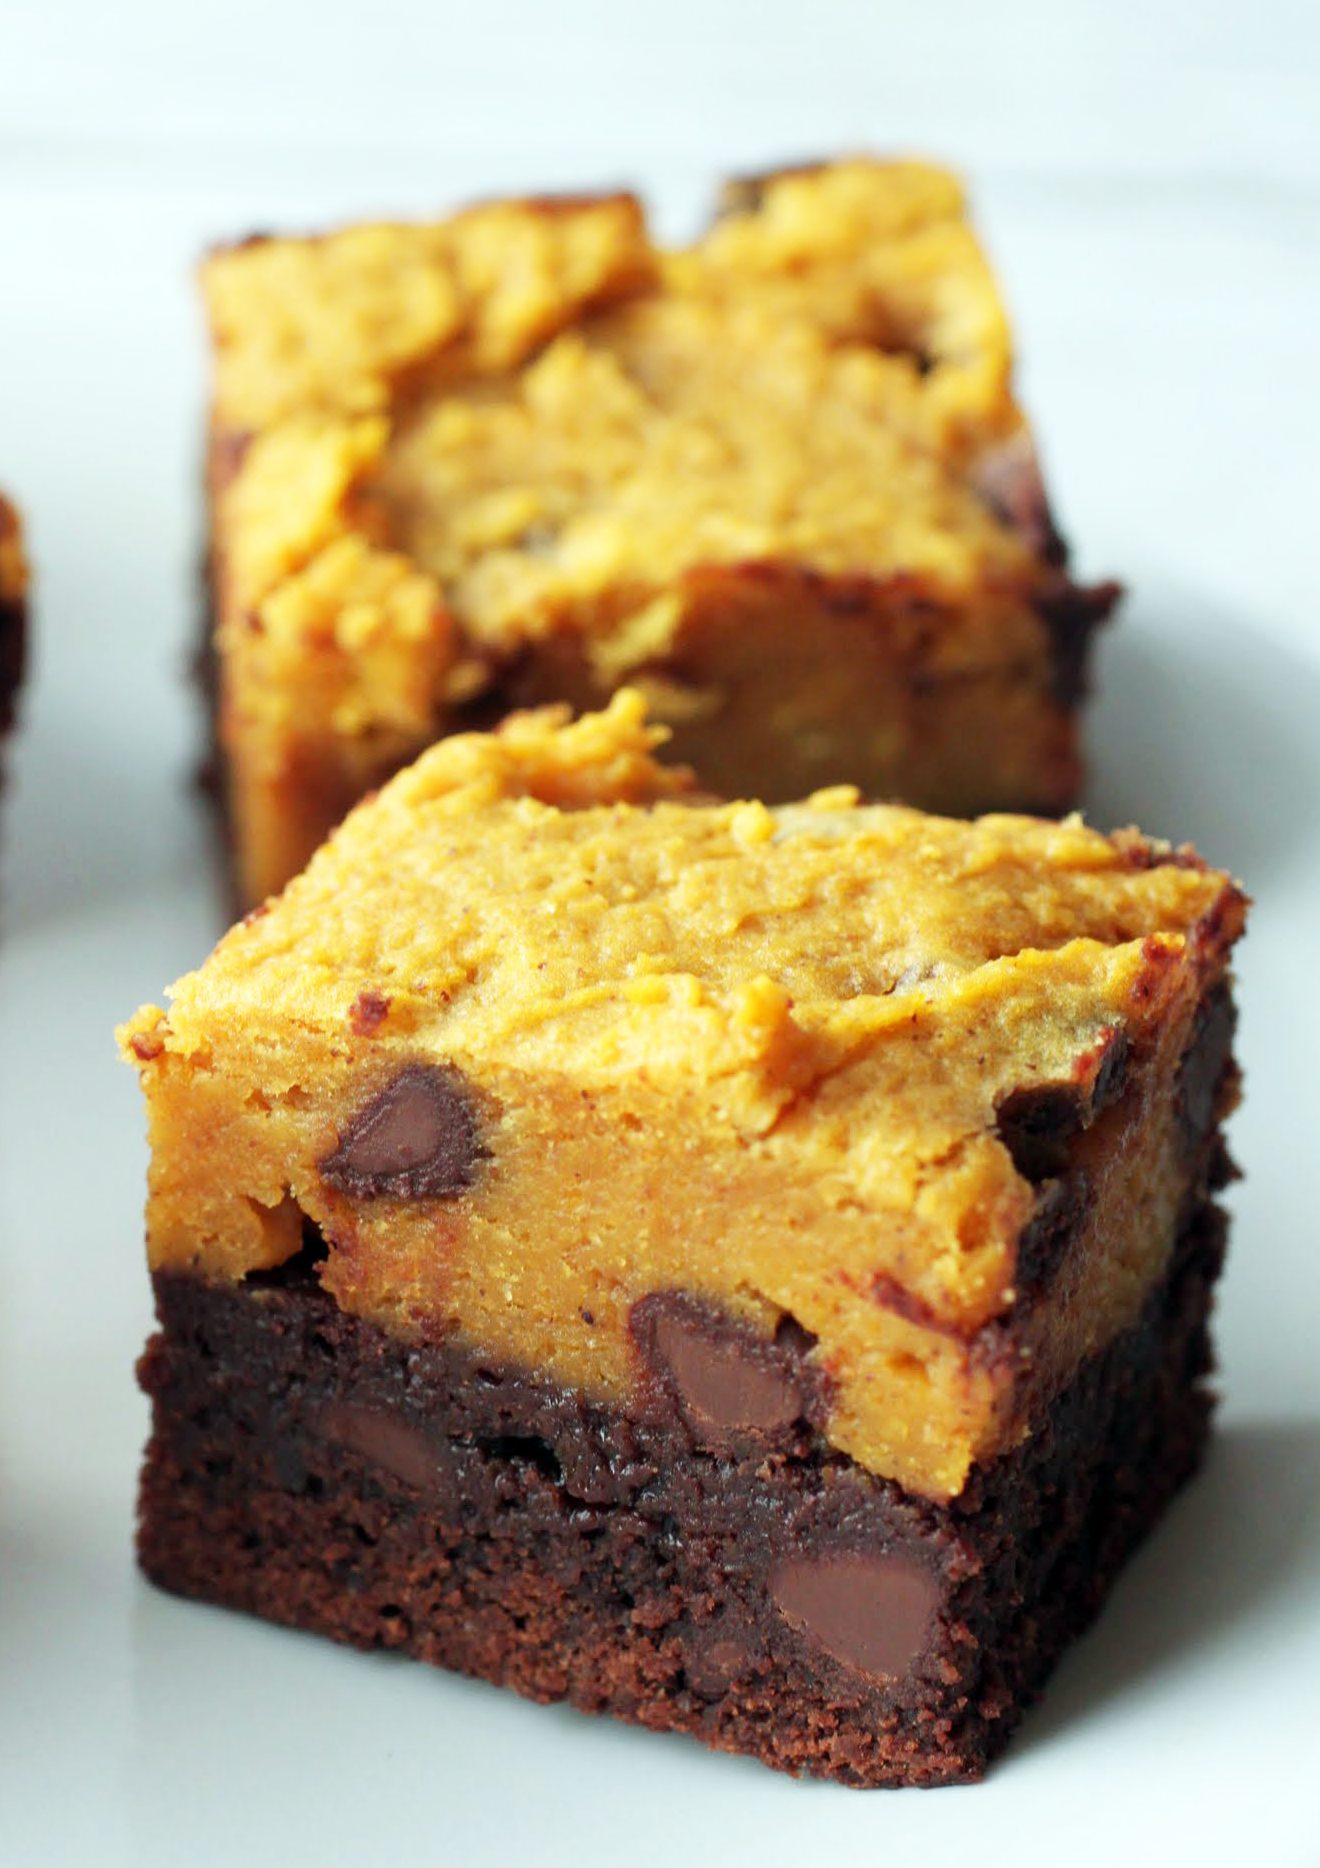
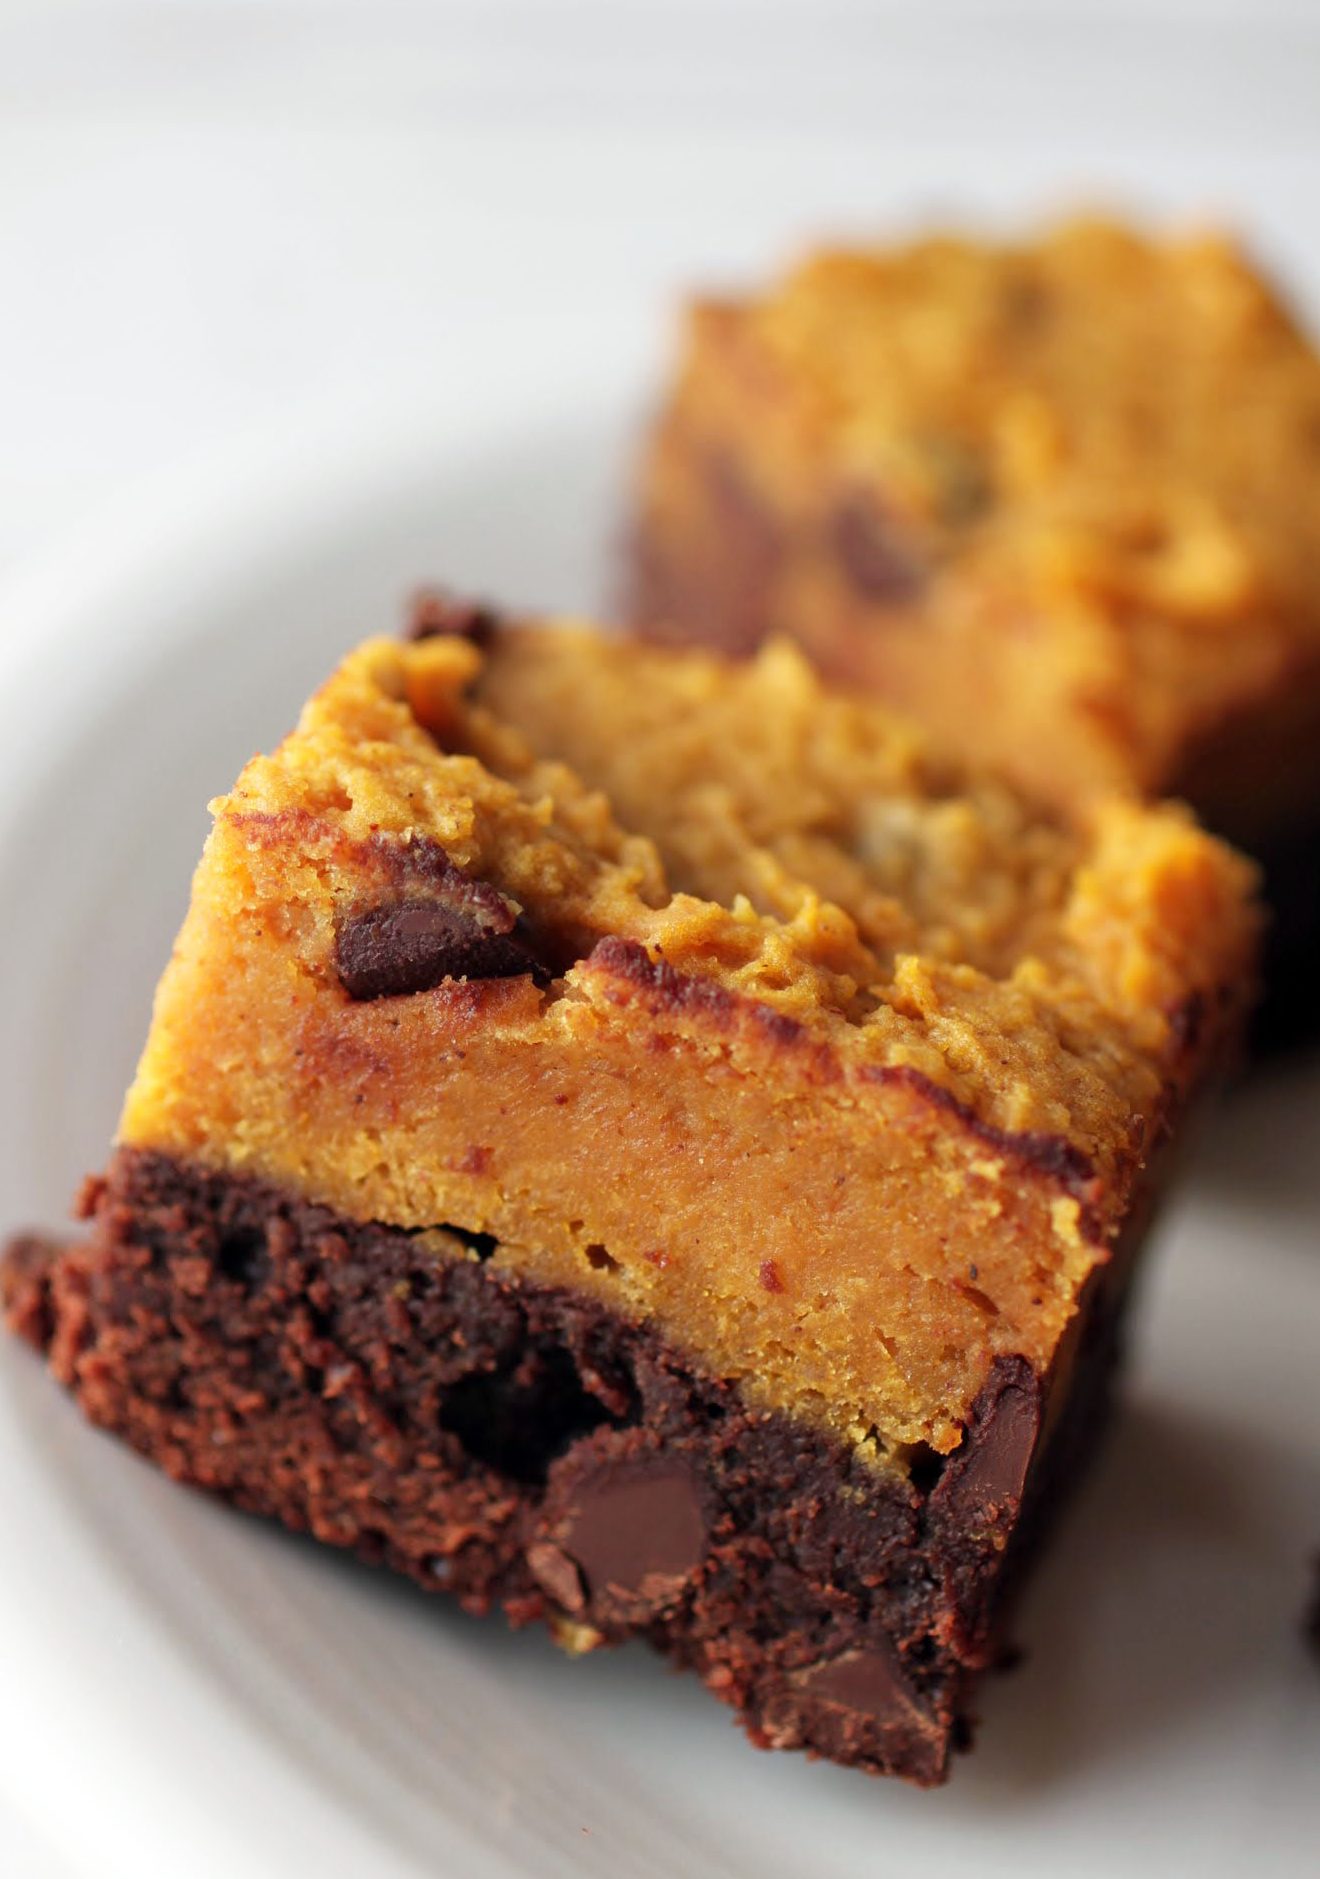
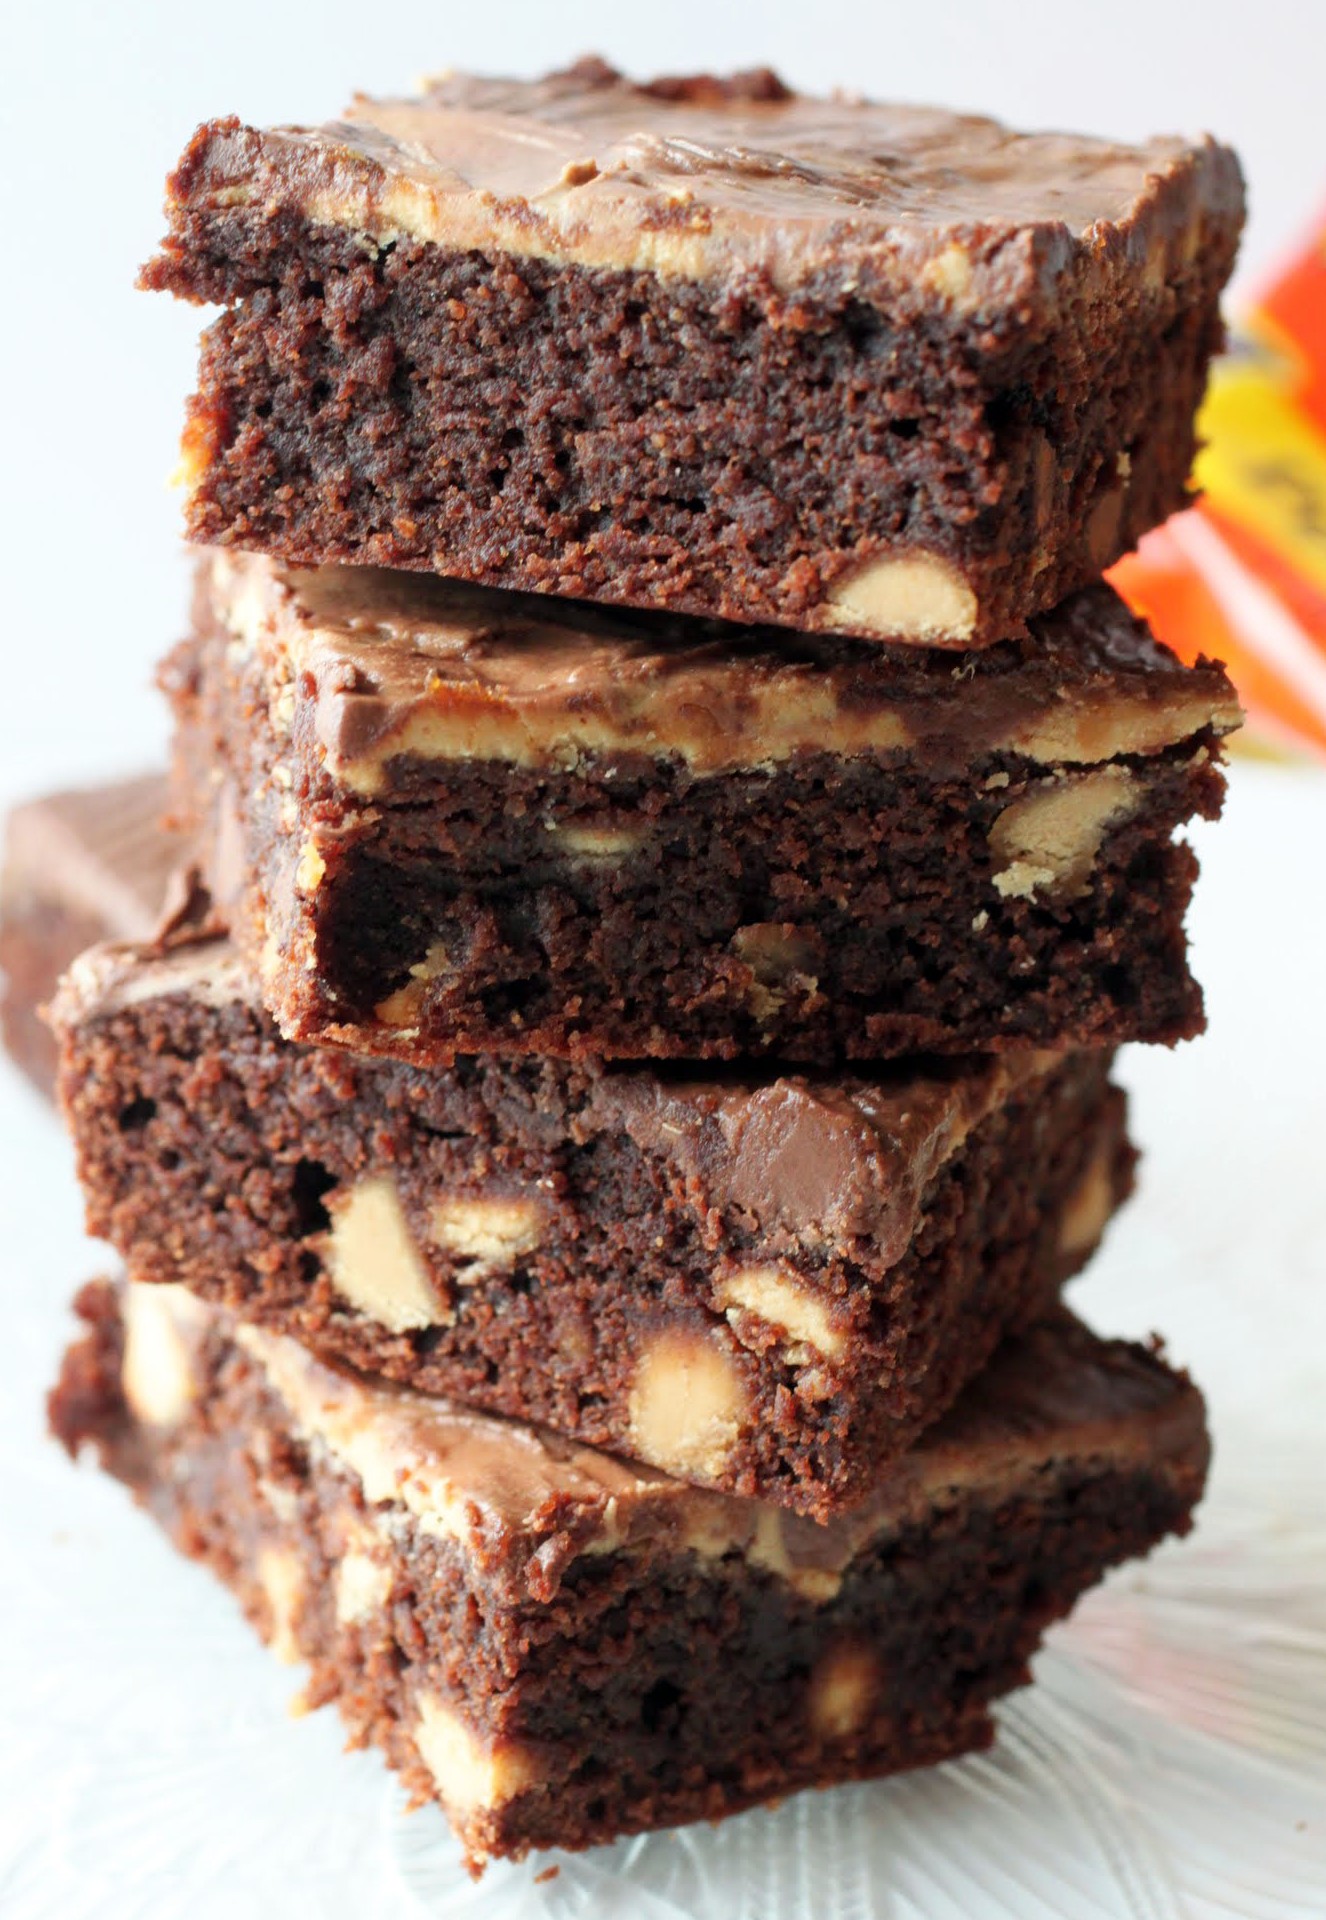
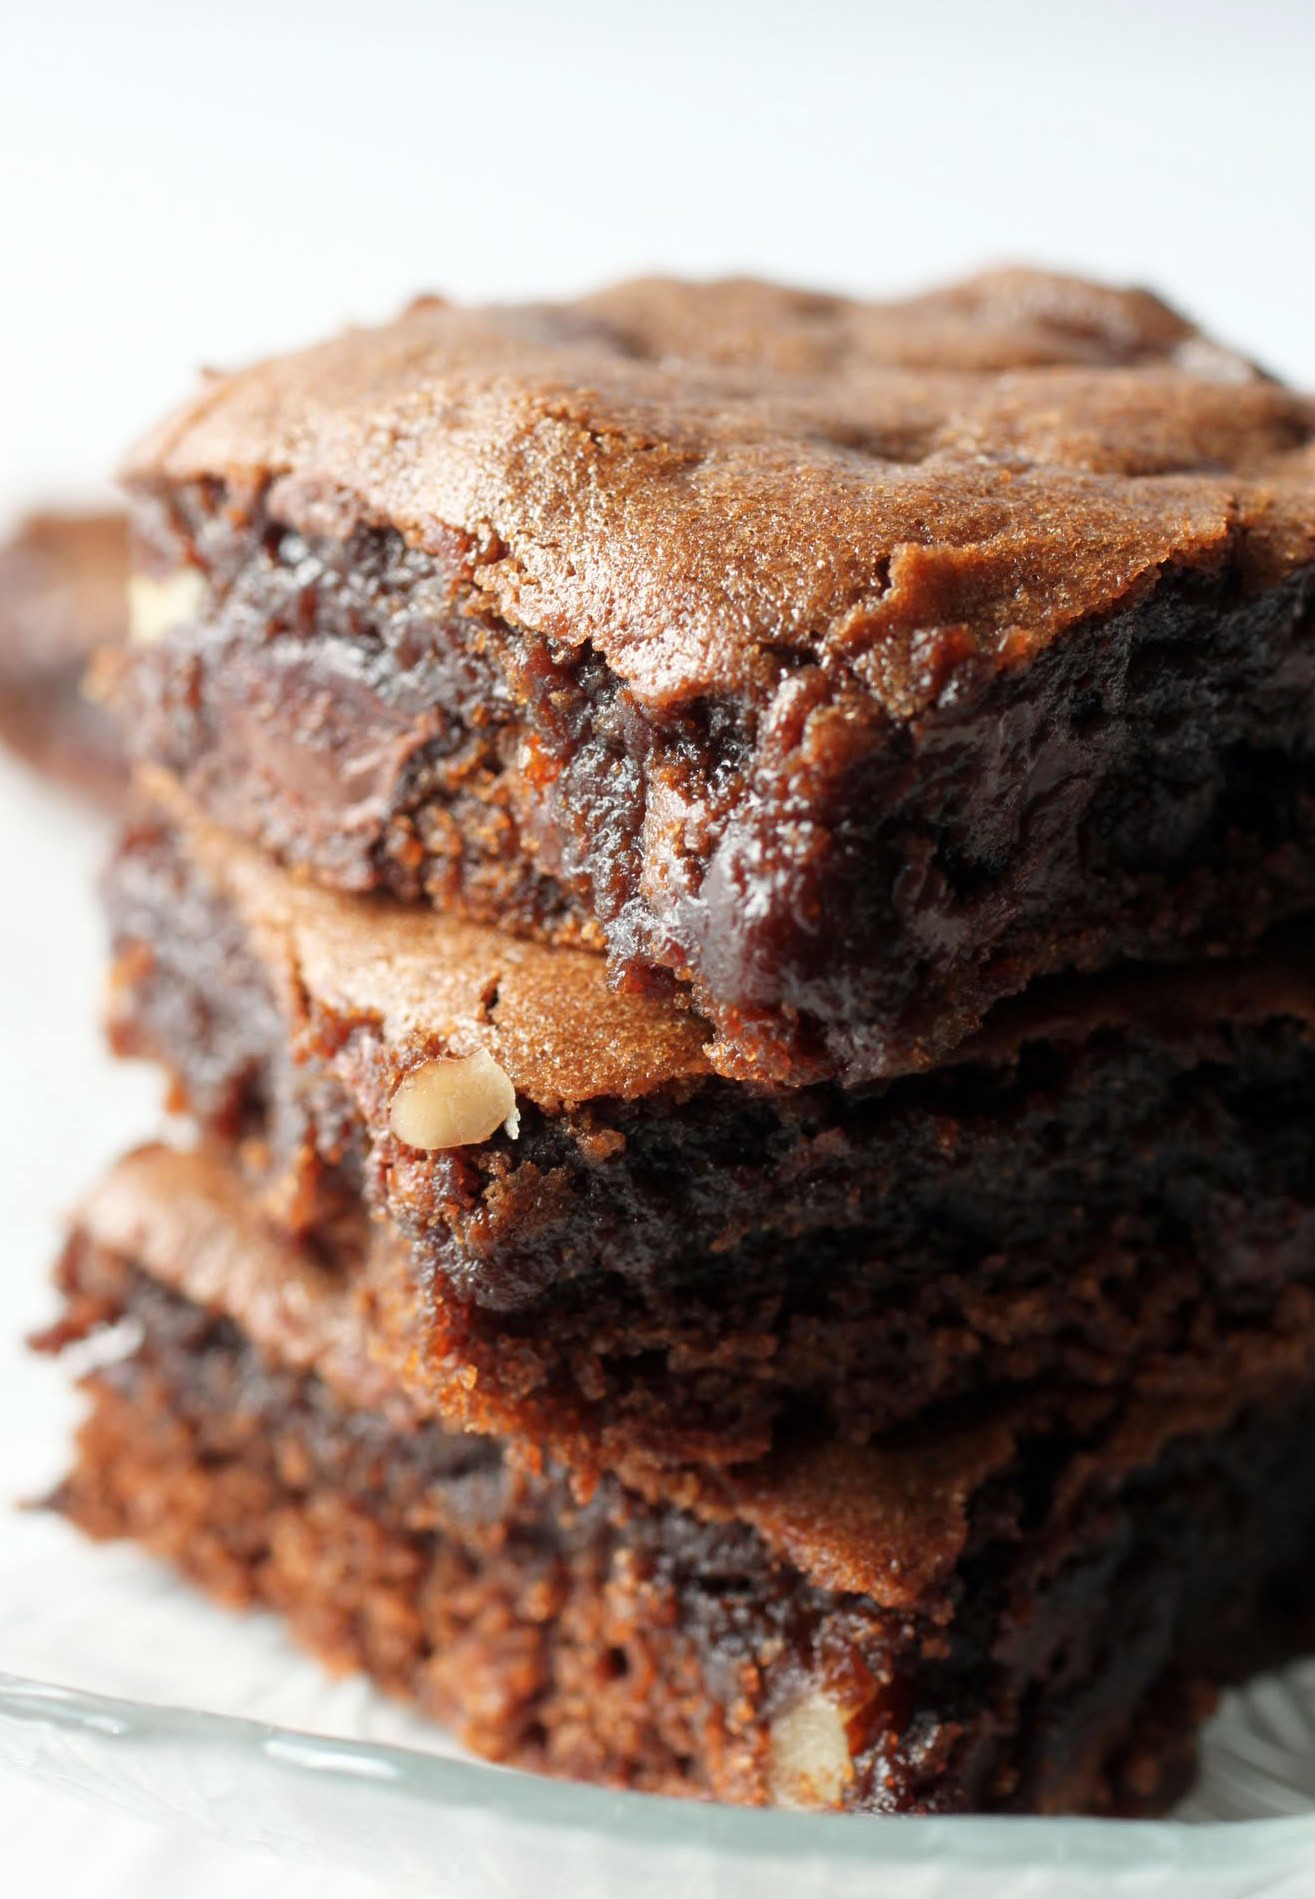
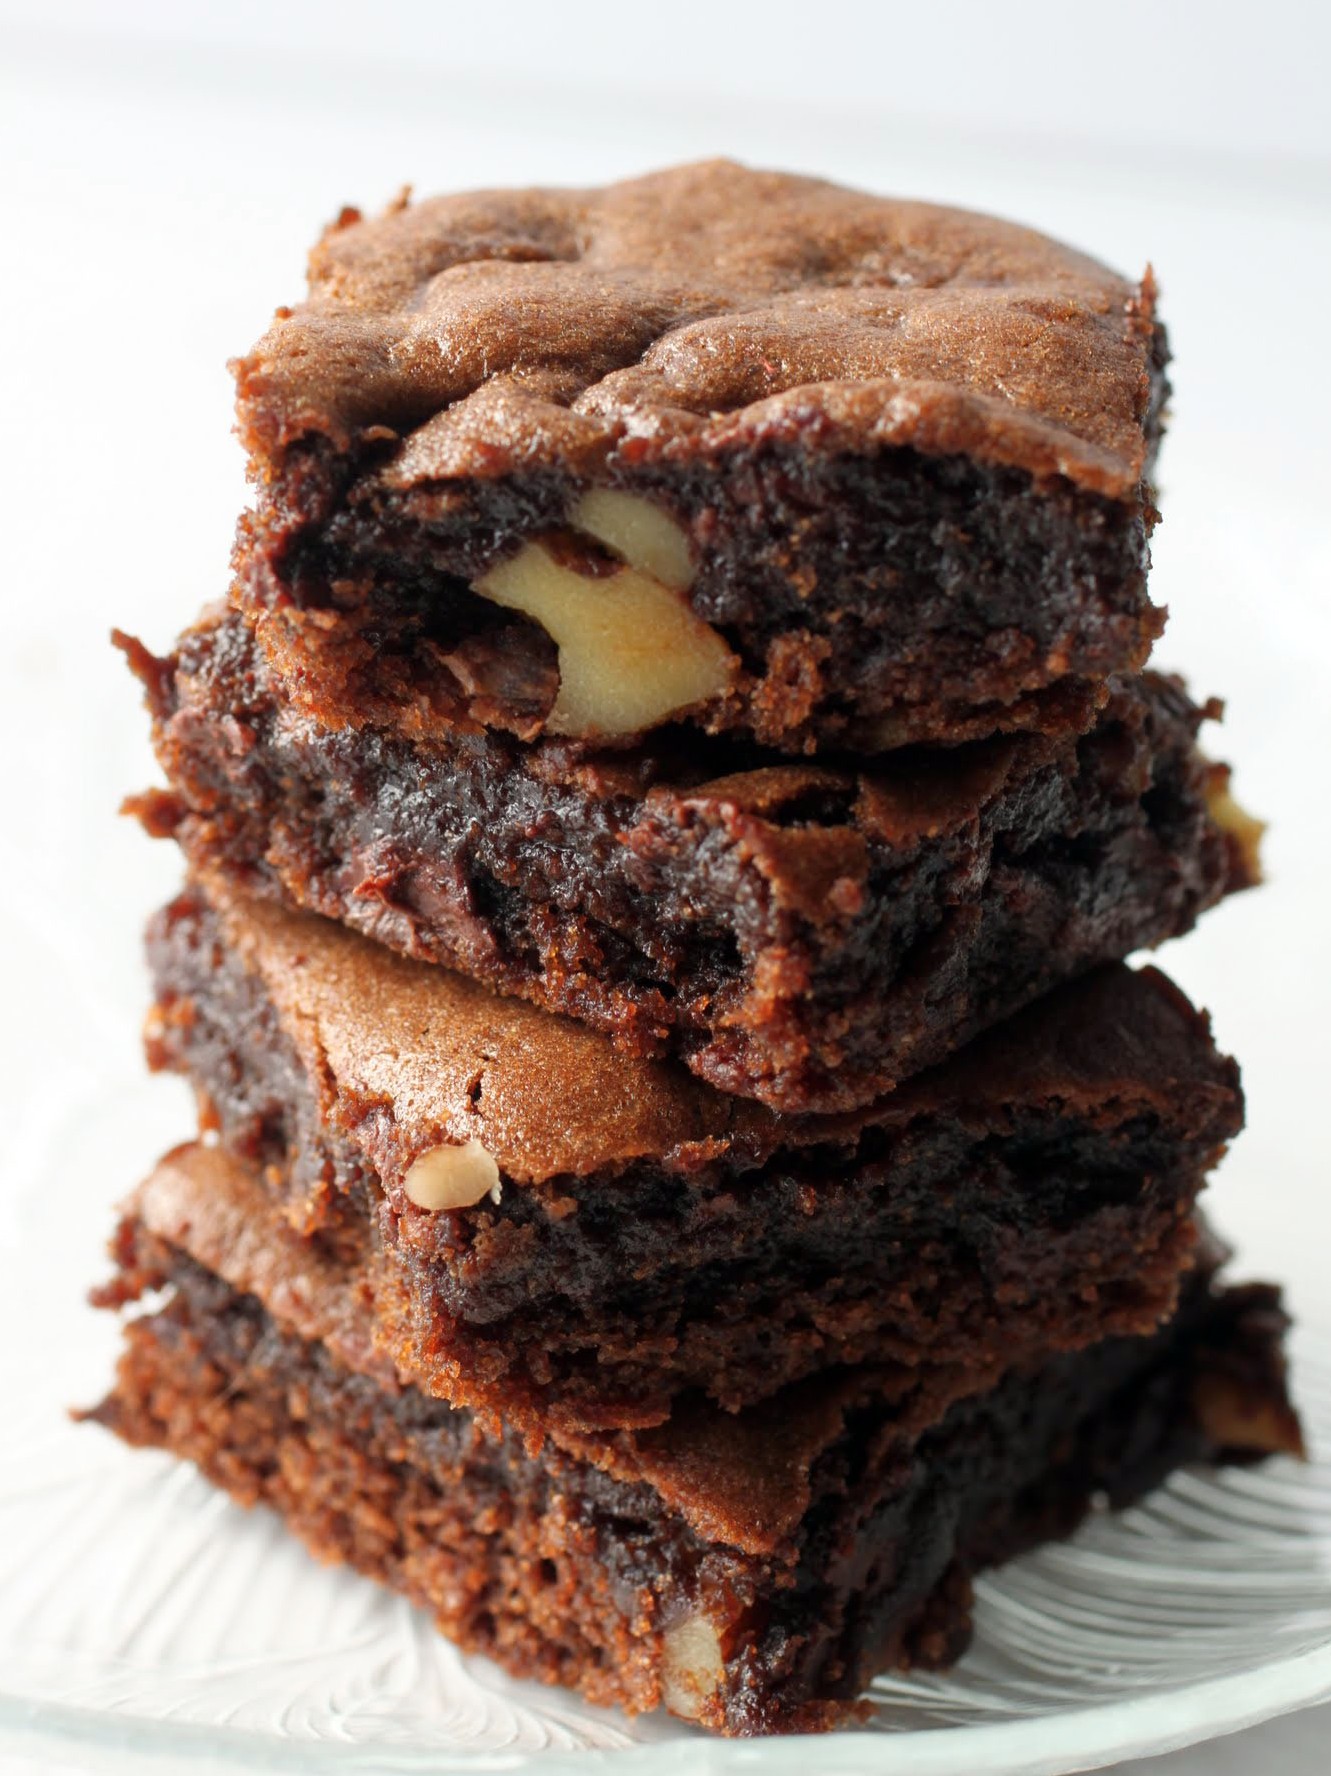
In case you’ve never had a brookie before, it’s just the kind of dessert that inspired me to begin food blogging. A cookie/brownie hybrid deserves a food blog, right?
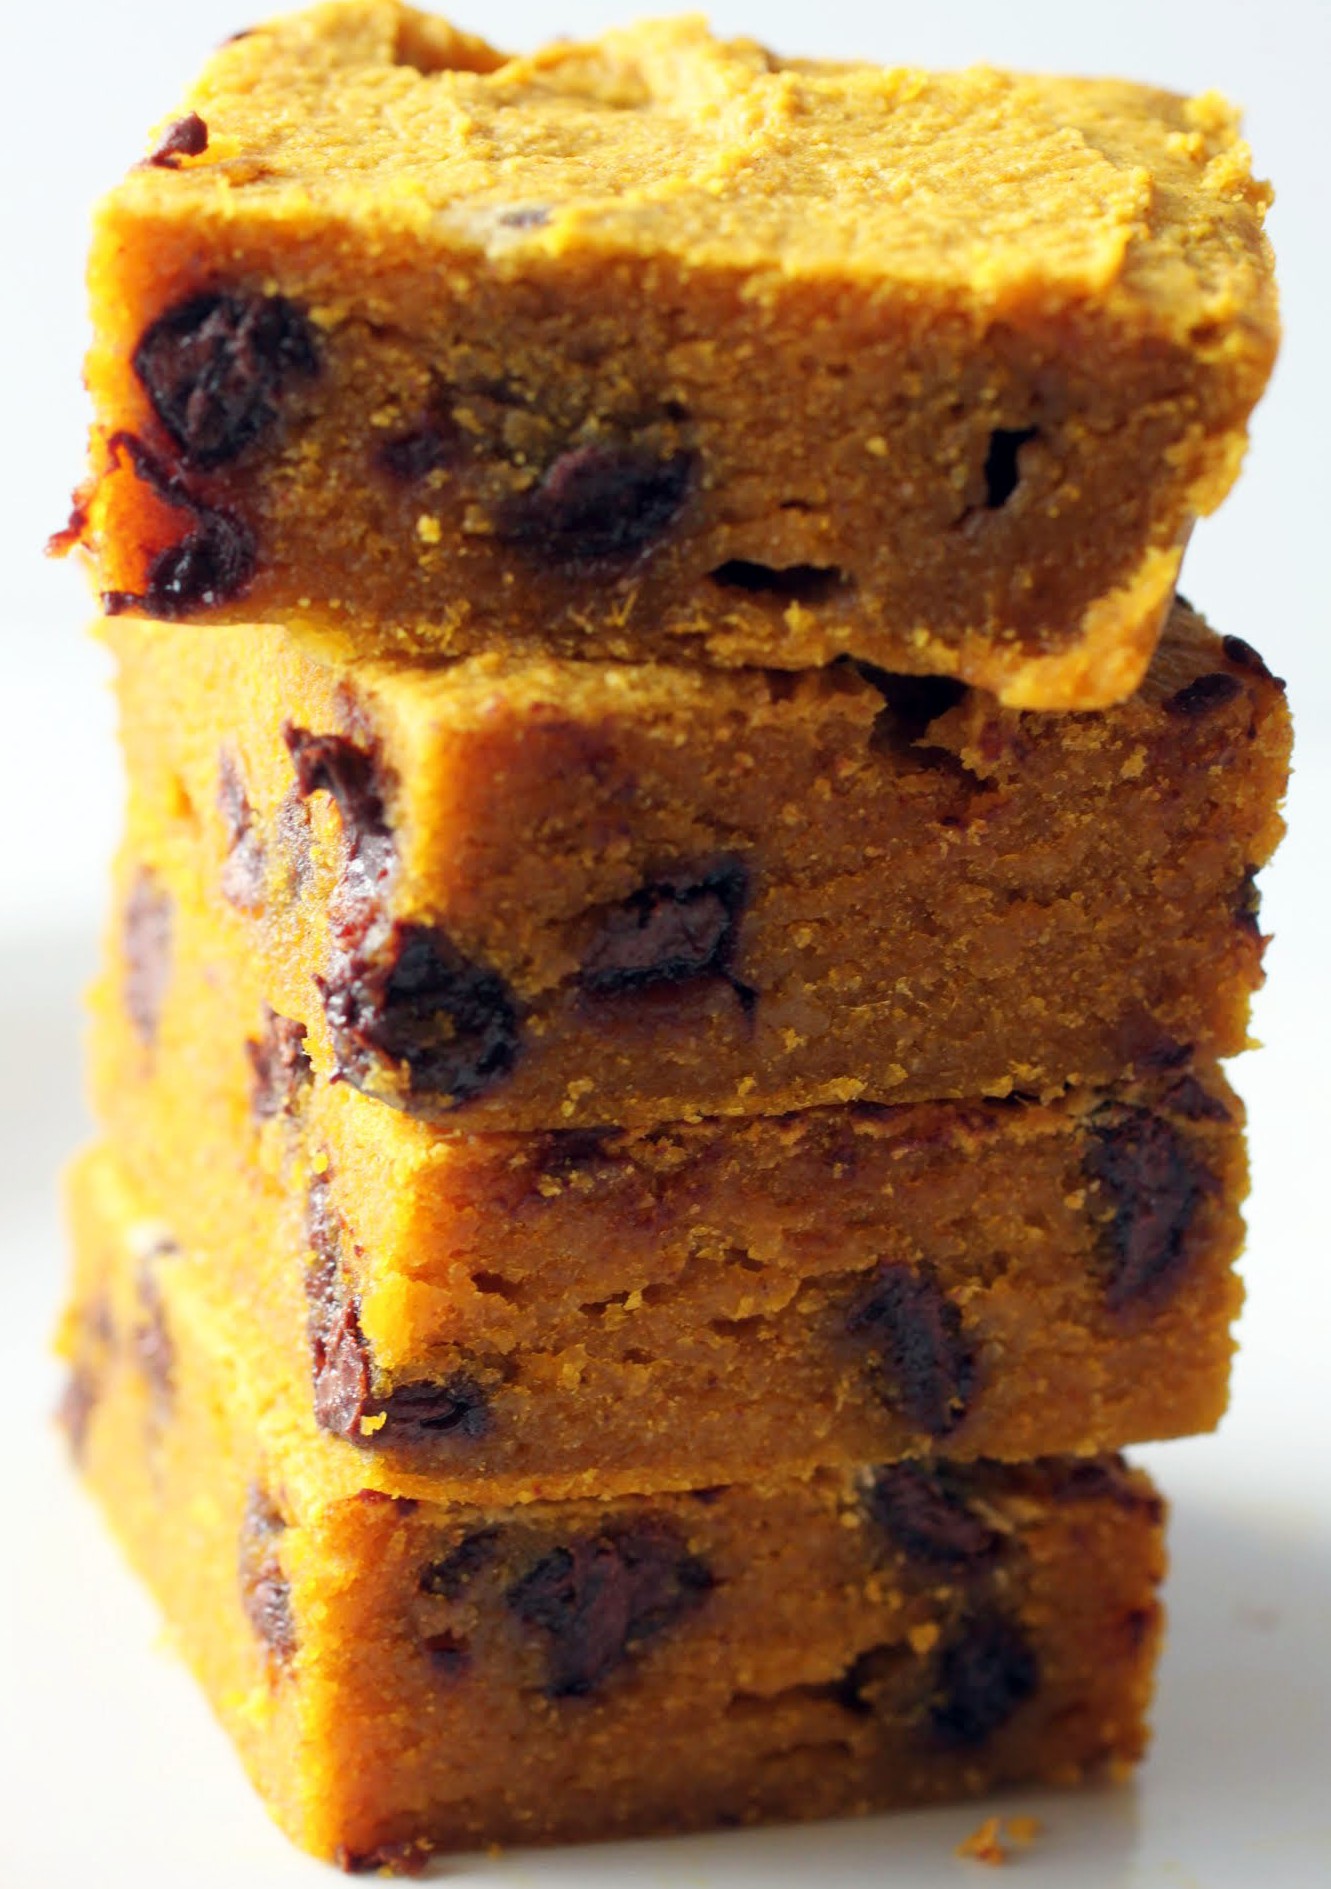
But you see, these are even better. The bottom layer is a chocolate chip-filled fudgy brownie, and the top is pumpkin chocolate chip cookie dough. I’m so glad brookies are a thing, but even gladder that pumpkin brookies can come out of it!
Almost three years ago, I decided to start Just About Baked. It was a love story to the desserts I push to decadent limits, and a way to write and express my creativity in a way that I hadn’t been able to before. I started this not knowing anything about what I was doing, and boy, did it show.
Those early pics? Don’t look. And as for the rest of it, I learned a lot about so many things. The learning curve was steep, and I was excited to get a chance to absorb whatever I could.
But here’s the rub. All this time, I’ve been doing my first passion during the day, which is teaching. I’ve been teaching full-time in public high school for 17 years. It’s a full-time job and then some. I work a minimum of ten hours each day and then come home to make dinner, do homework with kids, have playtime, put them to bed and then work some more. In case nobody’s ever told you this, grading papers and planning lessons takes forever, for English teachers especially. Case in point? Before I wrote this post today, I spent five solid hours grading about 35 essays. And I’ve got many more to go! Not complaining, but it is what it is.
Somewhere in the middle of having three kids and being a teacher, I needed some additional stimulation. Anyone who knows me realizes that my days are packed, and I like them that way. So I created this site, nurtured it, and managed to keep it fairly functional for a while. Until recently.
Over the summer, I got a lot busier at work thanks to a promotion, and working all day and part of the night all week long is tough enough without having to bake, photograph and organize JAB on weekends. See, I like to hang out with my kids, and that’s more important than social networking. I’m also not that good at social networking, to be honest. It’s always felt uncomfortable to me, like I’m existing in a world that’s not quite real. I also like occasional downtime, and working 24/7 takes that away. Oh, and did I mention that my house is falling apart because there’s no time to fix things or clean up after my three kids?
I like to give what I do time and attention, and it’s not happening on this blog the way it should or could be. I wish I could be Superwoman and just do everything, but nope. I’m not going to hold myself to impossible standards, and I’m not going to let the time I have with my family suffer either. My first professional passion was teaching, and there it stays. Prioritizing has to happen sooner or later.
That doesn’t mean that I don’t still consider myself a baker. It also doesn’t mean that I’ll never pick this up in an official capacity again. However, I need a break. I need time to think about things. It goes against the grain of who I am to do anything that resembles giving up, but I have to show myself some compassion. Better to take some time and figure out whether JAB is a chapter that will continue, or if it’s about to become a piece of my past.
I have one more post later this week that will thank all the lovely people who have helped me over this journey, and that I hope will express how much I’ll miss them. I’m emotional enough that I can’t even write about these pumpkin brookies for now, so just enjoy the pics, okay? I’ll see you in a few days, but for now, already feeling the separation anxiety. It’s been a heckuva ride, and I’ll miss it terribly.
Ingredients
Instructions
- Preheat the oven to 350. Line an 8 X 8 pan with foil and spray it with cooking spray. Set aside.
- In a medium-sized bowl, mix the cocoa into the melted butter until it dissolves. Add the sugar and stir again. When the sugar is incorporated, mix in the vanilla and eggs. Add the salt and flour, mixing until just combined. Stir in the chocolate chips.
- Bake for 20 minutes until mostly set. While the brownie base is baking, prepare the pumpkin chocolate chip layer.
- Combine the melted butter with the two sugars, stirring until smooth. Add the pumpkin puree and vanilla, stirring again until well combined.
- In a small bowl, combine the dry ingredients. Add them to the pumpkin mixture until everything is just incorporated. Stir in the chocolate chips.
- At the 20-minute mark, remove the mostly baked brownies from the oven. Carefully spread the pumpkin batter over the top. Return to the oven for another 10-15 minutes until set.
- Cool completely. Cut into squares and store in an airtight container.
I mean, it’s too sudden. We’re at 90 one day and then 60 the next. I cannot. Has Mother Nature ever heard of transitions? And by the way, could she just stop with the hurricanes already?
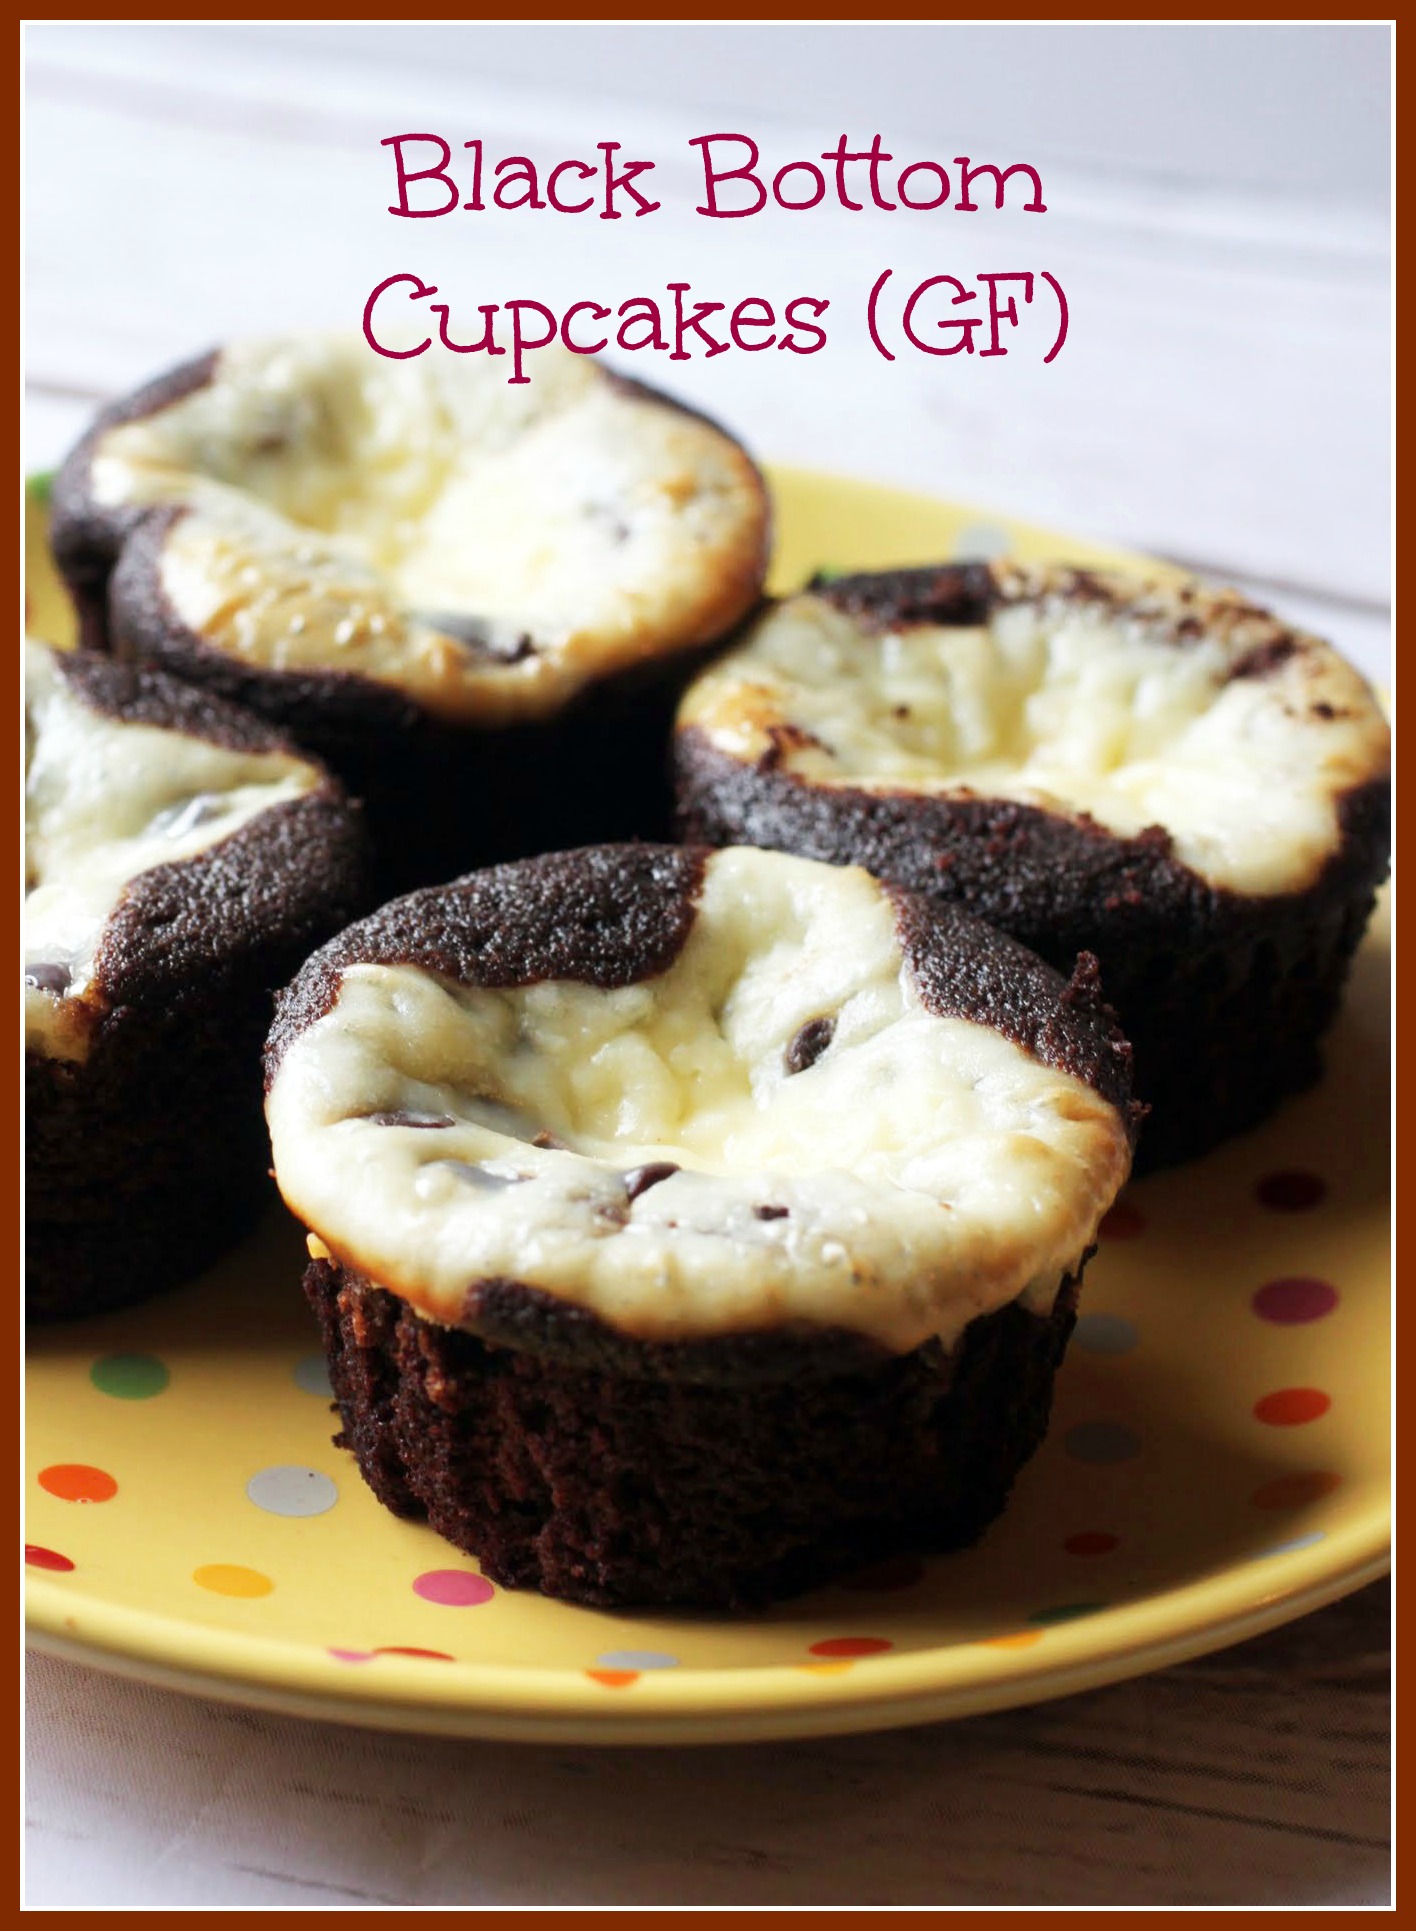
Since I don’t want to spend today talking about the weather, I’ll talk about something far more relevant instead. My blog’s been around for going on three years now, but I’ve never made black bottom cupcakes. Once this occurred to me (in the middle of the night, mind you, and it woke me up), I had to correct that immediately. I also had to make them gluten-free, just to make up for the oversight of never putting a chocolate cupcake stuffed with chocolate chip cheesecake filling onto this site.
A few weeks ago, you may remember that I fell over and injured my foot. Well, it’s all better now, but it’s been a pain-ridden time. Either I was walking funny or I hit something on the way down, because my back has been spasming nonstop. A few days ago, the relief began to seep in, but there’s still some pain.
The combination of all this plus the stress of the Jewish holiday season (it lasts a month) has made me very neglectful of anything but family or work. In other words, I’ve been ignoring the blog world and social media, and I’m sorry about that. But as my blog friends have taught me, there’s only so much anyone can handle before the nervous breakdown begins. Mine is scheduled for November, by the way. I have to hold it together until then. Winky face.

Seriously, I’ve spent a lot of time thinking about the concept of “good enough.” That’s a really tough standard for me to find acceptable in myself. In other people, it’s usually fine. But for me, I want to be the best. I’m not sure where this overdeveloped sense of competition came in, but I’m pretty sure it was born out of insecurity earlier in life. As an adult, I’ve been set on standing out and setting a standard of excellence.
I’m still driven that way, but I’ve pulled back from that on JAB. I will never be the best baking blogger, or even in the top several hundred. That’s okay. This site began as both an experiment and a hobby, and I’m okay keeping it there.
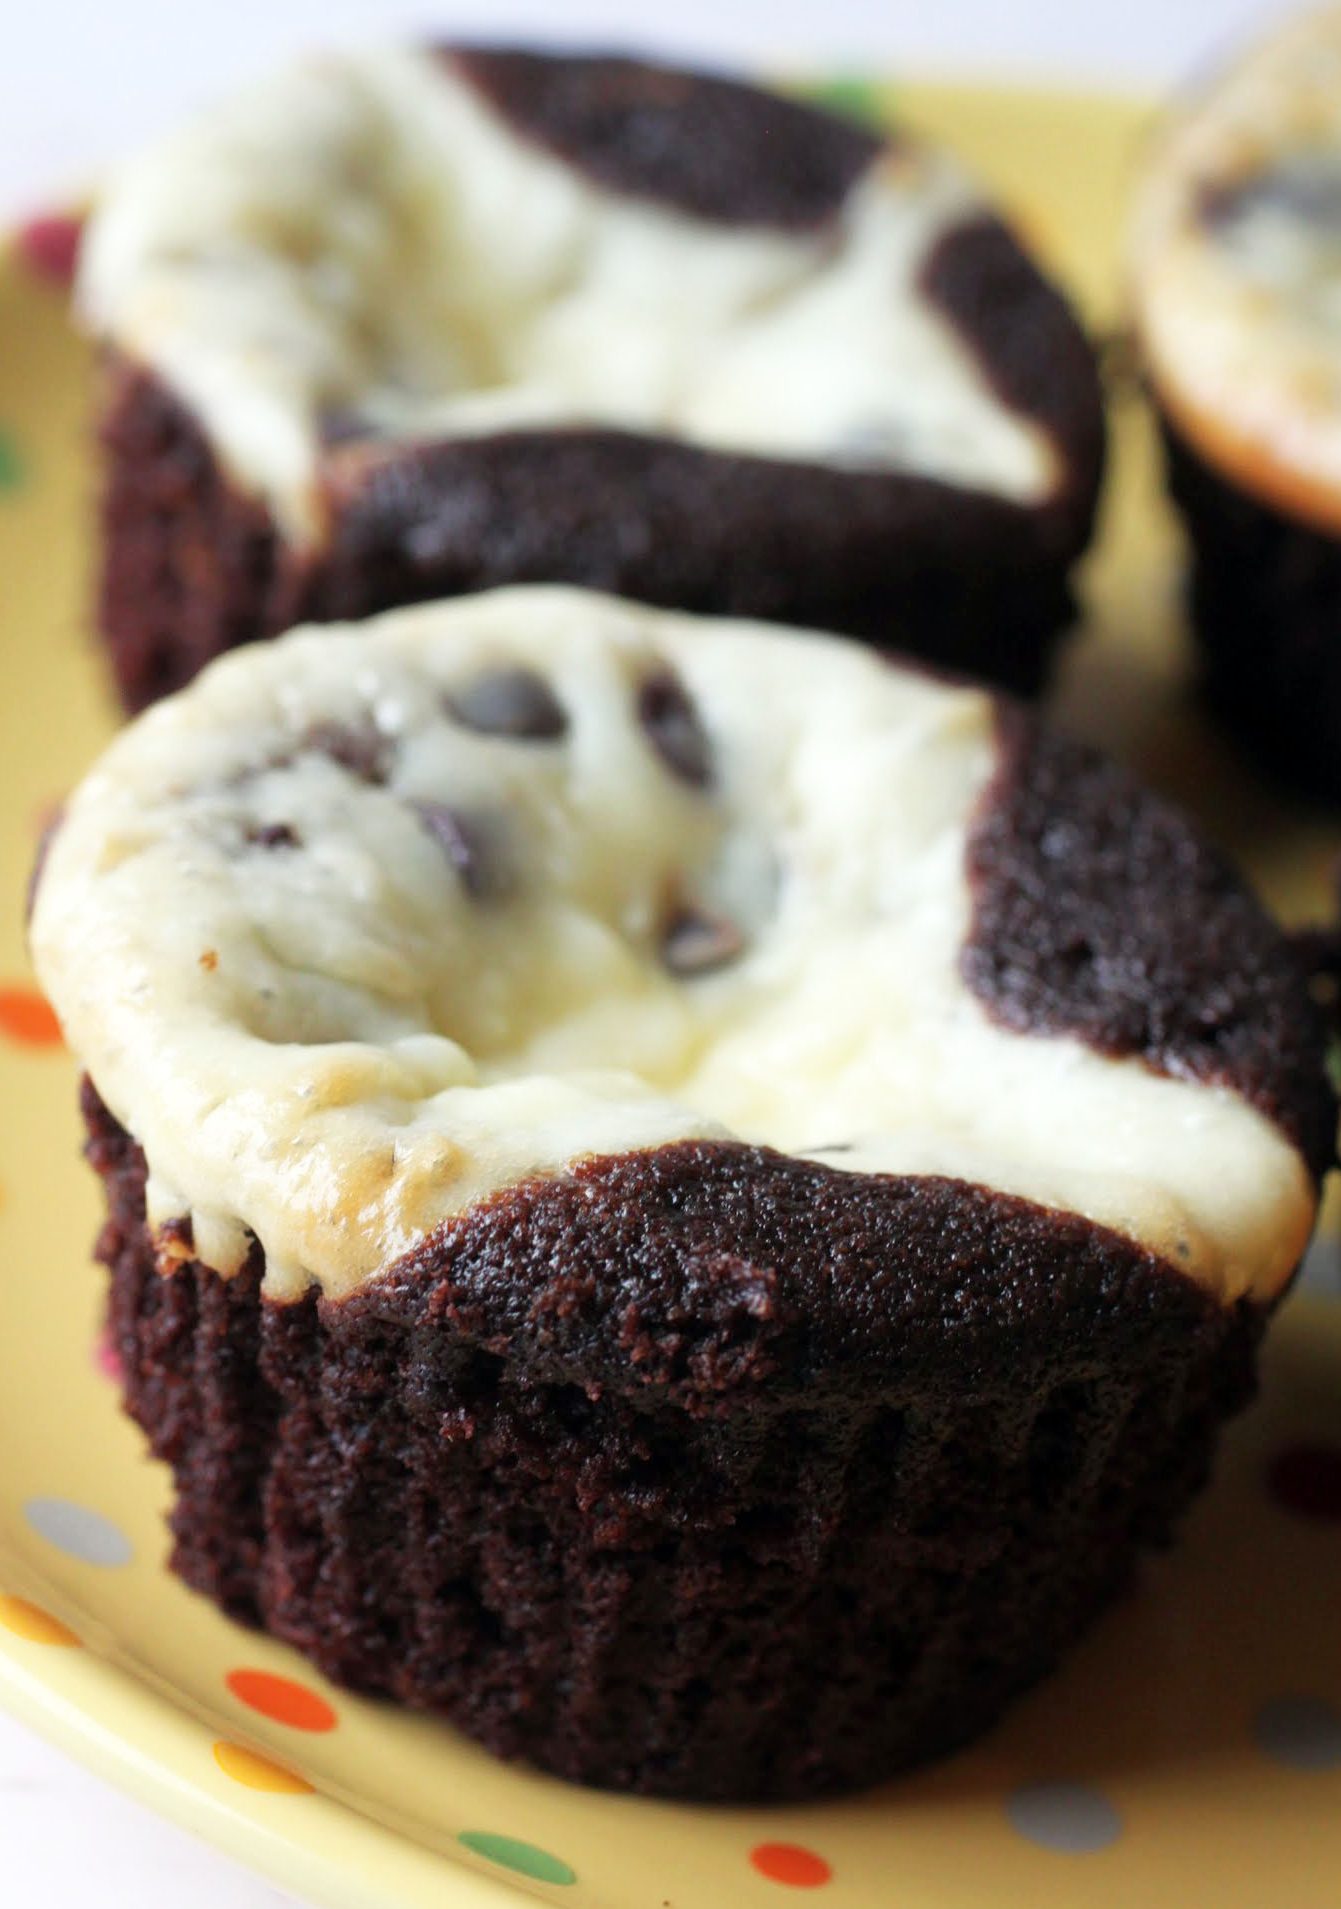
While I might not be on the Internet much, my desserts are as lovely as ever, I assure you. You’ll never know that these cupcakes are GF, and they’re also not that much of a nutritional wasteland.
The cake base of these cupcakes is positively virtuous: a chocolate cake that is vegan with no butter or eggs. The cheesecake filling is made with lowfat cream cheese and only about 1/3 cup of sugar, which means it’s not too sweet. You can eat a couple of these and not feel bad about it at all!

I’ve been in a tough place for the past couple of months, but I have hope that things will slow down and that I’ll stop waking up in the middle of the night thinking about black bottom cupcakes. Until that happens, I’ll just have to keep baking. Enjoy the fruits of my sleepless labor, friends!
Ingredients
Instructions
- Preheat the oven to 350. Line a muffin tip with cupcake liners and spray lightly. Set aside.
- In a small bowl, beat the cream cheese and sugar until creamy. Add the egg and stir again until smooth. Mix in the chocolate chips. Set aside.
- In a large bowl, combine the oat flour, sugar, cocoa, baking soda and salt. Add the water, oil, vinegar and vanilla. Beat until well combined.
- Fill each cupcake liner halfway with the cake batter. Add a teaspoon of the cheesecake filling to the top of each cupcake. This recipe will yield 18 cupcakes, so you may have to bake in batches.
- Bake for 20-25 minutes until the cheesecake begins to turn golden at the edges. Cool completely. Store chilled.
When that happens, I head to bakeries or farmers’ markets. At both, there are people displaying their wares and their creativity. I need both, believe me!
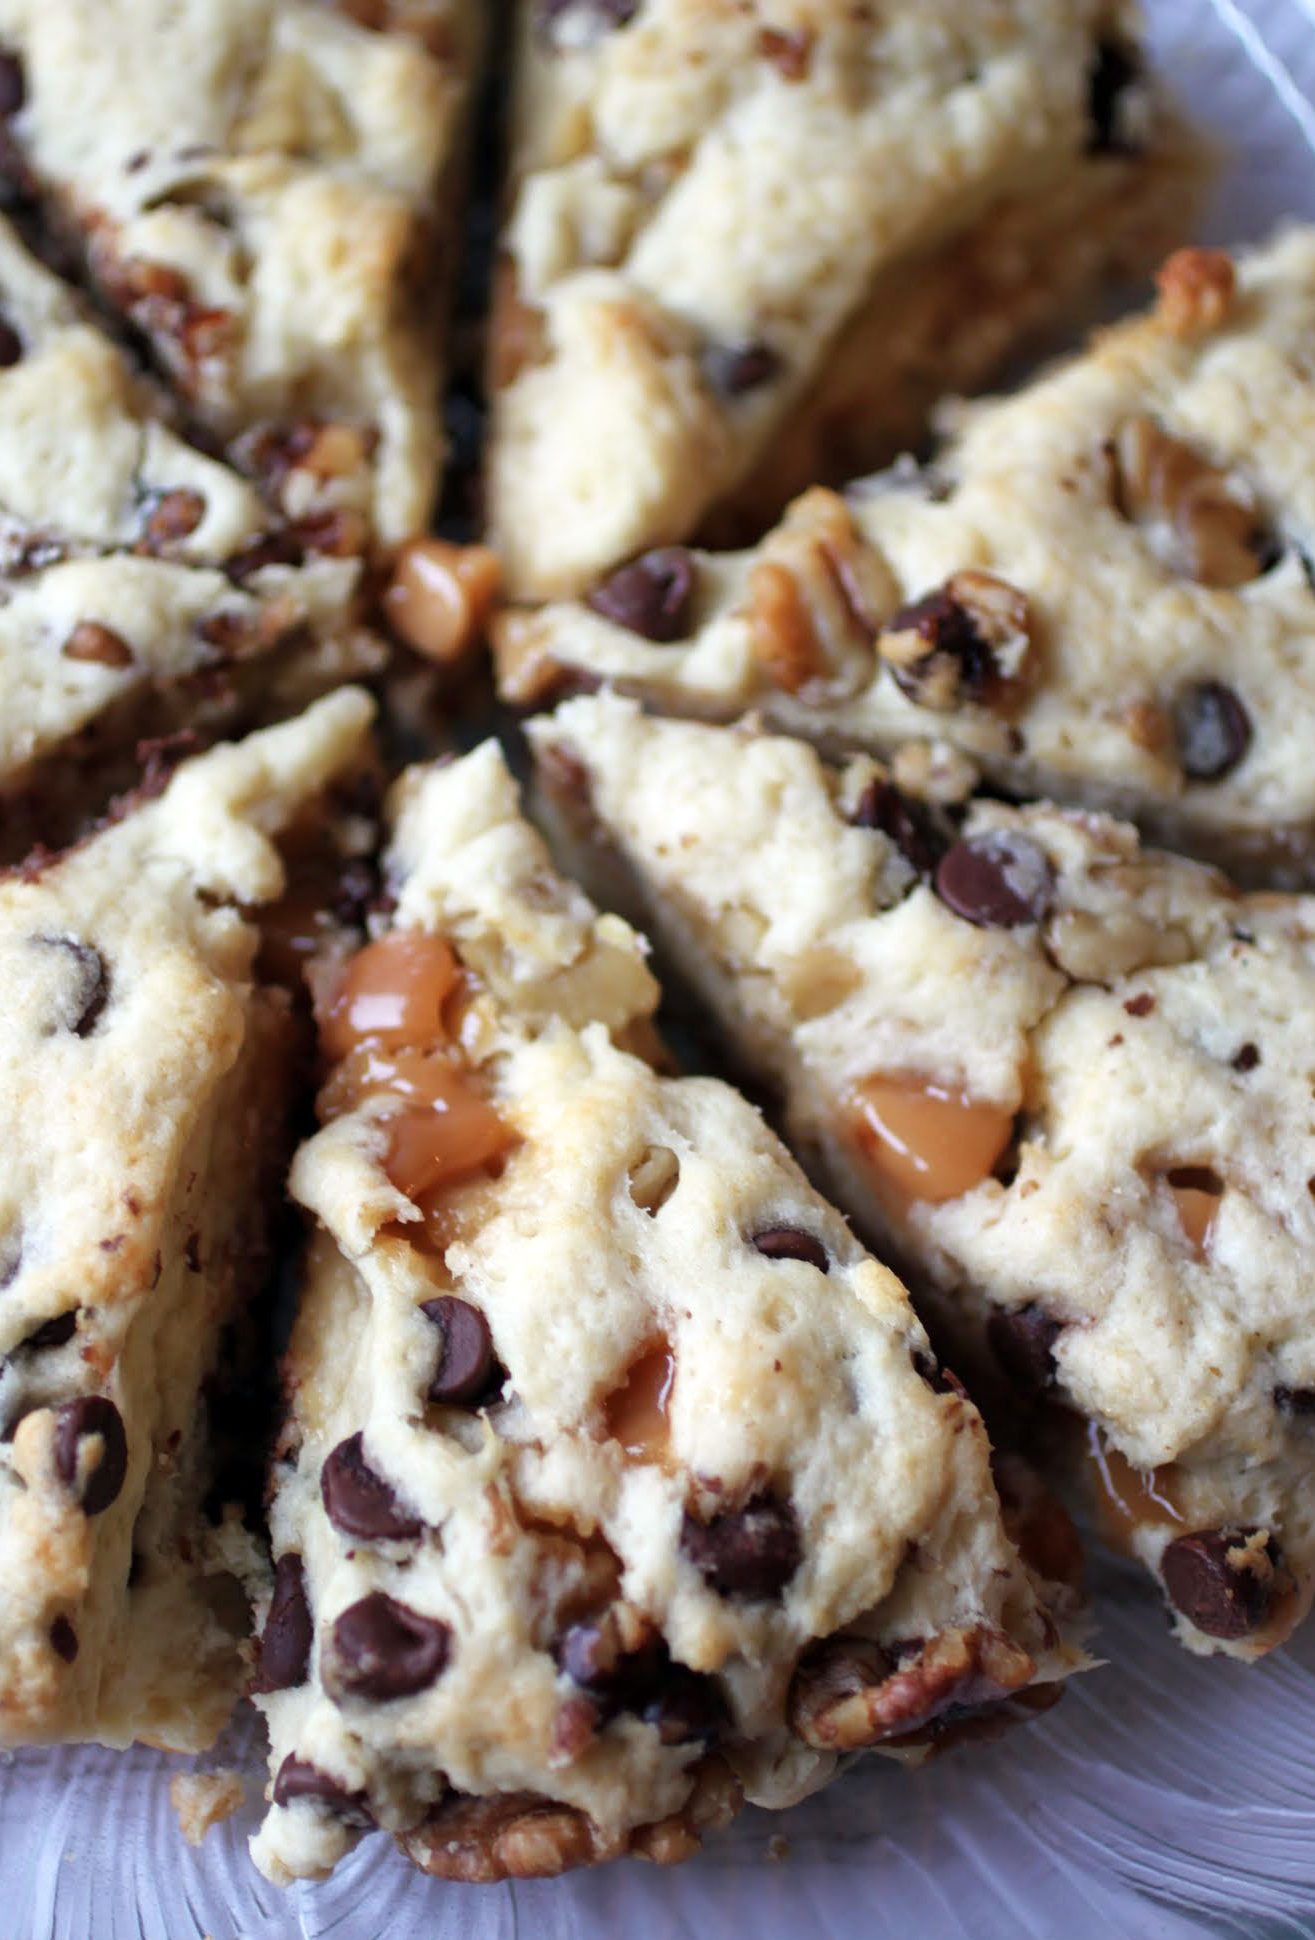
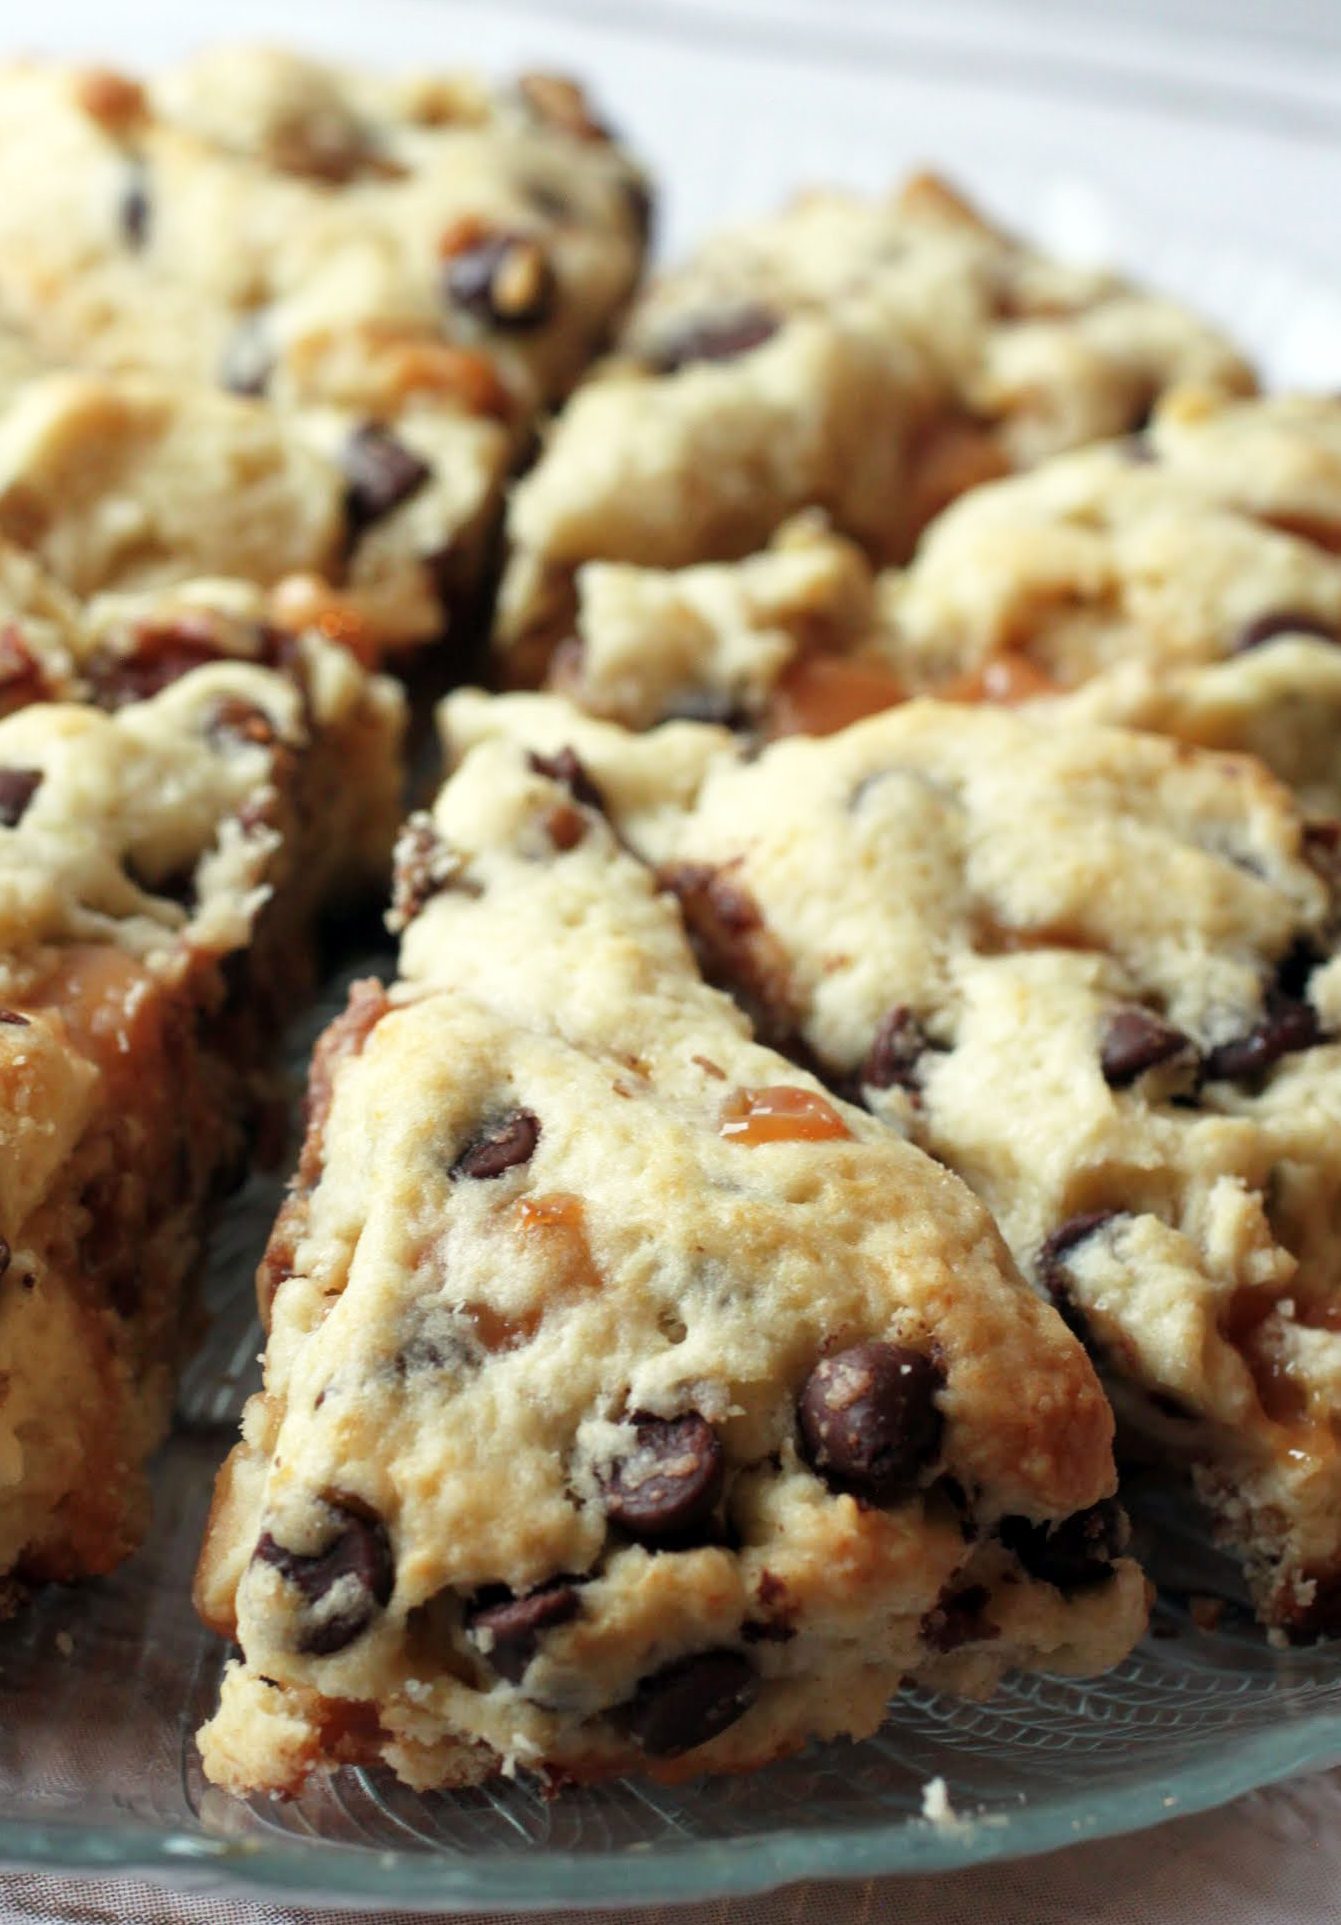
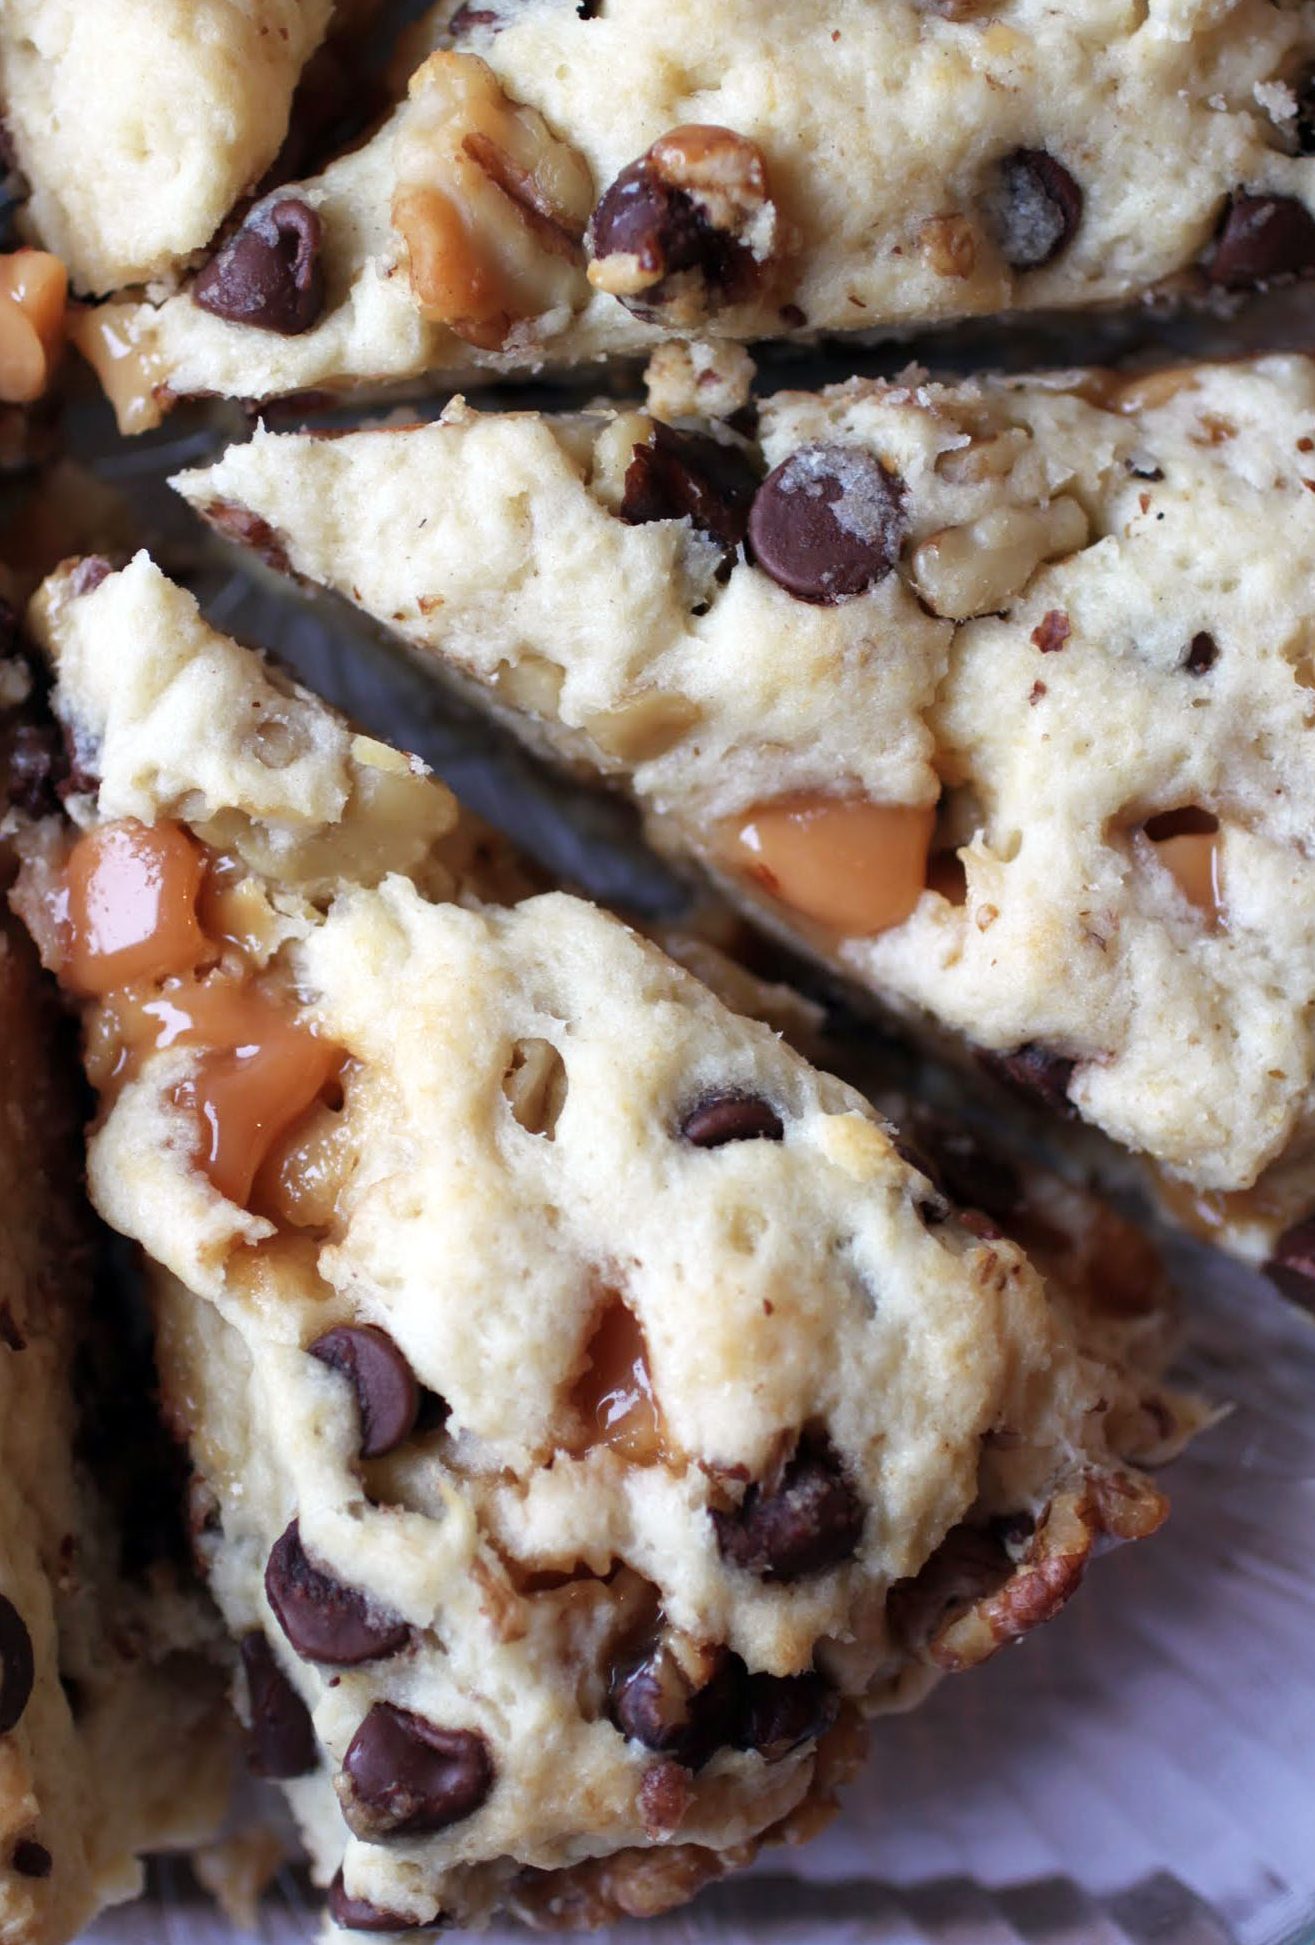
At the market a few weeks ago, a woman was selling turtle scones. The second I saw them, I knew I had to bake my own. Here they are. Could anyone not want these for breakfast? Nope, didn’t think so!
I’ve had a soft spot for Turtles (the candy, not the animal) since I was a kid. My dad would bring my mom a box every Valentine’s Day, and she would always share with me. How great is that? A mom sharing her special candy with her kids is true love. I’ve loved Turtles ever since.
The animal I’m less certain about. Turtles live for a looooong time. Sea turtles live to be at least 100, and those little ones you buy in the pet store live to about 30. I’m not sure I could ever make that long a commitment. Imagine how attached I’d get to my turtle, and how I’d feel when he passed. If he passed before me, that is. They can really hold on.
Still, turtles are cute. I remember this one from my zoology class in high school that somehow got into a duct and crawled all the way through and into our vice principal’s office. Oh, the screams. That was such a good day.
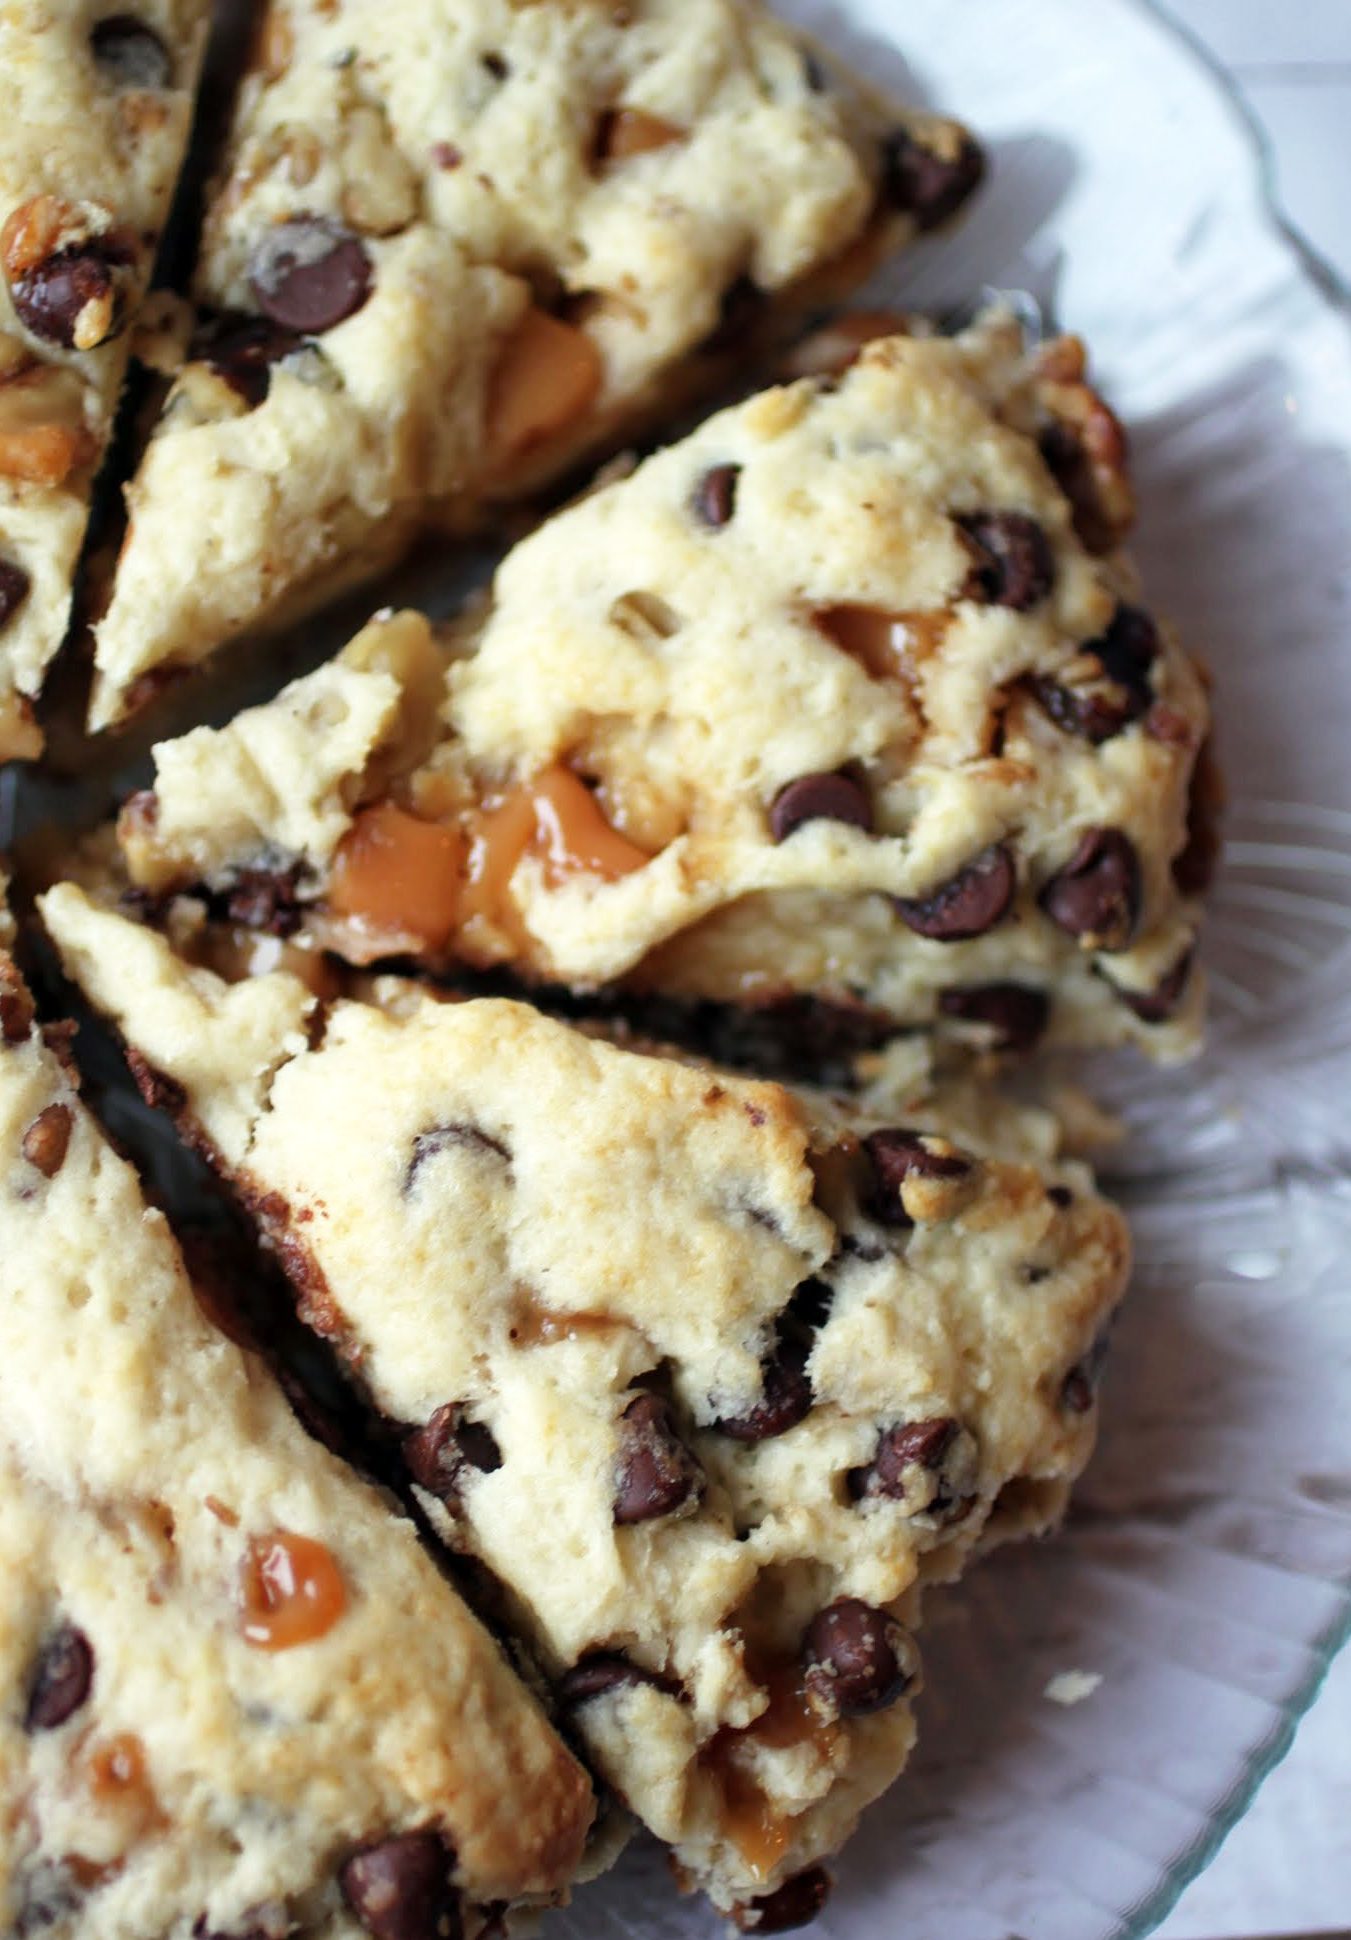
These turtle scones will only cause screams of joy, I guarantee you. I promise!

The base of these scones is cream, which makes them light and crumbly in the best way. Chopped caramels, pecans (or walnuts) and chocolate chips get right in there for a true breakfast pastry party. No better way to start your day that I’ve ever seen!
No matter what kind of turtle makes your day, these scones are definitely the way to go on this particular day. Hope you have a great Wednesday!
Ingredients
Instructions
- Preheat the oven to 400. Line a cookie sheet with a silicone baking mat or parchment paper. Set aside.
- In a medium-sized bowl, combine the flour, sugar, baking powder and salt. Add the cold butter and using the tips of your fingers, pinch the butter into the dry mixture until crumbs of varying sizes form.
- Add the egg and cream, using a fork to stir them in until a dough forms. You can use your hands or the fork to knead lightly until the dough is fully formed.
- Gently mix in the caramels, chocolate chips, and the pecans with your hands.
- Turn the dough out onto your prepared cookie sheet, pressing it into a circle that is about six inches in diameter.
- Cut the dough into six wedges. Bake for around 20 minutes until the scones are golden.
- Cool the scones until the chocolate hardens. Serve or store in an airtight container.
]]>
I’ll get into why in a minute, but I was pretty much hooked from the start. What could be more amazing than dreaming of a dessert and then creating it? Sure, back then I needed recipes (I was very reliant on them), but it was still a lot of fun to cook in my crappy dorm kitchen.
These brownies are the first ones I ever baked from scratch, and the first baked good I ever added my own spin to. I used to call them “candy bar brownies” because they are very much like that. Rich, fudgy brownies are filled with peanut butter and milk chocolate chips, with a thick layer of the same on top. They’re crazy addictive!
When I was in college, I had a boyfriend who was sort of local to the area. He’d invite me to his mom’s house on weekends, and I always wanted to bring a hostess gift of some kind. The problem? I didn’t have much money, and whatever money I did have I would spend on veggie burgers to make it through the week.
That’s when I started learning how to bake. I went to the college bookstore and bought a Pillsbury baking book (still one of my favorites) in the reduced-price bin. If I couldn’t bring expensive chocolates or bottles of wine (um, wasn’t 21 yet) as a present, I could at least bring baked goods.
At first, it was something of a struggle. I had no mixer, didn’t know what any of the directions meant (creaming? straining? whaaat?), and didn’t own more than one or two pans. Luckily, these brownies fit into the one kind of pan I did have: the ever-useful 9 x 13.
One day, I was in the baking aisle at the only grocery store I could walk to, and I found a box of Baker’s unsweetened chocolate. On the back was a recipe for one-bowl brownies, and there was no mixer needed. I could just melt the butter and chocolate in a microwave, mix stuff together, and be done with it. Instantly, that became my go-to brownie recipe of the 90s.
When Reese’s peanut butter chips burst onto the baking scene, I found them at the grocery store, too. They got a lot of use in my kitchen then, and they still do. I think they always will!
These brownies are full of both milk chocolate chips and peanut butter chips. When the brownies come out of the oven, I sprinkle the same mixture over the top, let it melt, and spread the chocolate over the surface. When it hardens, it’s like a brownie and candy bar in one!

I might not be in college anymore (not by a long shot), but I can still enjoy these brownies to the utmost. I hope you do, too!
Ingredients
Instructions
- Preheat the oven to 350. Line a 9 x 13 pan with foil and coat with cooking spray. Set aside.
- Melt the butter and chocolate in the microwave for one minute. Stir, and then heat in 30-second intervals (stirring each time) until melted and combined.
- Add the sugar and mix well. Stir in the eggs and vanilla. Finally, add the flour and mix until just combined. Fold in 1/2 cup each of the peanut butter and milk chocolate chips.
- Spread in the prepared pan and bake for 30 minutes. Remove the pan from the oven, turn it off, and sprinkle on the other 1/2 cup of both the peanut butter and milk chocolate chips.
- Return the pan to the oven for 2 minutes. Take it out and use a knife to spread the melted peanut butter and chocolate chips together in a vague marbled pattern.
- Cool completely until the chocolate is set, about 2 hours. Cut into squares and store in an airtight container.
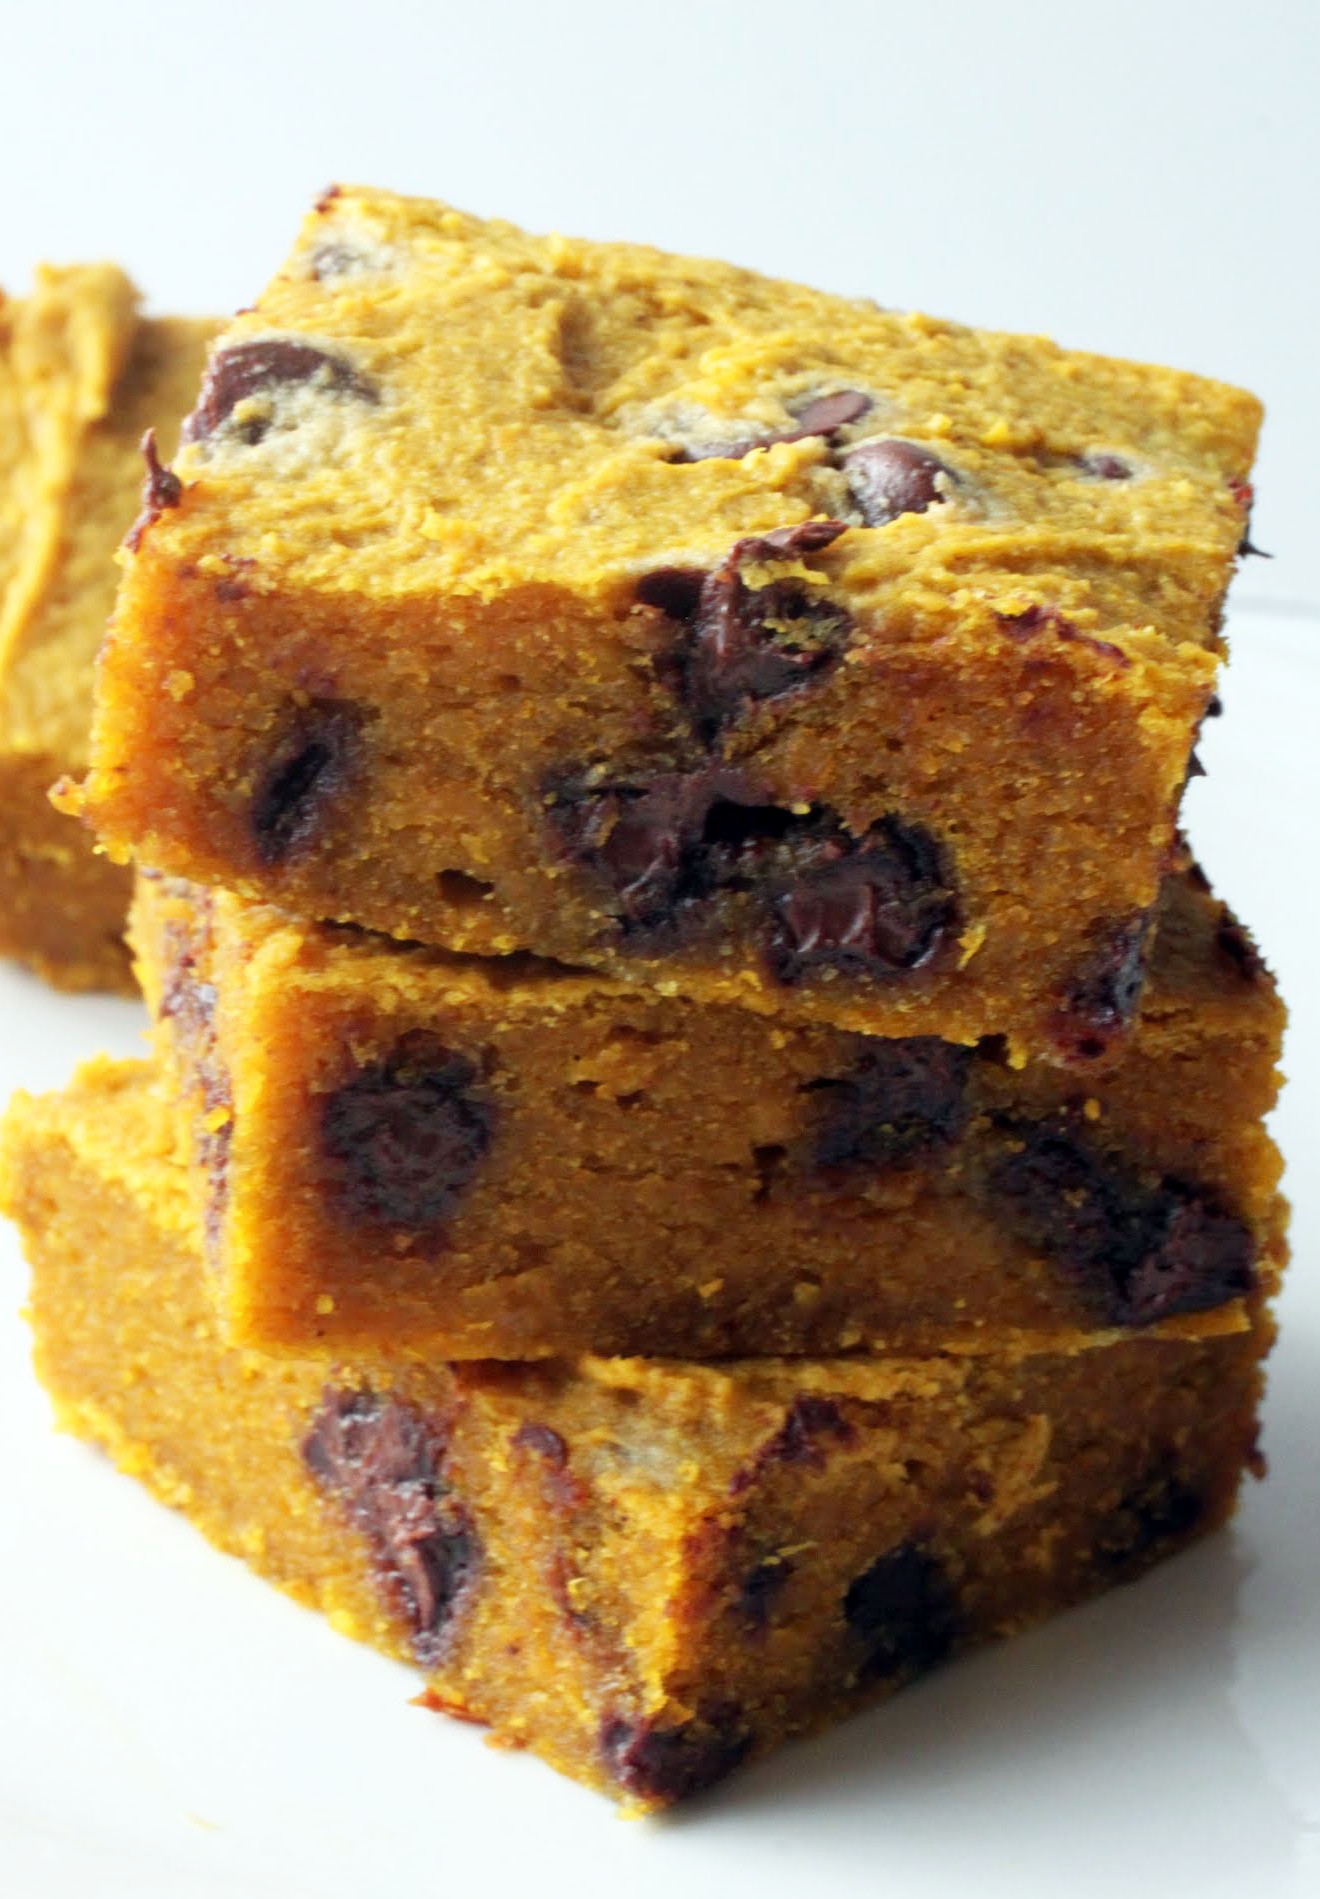
These are pretty outside the norm. Their consistency is similar to a fudgy brownie, but the taste is pure autumn. Sure, I threw in some chocolate chips, but who could resist that?
In order to inaugurate the coming cooling temps, here we go with pumpkin chocolate chip bars. Let’s grab some spiced cider and run with it!
Having Monday off was such a great treat. We went to the D.C. arboretum, which is this amazingly beautiful place. There are great views, lots of bonsai trees, and most awe-inspiring, the columns of the original Capitol Building. They’re pretty cool.
We decided to take the kids with their scooters. Scooters are kind of amazing if kids can do them right, which my oldest is getting good at. His control is really improving, which is awesome, because the last time he wiped out on his scooter, he screamed for hours. Hours. And he kept insisting that we take him to a hospital. It was not a happy day.

Now he’s fine, and the girls are learning. My middle kid can do it for a while, but not long. The youngest will literally step onto her scooter for about point five seconds before she steps right off and demands to go “uppy.” How we love carrying both a scooter and a four year-old at the same time. If that’s not a recipe for back trouble, I don’t know what is.

Still, it was a beautiful day, and people kept watching the kids on their scooters and smiling at us. It sure beat a day of endless toil, which makes that whole Labor Day holiday name ironic every year.
When we got home from the arboretum, I was tired, thirsty and hungry from all that scooter and kid carrying. Luckily, these bars were on hand to keep me happy.

If we’re talking easy recipes to get your fall rolling, here we are! These can be made in one bowl. Just be sure to cool your melted butter, or you’ll wind up scrambling your egg and that translates to starting all over. Nobody likes that.
This time of year, I like to have pumpkin pie spice on my shelf at all times. It’s such a versatile spice mix, and it always produces those great fall flavors. It also saves you the trouble of combining the spices on your own. Magic in a little bottle!
If you’re ready for fall, here comes the first of many pumpkin recipes. Start your engines!
Ingredients
Instructions
- Preheat the oven to 350. Line an 8 x 8 inch baking pan with aluminum foil and coat with cooking spray. Set aside.
- In a medium-sized bowl, combine the melted butter, sugar and egg. Stir until well-combined. Add the vanilla and pumpkin and stir again.
- Mix the oat flour and spices together. Pour into the pumpkin mixture and stir until the dry ingredients are just incorporated.
- Fold in the chocolate chips.
- Spread the batter evenly in the prepared pan and bake for 25 minutes. Do not overbake.
- Cool and cut into squares. Store in an airtight container.
Because life, everyone. It can be stressful and overwhelming, and I’m in the middle of a crazy week welcoming teachers back and getting them set up. So do you know what I need?
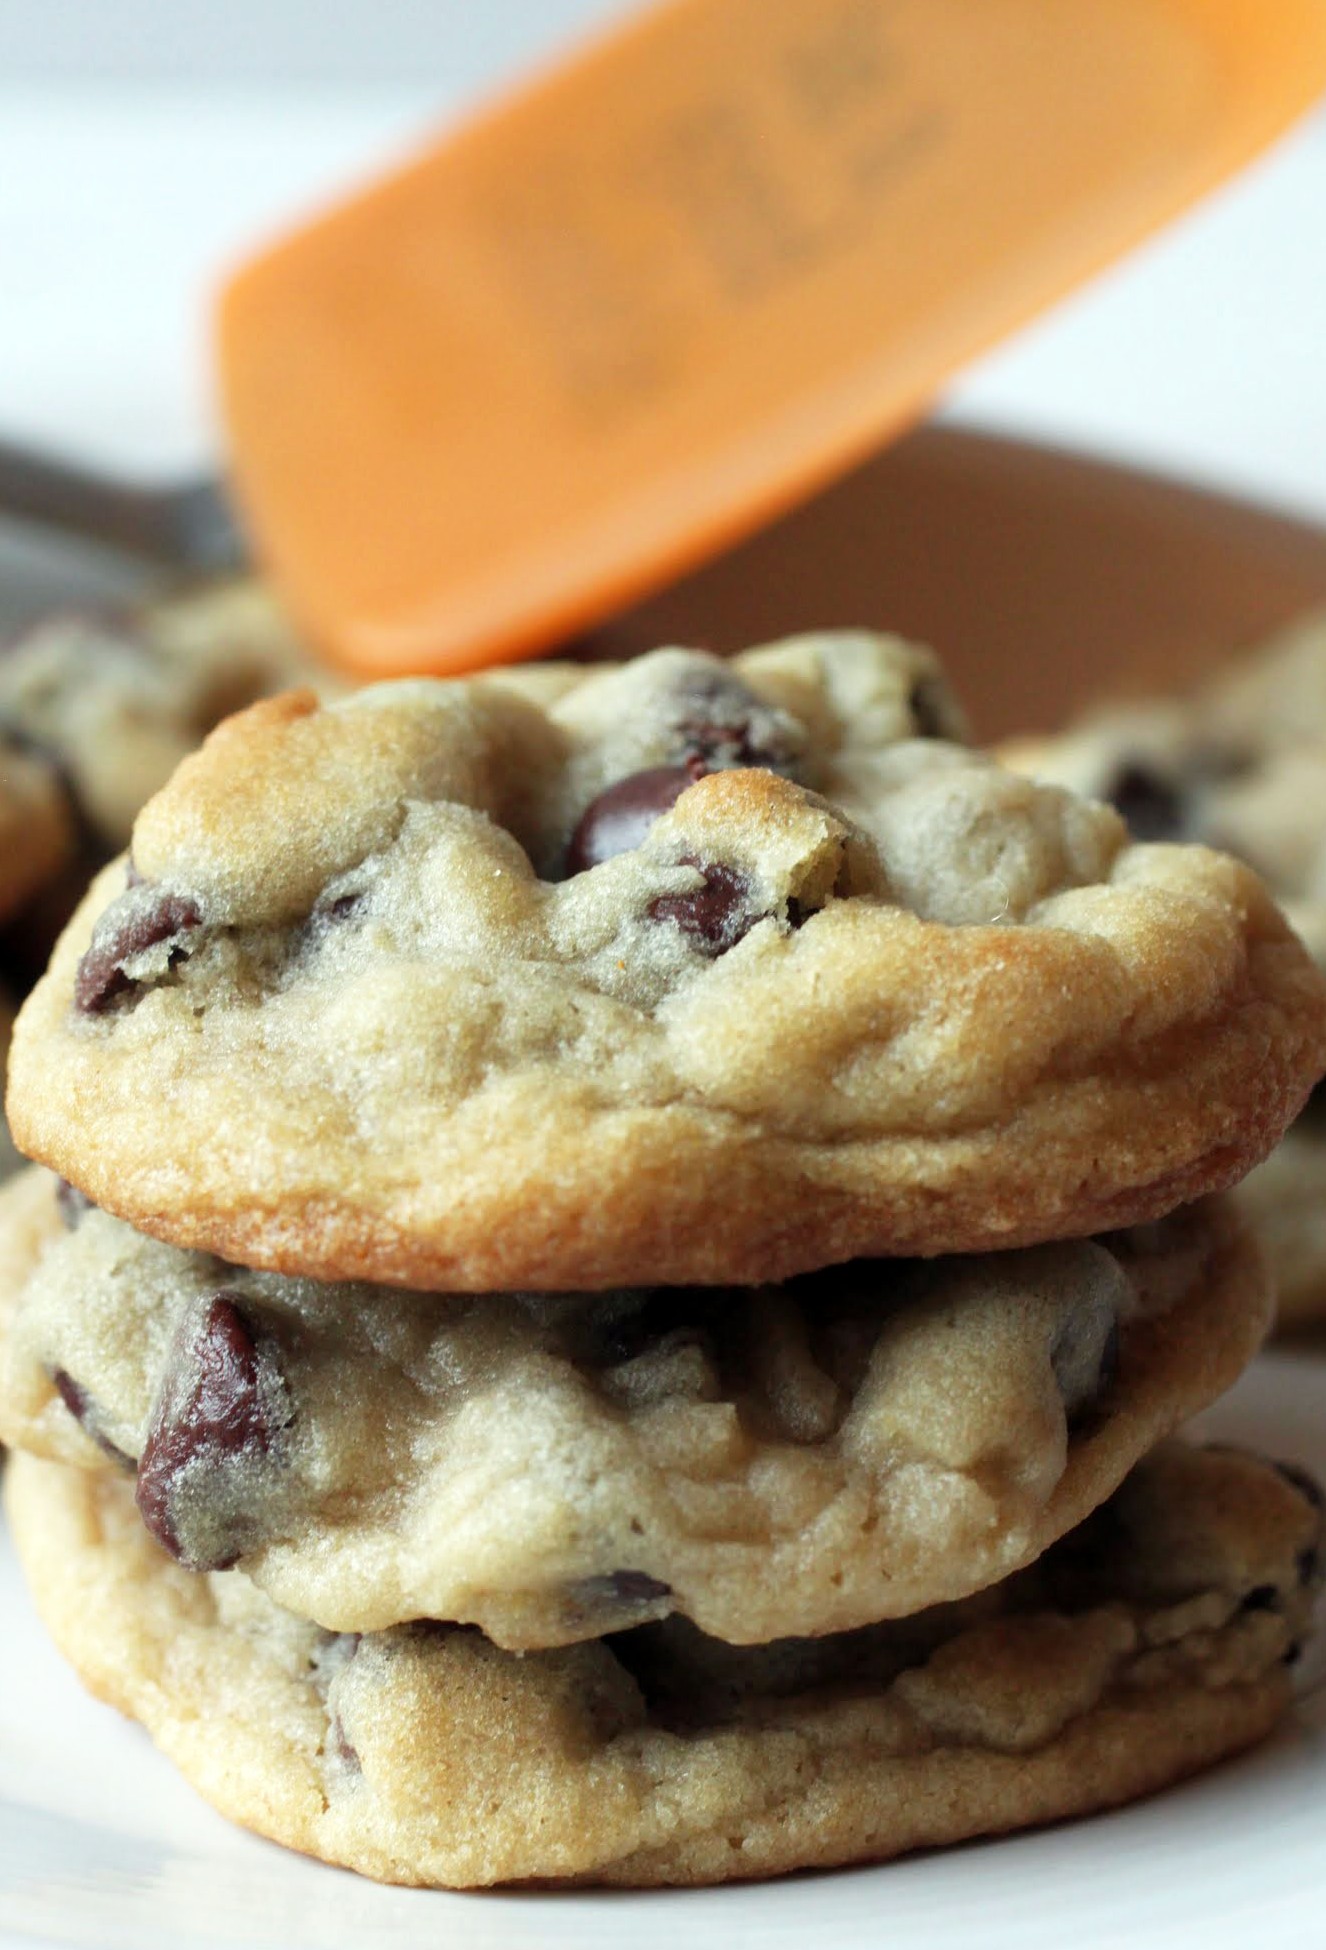
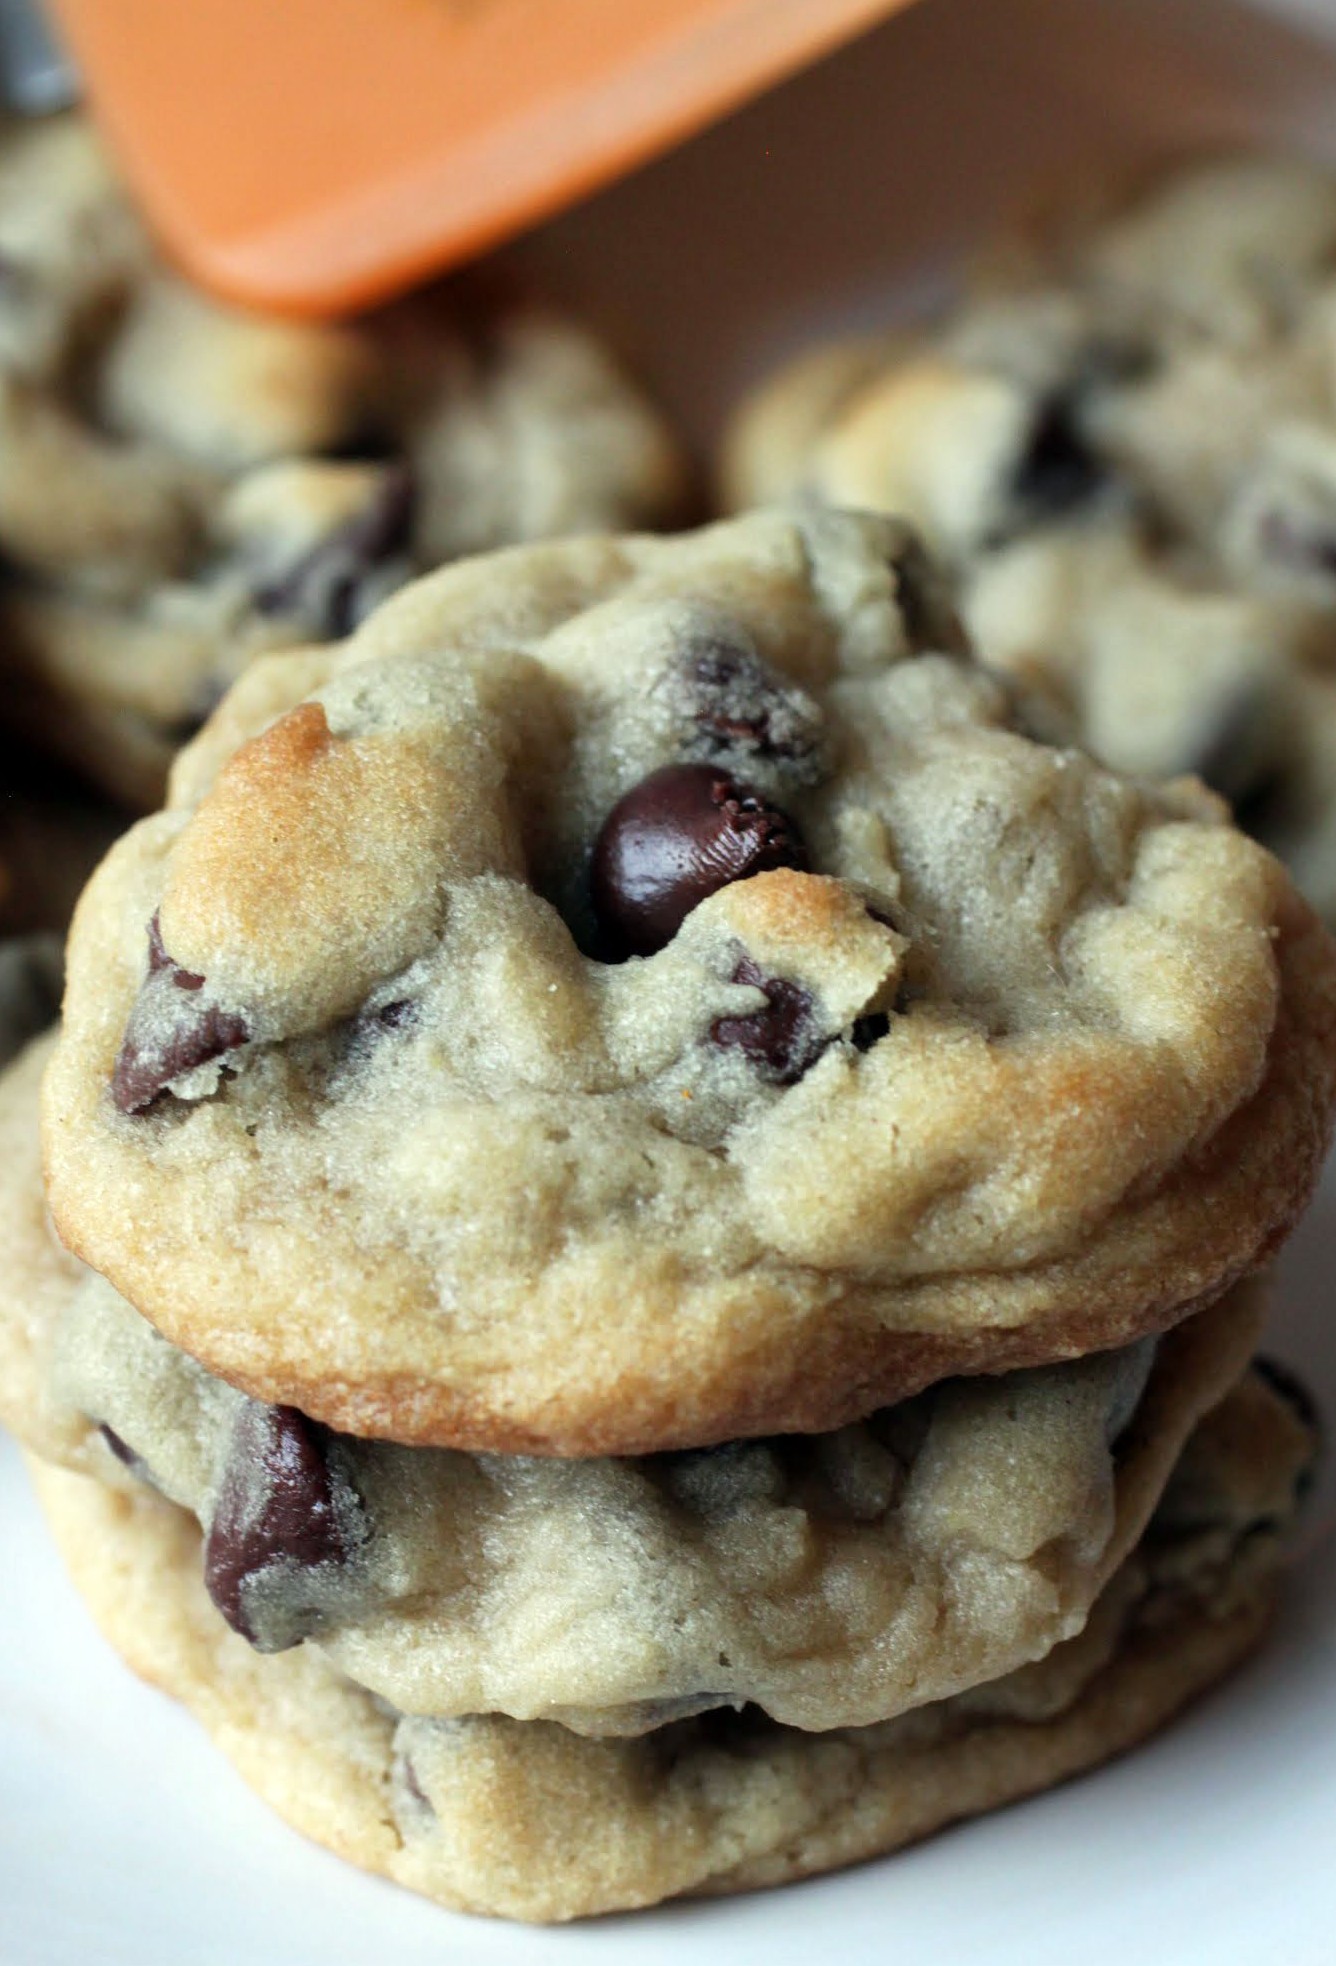
Cookies. Chocolate chip cookies. The easiest, simplest recipe. You ready?
Being ready is hard. Whenever I’m talking to people without kids who are thinking about becoming parents, they often worry about being ready. That’s just silly, because nobody is ever ready to be a parent. You jump in and do your best and that’s kind of how it goes.
Of course, some people know they’ll never be ready, and that’s cool.
Teachers never feel fully ready for the start of school either. It’s funny, because we do it every year. Still, we work all week to get our classrooms set up and lessons planned because we know that come the first day, the kids are with us and we have to be totally good to go. There’s still that nagging doubt about being actually ready, even with maximum preparation.
Personally, I’m never ready to turn down a chocolate chip cookie. Who’s with me?
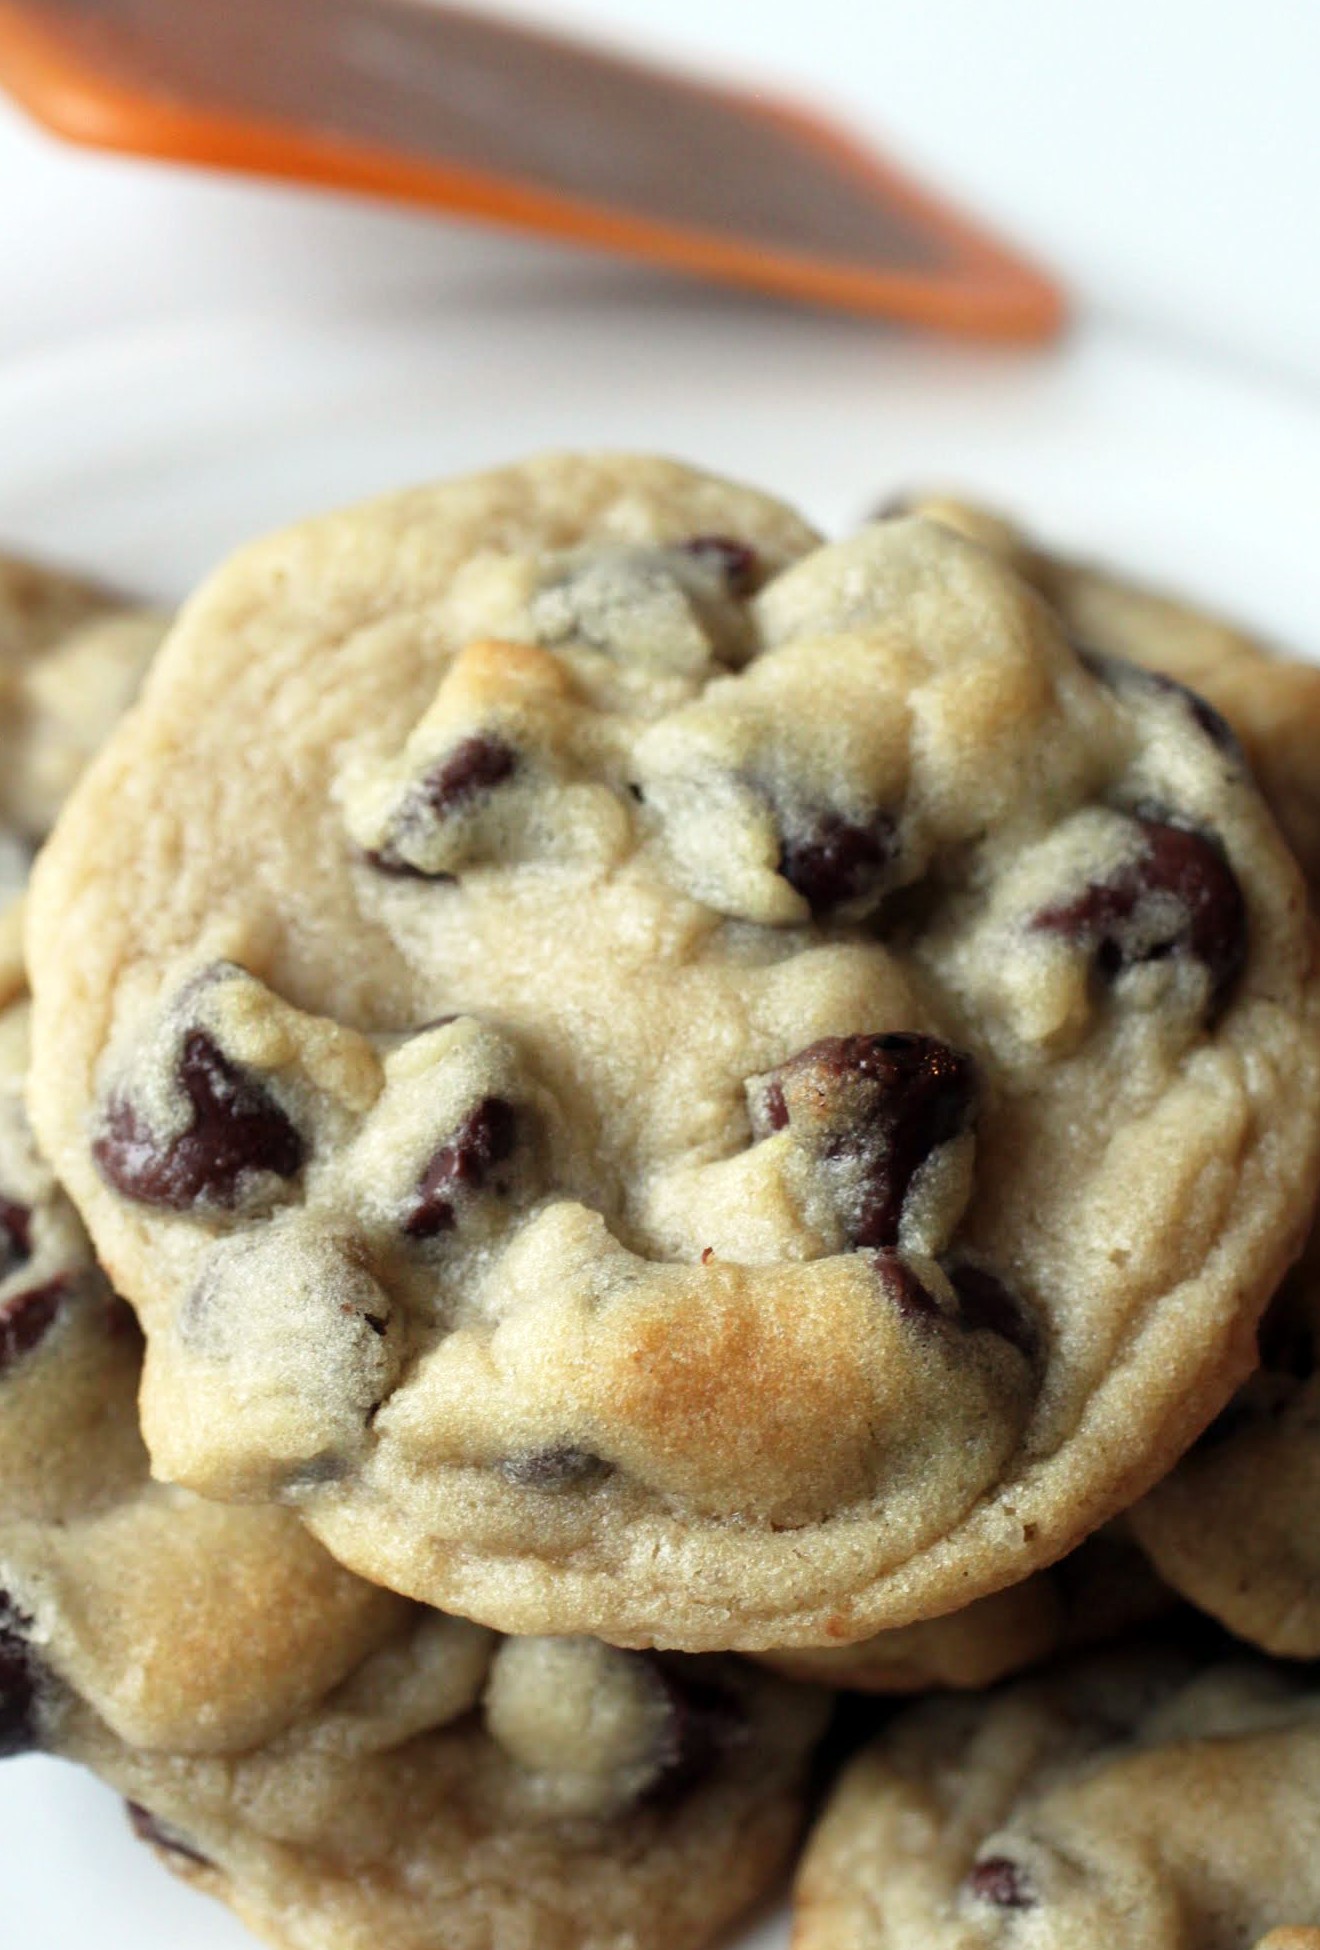
There are as many chocolate chip cookie recipes out there as there stars in the sky. Well, maybe not that many. But close. Why? Because everyone has a different idea of what the perfect chocolate chip cookie is. Chewy or crispy? Thin or thick? Soft or crunchy?
This recipe ignores all the drama and just combines simple ingredients to make a cookie that serves as a nice middle ground. It’s crispier at the edges but soft in the center, and it’s neither ultra-thin nor pillowy thick. It’s just…a cookie. You dig?
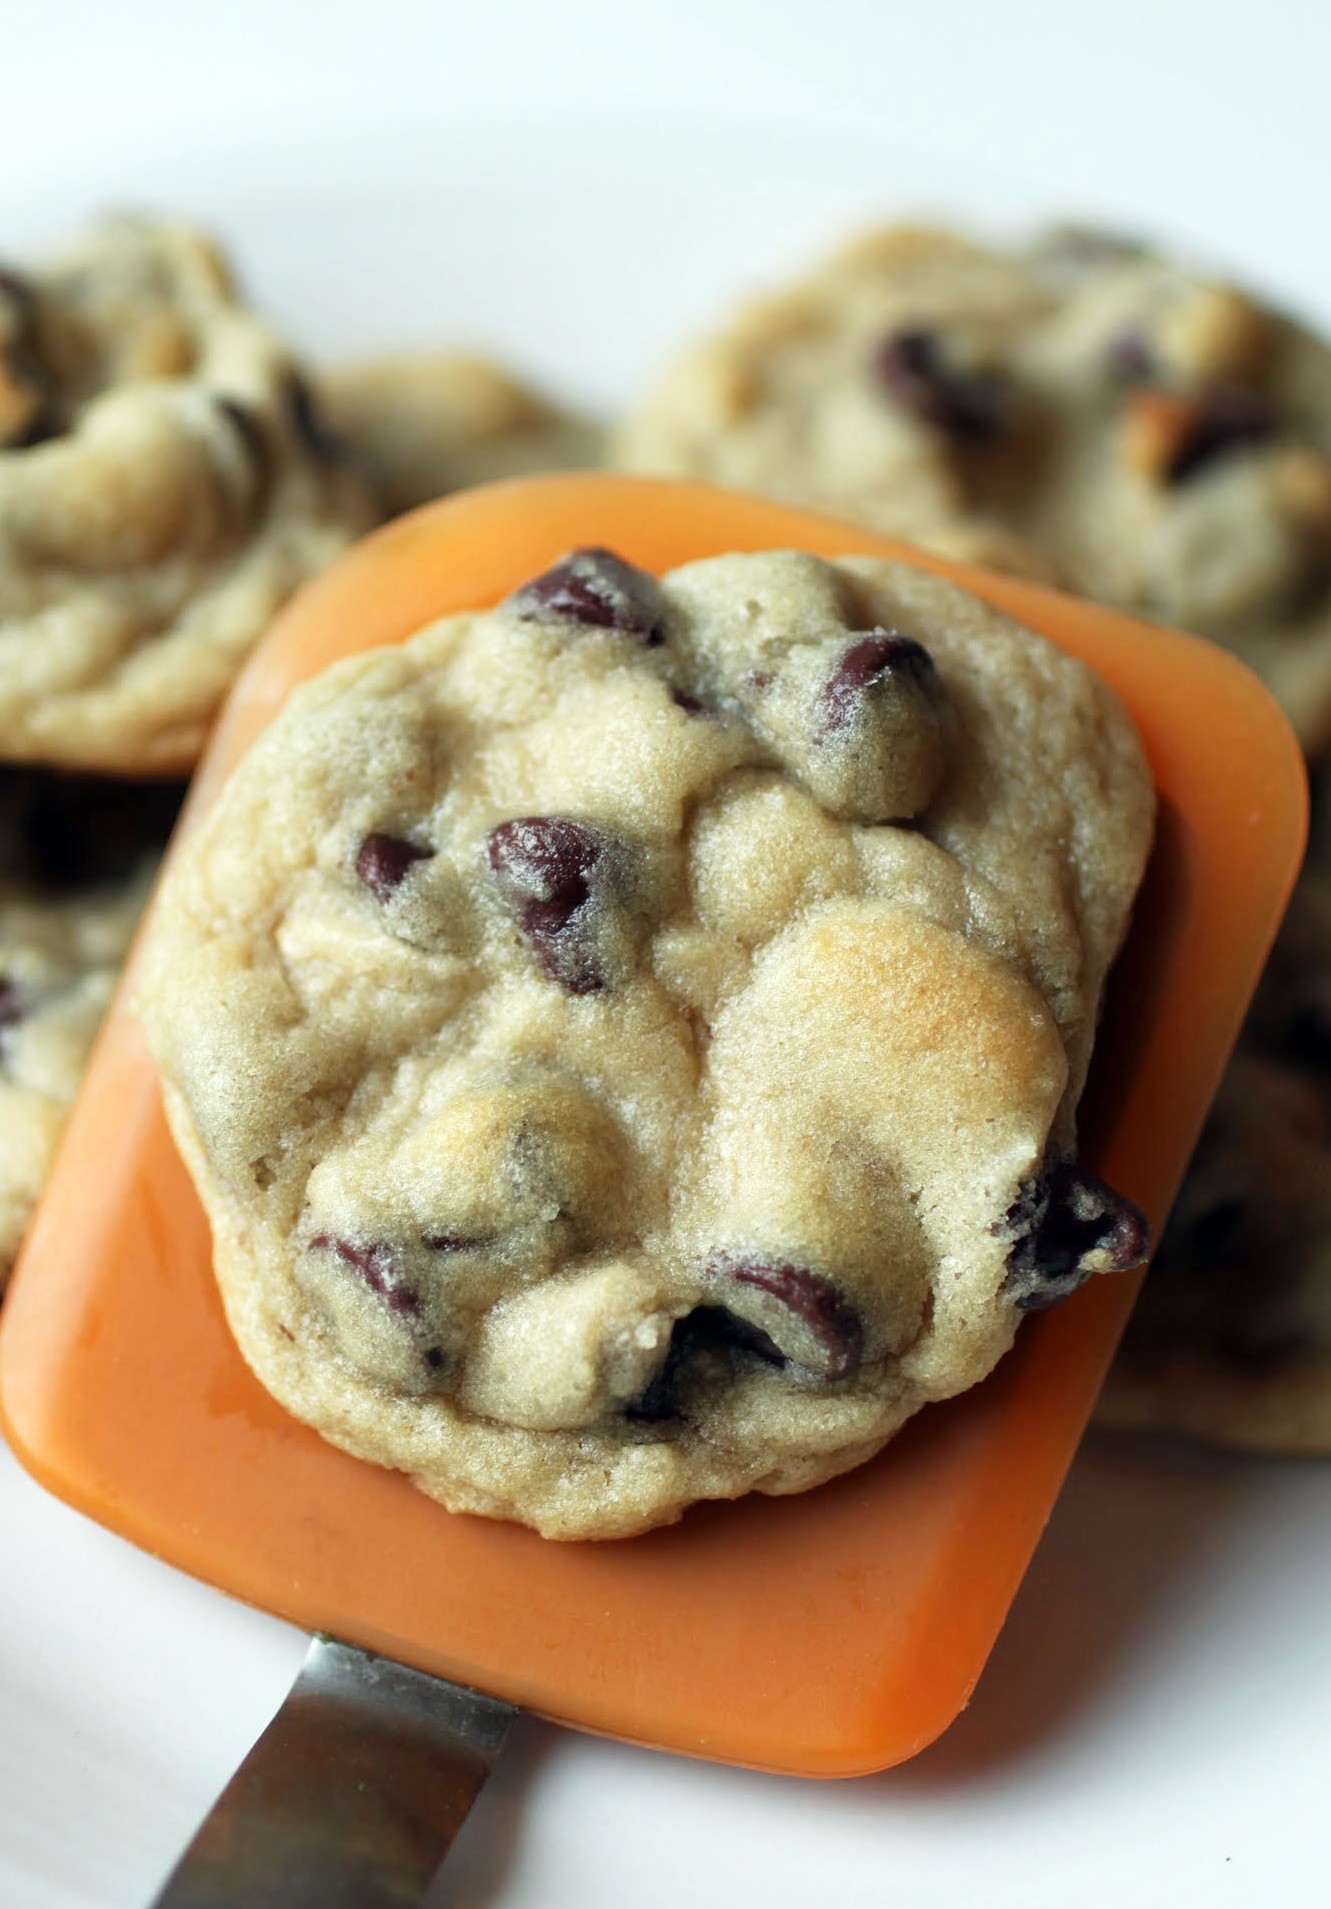
Listen, life is busy these days and all I really want to do when I get five minutes of alone time is sit around and eat chocolate chip cookies. I’m ready for that, and I’m guessing that you are, too. Let’s do it!
Ingredients
Instructions
- In the bowl of a stand mixer, beat the butter and both sugars until light and fluffy. Add the egg and vanilla, stirring until smooth.
- In a small bowl, combine the flour, baking soda and salt. Add the dry ingredients to the mixer, stirring until just combined.
- Using a spatula, fold in the chocolate chips.
- Cover the bowl and chill the dough anywhere from two hours to overnight.
- When you're ready to bake, preheat the oven to 350. Cover two cookie sheets with silicone baking mats or parchment paper.
- Form the cookie dough into tall mounds of about an inch or so in diameter and place two inches apart on the cookie sheets.
- Bake for 10 minutes. Remove from the oven and cool completely. Store in an airtight container.
Do you feel as though you have an impact on the world around you?
I’ve always felt very satisfied at my chosen profession. With teaching, I’m fairly sure that I make an impact. I just have to strive my hardest to make it a consistently positive one for my students and the teachers I supervise. That’s one reason I don’t really want to go into anything else; I might be getting paid, but it’s also a way to give back.
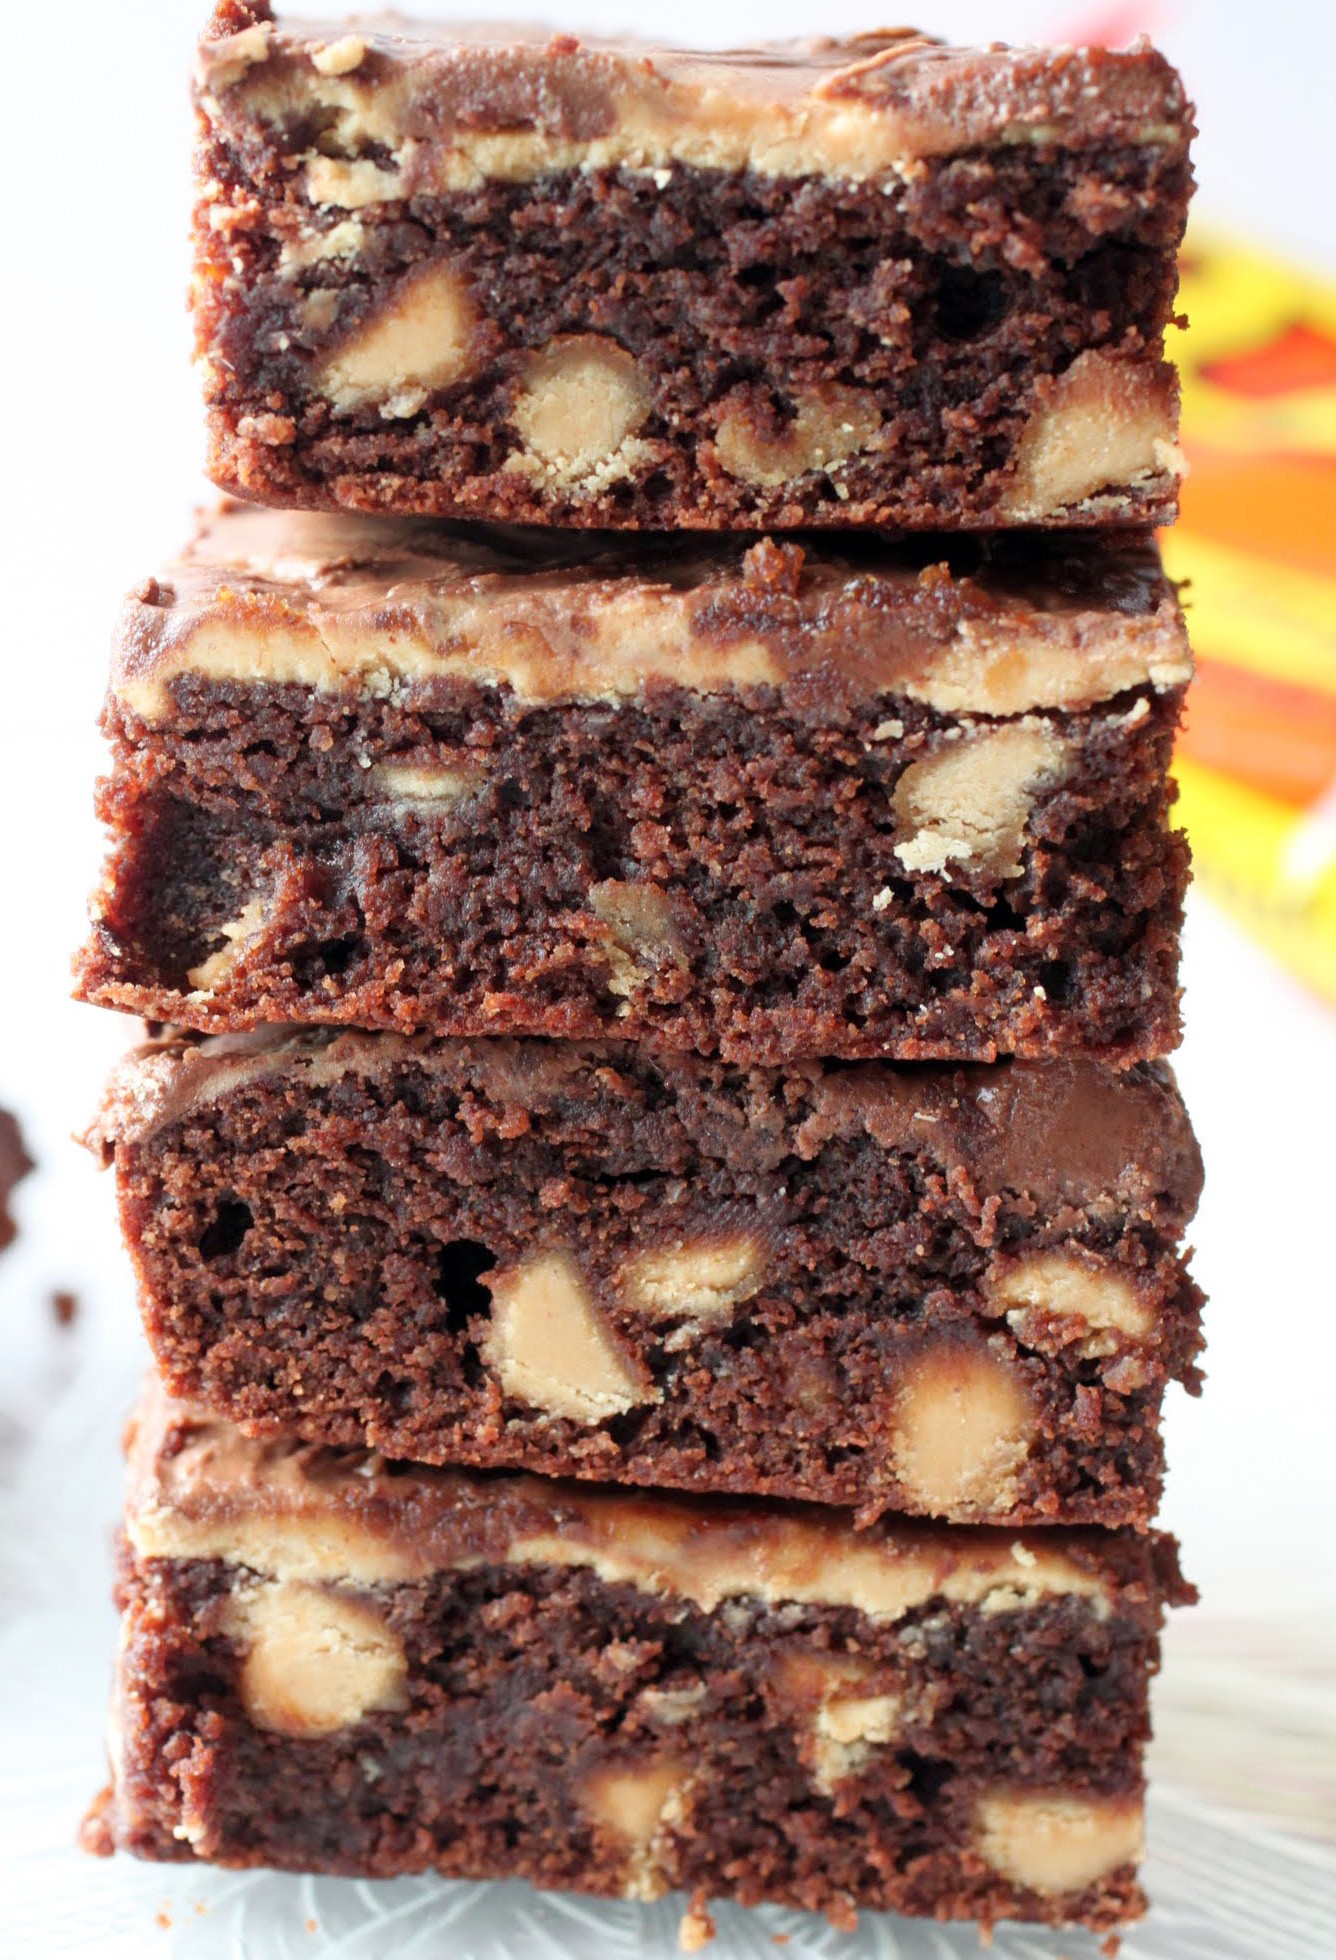
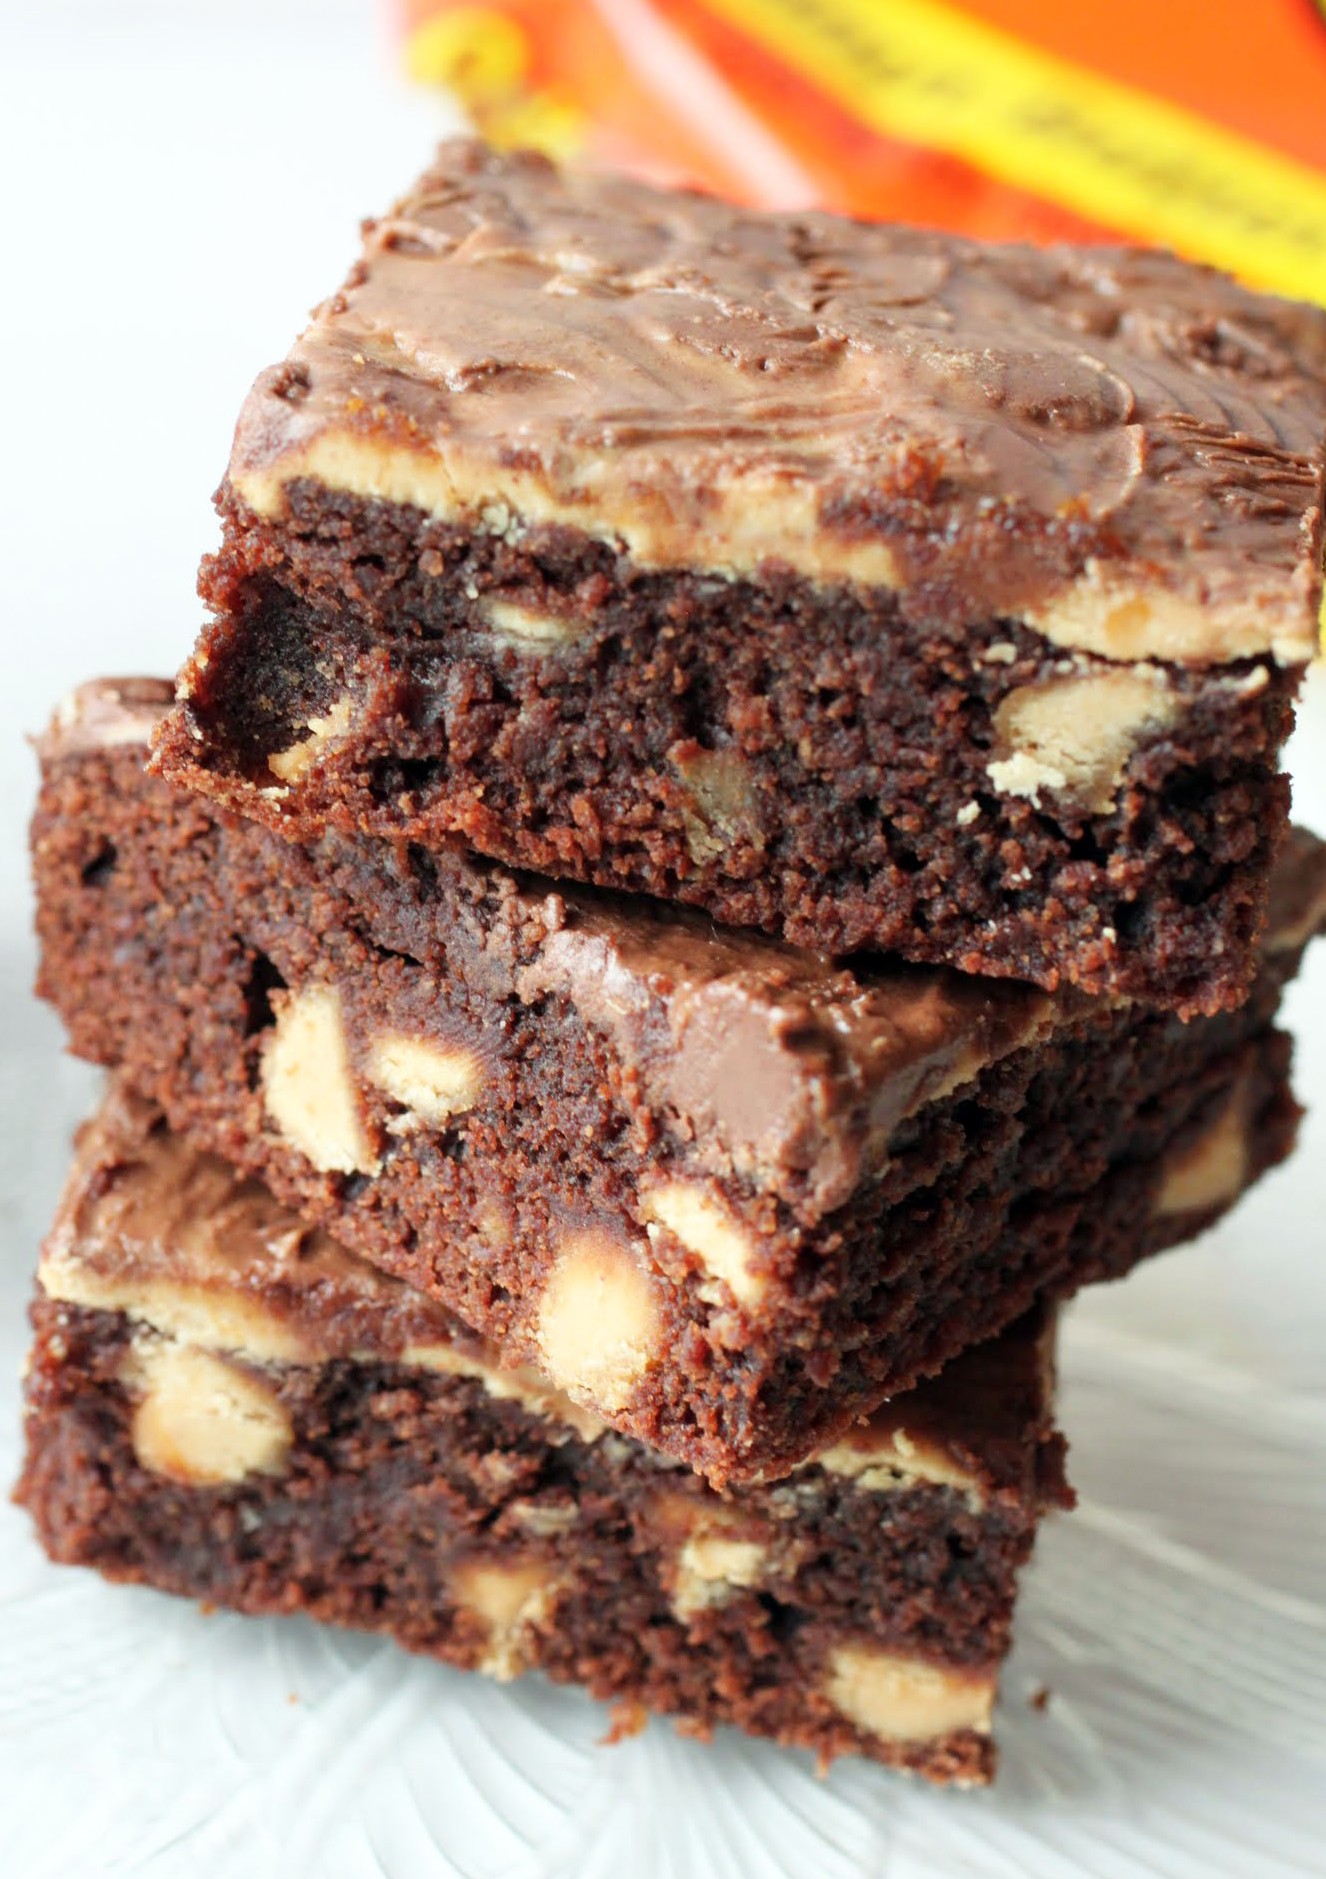
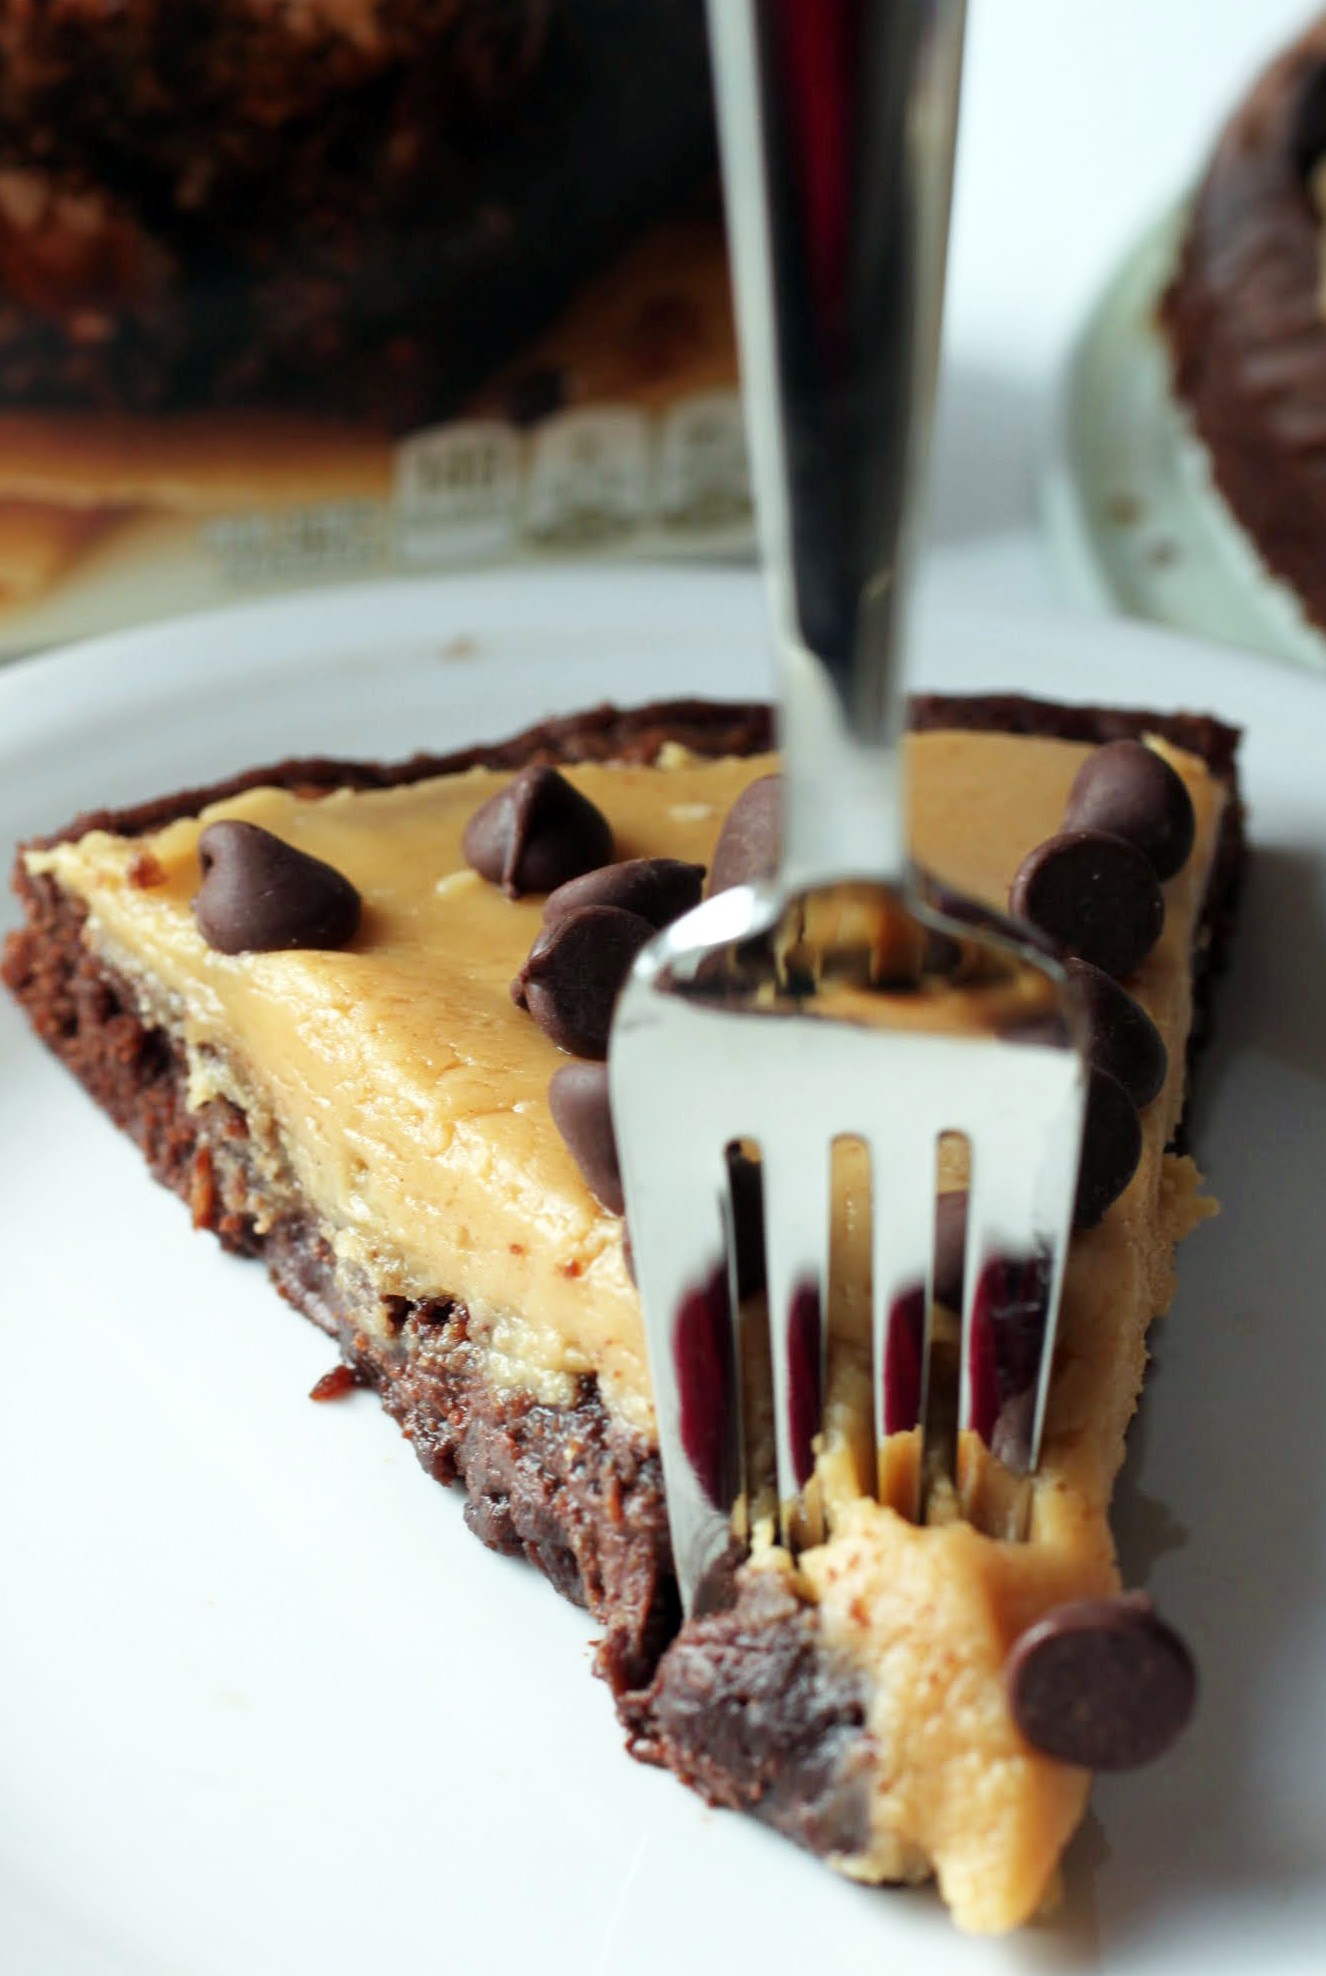
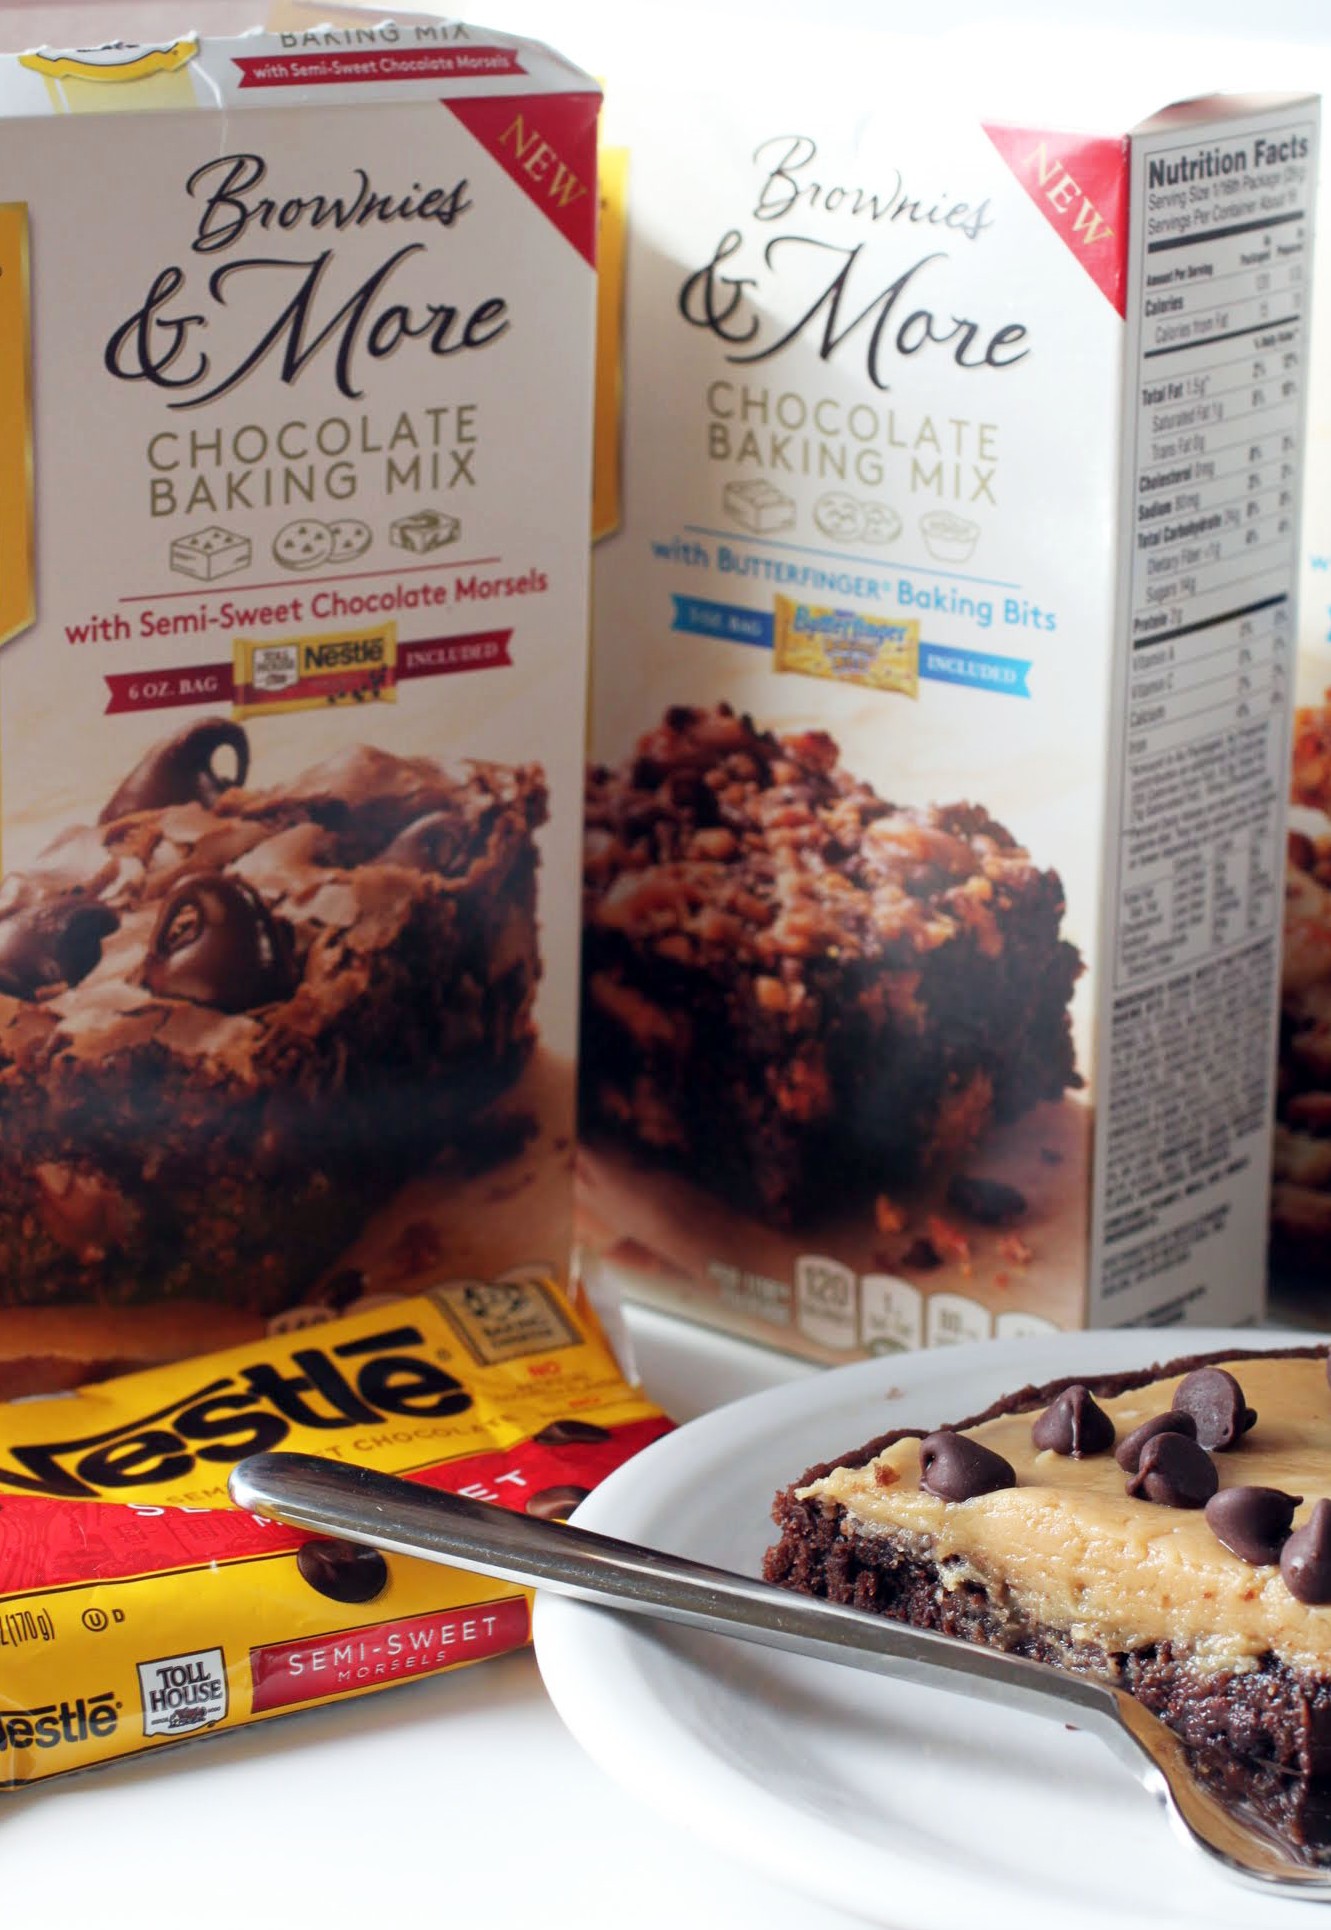
Teaching is also about possibilities. Every day, I see new paths for both myself and the people around me, and that inspires creativity. It’s that same creativity that sparks my baking and that makes it so much fun to create new desserts. Thanks to NESTLÉ® TOLL HOUSE® and their new line of baking mixes, I can take their Brownies & More with chocolate morsels mix and turn it into a quick and tasty peanut butter brownie pizza!
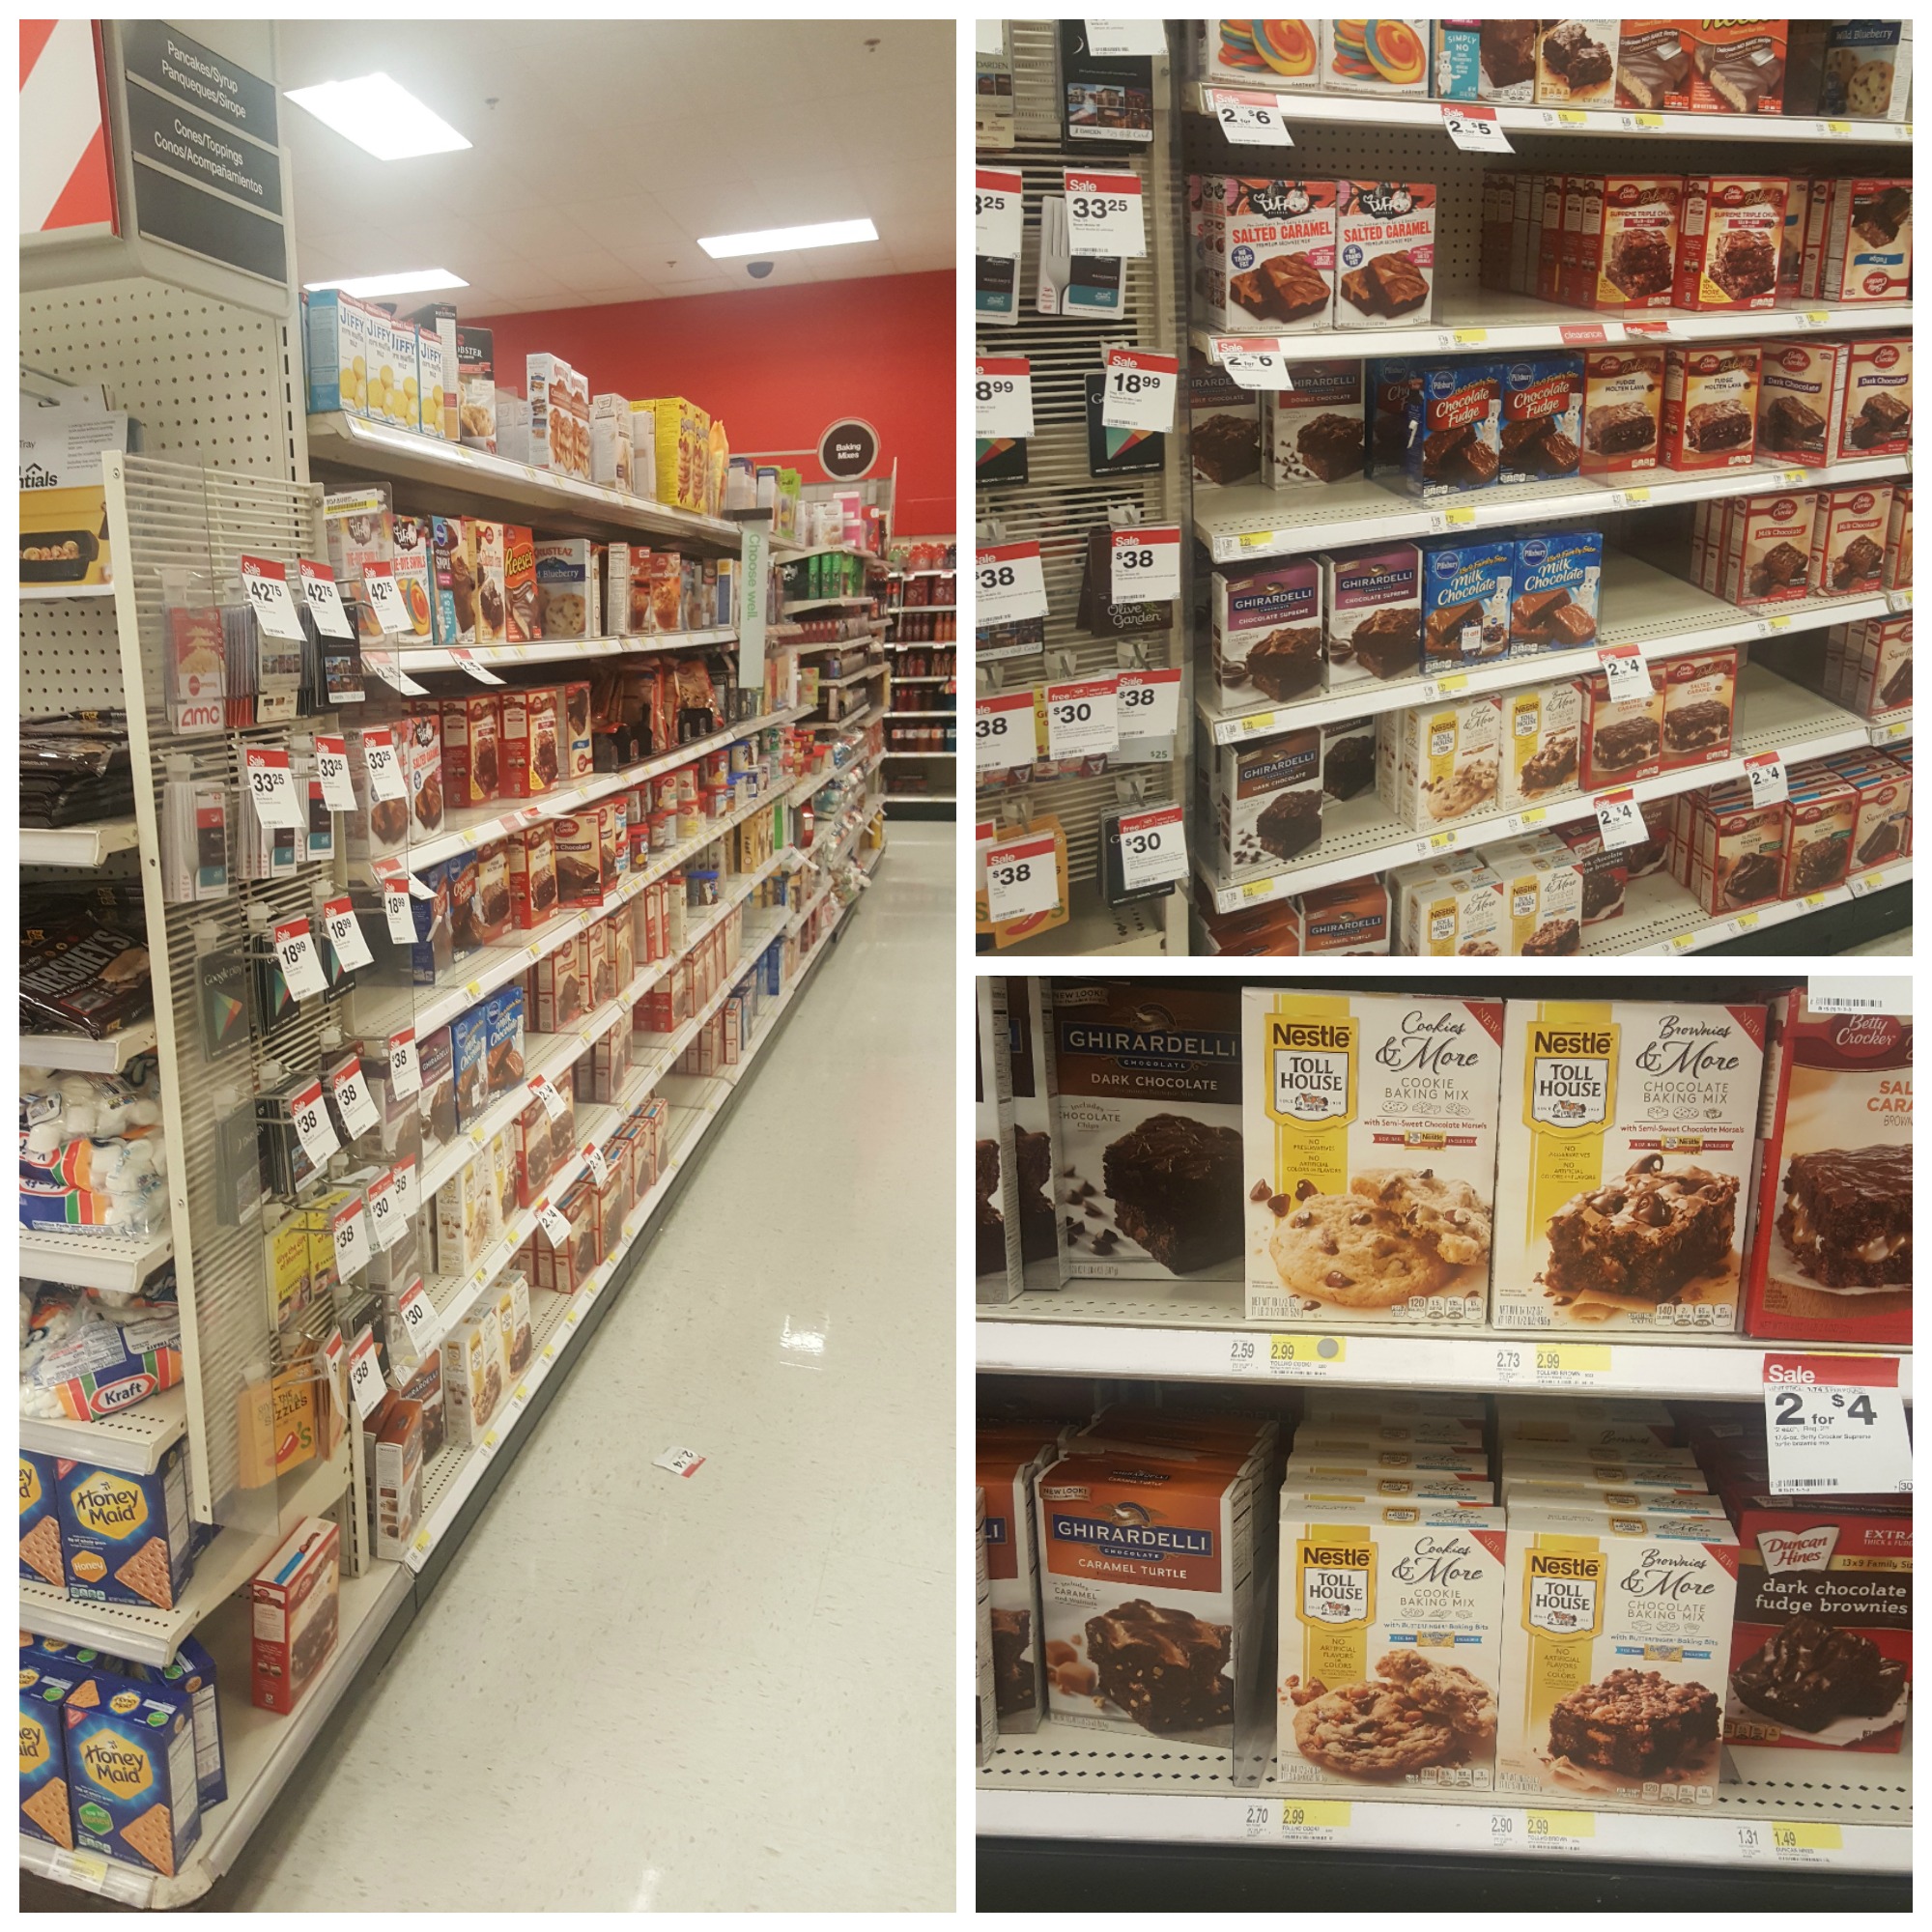
As I’m working among the dusty books this summer getting the office ready for teachers, I need to take breaks from time to time. Last week, I spent the morning in a storage room without air conditioning straightening things out. By the time a few hours had gone by, I needed a break and some supplies. Luckily, I work down the street from Target, and when I got there, I stocked up on every single flavor of these baking mixes. After all, I need to bake treats for my teachers, who are coming in this week voluntarily to meet. Talk about inspiring!
Personally, I’ve always been inspired by people who lead by example. I’ve worked for some amazing teachers and instructional leaders who find innovative ways to help kids achieve, and it’s my continuous goal to be the same way. Hard work is important, and so are good intentions. Still, I also enjoy looking at ideas from a new angle and trying to find a different approach. It keeps everything much fresher.
It’s that same skill that makes me a lover of baking mixes. Sure, I could enjoy these NESTLÉ® TOLL HOUSE® mixes just the way they are by following the directions on the box. And believe me, I did whip up a batch of both the Cookies & More with chocolate morsels as well as the Cookies & More with Butterfinger just for fun, and it was great. I also can’t wait to try the Brownies & More with Butterfinger. These new mixes have no artificial flavors or colors, and they come with the cutest little bags of chocolate morsels or Butterfinger bits. I’m always about the cute.
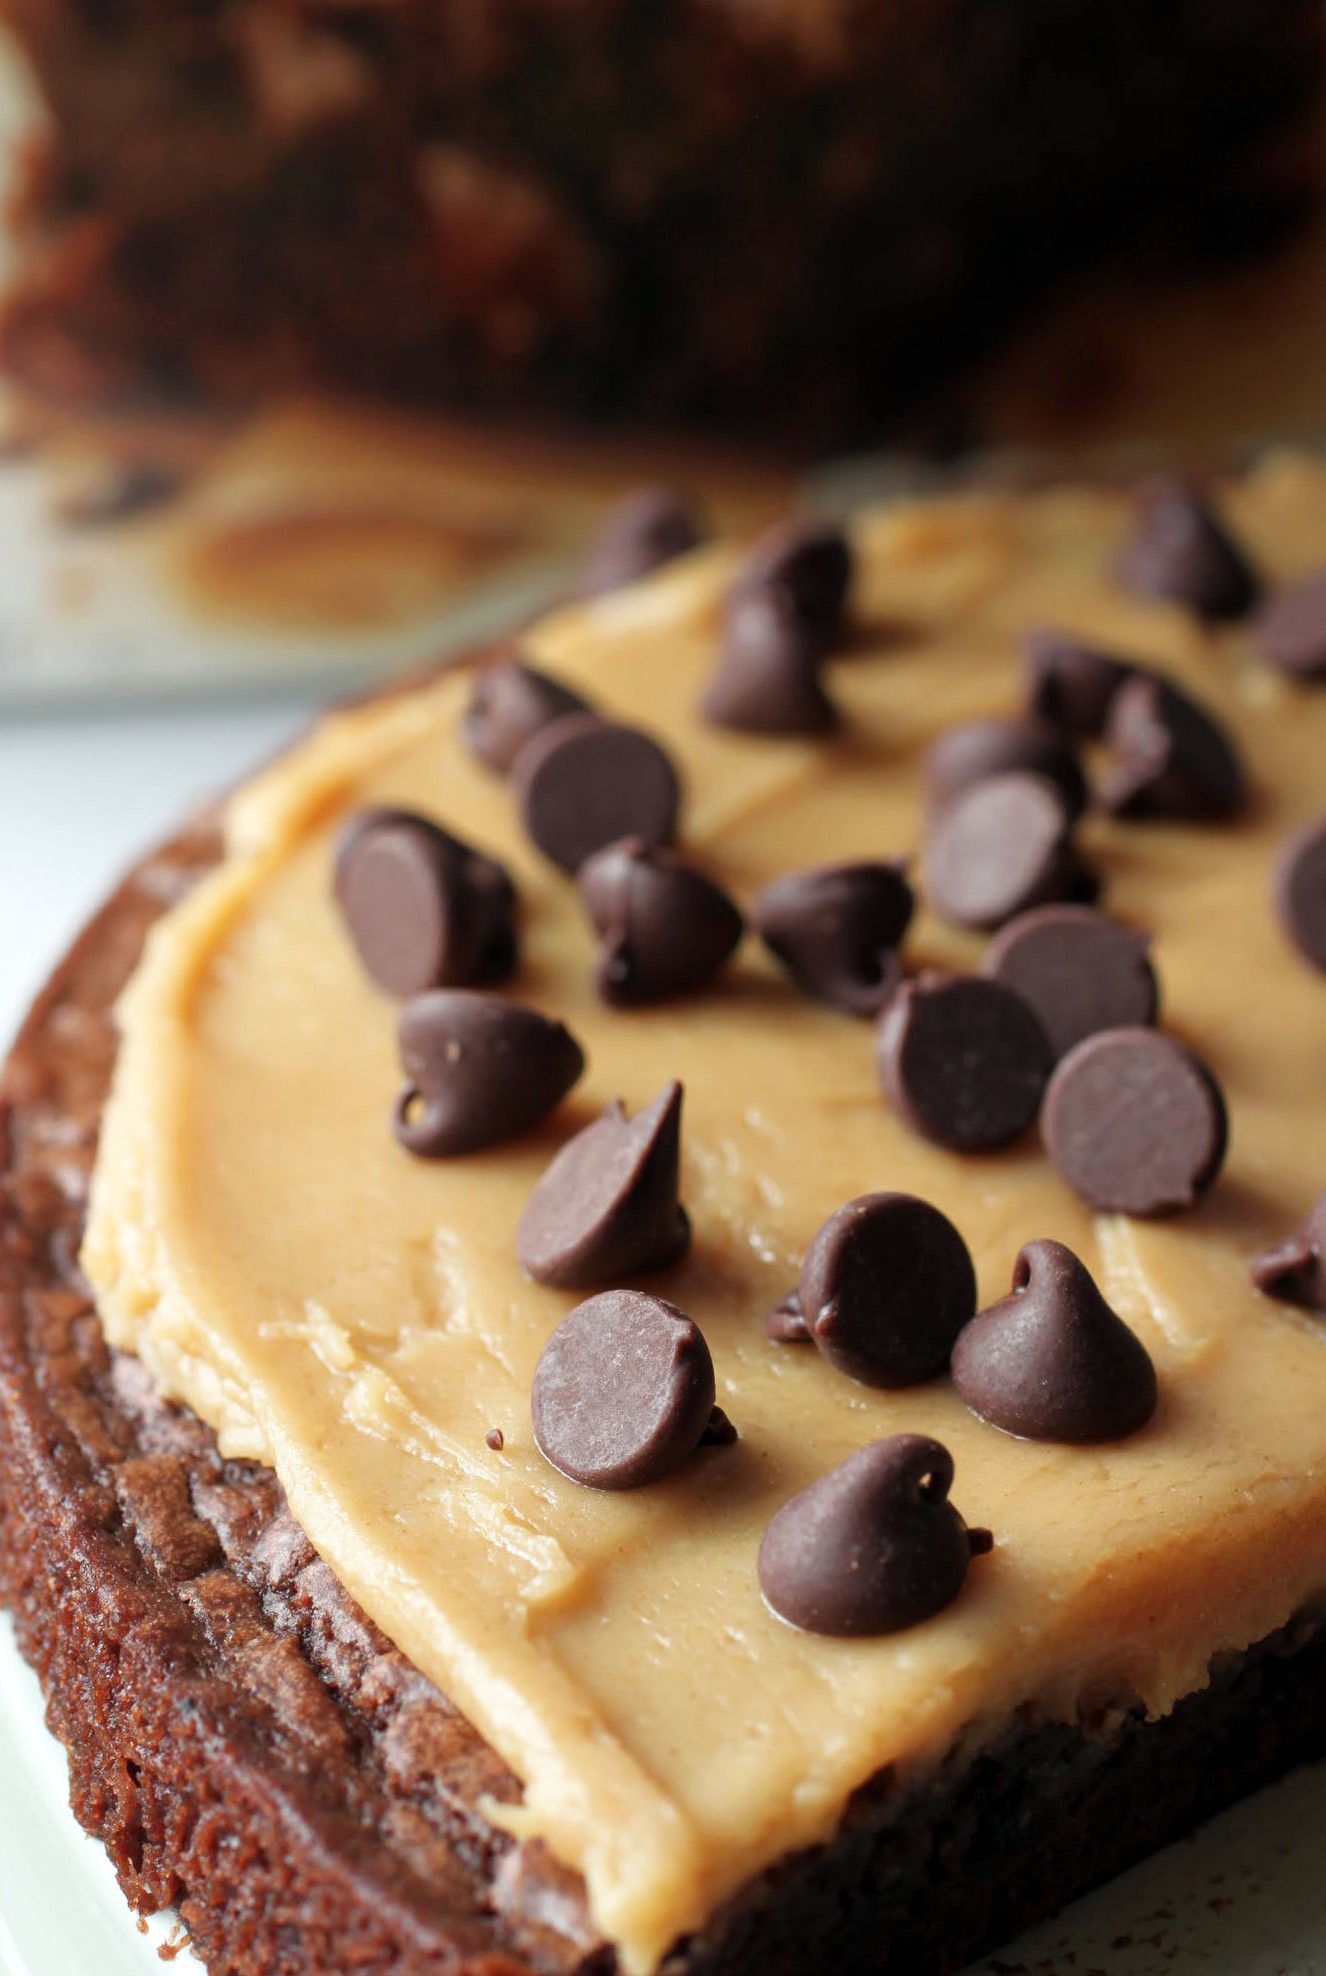
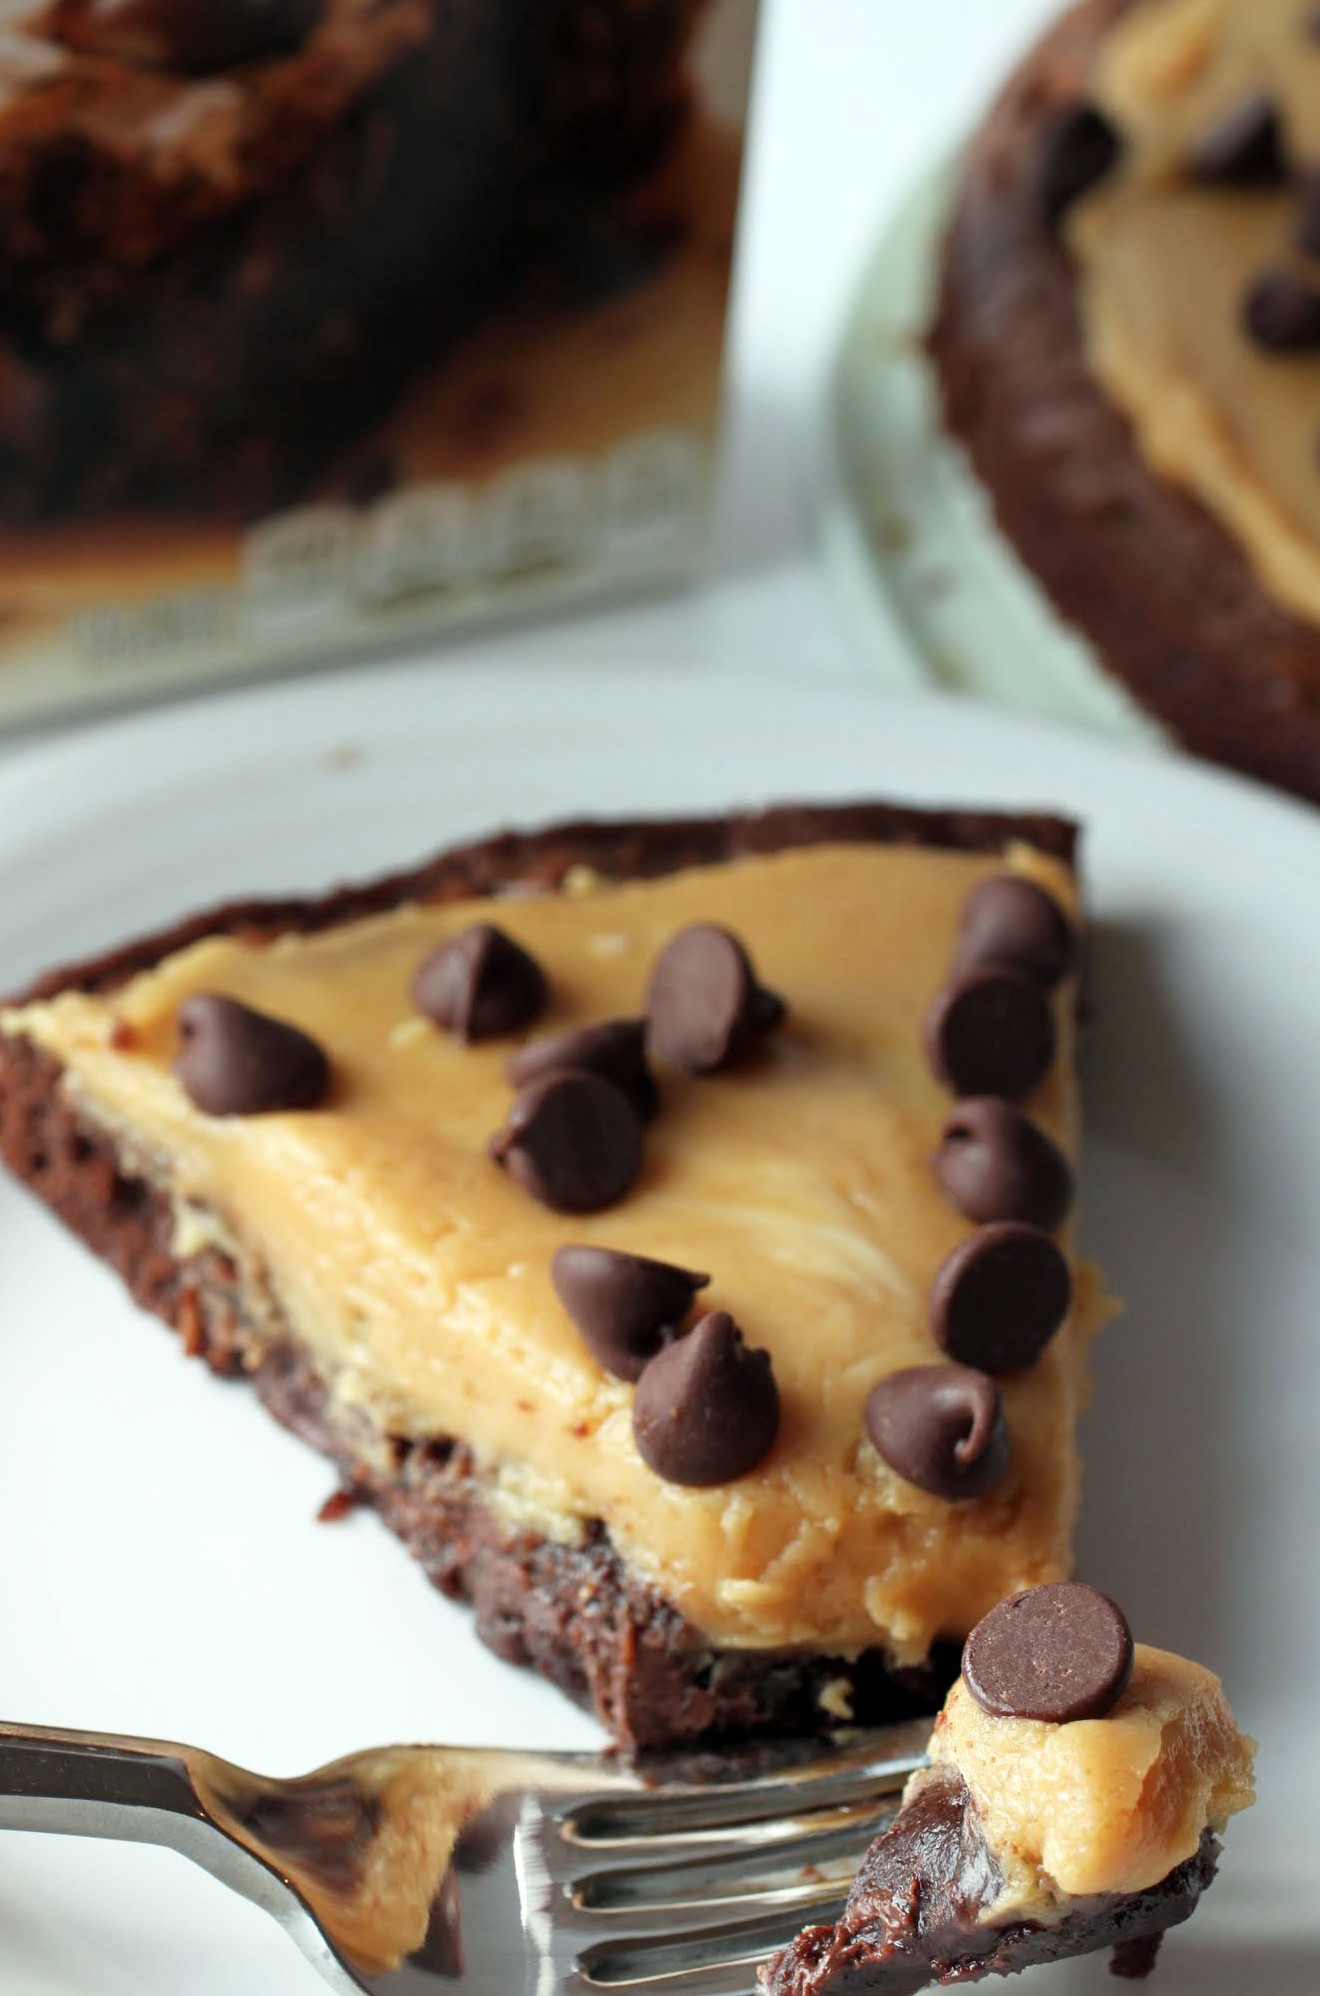
Still, when I buy a baking mix, I turn it into something else about 85% of the time. It’s just more fun that way! In this instance, I took the brownie mix and used a springform pan to make a “pizza” crust. The base gets covered with a peanut butter frosting and more chocolate morsels from the cute bag. It’s a fast, easy and fun dessert that I guarantee will fill the crowds with awe and wonder at what you can do.
How do you like to dress up your baking mixes? Pick some up with this special deal from Ibotta and start baking now. There are so many options, and the creativity is yours to enjoy. Innovation is where it’s at, and using baking mixes provides a solid place to start. See what you can create!
Ingredients
Instructions
- Coat a 9-inch springform pan with cooking spray. Set aside.
- Prepare the brownies according to package directions, with the exception of the chocolate morsels. Put half into the batter and leave the rest for later.
- Spread the brownie batter into the prepared pan. Bake as directed. Cool completely. Release the brownie base from the pan.
- In a medium bowl, combine the cream cheese and peanut butter until smooth. Add the powdered sugar and vanilla and mix well; it will be crumbly. Add the milk and beat again until smooth and spreadable.
- Leaving a space at the perimeter for the brownie edges to show, spread the peanut butter topping over the brownies thickly and evenly. Sprinkle on the remaining chocolate morsels.
- Cut into wedges. Store covered.
]]>
When I was growing up, I got used to the sight of him sitting down at the kitchen with a bowl of shelled nuts and a nutcracker. He’d crack away, and I’d sit next to him and crack an almond here or there, since they were my favorite. Every now and then, he’d crack a walnut and I’d be in awe, since those are really tough to manage.
Well, my dad still snacks on nuts, and he also likes them in his baked goods. When given the choice between chocolate chips or nuts, he’ll go nuts all the way. But I say, why choose? So these brownies are full of both chopped walnuts and chocolate chips. Hello, old school brownies!
I am so incredibly beyond excited that Friday looms. This week, I had to drive about 25 miles each way to a class and then sit all day and learn. I love learning, but I don’t love driving. I also don’t love sitting for long periods of time. Being in motion is key.
Movement is a friend. When we don’t move, we get all sore and achy. I’m sure you’ve had that same experience. Still, a day loafing on the couch is warranted now and then. Do you have any of those in your future?
Some of life’s finest moments revolve around a couch, a blanket, and a classic dessert. Sometimes I opt for truffles, if Kenny’s been a sweetie and kept my supply nice and stocked. But when there are no truffles, a brownie will do just as well!
Confession: as much as I love the velvety texture of a brownie without any mix-ins, there are times when I really crave that extra crunch. A brownie with walnuts and chocolate chips has enough crunch to make anybody happy.
These are fudgy enough for any picky brownie eater too, in case you couldn’t tell. I’ve never made a cakey brownie in my life, and I don’t intend to start now!
Hope your weekend is filled with good snacks and lots of downtime. If you want that extra dose of relaxation, try a nutcracker. It can be very satisfying. Just ask my dad!
Ingredients
Instructions
- Preheat the oven to 350. Line an 8 X 8 pan with foil and spray it with cooking spray. Set aside.
- In a medium-sized bowl, mix the cocoa into the melted butter until it dissolves. Add the sugar and stir again. When the sugar is incorporated, mix in the vanilla and eggs. Add the salt and flour, mixing until just combined. Fold in the nuts and chocolate chips.
- Spread the batter in the prepared pan. Bake for 25-30 minutes until done.
- Remove the brownies from the oven and cool completely. Cut into squares and store in an airtight container.
Well, you might not realize that if you don’t live near an east coast beach town. For those of us who are in the know about boardwalk treats, we get the joy of candy shops with thick slabs of fudge for sale everywhere. It can’t be beat!
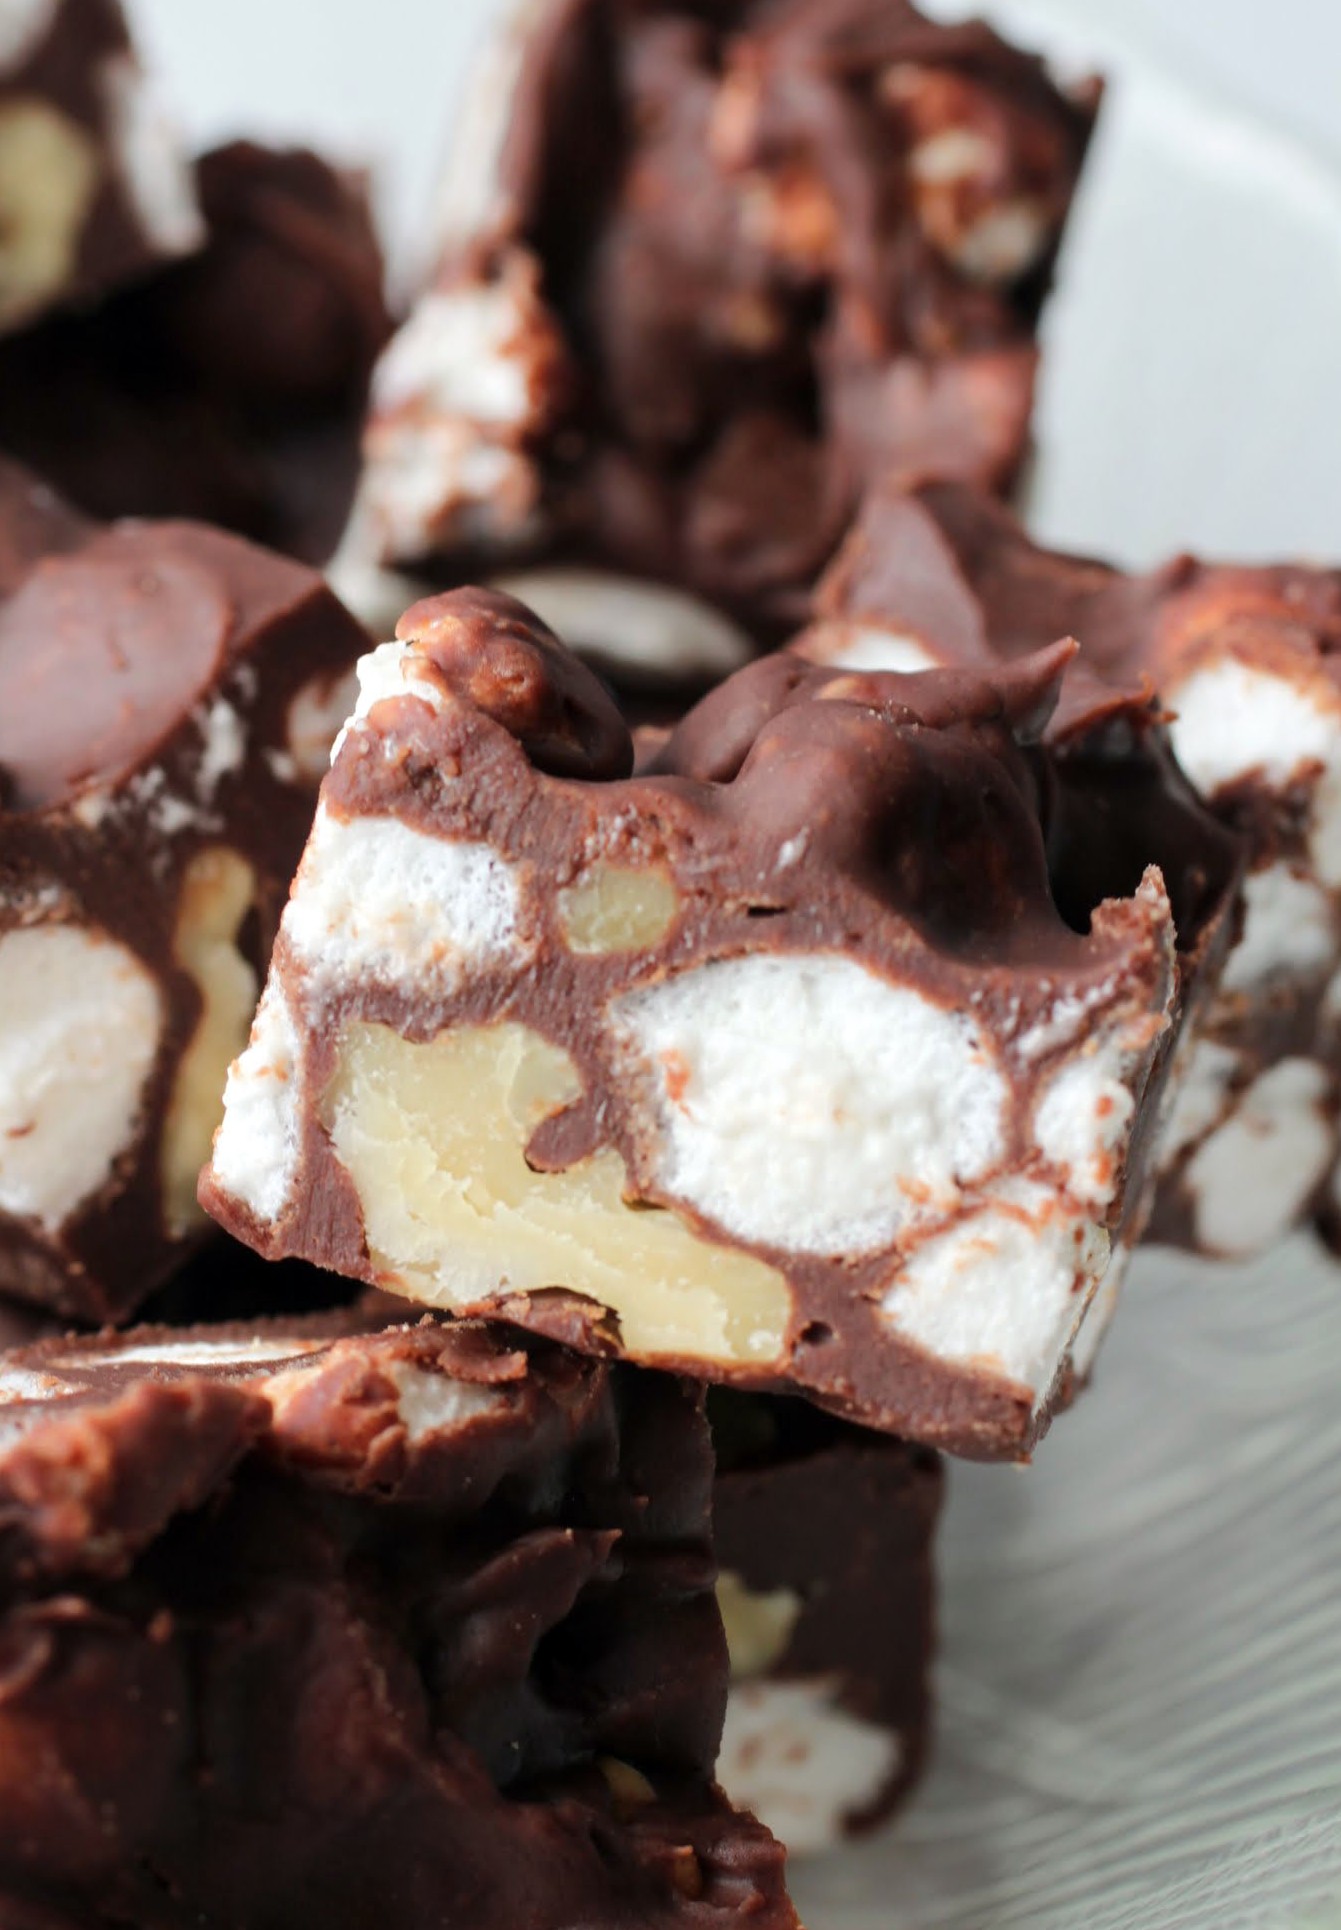
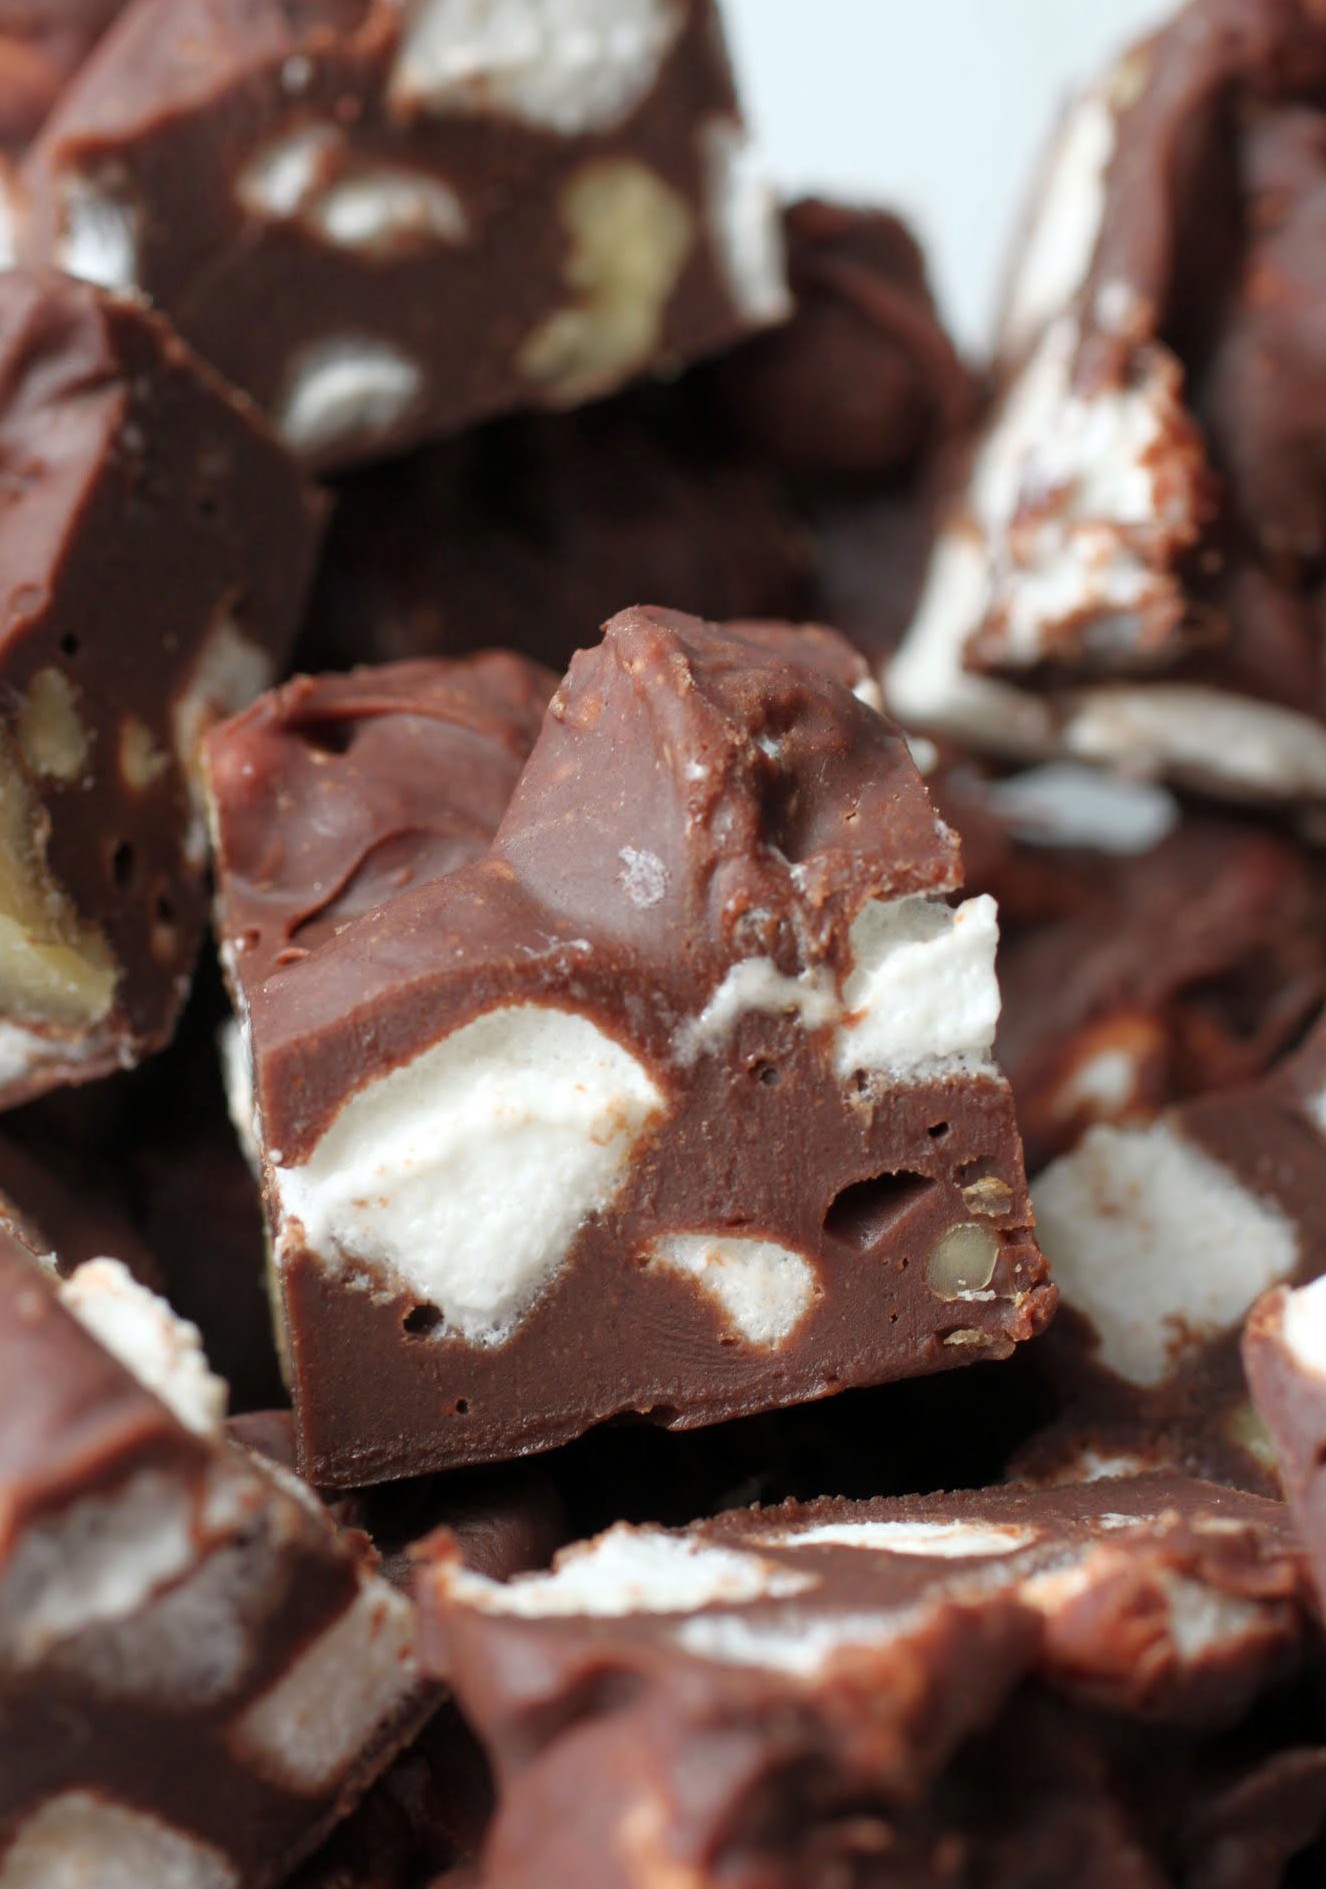
I’m not due to hit the beach for another month or so, and I could just throw up my hands in despair and decide to wait. Or I could make this rocky road fudge, which takes about five minutes to put together and tastes oh so beachy!
For her birthday a few weeks ago, we gave my daughter a doll and a tricked-out stroller. She really wanted an American Girl doll, but I mean, come on. They’re a hundred bucks a pop, and that’s before clothes and accessories. Plus, she’s a child. Can she really take care of a hundred dollars’ worth of anything? We had doubts.
I’m glad we got her the cheaper doll, since she’s been dragging it around by its hair or swinging it by its arms. I feel really badly for the poor doll. She’s probably wondering why she had the rotten luck of being adopted by this crazy family.
The other day, my mother brought over the doll cradle that I used when I was growing up, and I was actually surprised to see that it was in pretty good condition. But then I got to thinking about it, and I took pretty good care of my toys. I was never neat, and I was certainly no angel of a child. But somehow, the toys stayed nice.
With my kids, it’s a totally different story. They’re not precisely destructive, but they’re not good at understanding how caring for something lengthens shelf life. So in yet another episode of Mir’s Mom Guilt, I ask you: how to create learning opportunities for them? Short of confiscating all their toys, that is?

I’d like to see somebody try and confiscate anything of mine. I’d be pretty fierce. Especially if they were trying to take away dessert. Not happening!
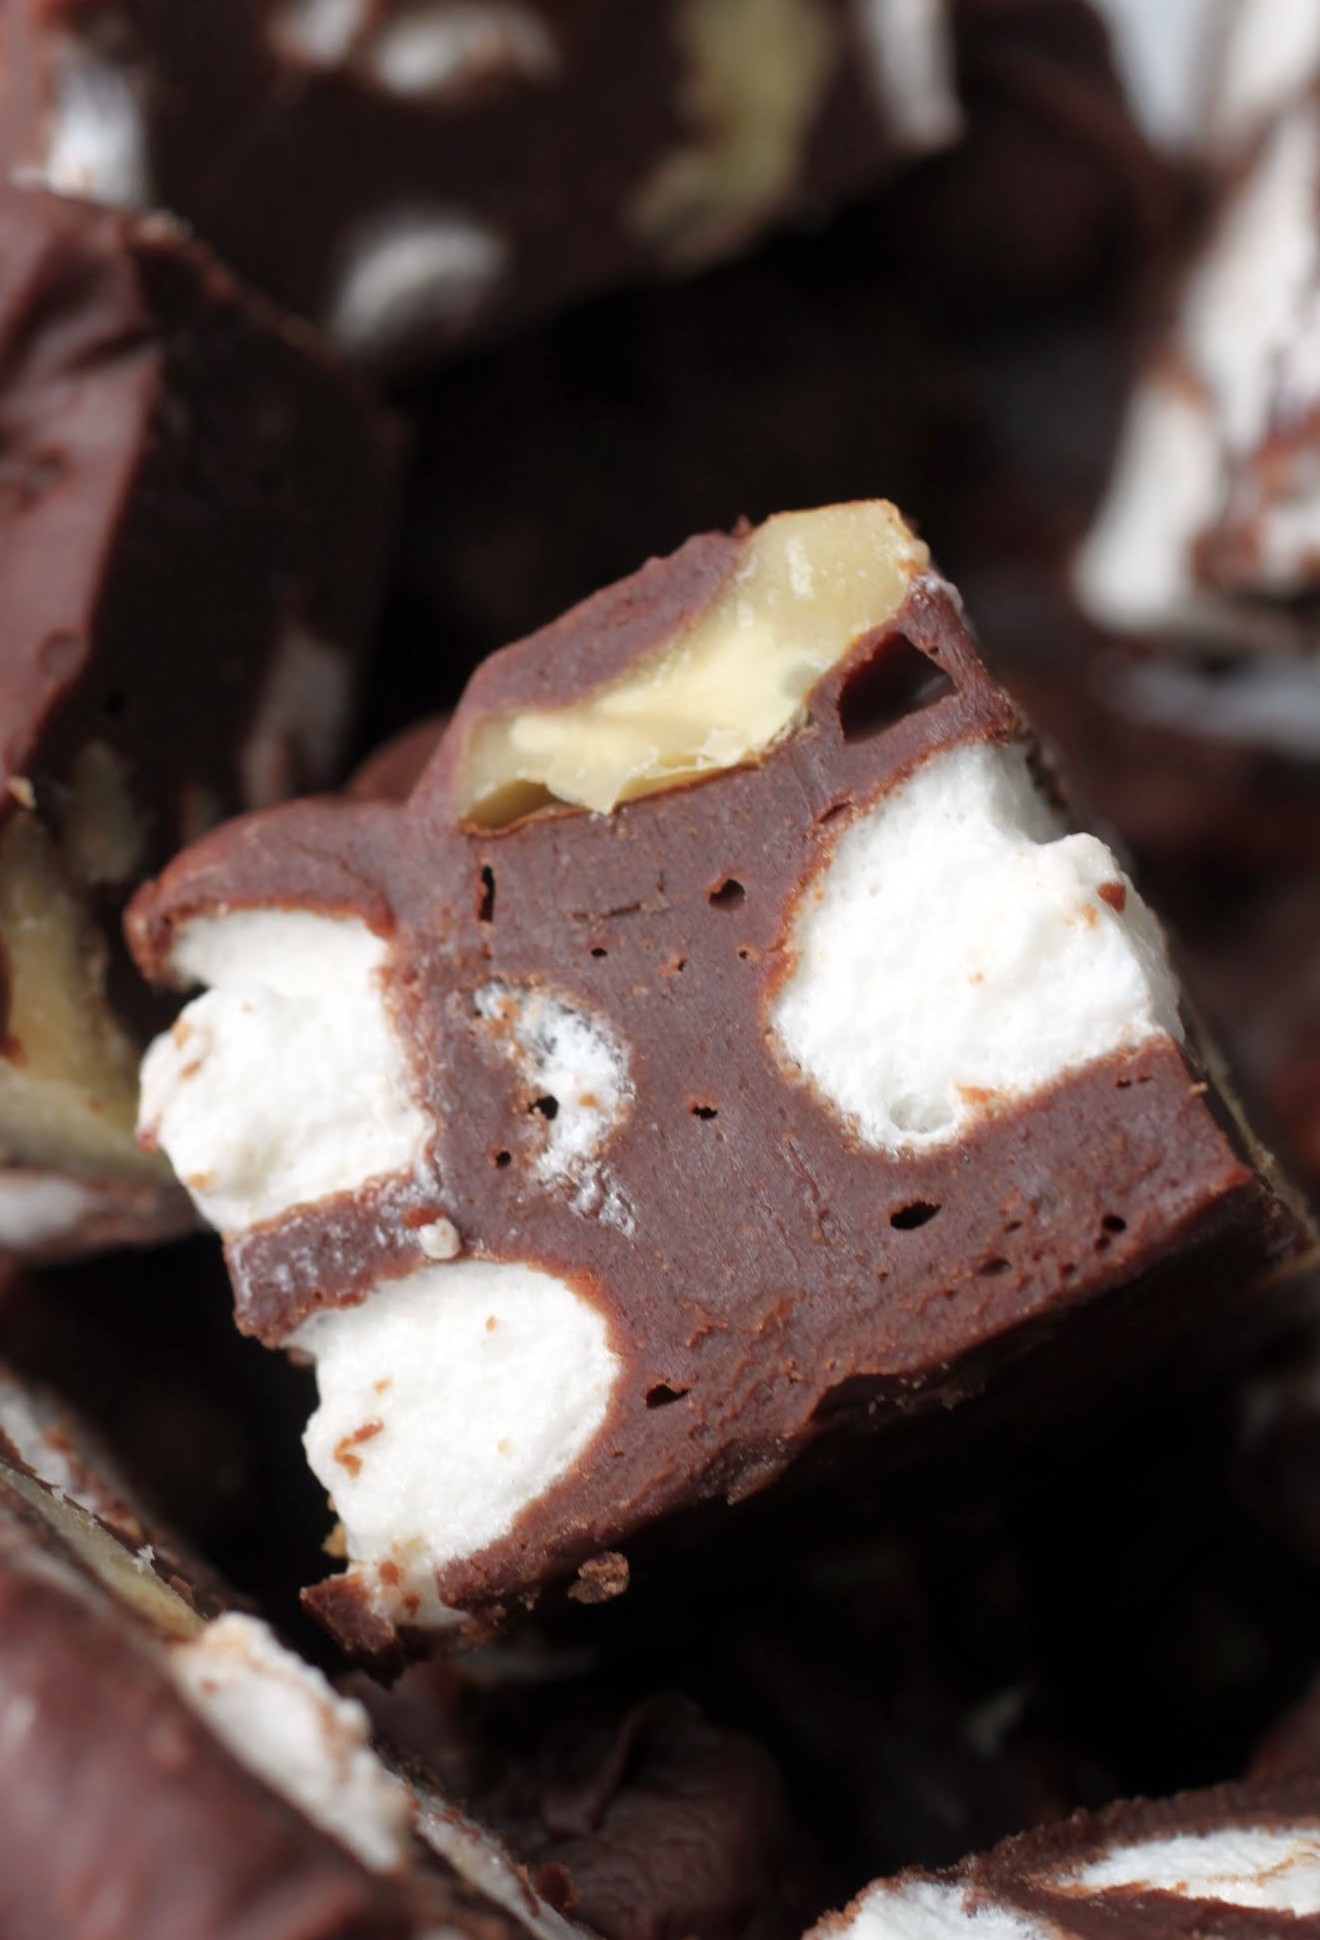
Whenever I’m in a hurry, I make fudge. Seriously. The whole thing takes less than five minutes, thanks to our good friend, Mr. Microwave. And after the requisite chill time, it’s time to dig in!
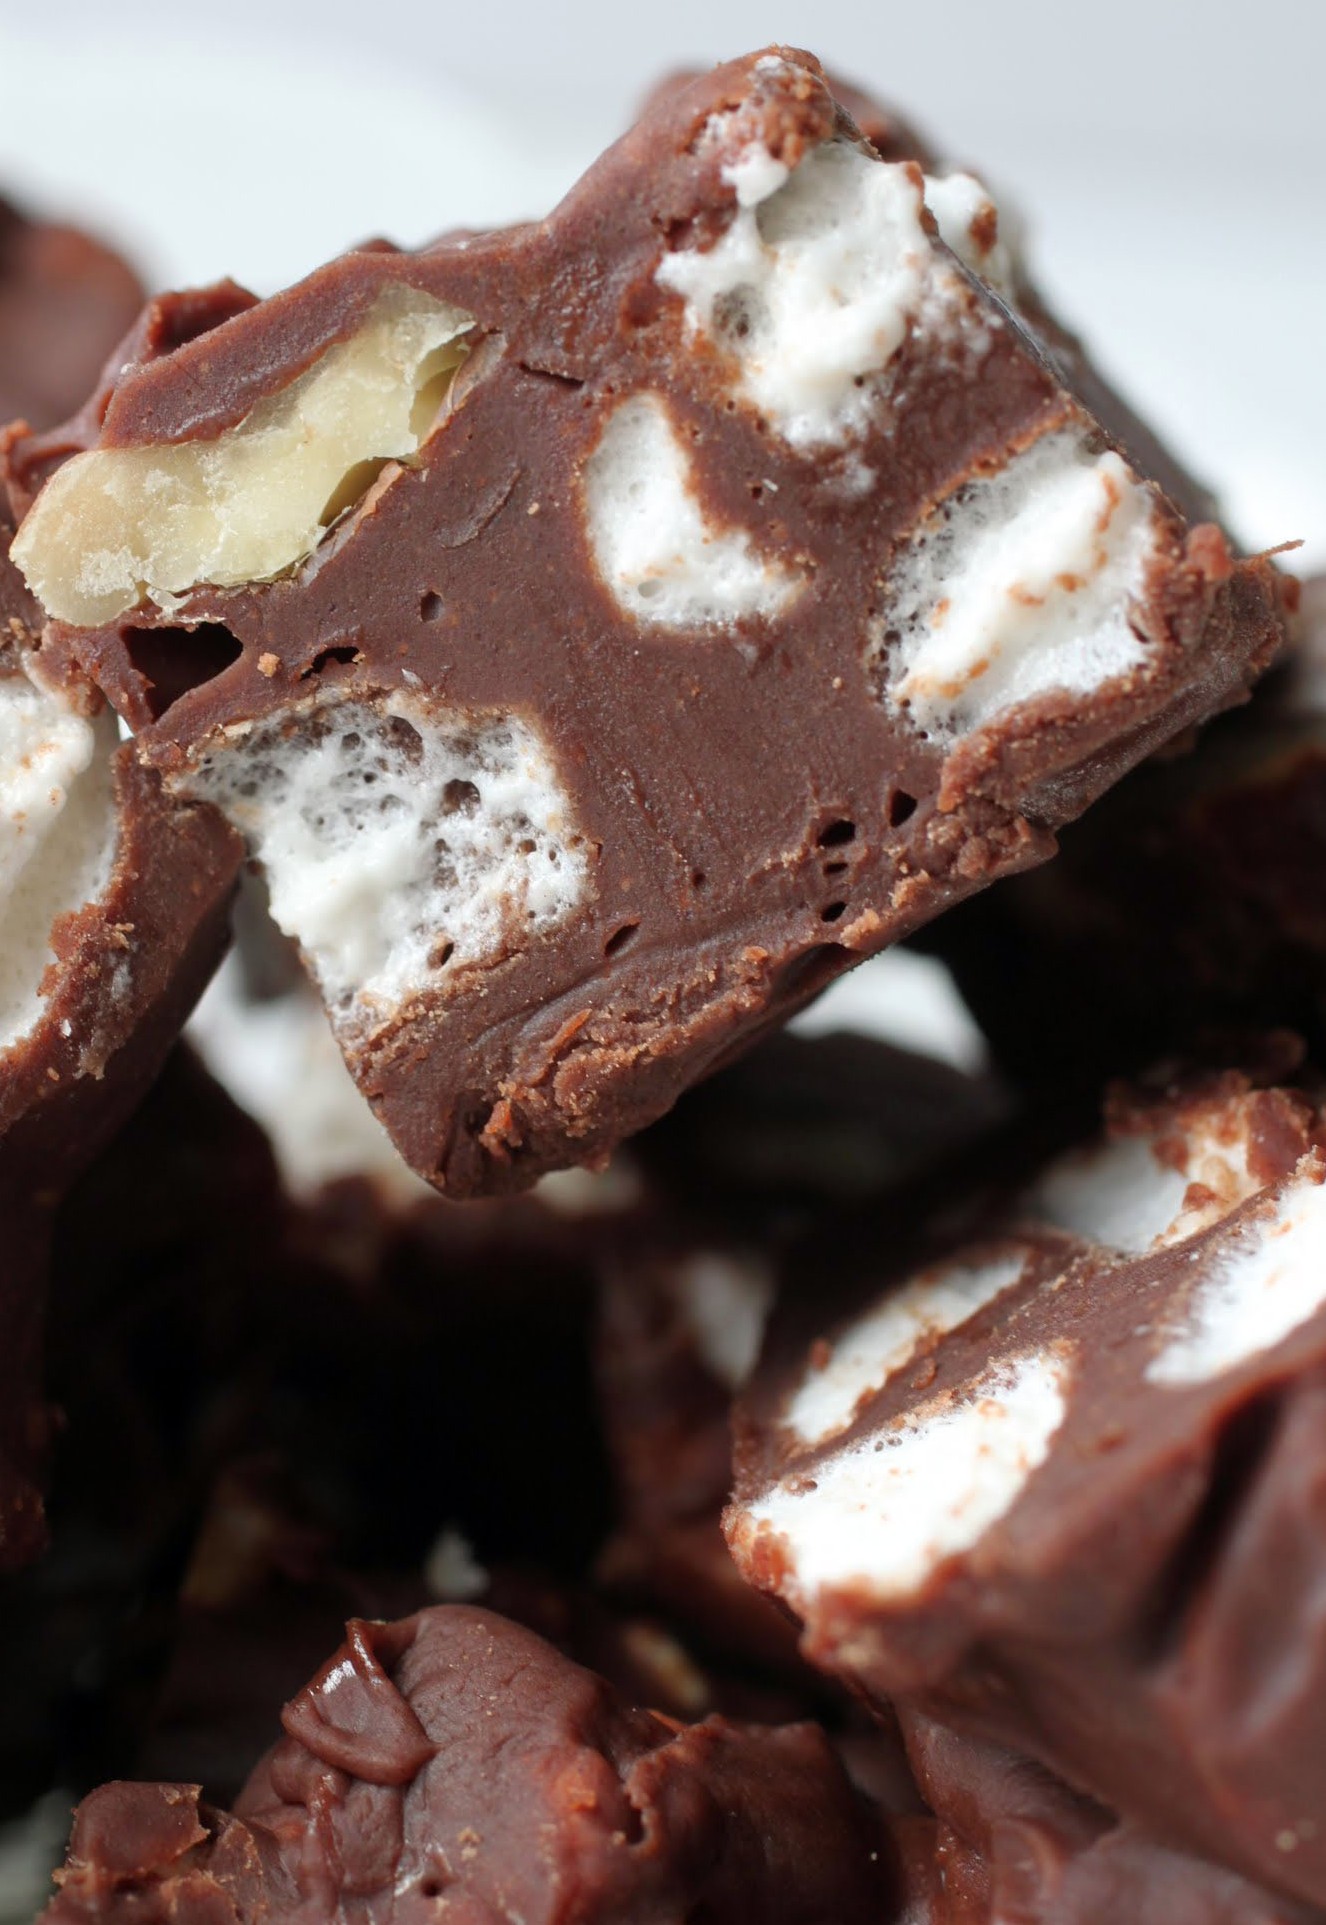
This fudge is loaded with mini-marshmallows, walnuts and lots of chocolatey goodness. Your inner rocky road fanatic will be quite pleased!
If you can’t get to a beach town this summer, here’s the next best thing. Give it a shot!
Ingredients
Instructions
- Line an 8-inch square pan with waxed or parchment paper. Set aside.
- Pour the milk chocolate chips and condensed milk into a microwave-safe bowl. Heat for two minutes and stir. If needed, heat for another 30 seconds and stir until smooth.
- Mix in the mini marshmallows and walnuts. Pour the mixture into the prepared pan and pat down evenly with a spatula.
- Chill for three hours until set.
- Cut into squares with a sharp knife. Store in an airtight container.
Last week, I stopped by CVS for a quick trip to get some cleaning supplies. I’ve just moved into my new office space, and it was pretty dang dirty, so I needed to rush out right away and get cleaning spray, wipes, paper towels, the works. I was only going to pop in for a second.
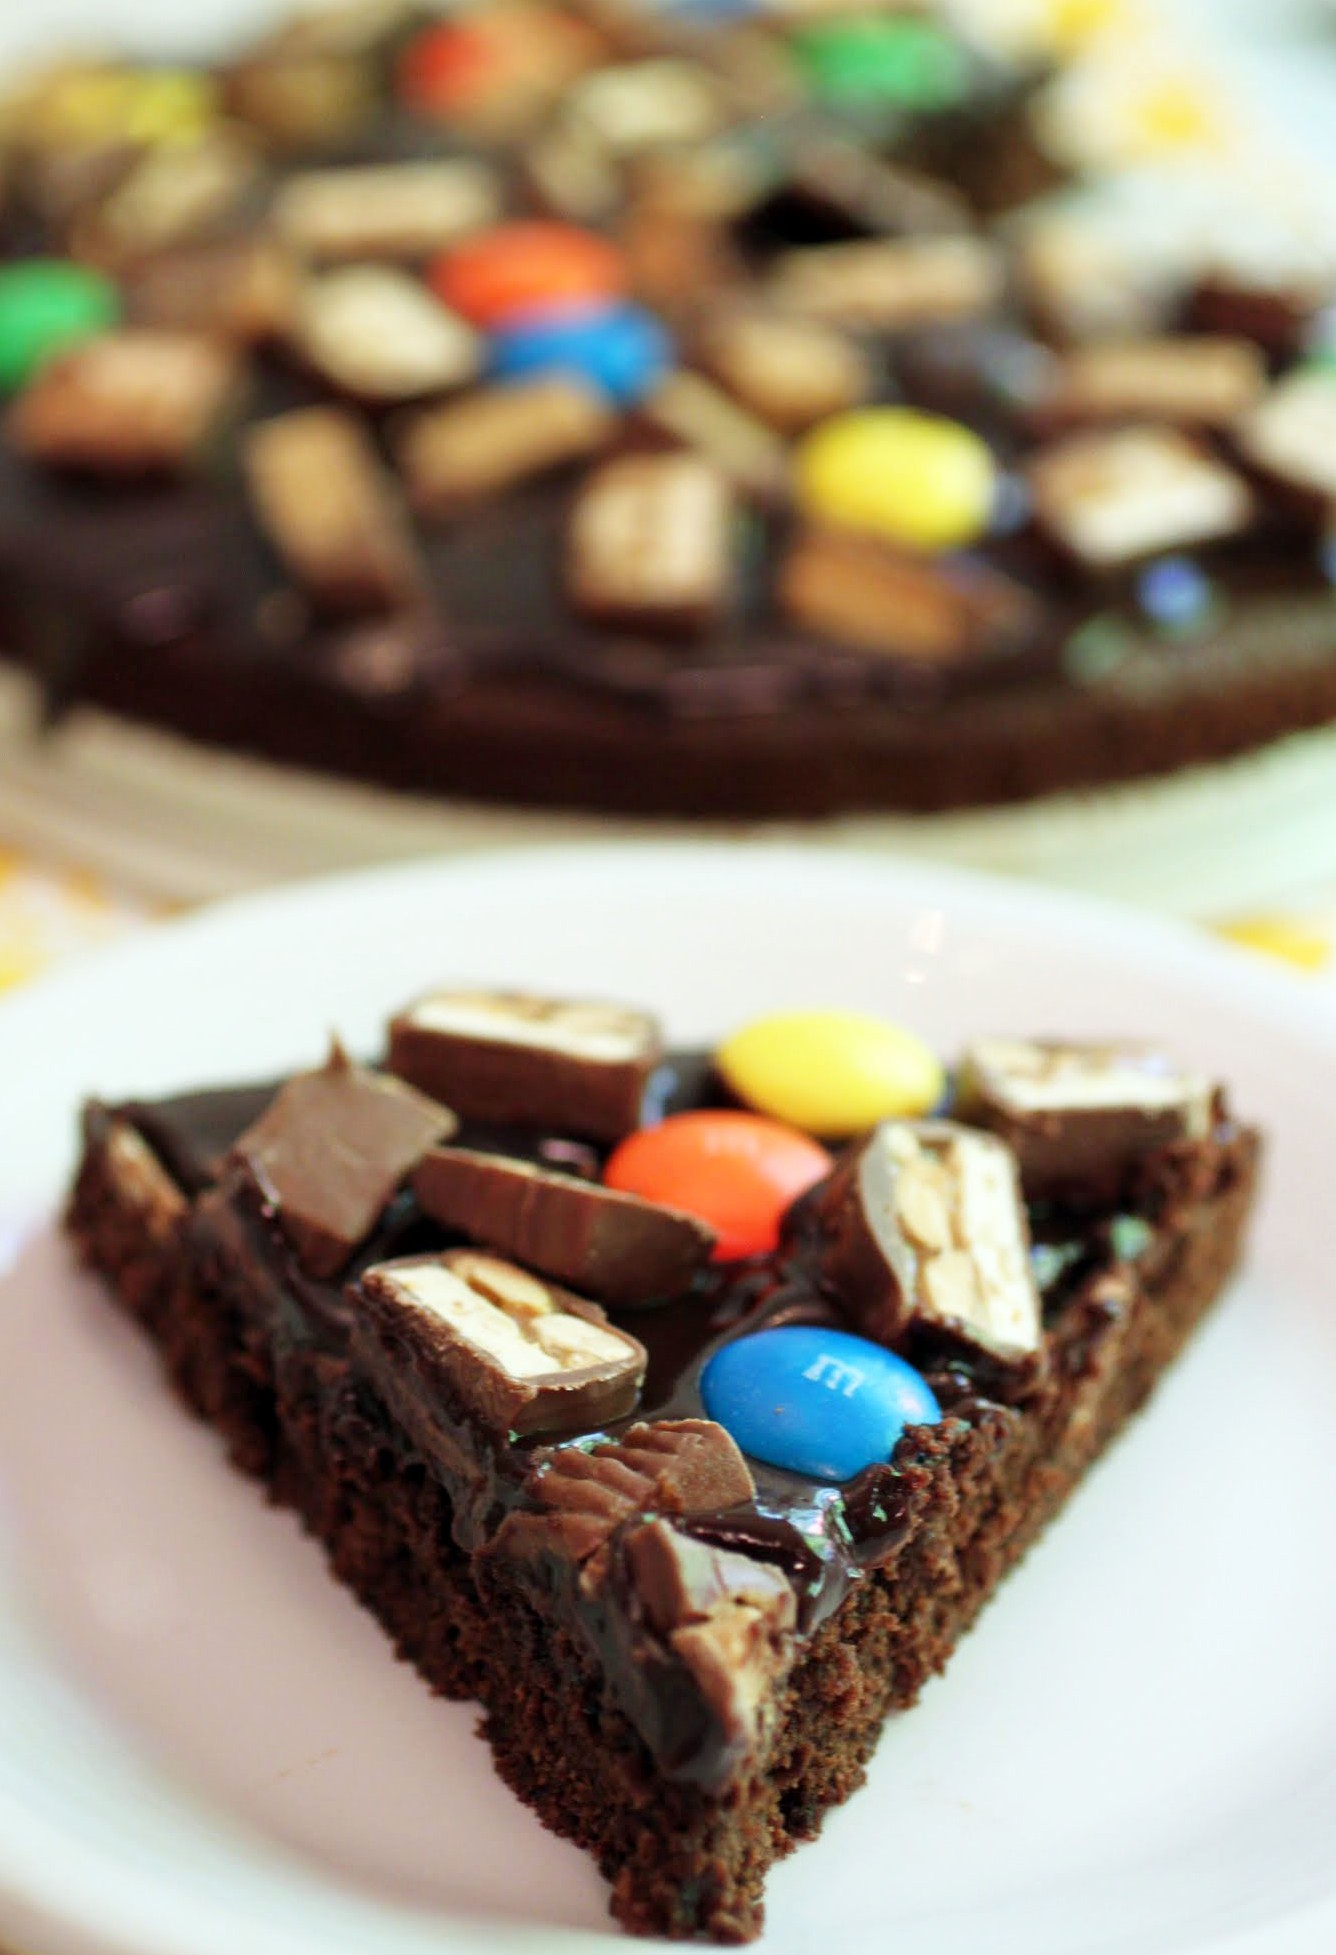
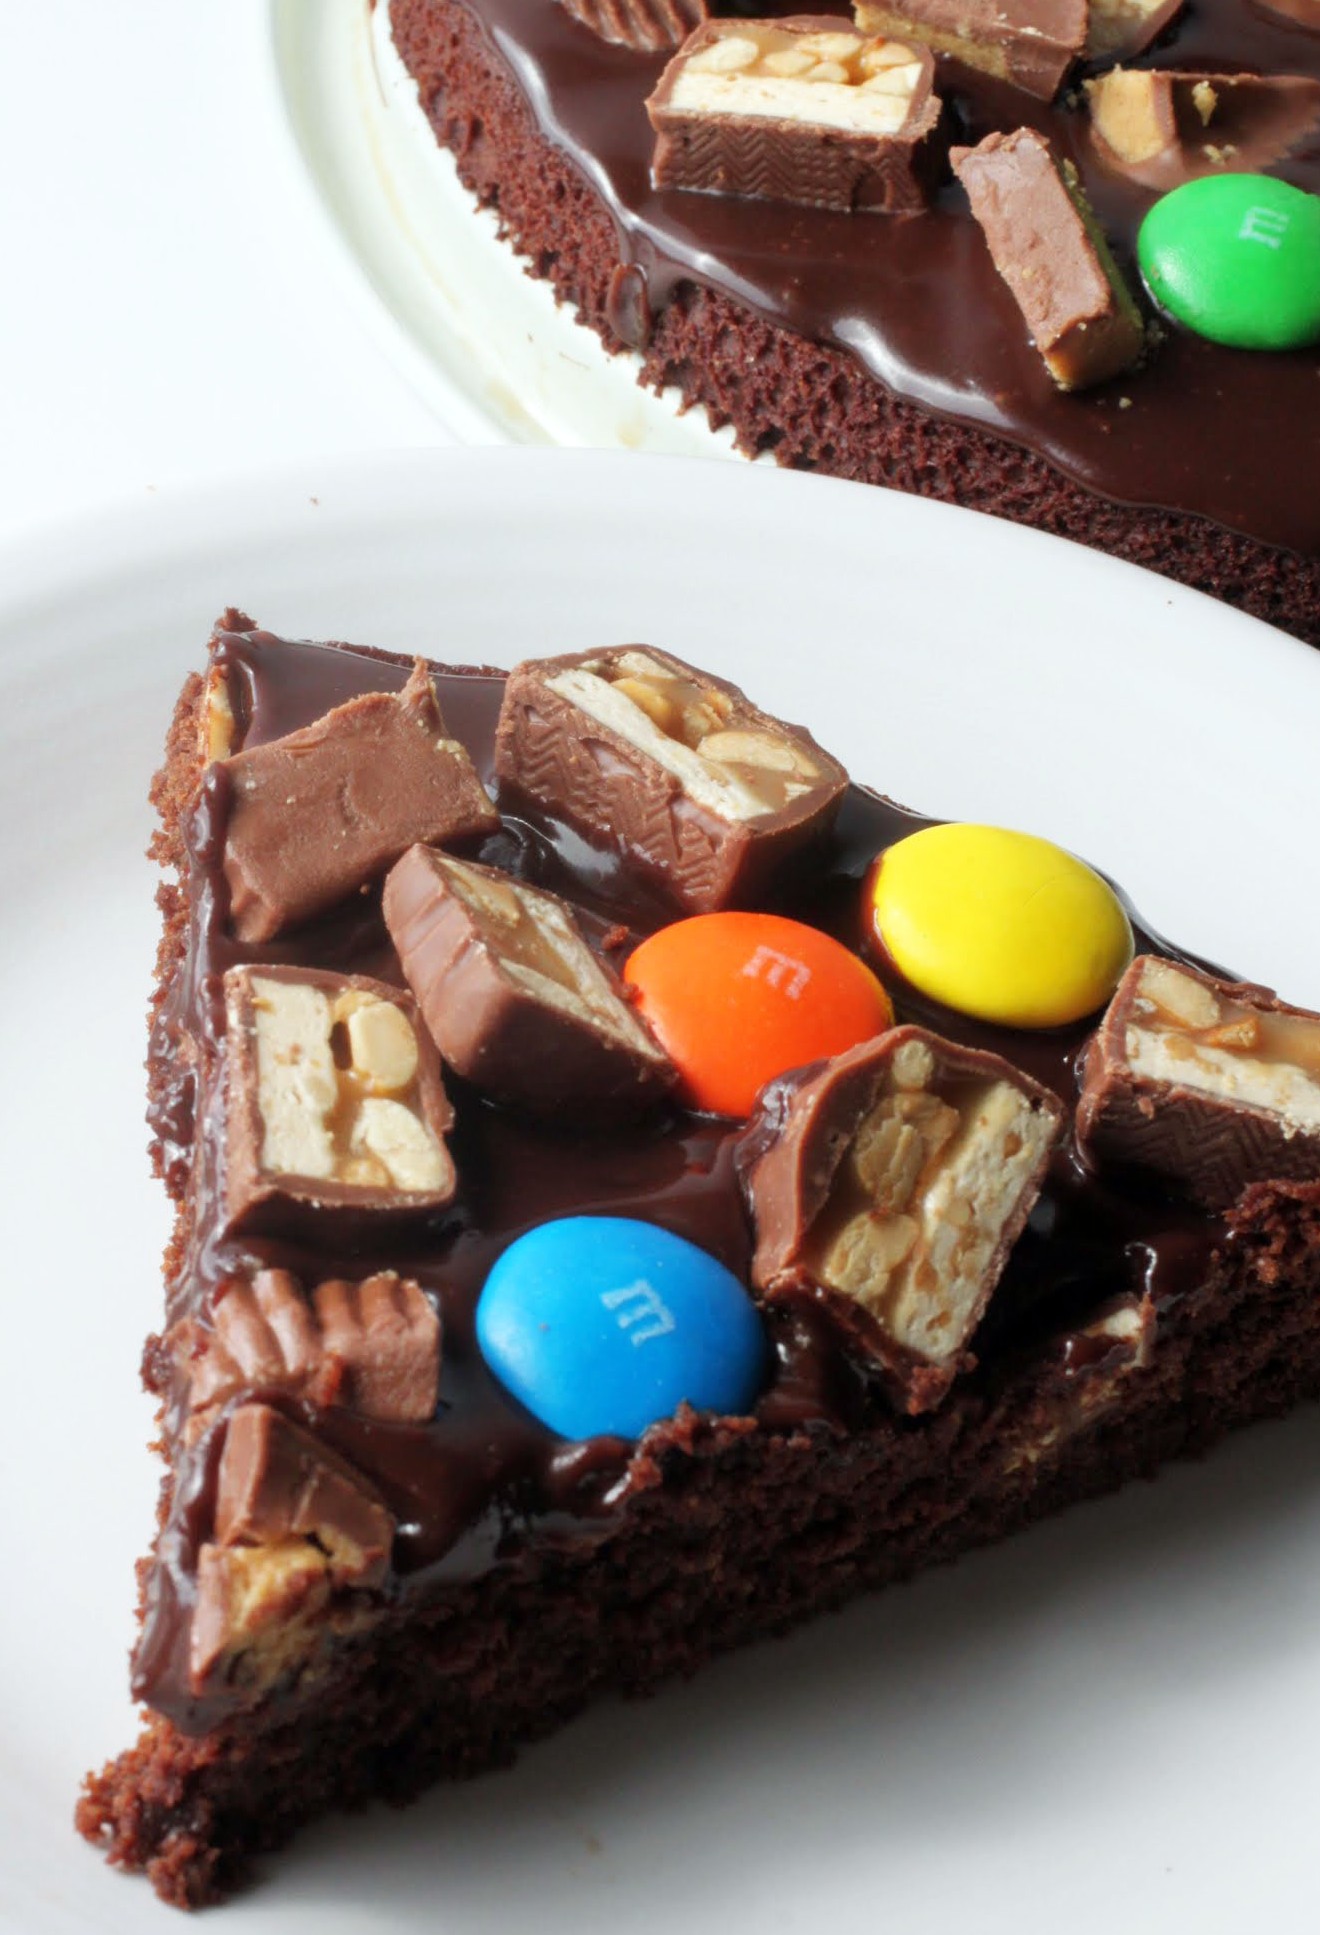
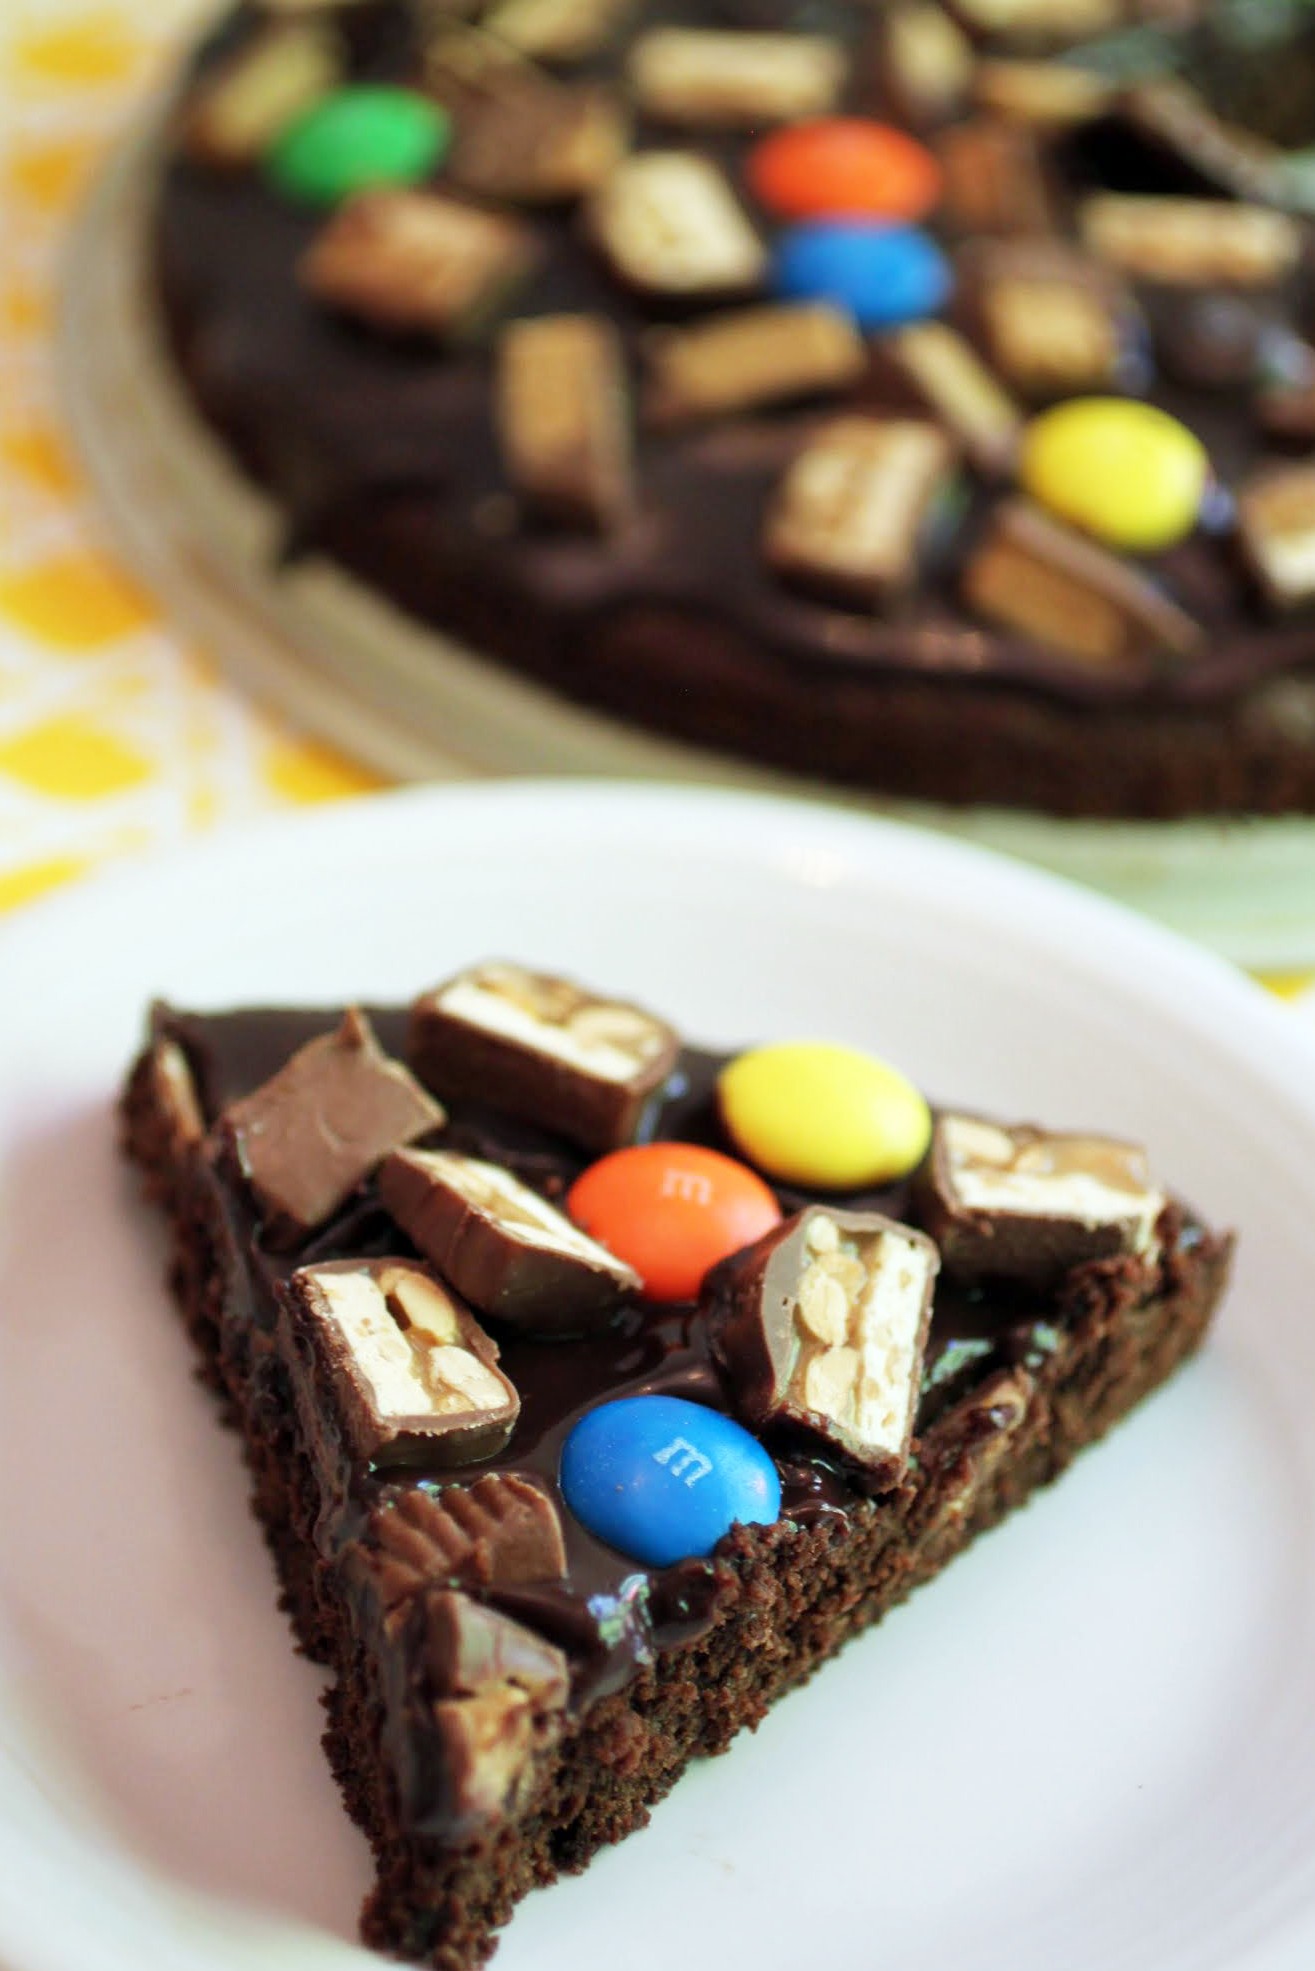
But you know, CVS has the best stuff. Makeup and hair stuff and gel pens, oh my. And have I mentioned the bags of candy? Yep, I walked out of there with snack-sized Reese’s, Mega M & Ms and yes, fun-sized Snickers. Rather than eat the entire contents of each bag immediately while I cleaned dried-up Jolly Ranchers off a desk in the office, I chose to save them and bake this candy bar brownie cake instead.
This past week, I went to cake decorating class. I originally signed up for this class before my job promotion when summer was supposed to be uneventful and relaxing, and now I just don’t know if I can do it. I was sitting in class at night trying to form a fondant and gum paste flower, and the table was making waves in front of me. I was about two seconds from face-planting onto my sugar daisy.

Fondant is a tricky beast, for those of you who work with it. It’s like play-doh, except it theoretically tastes a little better. I know it looks really nice, and I like making decorations with it. That said, I’ve never been the biggest fondant fan. For one thing, it doesn’t taste as good as frosting. For another, it really gets handled a lot. I know (or hope) that bakers are working with really clean hands, but the image of someone handling something that much before I put it in my mouth is a turnoff.
Also, the stuff cracks really easily, and once that happens, there’s no fix. I know we’re into this whole smooth cake trend, and it’s totally pretty. But I get frustrated sometimes at all the fondant cakes that look alike. Or maybe that’s just me looking for an excuse to drop cake decorating class so I can get more sleep.
For the first time this week, I’ll be making a tiered cake. I’ll let you know how that goes. Send me tips, okay? I’ve chosen to frost it as a mostly-naked cake to keep the work down to a minimum, but boy, I’m scared.
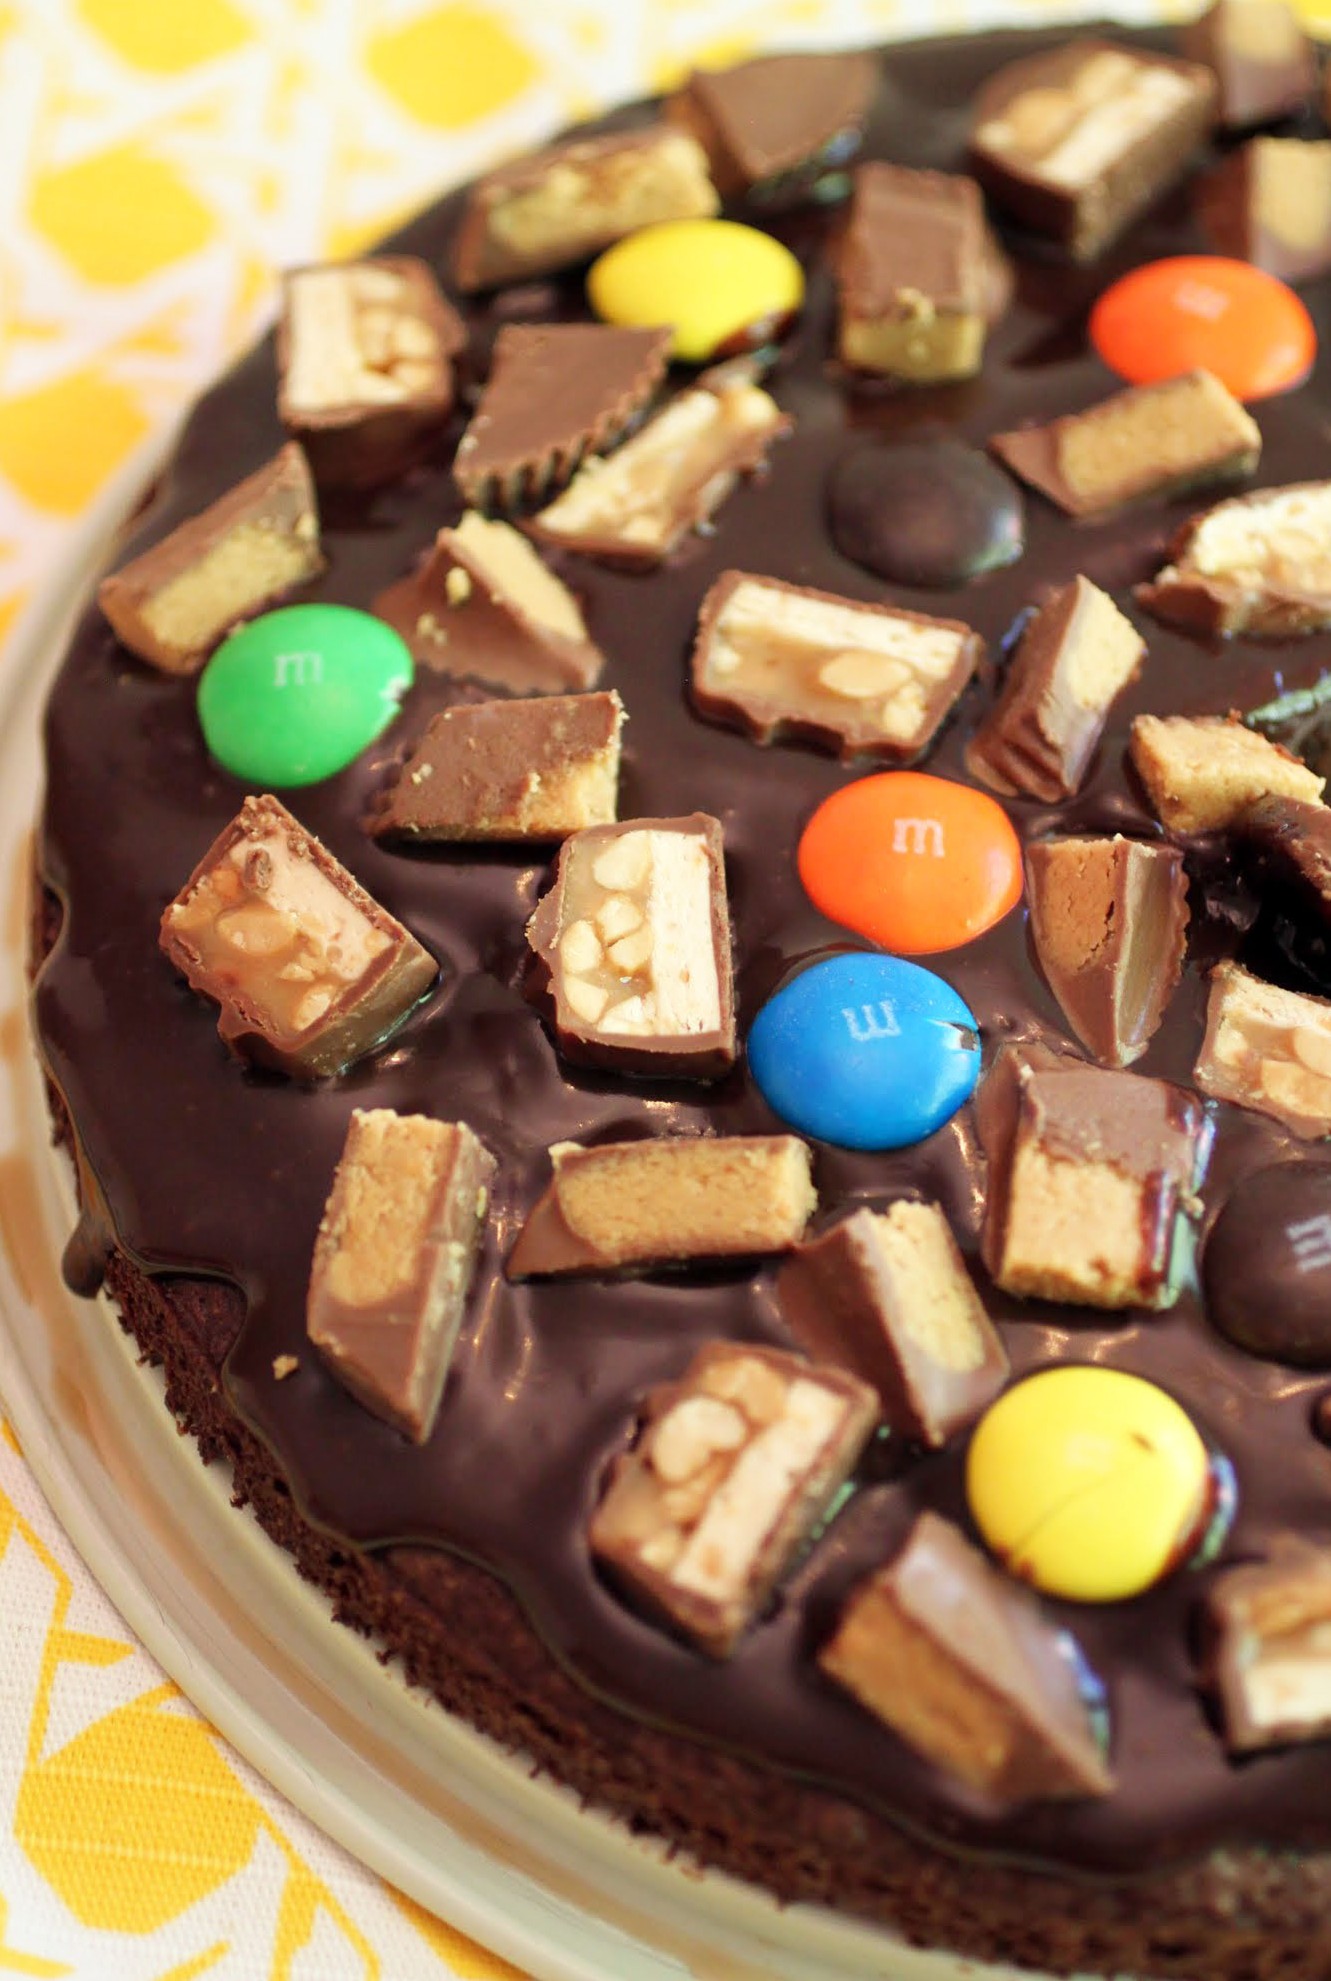
When I’m trying new things in the cake decorating world, it’s nice to make a dessert that it low-maintenance and no-fuss. This brownie cake is exactly that. The base is a fudgy brownie, covered with easy chocolate ganache and topped with my CVS collection of chocolate bars. Could life get any sweeter?
And now I’m off to try and dowel some cake. Wish me luck! I’ll be stopping by here for therapy if things don’t go well. Have a great start to your week, everyone!
Ingredients
Instructions
- Preheat the oven to 350. Coat a 9-inch springform pan with cooking spray. Set aside.
- In a medium-sized bowl, mix the cocoa into the melted butter until it dissolves. Add the sugar and stir again. When the sugar is incorporated, mix in the vanilla and eggs. Add the salt and flour, mixing until just combined.
- Pour the batter into the prepared pan and bake for 25-30 minutes until set. Cool completely.
- While the brownie cake is cooling, make the ganache.Heat the heavy cream and chocolate chips in the microwave for one minute. Stir until smooth.
- Release the cake from the springform sides. Slowly pour the ganache over the cake, edging it gently out to the perimeter of the cake. Stop when the cake is covered.
- Sprinkle the chopped candy bars on top.
- Chill for an hour until the ganache is set. Slice into wedges and serve, or store covered.