Yes, my post is later than usual this week, and no, it’s not on purpose. I just forgot what day of the week it was because, as usual, there’s a lot happening at work. I’m usually pretty good with time, so I’ve managed to surprise myself by losing track of it a little.
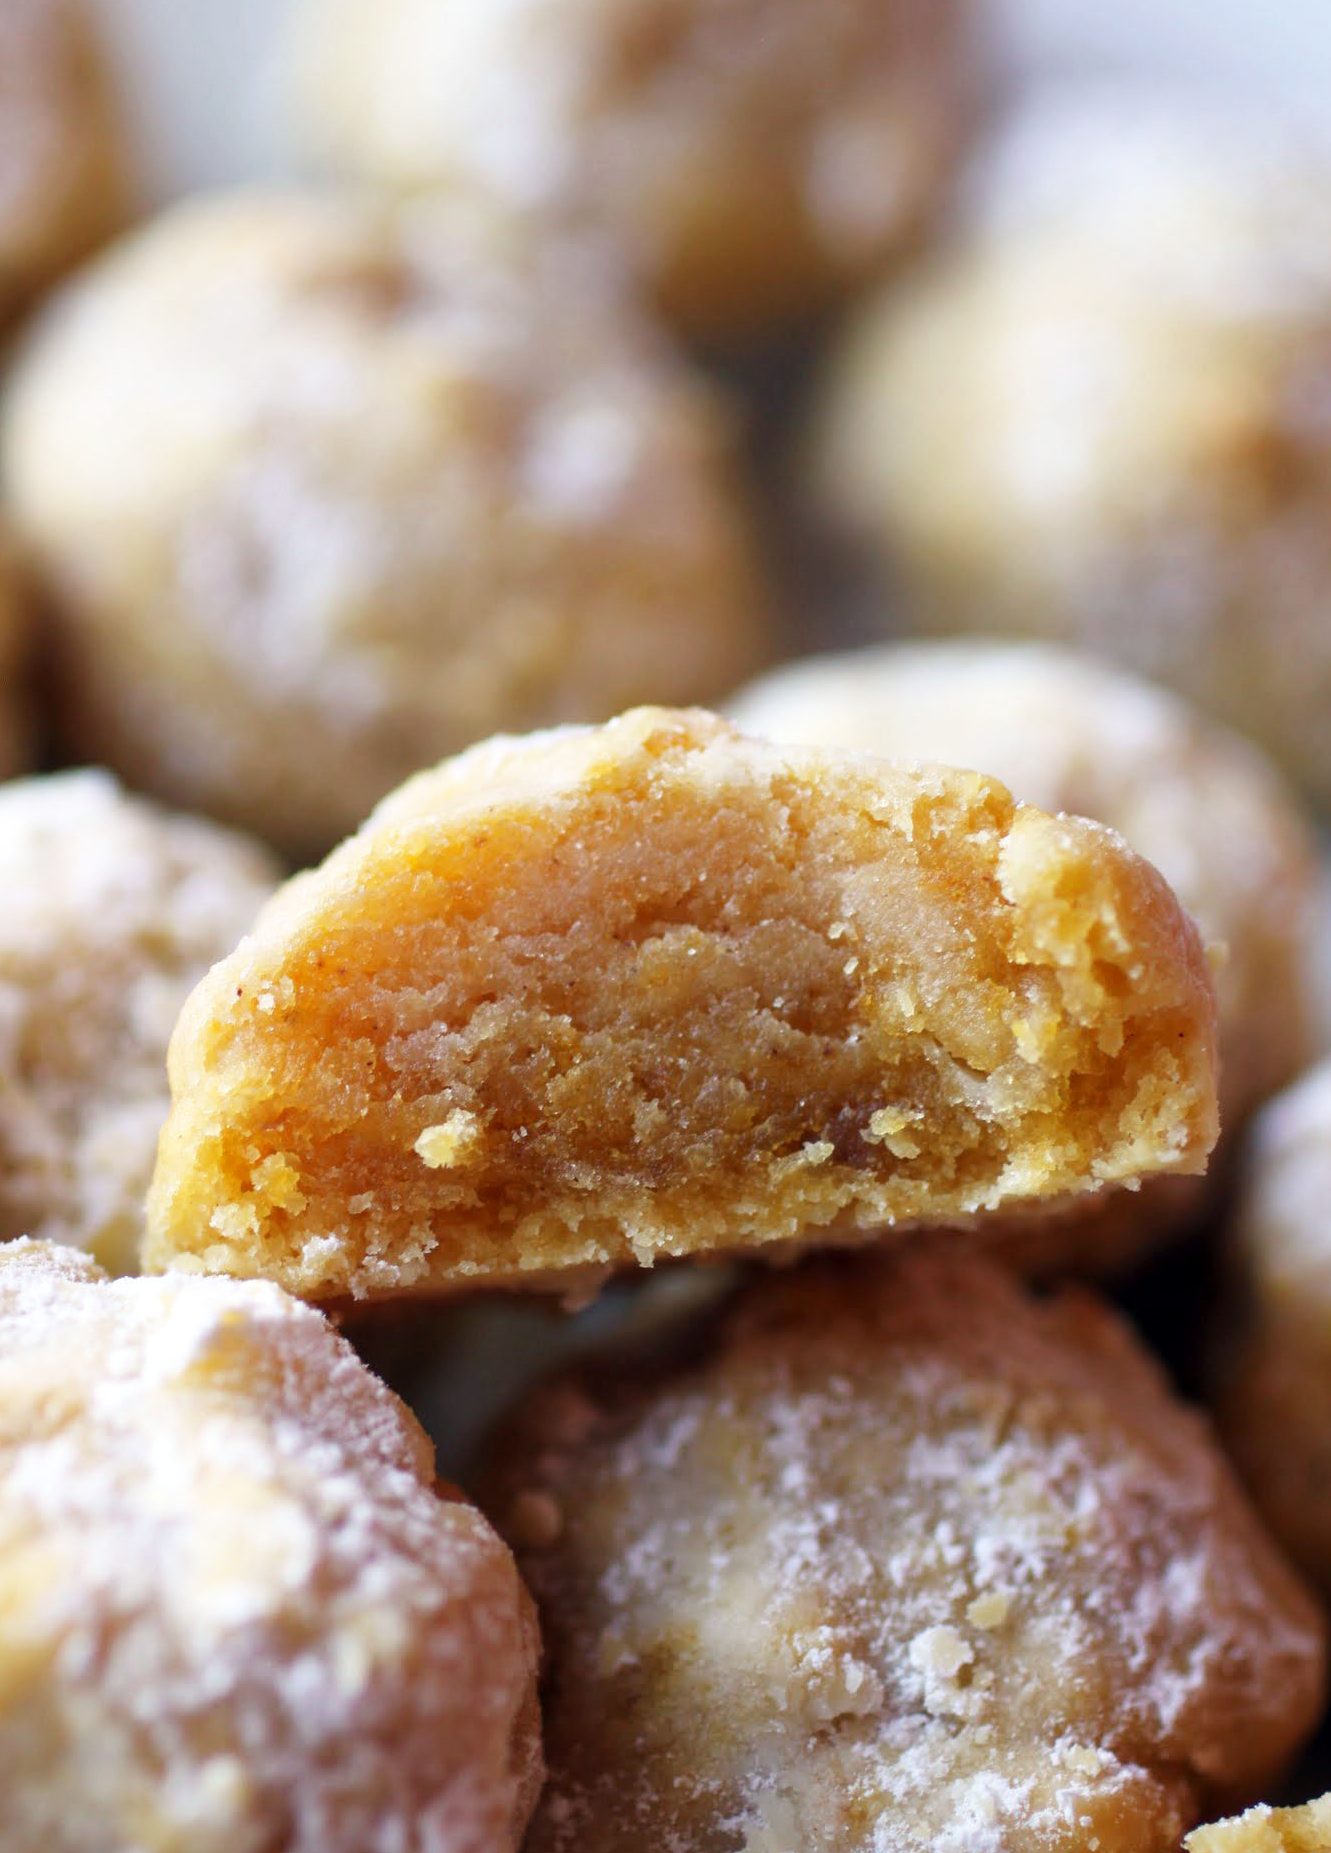
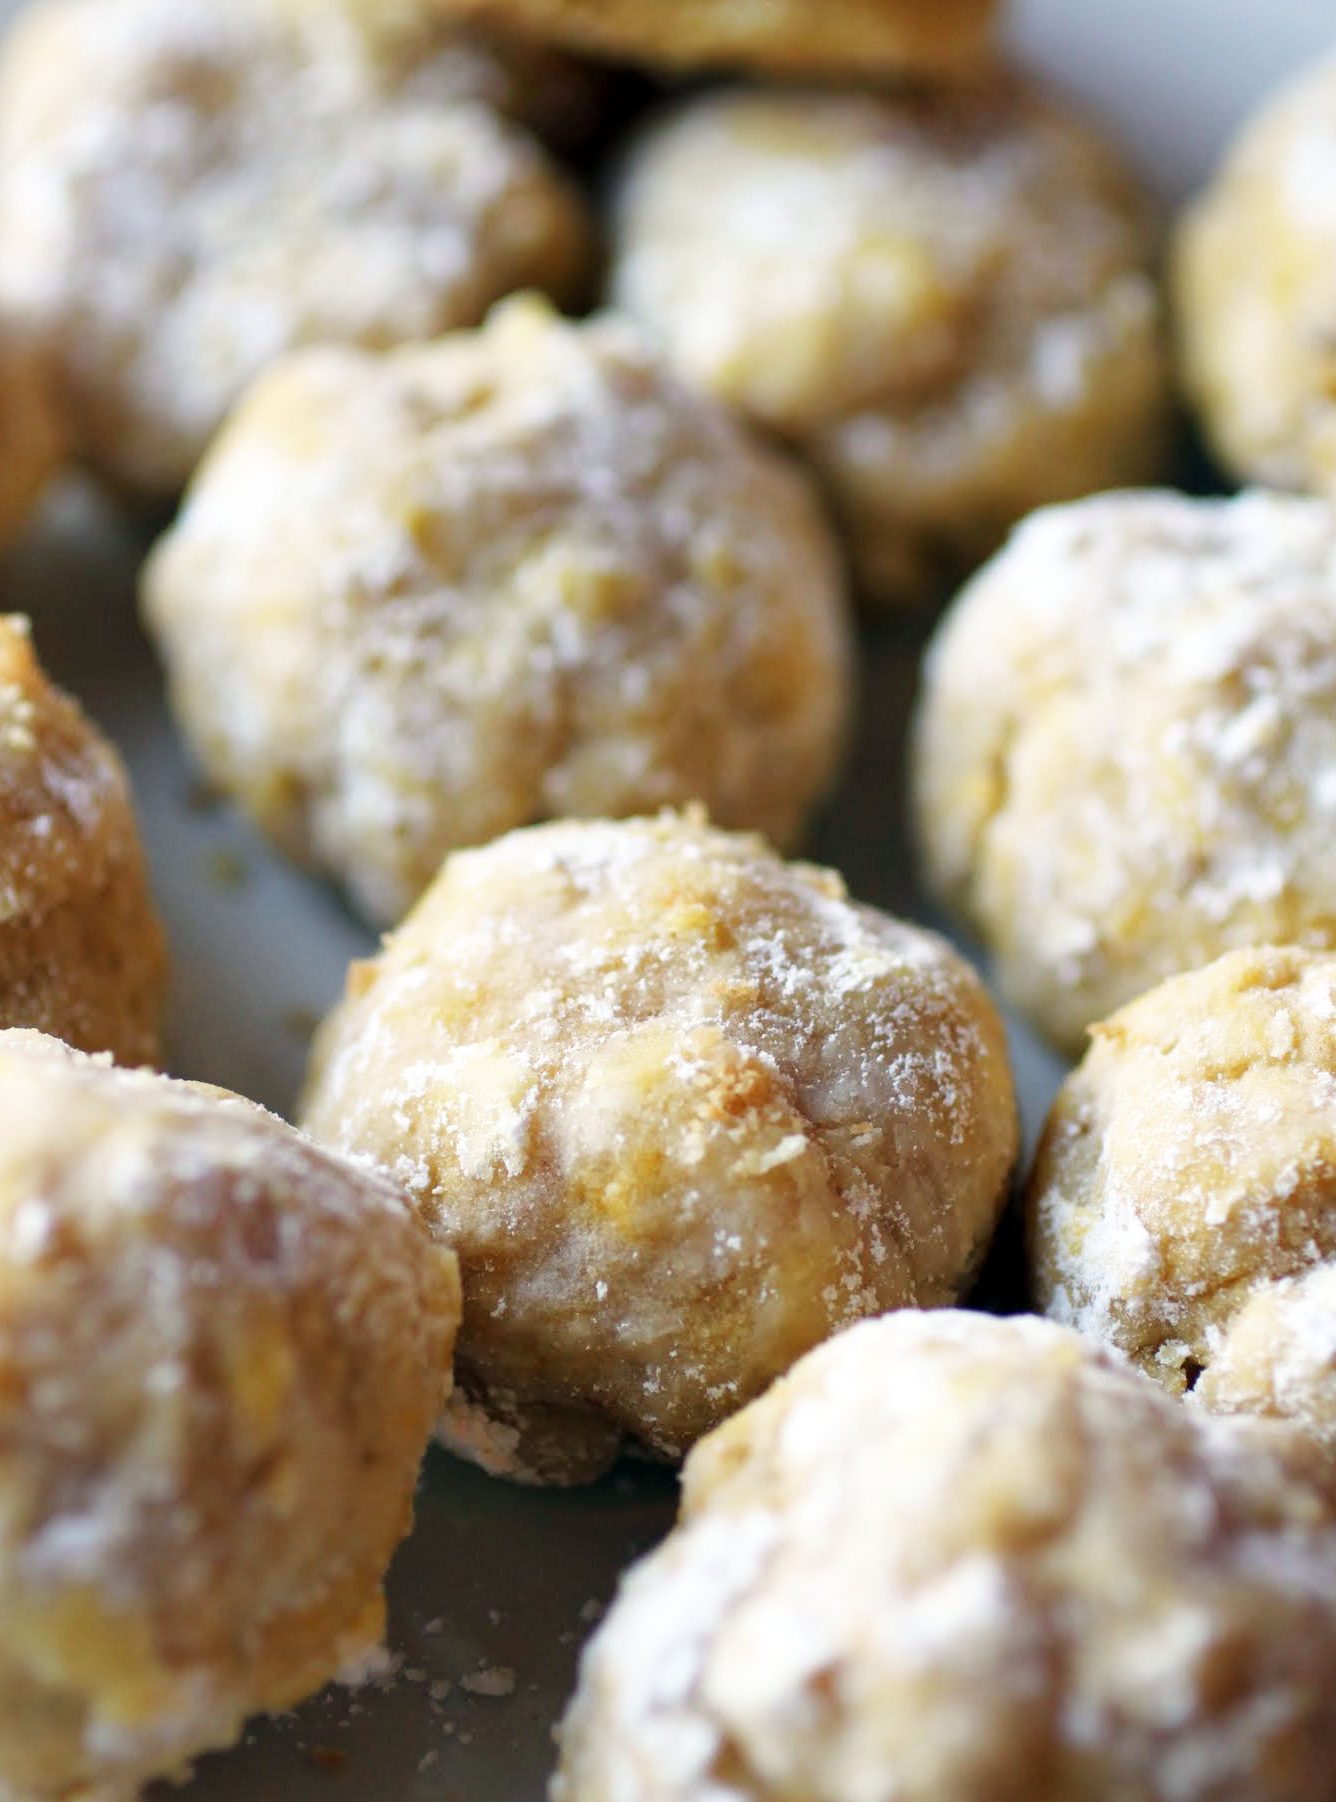
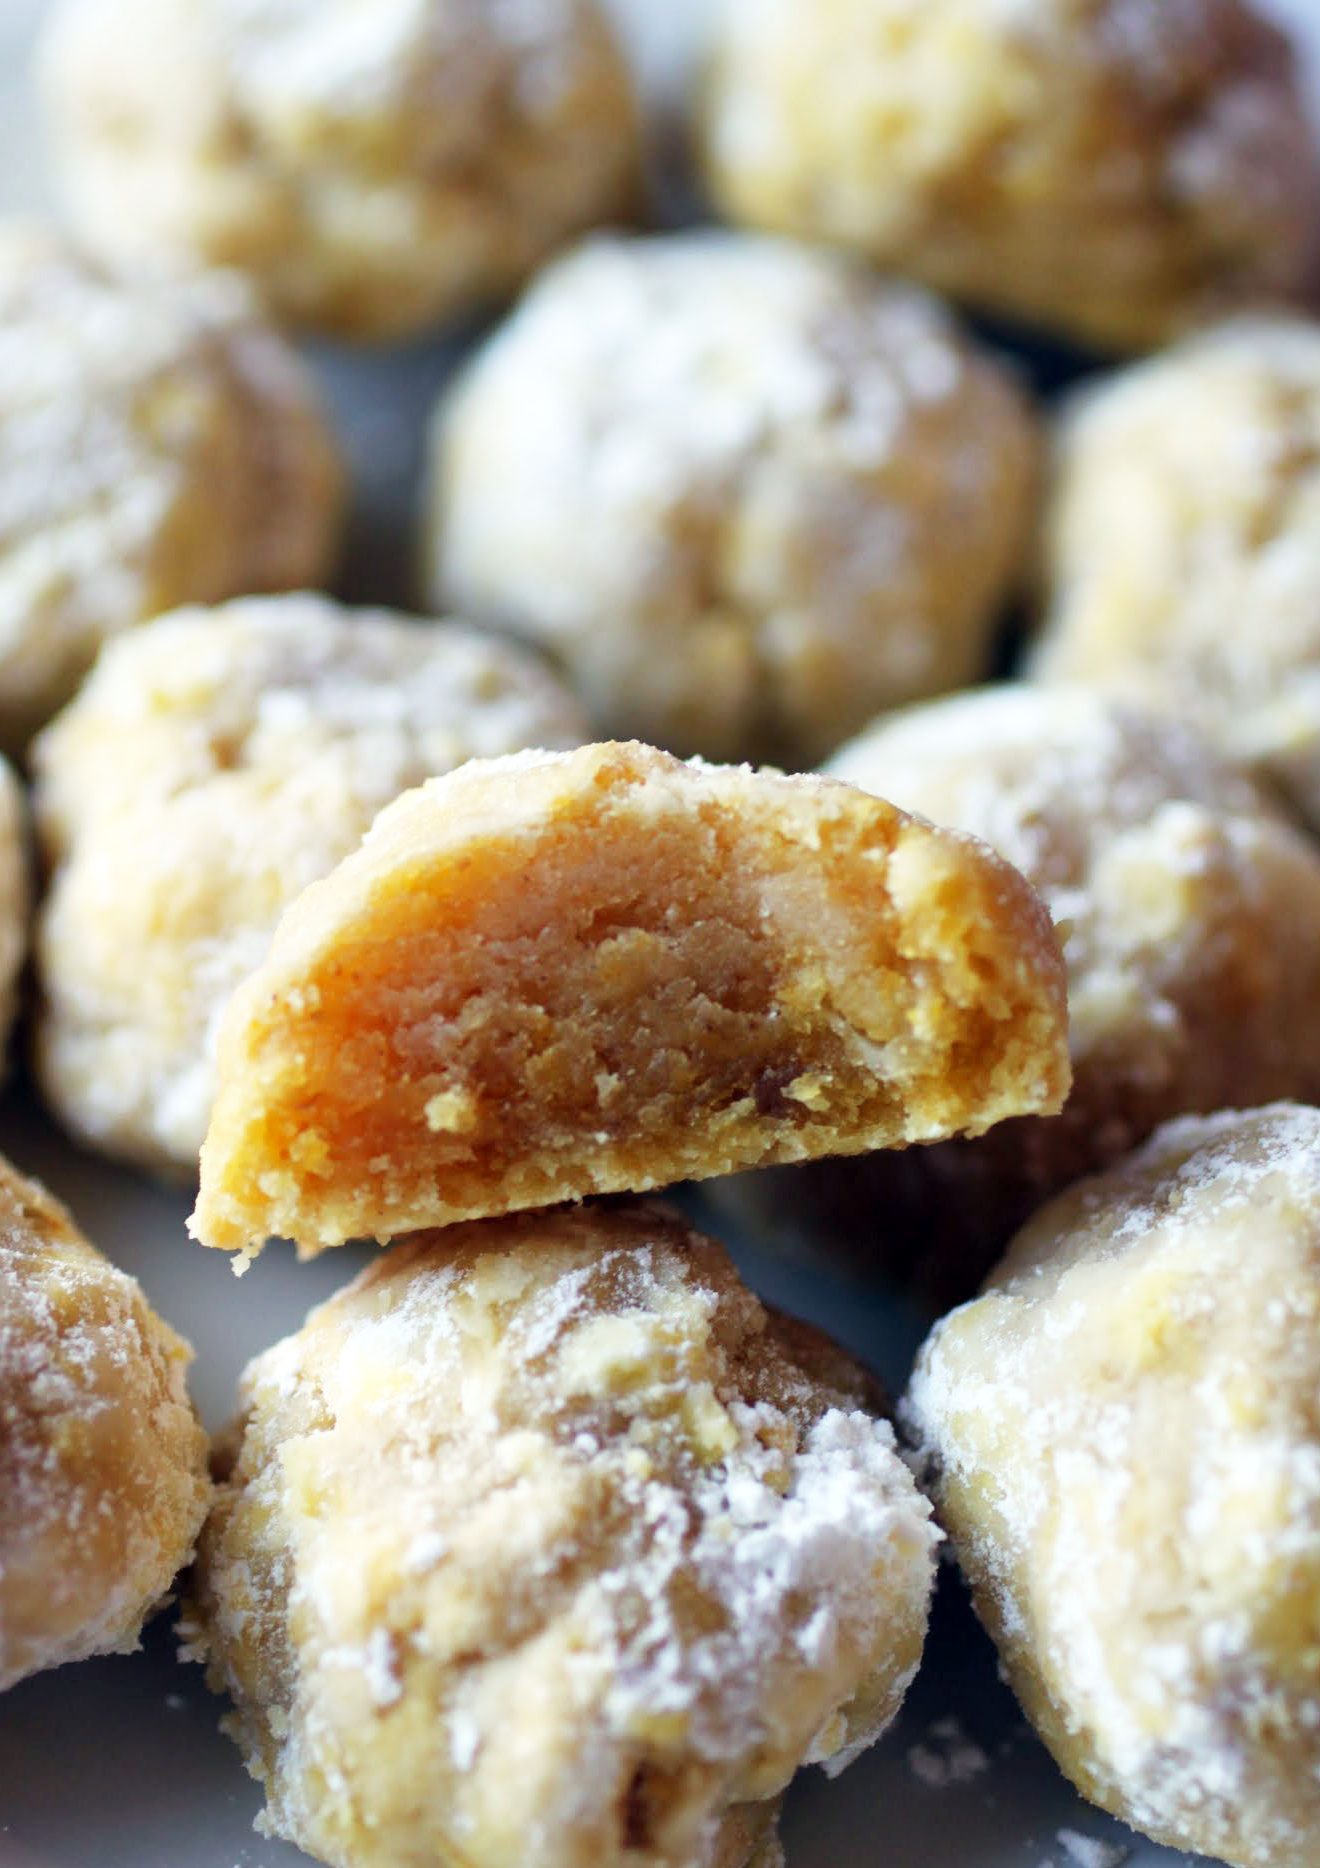
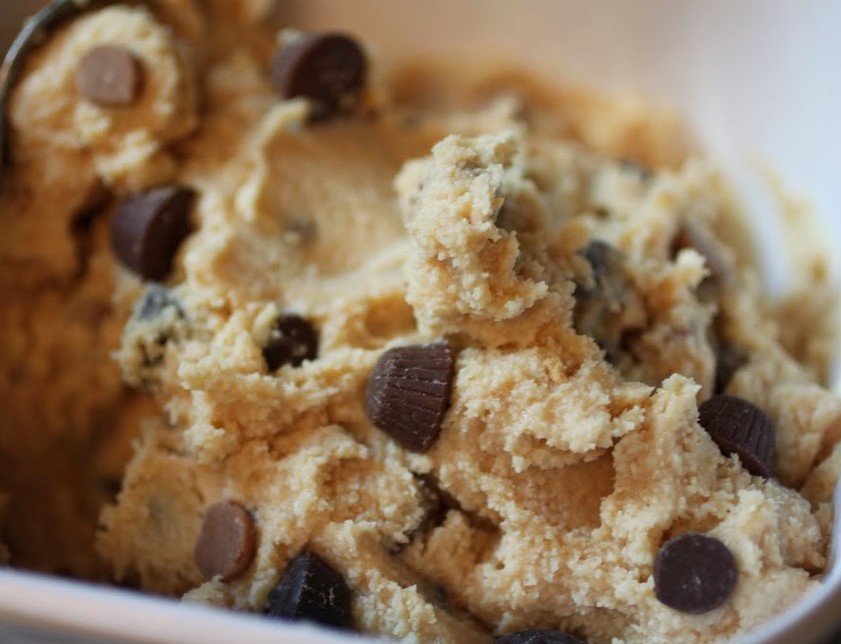
Or maybe I just wanted to wait longer to bring you this autumnal take on my favorite cookie, the snowball. These pumpkin snowballs are the perfect afternoon snack on a crisp fall day!
When I was a kid, catalogs were a pretty big deal. Before online shopping happened, I would happily spend hours poring over the pages of different catalogs. My favorite by far was the Sears Wish List, which came out in the fall and was full of holiday cheer and tons of toys. I could look at those toys forever, imagining that I owned them all.
A more consistent and less exciting offering was my mother’s L.L. Bean catalog, which I would look through and privately wonder at. My mother always said that their clothes were “classic,” but to me, that just meant dull. I was always much more into sparkly things and spur of the moment trends. And khaki chinos? Shiver. No, thanks.
Now that the holiday season is in the kind of imminent future and the leaves are starting to turn, I’m definitely thinking about those catalogs. Time has a way of slipping by, and I’m not trying to rush things. At the same time, there’s been no opportunity lately to stop and smell the crunchy leaves. Or read a catalog. We’re going to have to work on that.

The best way to get a break in my world is with cookies. Snowballs have always been a huge fave of mine, and adding just a small amount of pumpkin puree and pumpkin pie spice makes them more than ready for fall.
If you remember the days of leafing through catalogs while lying on your tummy on a carpeted floor, then we’re simpatico. If you think time is going by too fast, join humanity. We’re all there. I hope you get some time to stop and look around. If not, I hope there’s a cookie break in there somewhere!
Ingredients
Instructions
- Preheat the oven to 350. Line a cookie sheet with a silicone baking mat or parchment paper. Set aside.
- In the bowl of a stand mixer, beat the butter, powdered sugar, vanilla and pumpkin until fluffy. Add flour, pumpkin pie spice and salt and beat again until the dough forms.
- Roll the dough into tablespoon-sized balls and place on your cookie sheet about 2 inches apart. Bake for 10-12 minutes until the bottoms are just starting to brown.
- Wait 5 minutes and roll the cookies in the powdered sugar carefully. You don't want to press down, or the cookies will crumble. Wait a few minutes, and then roll them a second time.
- Cool completely. Store in an airtight container.
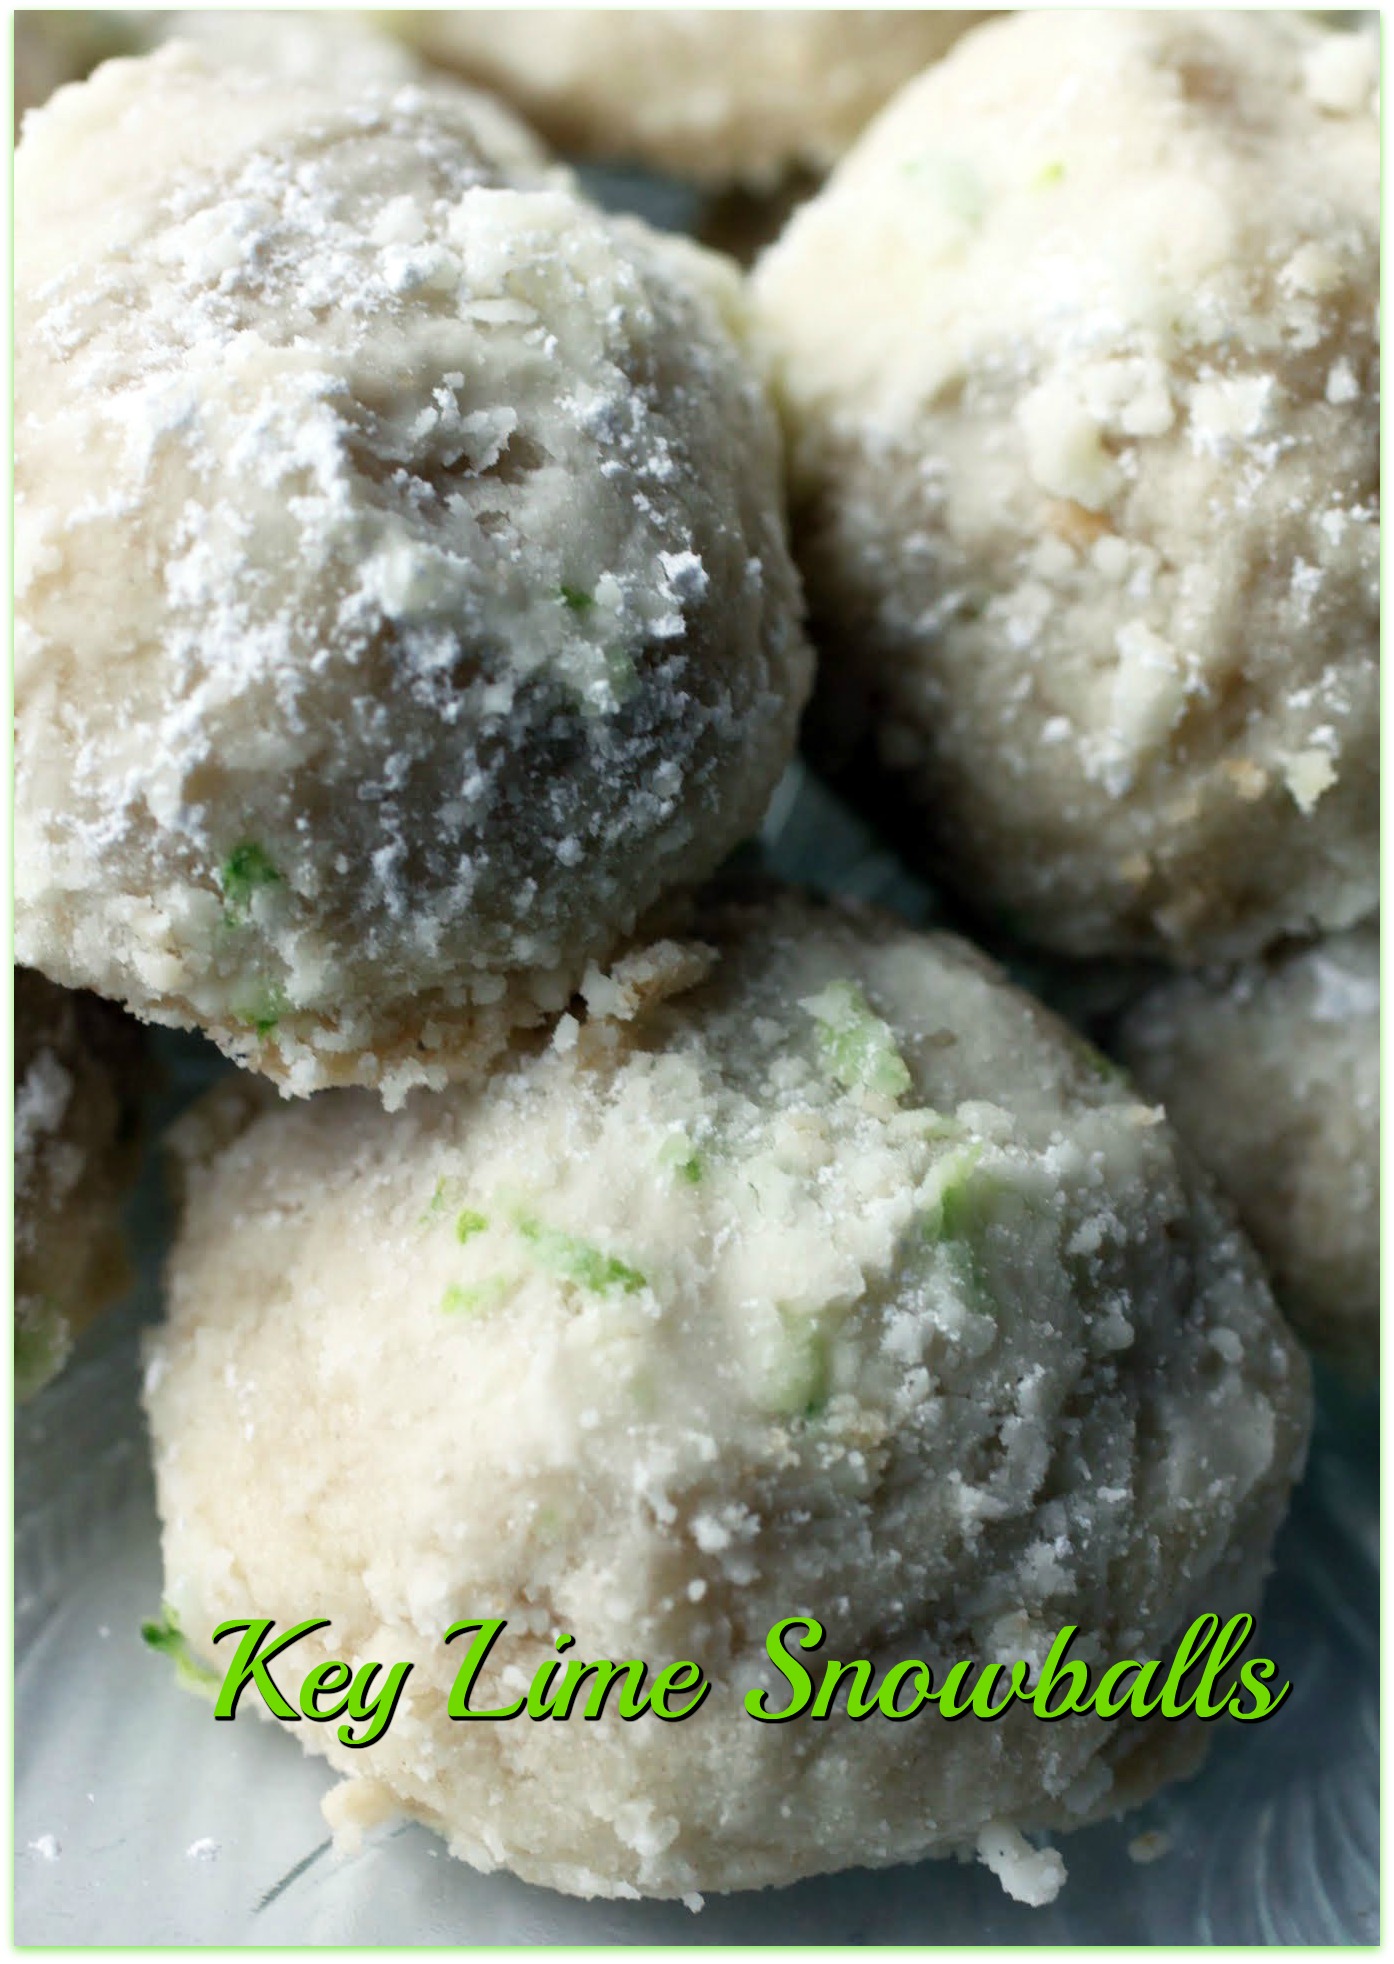
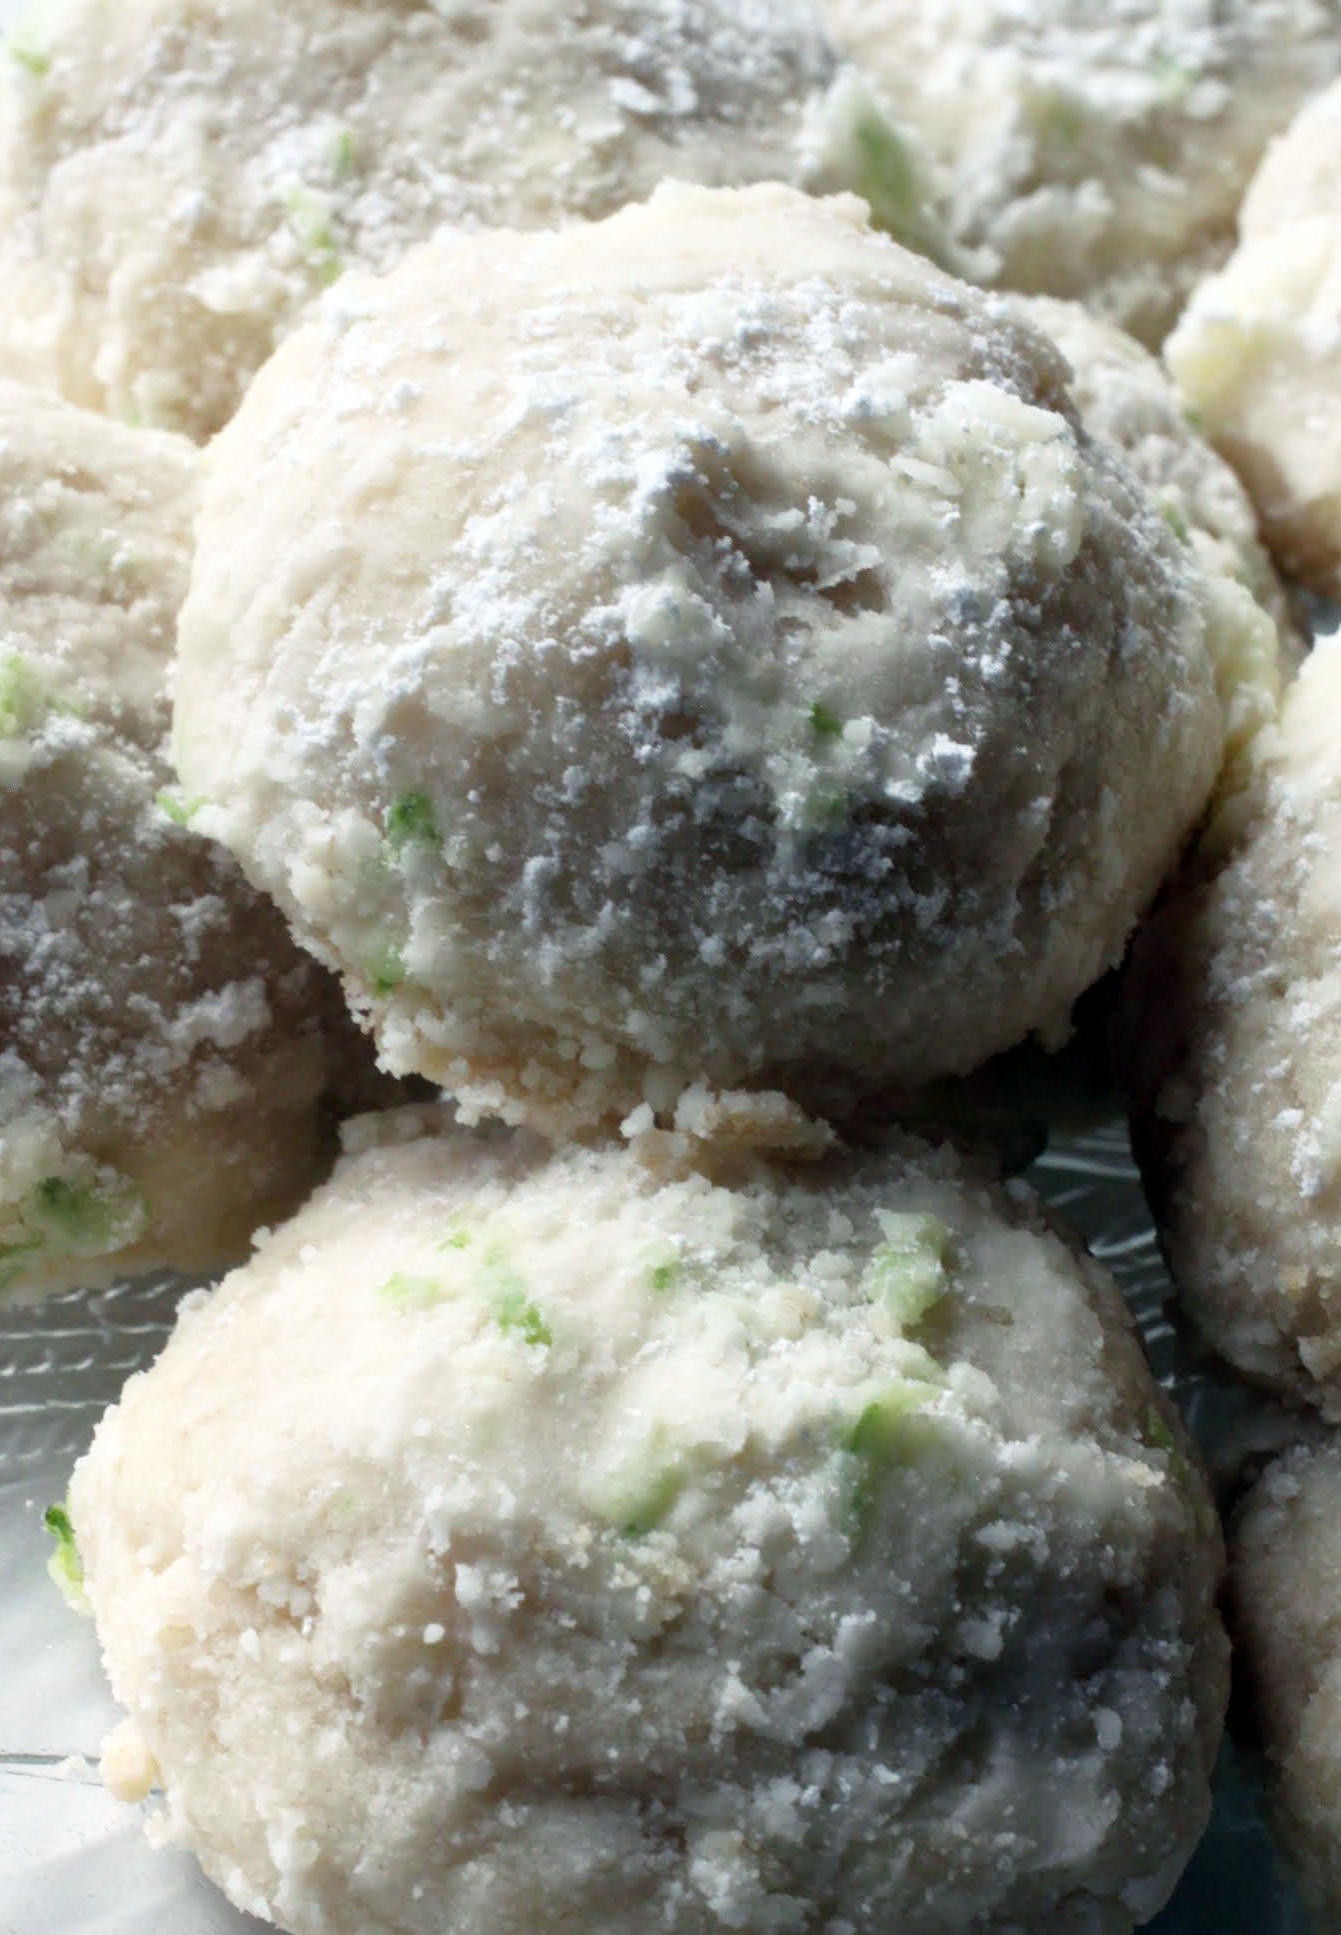
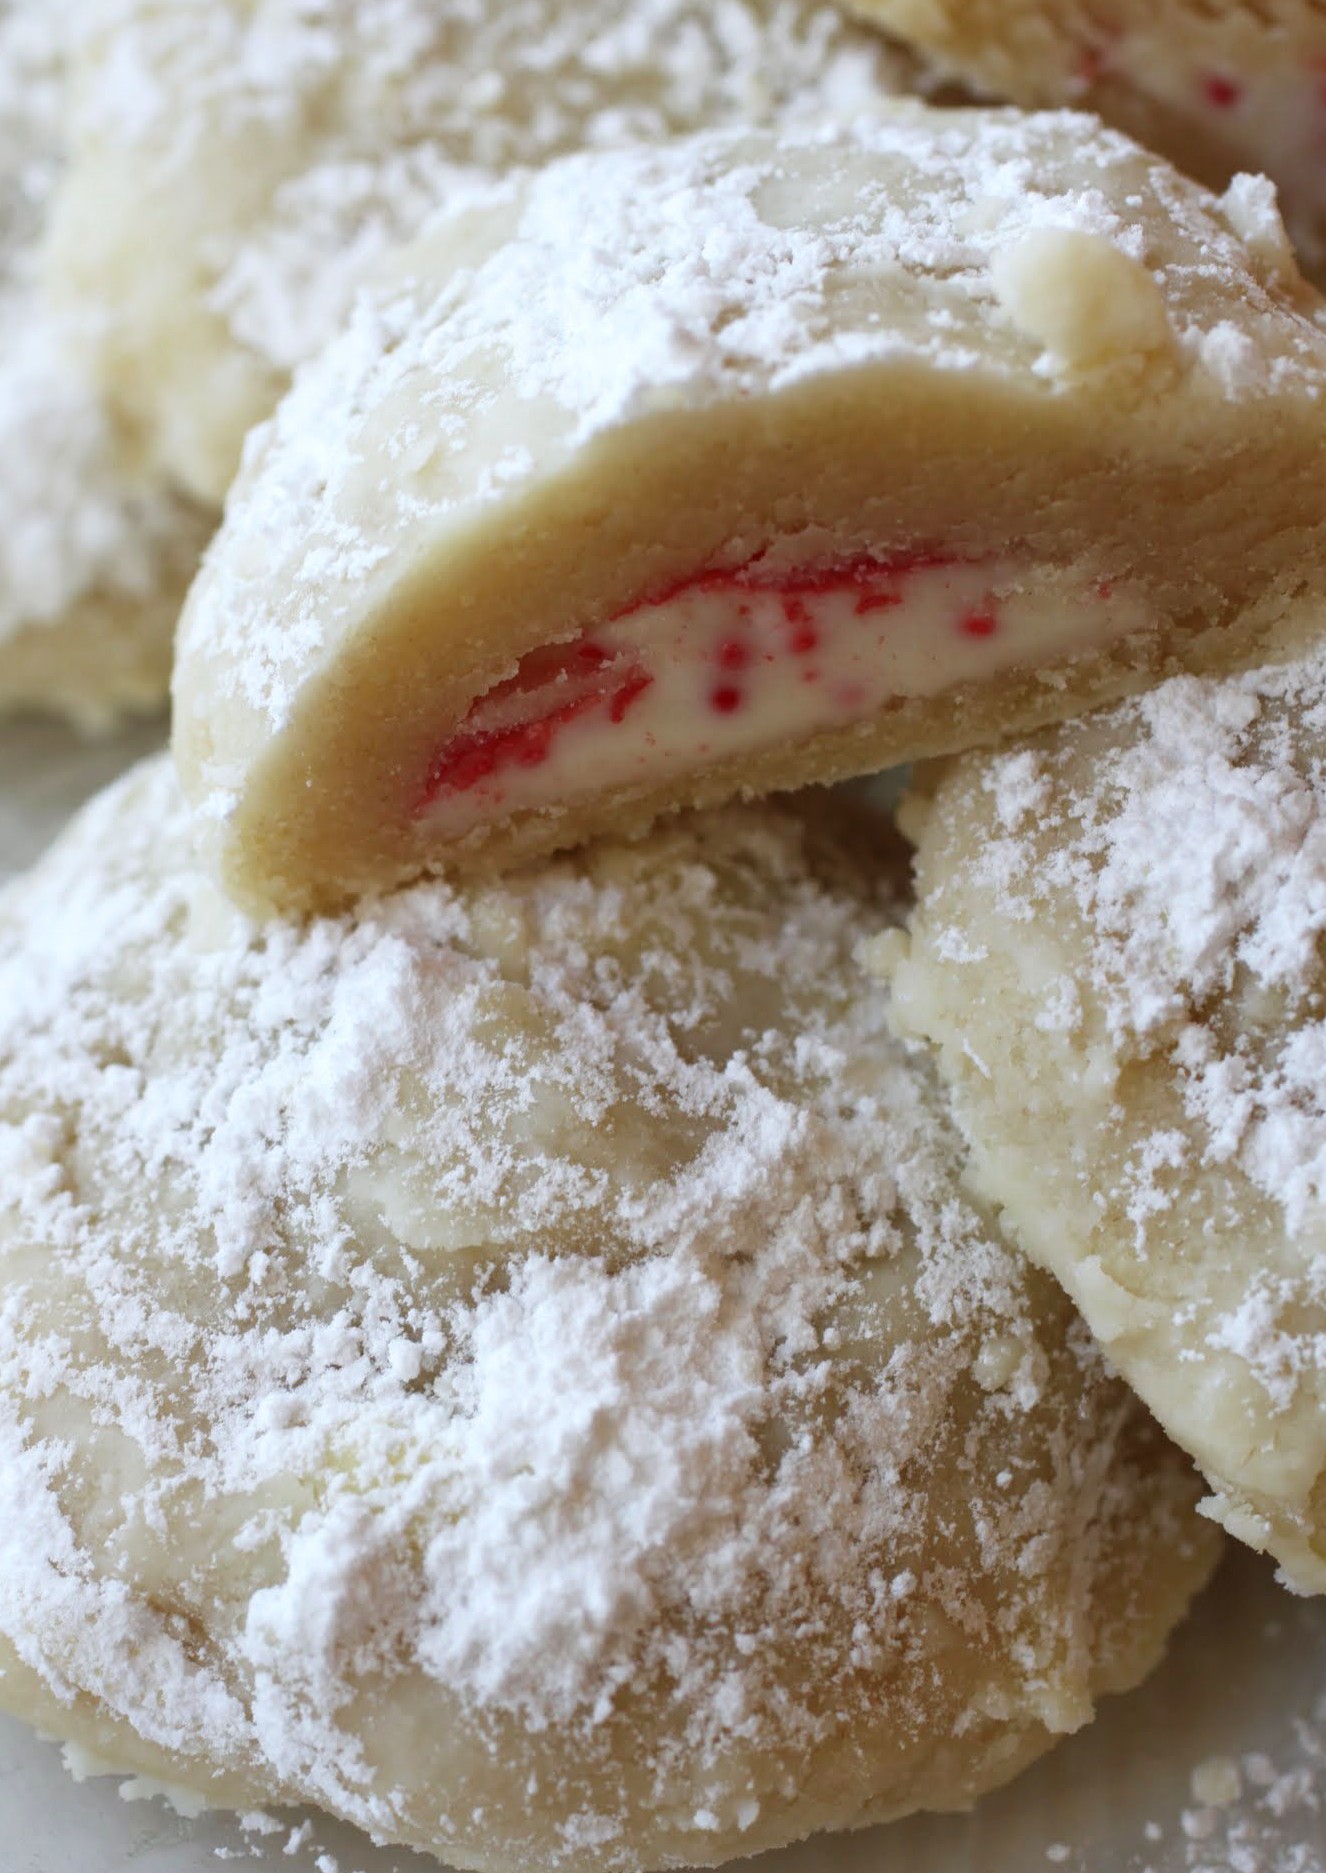
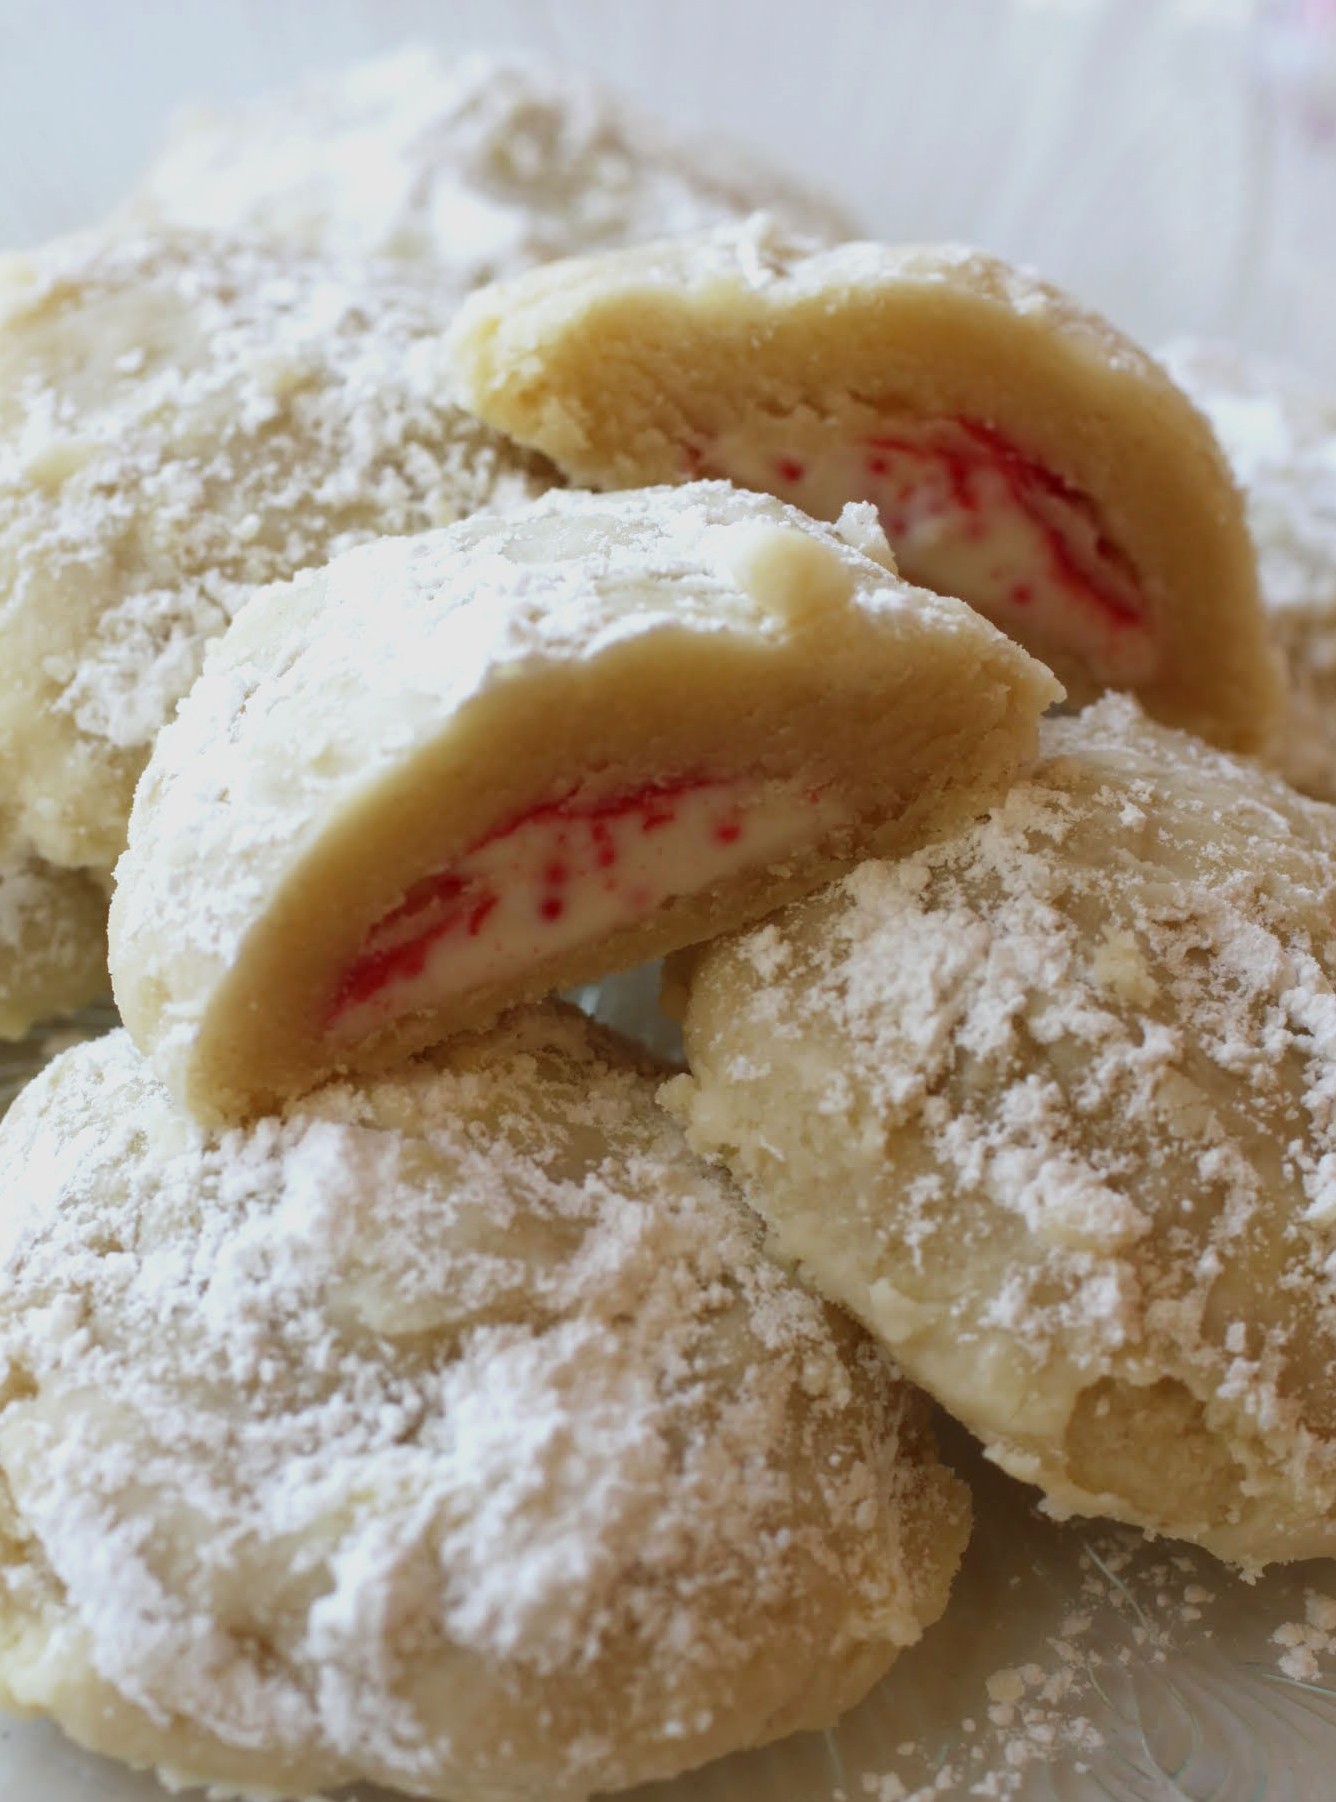
These are key lime, you see. The very best of summer citrus condensed into a buttery, decadent cookie. Regular snowballs, move over. It’s time for a warm-weather makeover!
Well, that’s assuming we get any warm weather soon. It’s been raining for like 17 straight days. Why did nobody warn me about DC being moved across the country to Seattle?
Last week, somebody made a comment on FB about how people get really whiny about rain and how it’s no big deal. I’m guessing that this person’s mood is not at the mercy of the elements, and I’m jealous. I really need sunshine to feel happy.
Also, it’s apparently good for my bones to get lots of Vitamin D, which is easier when the sun’s out. No, no, I’m not advocating sun worship of any kind. Protect your skin with sunscreen, always!

The downside of that is, of course, less natural exposure to Vitamin D. For some people that’s no big deal, but I recently failed a bone density test with flying colors. I’ve been very good with the sunscreen, but not so great with the calcium.
So here I am, loyal readers, asking you for tips. I’m not much of a dairy person, which I realize is a problem. I don’t like yogurt (unless it’s frozen) and I could never eat enough cheese to make it worthwhile to my bones. So what else can I eat? I hear kale is good, and spinach. Give me some recipes or ideas! No beans, please. I’m picky.
In the meantime, I’m all good on the cookie front. I get plenty of cookies. If only they had calcium!
I’m a snowball girl through and through. These are easily my favorite kind of cookie. The texture gets me every time. It’s because the dough (egg-free, so you can eat as you work!) is made with powdered sugar instead of granulated, so these have the most melt-in-your-mouth, velvety feel.
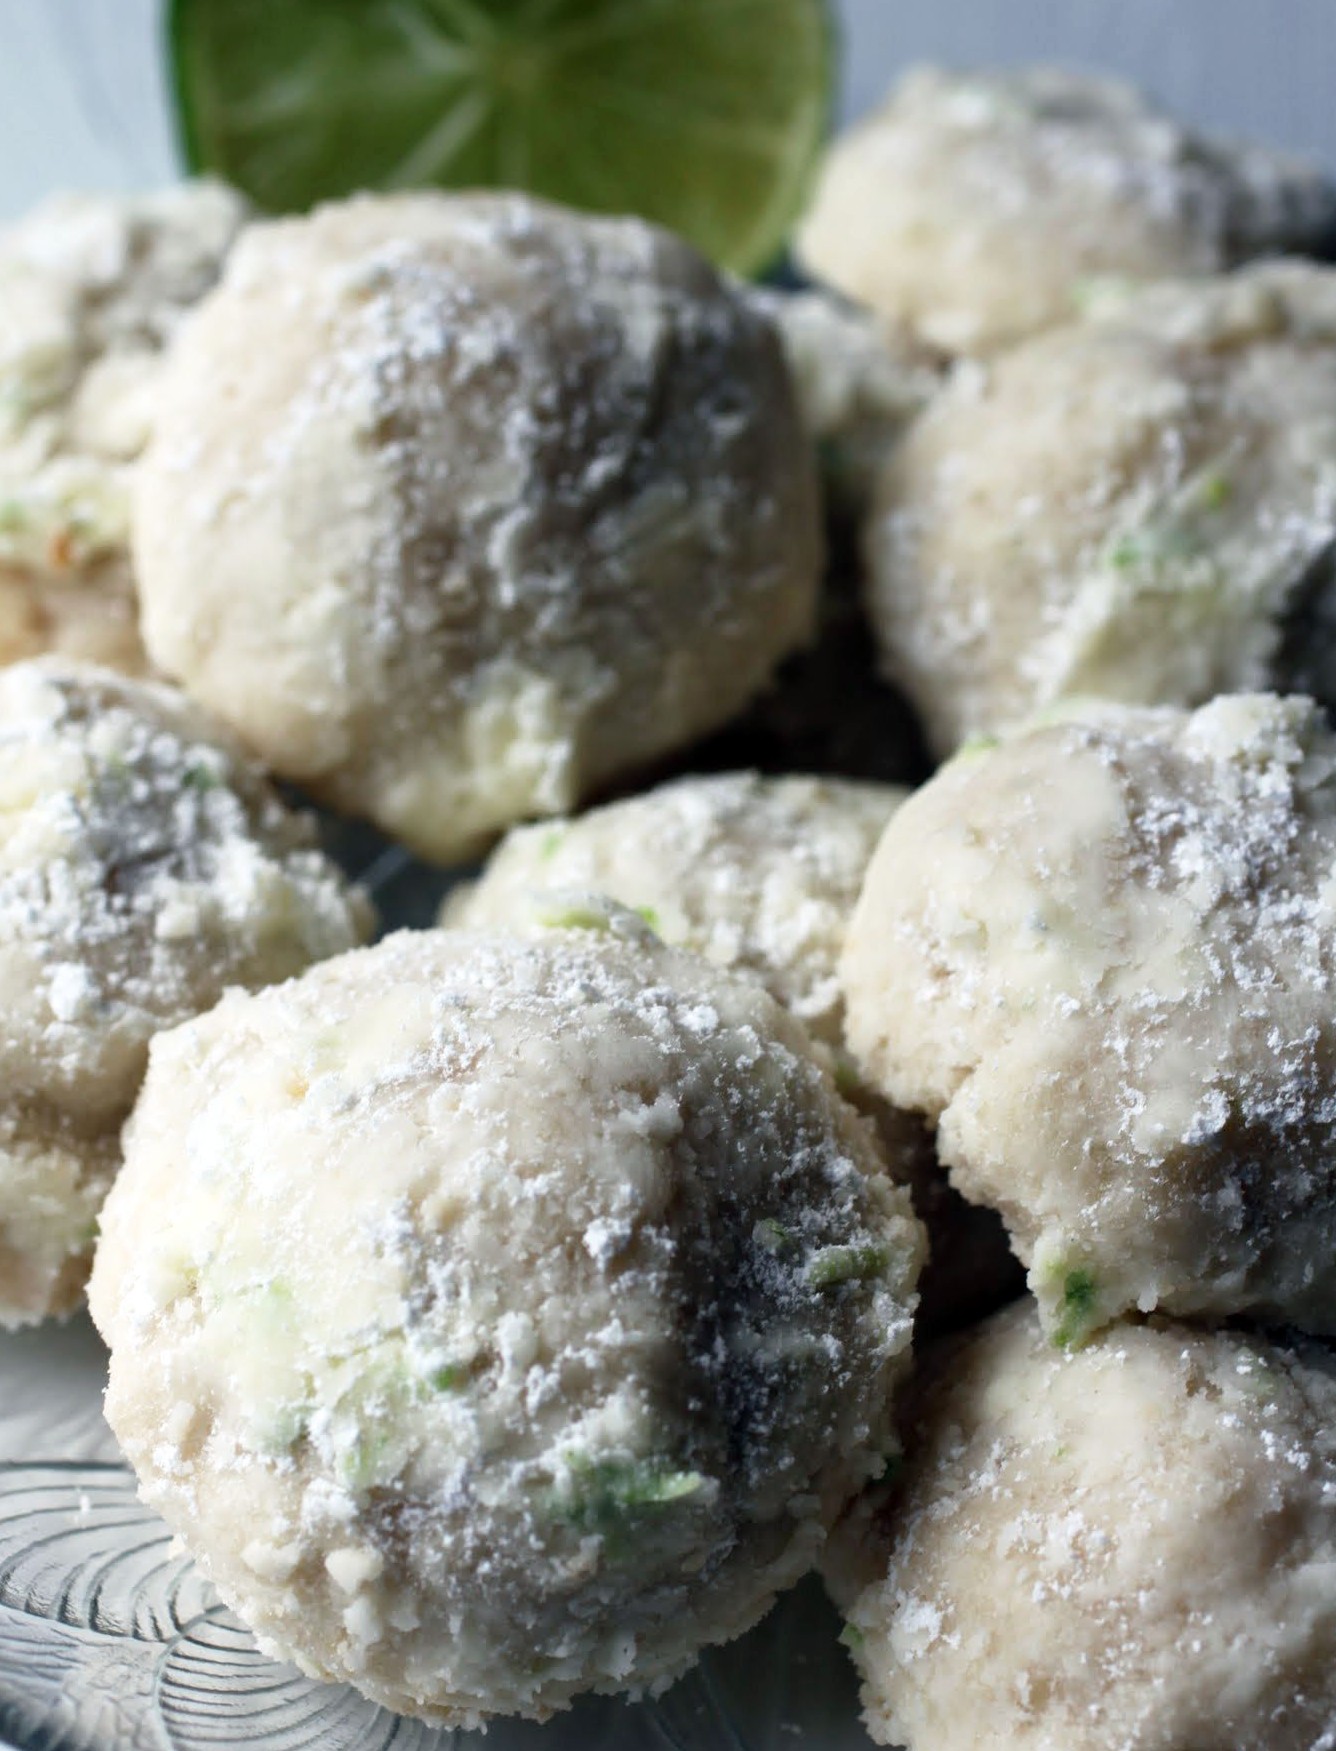
To spice things up, I added in a little bit of lime juice and a lot of lime zest. The zest is in both the cookie dough and in the powdered sugar that the cookies get rolled in. I wanted to find key limes (and I still will, thus the title of this post), but all I could get for this baking day were the regular kind. Either way, it’ll taste amazing!
It’s rainy out and I want some awesome, sunshiny calcium. Help a girl out!
Ingredients
Instructions
- Preheat the oven to 350. Line a cookie sheet with a silicone baking mat or parchment paper.
- In the bowl of a stand mixer, beat the butter, powdered sugar, vanilla, lime juice and lime zest until fluffy. Add flour and salt and beat again until the dough forms.
- Roll the dough into tablespoon-sized balls and place on your cookie sheet about 2 inches apart. Bake for 10-12 minutes until the bottoms are just starting to brown.
- Putting the topping ingredients into a small bowl and mix them together.
- Wait 5 minutes and roll the cookies in the powdered sugar mixture carefully. You don't want to press down, or the cookies will crumble. Wait a few minutes, and then roll them a second time.
- Cool completely. Store in an airtight container.
]]>
Not outside, actually. The D.C. area is expecting a balmy 60 degrees through the week. But in my office, the temperature has dropped like a rock. It makes me want to put on a blanket and eat these cookies while my students huddle into their sweaters.
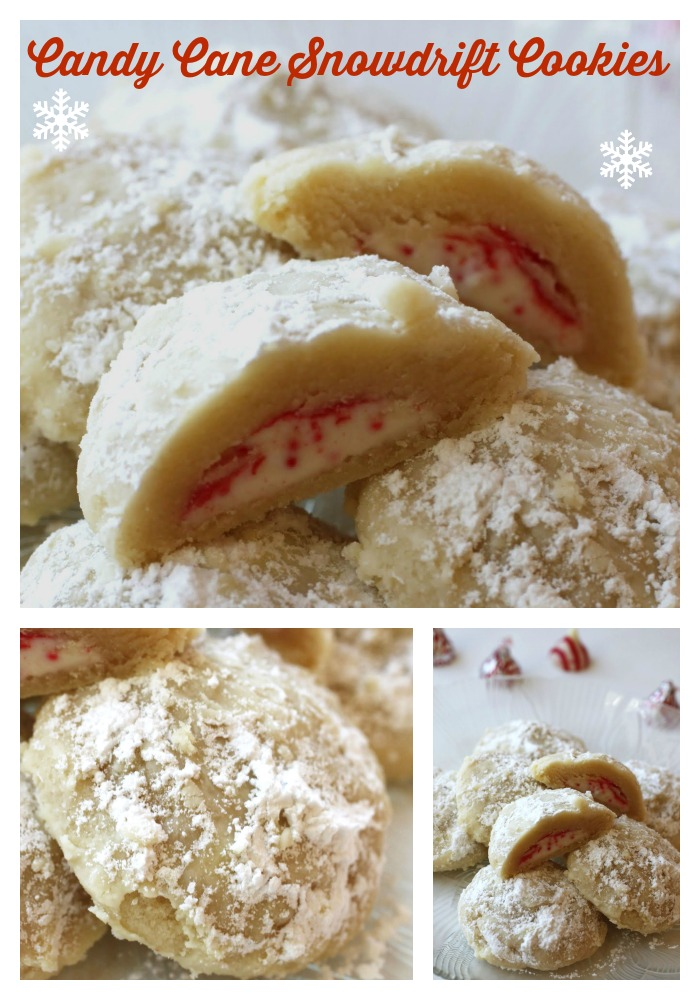
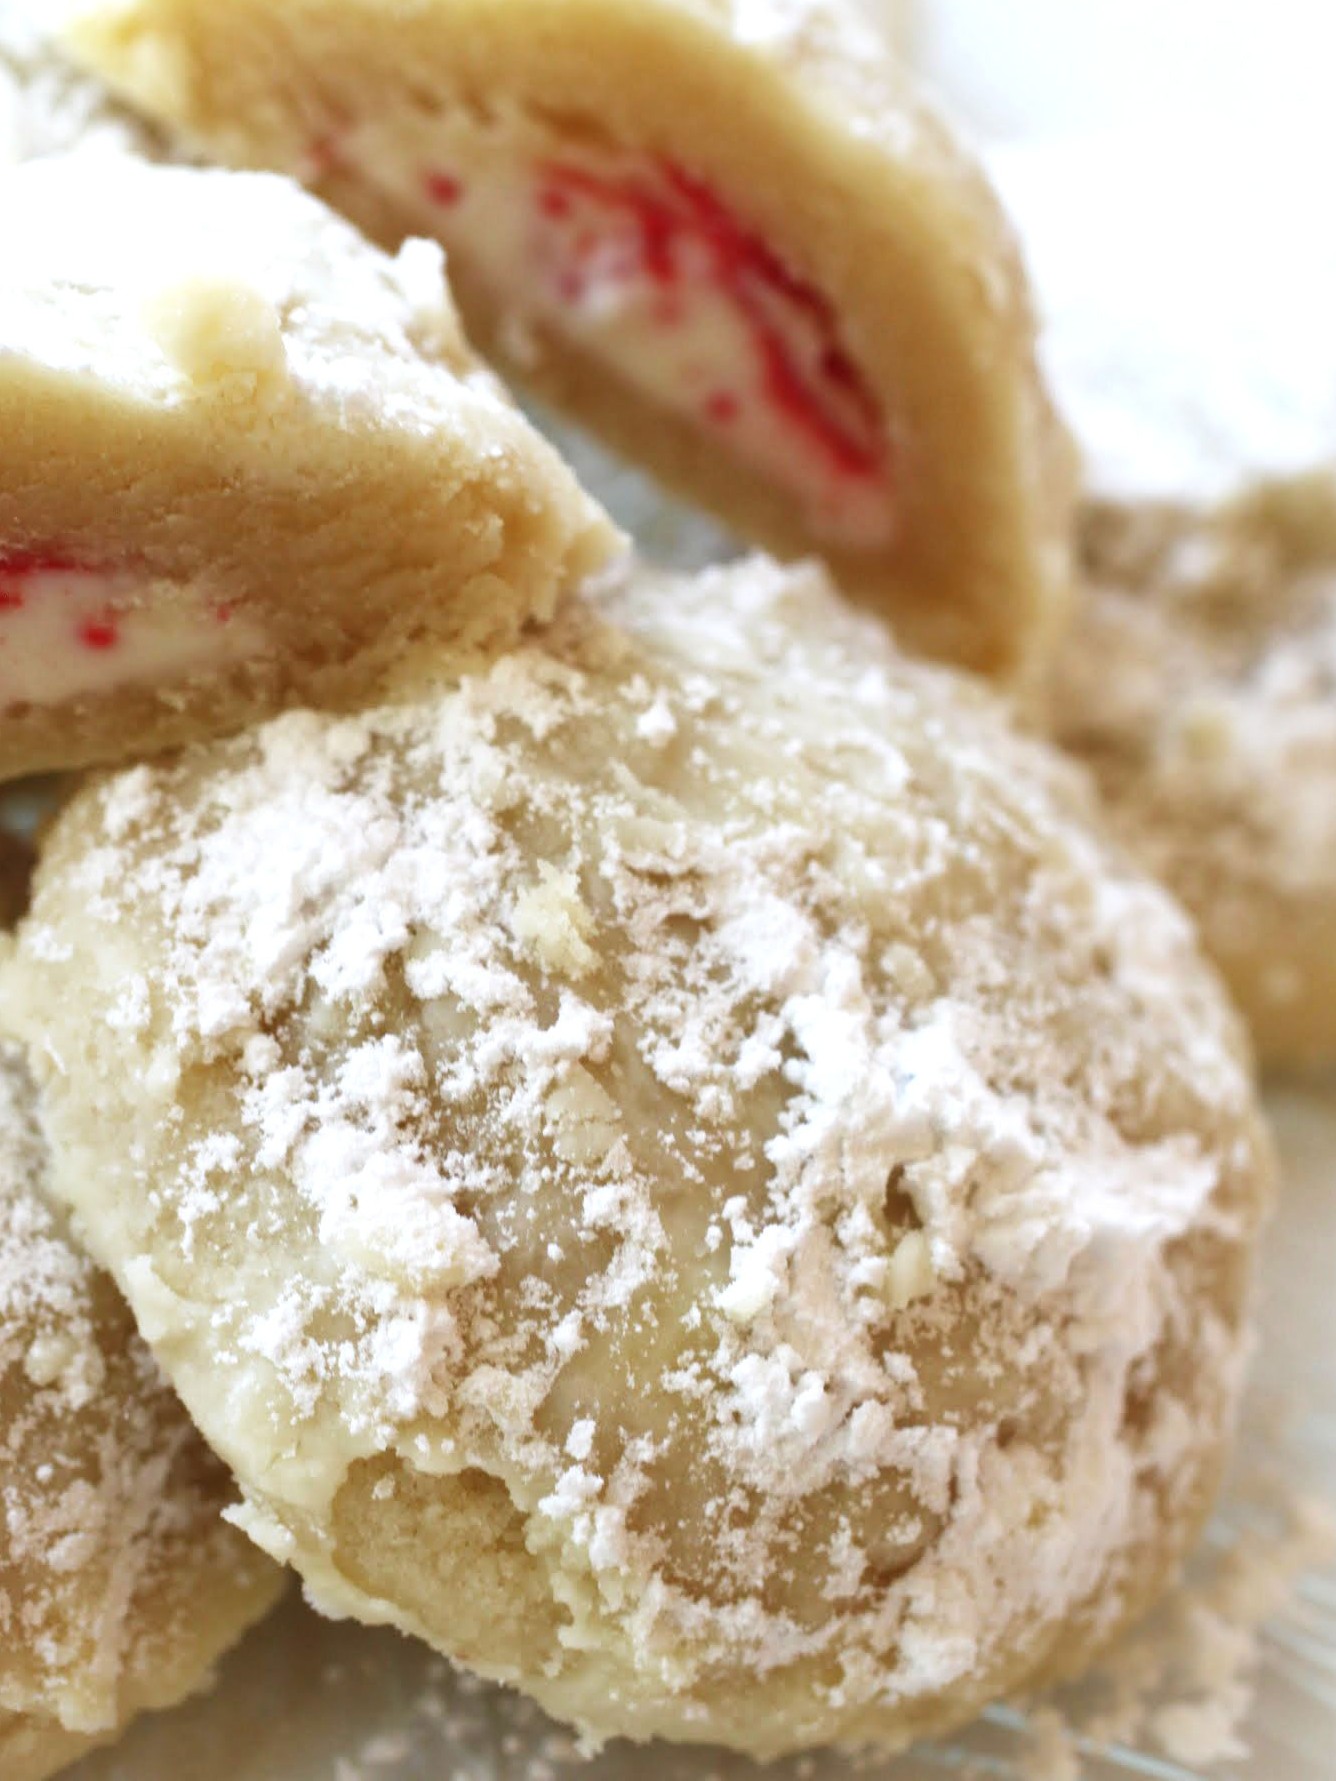
These cookies are my favorite, and I’ve upped the fun by sticking a candy cane Kiss in the middle. They melt down in the oven, making for a perfect surprise center. Hello, holiday cookie!
Now it’s time for me to vent, so get ready.
Did you know that women freeze in their offices all the time because the average temperature in any building is set to a man’s sense of heat and cold? In other words, even the dang HVAC system all over the country is sexist.
Seriously, I’m tired of accommodating for a man’s world. Folks, I’m petite. I’m gonna be cold at work for the next several months. But it isn’t just the temps. It’s little things, like how I’m always jumping up (in heels, mind you) to reach shelves in stores, which makes me look and feel ridiculous. It’s how the water cooler refill at work is impossible to lift and put on the stand without getting water everywhere. And it’s how people expect me to be good at crafty things, just because I’m a female.
Really, guys. I can’t craft to save my life. Zero interest. I try to tie bows on things and it doesn’t work. I’ve heard of decoupage, but for years I just thought it was something dirty.
So as I sit here freezing my butt off, I’d rather think about what’s all fine and dandy in my world, and that’s holiday cookies. Lots and lots of them! Like these.
The dough for these is made with powdered sugar instead of granulated. That makes the consistency of these cookies completely different from any other holiday cookie. You can call these snowballs, but I made them flatter to make that filling spread out more evenly throughout the cookie. You can call them wedding cookies, but ain’t nobody getting married right now.
So instead, I call them snowdrifts. These are a dreamy, soft, minty sweet escape from the perils of life. One bite of these and I totally forget that I’m cold. In fact, winter seems kind of quaint, just for a minute.
And when the cookies are all done, I can rail about the patriarchy controlling my office temps until I stick another cookie in my mouth. Seems like a perfect routine, really.

As the winter looms and we get more easily irritated by life’s little inconveniences, remember to be grateful for holiday cookies. I know I am!
Ingredients
Instructions
- Preheat the oven to 350. Line a cookie sheet with a silicone baking mat or parchment paper.
- In the bowl of a stand mixer, beat the butter, powdered sugar, and vanilla until fluffy. Add flour and salt and beat again until the dough forms.
- Take a candy cane Kiss and place into a wad of dough, and place another wad on top. Roll the dough into tablespoon-sized balls and place on your cookie sheet about 2 inches apart. Bake for 10-12 minutes until the bottoms are just starting to brown.
- Wait 5 minutes and roll the cookies in the powdered sugar carefully. You don't want to press down, or the cookies will crumble. Wait a few minutes, and then roll them a second time.
- Cool completely. Store in an airtight container.
]]>
This morning, I crossed an important item off my life bucket list: stand up paddleboarding, or SUP, as it’s known to the cooler masses. It felt really good to face my terror and prevail. More on that in a moment.
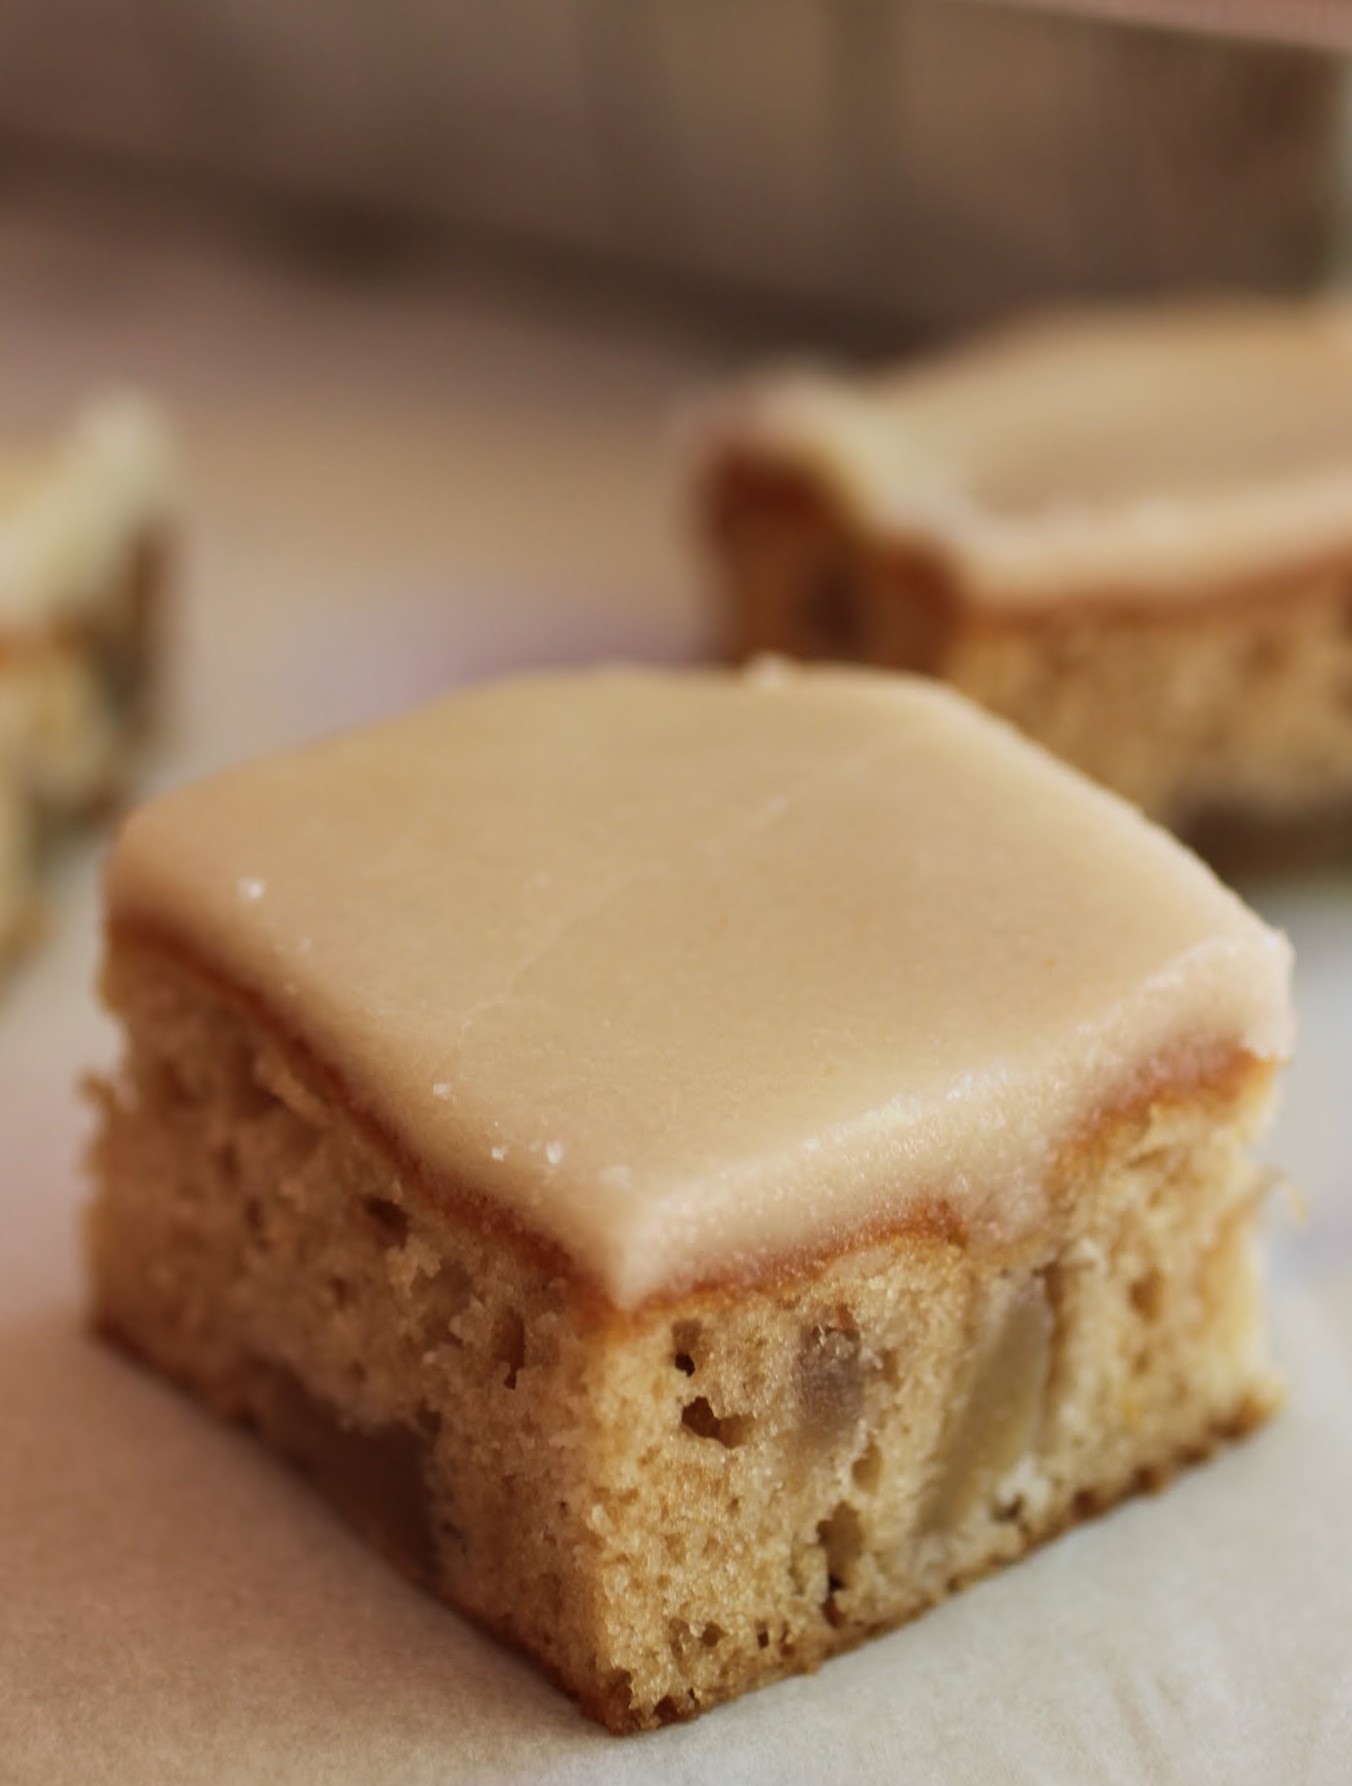
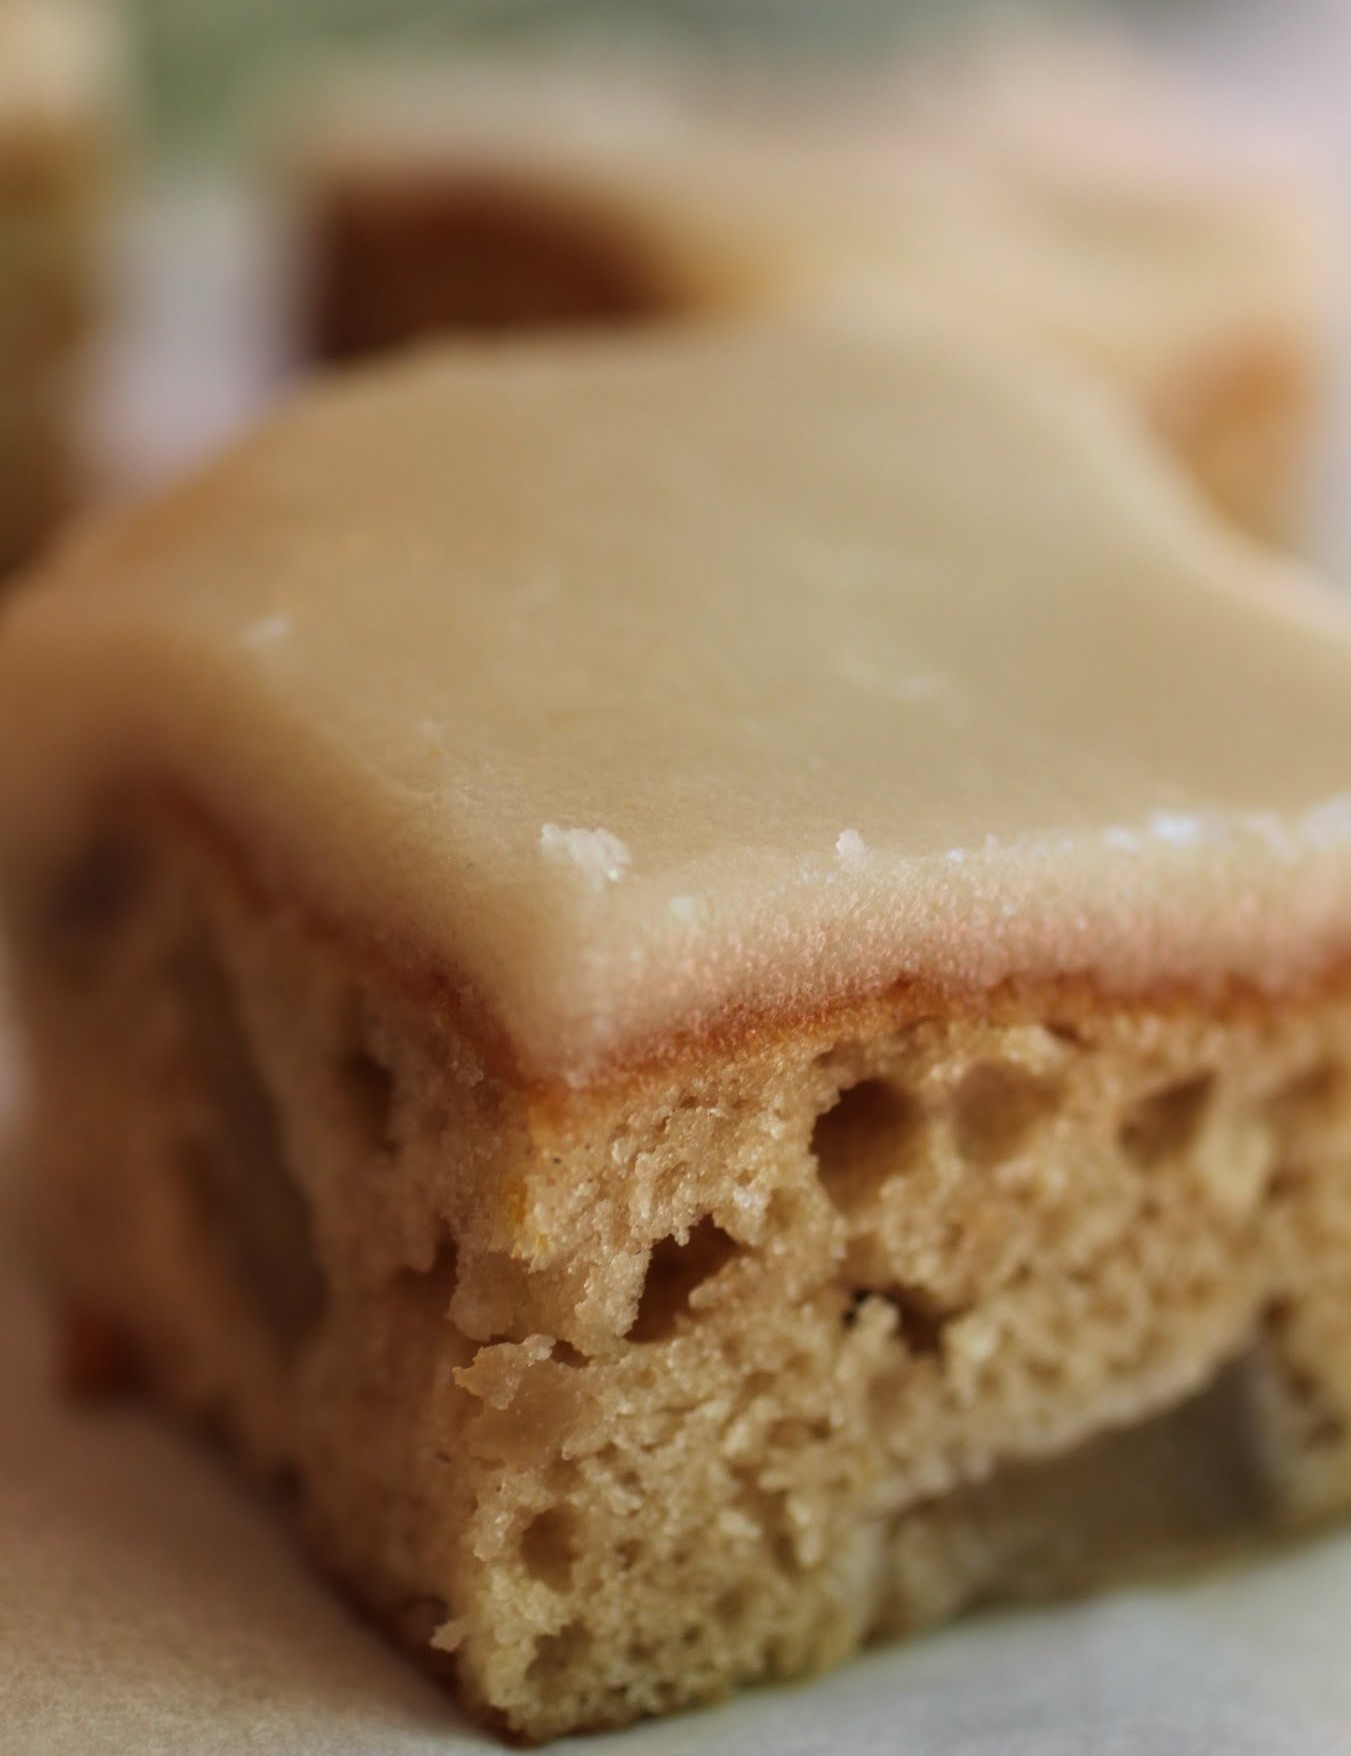
I figure that as long as I continue to face the challenges that scare me, it’s okay to ease up in other parts of life. Baking has always been that place of respite for me, and this apple cake is no exception. It’s quick, simple, and slathered in an unbelievable brown butter icing.

A couple of years ago, I started seeing pictures of celebrities in my trashy magazines doing something that looked like so much fun. It was SUP, only I didn’t know anything about it at the time. It just seemed so peaceful: standing up on a board with an oar, bonding with nature or the water or whatever. I didn’t really think it through much more, since I figured it was one of those things that people in L.A. do that people in D.C. don’t have access to.
Last summer, I learned that SUP lessons were available right off the Key Bridge in Georgetown, which is a very frou-frou area of the city. Georgetown is full of expensive shops including, of course, the famous Georgetown Cupcake. Want a hint from a local? Next time you’re in town, head toward Baked and Wired instead. It’s also in Georgetown, and it’s worth the trip.
Anyway, this summer I bit the bullet (or paddleboard) and signed Kenny and me both up for a lesson. We were supposed to go a month ago, but then we had a traumatic tubing incident and my body was too sore to do any SUP action just a couple of days later. Our lesson date was moved to September, and I tried not to think too much about the terror.
Good thing too, guys. I didn’t fully allow myself to realize the horror of our situation until we were on the water, leashed onto the board, being told to stand up and look at the horizon. I had two choices: stay on my knees and whimper, or just woman up and do it. Guess which one I picked?

You’ll be happy to learn that over the course of the two hours on the water, I got up and down several times without falling over once. It was scary, and I’m not going to lie. It was very, very far from being relaxing. But it was worth it, and I’m so glad I did it. I’m also so glad that there was apple cake to come home to.

This cake mixes up in one bowl, and it’s absolutely no-fail. To dress it up a little, I added the icing, which just required some brown butter for flair. To make brown butter, cook the butter in a saucepan over low-medium heat, swirling the butter often, for anywhere between five and 10 minutes, depending on how much butter is in the pan. When the butter starts to darken in color and smell nutty, it’s done.
Not everything in life can be so simple, but baking should not be a place where you feel any stress. Save it for the open water as you’re wobbling around on a SUP. That’s where you can face the real fears!
Ingredients
Instructions
- Preheat the oven to 350. Coat a 9 x 13 pan with cooking spray.
- Mix all the cake ingredients together in one bowl, stirring until well combined. Pour the cake batter into the pan.
- Bake for 30-35 minutes until golden brown and set (test the doneness with a toothpick). Let the cake cool completely before icing.
- To make the icing, mix brown butter with the powdered sugar and vanilla. Add the milk gradually until the glaze becomes thick but spreadable.
- Pour the glaze over the cake and spread evenly over the surface. Let the glaze set.
- Cut into squares. Store covered.
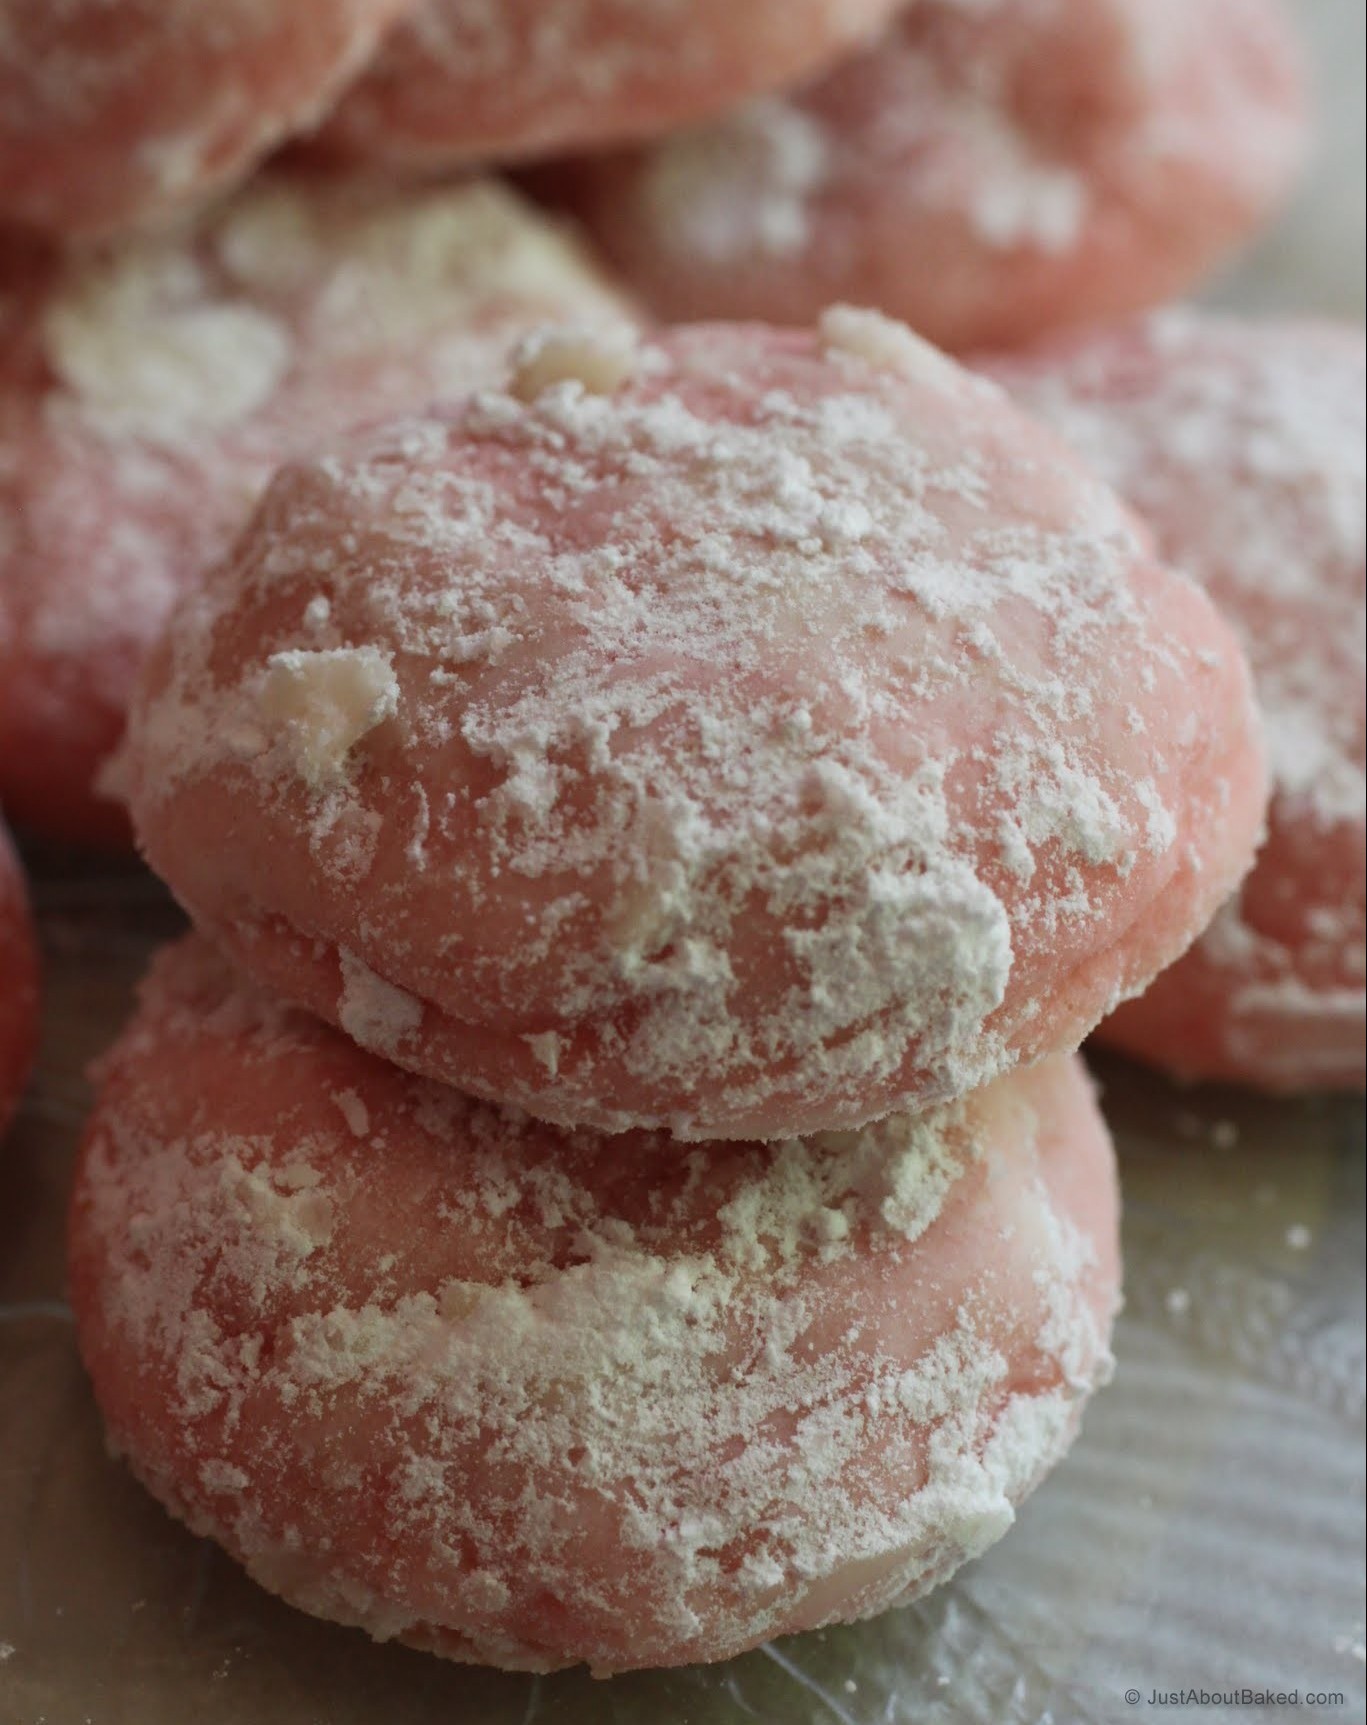
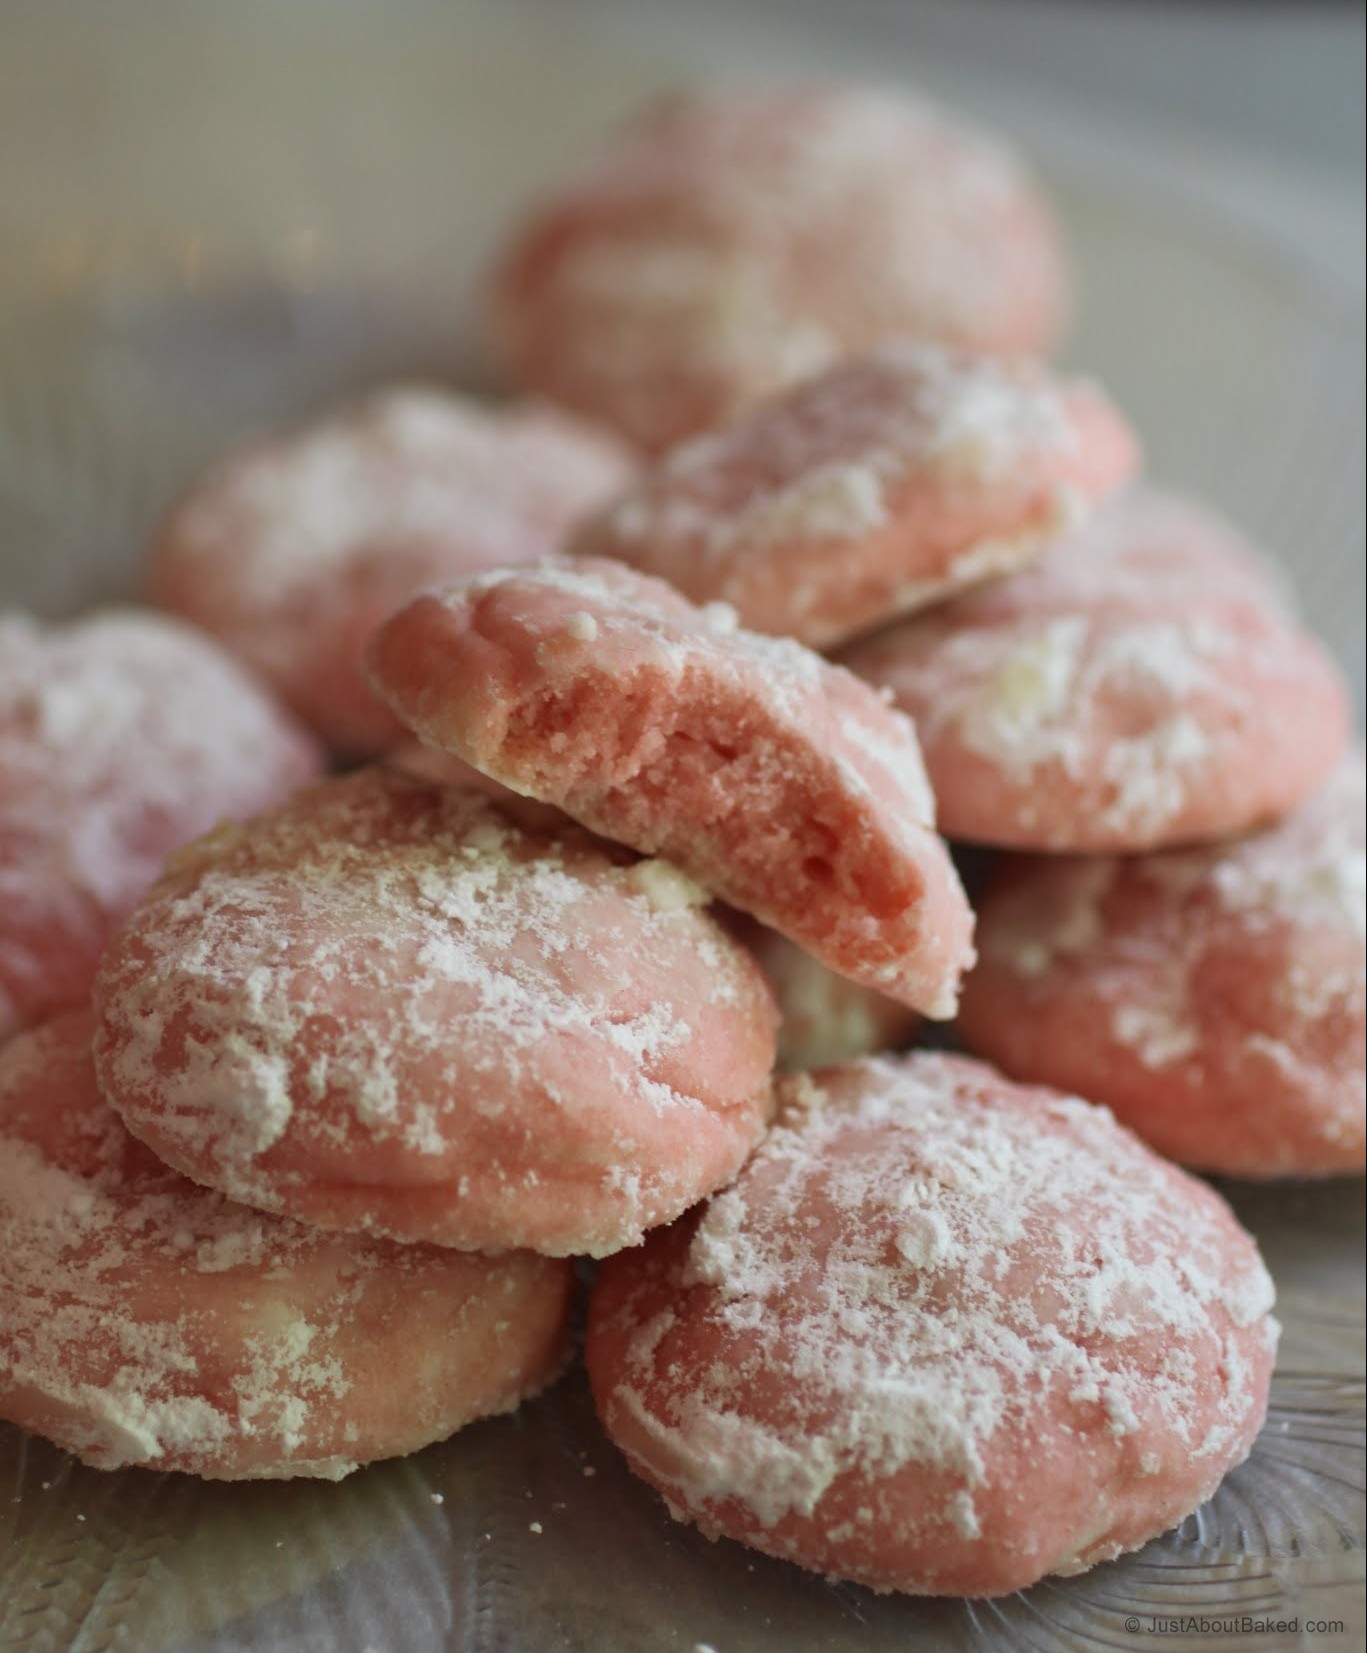
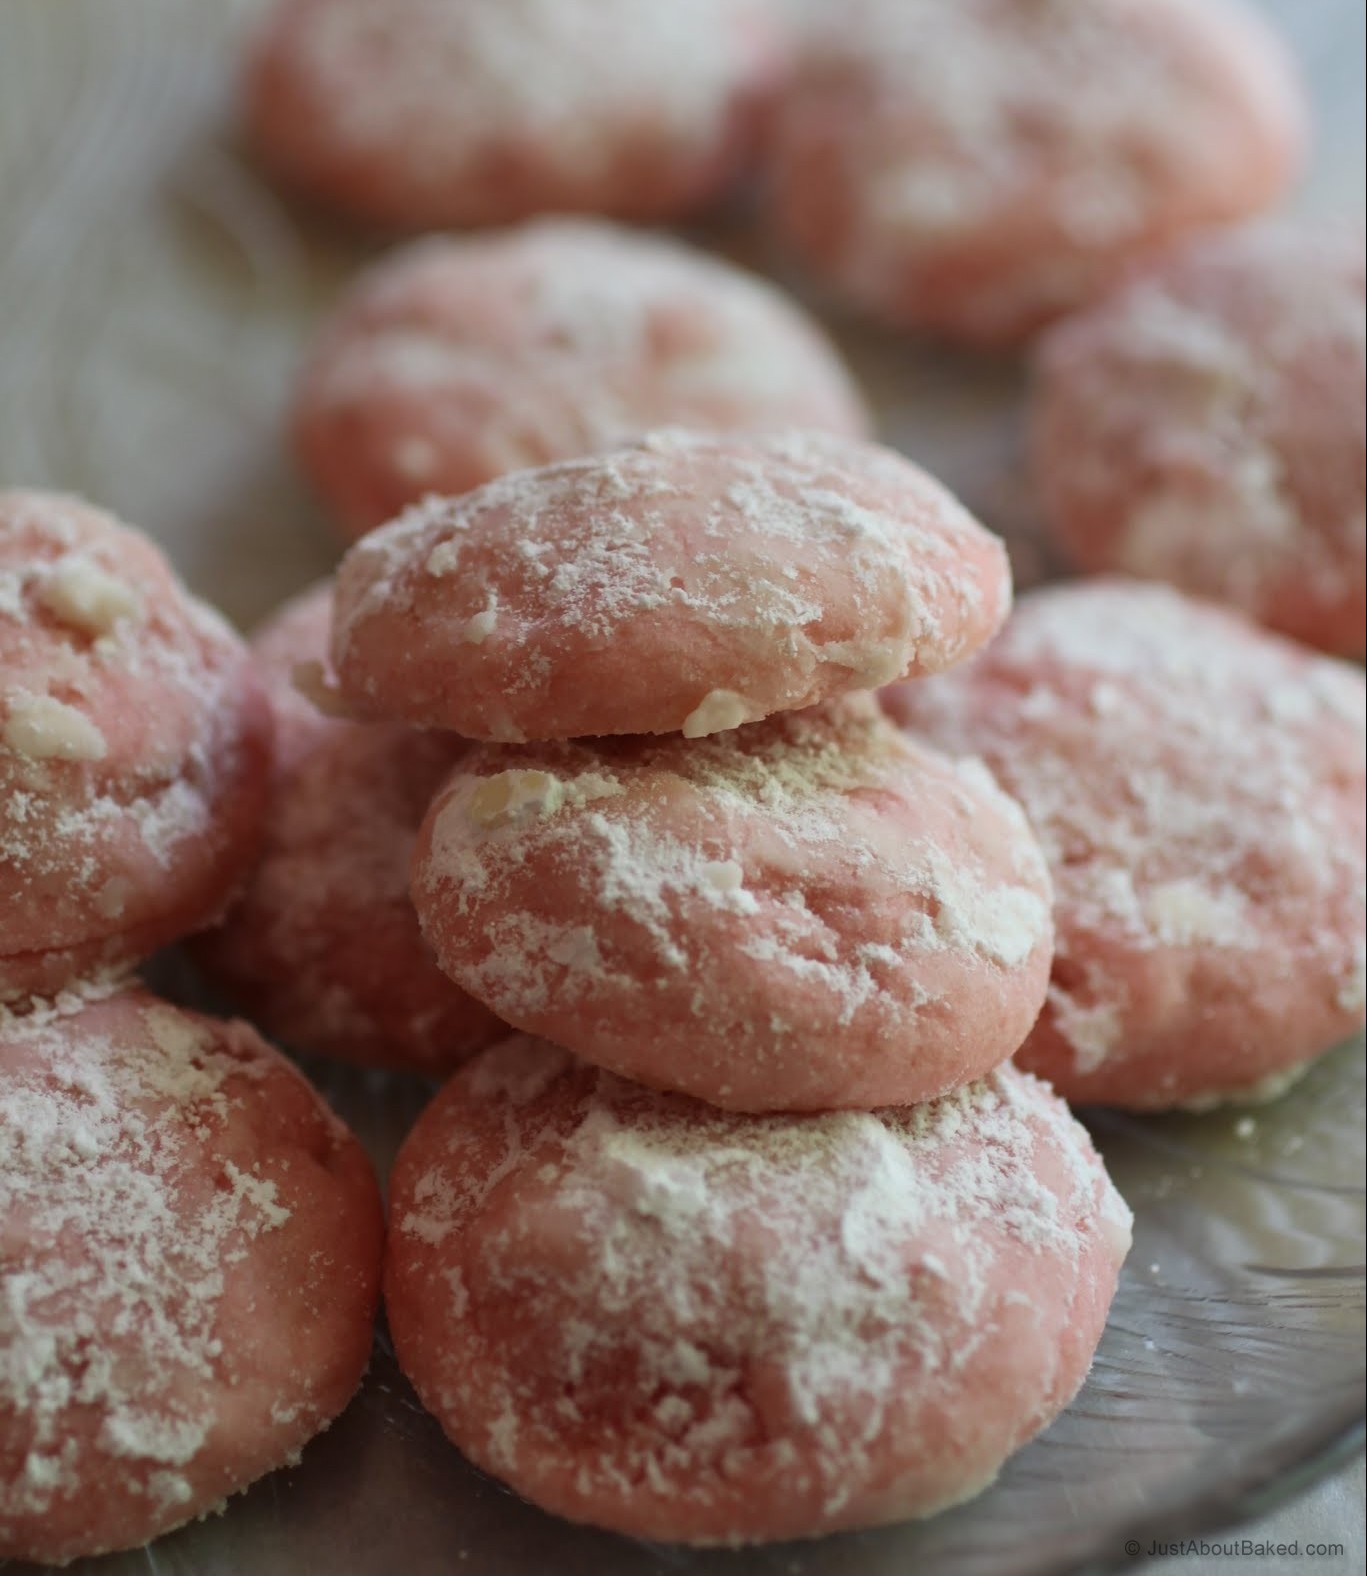
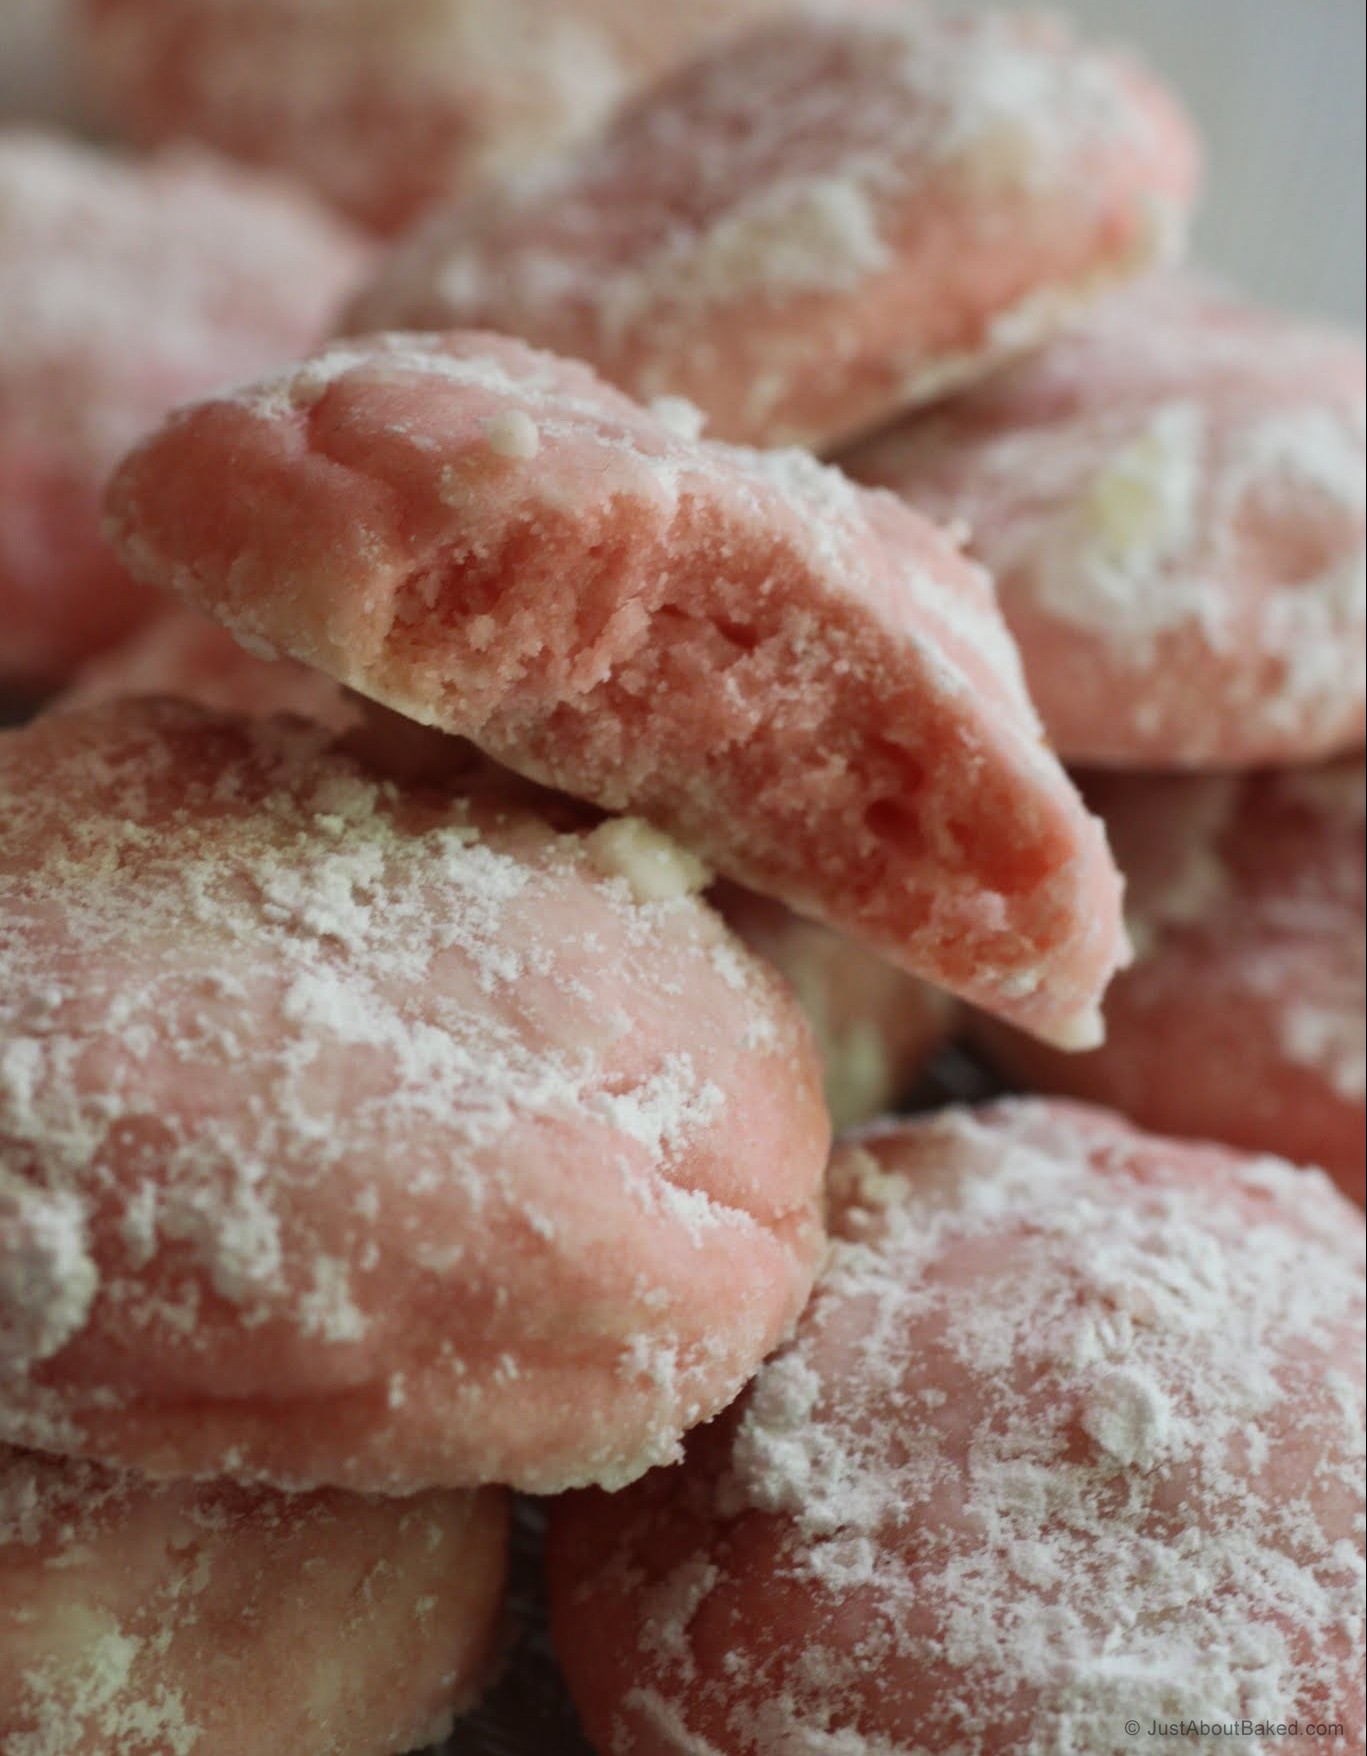
Well, I do. This pink lemonade version has taken my favorite winter cookie and morphed it right into summer where it belongs. It’s pink and cute and ridiculously tasty. Those are all fantastic reasons to eat a cookie!
Another reason to eat a pink lemonade cookie? Lemon is a summer flavor. In fact, as you’re reading this, I’m at the beach with my buddy getting some girl time. And you can bet your patootie that we’ll be getting some fresh-squeezed lemonade on the boardwalk!
I didn’t grow up near the beach, so it’s still a wonder to me. Nope, I grew up in landlocked Indianapolis, where the closest thing to a beach is Lake Michigan. The first time I stepped foot on the Eastern Shore and onto the boardwalk, I was transported to a whole world I’d never even known about. It was nothing short of magical.
Let’s not even get into the fact that they deep-fry everything on the boardwalk, from Oreos to Reese’s peanut butter cups. Let’s not even talk about the soft-serve, or big pretzels, or popcorn, or fudge, that is literally every two steps. Heck, I’m not even going to talk about the smell of Thrasher’s fries permeating the air as people stroll around with buckets and take in the scenery.
The point is, the beach smells like food. Delicious food. And salt air. And sunscreen. It’s like every amazing summer smell is packed into one area, and everyone is pretty much in swimsuits and flip-flops. In the evenings, people put on light breezy outfits and hit the bars or restaurants. We’re all at a party together and even though nobody knows anybody else a lot of the time, the air is friendly and happy. Except for parking issues, nobody seems to get that upset at the beach.
Every summer, I log in a fair amount of beach time. The beach always seems to be the place where the world ends and forever begins. All that water, stretching out past the horizon. But don’t go that far in because there are sharks everywhere this year. I love swimming, but not sharks. So I’ll get my beach time, and if I have to swim? #swimmingpool
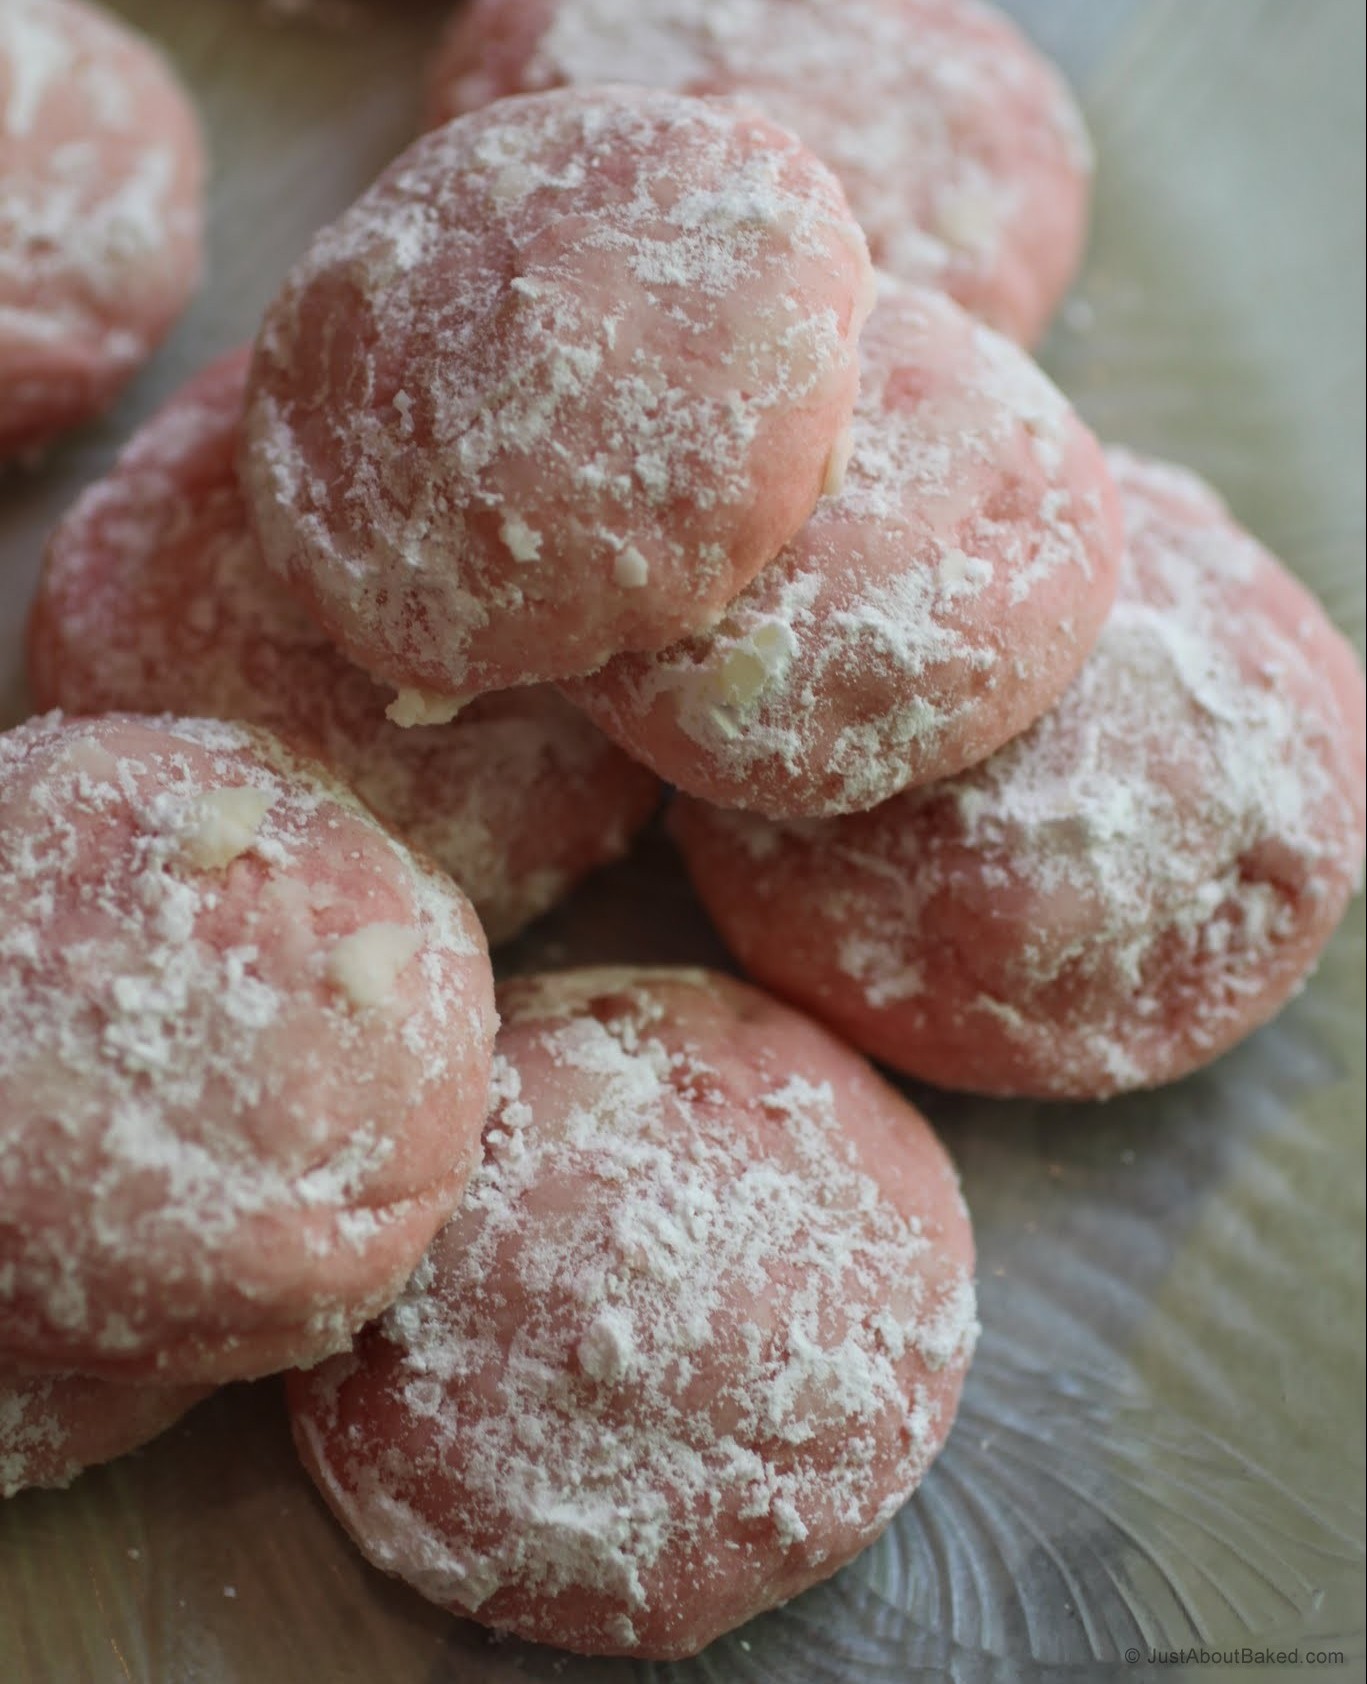
These cookies are beyond addictive, so let that be fair warning. If you’ve never had a snowball, they’re light and fluffy, based in powdered sugar. That makes the dough crumbly and melt-in-your-mouth amazing. The problem is, it’s way too easy to shove several into your mouth and not share with anyone else.
Snowballs might be a winter thing, but that’s all changed now. Pink lemonade is a summer delight, and so is the beach. Now, so are snowballs. Get your inner beach bum out and cookie it up!
Ingredients
Instructions
- Preheat the oven to 350. Line a cookie sheet with a silicone baking mat or parchment paper.
- In the bowl of a stand mixer, beat the butter, powdered sugar, and lemon extract until fluffy. Add flour and salt and beat again until the dough forms. Bit by bit, slowly add the food coloring until you have the desired pink shade.
- Roll the dough into tablespoon-sized balls and place on the cookie sheet about 2 inches apart. Bake for 10-12 minutes until the bottoms are just starting to brown.
- Wait 5 minutes and roll the cookies in the powdered sugar carefully. You don't want to press the cookies into the sugar too firmly or the cookies will crumble. Wait a few minutes, and then roll them a second time.
- Cool completely. Store in an airtight container.
 Oh, well. Every time I overdo it, I just eat cleaner the next day and it all balances out somehow. It’s totally worth the sesame chicken. Sesame chicken is one of life’s great pleasures. As is sushi. As are Reese’s peanut butter eggs.
 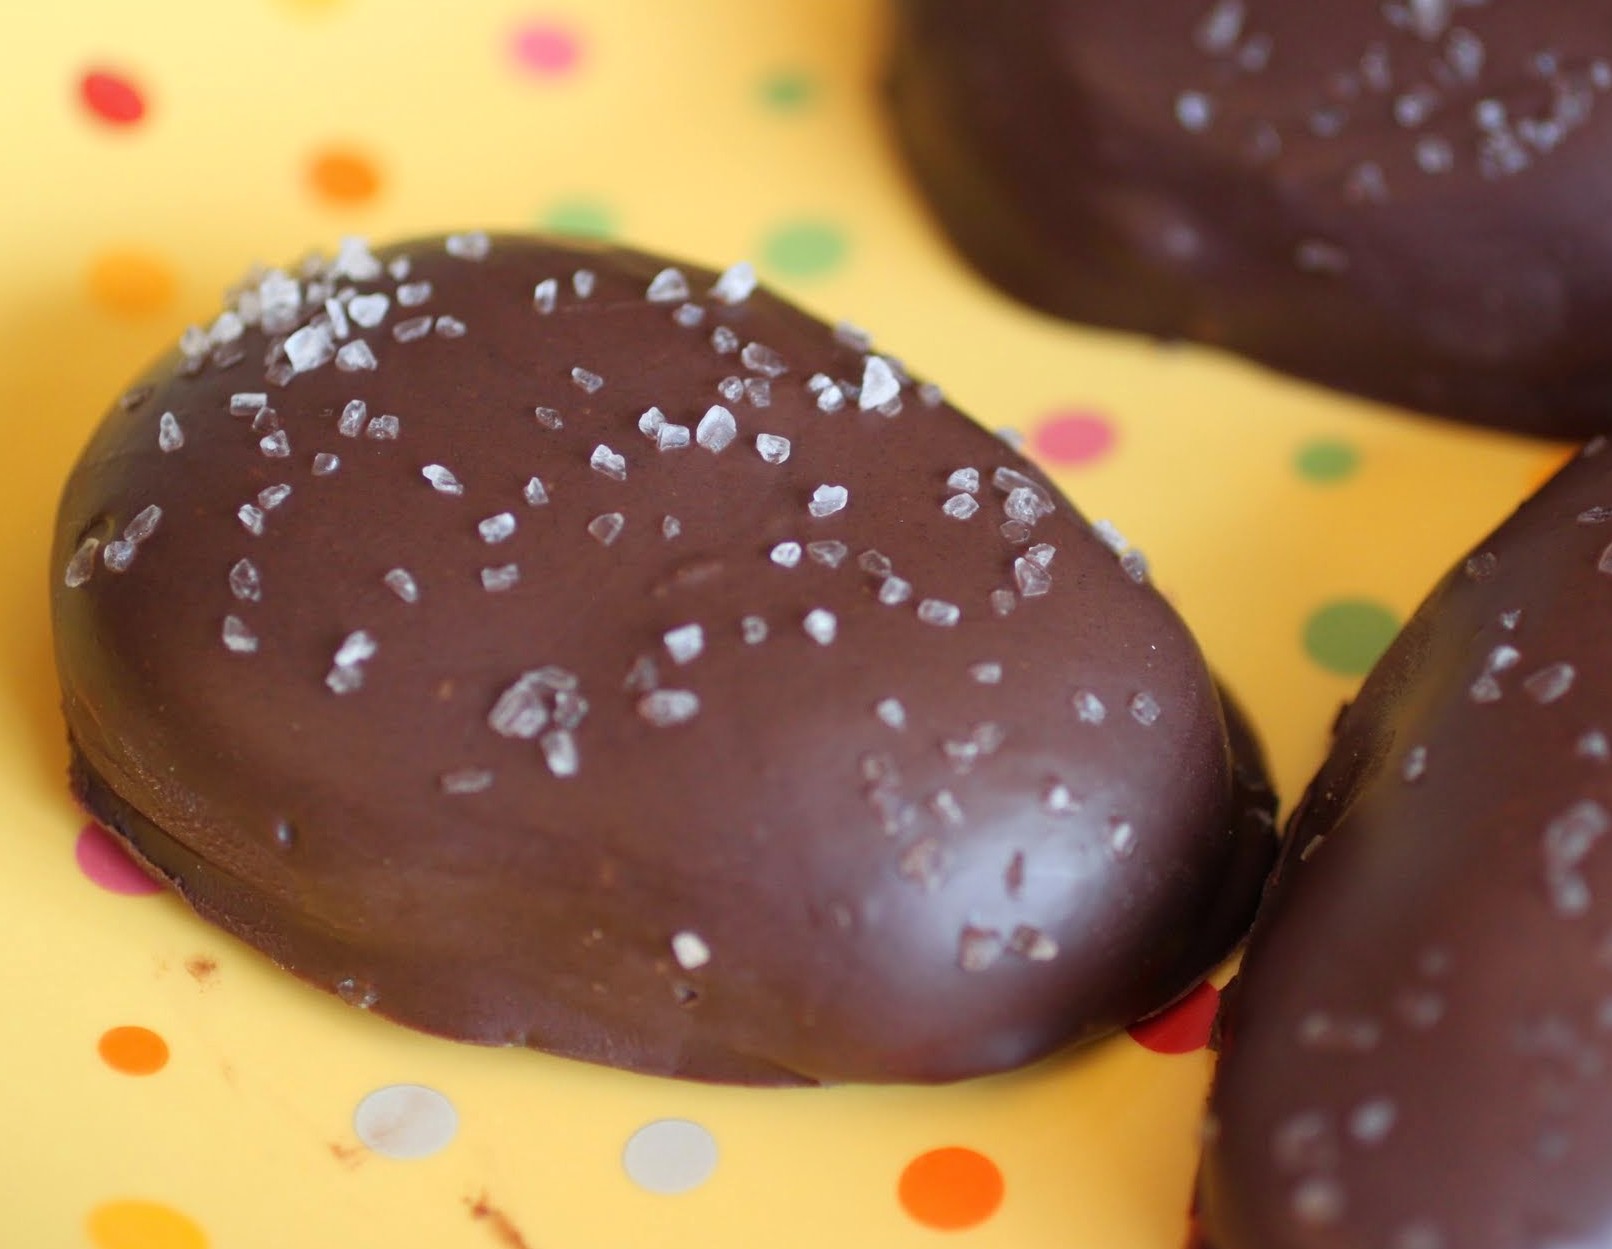 Yep, that’s my all-time favorite candy choice, and this time of year, PB eggs are everywhere! Still, that didn’t stop me from trying to make my own. And the only thing I did differently was add sea salt to the top. Believe me, it’s an adjustment that’s well worth your time.
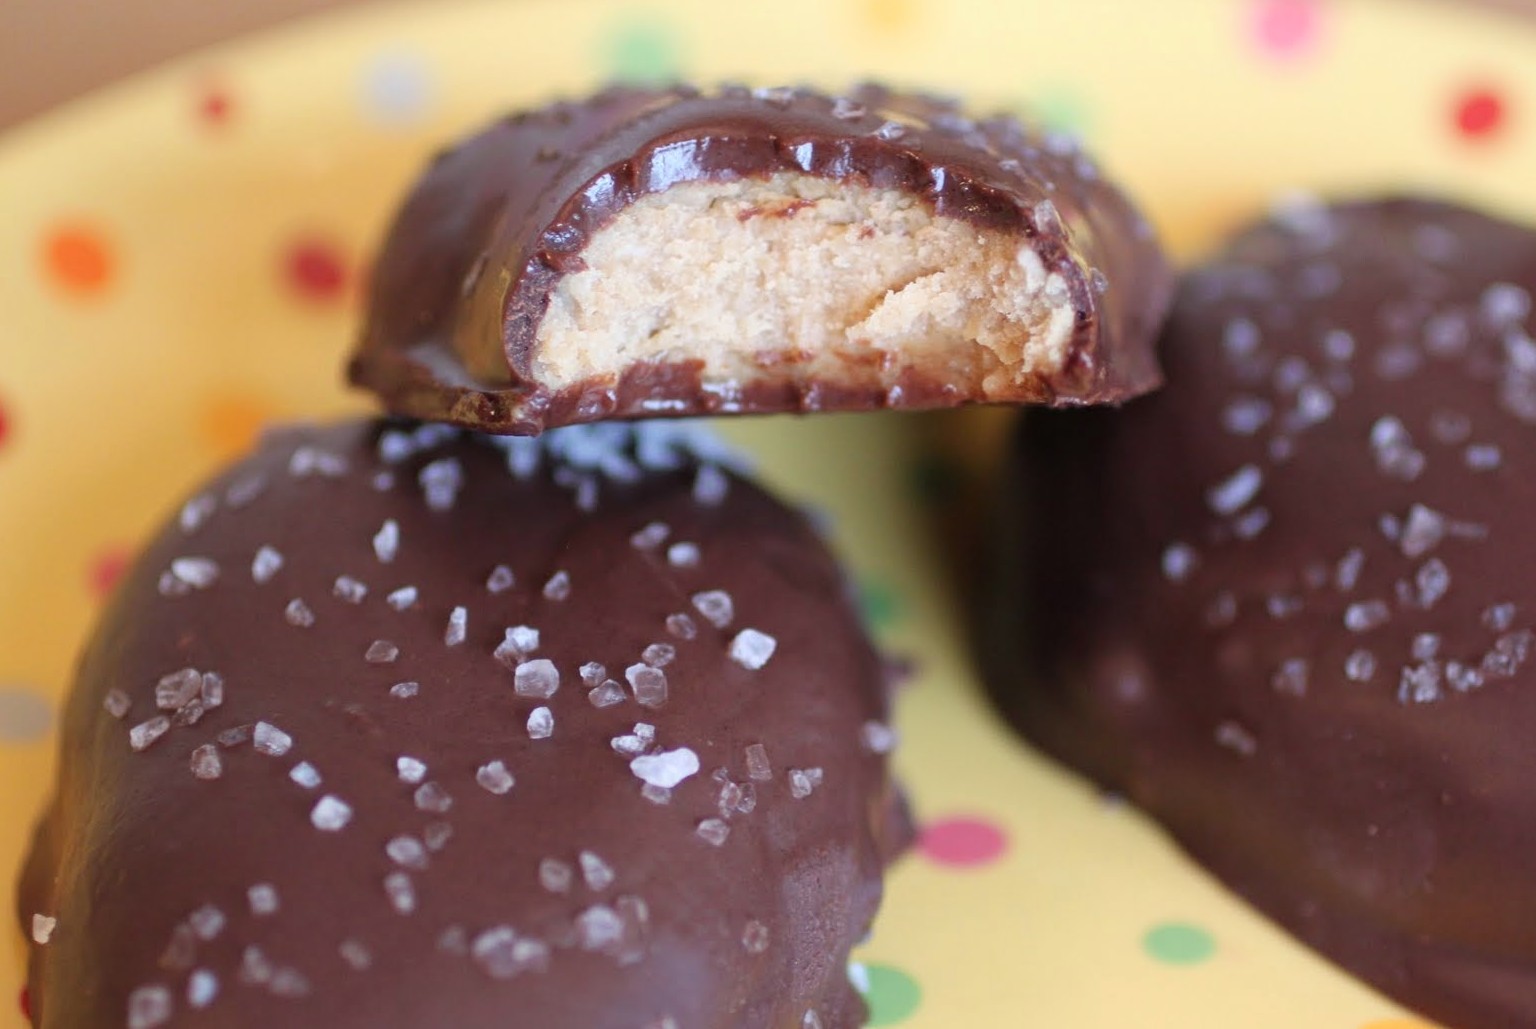 As though Reese’s eggs weren’t addictive enough, these are even more irresistible. I gave them to Kenny because they happen to be gluten-free and he doesn’t get a ton of good GF sweets in his life. And then I was a terrible wife and ate half of them. It was impossible not to. So I’m kind of not sorry. After all, they’re easy enough to make again. And sometimes a girl just has to overindulge.
 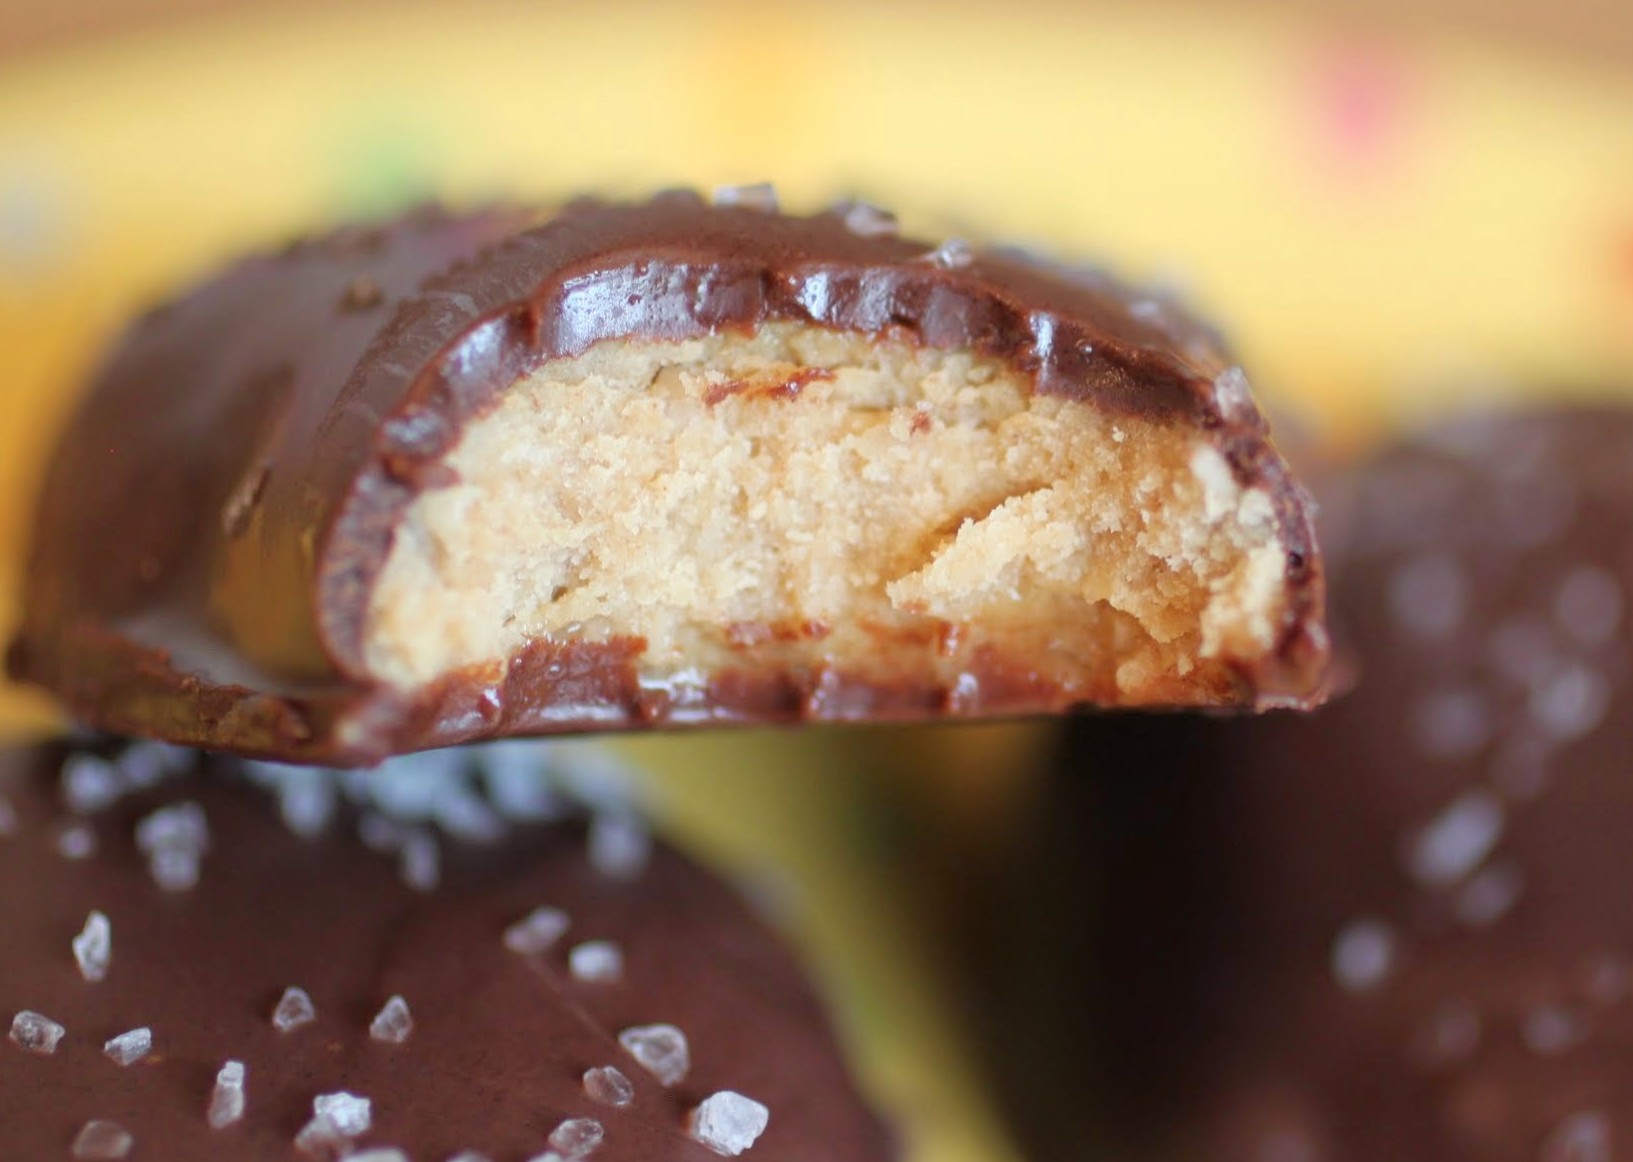 This recipe is no-bake, no fuss. The hardest part is probably the dipping, but don’t be a perfectionist about that. As long as you wind up with an egg-shaped, chocolate and salt-covered confection, nothing else really matters. Sometimes we all go overboard, and that’s cool. Just make sure you’re doing it with your favorite foods! And now, if you’ll excuse me, I have some leftover sesame chicken in the fridge just calling my name!
Ingredients
Instructions
- On the stovetop, melt the butter over low heat in a medium saucepan. Add the brown sugar, peanut butter, powdered sugar, vanilla and salt. Stir until the mixture is combined and smooth.
- Put the saucepan in the refrigerator for 15 minutes to get a little thicker. Form egg shapes with your hands with about two tablespoons of the peanut butter mixture. Place the eggs on a waxed paper-covered plate.
- Freeze for 15 minutes. Don't leave the eggs in the freezer for too long or they'll stick to the waxed paper and not come off.
- Line a cookie sheet with a silicone baking mat or parchment paper.
- Melt the chocolate according to package directions.
- Working carefully, dip each egg into the melted chocolate, lifting it with a fork to let the excess chocolate drip through the tines. With a toothpick, slide the egg gently onto the lined cookie sheet. Sprinkle with sea salt.
- Repeat the process until all the eggs are dipped. Allow the chocolate to harden.
- Store in the refrigerator so the eggs don't melt. They won't last long!
Do you remember the red pistachios? Do they still exist?
I loved those things. They got red dye all over my hands, but I always thought they tasted better than the regular kind. My grandparents always kept them around for me. And then one day, they disappeared. I haven’t seen a red pistachio since.
Things have a habit of disappearing, unfortunately. There’s a great poem by Elizabeth Bishop called “One Art” where she talks about what she calls “the art of losing.” It’s a great poem, and my English teacher self highly recommends it to you. But I sometimes get creeped out by how much I’ve lost without even realizing it until after the fact.
It’s normal, of course. My childhood houses are gone, the cities I grew up in, all in the past. And while I’d like to think that they’re still out there somewhere, it’s hard to factor in the existence of a house I no longer live in, or a city I haven’t seen in years. But that’s life.
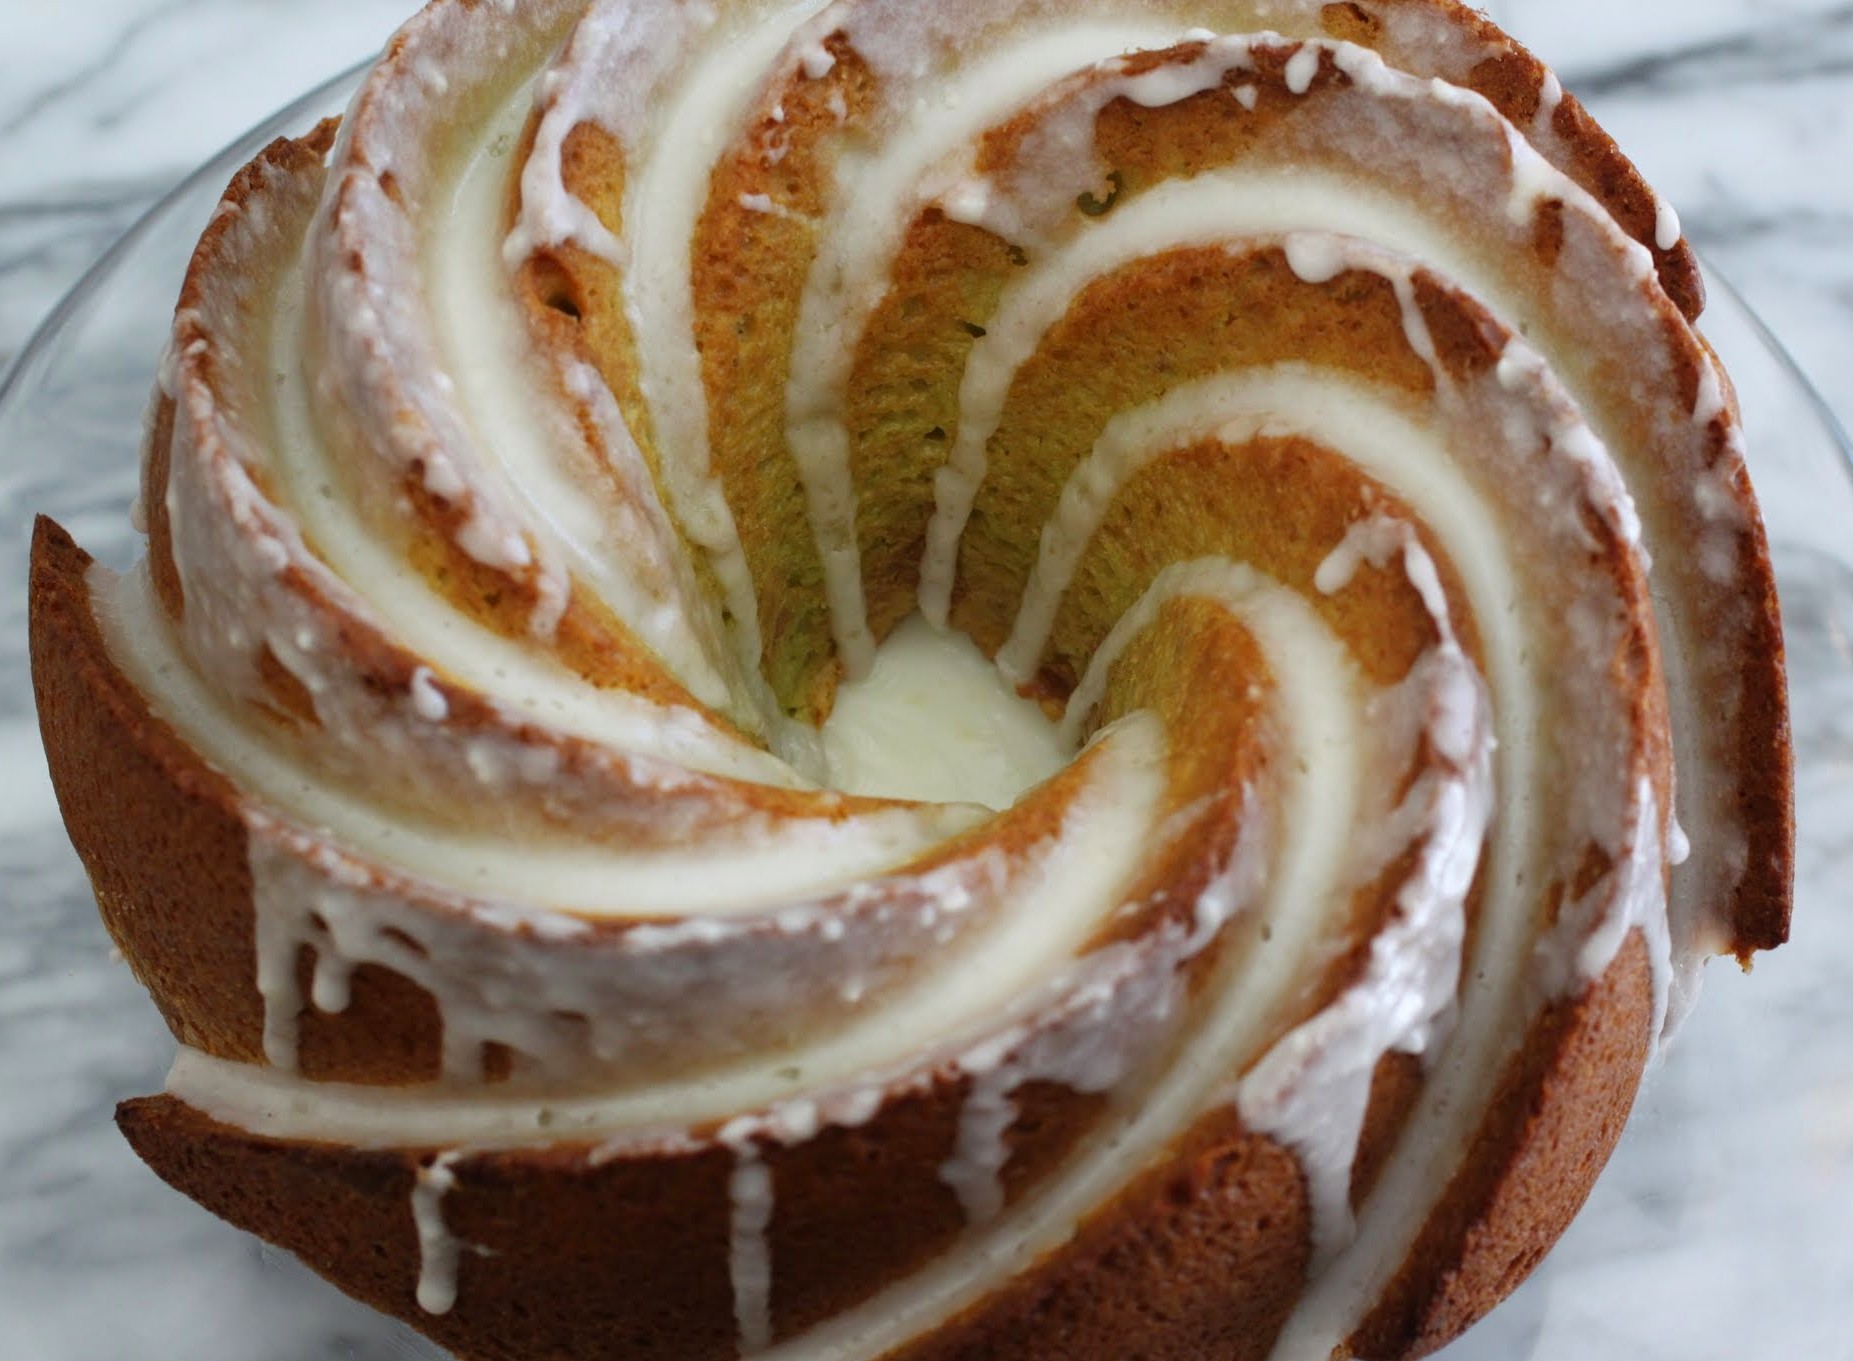
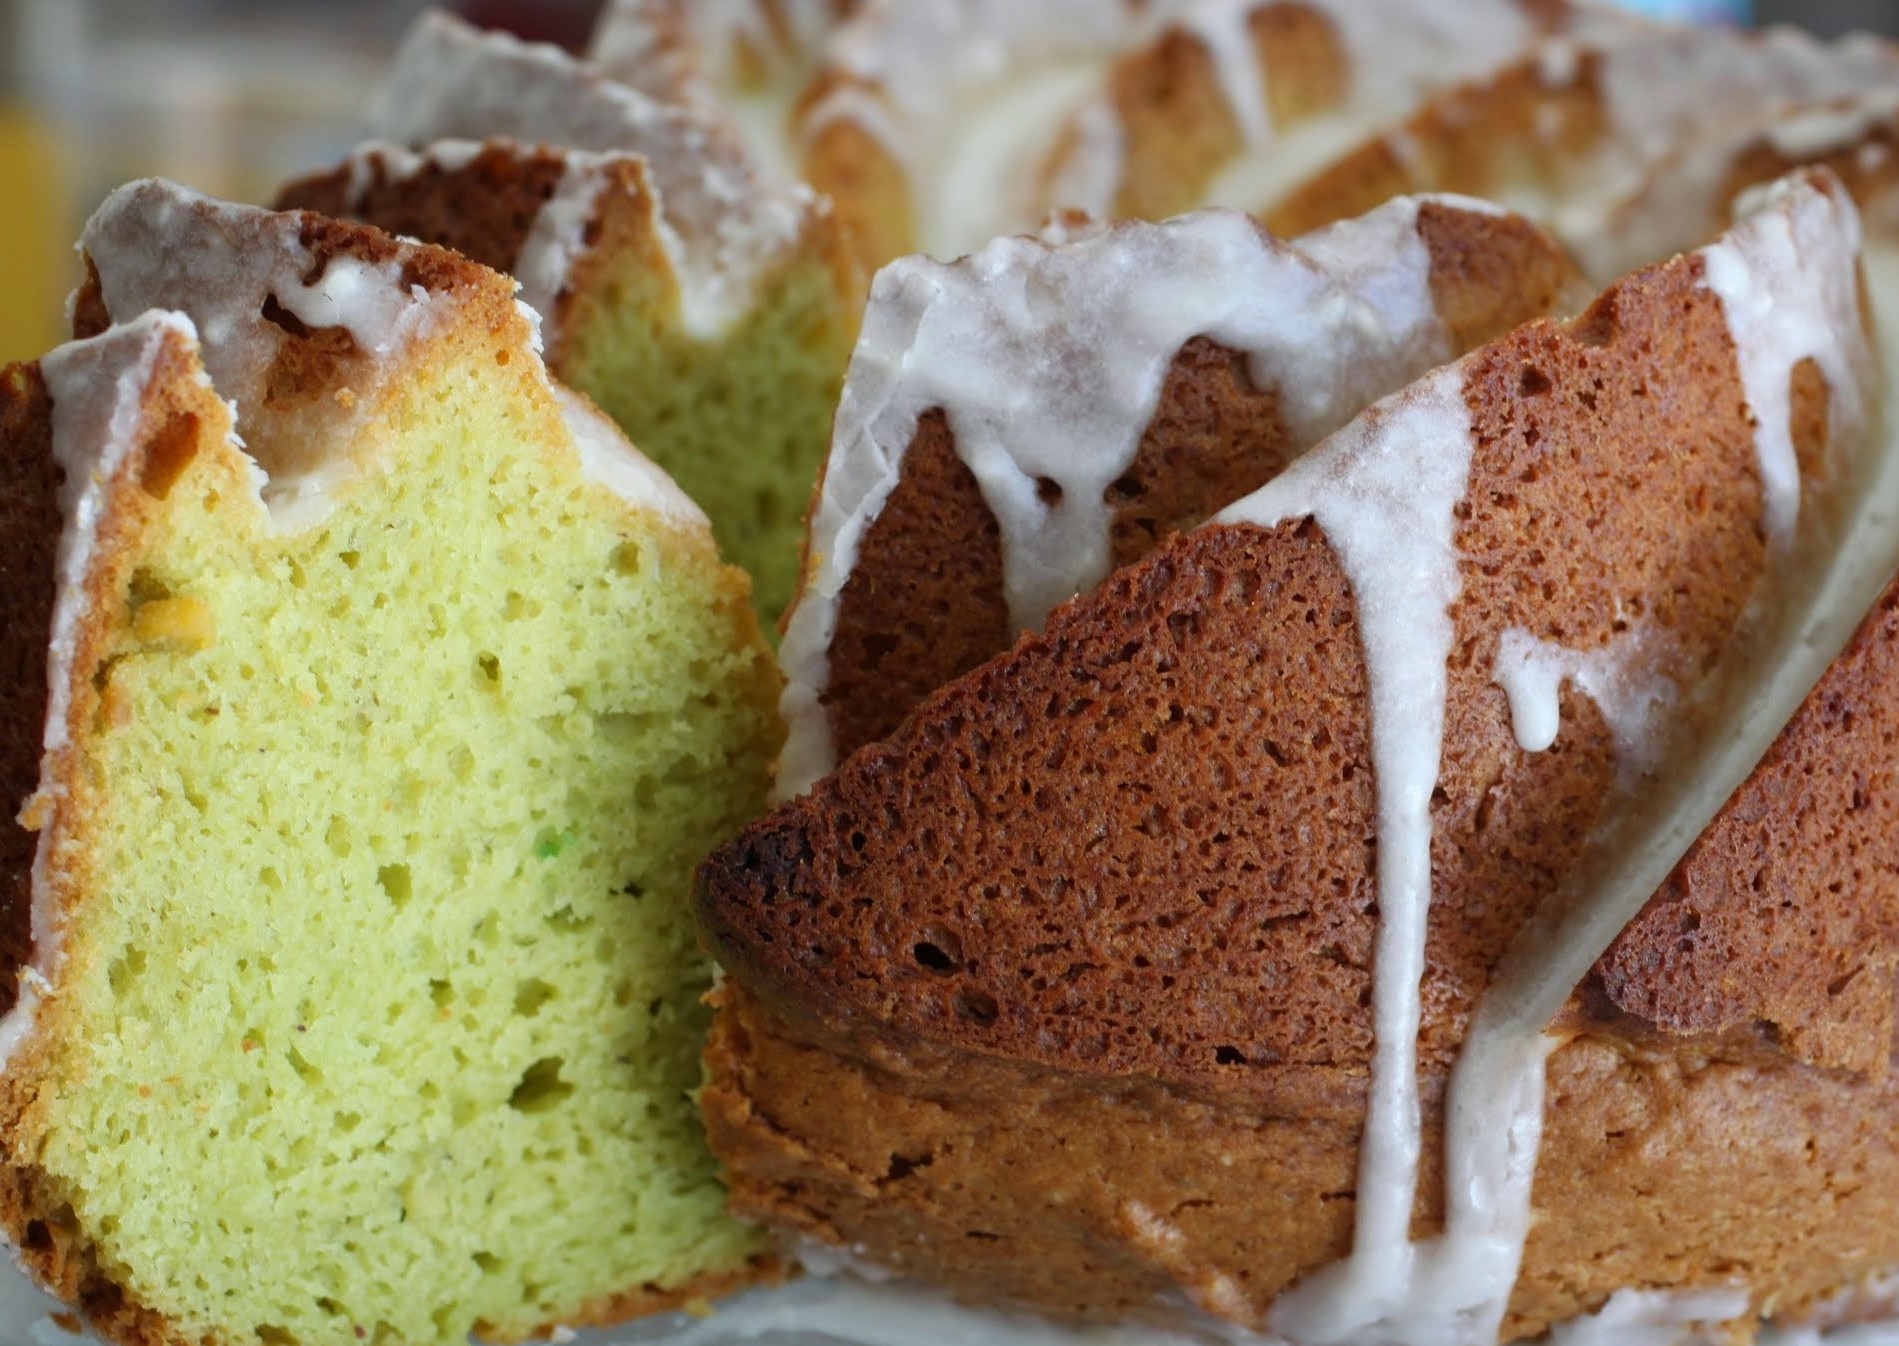
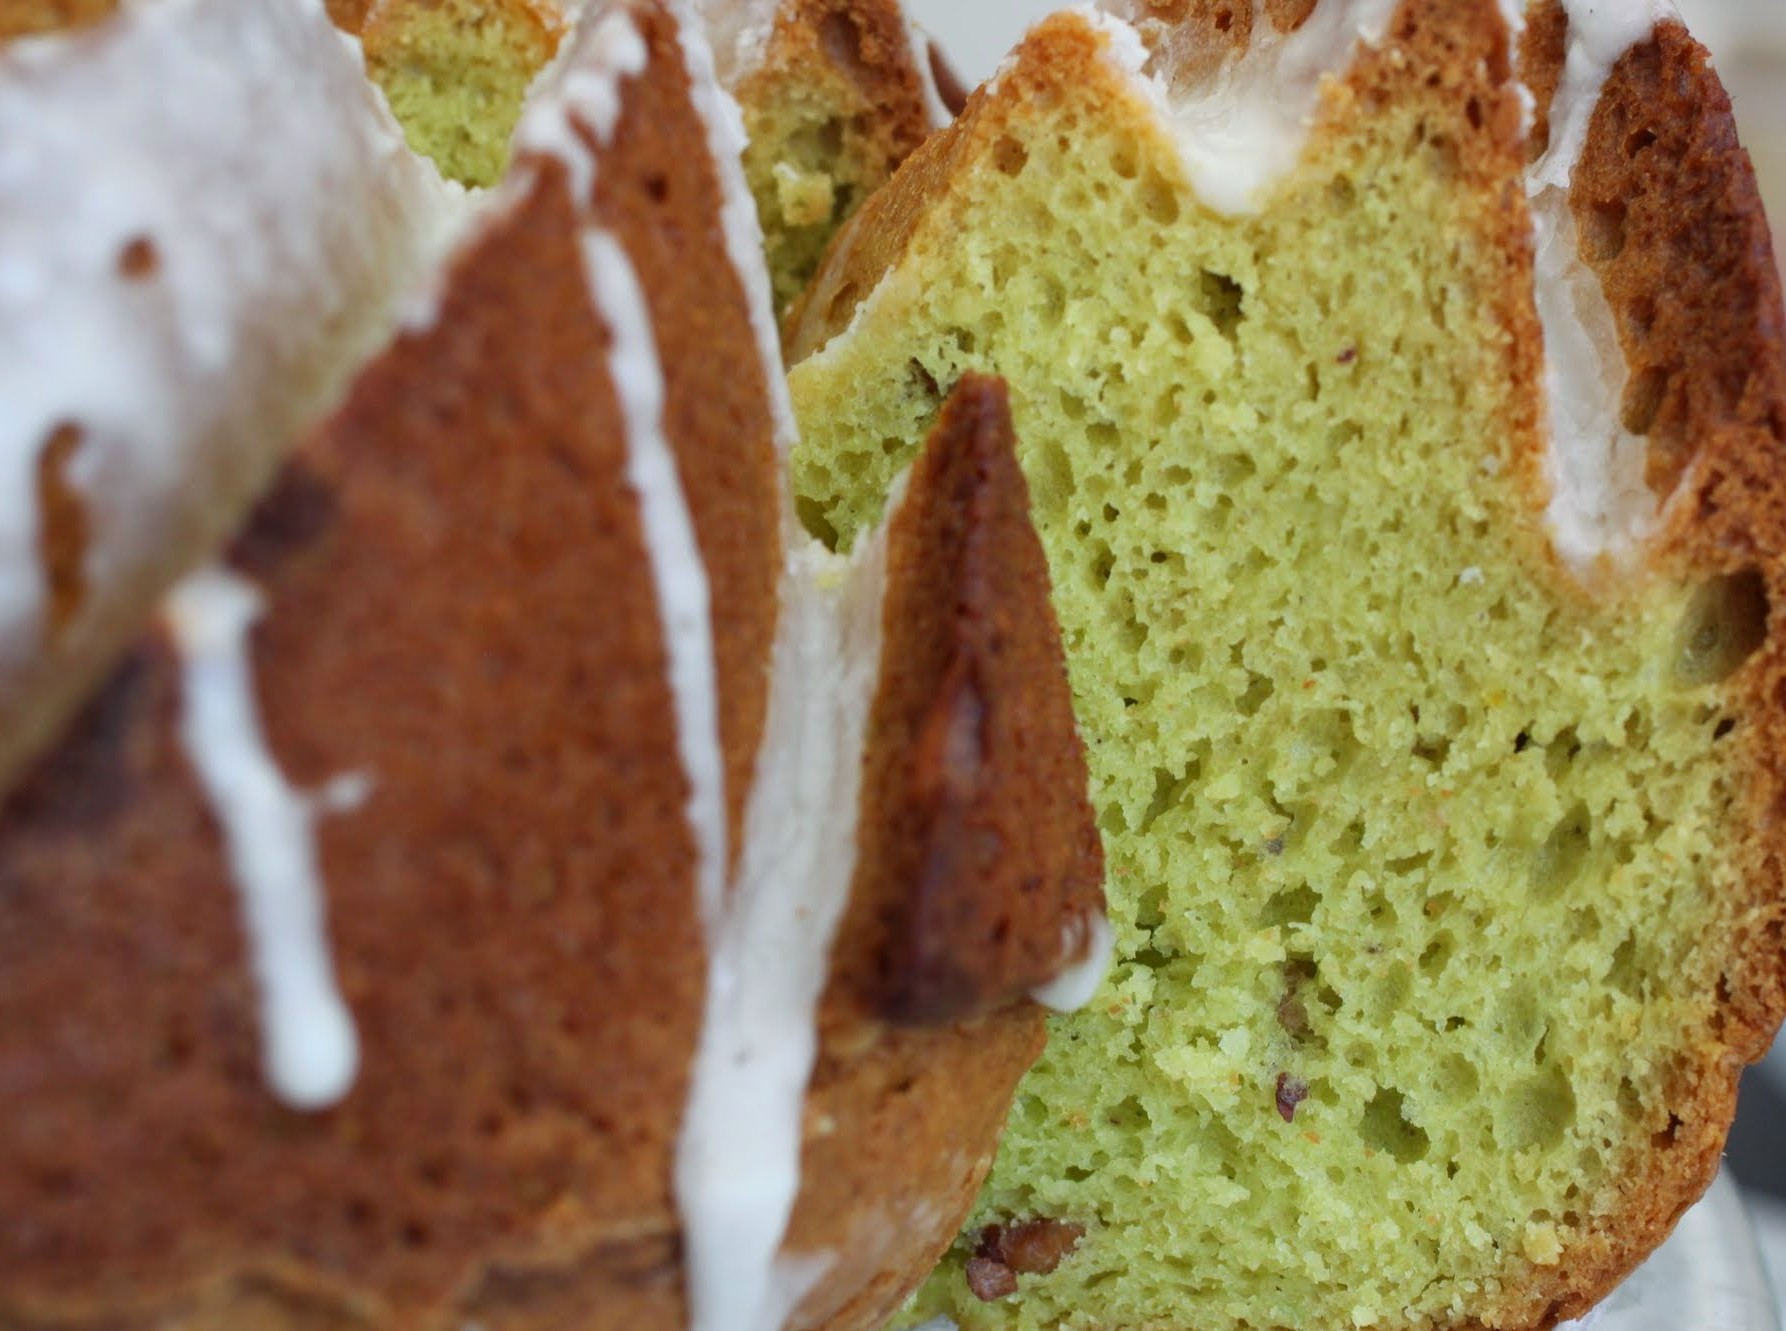
Luckily, pistachios still exist, even if they’re not red. And they come in great flavors. If you’ve never tried a salt and pepper pistachio, you are missing out. And if you’ve never had pistachio cake, that needs to end right now.
This cake recipe was handed to me years ago by a friend, and I just never tried it. To be honest, it didn’t look right at first. Pistachio pudding mix existed? And I could put it in cake?!
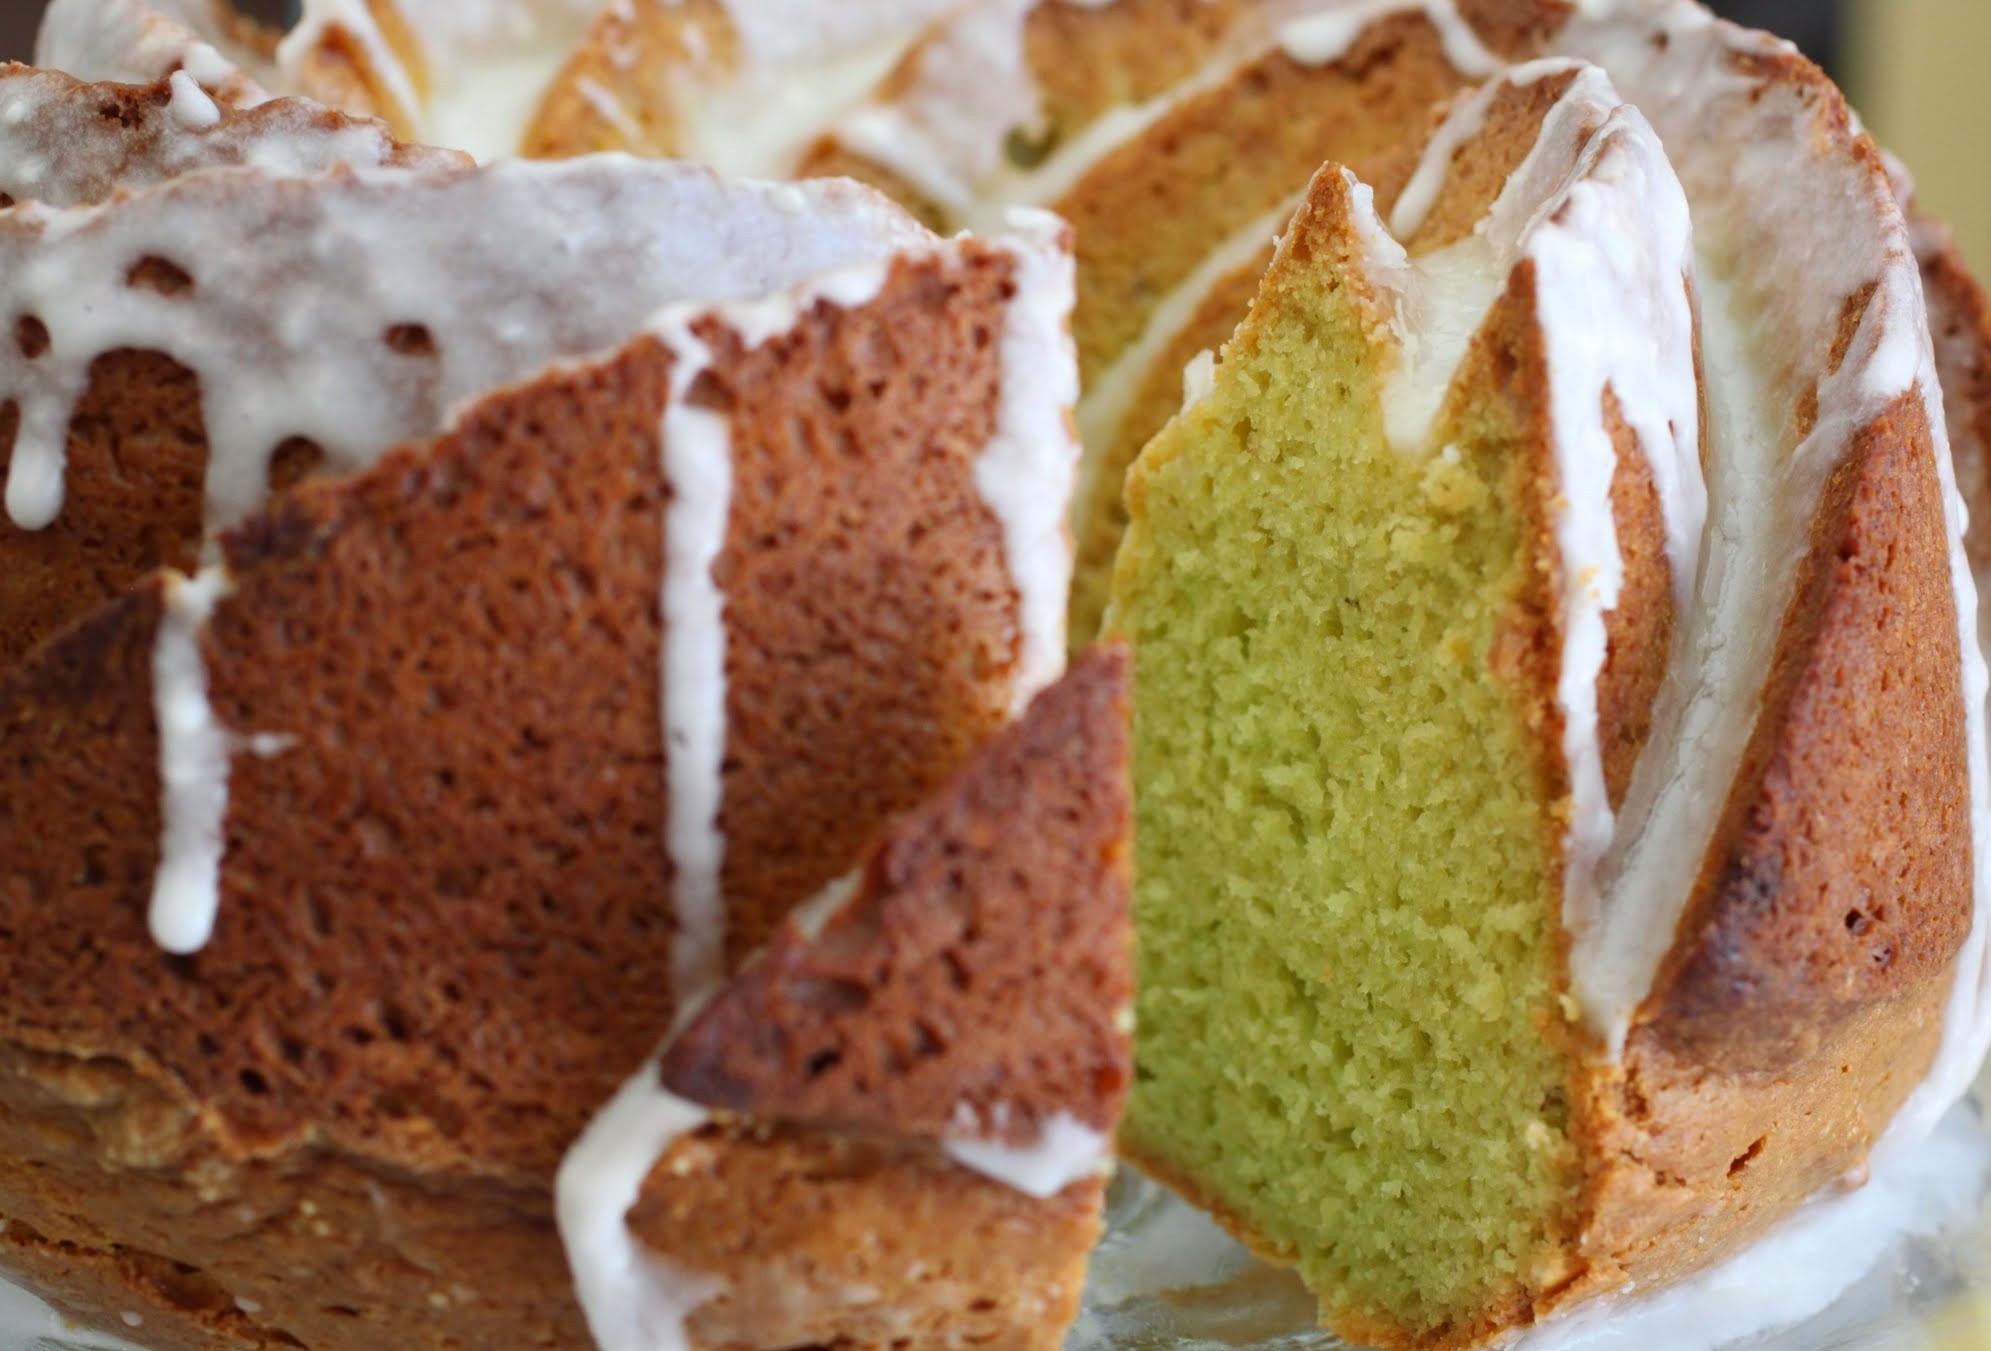
Oh, I was such an innocent. Cake mix rocks, pudding mix rocks, and when you put them together, they create even more delightful results. In this case, you get a perfectly dense, does-not-taste-like-a-mix, beautifully green cake.
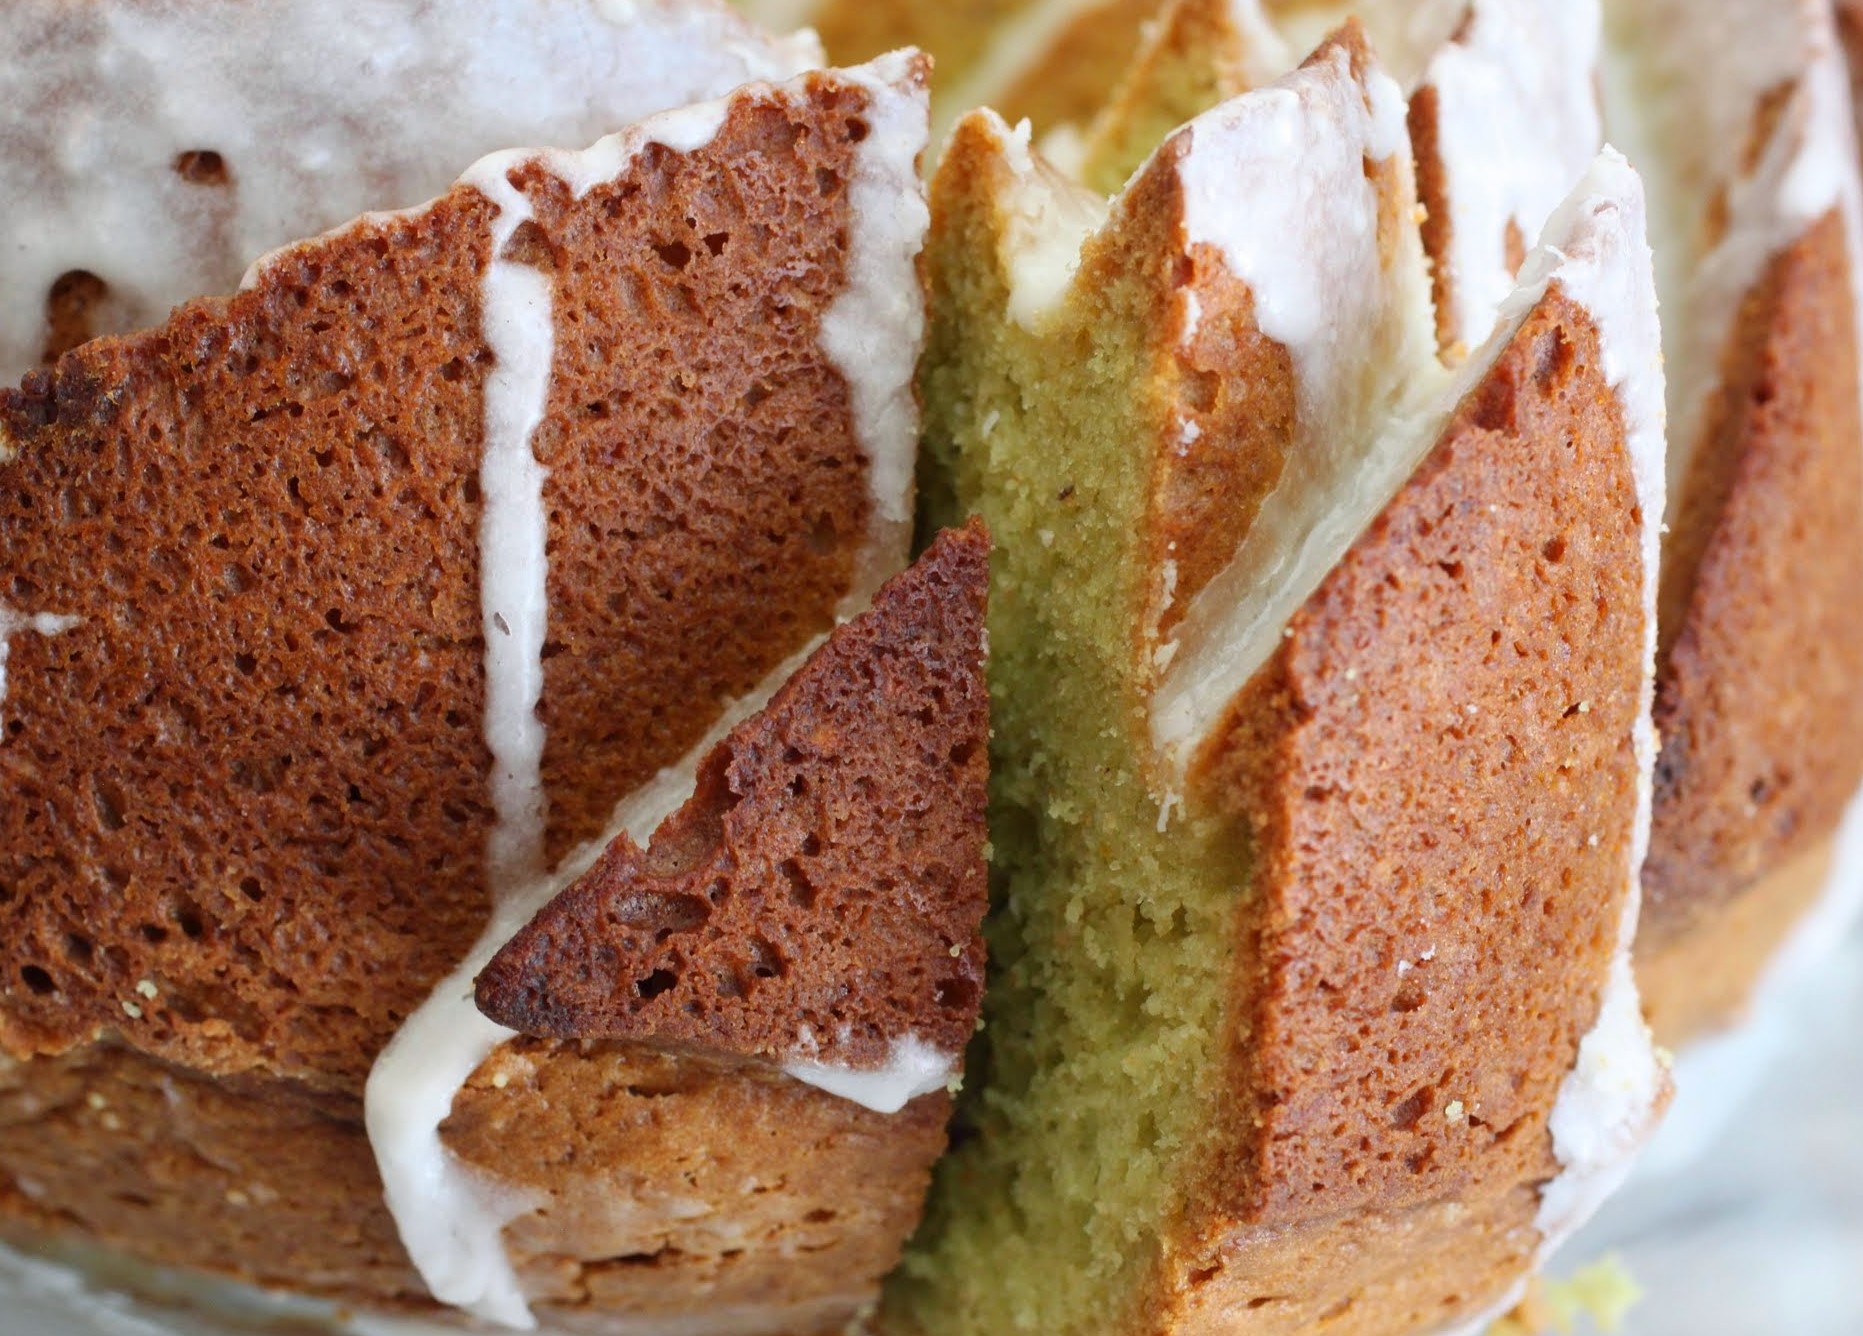
Just in time for St. Patrick’s, might I add! That’s right. I’m getting into the holiday spirit here. And the glaze pushes this cake right over the top. I put some almond extract into the glaze (which I would inhale straight if I didn’t suspect it tastes icky by itself) and that really made that pistachio flavor pop.
The thing is, we never notice some of our favorite things until they’re gone. Or people, really. I miss a lot of people. I miss places I grew up. I miss red pistachios. And while I hope never to miss pudding mix, you never know. The time is now. Cherish what you have!
Ingredients
Instructions
- Preheat the oven to 350. Coat a bundt or tube pan with cooking spray. Set aside.
- In a bowl, mix all of the cake ingredients together until everything is smooth and incorporated. Your batter should be nice and evenly green.
- Pour the batter into the pan. Depending on the size of the pan (a smaller and/or deeper pan has more baking time), bake for anywhere from 45-60 minutes. The cake is done when a toothpick inserted into the center comes out clean.
- Cool until the cake is no longer hot. Invert the pan onto a plate and continue to cool.
- While the cake cools, make the glaze. Combine the butter, almond extract, and powdered sugar. Gradually add the milk until the desired consistency forms. You want a thick glaze, but it needs to be liquidy enough to pour.
- Carefully remove the cake from the pan. Pour the glaze on the cake and let it set.
- Cut into slices and serve.
]]>
I was reading one of my favorite blogs for peanut butter desserts, Averie Cooks. I’m sure you’re familiar with Averie, but if not, she’s a peanut butter goddess. I own her cookbook, Peanut Butter Comfort, and I like to sit around and drool at her pictures.
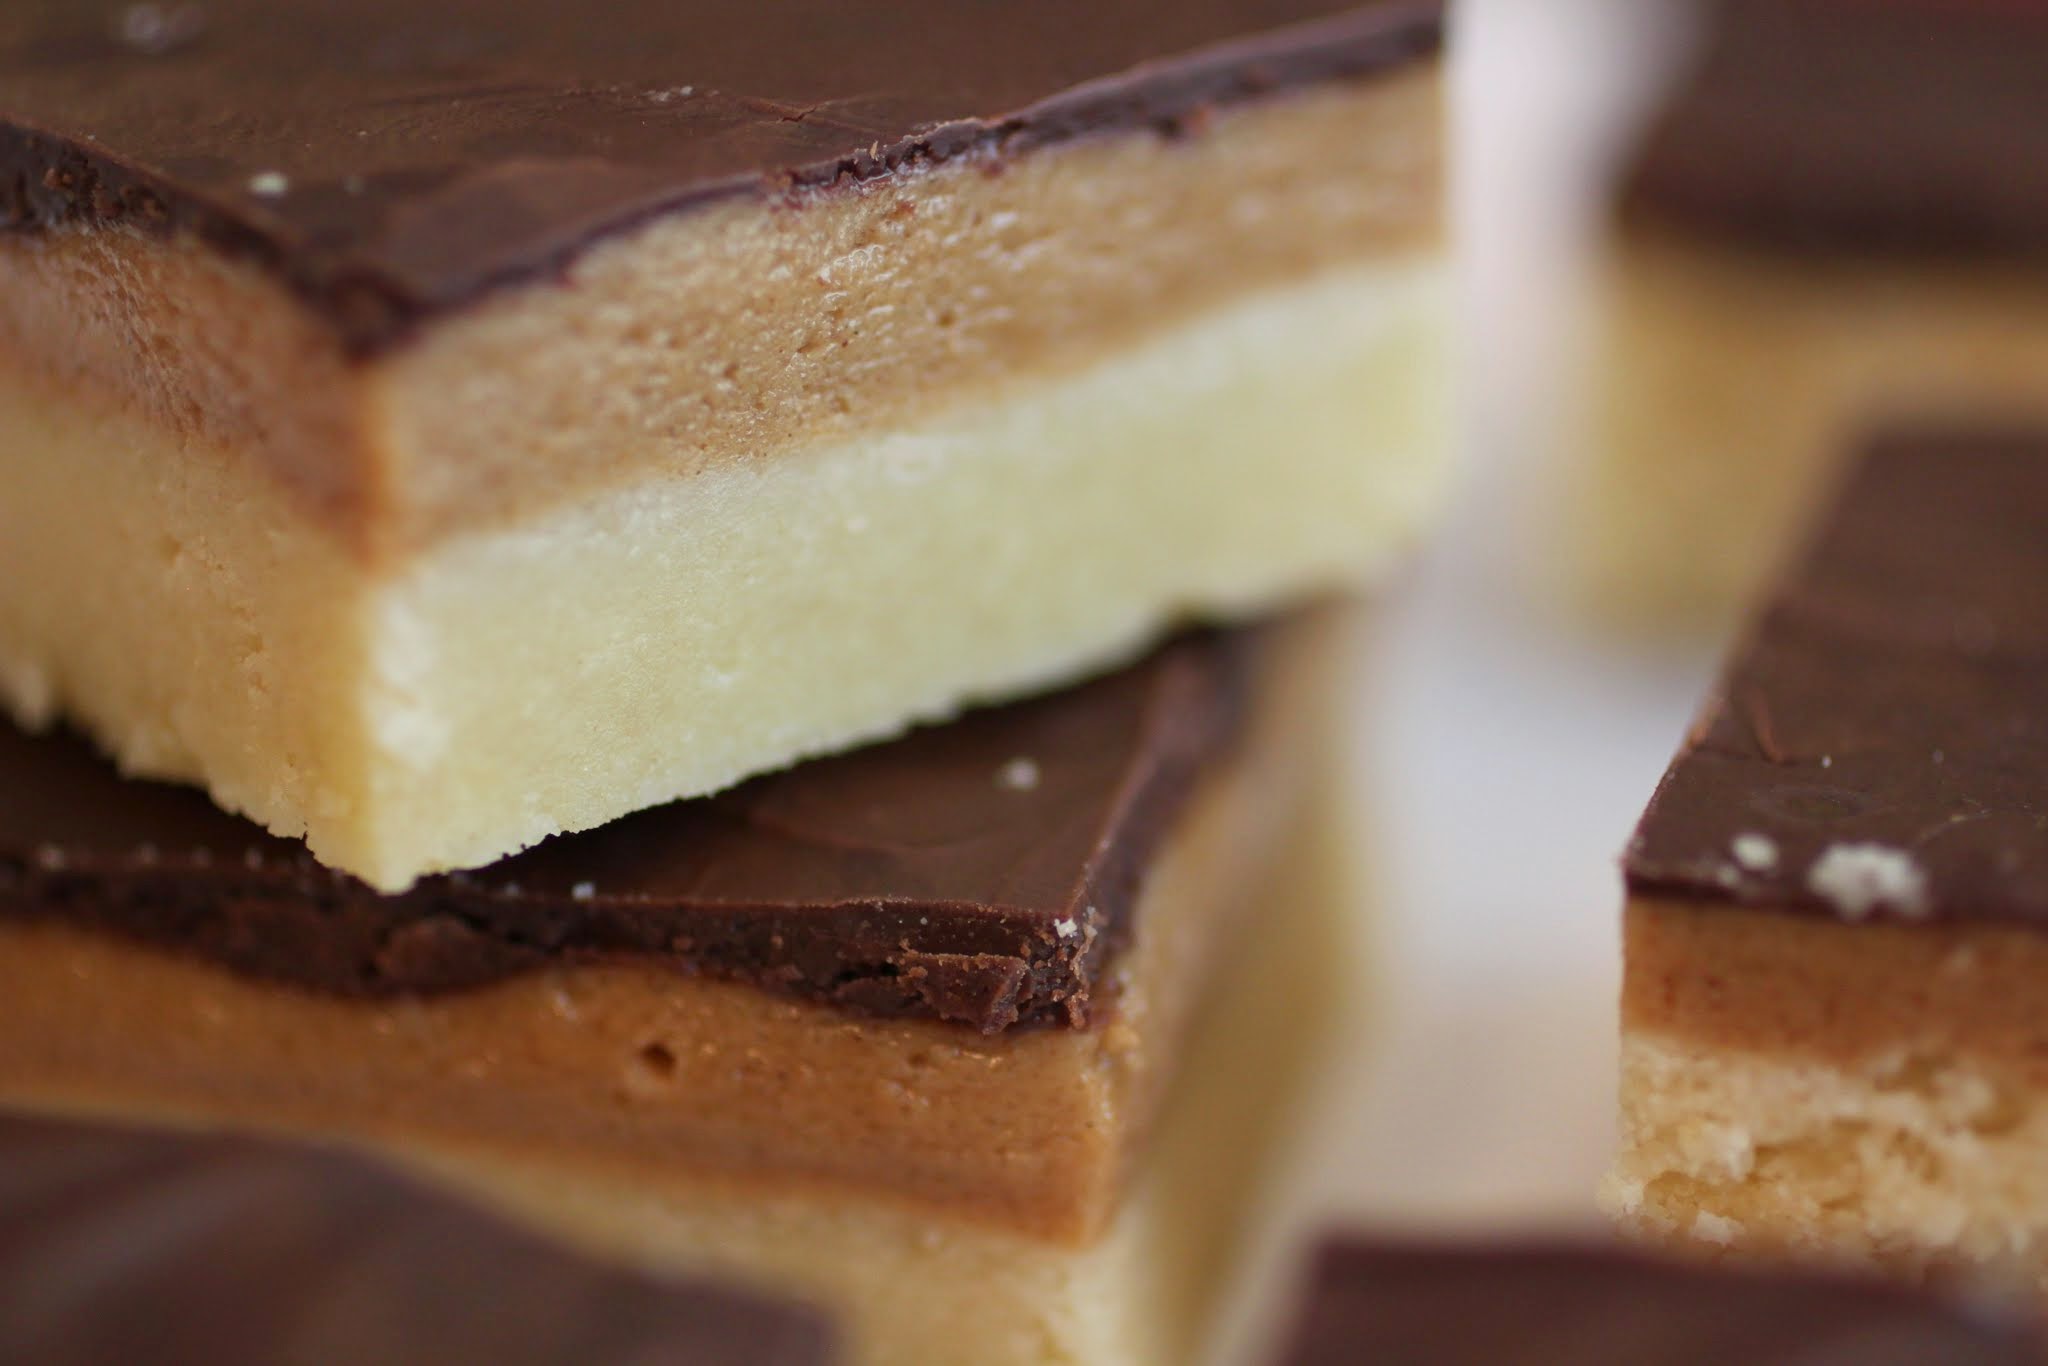
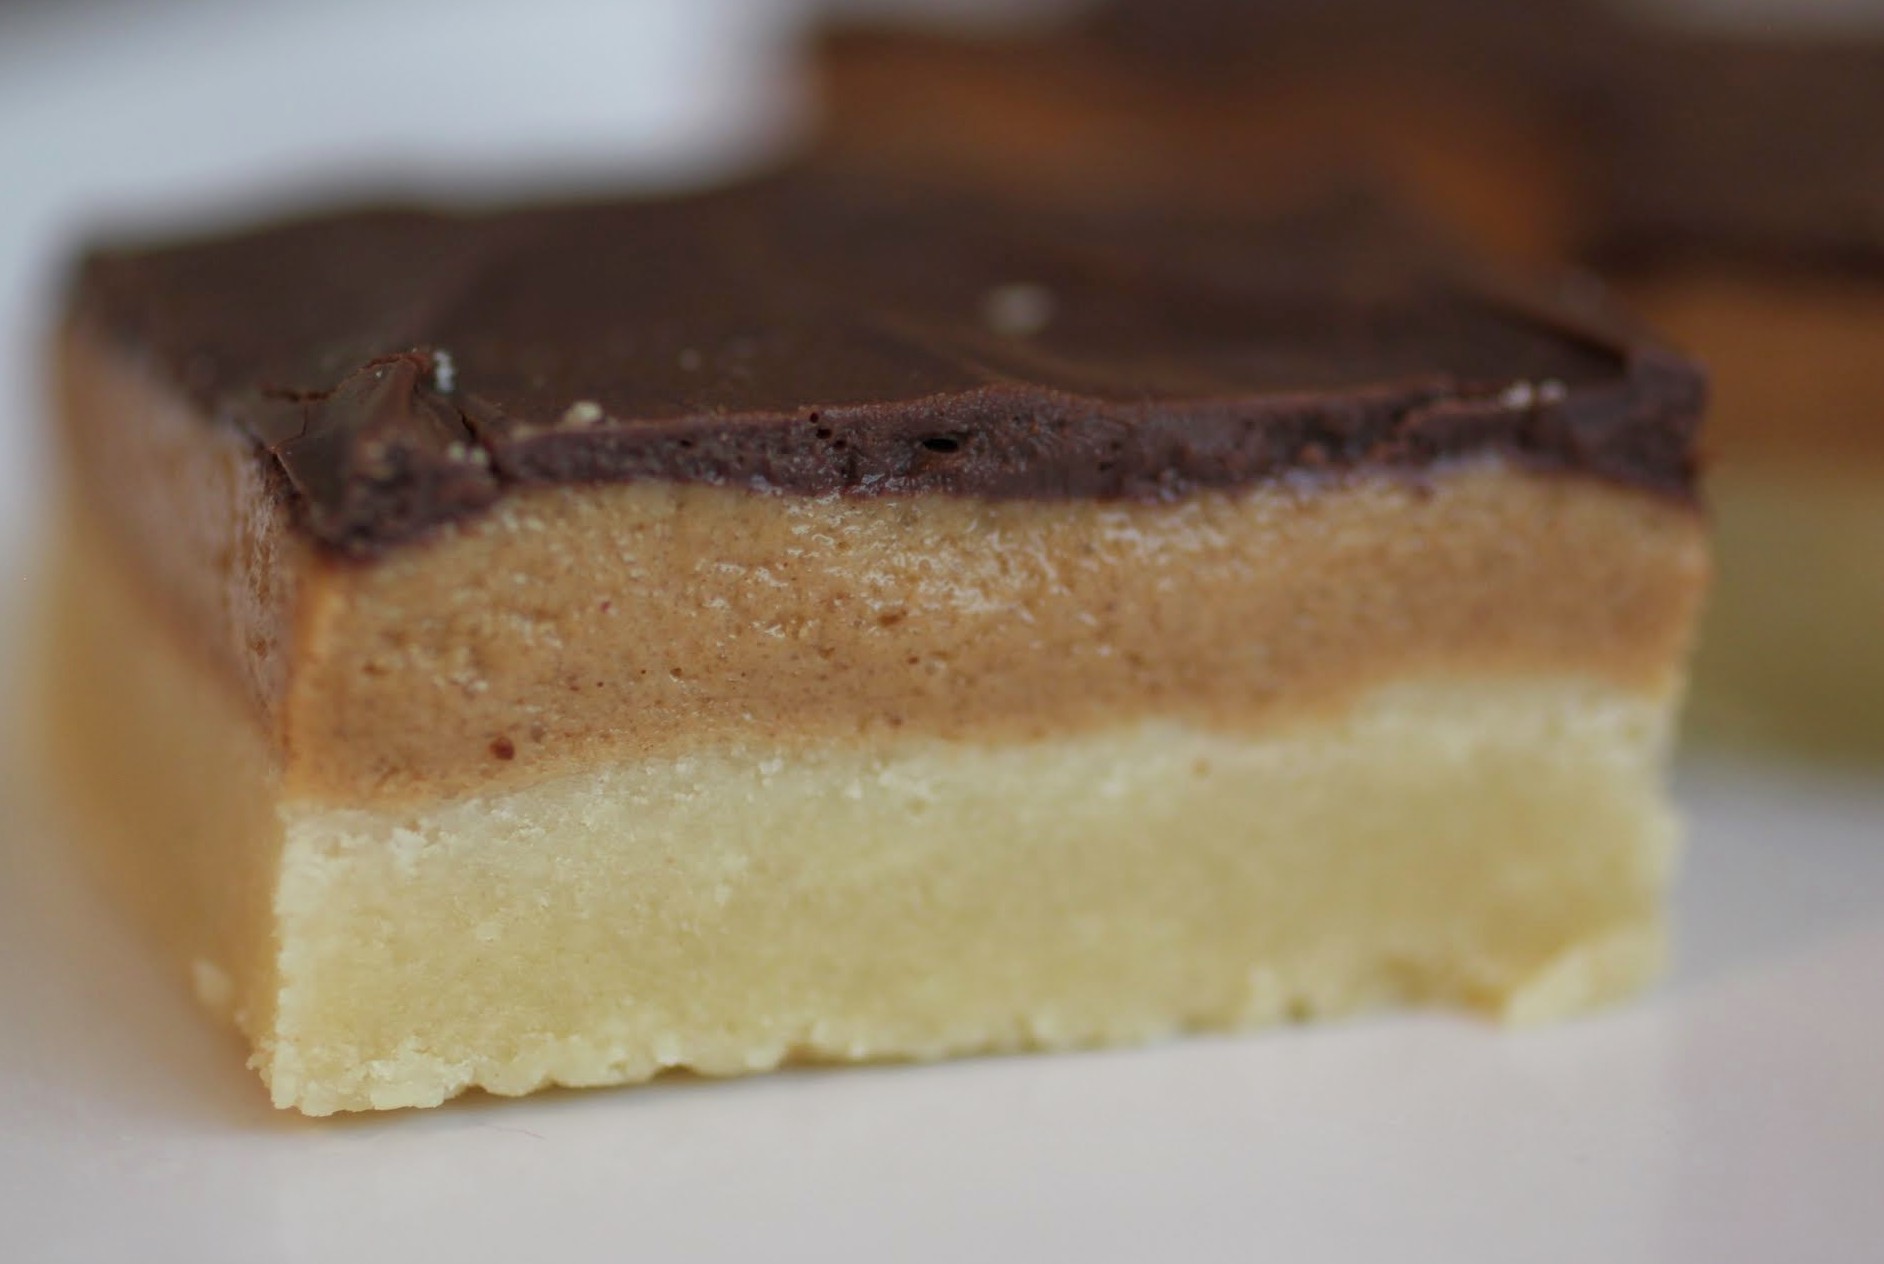
Anyway, last Friday she posted these Tagalong bars. And as soon as I saw them, I slapped myself on the head and cursed. Because you see, I had a very similar bar cooling on my kitchen counter.
Listen, I’m no Averie. I can’t say that my pictures are better than hers, because they’re totally not. And I don’t know how her bars taste yet, though I’m willing to bet they’re awesome. But I’m actually thrilled that we were on similar wavelengths last week, because that means I’m doing something right.
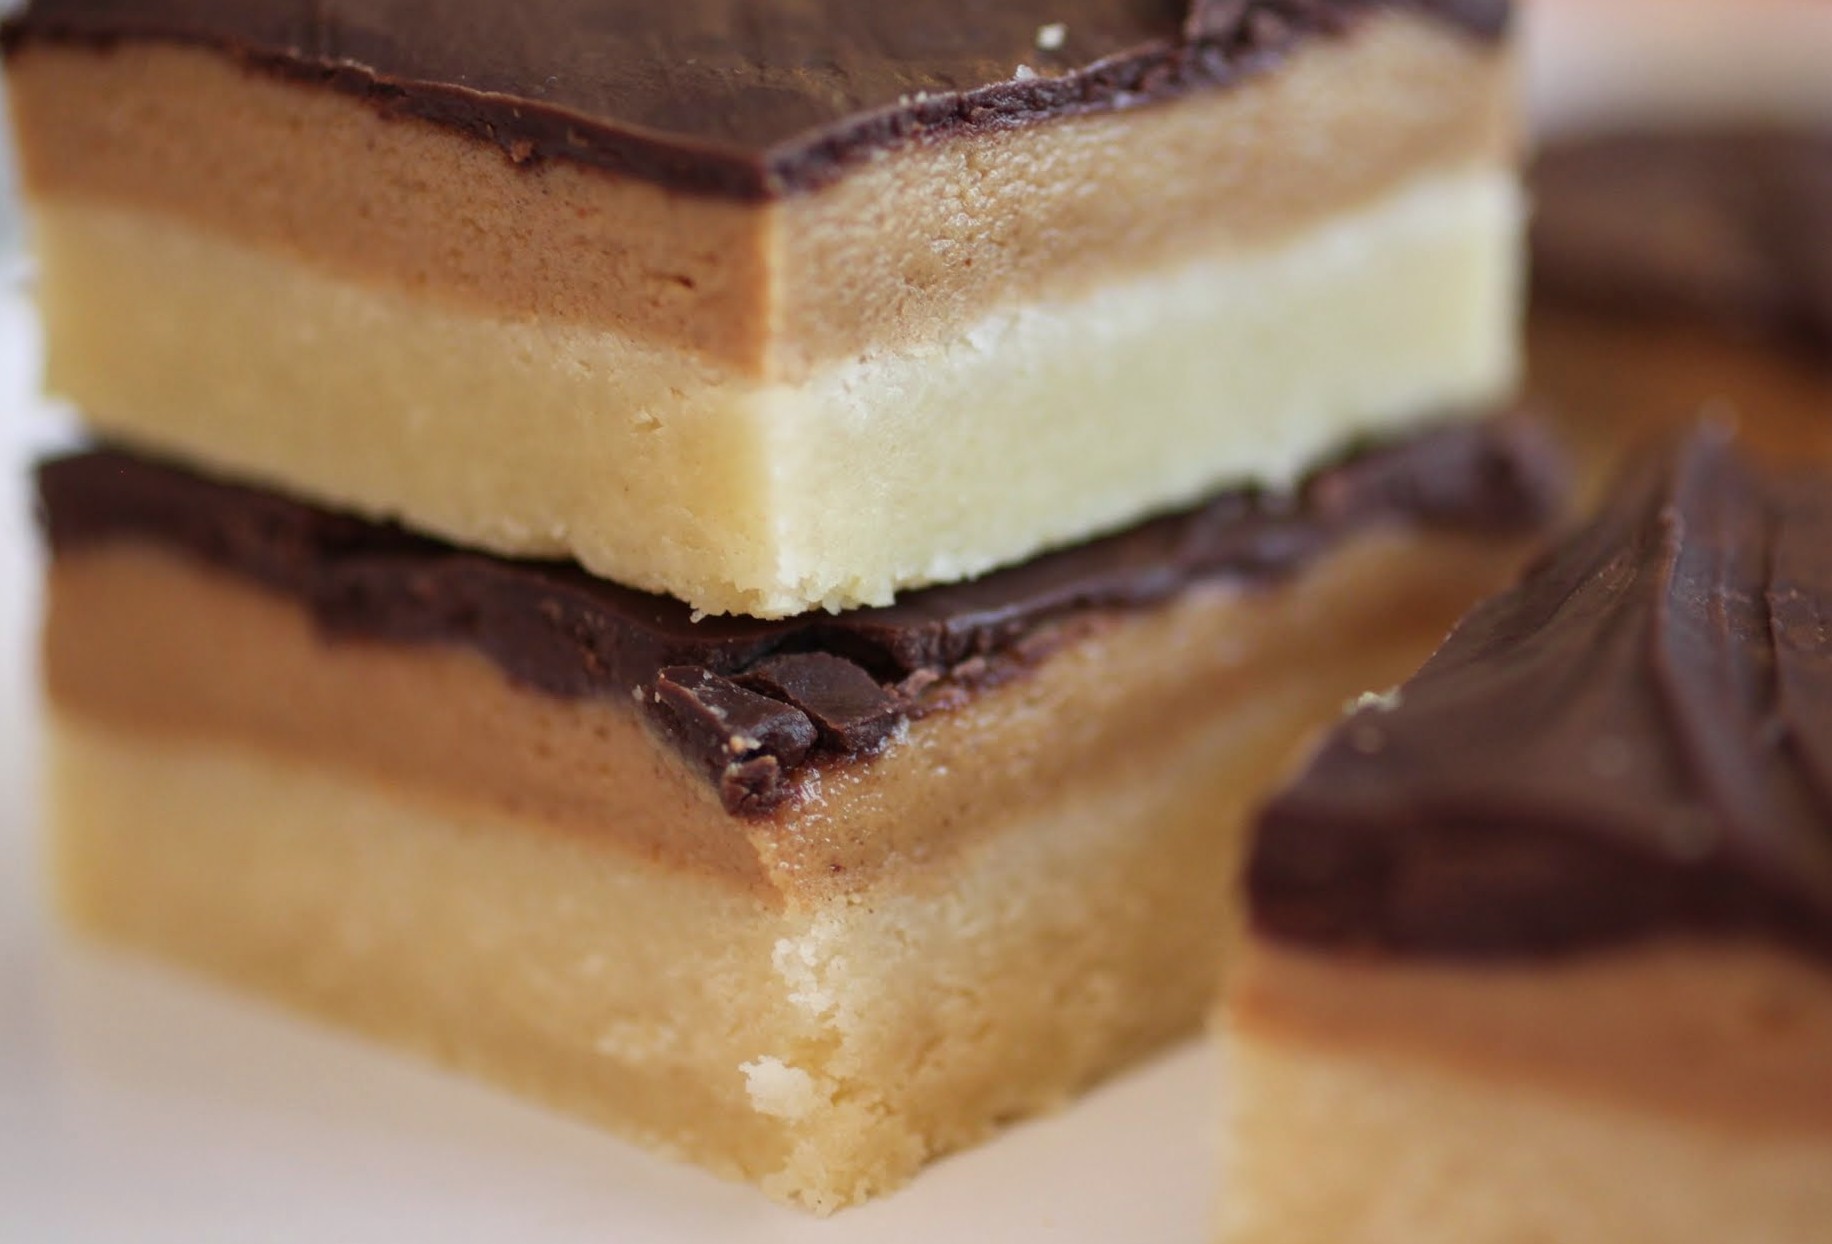
And as you can see, our recipes are pretty different, despite their seeming surface similarities. When it comes down to it, it’s pretty clear that Tagalongs are fabulous enough to deserve several copycat versions making their way around food blogs.
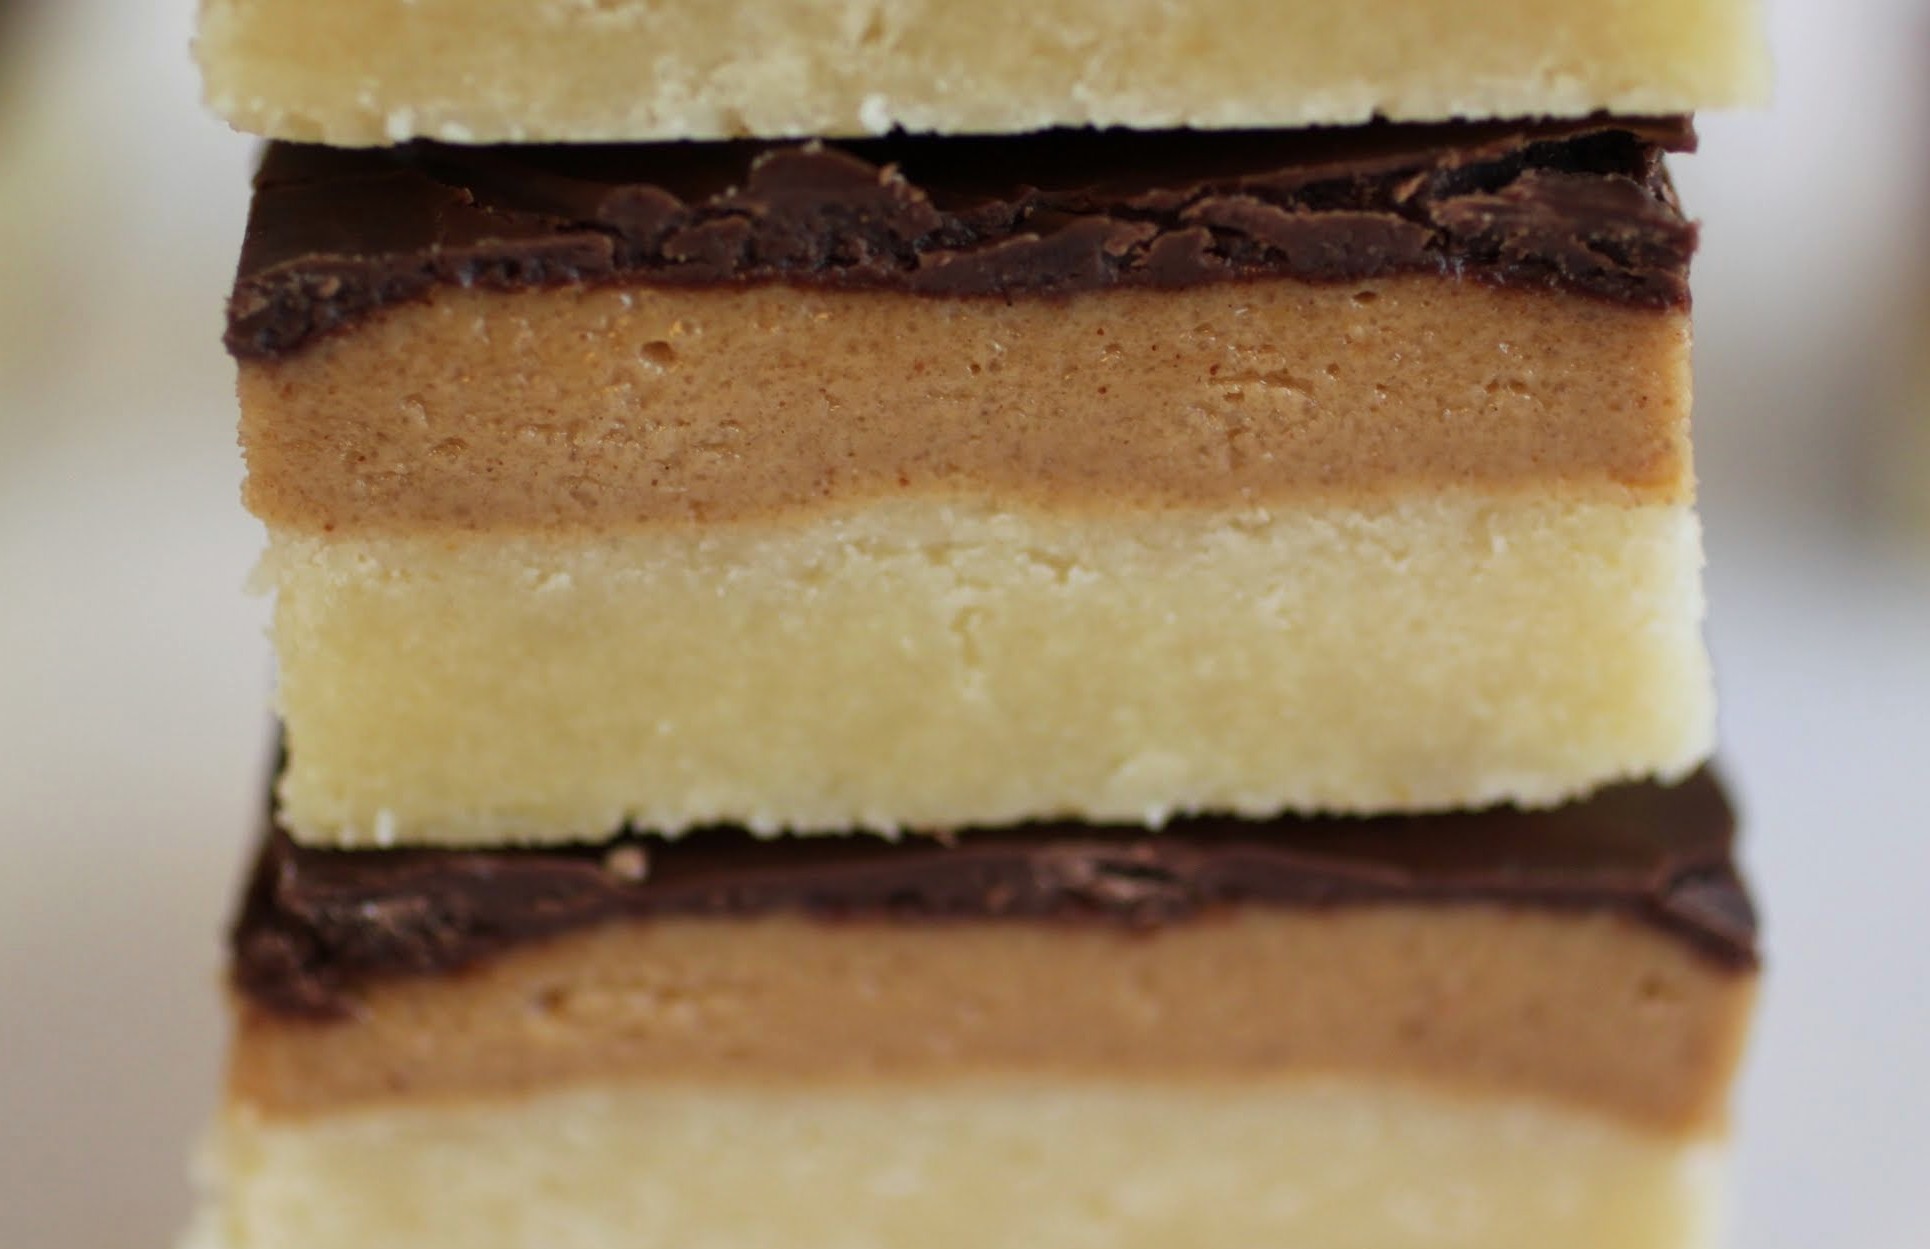
My intent with these bars was to KISS. You know, to Keep It Simple, Sister. No, that last “S” doesn’t usually stand for “sister,” but I was taught as a kid that you should never call anyone “stupid,” and I hold by that rule. That aside, these bars are very easy to put together.

The base is a quickly assembled shortbread, and the middle layer is just peanut butter and powdered sugar. I ran out of powdered sugar and forgot about it, so when I was making these bars, I had to make my own using a blender. It’s quick and easy, not to mention cheap. I felt very much like Tom Hanks in Castaway when he makes fire. Yes, I actually ran around my kitchen screaming, “I….have made…FIRE!” Luckily, everyone at home is quite used to me by now.
The top layer is simply melted chocolate left overnight to harden on its own, and voila! Tagalong magic without the Girl Scouts to enable me. Not that I’m complaining about that.
Food bloggers often think alike, and if I’m thinking like peanut butter queen Averie, I’m a happy girl. I hope you enjoy all that Tagalong season has to offer on both her site and mine, not to mention the other amazing offerings out there, like this one from Dorothy of Crazy for Crust (a.k.a. one of my favorite food bloggers ever). Eat up!
Ingredients
Instructions
- Preheat the oven to 350. Line an 8 x 8 pan with foil, leaving enough to hang over the sides. Coat with cooking spray. Set aside.
- In the bowl of a stand mixer, cream the butter and powdered sugar until light and fluffy.
- In a measuring cup, mix the flour and baking powder. Pour into the butter mixture and beat until a dough forms. It will be thick.
- Press the dough into the prepared pan evenly. Bake for 15-20 minutes until the edges are golden. Cool.
- While the crust is baking, make the peanut butter filling. Mix the powdered sugar and peanut butter until a dough-like consistency is reached. Set aside.
- When the shortbread crust is cool enough, pat the peanut butter filling gently and evenly onto the surface of the shortbread.
- In a microwave-safe bowl, melt the chocolate chips for one minute and 30 seconds. Stir until smooth. Spread carefully over the peanut butter filling.
- Let the chocolate harden completely, preferably overnight. Cut into squares with a sharp knife.
]]>
But then I realized that New Year’s Eve is tonight, and what better to ring in the year than my favorite combination in all the world? I mean, really. It had to be peanut butter and chocolate.
So cocoa will be back Friday. For now, I’m all about this dip. This fantastic dessert dip is perfect for a New Year’s party and a guaranteed crowd-pleaser. It’s also easy and it can be made without gluten. So don’t stop yourself this time!
Since I’m being honest right now, I’ll admit that my New Year’s plans are pretty low-key this year. It’s going to be me, Kenny, and this dip with any associated dippers. Maybe sushi or a gluten-free pizza. And definitely some Netflix.
Possible dippers can include anything from pretzels to apples. Think about what flavors you like with peanut butter and then just run with it! If you want to get really crazy, make a chocolate martini to toast the new year while you’re shoveling this dip into your mouth.

Happy New Year! I started this blog in 2014, and I’m really hoping to keep the ball rolling in the coming year. Thanks for reading, and have a lovely holiday!
Ingredients
Instructions
- In a saucepan over medium heat, melt the butter. Stir in the brown sugar until it liquefies. Set the mixture aside to cool.
- When the butter mixture is cool, beat the cream cheese, powdered sugar, vanilla and peanut butter in the bowl of a stand mixer until smooth and creamy. Add the butter mixture and beat on low until fully combined. Fold in the peanut butter cups, chocolate chips and peanut butter chips.
- Scrape the dip into a bowl and cover with plastic wrap. Refrigerate until thick and spreadable, but not hard, about 30 minutes.
- If you're not using the dip immediately, store in the refrigerator and take out a half hour before serving.
But that doesn’t stop me from enjoying all this season has to offer. When I was a teenager, I’d hire myself out as a carol singer, and I still love those songs. In my childhood, I sang in the chorus of The Nutcracker every year, another beloved holiday season memory. And I have never, ever turned down a holiday cookie.

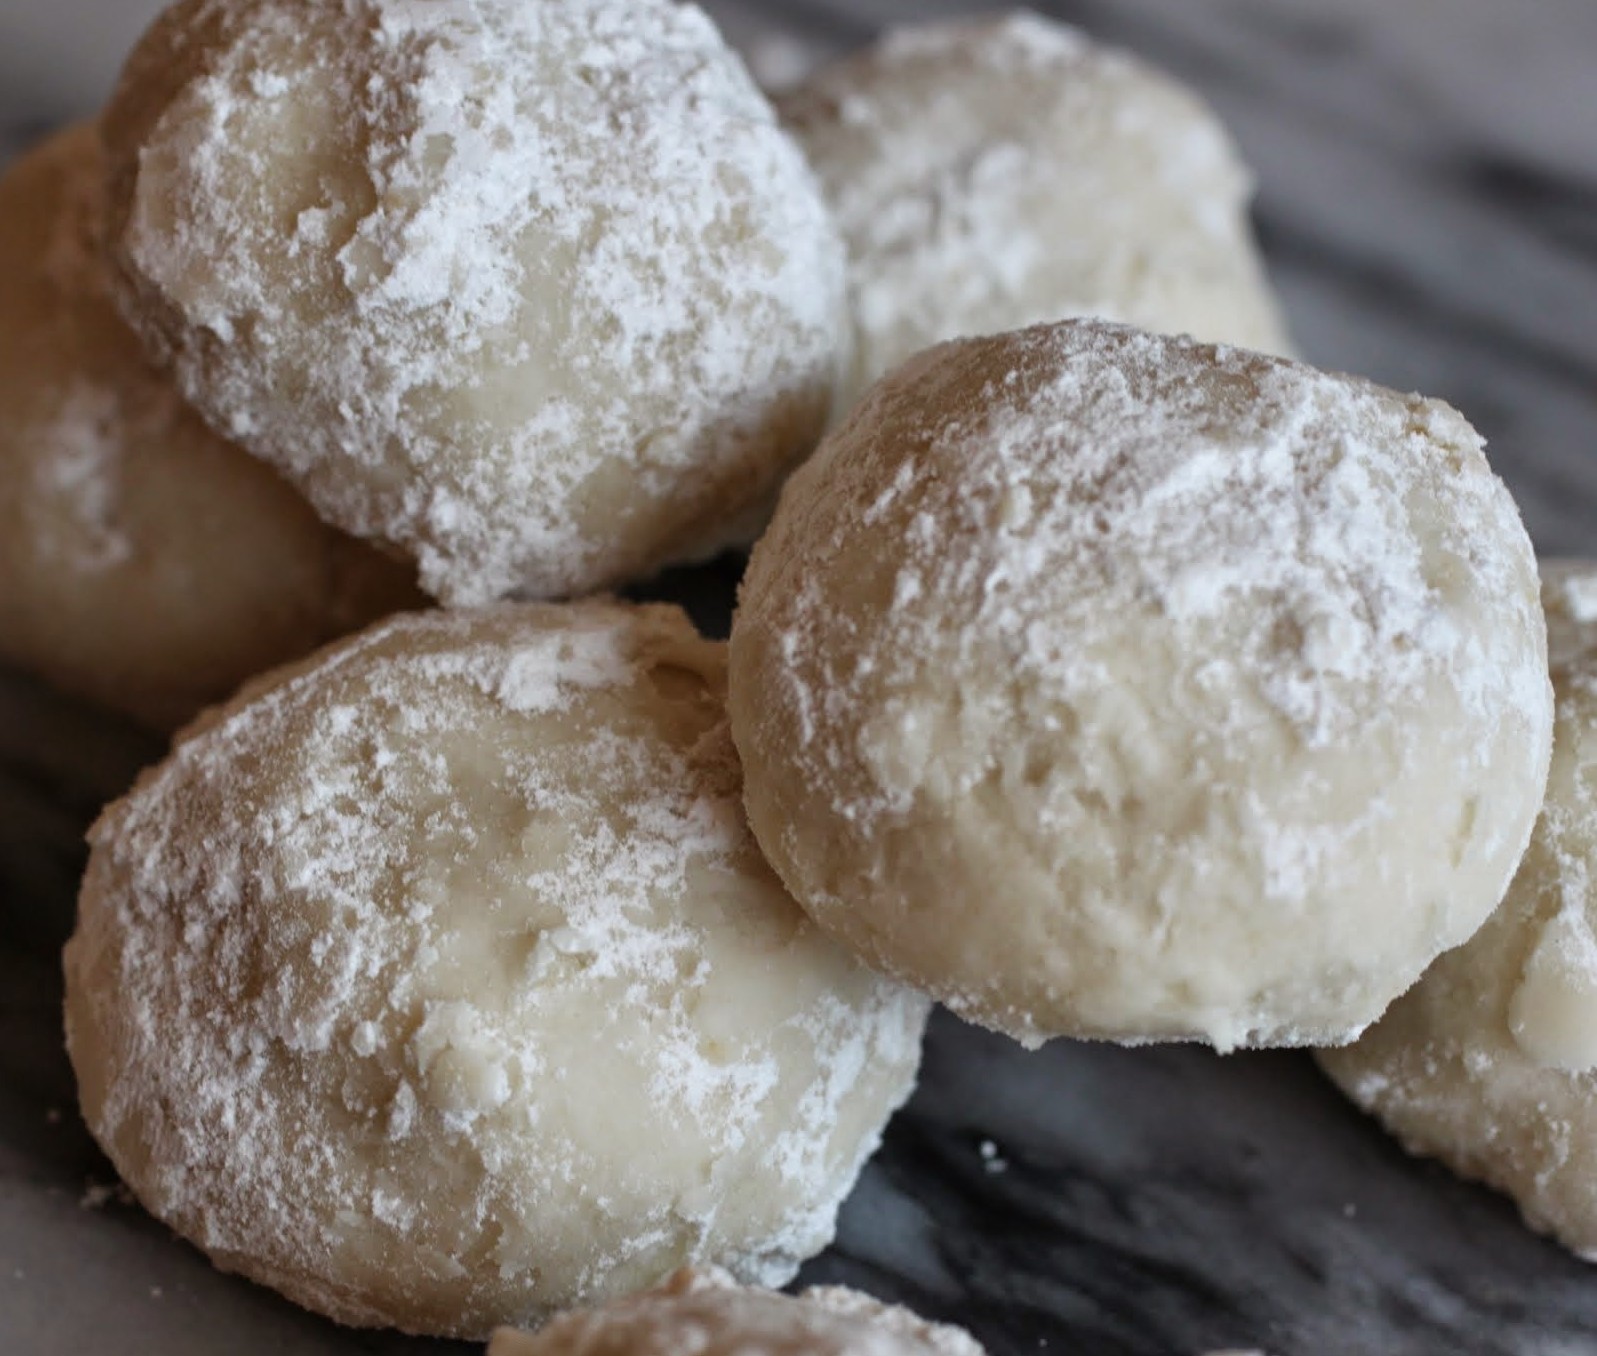
These are one of my favorites. They’re known alternately as Russian tea cakes, but to me, they’ll always be snowballs. It’s the perfect name for these sugary bites that quite literally melt in your mouth. This is one of those rare desserts without chocolate that I can’t resist. I sit down to eat one and wind up popping three.
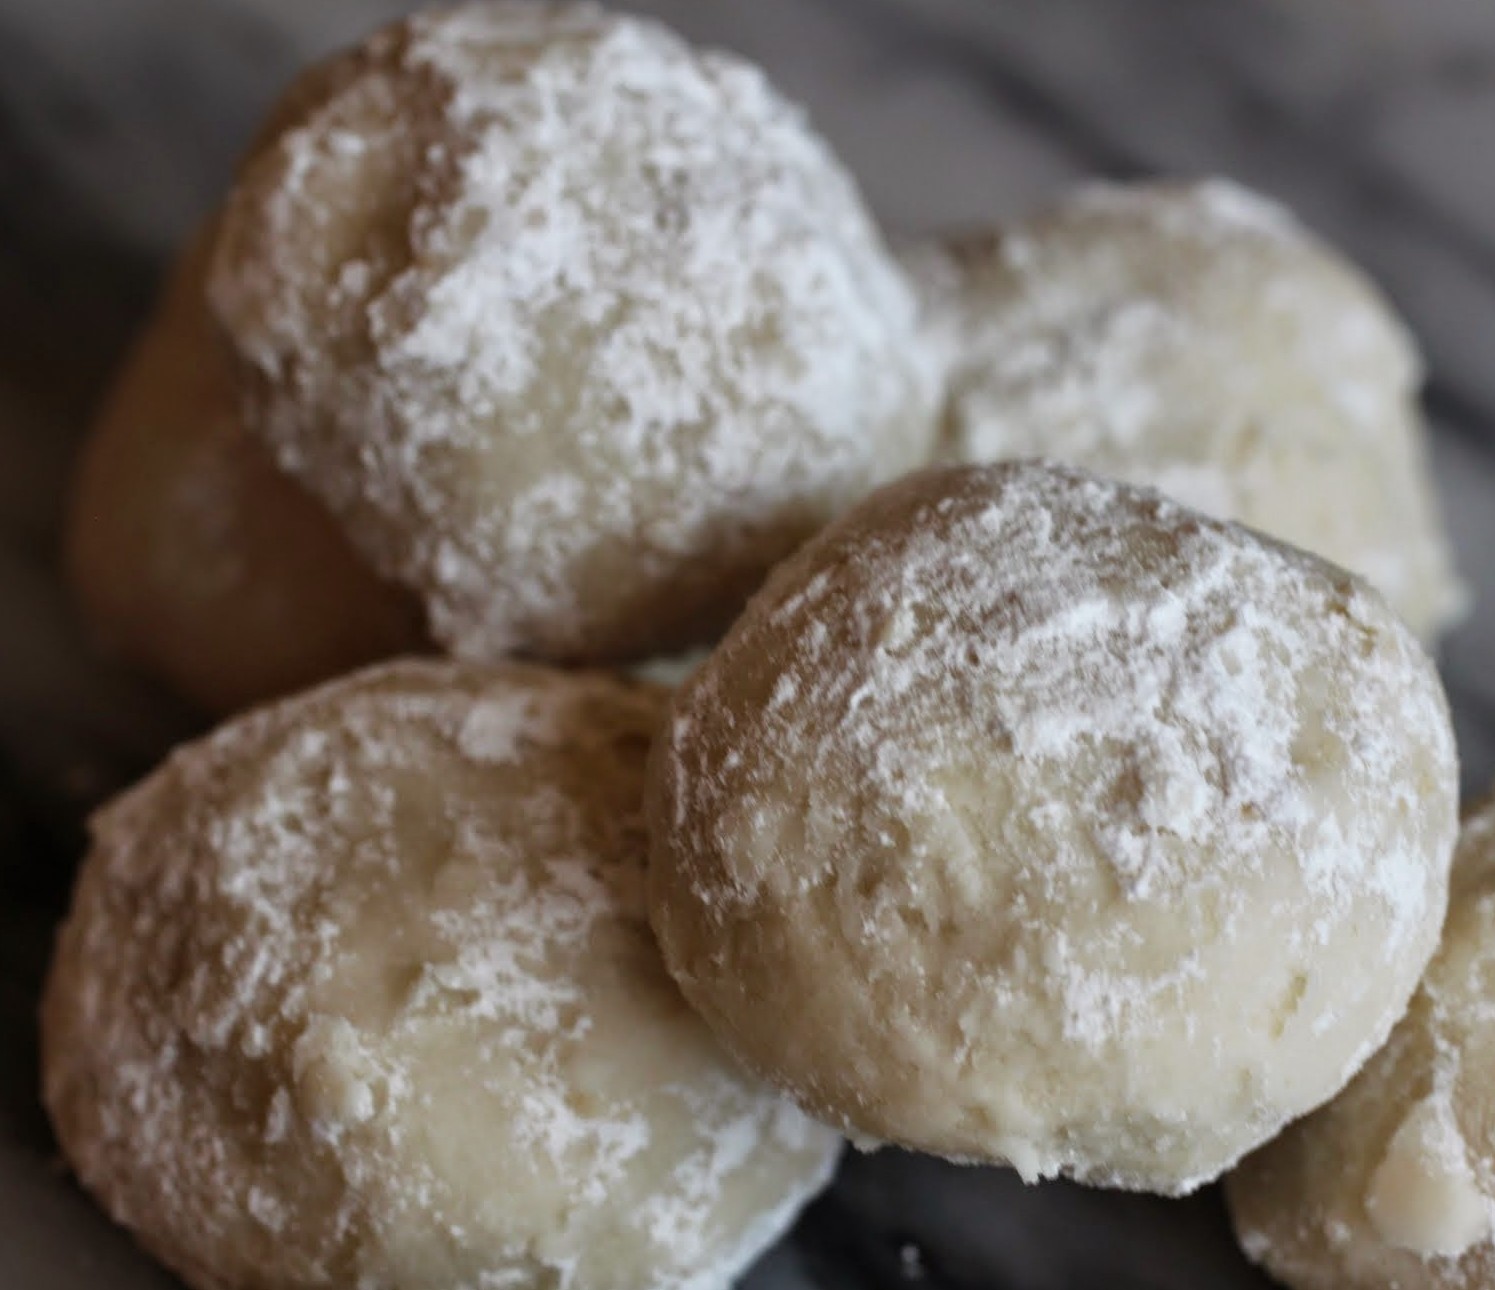
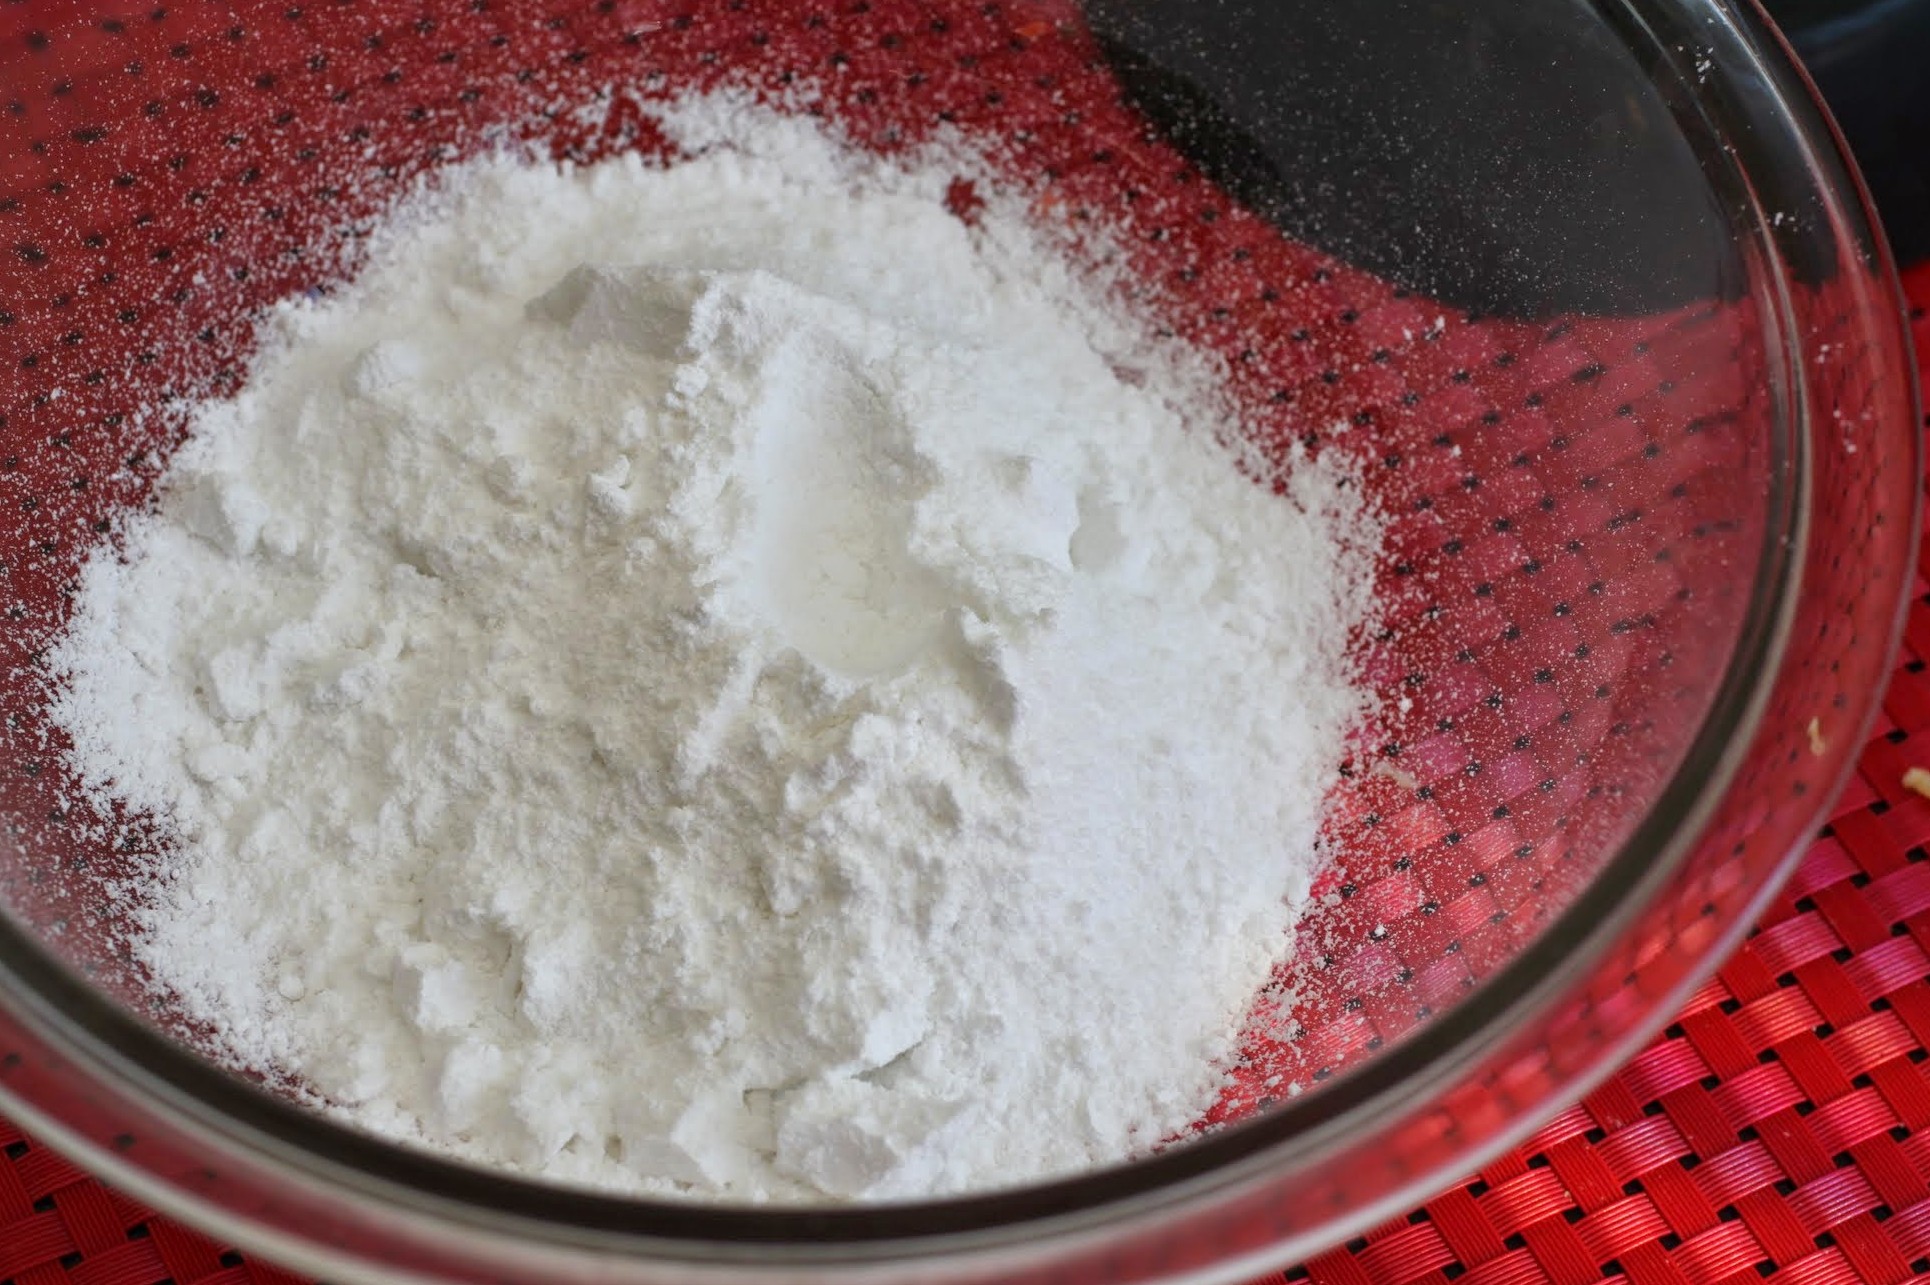
The secret behind a good snowball cookie is powdered sugar. It’s in the dough, which has the chemical effect of stopping the cookie from spreading out as it bakes (food nerd alert!). It also provides a crumbly texture that is, quite frankly, just as addictive as the taste.
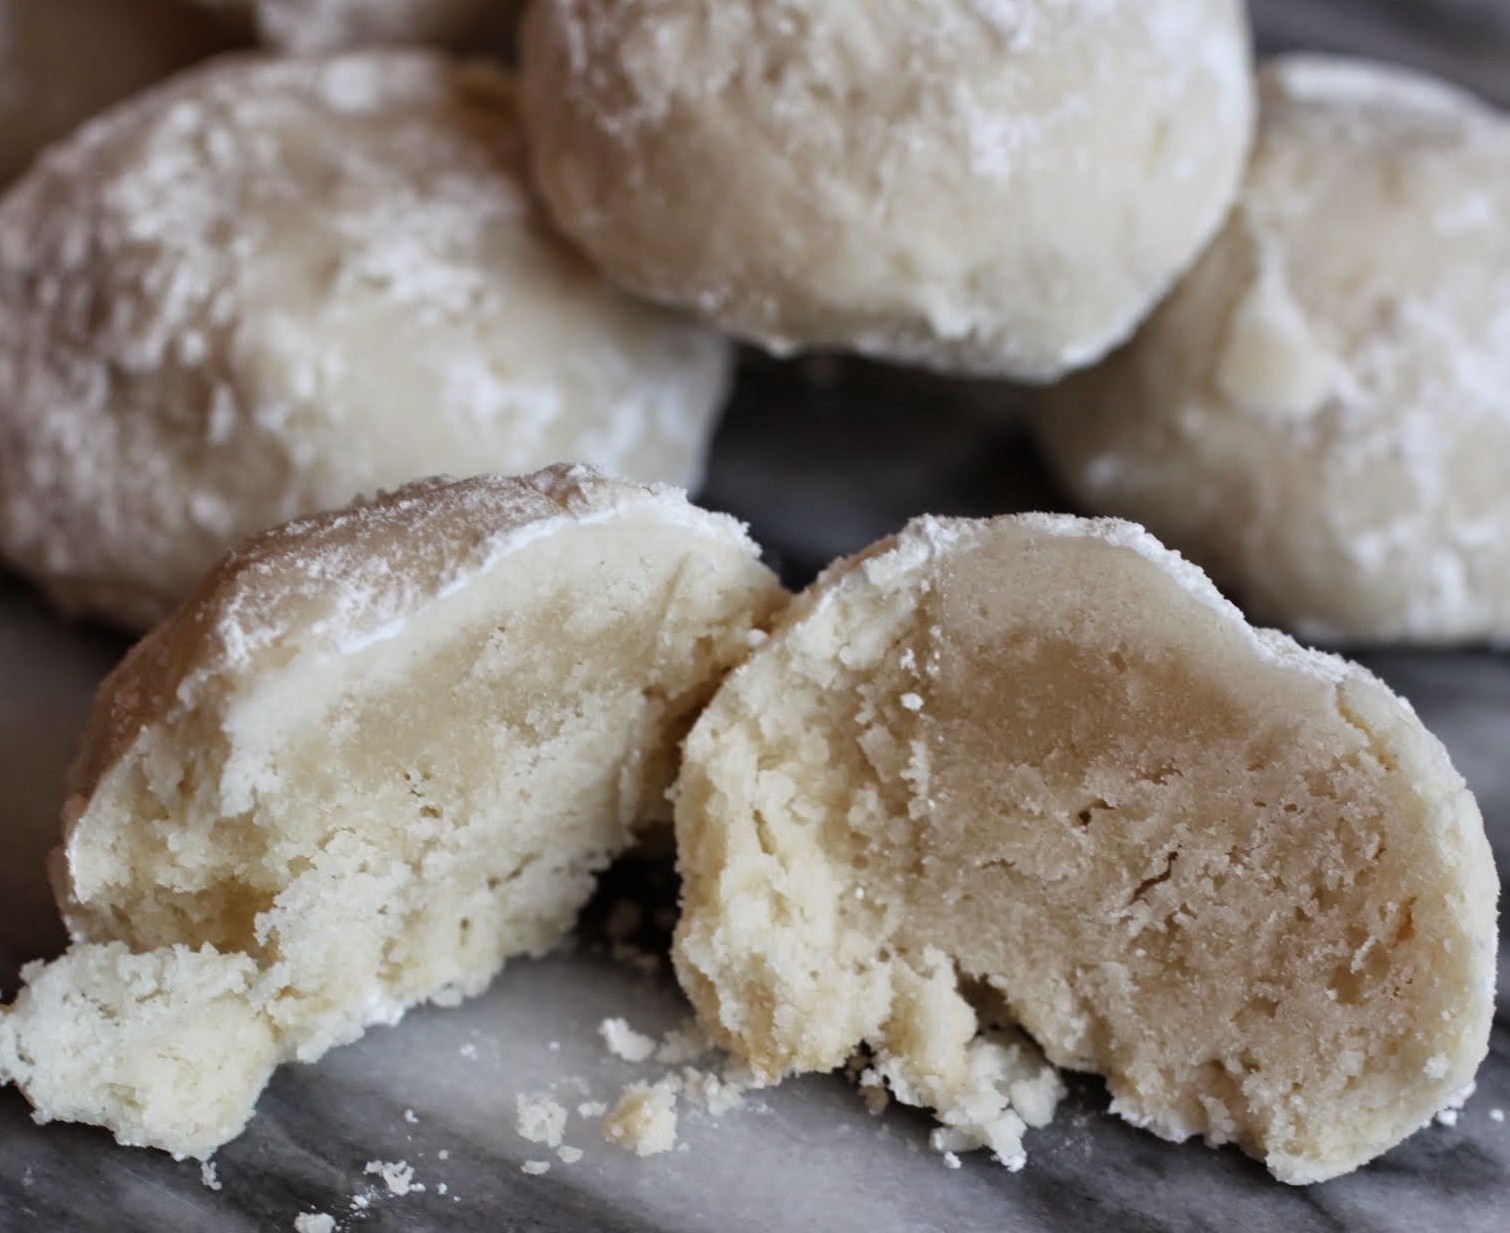
These cookies get two powdered sugar baths after baking as well to make sure they turn out super snowy. And then you can sit back and watch them disappear. I actually make these in small batches to prevent a snowball binge, but the recipe easily doubles or quadruples. With the proportions listed below, you’ll get about 14 snowballs.
Happy holidays, no matter what you’re celebrating, or not. I love the lights, the cheer, the optimism, the cookies. It’s a wonderful season!
Ingredients
Instructions
- Preheat the oven to 350. Line a cookie sheet with a silicone baking mat or parchment paper.
- In the bowl of a stand mixer, beat the butter, powdered sugar, and vanilla until fluffy. Add flour and salt and beat again until the dough forms.
- Roll the dough into tablespoon-sized balls and place on your cookie sheet about 2 inches apart. Bake for 10-12 minutes until the bottoms are just starting to brown.
- Wait 5 minutes and roll the cookies in the powdered sugar carefully. You don't want to press down, or the cookies will crumble. Wait a few minutes, and then roll them a second time.
- Cool completely. Store in an airtight container.
]]>