When that happens, I head to bakeries or farmers’ markets. At both, there are people displaying their wares and their creativity. I need both, believe me!
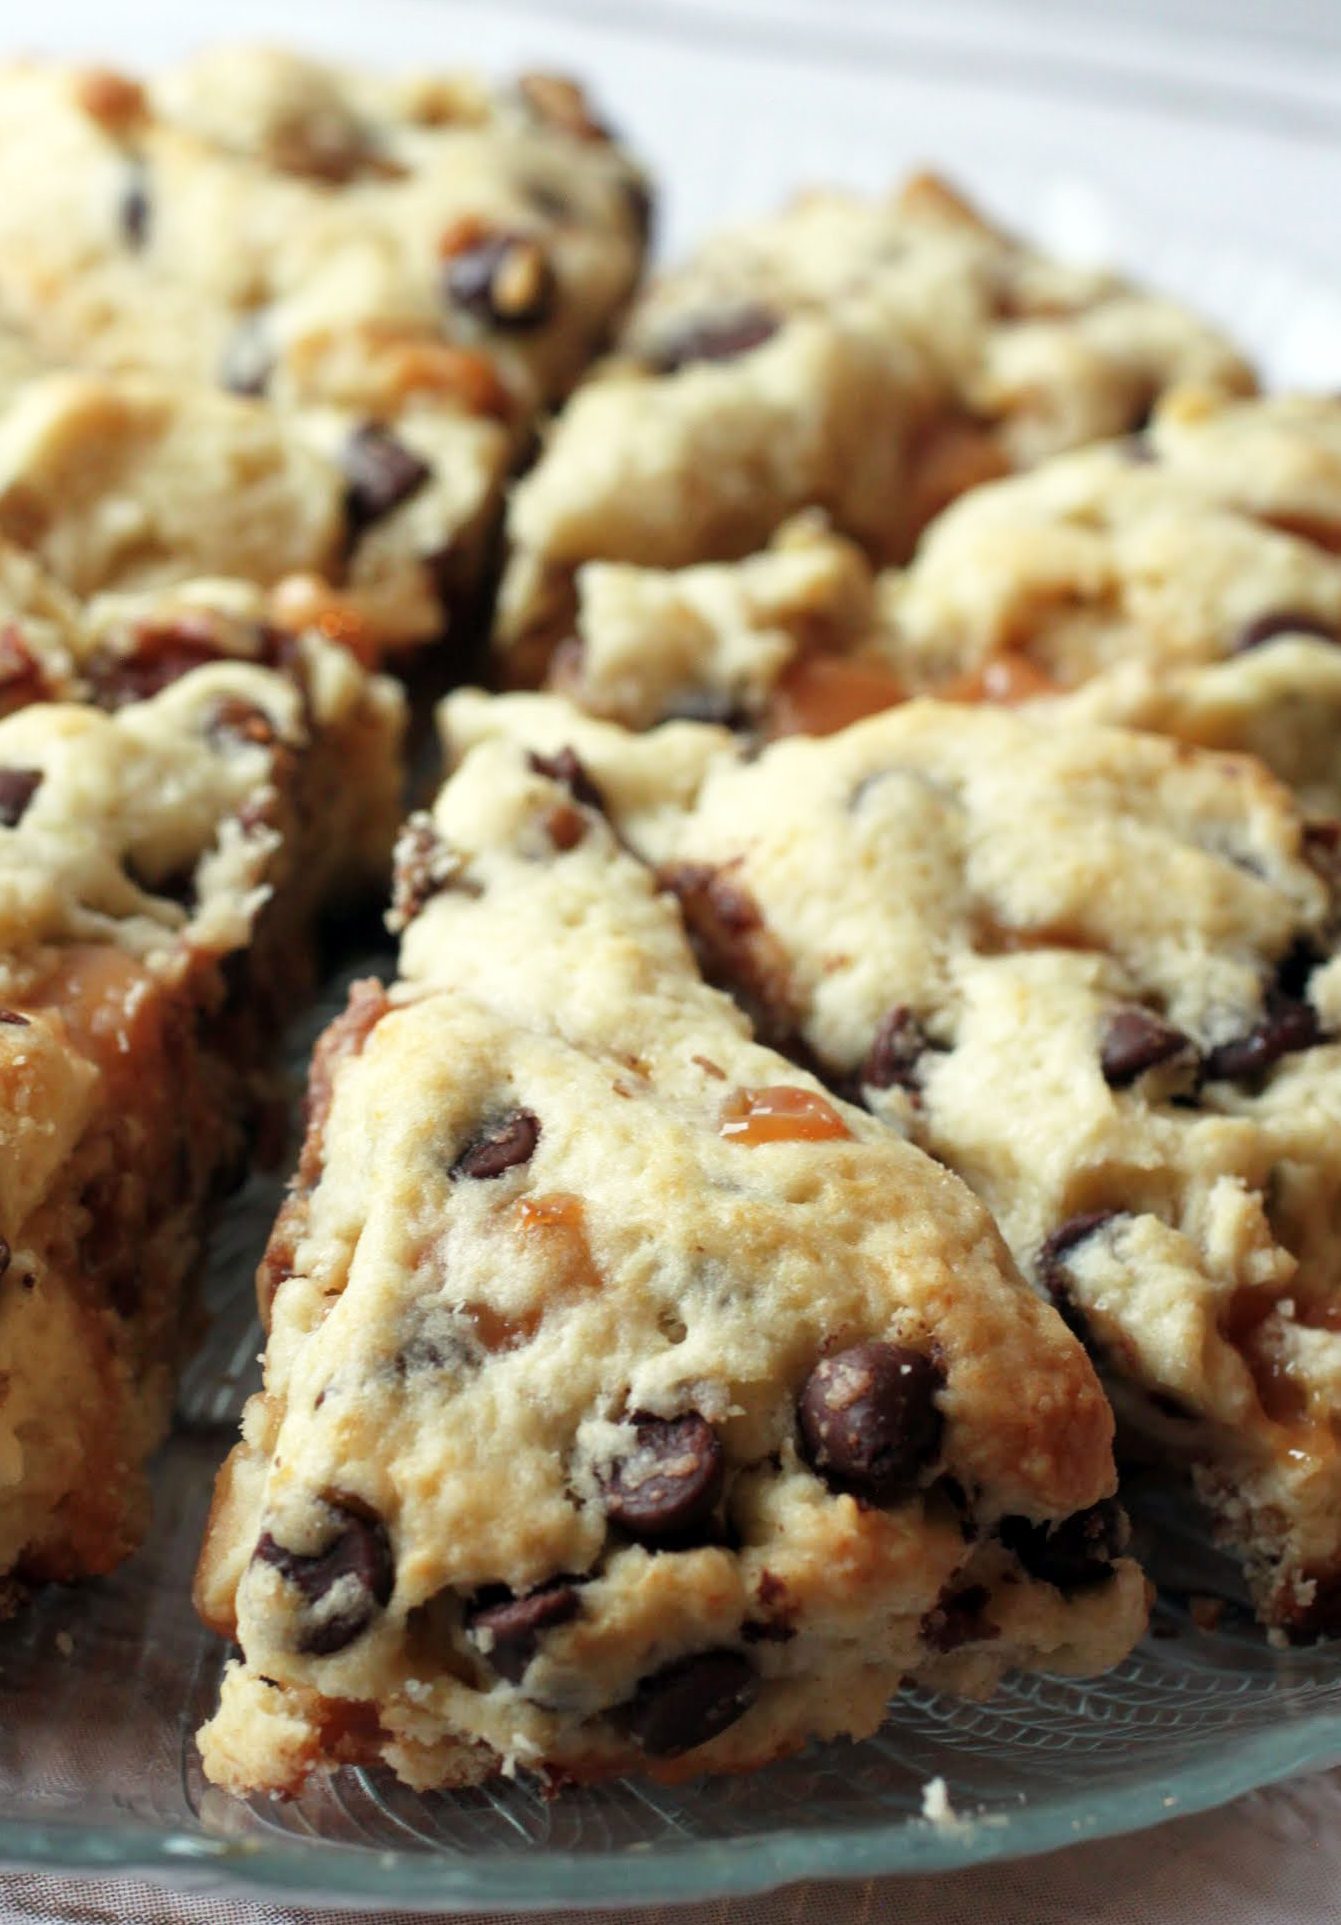
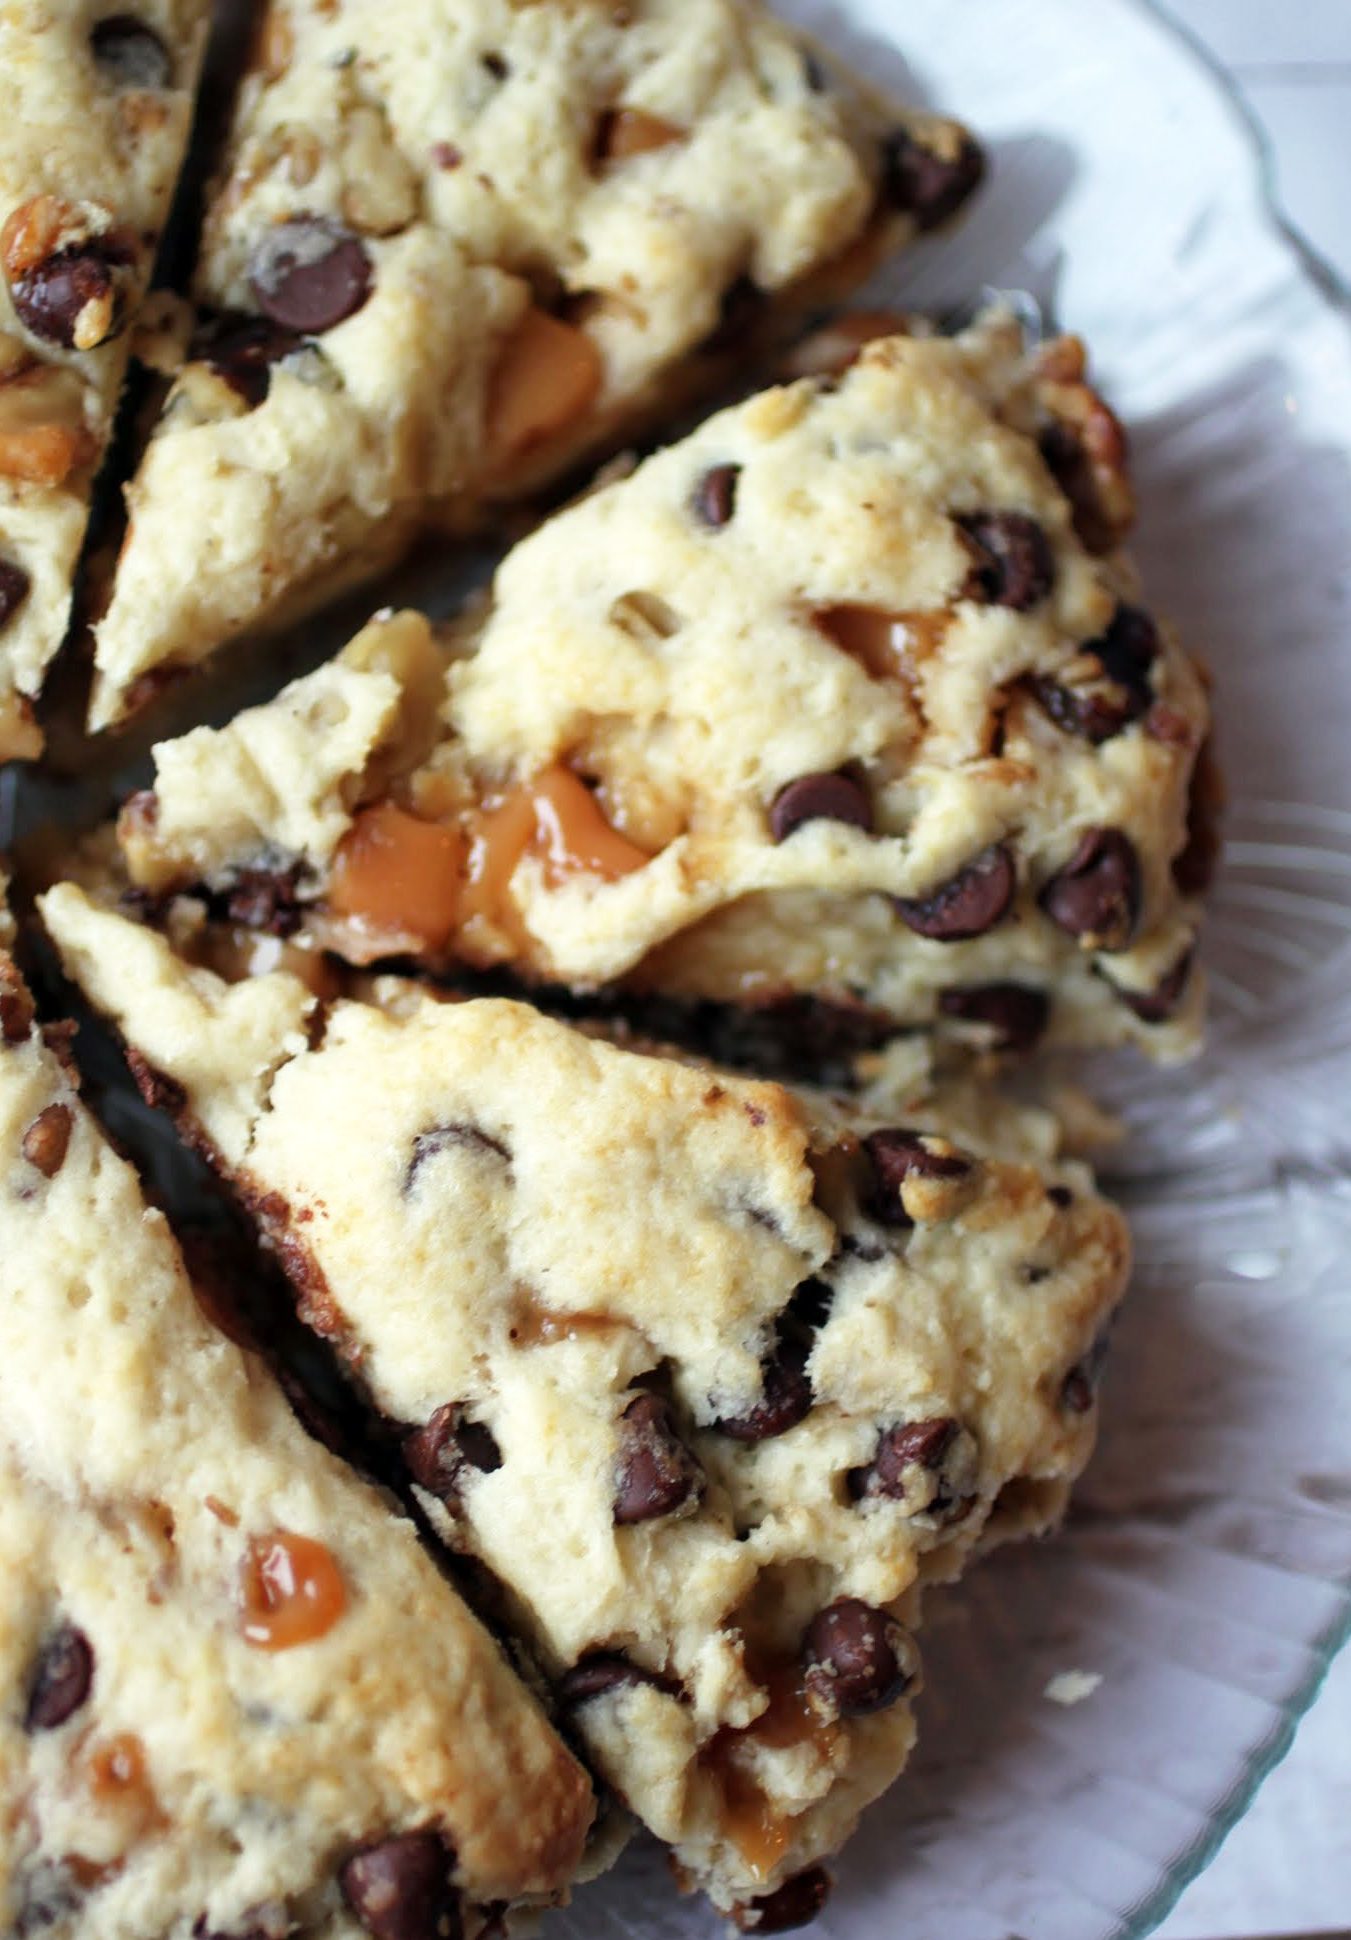
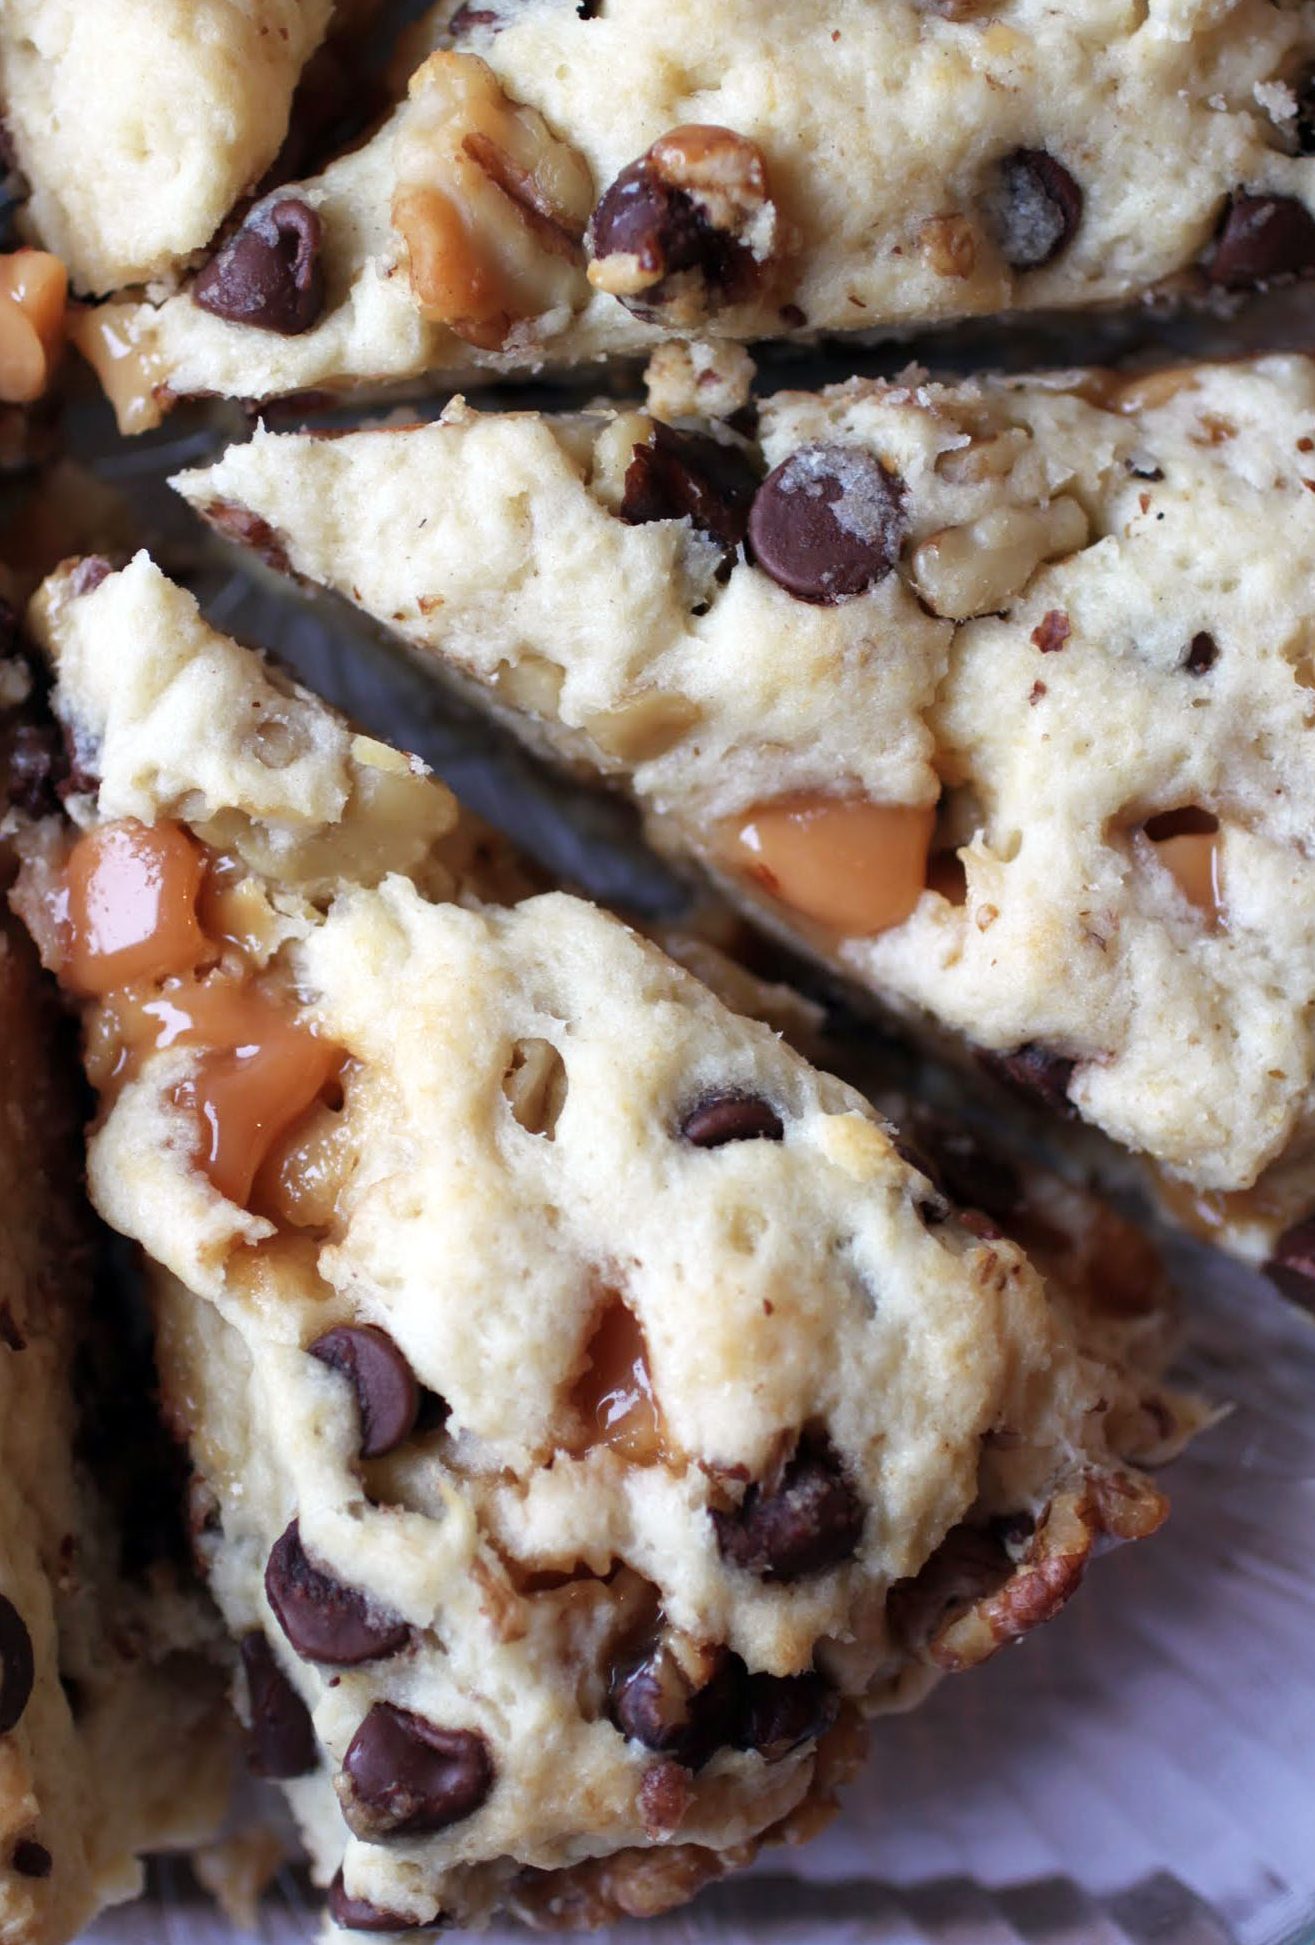
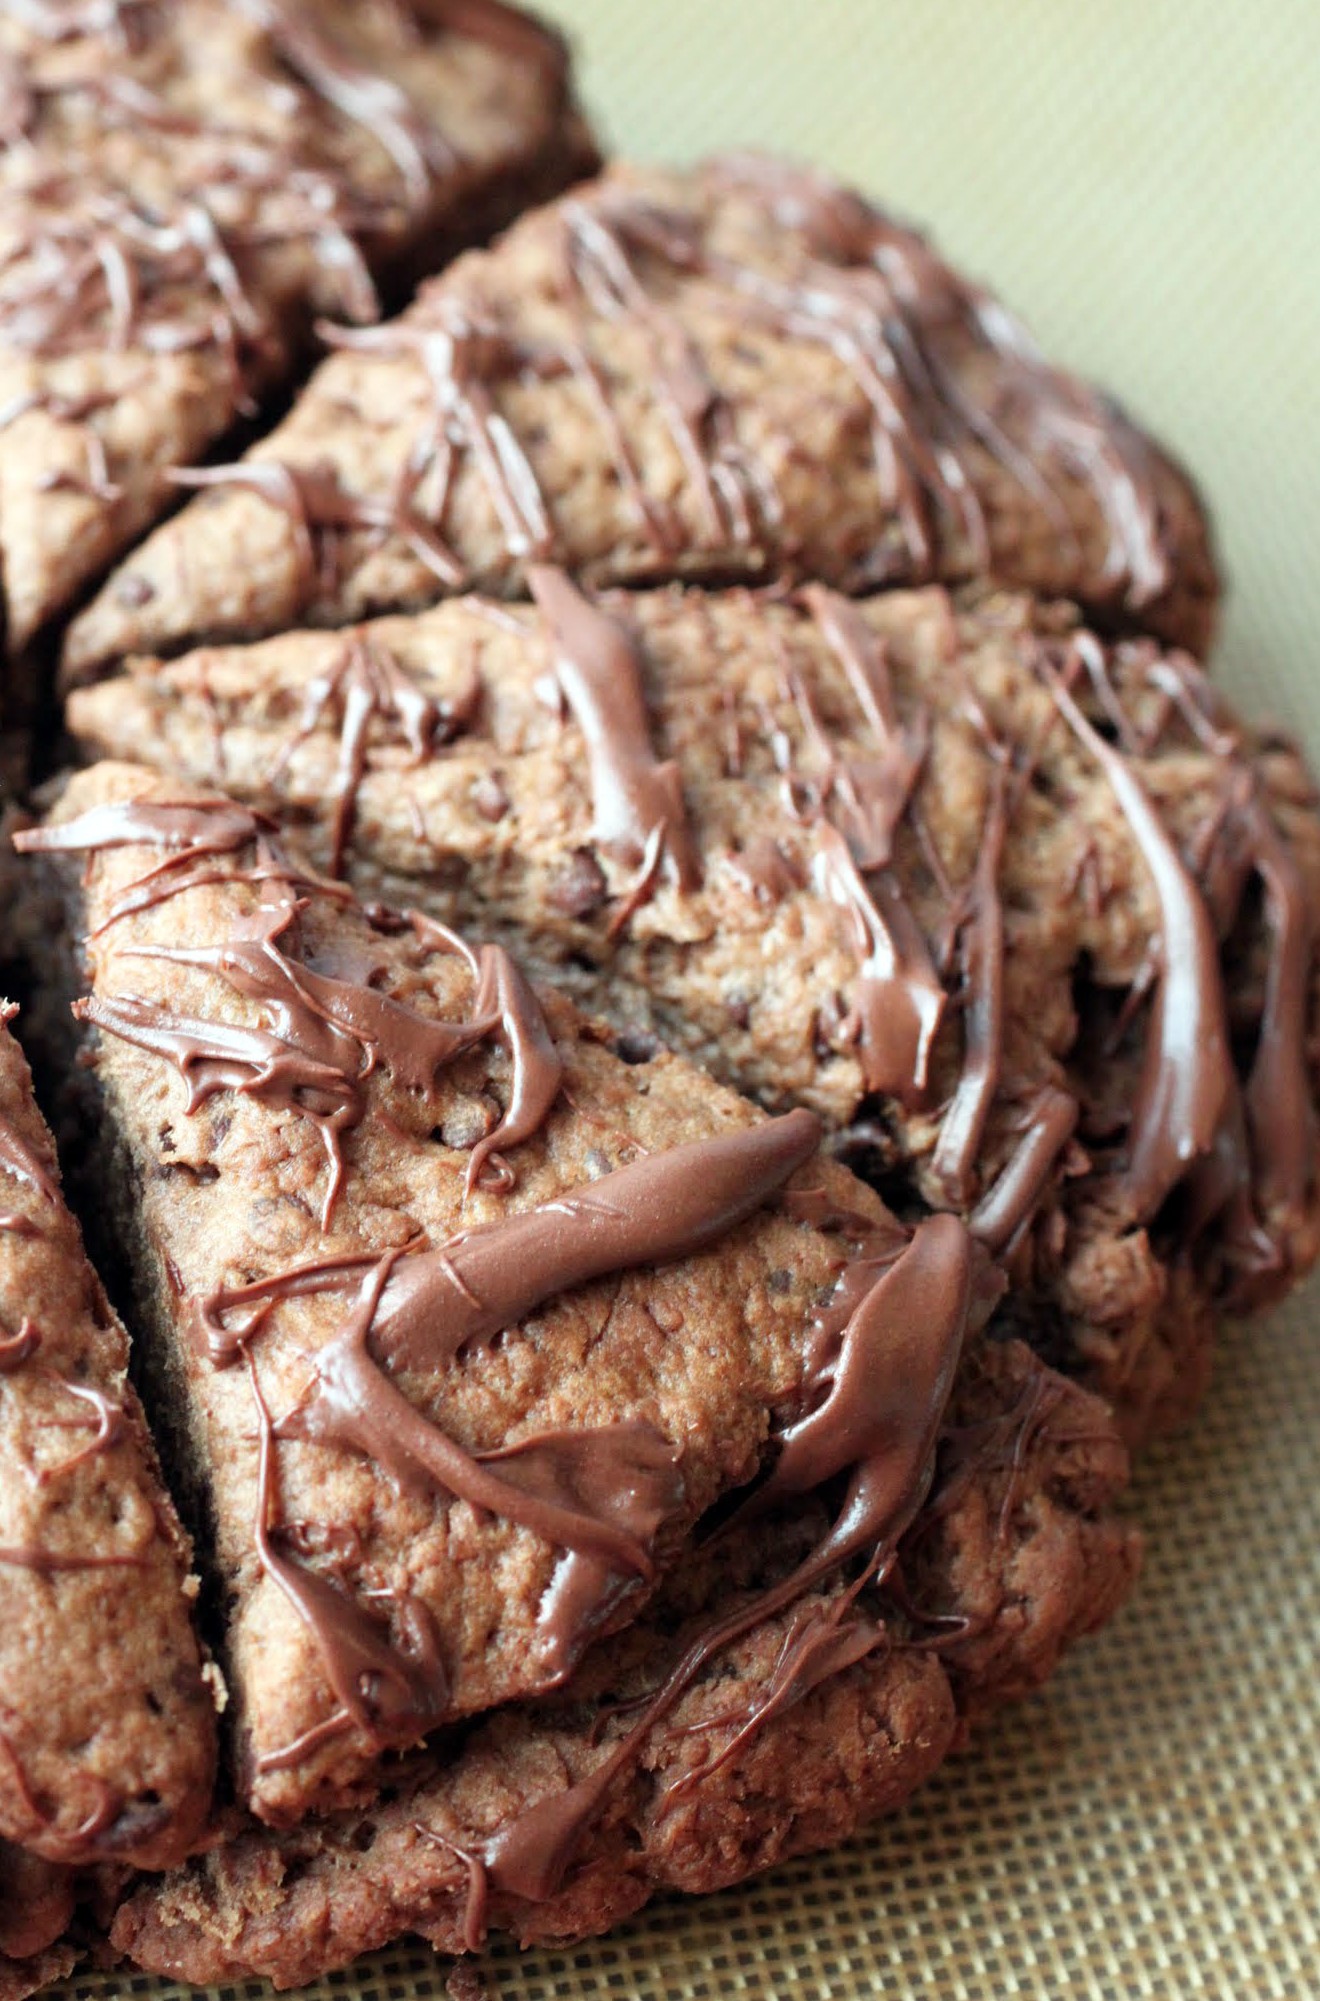
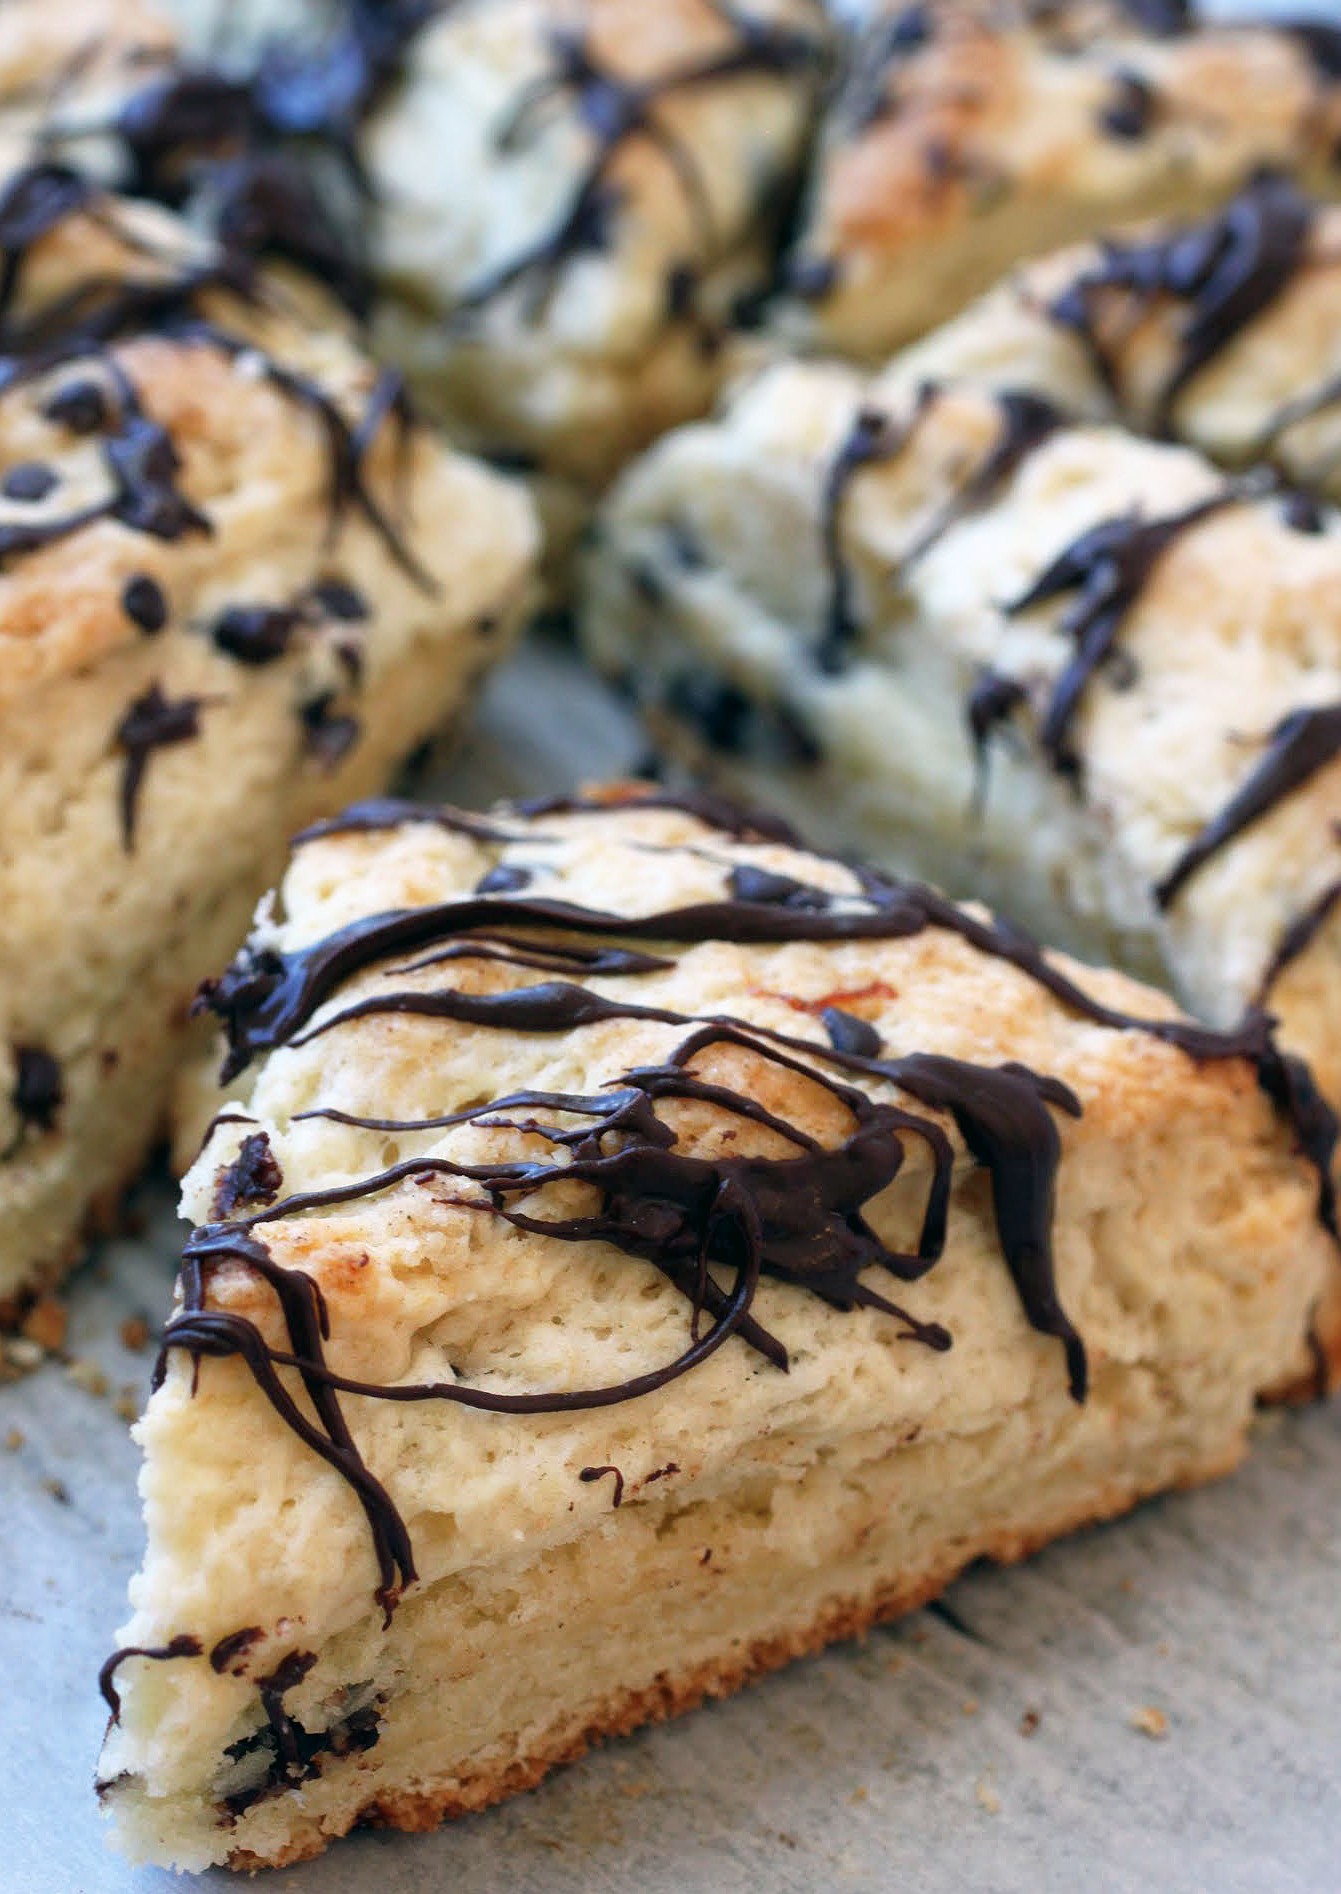
At the market a few weeks ago, a woman was selling turtle scones. The second I saw them, I knew I had to bake my own. Here they are. Could anyone not want these for breakfast? Nope, didn’t think so!
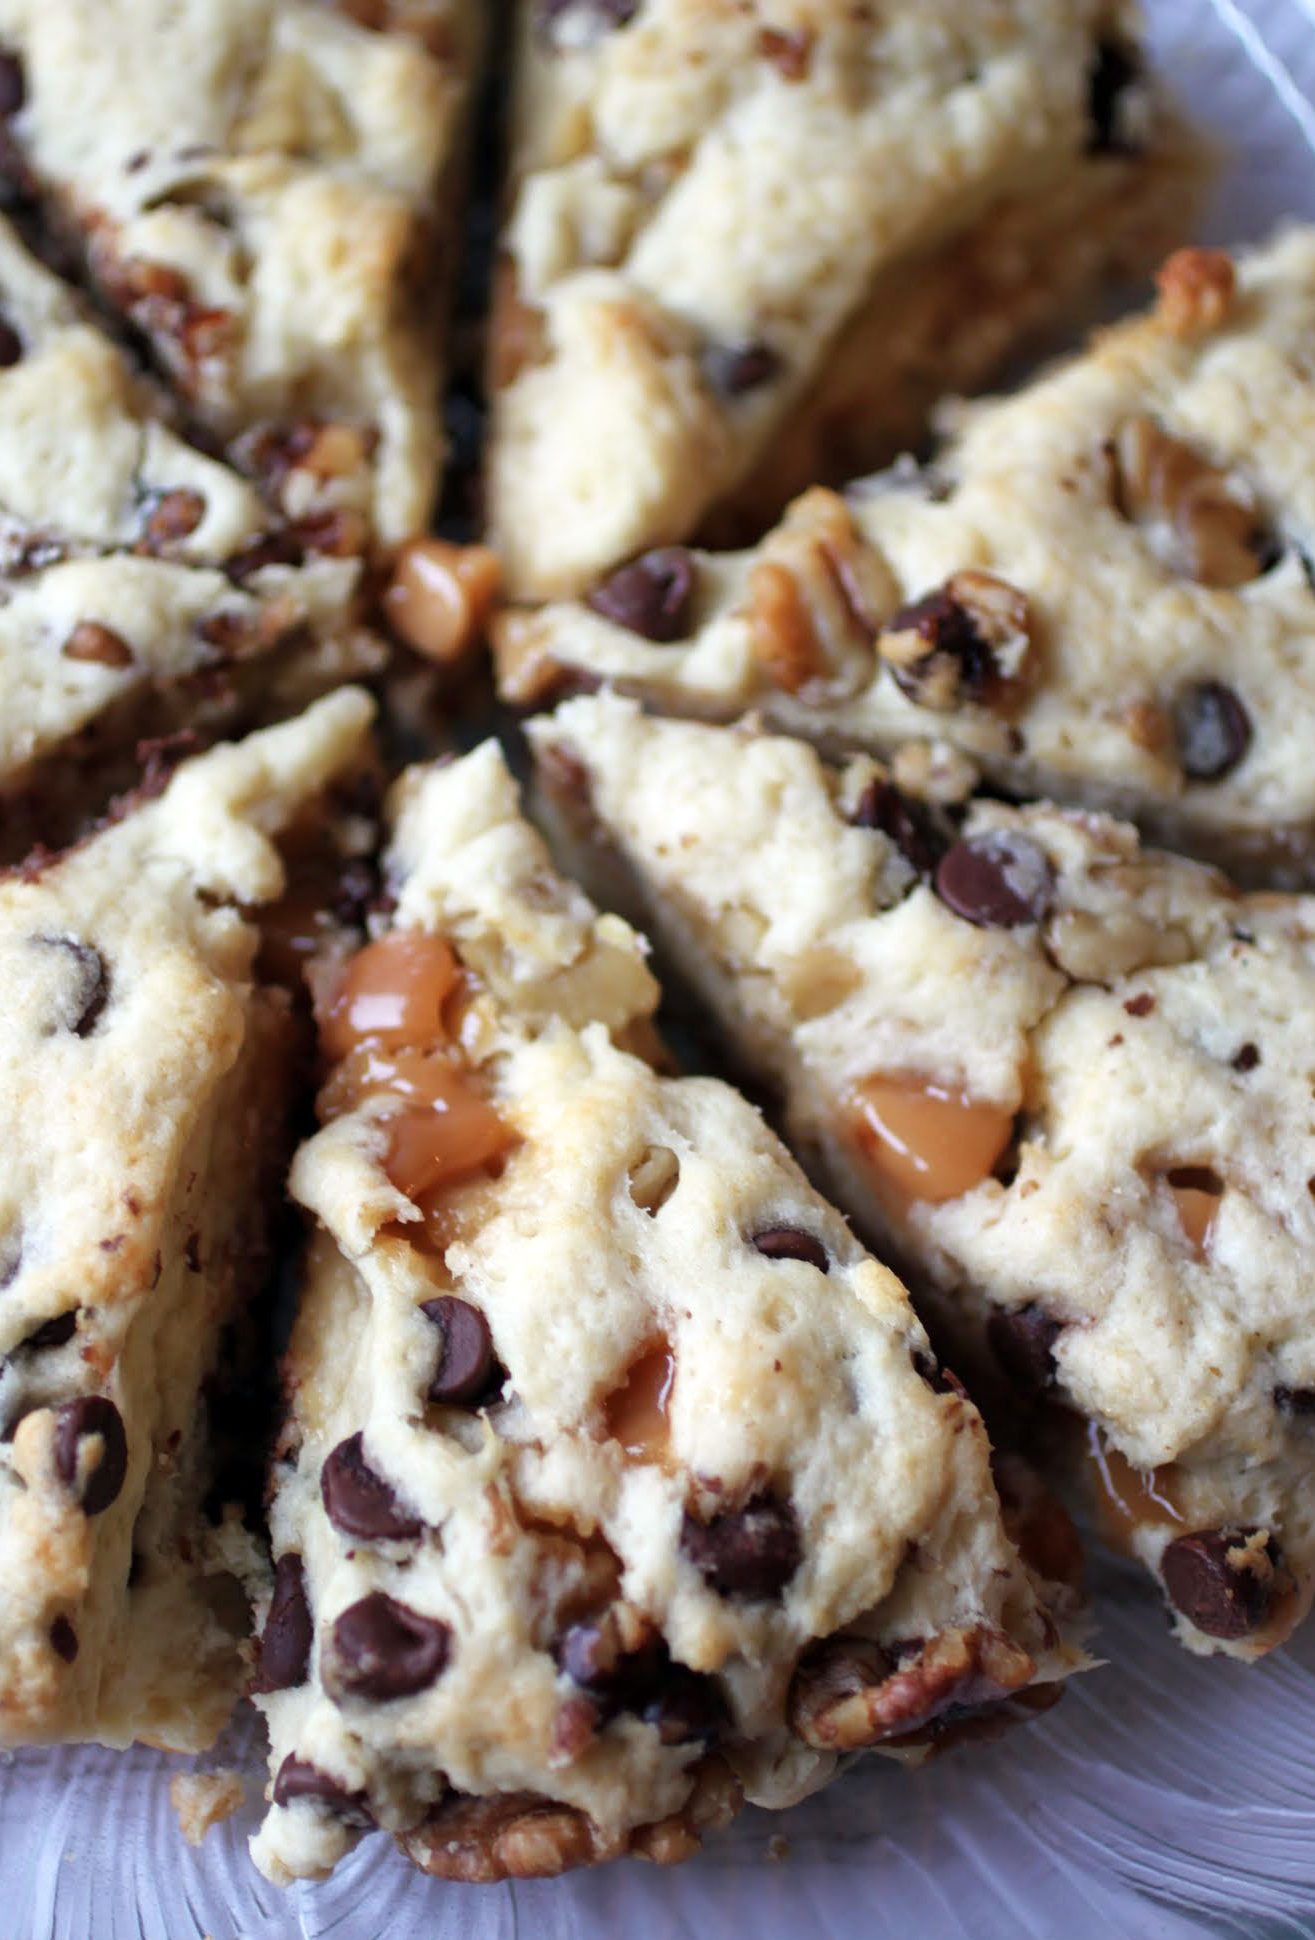
I’ve had a soft spot for Turtles (the candy, not the animal) since I was a kid. My dad would bring my mom a box every Valentine’s Day, and she would always share with me. How great is that? A mom sharing her special candy with her kids is true love. I’ve loved Turtles ever since.
The animal I’m less certain about. Turtles live for a looooong time. Sea turtles live to be at least 100, and those little ones you buy in the pet store live to about 30. I’m not sure I could ever make that long a commitment. Imagine how attached I’d get to my turtle, and how I’d feel when he passed. If he passed before me, that is. They can really hold on.
Still, turtles are cute. I remember this one from my zoology class in high school that somehow got into a duct and crawled all the way through and into our vice principal’s office. Oh, the screams. That was such a good day.
These turtle scones will only cause screams of joy, I guarantee you. I promise!

The base of these scones is cream, which makes them light and crumbly in the best way. Chopped caramels, pecans (or walnuts) and chocolate chips get right in there for a true breakfast pastry party. No better way to start your day that I’ve ever seen!
No matter what kind of turtle makes your day, these scones are definitely the way to go on this particular day. Hope you have a great Wednesday!
Ingredients
Instructions
- Preheat the oven to 400. Line a cookie sheet with a silicone baking mat or parchment paper. Set aside.
- In a medium-sized bowl, combine the flour, sugar, baking powder and salt. Add the cold butter and using the tips of your fingers, pinch the butter into the dry mixture until crumbs of varying sizes form.
- Add the egg and cream, using a fork to stir them in until a dough forms. You can use your hands or the fork to knead lightly until the dough is fully formed.
- Gently mix in the caramels, chocolate chips, and the pecans with your hands.
- Turn the dough out onto your prepared cookie sheet, pressing it into a circle that is about six inches in diameter.
- Cut the dough into six wedges. Bake for around 20 minutes until the scones are golden.
- Cool the scones until the chocolate hardens. Serve or store in an airtight container.
]]>
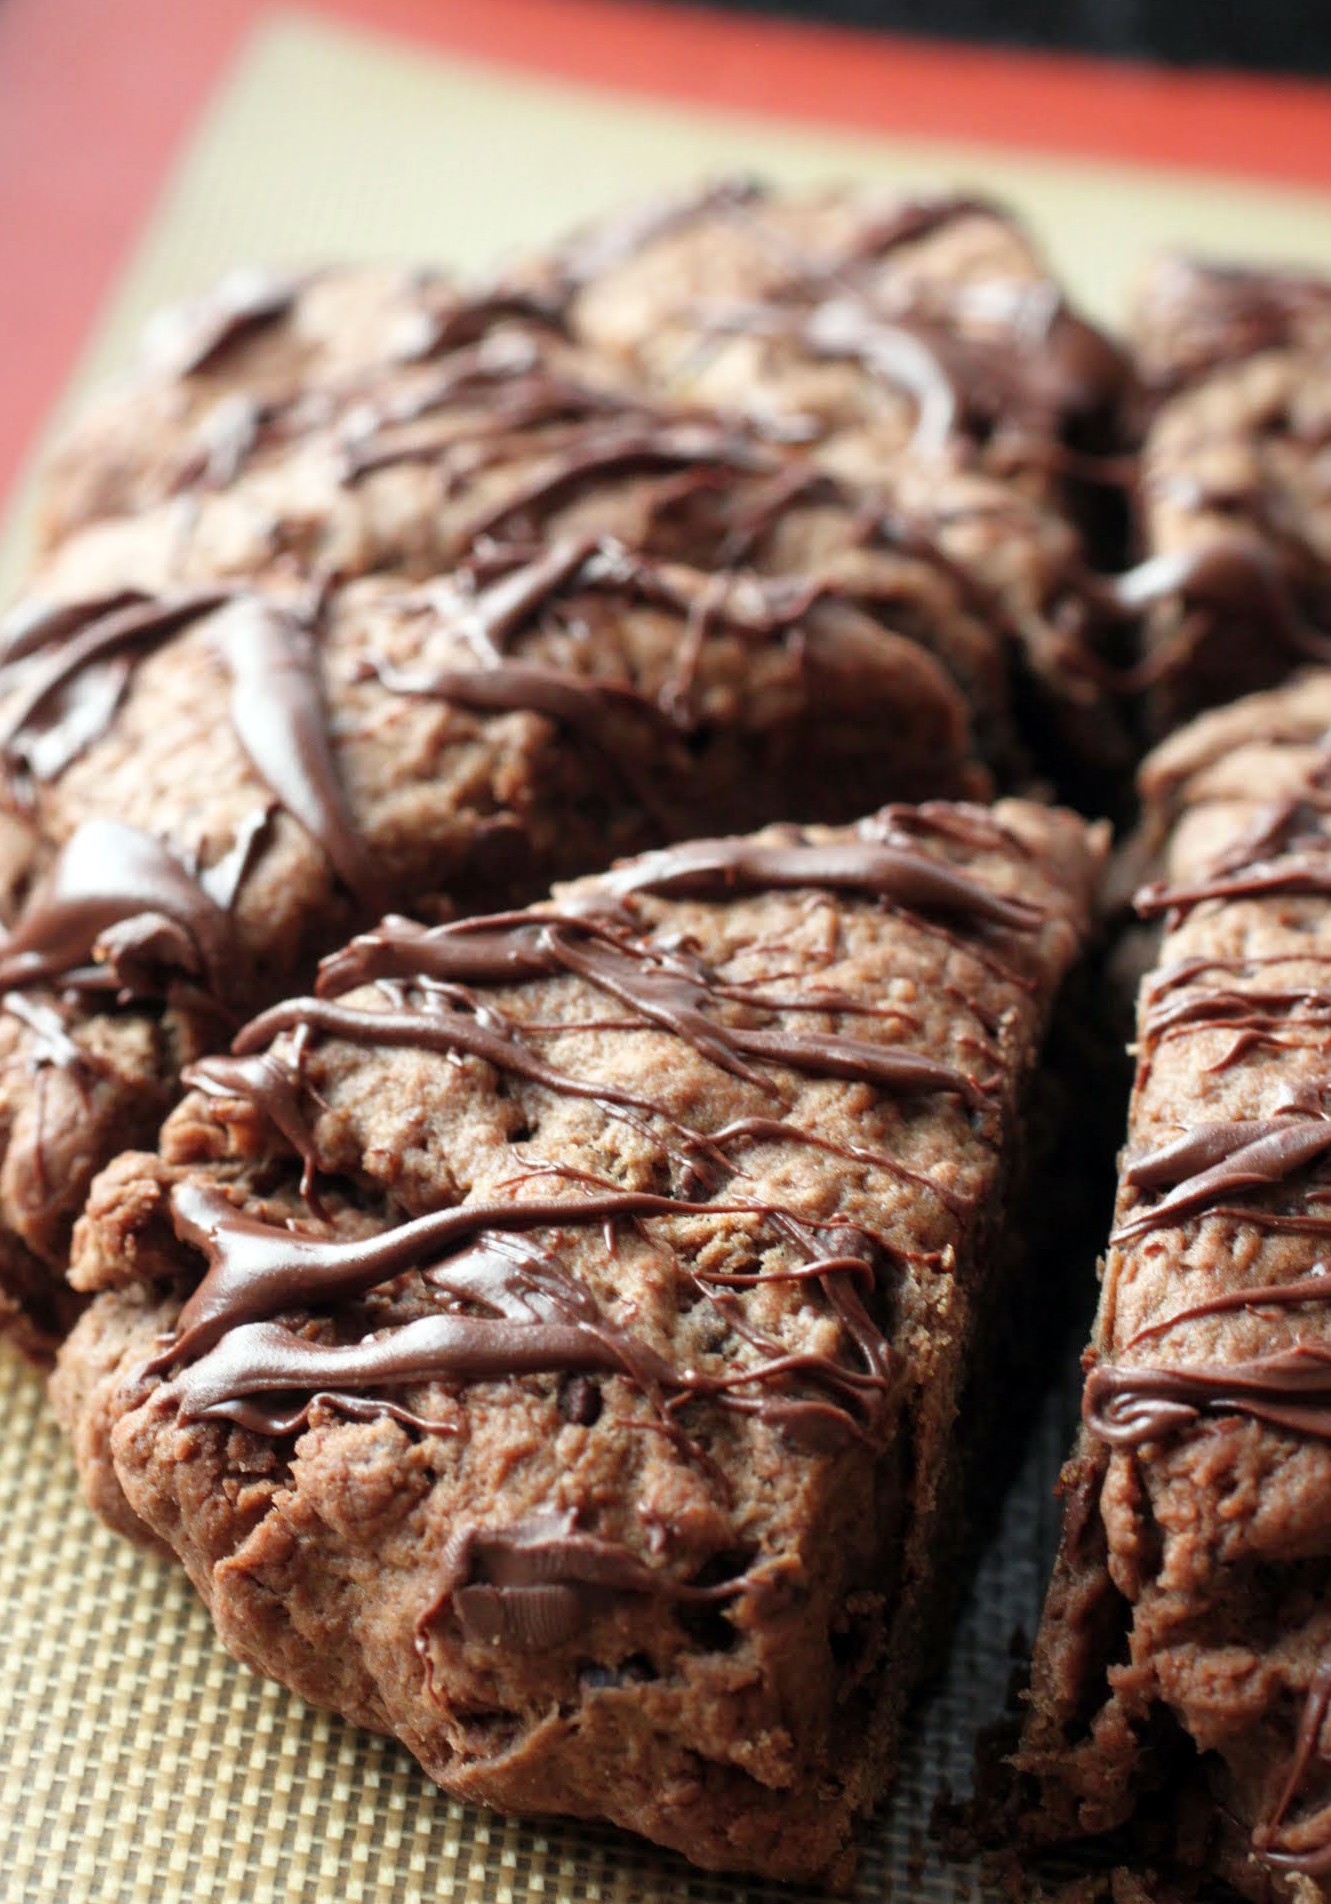
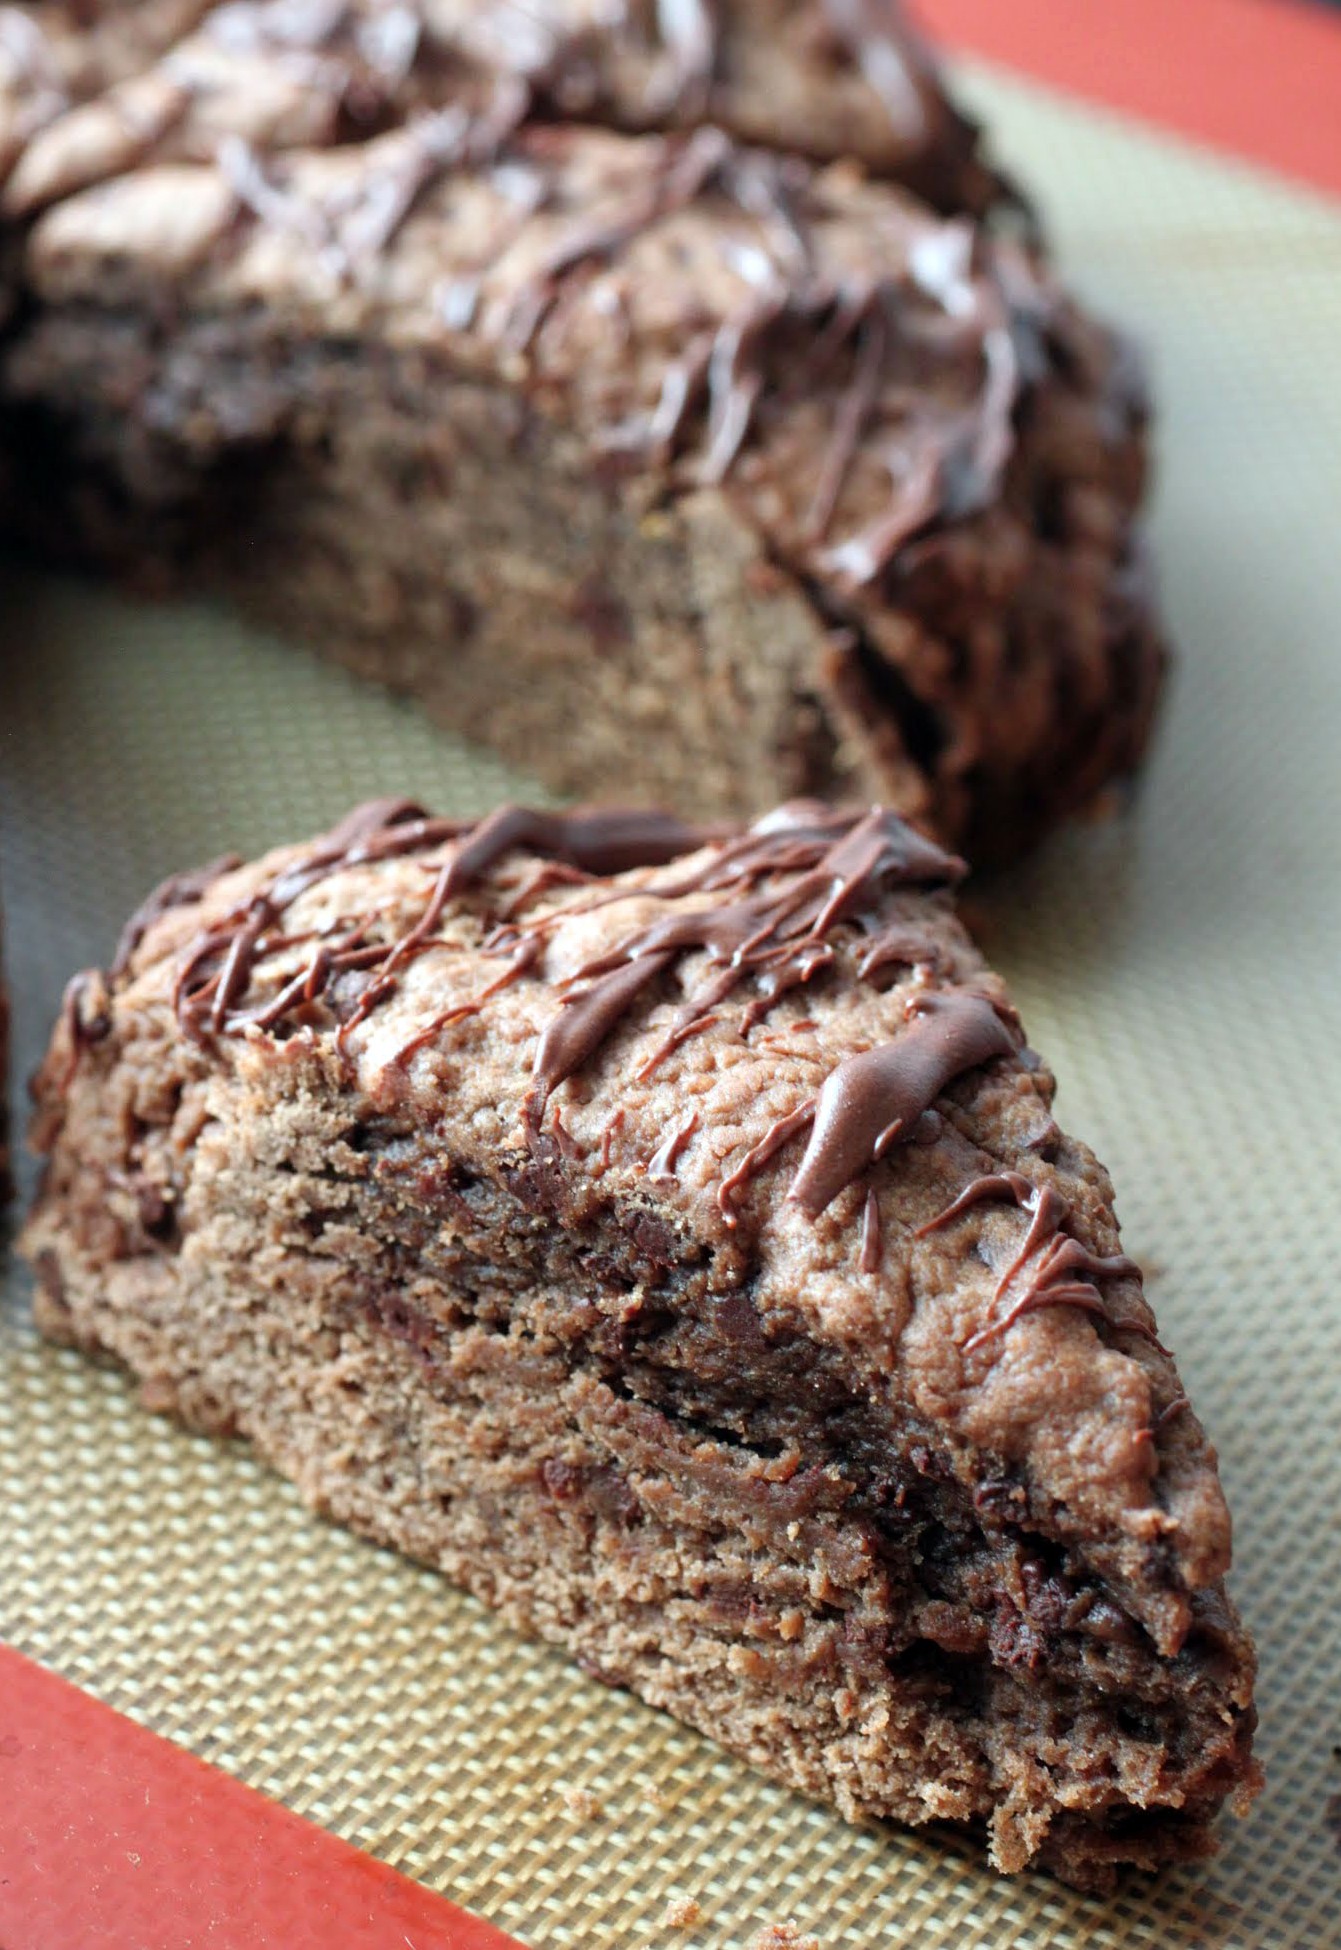
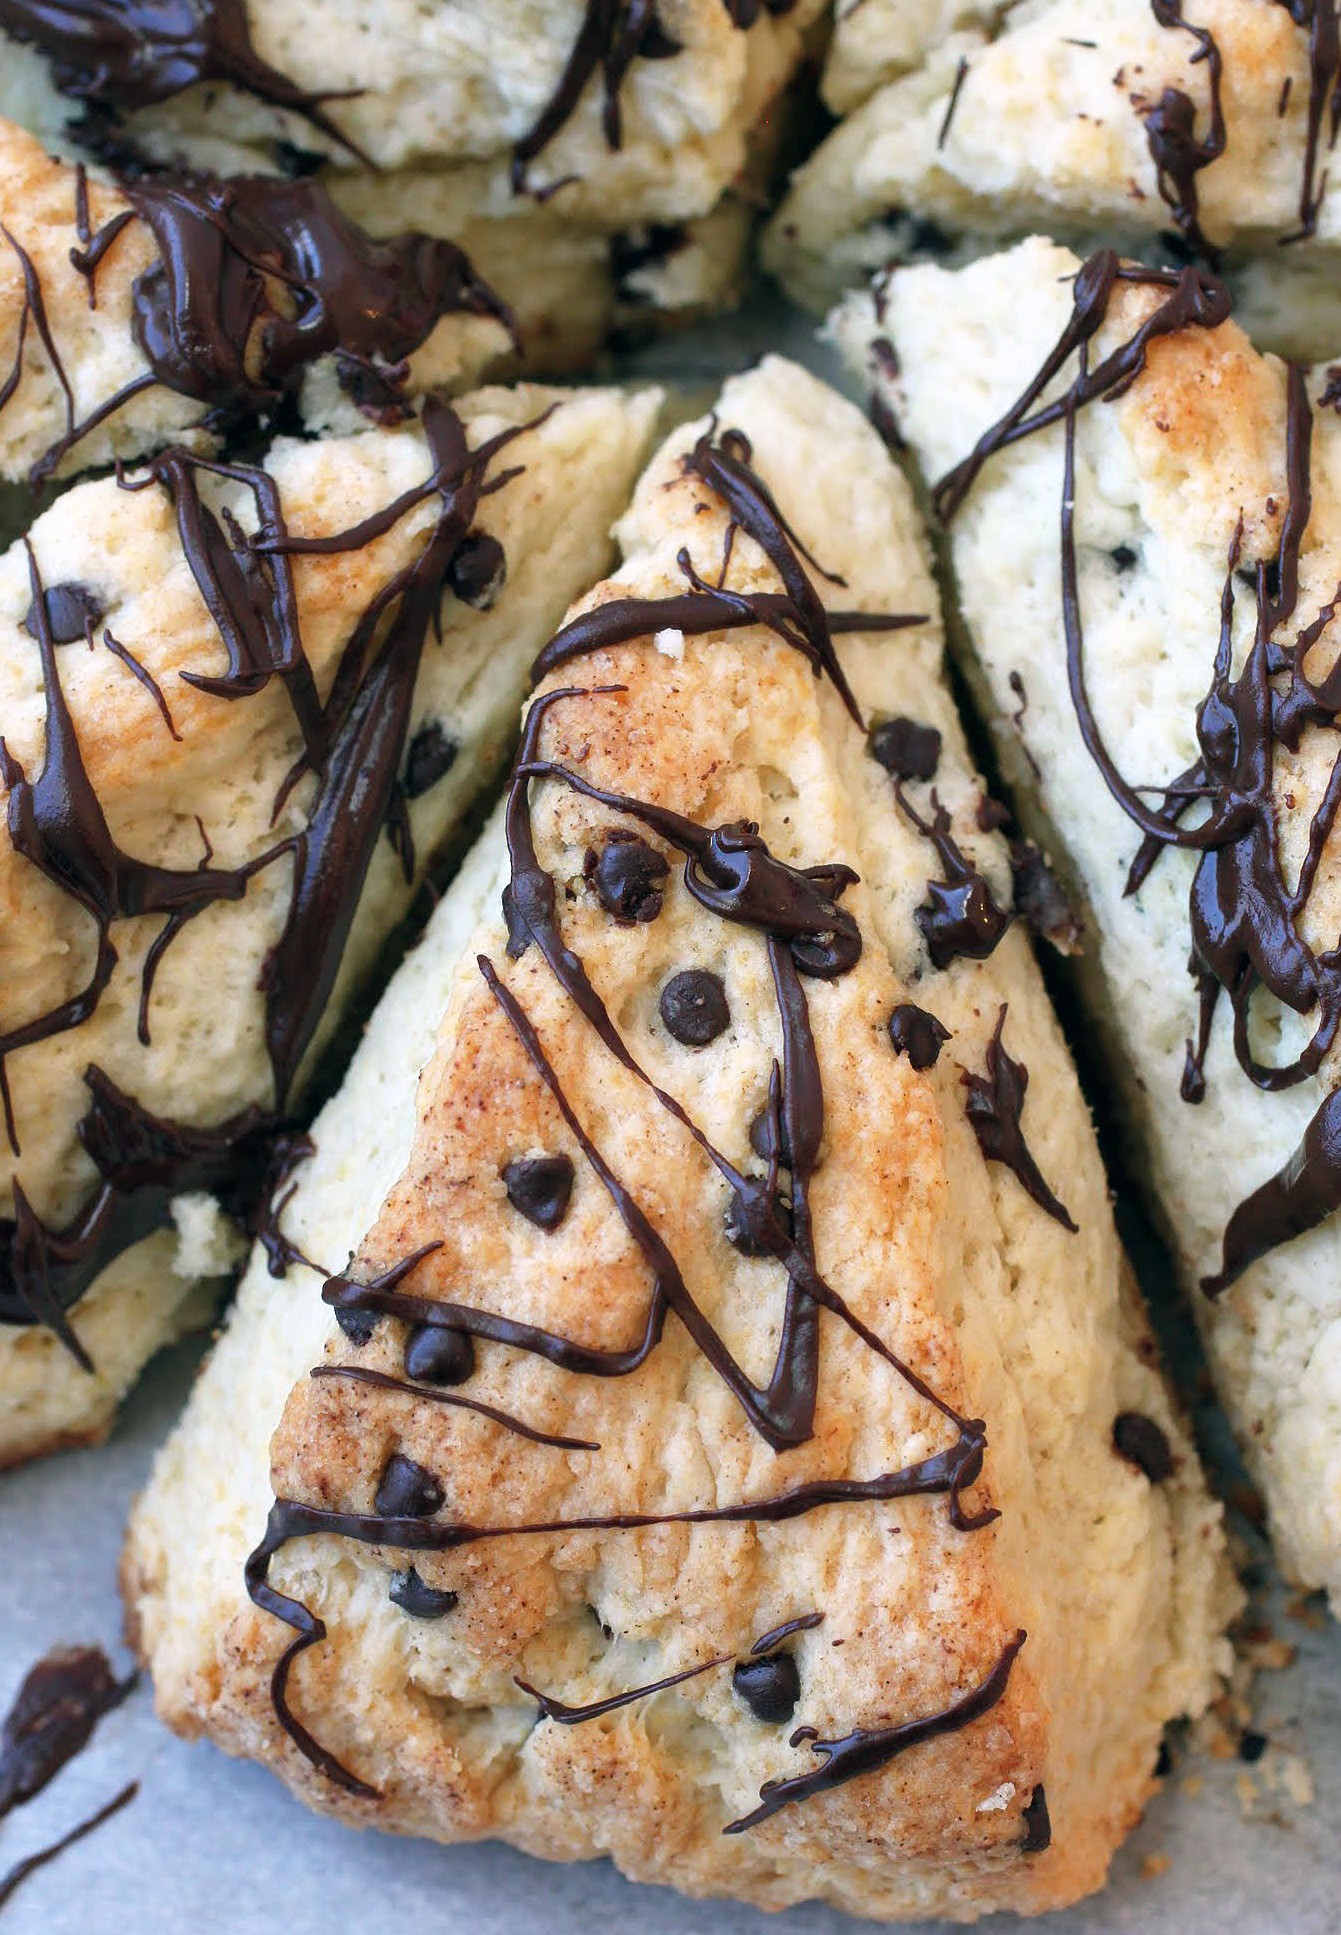
Perhaps my British friends don’t do triple chocolate scones often, if ever. But there’s a first time for everything, and these deserve a lot of attention.
The base for these scones is cream, which works with butter to make these light as a feather while still full of rich chocolate flavor. Maybe people are out barbecuing this Labor Day weekend, but we’re having tea and scones instead!
Since I always approach my blog with pure honesty, it’s time to get real here: I’ve been struggling ever since I started my new job back in July.
As I watch my blog numbers and stats drop, I know exactly what’s going on. I just don’t have time anymore for a lot of the social networking and publicity piece that JAB needs to get more readers. It’s been hard enough to keep the posts going in the face of running a department, and I’m just trying to keep my head above water while being pulled in a million different directions every day. During my work day, I can’t work on the blog, and my hours are now a lot longer. So the blog has to be done either early in the morning or late at night.
For now, I’m holding onto JAB because I love it. And while I feel bad that my Facebook and Twitter shares are pretty paltry, and that I’m commenting less on my friends’ blogs, I don’t really see another way. Unless I want to work around the clock and ignore my children, my husband and my sleep, this is where we’re at right now. It’s not ideal, but I’m learning to live with less than perfect. It’s hard, because I’m a perfectionist. But I figure that holding onto JAB any way I can is better than giving it up entirely.
How could I give up the motivating force for baking scones, after all? These are super special.

The base has unsweetened cocoa, and the mini chocolate chips sprinkle more bursts of chocolate flavor throughout. And of course, these have to be topped with chocolate drizzle. The best baked goods have drizzle!
While many baking bloggers are die-hard frozen shaved butter fans when it comes to scones, I really dislike working with frozen butter. Cold butter does the trick just as nicely, and takes all the hard work out of making these. Scones are a one-bowl, mix with your hands kind of dessert. Anyone can do this!
As I navigate a life that is way too hectic and leaves no room for anything but work and family time, I will try to bring you the best I can. I’m sorry if it’s not perfect, or even close to perfect. But for now, it’s all I can do!
Ingredients
Instructions
- Preheat the oven to 400. Line a cookie sheet with a silicone baking mat or parchment paper. Set aside.
- In a medium-sized bowl, combine the flour, cocoa, sugar, baking powder and salt. Add the cold butter and using the tips of your fingers, pinch the butter into the dry mixture until crumbs of varying sizes form.
- Add the egg and cream, using a fork to stir them in until a dough forms. You can use your hands or the fork to knead lightly until the dough is fully formed.
- Gently mix in the mini chocolate chips with your hands.
- Turn the dough out onto your prepared cookie sheet, pressing it into a circle that is about six inches in diameter.
- Cut the dough into six wedges. Bake for around 20 minutes until the scones are crispy at the edges.
- Melt the 1/4 cup mini chocolate chips carefully in the microwave in 30-second intervals, being careful not to overheat them. Using a spoon, drizzle the melted chocolate over the scones.
- Cool the scones until the chocolate hardens. Serve or store in an airtight container.
Ideally, the voting process should be nothing but exciting, but it’s harder this year than usual. Looking toward November is a worrisome occupation, at least for me. I want to believe that everything will turn out okay, but I’m in a negative frame of mind these days.
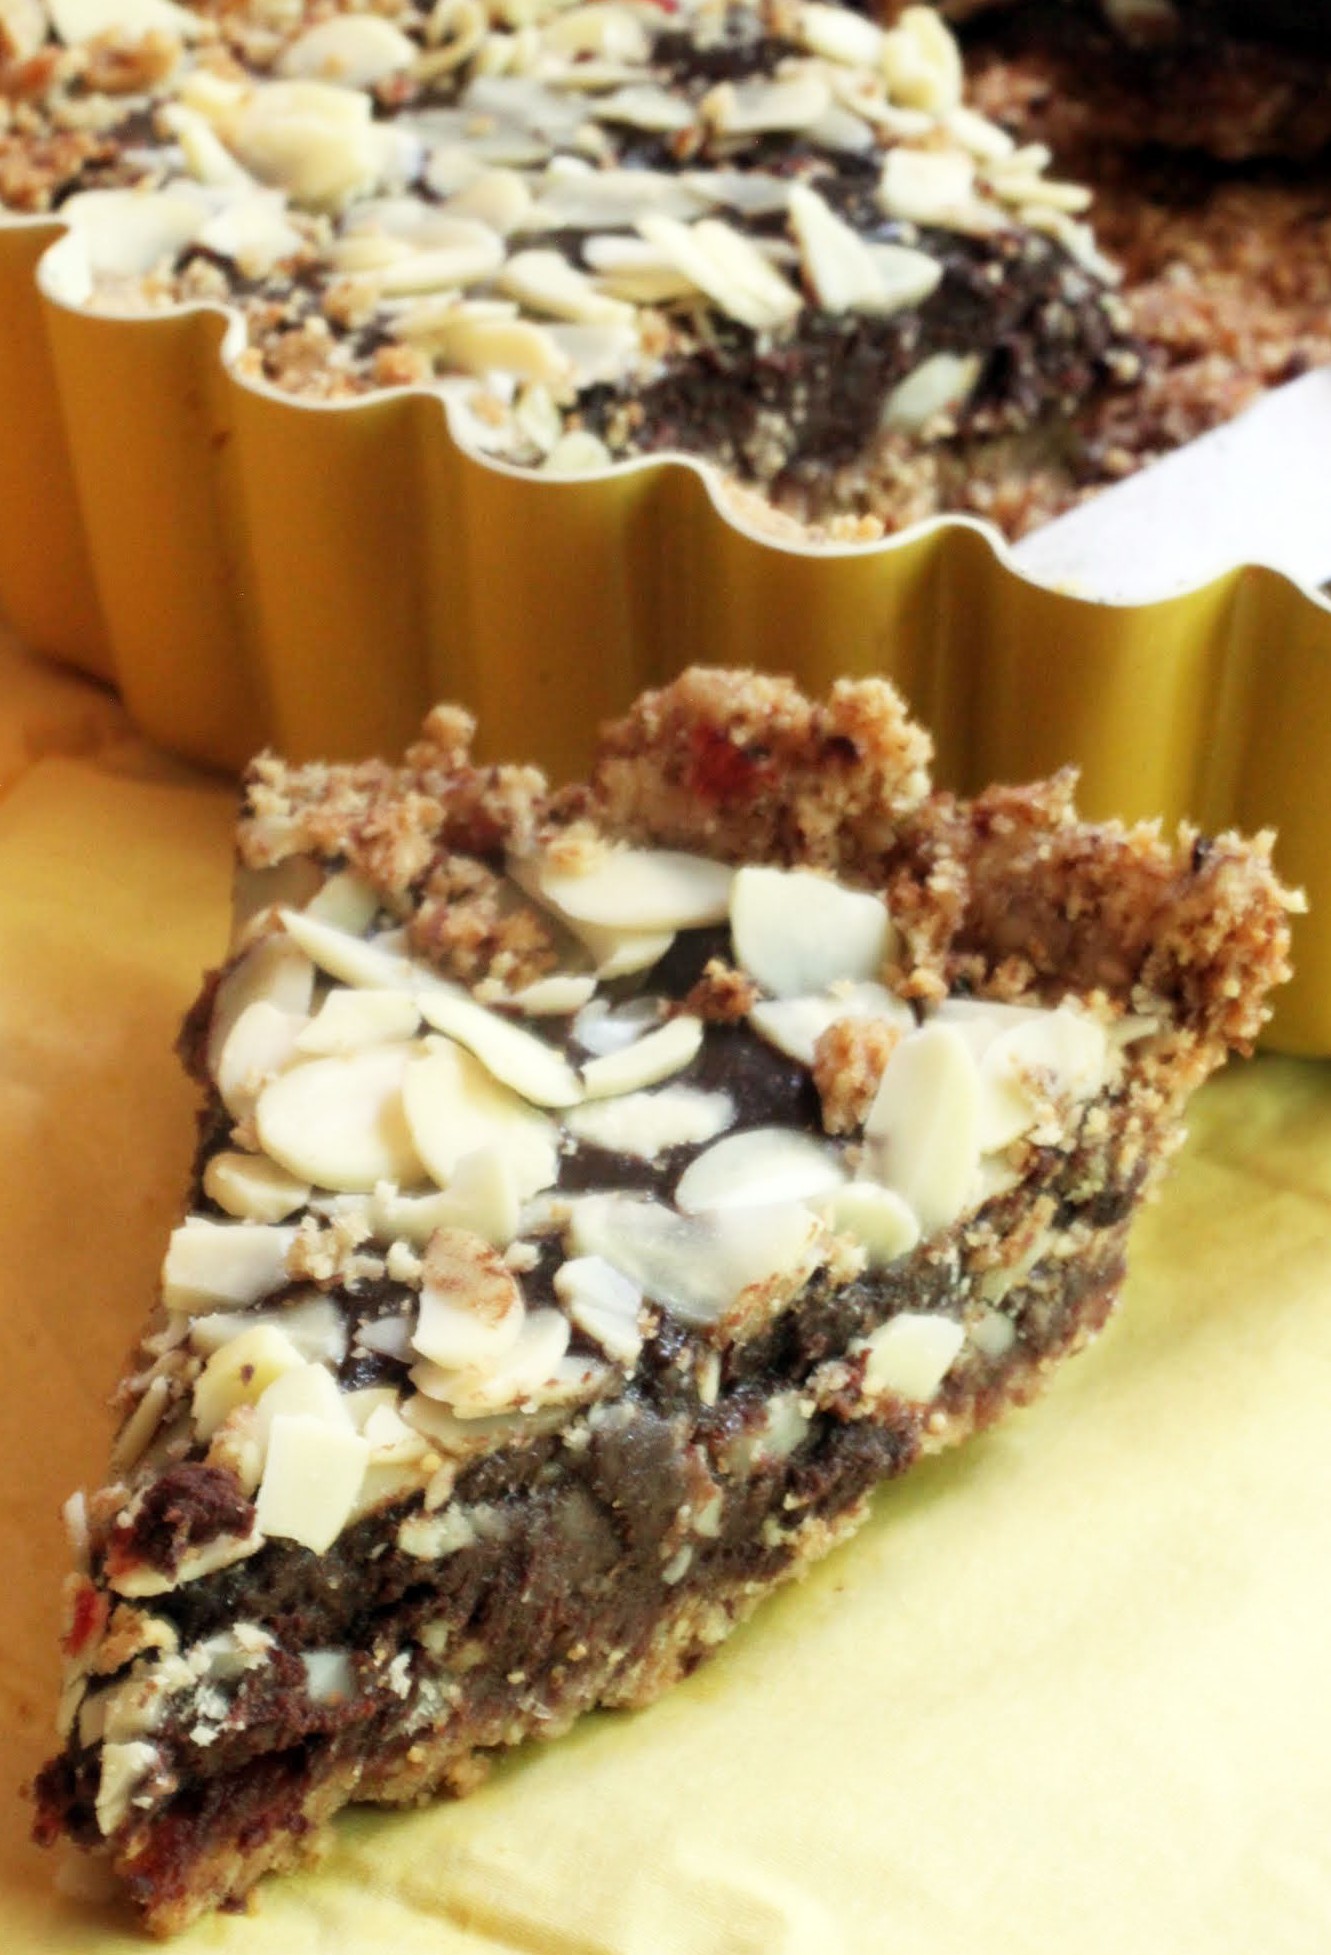
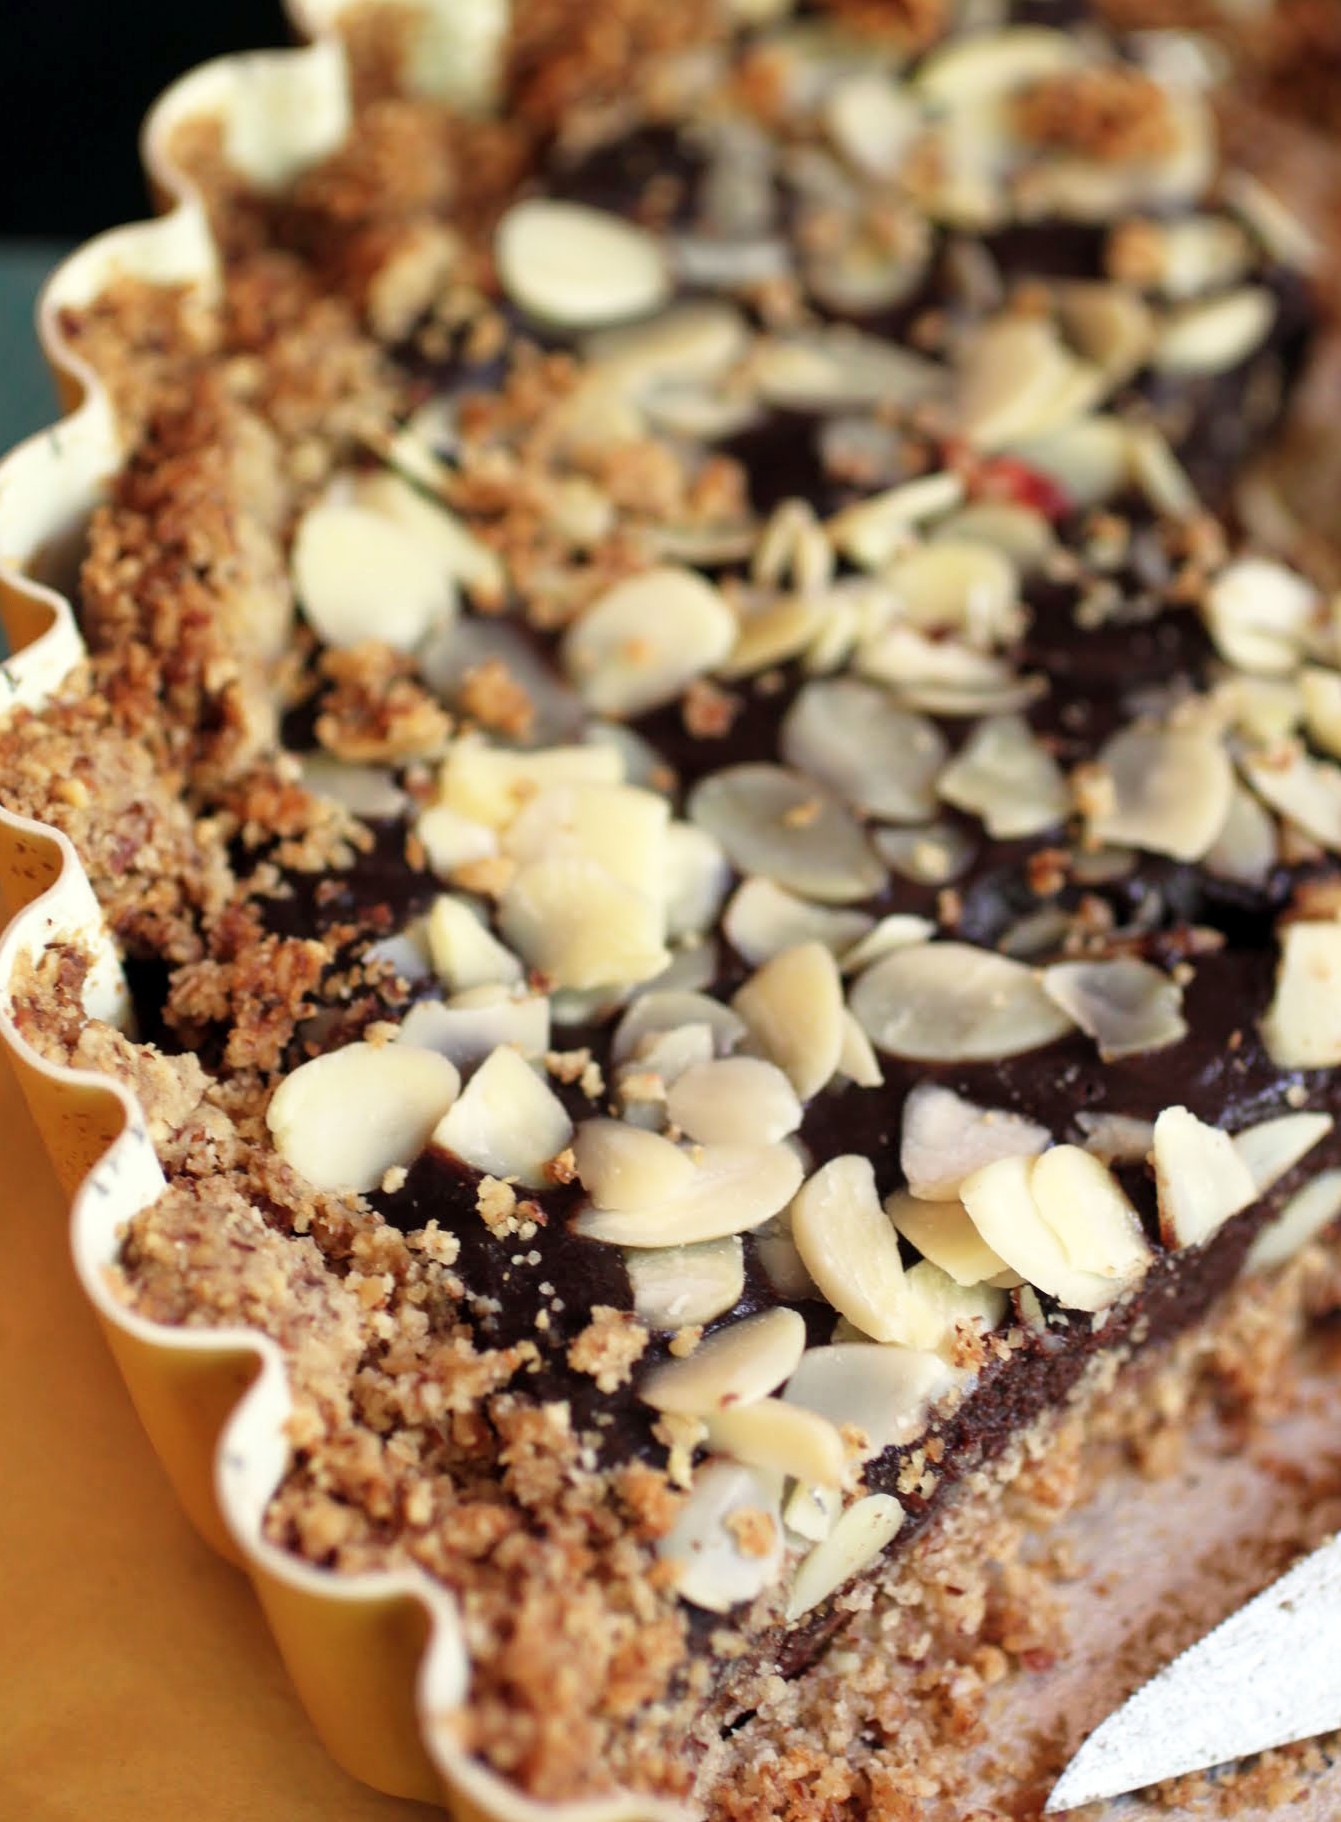
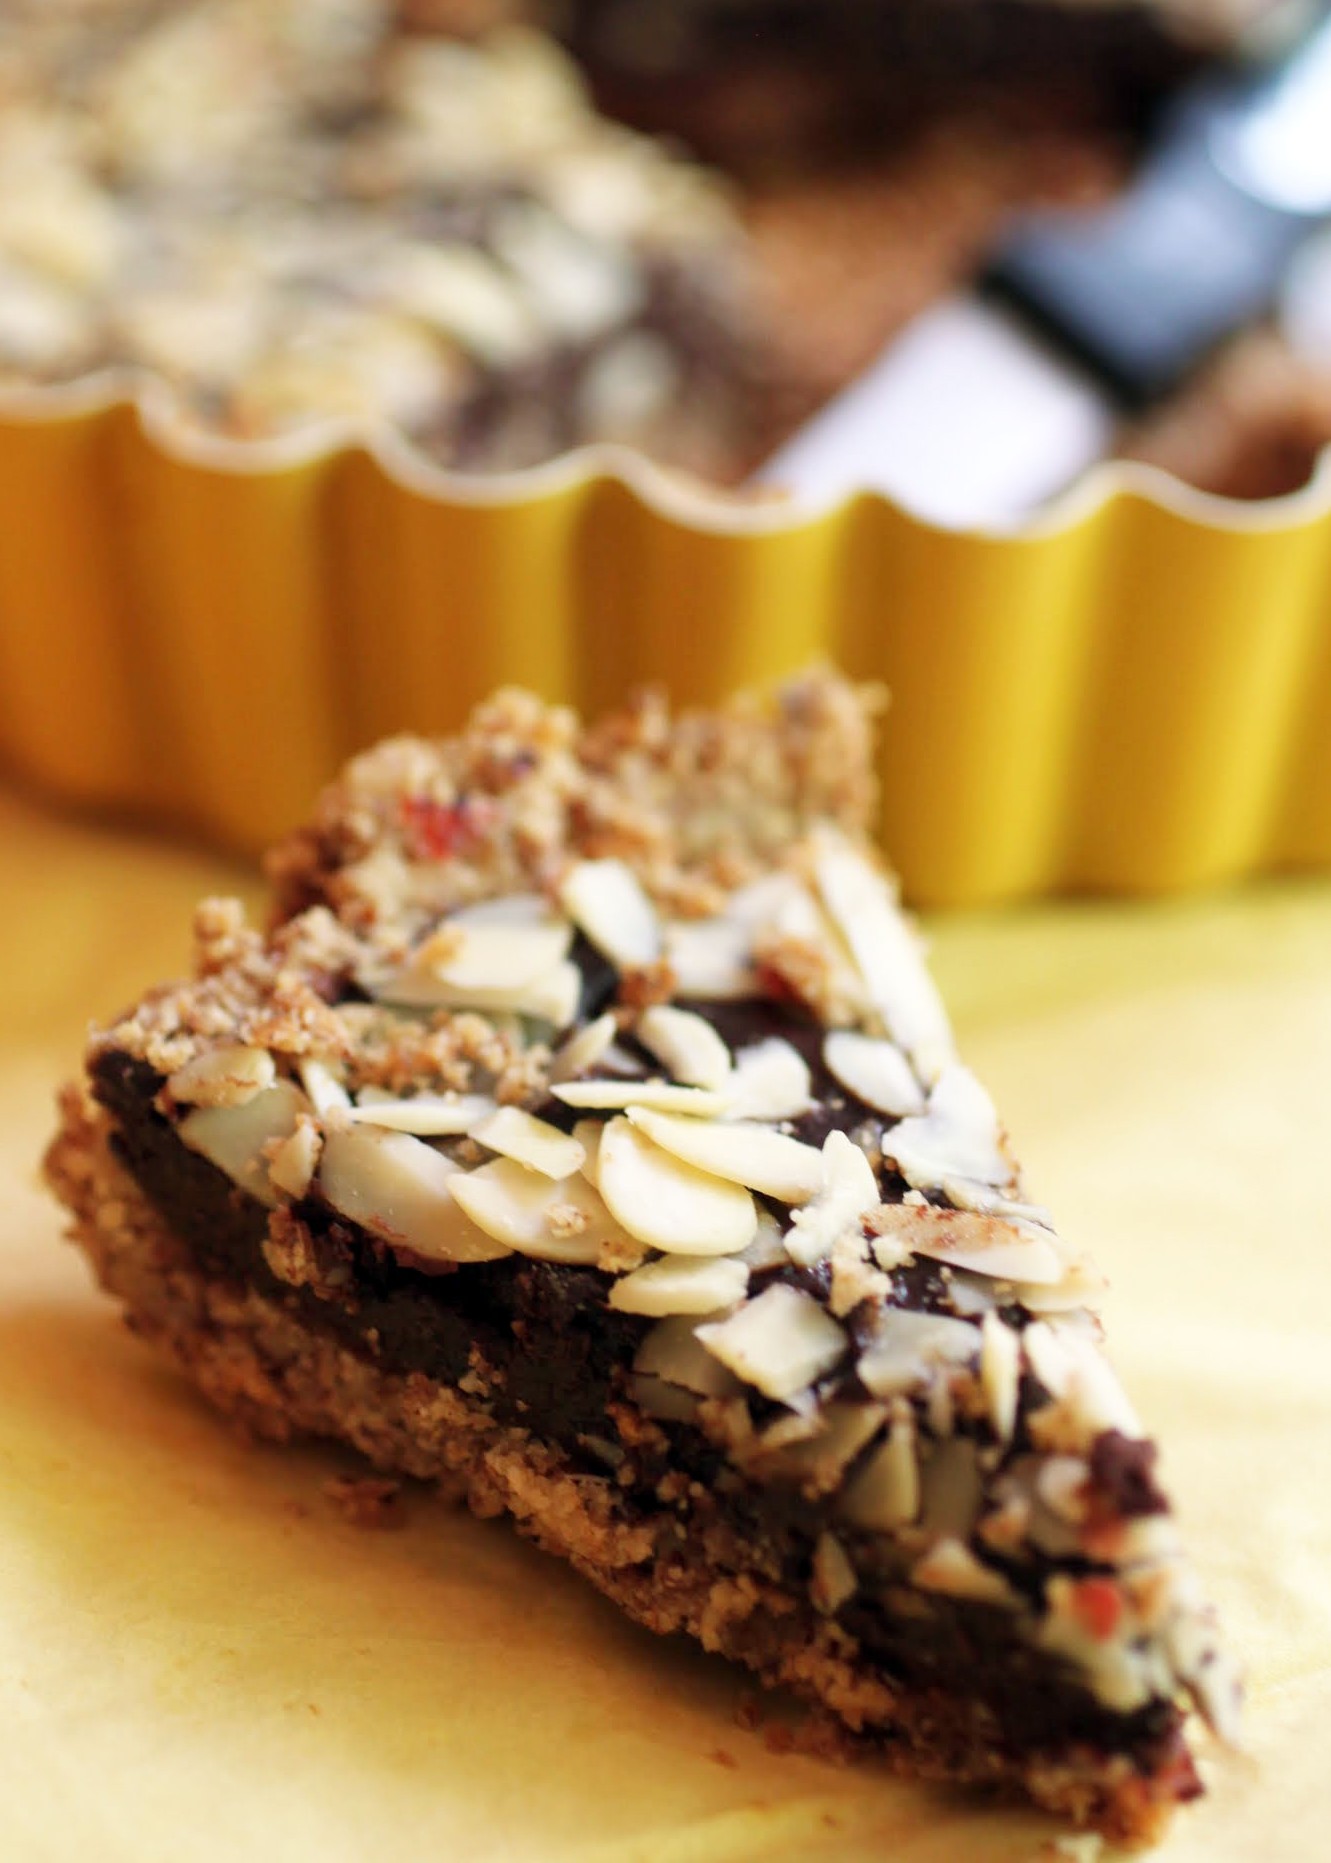
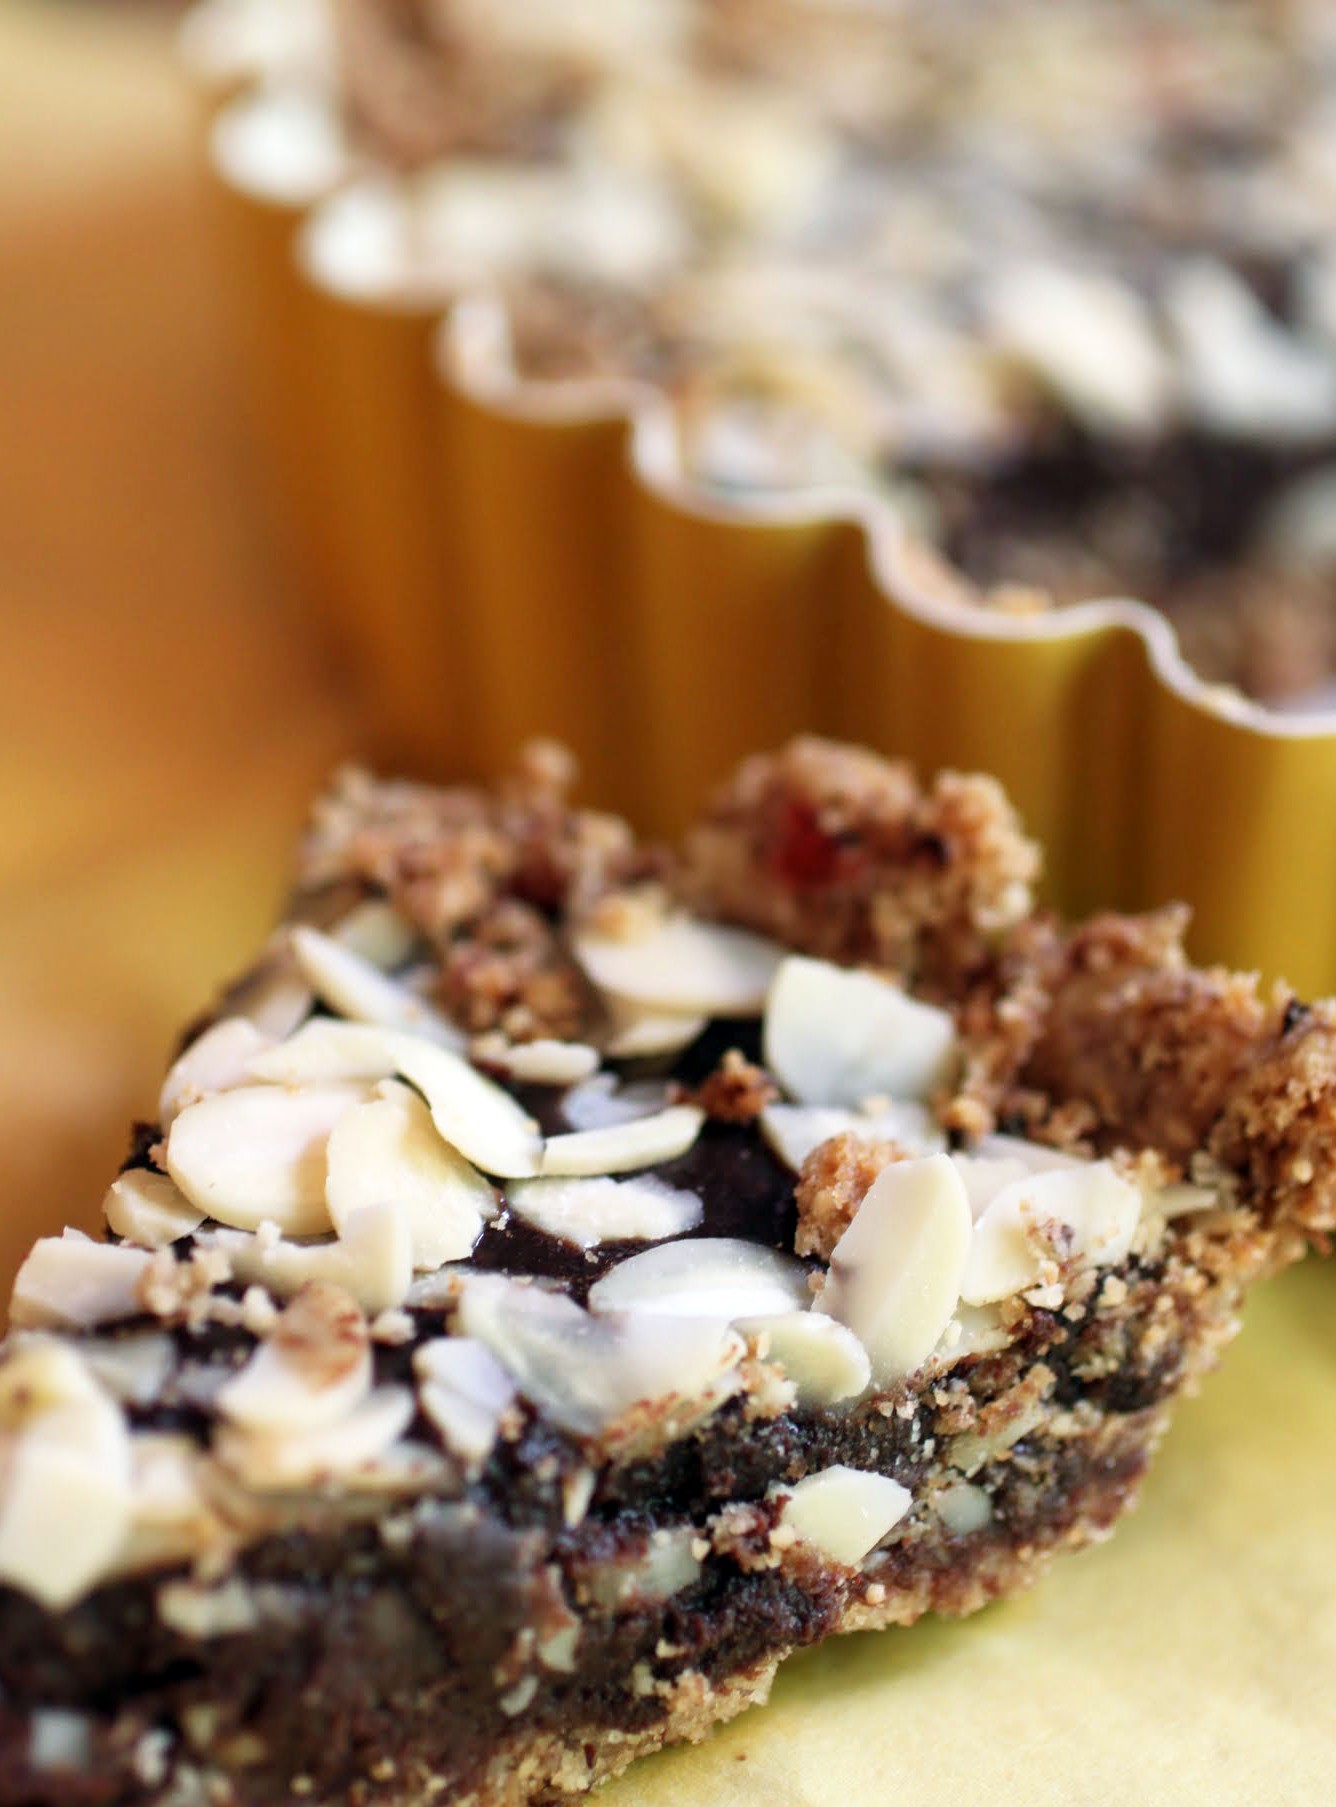
Whenever I feel overwhelmed, I bake. There’s a mindful mindlessness about baking that lets my brain fall away a bit as I make ganache or press tart dough into a pan. The motions are repetitive, soothing, and exactly what I need sometimes. When the result is this mind-blowing linzer tart smothered in ganache and almonds, I can banish all the negativity and just think about the rich flavors exploding in my mouth.
It’s not like me to be incredibly negative, or at least, not in my head. But recently I’ve sustained a series of failures, and so I’ve had to work harder to focus on the good stuff. Whenever I’m in this frame of mind, it’s hard to see all the people who are seemingly more satisfied and successful displaying their good fortune right and left. The rational part of my brain is thrilled for them, but the emotional part is resentful. That’s human nature, after all.
So in times like these, I’m shifting the focus where it should be. On my family, of course, which affords me great joy. On the part of my job that takes place in the classroom, where I work with the best students a teacher could ask for. On the changing season, letting sunshine and fresh air into the house. On having an awareness of purpose. There’s so much to be thankful for.
When I get thankful, I think of pie. Really. It’s some kind of Thanksgiving trigger. But it’s April. What to do?
Well, make a tart. It’s gluten-free for my beloved Kenny and kosher for Passover for the rest of us. We don’t get normal food until Sunday! Yes, that counts liquor. Happy hour is going to have to wait a bit.
This is one of the best desserts I’ve made in the GF category. The crust (adapted from Paula Shoyer’s The New Passover Menu) is mainly almond meal with some walnut meal thrown in for good measure. Once the crust is baked, I spread raspberry jam over the top and filled it with ganache. I made this tart non-dairy by using fake coffee creamer and margarine, but the recipe will list heavy cream and butter because that’s more standard. They both work, though!
I’m looking out the window as I write this, where the leaves on the trees have become rich and green. There’s a lot that’s good to focus on. During a time that’s less than easy in some ways, I need to see all the beauty and savor it. And I also need to savor this tart, so get on that train with me!
Ingredients
Instructions
- Preheat the oven to 350. Coat a tart pan (the kind that has a removable bottom) generously with cooking spray. Set aside.
- In the bowl of a stand mixer, cream the butter until smooth. Add the ground nuts, potato starch and sugar, mixing until well incorporated.
- Press the tart tough into the prepared pan, working the dough evenly over the bottom and up the sides with the back of a measuring cup.
- Bake the crust for 20- 25 minutes until the edges are golden brown and the center is set. Set aside.
- In the microwave, melt the heavy cream and chocolate chips for one minute. Stir until smooth.
- Spread the raspberry jam over the bottom of the crust evenly. Pour the ganache over the raspberry jam, smoothing out the top. Sprinkle the sliced almonds over the surface.
- Chill the tart until set, about one hour. Cut into wedges. Store covered and chilled.
It has nothing to do with a fear of yeast, which has never really bothered me. It’s pretty easy to use, unless the yeast is dead. And that doesn’t happen very often. No, it’s more about the ultimate convenience and endless wonder of a bread machine. Why work on the dough myself when there’s a lovely machine sitting on my counter that can do all the heavy lifting for me?
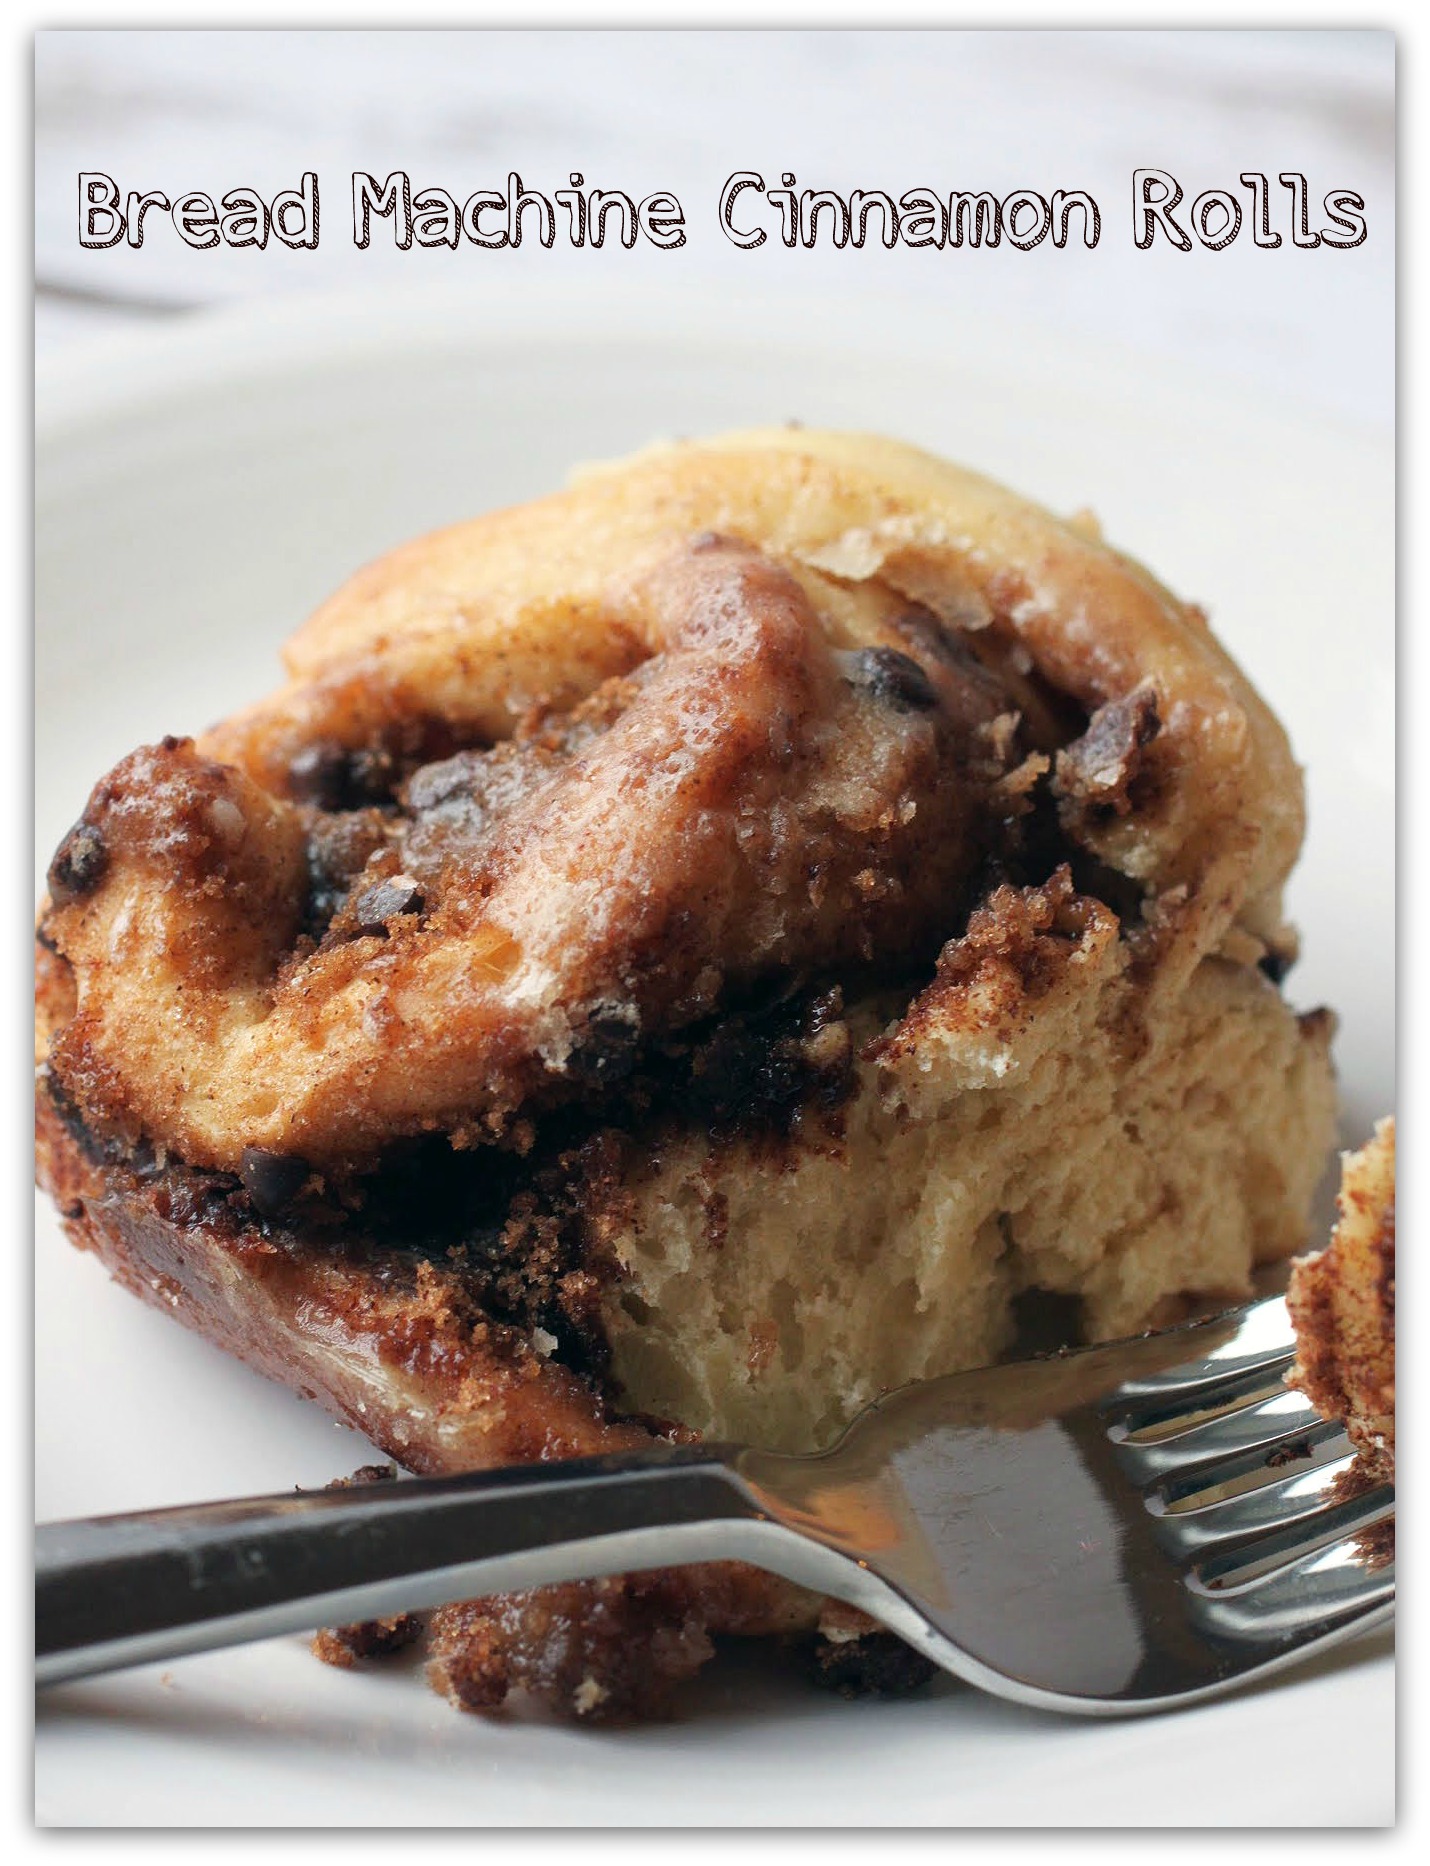
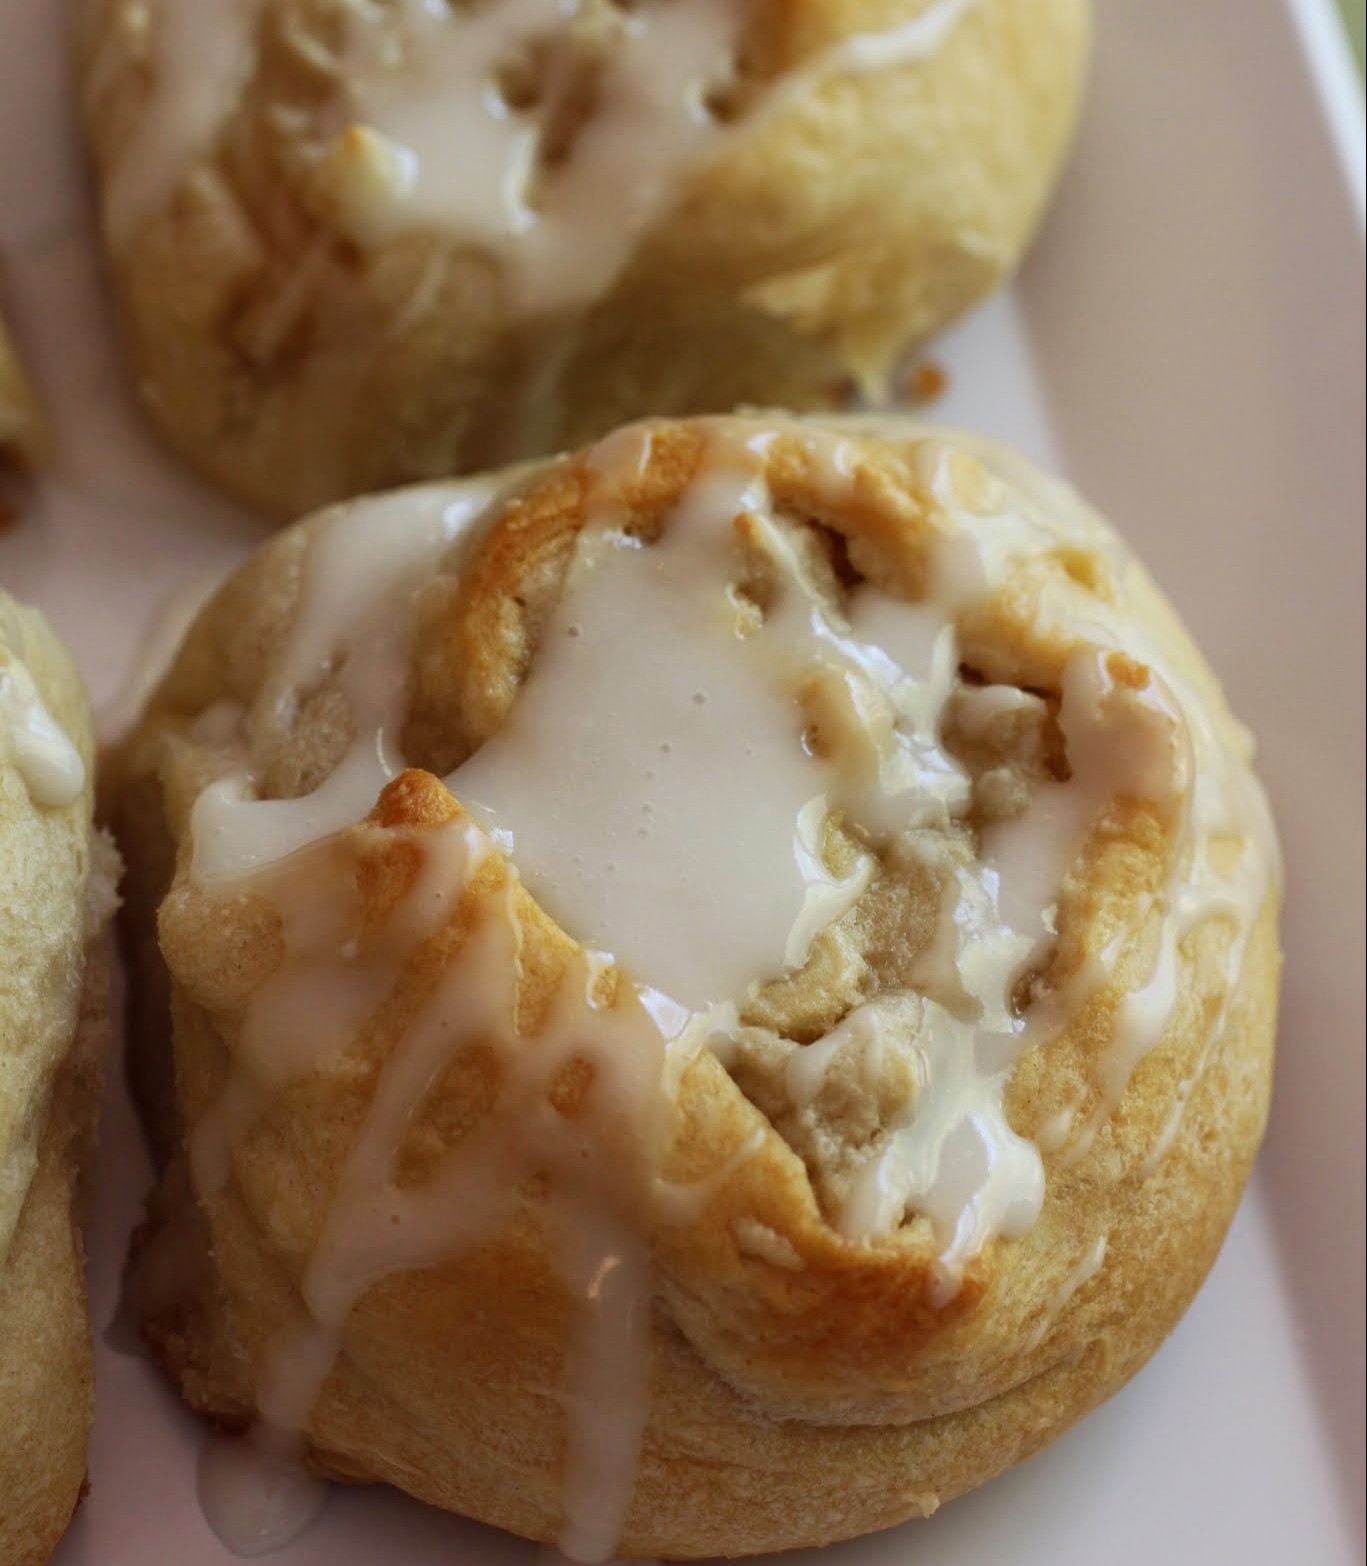
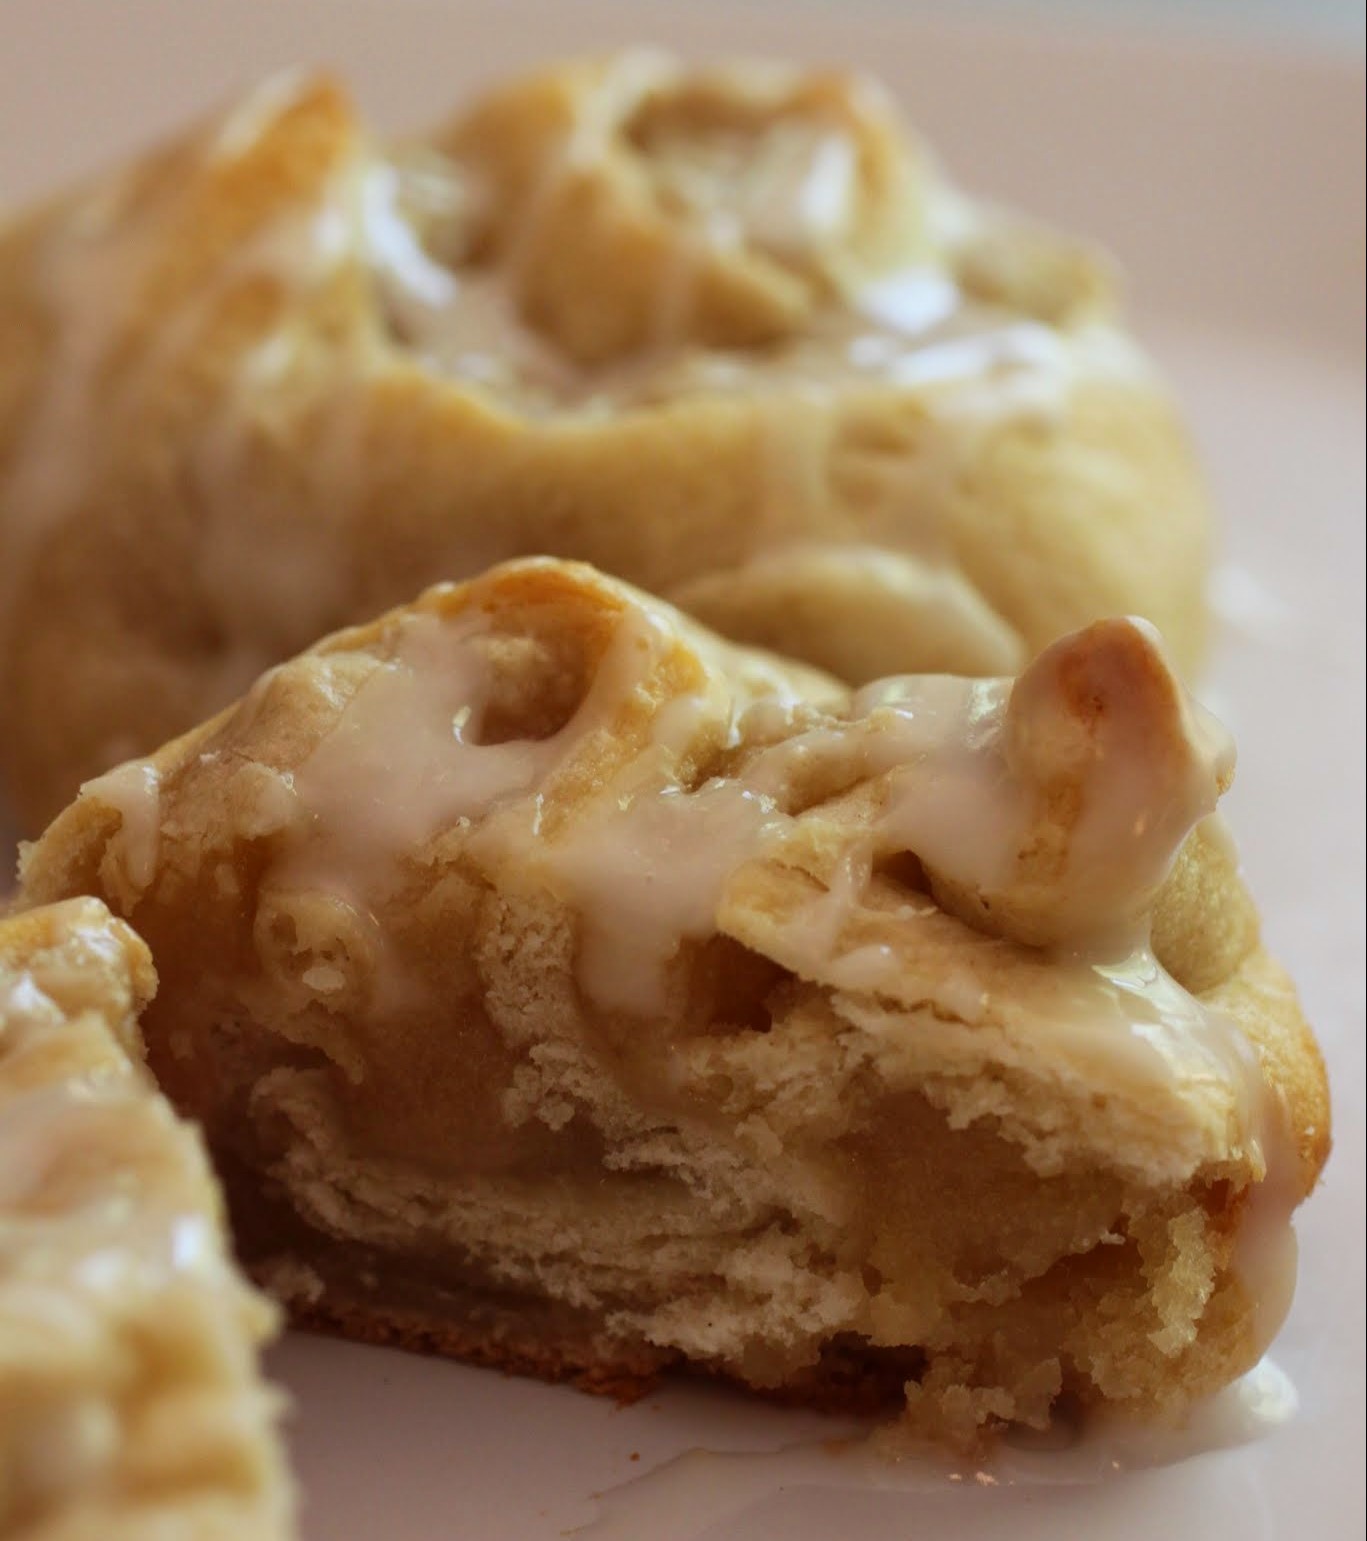
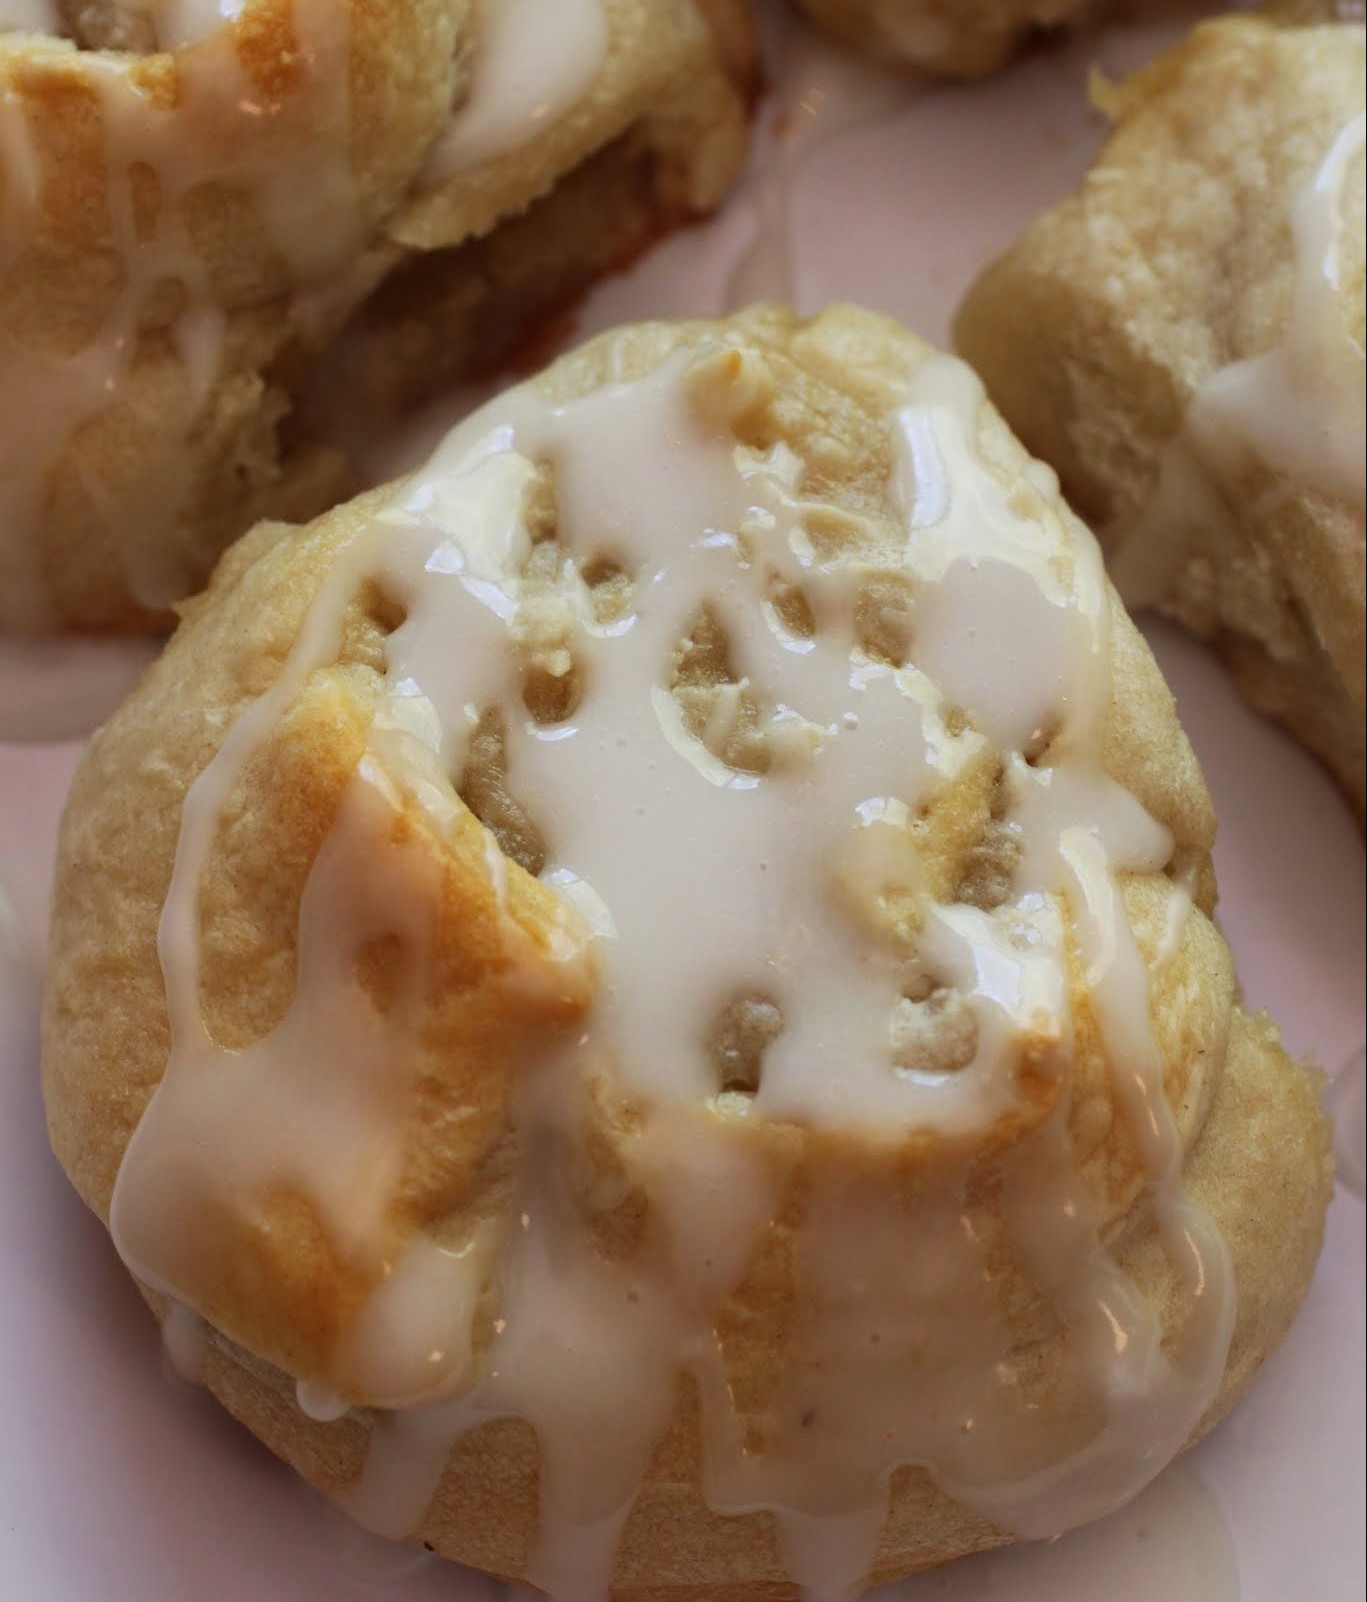
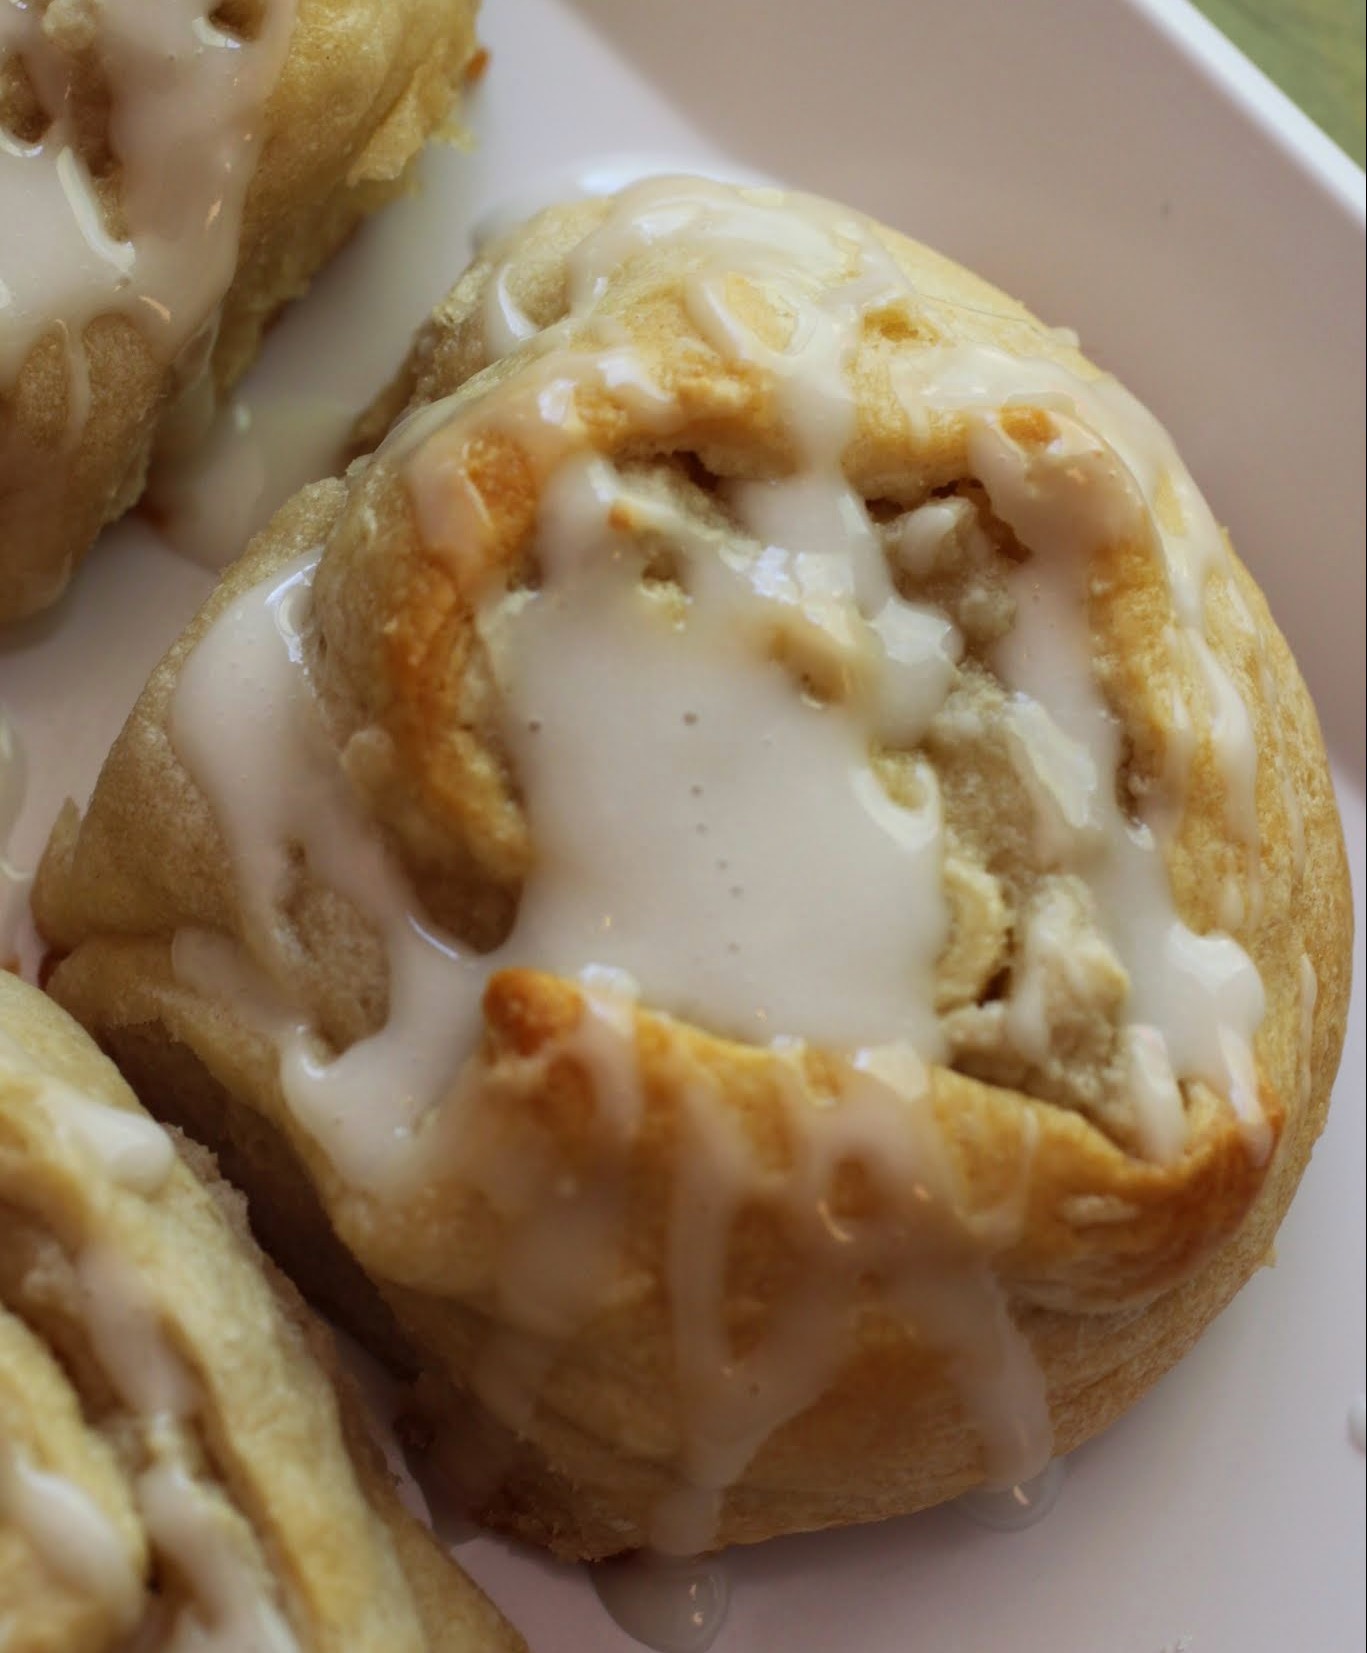
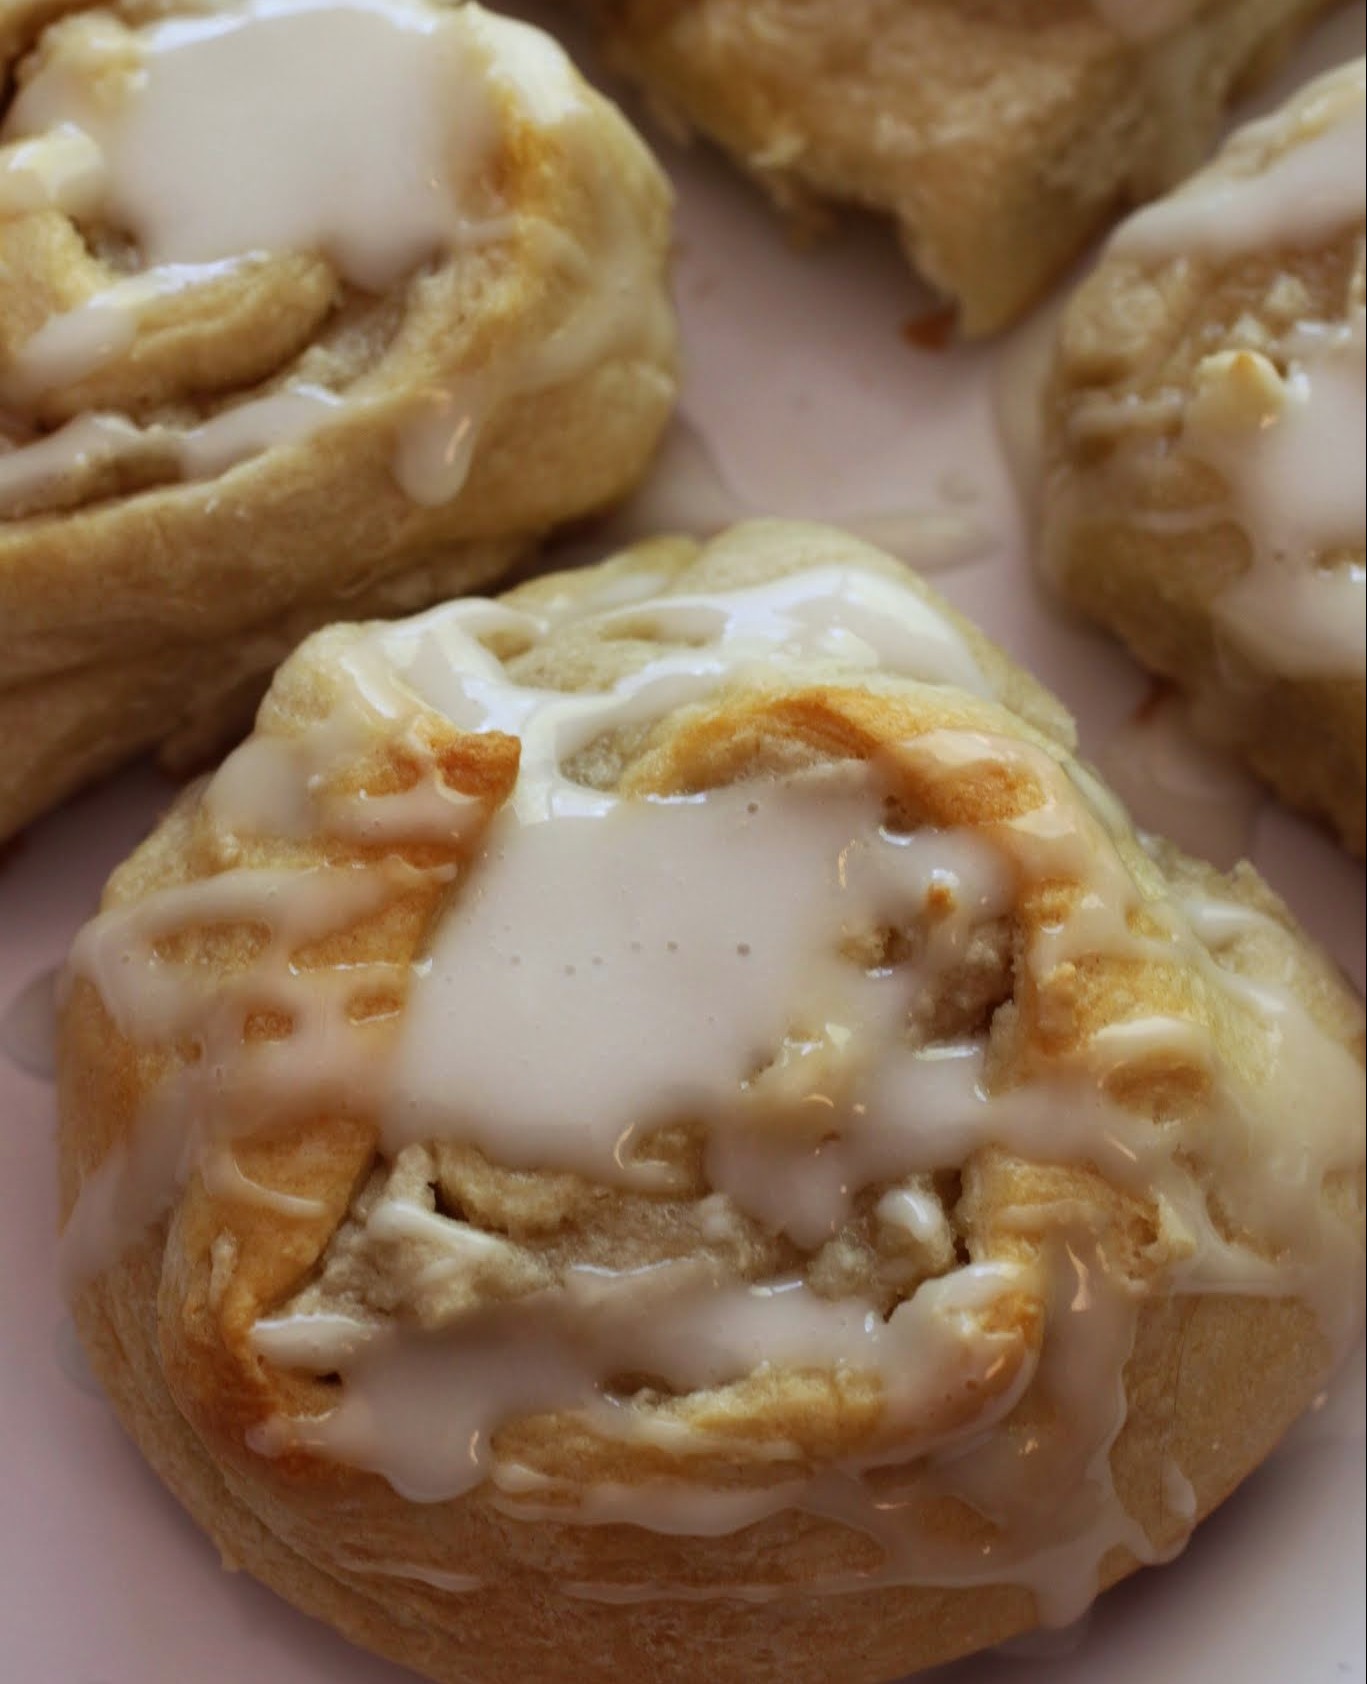
Now, now, bread enthusiasts. Back off. I’m sure that my machine can’t do the wonderful things you can do, but it sure can make some cinnamon rolls lickety-split. I made these (and they’re dairy-free, too!) the night of our big snowstorm, and they made a perfect breakfast to wake up to.
While the snow is slowly melting, more disasters loom. I was looking forward to a snow day or two to myself (my kids’ school went back midweek while my system remained closed) when my youngest came down with a fever. She can’t go to school like that, so now I’m on full-time nurse duty. If history repeats itself (and it does), I’ll catch whatever she has just in time to go back to teaching this coming Monday.
Parenting 101, y’all. Ready? The more children in the house, the more disease. It’s a given, and it’s totally gross. I used to think I wouldn’t be able to clean up anything disgusting, but I’ve proven myself wrong. I’m not saying that it’s fun, but I’ve seen enough stomach-churning sights over the past eight years that I’m kind of regretting my decision not to go into medicine. Would I have passed organic chemistry? Maybe not, but I would have been able to look at any kind of human ickiness without batting an eyelash.

Plus, I’ve become extremely adept at diagnosis. Most of the time when I go to a doctor, I already know what they’re going to say. If not for their magic access to prescription-only medication, I wouldn’t even go. Oh, except for the fact that they know a lot more than I do and can save lives and all of that.
It’s a passion for research that has me scouring medical encyclopedias and cookbooks alike. With so few years on this planet (relatively speaking, that is), we’ve gotta learn whatever we can while we can! And have I mentioned that for me, a bakery visit also counts as research?

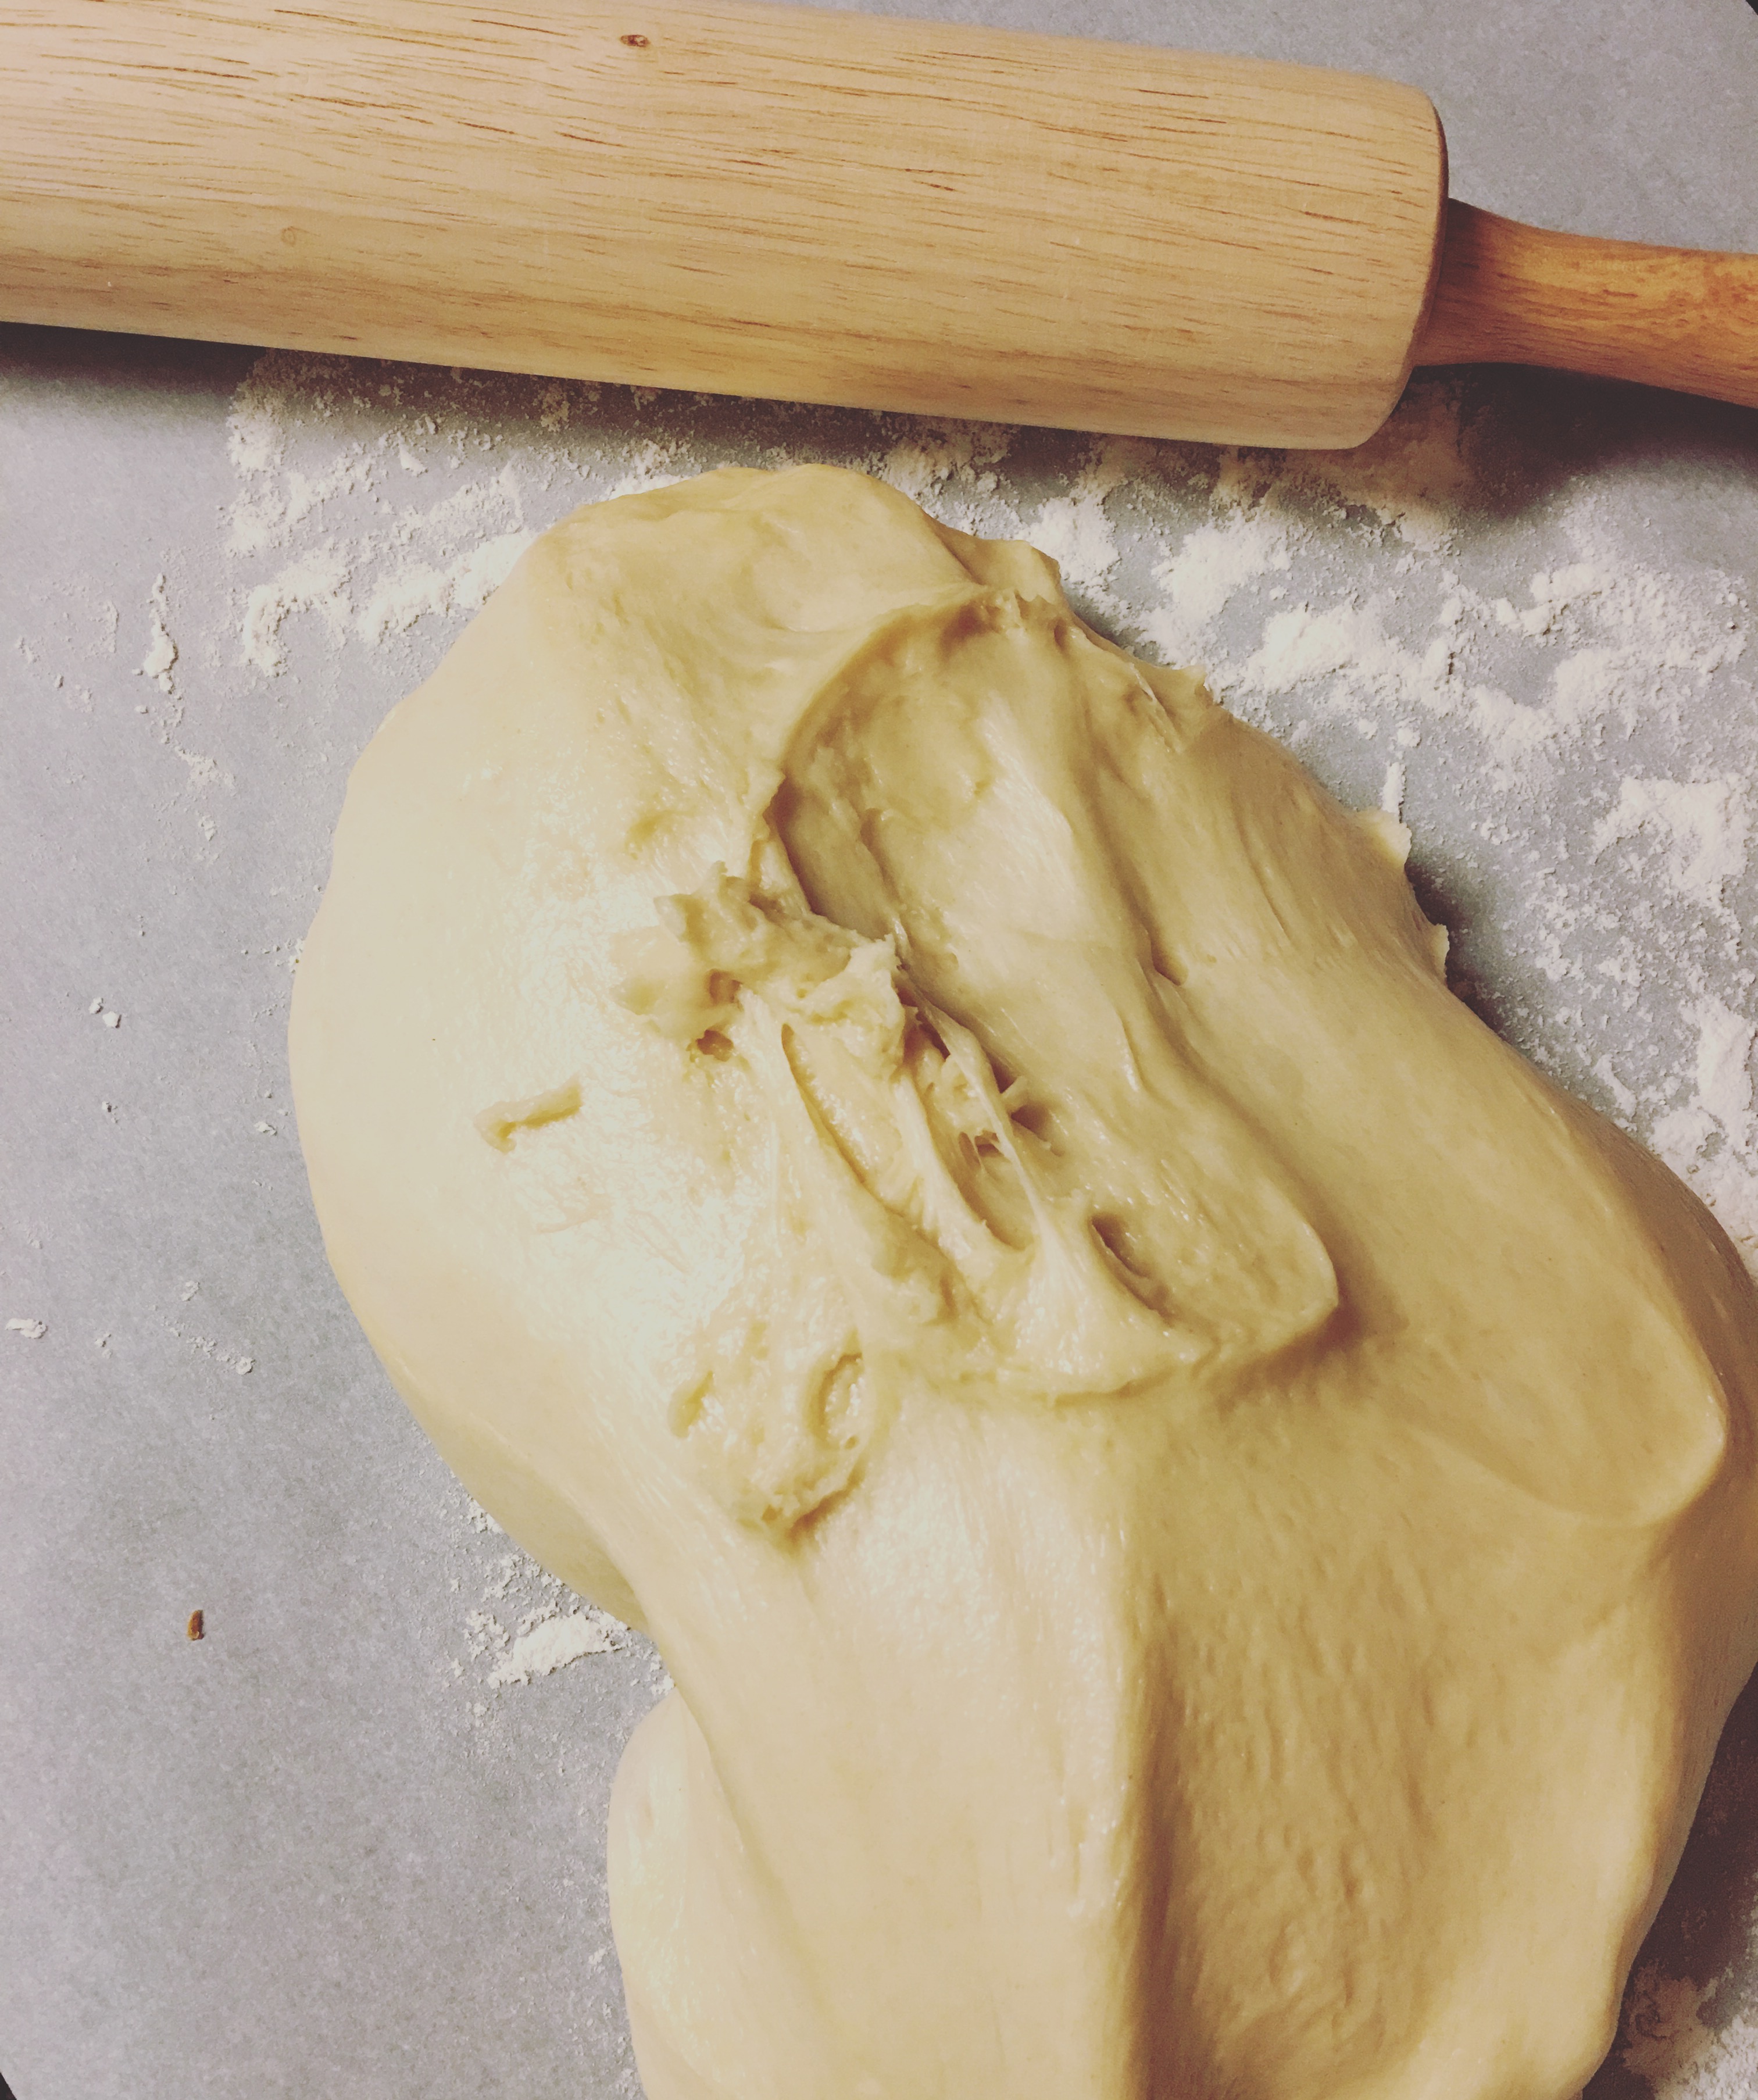
Whenever I go to the mall, I smell those famous Cinnabon devils baking. They had to put that right next to a DSW to tempt me, right? But I resist the urge every single time because I know I can make cinnamon rolls that are just as good and less of a calorie bomb right here at home. The dough comes out perfectly in a bread machine. See?
These are non-dairy. Translation: I used margarine. Or you can use any non-dairy butter substitute, or just use butter. I wanted to see what would happen without butter, and I’m happy to report that I still couldn’t stop eating these. So if Khloe Kardashian is still on that dairy-free diet, she’s welcome to dig in. I don’t think they’ll qualify as a health food. Sorry, K.
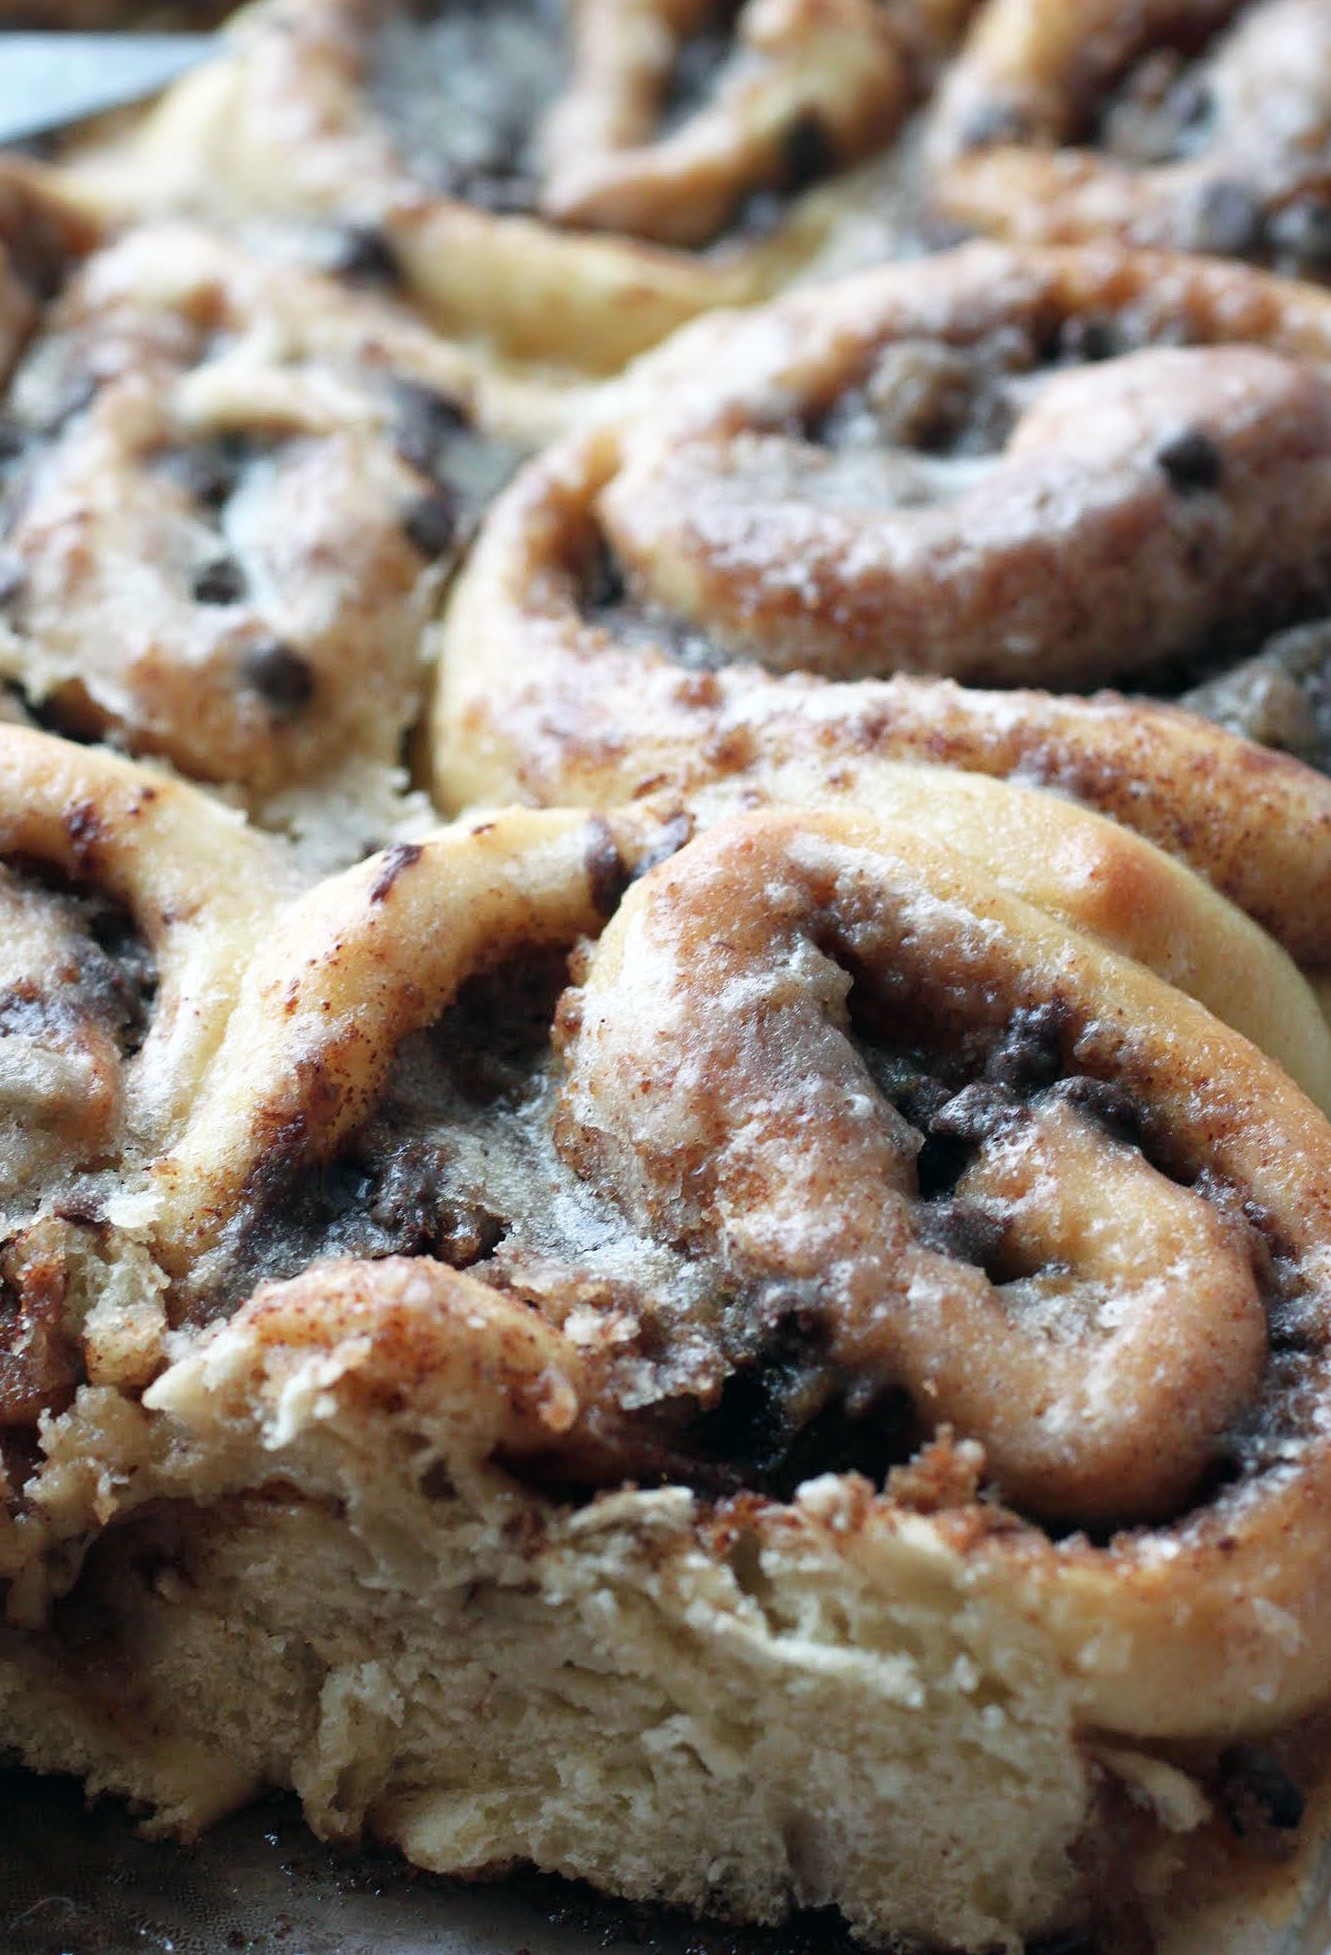
These come together super fast, and I also put mini chocolate chips in the filling to make the rolls especially melty and irresistible. Instead of a traditional cream cheese glaze, I used a simpler glaze for shine. Sometimes I like the cream cheese glaze, but most of the time I actually prefer a plainer roll. With the heavy glaze, it can be too much.
You’re one bread machine away from this happiness, so I recommend you hit it! And if someone gets sick, you can eat all of these to keep your energy up as you nurse the afflicted toward recovery. Either way, they make for a much cozier winter!
Ingredients
Instructions
- Place all the dough ingredients into the bread machine in the order indicated by the manufacturer. Typically, wet ingredients go in the pan first, followed by the dry. Select the dough cycle and press start.
- When the cycle is complete, turn the dough out onto a floured surface and let it rest for 10 minutes while you make the filling.
- In a bowl, combine the brown sugar, cinnamon and chocolate chips. Set aside.
- Roll the dough out into a large rectangle measuring roughly 16 by 21 inches. Sprinkle the filling mixture on top.
- Using the long side (so you have one large cylinder when you're done), roll the dough tightly into a swirl.
- With a serrated knife, gently cut the dough into 12 even pieces. Place the pieces into a greased 9 by 13 inch pan.
- Cover the rolls with plastic wrap and let them rise for 30 minutes. Preheat the oven to 400 degrees.
- Bake the rolls for 15-20 minutes until golden brown.
- While the rolls are baking, combine the glaze ingredients. As soon as the rolls come out and are still warm, pour the glaze over the rolls. It will seem to disappear, but will leave the rolls shiny on top.
- Serve warm.
]]>
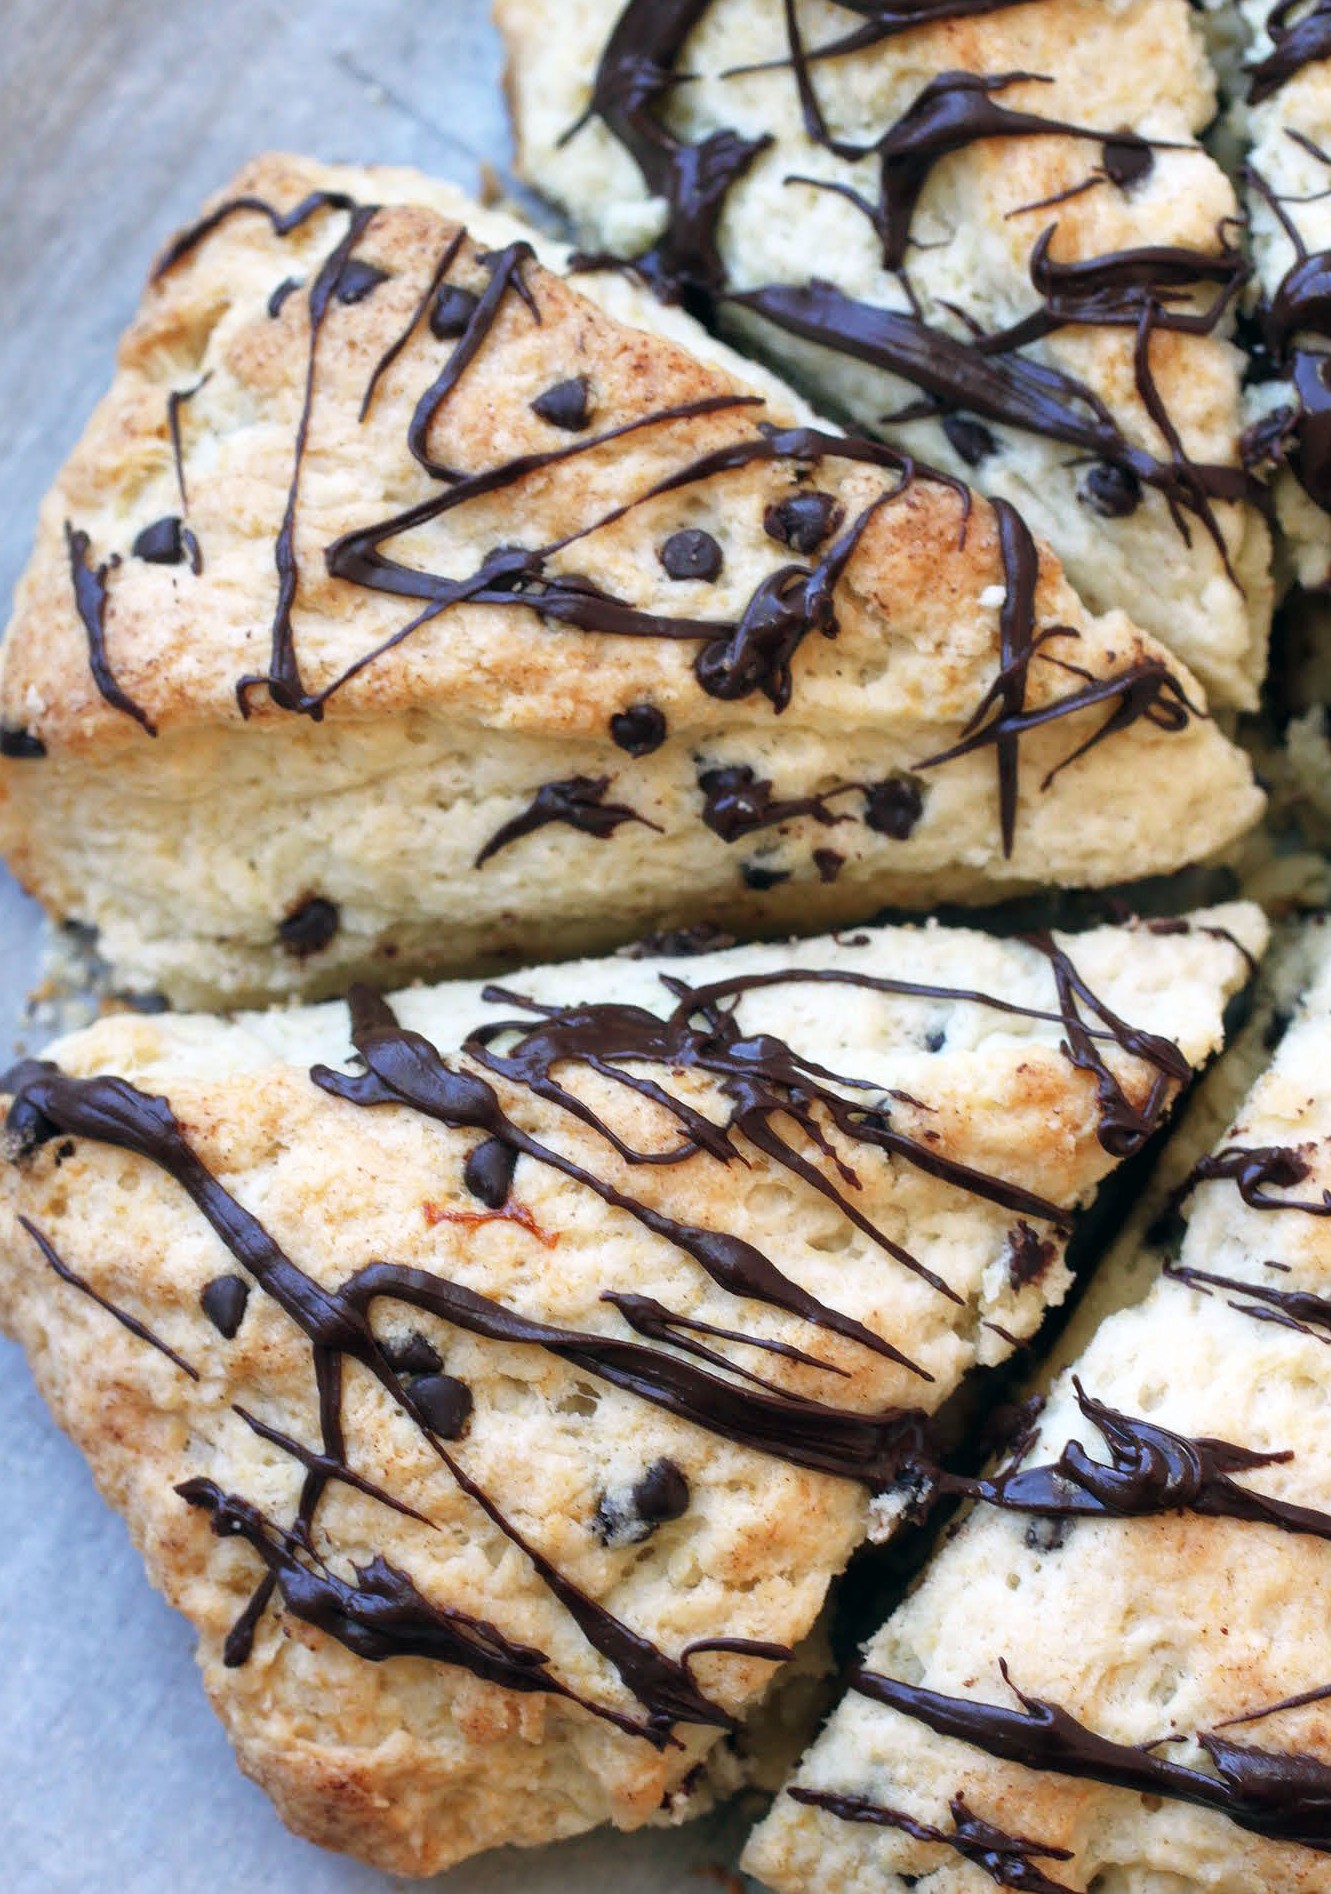
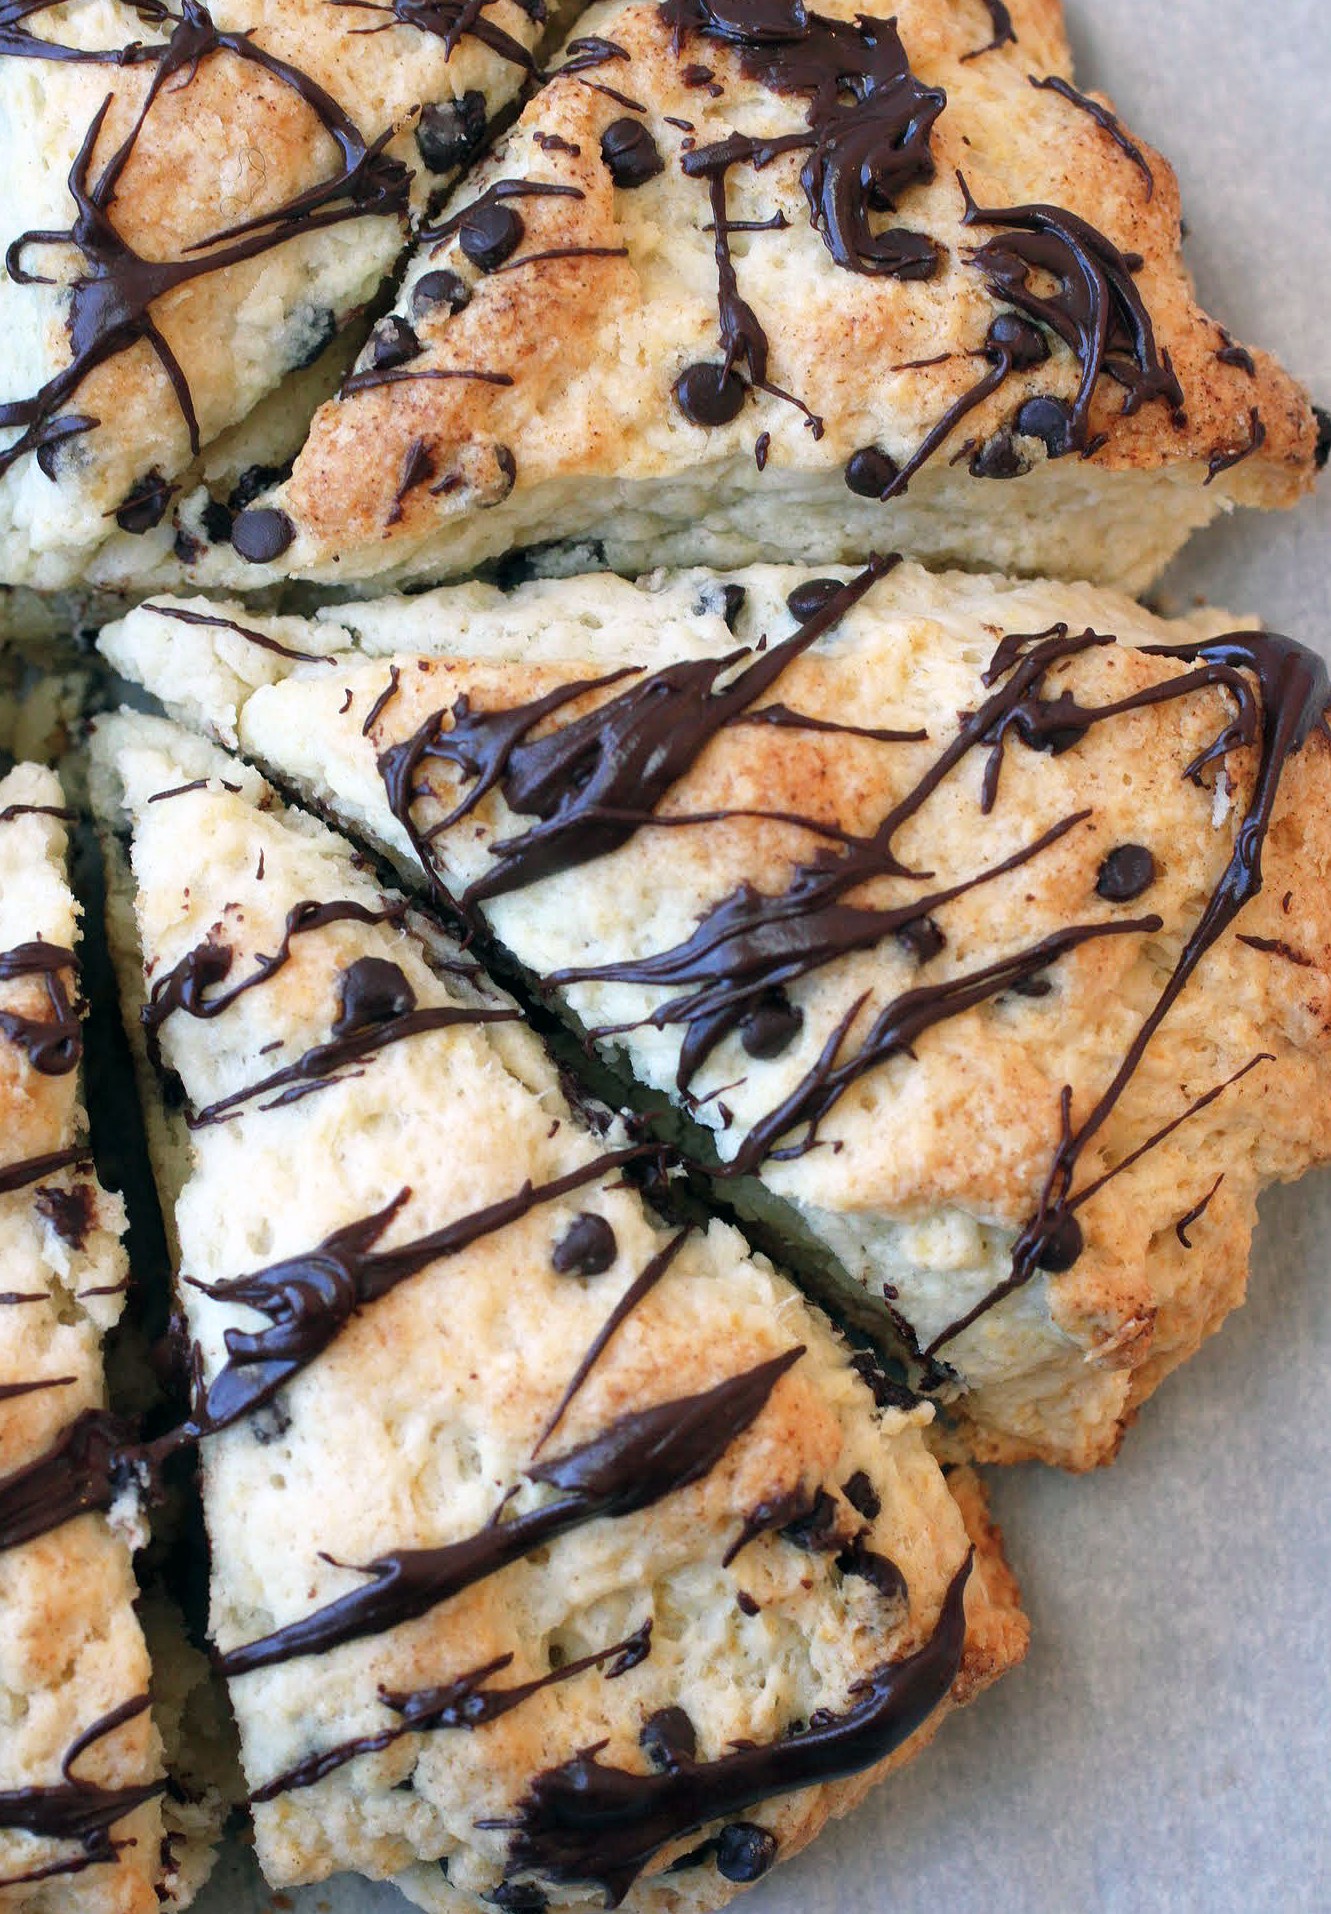
Nothing sparks my carb cravings like being snowbound, so being trapped in the house means I had to make scones. And not just any scones, either. This recipe is a version of the great Dorie Greenspan’s cream scones, which come together quickly, easily, and perfectly.
I only made one change: I added mini chocolate chips and drizzled chocolate on top. I mean, how could I not? But if you’re a purist, by all means leave them out.
People all over America (especially those who live in Boston or Buffalo) have been mocking D.C. for our wimpy reaction to snow and our subsequently slow cleanup. And believe me, as a Midwestern import to these here parts, I totally get it. We look really lame to anyone who is accustomed to a two-foot dumping of snow.
Back in Indiana where I grew up, snow days were rare. I have very clear memories of struggling to get to my high school and walking in several hours late to French class after a dicey, two-hour drive on the road that involved being towed by someone who had chains. That’s just how we did it. The expectation was that sooner or later, everyone would show up to work.
But see, I kind of like the wimpy ways of the D.C. area better. It’s so much nicer to be home with hot chocolate and scones than to be struggling out there in crappy weather hoping that nobody rear ends you. Why do we have to be at the rat race all the time? My students will be fine. I’ll just cut out a book or something that we were supposed to read. I kid, I kid.
Thanks to our Puritan roots, Americans are pretty obsessed with working. We equate hard work and productivity with virtue, and I’m sorry, but no. There’s also something to be said for knowing when to kick back and just chill out. I realize that our economy might tank if we all did the whole midday siesta thing, but I love the fact that certain countries take a midday break to go home for lunch and a nap. We might be poorer if we did that , but we’d be a lot happier.
Plus, if we had siesta every day, snow days wouldn’t feel like such a break from the norm. We’d be far more used to chilling with our families in the middle of the day. Anyone up for creating a movement with me?
While you ponder that, have a scone. Or three. These are the best scones ever, and I don’t care about modesty because I didn’t invent this recipe. So there. It’s so easy, too!
A lot of scone makers will hold that to get the best scone, you need to work with frozen butter. Honestly, that’s an extra step I don’t have time to make, and I don’t think it makes much of a difference. I’ve tried it both ways. All you need is cold butter and your fingers (pastry blender not needed) and you’ve got a scone dough that comes together in five minutes and produces the flakiest scones. And they’re not dry at all. Nope. They’re really the epitome of what a scone should be.
While you’re busy running around every day, remember being trapped in the snow, or that time you got a really great midday nap. It might make you wish a blizzard would come and give you an excuse to have more scones for breakfast!
Ingredients
Instructions
- Preheat the oven to 400. Line a cookie sheet with a silicone baking mat or parchment paper. Set aside.
- In a medium-sized bowl, combine the flour, sugar, baking powder and salt. Add the cold butter and using the tips of your fingers, pinch the butter into the dry mixture until crumbs of varying sizes form.
- Add the egg and cream, using a fork to stir them in until a dough forms. You can use your hands or the fork to knead lightly until the dough is fully formed.
- Gently mix in the mini chocolate chips with your hands.
- Turn the dough out onto your prepared cookie sheet, pressing it into a circle that is about six inches in diameter.
- Cut the dough into six wedges (as shown in video). Bake for around 20 minutes until the scones are golden.
- Melt the 1/4 cup mini chocolate chips carefully in the microwave, being careful not to overheat them. Using a spoon, drizzle the melted chocolate over the scones.
- Cool the scones until the chocolate hardens. Serve or store in an airtight container.
]]>
For weeks, I test out pie recipe after pie recipe, putting my very favorites right here on JAB for all to enjoy. But when the big day comes, I have to decide which pies to put on the table. So far, I’m committed to a Dutch apple pie with oat crust and some kind of cookie pie, as well as my pumpkin ganache pie. But that leaves two pies up in the air, plus a non-pie dessert. I’m thinking Kahlua cake.
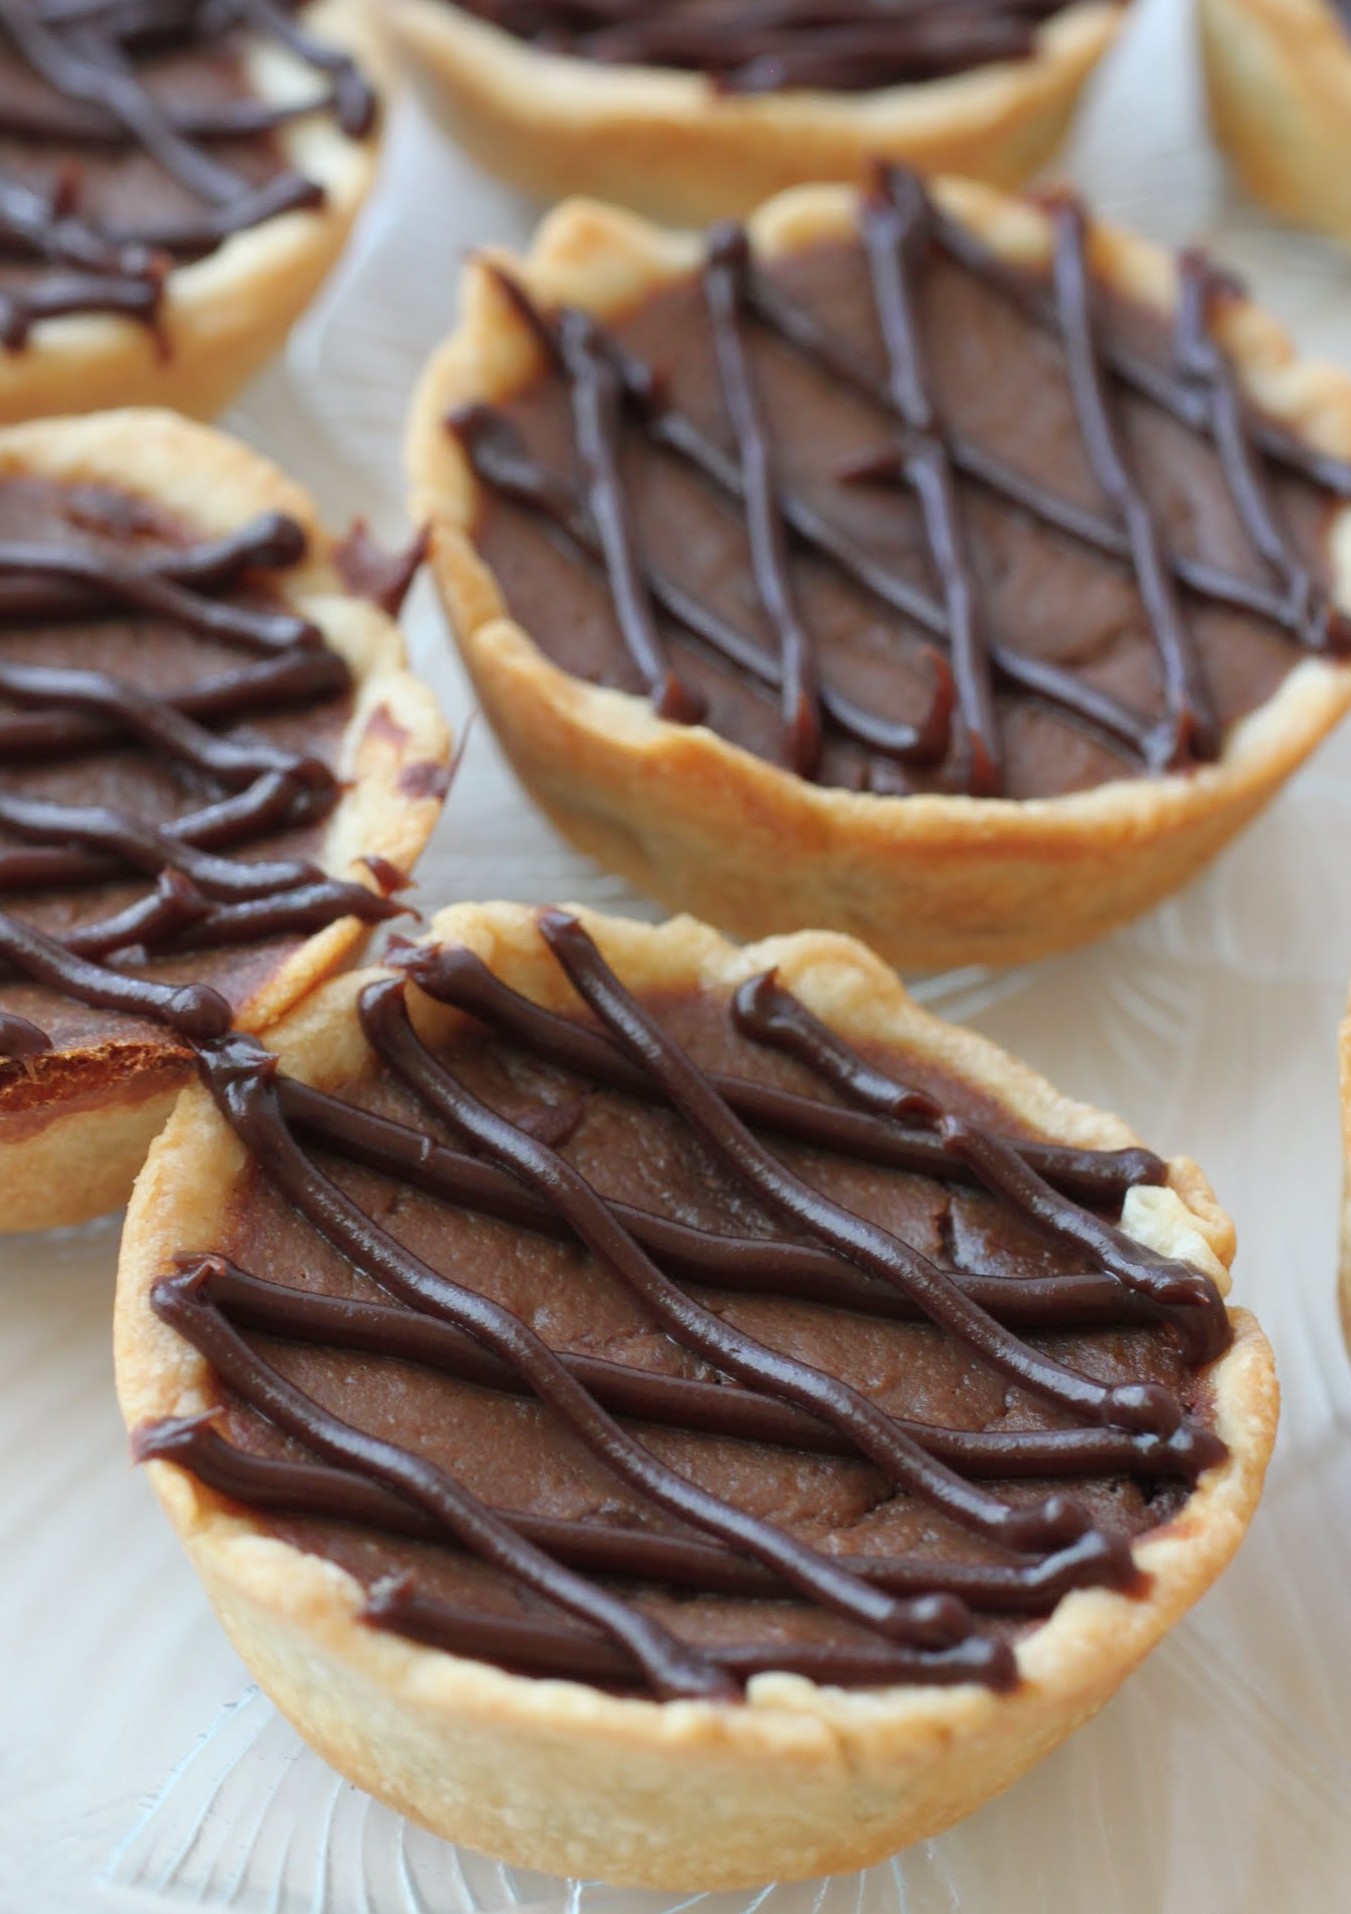
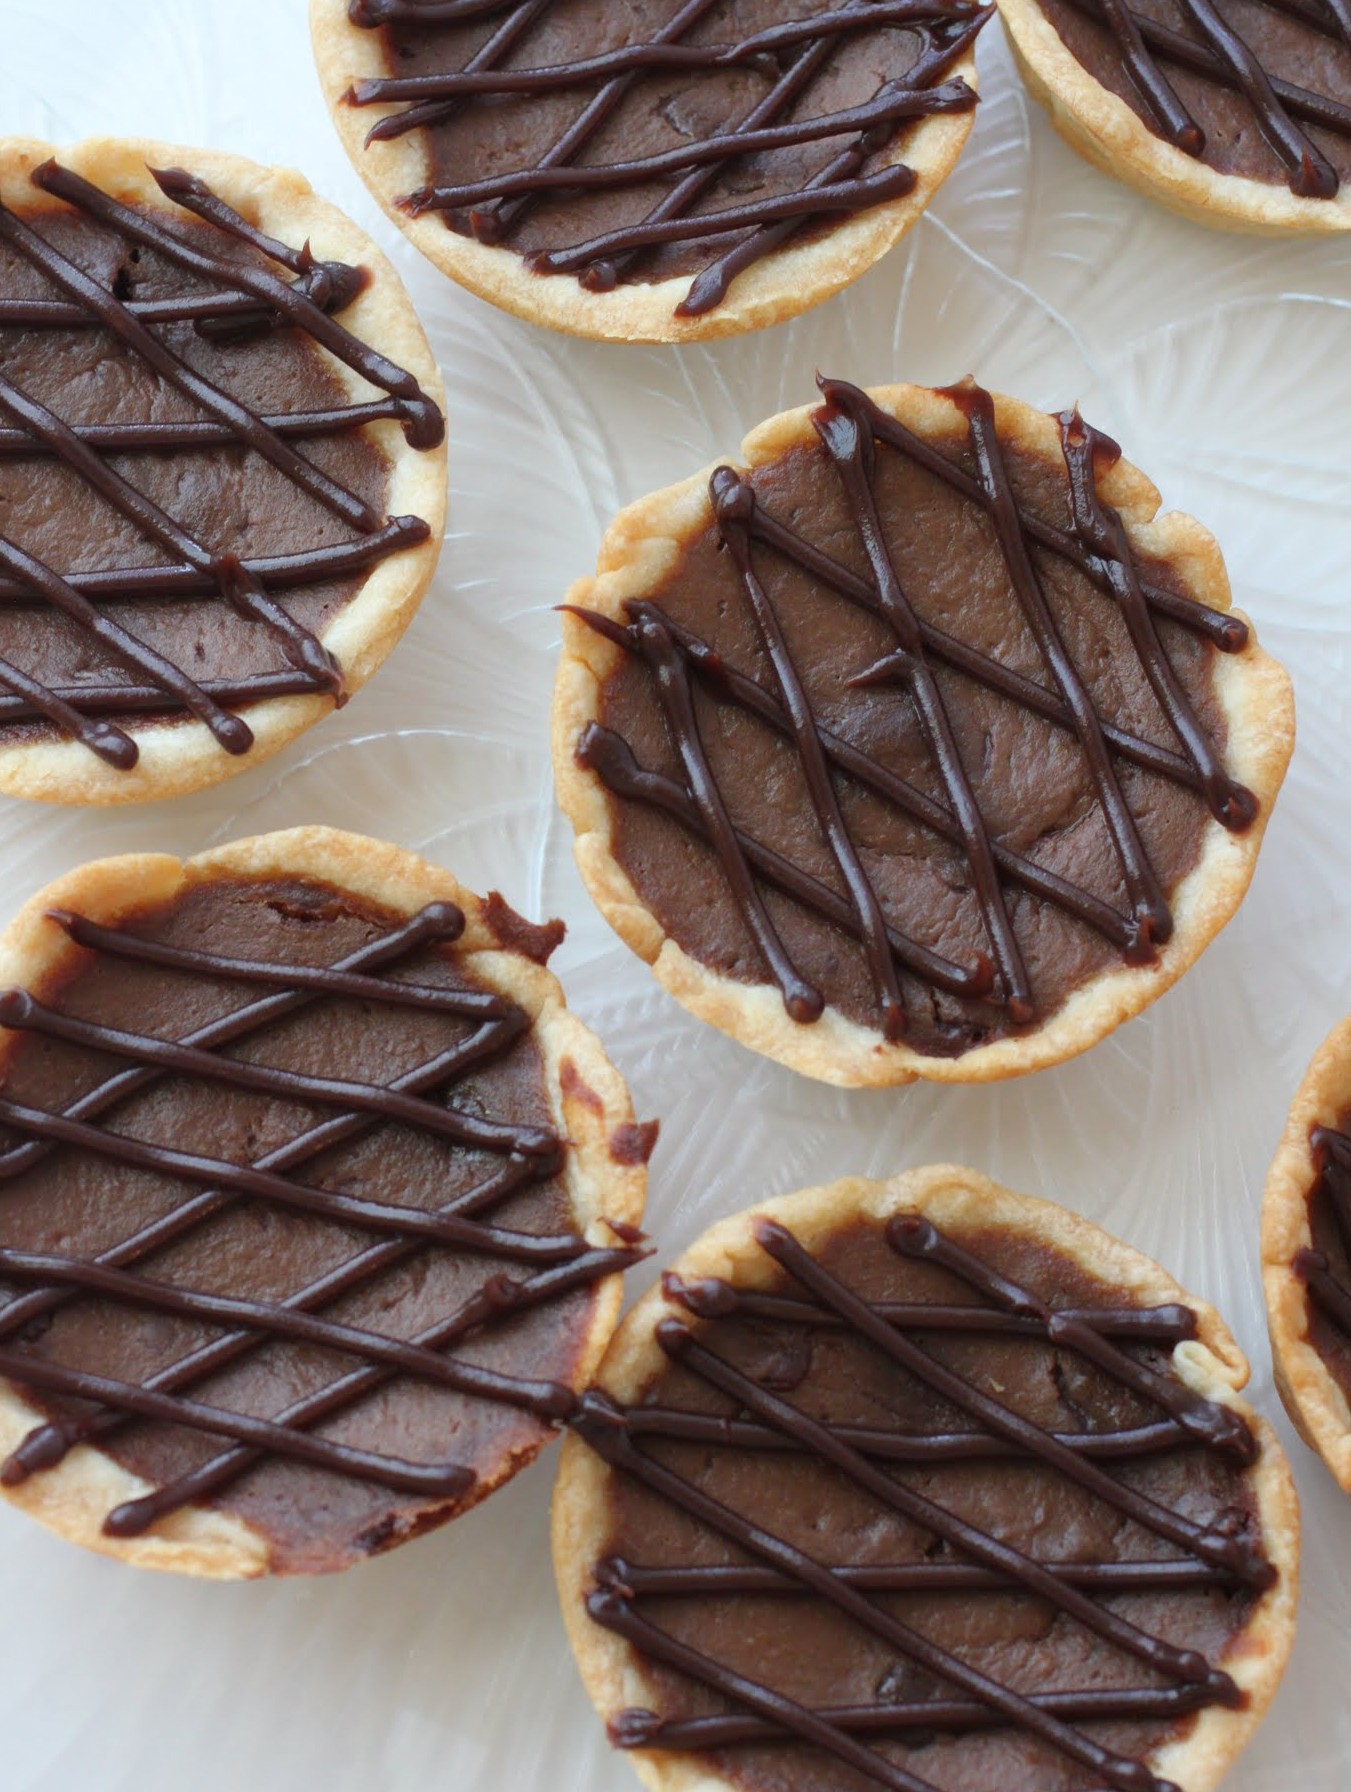
These little guys are certainly a serious contender. They’re small enough to be portion-controlled (though who wants that on Thanksgiving?), and they have just the right amount of both chocolate and pumpkin. Plus, they’re elegant. I’m quite a fan.

I was busy watching an episode of Next Great Baker this morning while I whipped up some ganache. First of all, I love that show, but I love baking while I watch that show even more. If you’re not familiar, a posse of bakers vie for the grand prize from Cake Boss star Buddy Valastro, which usually includes a whole lotta cash as well as a chance to work at Carlo’s Bakery. The bakers have to be smart and talented, but they also have to move very fast.
The show really should be called Next Great Cake Decorator, because that’s the focus. I’ve seen many a clearly talented baker get booted because a cake failed. Sometimes the flaws are structural, but often, it’s that the decorating just doesn’t go that well. I have a lot of faith in my baking skills, but I’d never do that well on the show because my fondant skills just…aren’t. I don’t even like fondant.
What Buddy should totally do is a Next Great Baking Blogger show. I’d watch that, and I bet some of you would, too. We could all vie for some awesome prize, like Queen of the Baking World. I’ve always wanted a crown. Or heck, we could also compete for cold hard cash. I like that, too.

While I was watching this morning, I saw these two huge, jacked-up bakers from New Jersey flexing their various muscle groups and looking so proud of their ability to lift gigantic cakes. And all I could think about was how proud they were of their hugeness. I’ve always been petite, and I’m cool with that. So I guess we love what we relate to. They love their giant cake, and I love my little pies.
These are so cute, and of course, they aren’t just pumpkin. They’re chocolate pumpkin. To make the filling, you literally melt chocolate and add it to all the standard pumpkin pie ingredients. The result is pretty noteworthy. The pie tastes a lot like pumpkin pie, but there’s that added richness of the chocolate. If you’ve never tried it, I urge you to give it a shot.
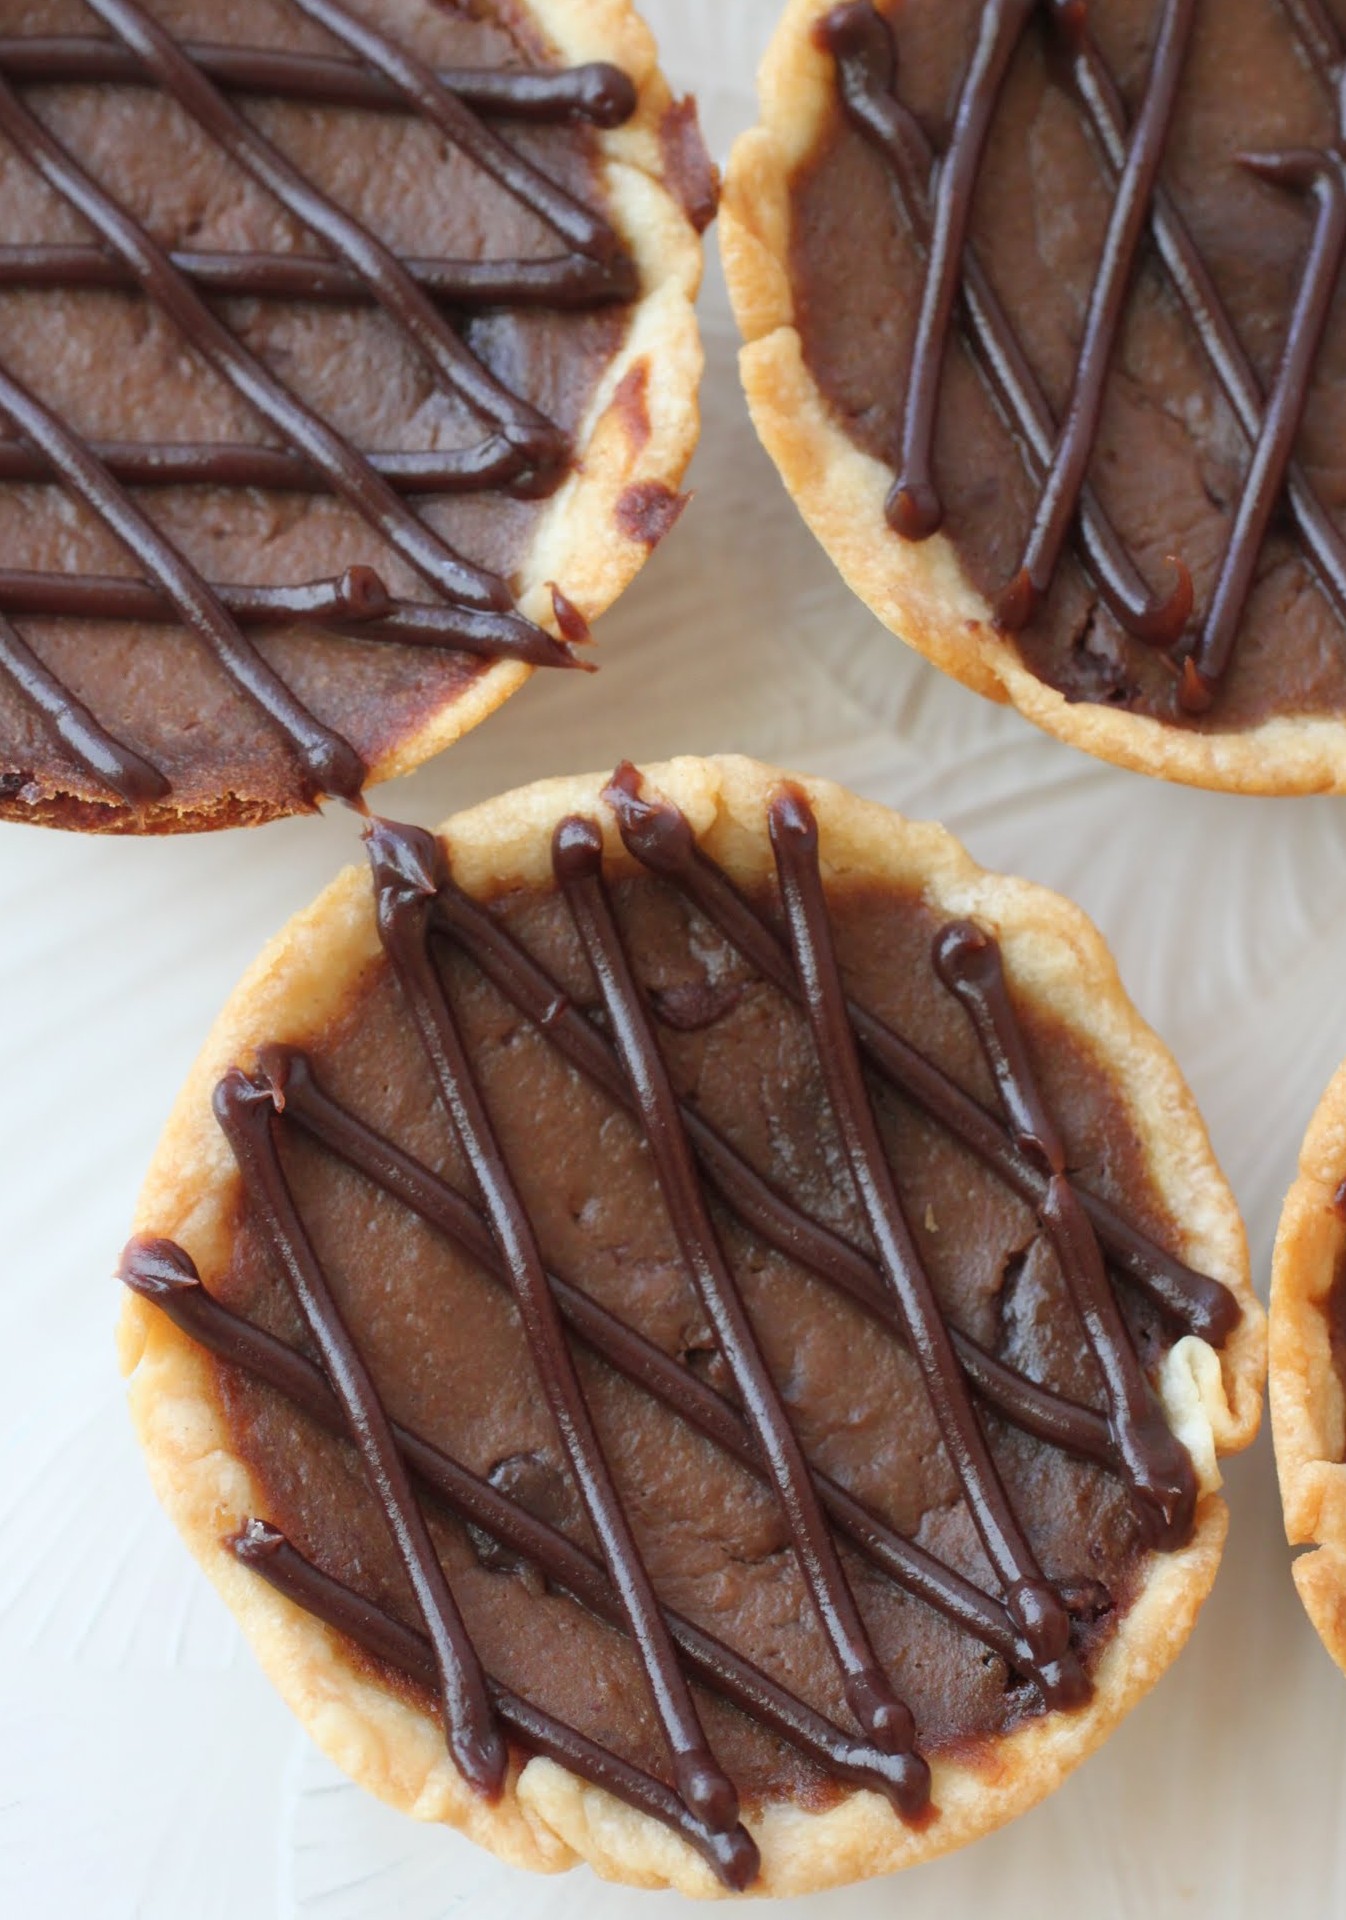
I used refrigerated dough, rolling out little circles and placing them in a muffin tin. In went the filling, and after baking and a night of chilling, I piped a lattice design on top with hot fudge. If you never use hot fudge for decorating, you should. It comes out more slowly than melted chocolate, giving you more control over the final look.
Even as I write this, I’m itching to get back to Next Great Baker. I’m so much more productive in the kitchen when I can bake right along with a whole slew of hyper-competitive dessert chefs. Or cake decorators. Whatever they are, they’re fun. And so are these little tiny pies! Try to work both into your life, if you possibly can.
Ingredients
Instructions
- Preheat the oven to 350. Coat two 12-yield muffin tins with cooking spray. Set aside.
- On a nonstick surface like Silpat, roll out the pie dough. Using a drinking glass, cut out circles and fit each circle into the muffin tin, being sure to press the dough up the sides. Poke the bottom of each little crust with a fork.
- Bake the crusts for 10 minutes. Remove from oven.
- While the crusts are baking, make the pie filling. In a microwave-safe bowl, melt the butter and chocolate chips for 1 minute. Stir until the chocolate melts smoothly into the butter. Set aside.
- Combine the remaining filling ingredients in a bowl. Pour the chocolate mixture into the pumpkin mixture, making sure the filling is smooth and all ingredients are evenly incorporated.
- Spoon the pie filling into the crusts, filling up to near the top. Bake for an additional 20-25 minutes until the filling is set.
- Cool completely. Chill the mini-pies overnight.
- When you're ready, fill a piping bag with room-temperature hot fudge ice cream topping. Using a small round tip, pipe a lattice design onto the pies.
- Serve. Store chilled and covered.
]]>
Does that work for everyone? Nope. My friend is more of an evening exerciser. By that time, I am done and a half. Can barely move, except to lift the fork to my mouth to eat dessert. That’s my workout later in the day!
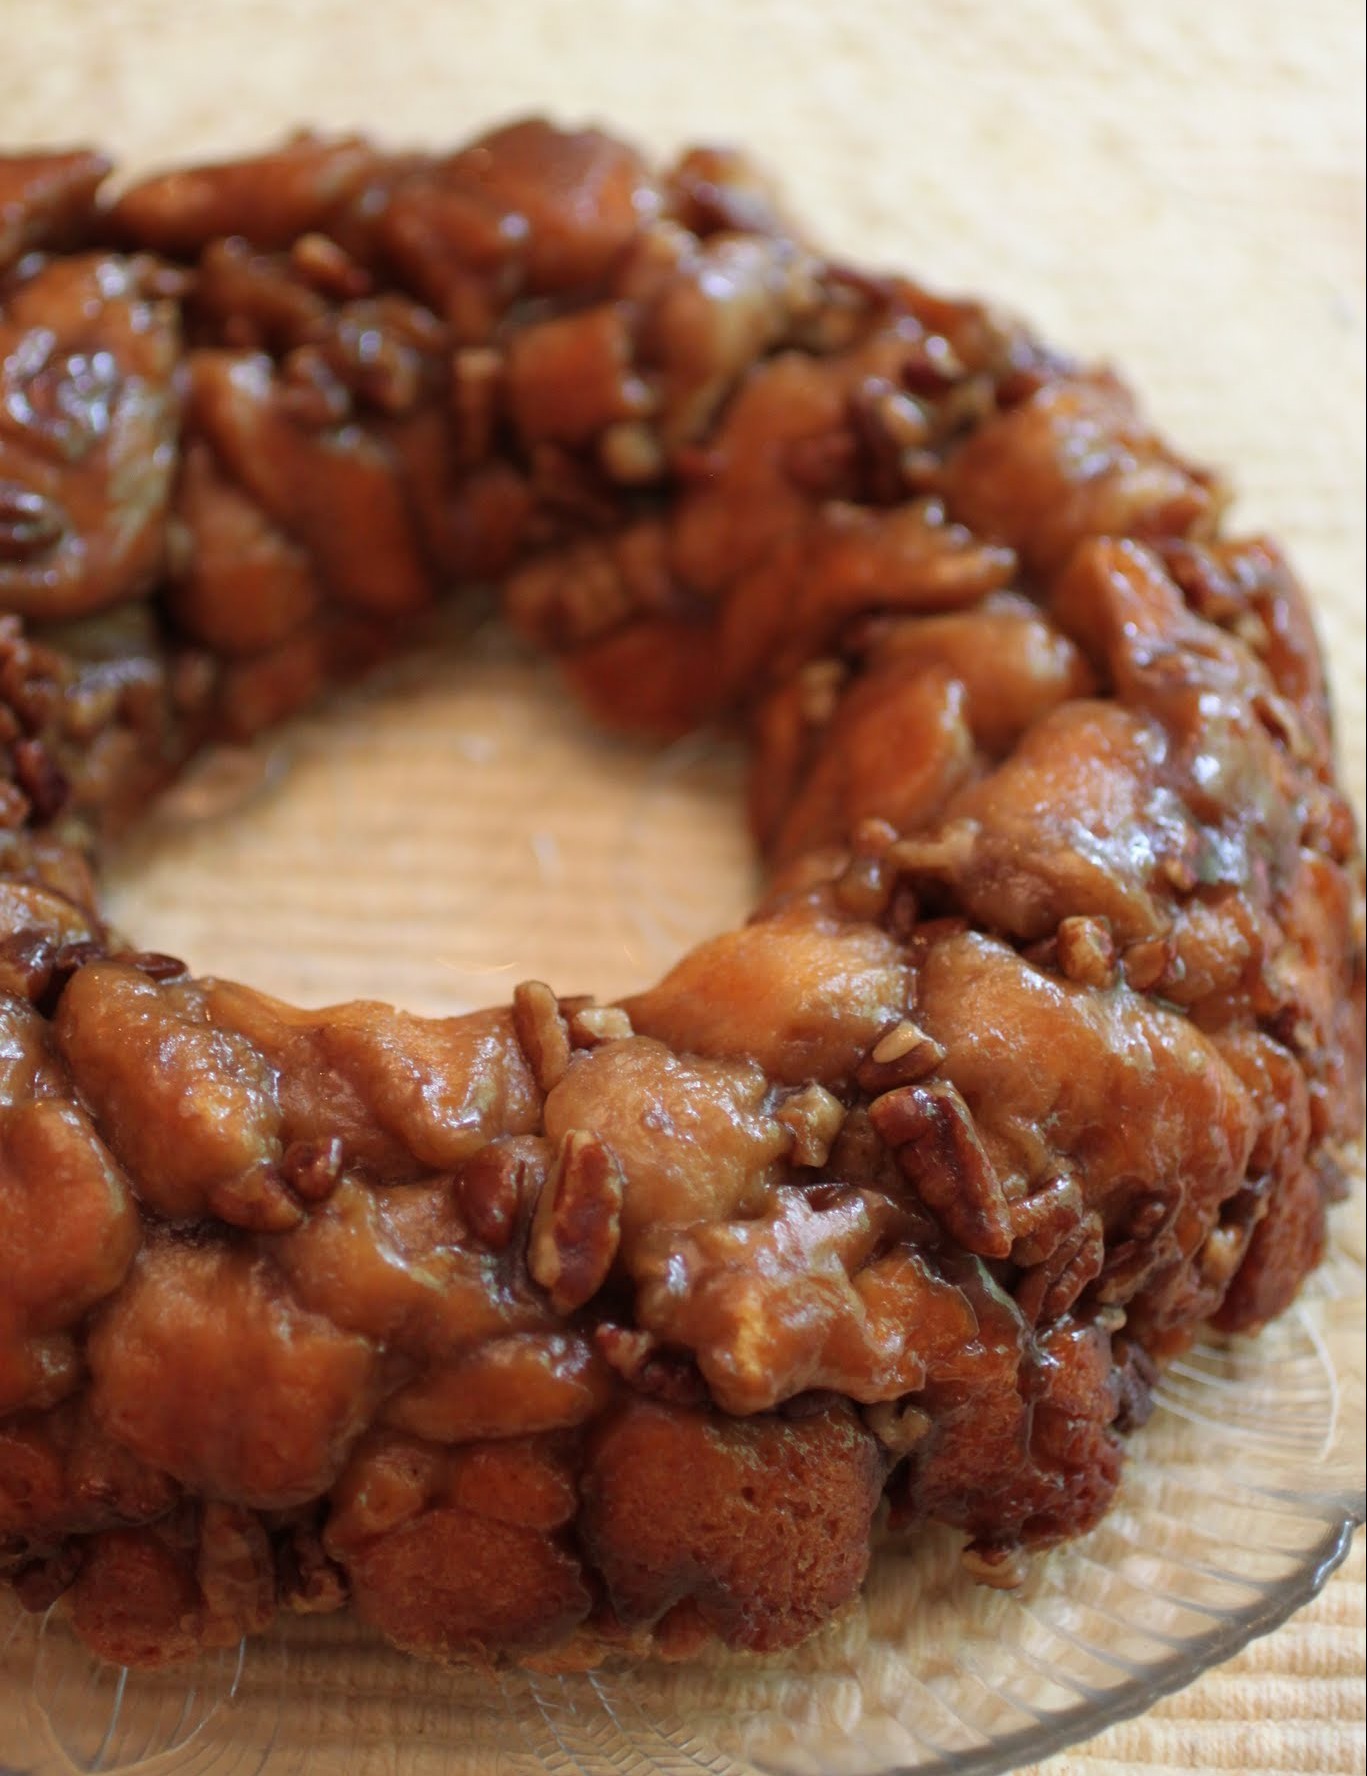
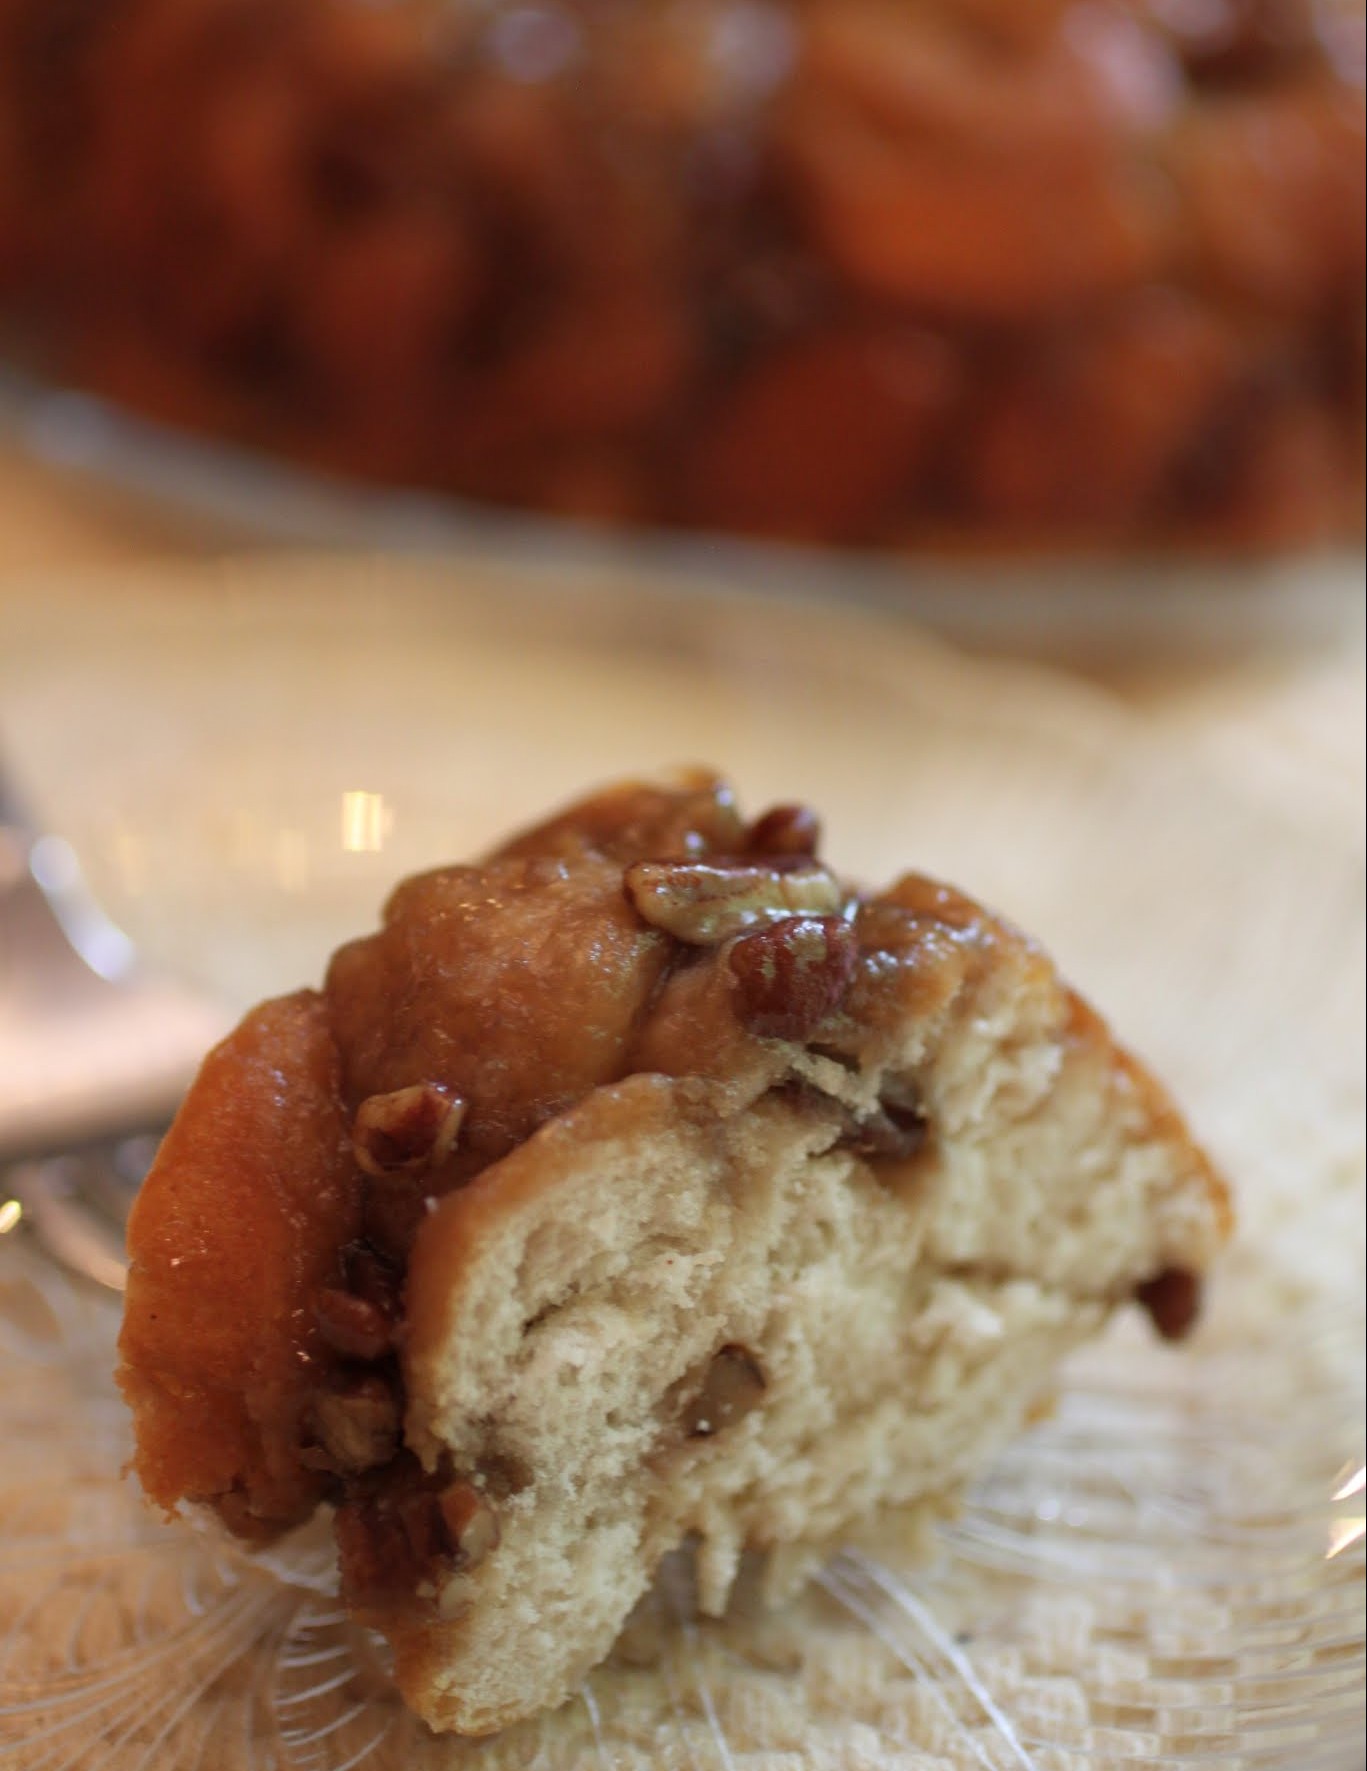
When you want a good breakfast treat that is homemade but easy, I recommend turning to refrigerated biscuits. Not to make biscuits with, silly. To make something far more fun. This salted caramel pecan pastry ring is delicious and perfect for the morning, not to mention pretty quick to put together. It takes the usual five minutes or so!
When I bake, I often listen to music. It helps pep everything up and I like to fling flour around while I dance in the privacy of my own kitchen. Sometimes the songs are a bit lacking, like this one on the radio lately that just will not stop.

I have no idea who sings it, so bear with me. It’s got lyrics that go something like, “If we’re talking bodies, you’ve got a perfect one so put it on me.” Wow. Those are some lyrics. Yes, I’m being a snob about it. I’m an English teacher.
But the most annoying part about the song is the kind-of chorus, where the singer just bleats one word: “Bodies.” Like, over and over. Or at least it seems to never end.

Why do I keep listening? Well, I don’t anymore. Now I change the station as soon as I realize what’s happening. But the first few times, it was like rubbernecking at a traffic accident. I just couldn’t listen away. I had to figure out if this was really a song.
If I’ve offended you because you love this artist, song, or bodies in general, sorry. I had to get that off my chest before moving onto a much more pleasant topic.
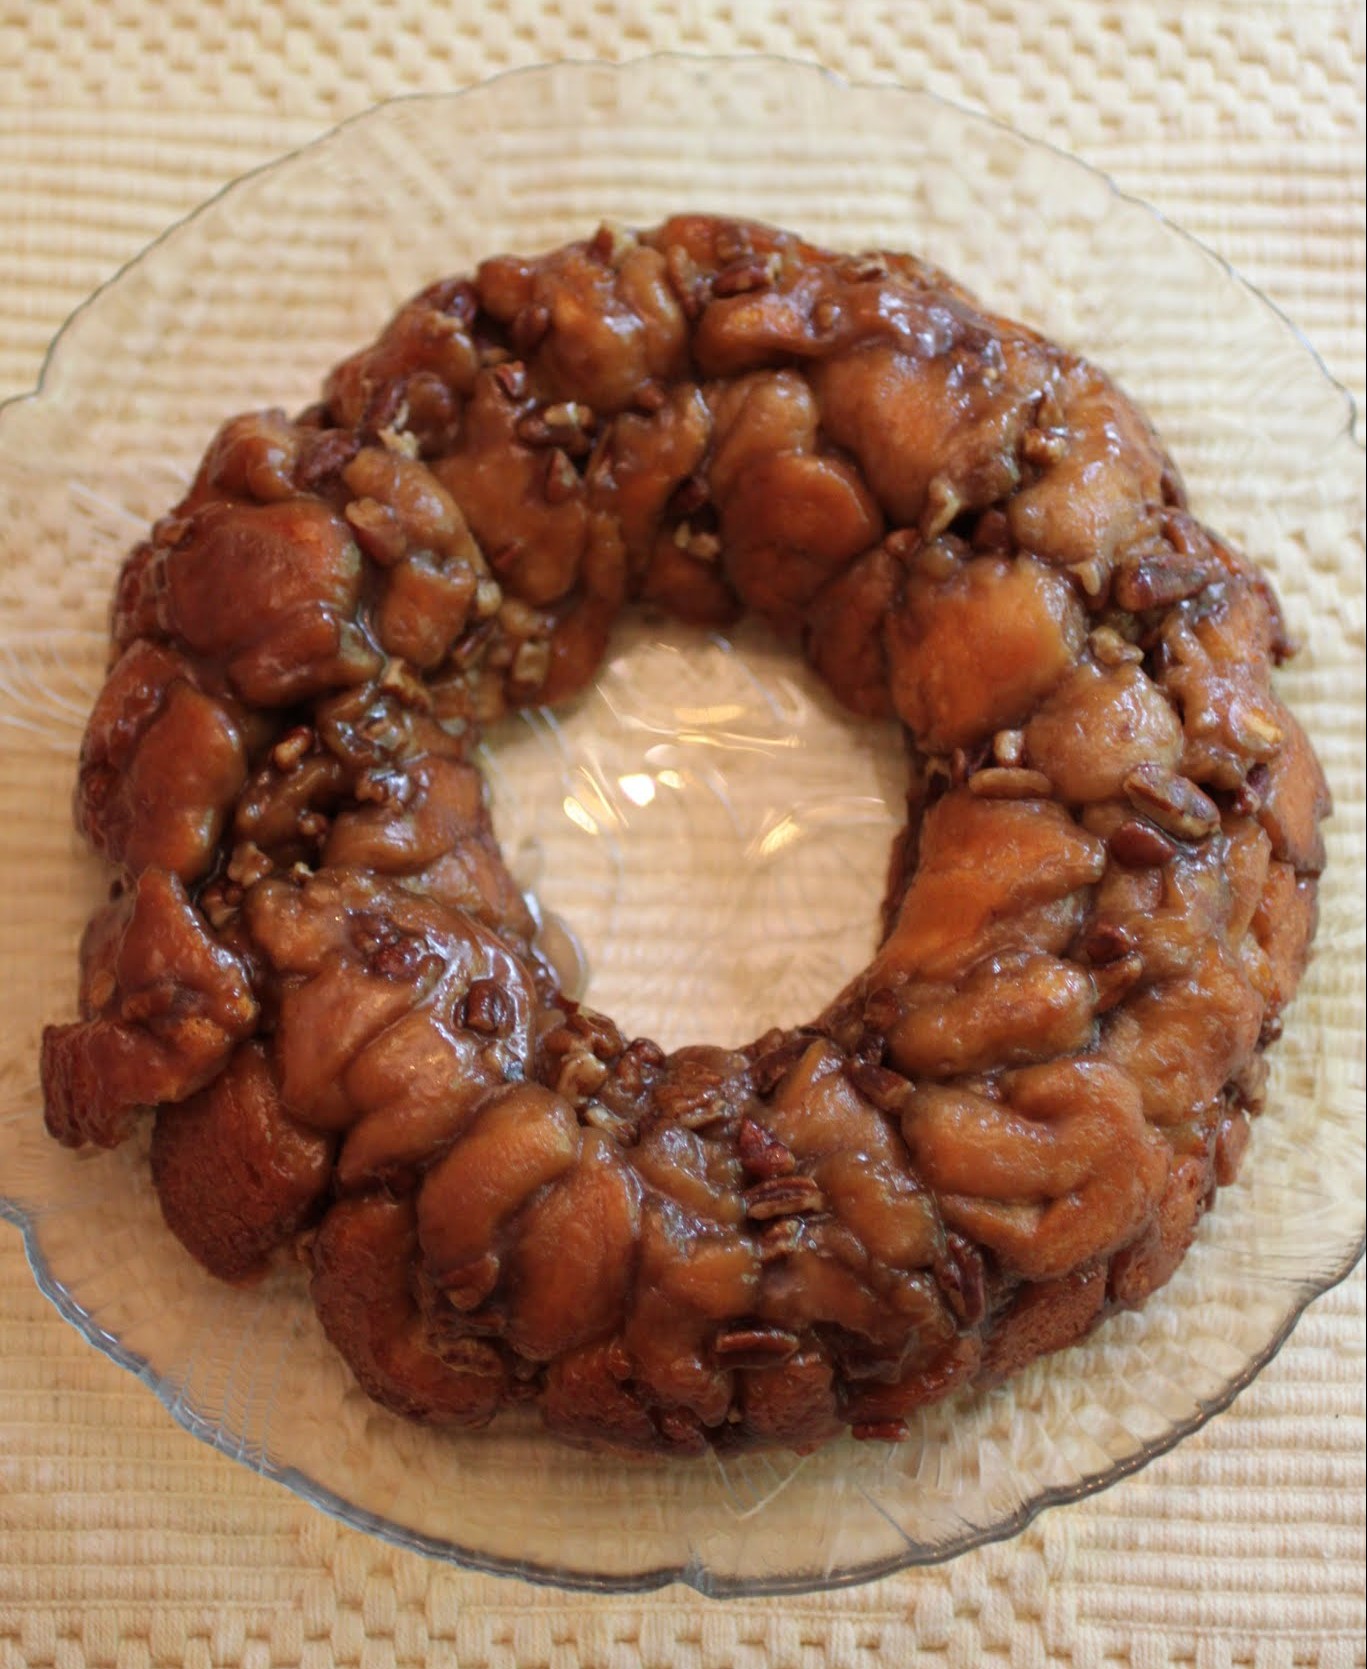
This miracle of a breakfast treat is made by dipping bits of refrigerated biscuit dough into a brown sugar and butter mixture laced with pecans and coarse sea salt. The result is quite lovely, and must be taken very seriously.
In other words, have plans to eat breakfast if you make this. Don’t skip it. Commit.
Breakfast should be something you look forward to, no matter what you crave. Hey, we all like different music, clearly. So we probably don’t all want sweet pastry for breakfast. But I do, so pass this over!
Ingredients
Instructions
- Preheat the oven to 400 degrees. Coat a bundt pan with cooking spray and set aside.
- In a saucepan, combine the brown sugar, pecans, sea salt, butter, and water. Heat on medium until the butter melts, stirring consistently. Remove from the heat.
- Open the biscuits according to package directions. Separate the biscuit dough into roughly 20 thinner pieces and break each piece in half. Roll each half into a ball and drop it into the brown sugar mixture in the saucepan.
- Toss all the dough pieces to coat. It's fine if they get mushy and lose their shape.
- Spoon the dough into the bundt pan, pressing down to make one even layer. The dough will only come up partway in the bundt pan.
- Bake for 20 minutes until brown and bubbly. Remove from the oven and cool for five minutes. Invert carefully onto a plate.
- The ring is best served warm, so if you need to, you can heat it up later in the microwave.
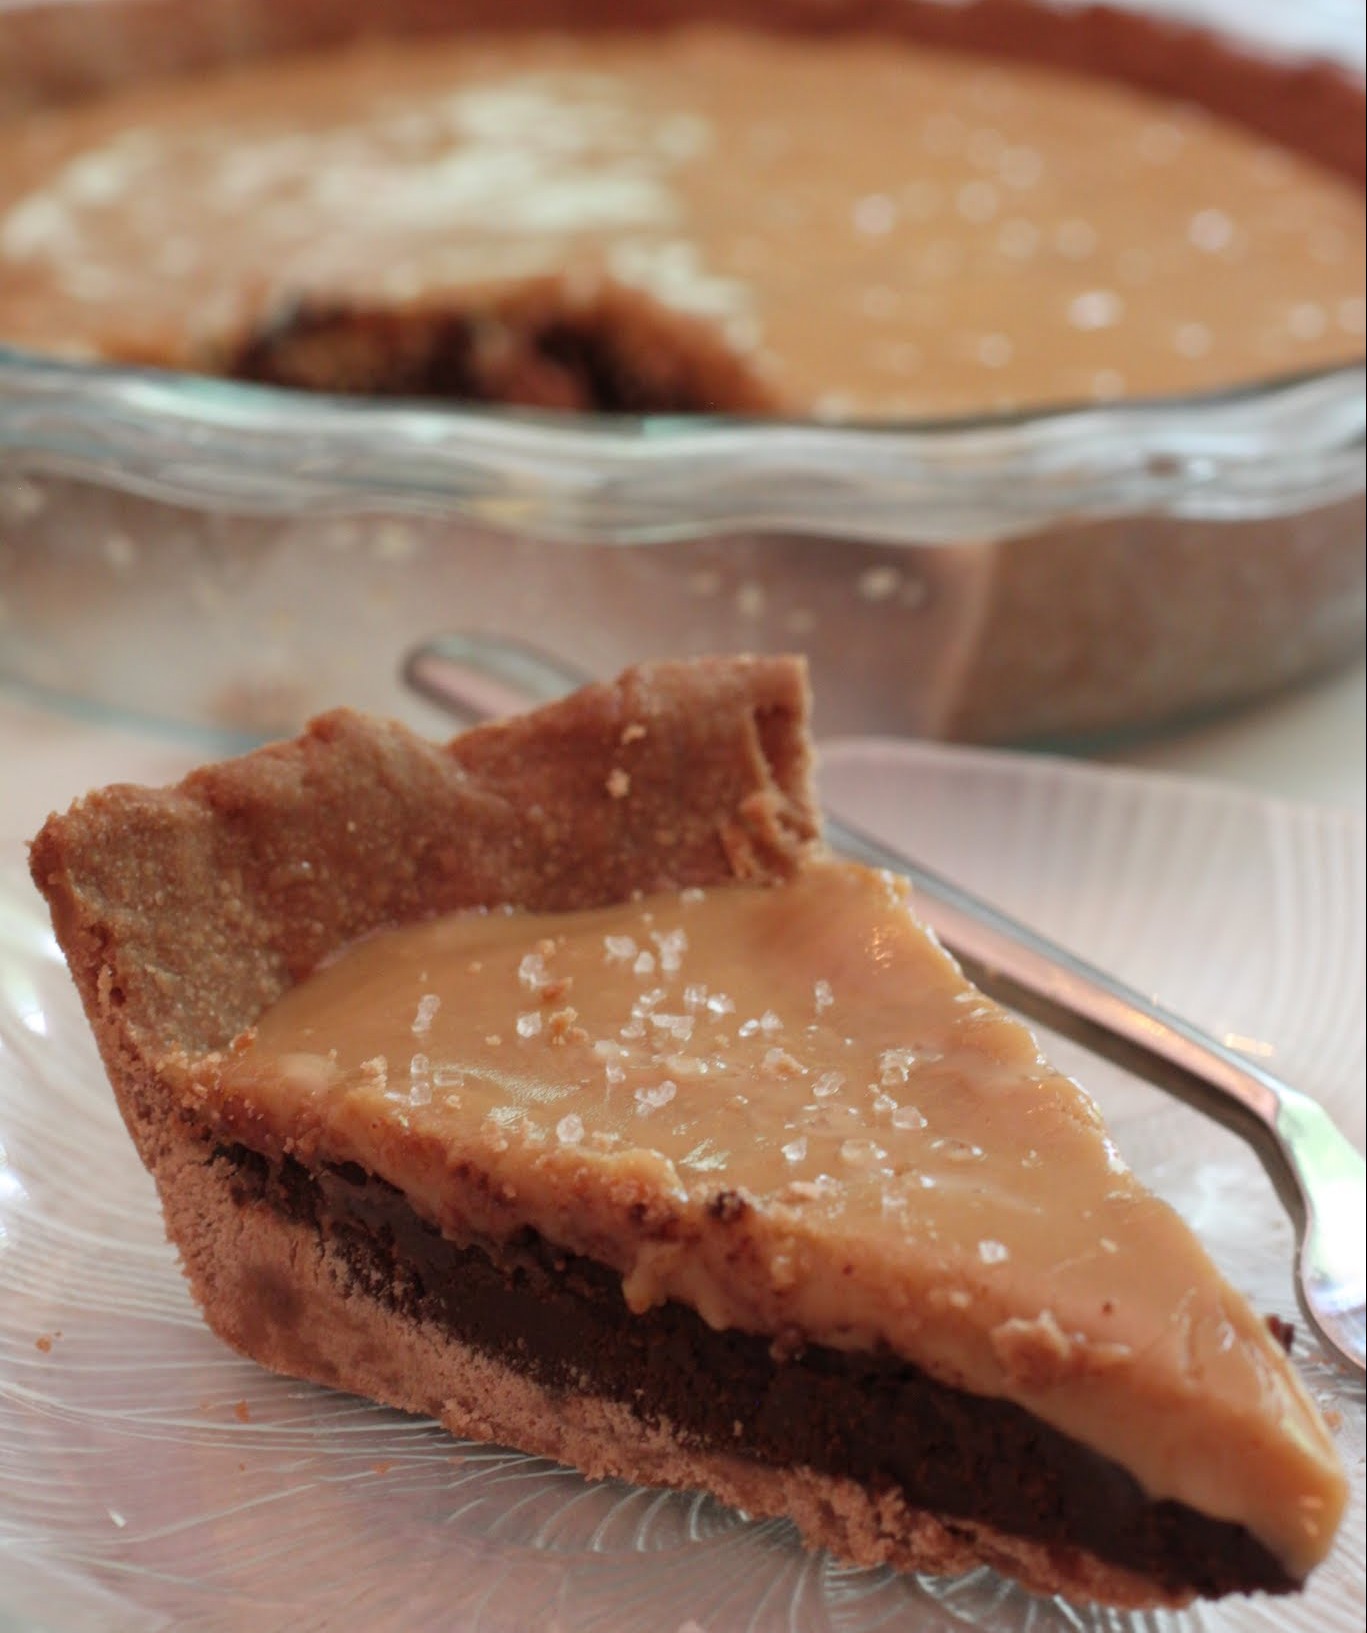
The idea of making a pie crust used to terrify me. I knew that it involved a food processor, which I owned, but couldn’t put together. Seriously. The directions were so confusing. But then, I found a way around it for an easy crust you can make in a bowl. More details on that later.
By the way, I know how to use my food processor now. But whatever. What makes this pie so amazing is peanut butter caramel. Salted peanut butter caramel. Yes, that exists. And it’s easy to make!
What was life like before people knew about salted caramel? Or sushi? Or cake pops that you put in the freezer and eat when they’re super cold?
I really, really have a thing for the freezer. Some people put baked goods into the freezer as a deterrent. Not me. I put baked goods in the freezer, wait a couple of hours, and then start gnawing away. Frozen cheesecake is the best. Frozen brownies are even fudgier than those at room temp. Now that it’s getting hot out, everything I bake (except cookies or giveaway treats) goes straight into the freezer. I strongly encourage you to give it a shot!

If you’ve decided that I’m crazy at this point, I’m okay with that. Liking things a certain way is my right, and if you care to judge, go right ahead. I won’t say anything to you if you’re wearing flats, though I might judge you privately. How do people wear flats? I would like to, in theory. They just make my calves look huge. And my legs look shorter. And maybe I just have a high arch, because heels are more comfy cozy.
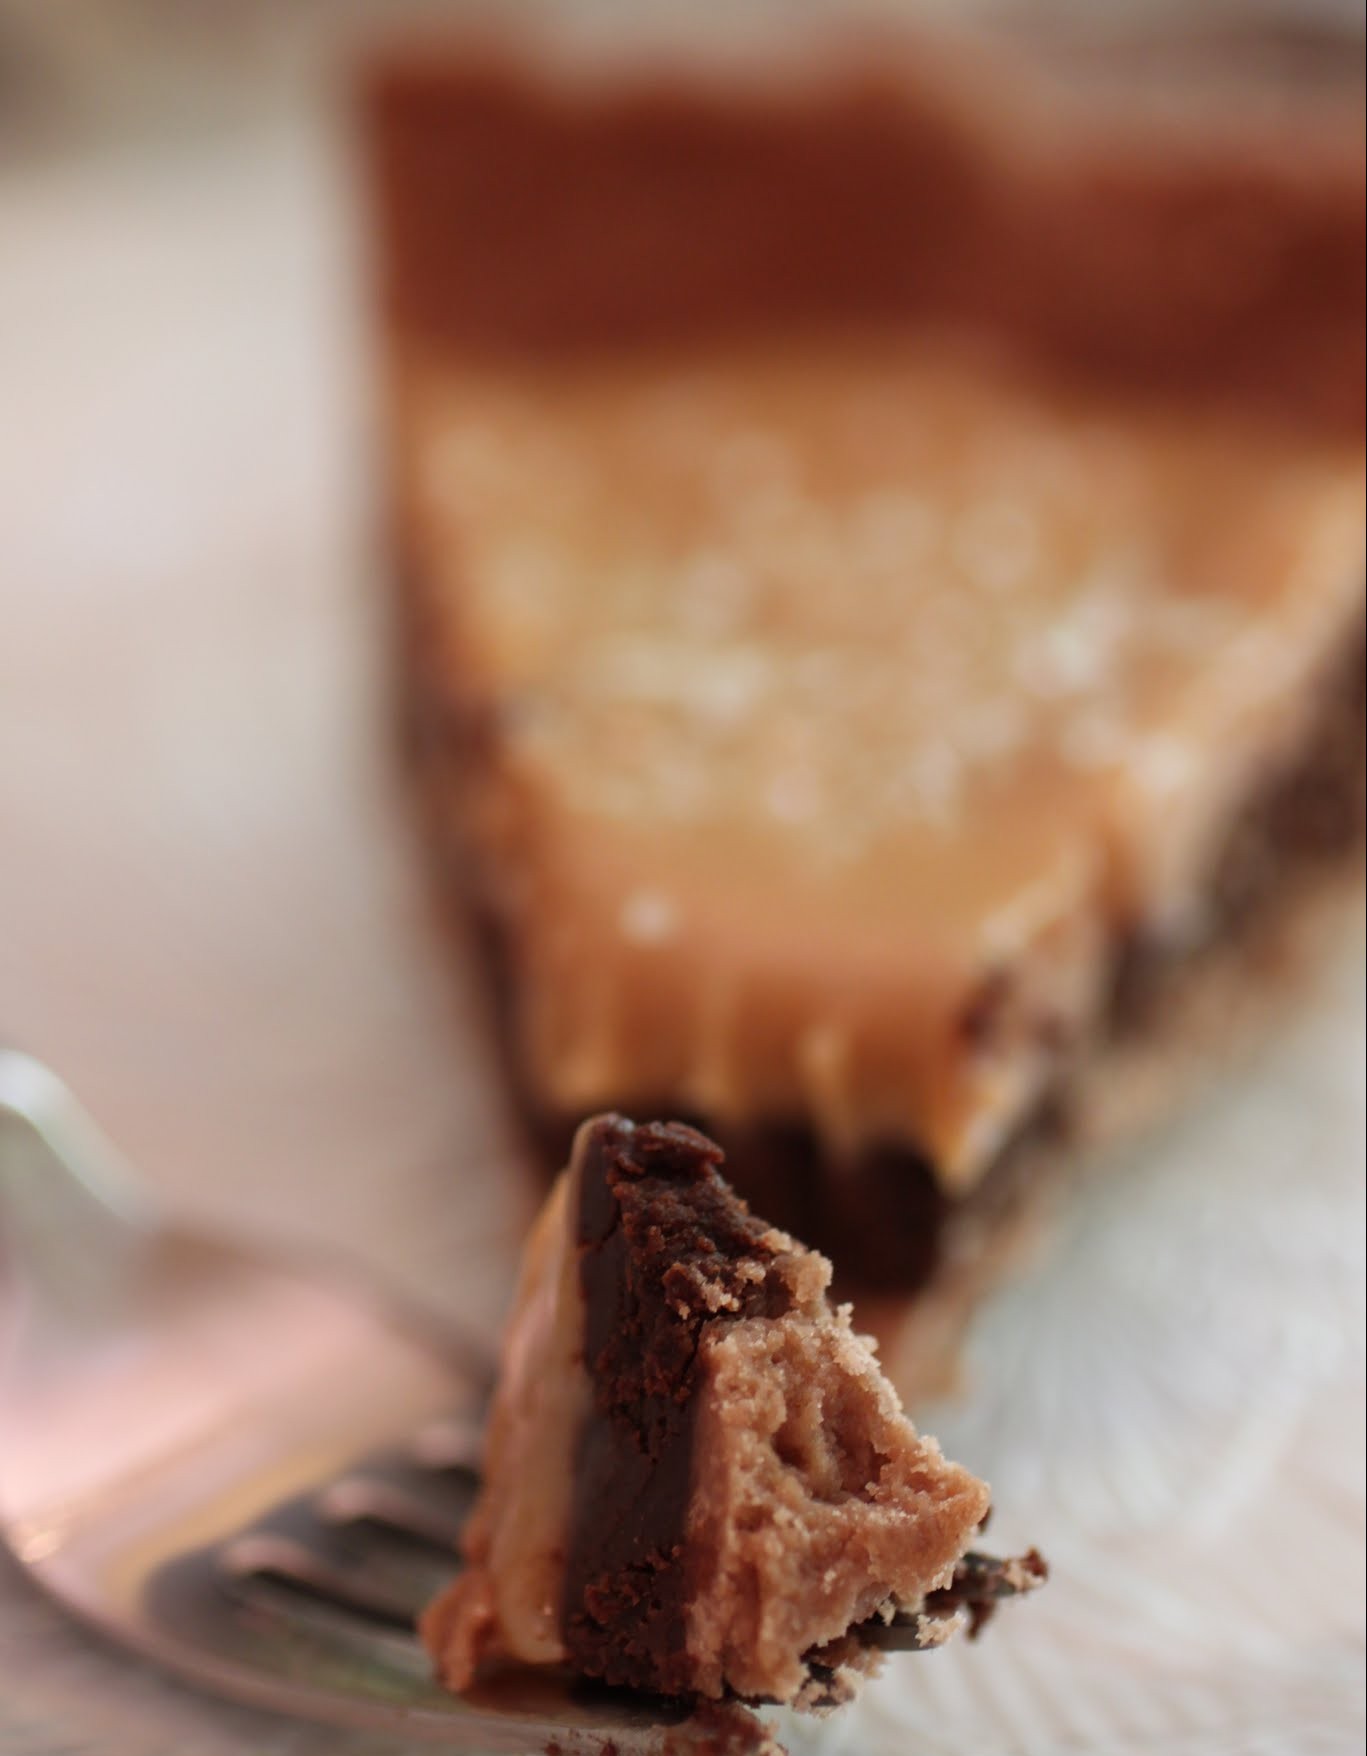
If there’s one thing we can agree on, I hope, it’s that pie crust should be easy to make. The recipe below uses melted butter instead of cubed cold butter, which is more standard. This crust can be made in a bowl in less than five minutes, and if you aren’t into the chocolate flavor, just omit the cocoa. I hope this cures you of your pie crust fears forever. Amen.
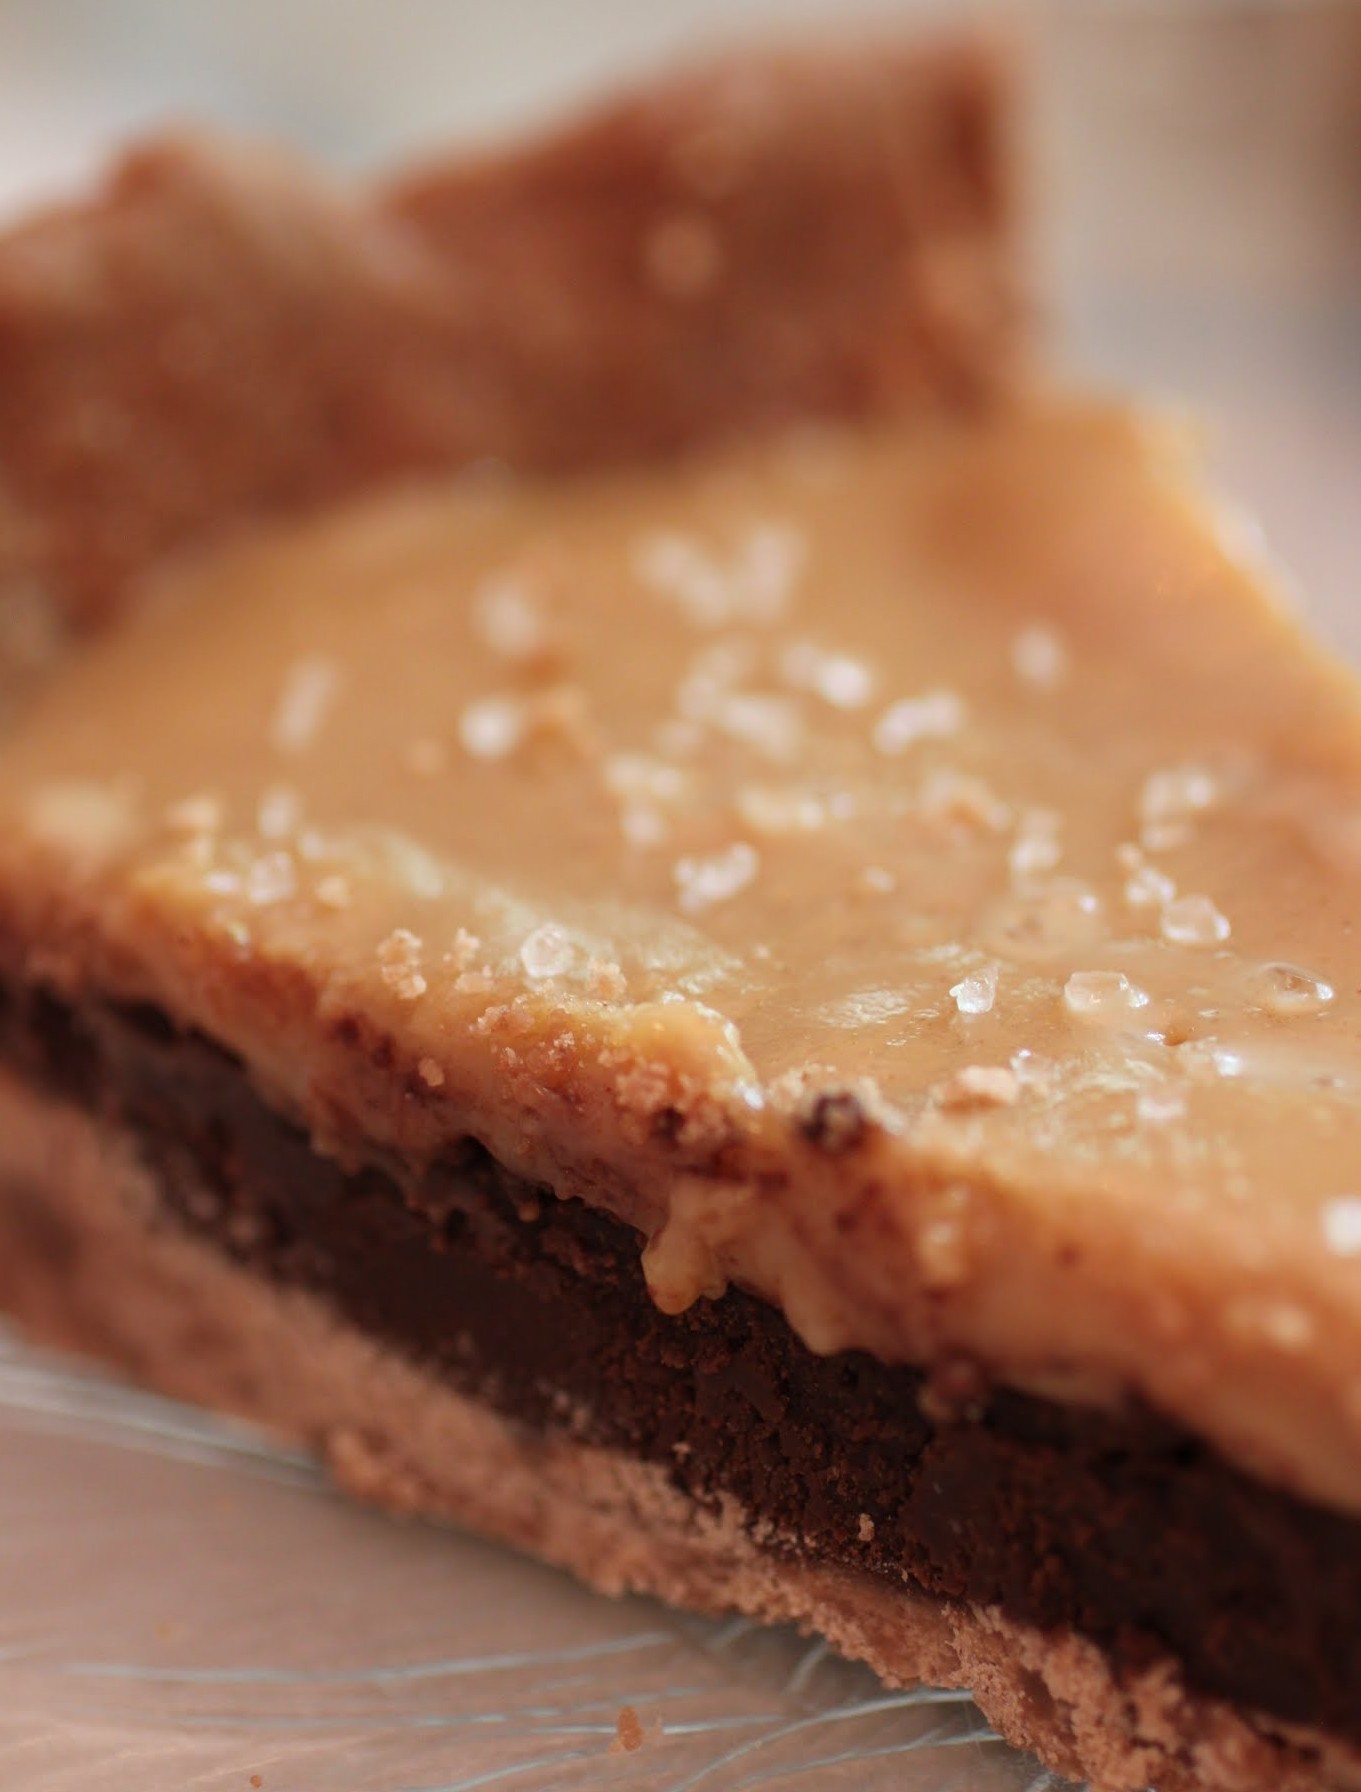
Now, I had to make this pie crust chocolate to accommodate the happiness that comes next. The first layer of filling is a very simple, thick ganache. It looks almost like a brownie, doesn’t it? But nope, it’s ganache, made purposely on the heavier side to give the pie more heft.
Layered on top is my favorite part: salted peanut butter caramel. This stuff is so simple to make that it’s almost not a recipe. Ready? You take one cup of peanut butter and melt it with a can of SCM (that’s sweetened condensed milk for you laypeople out there) until it’s smooth. Donesies! And then I sprinkle coarse sea salt on top.
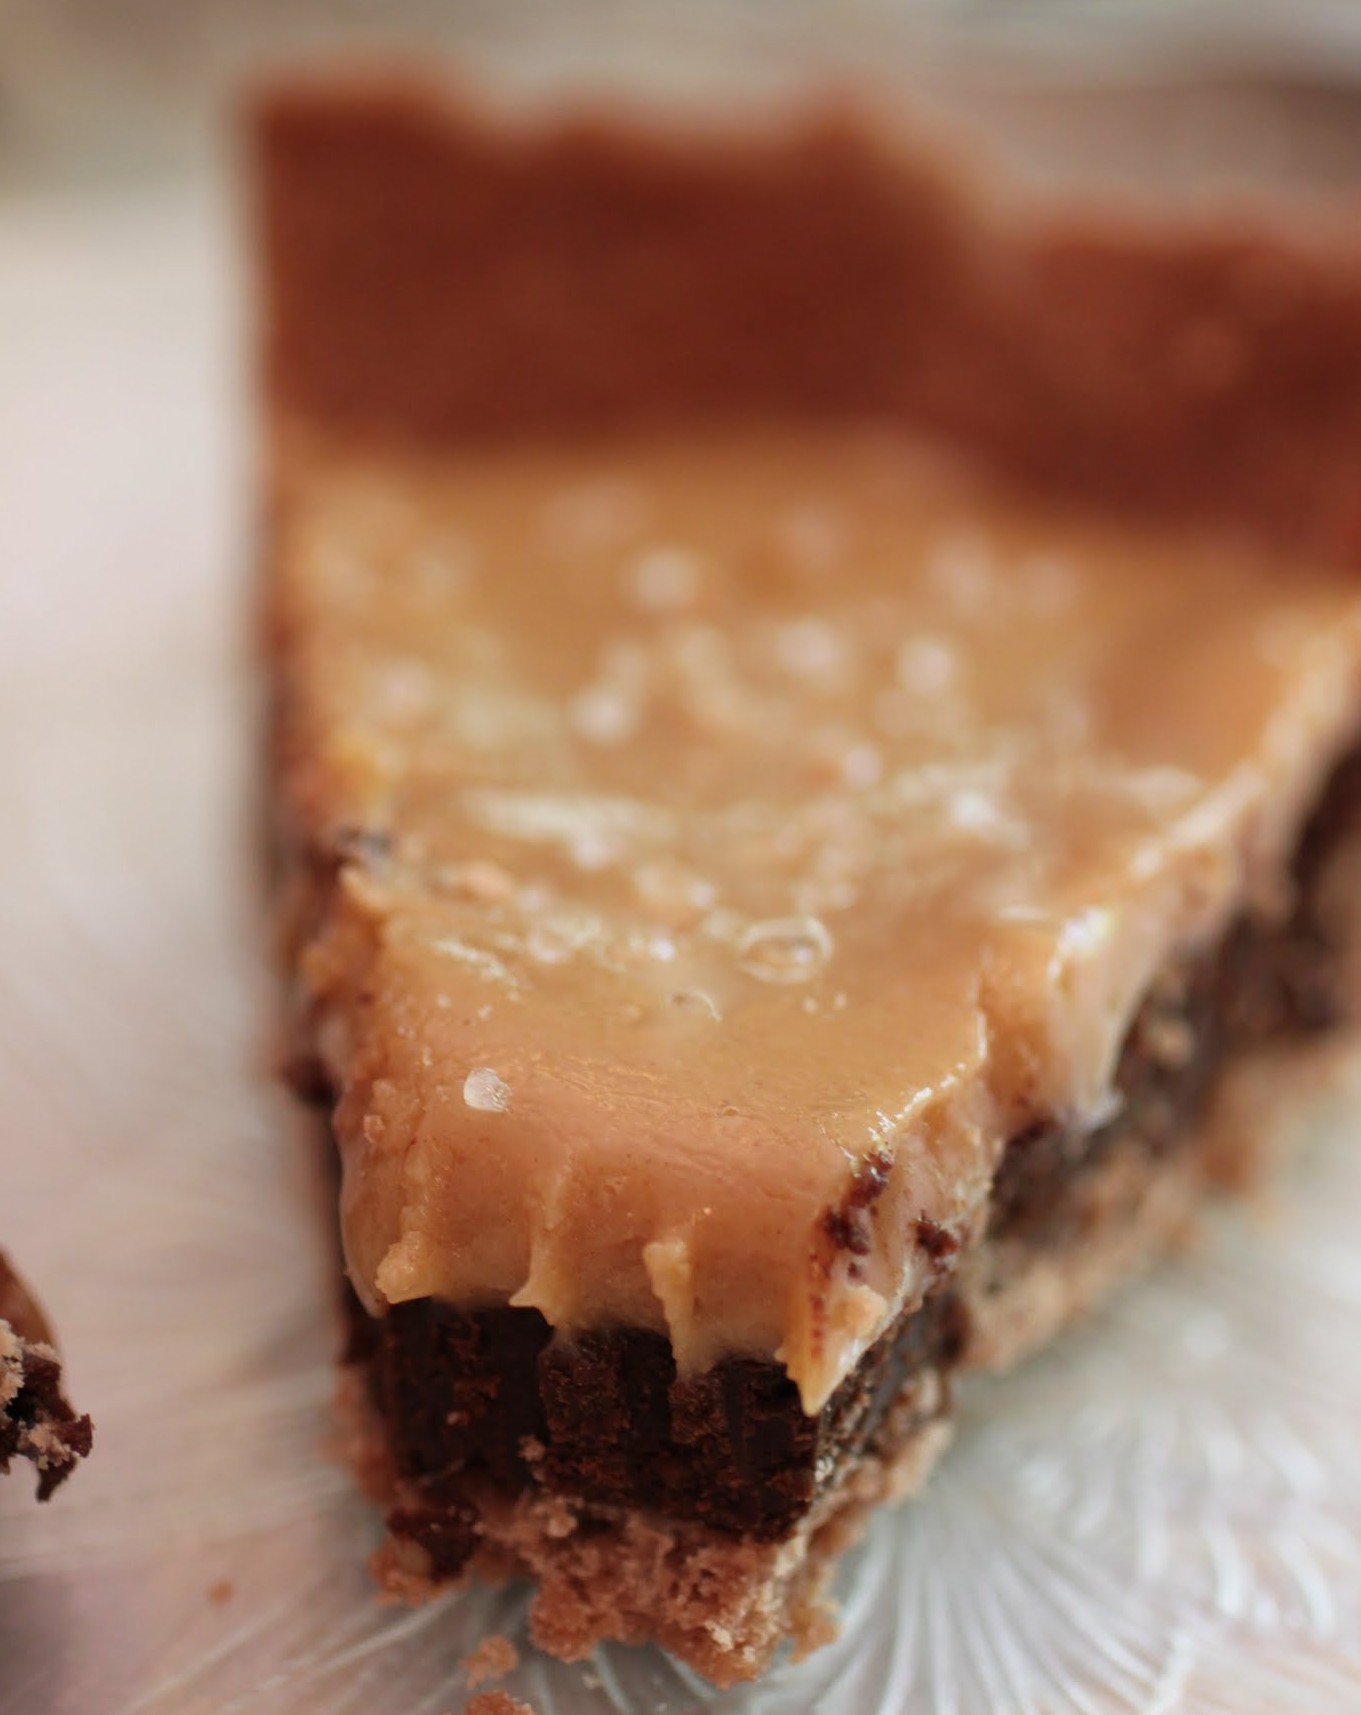
All of this comes together, gets chilled in the fridge, and you’re done. And for all this effort (i.e., almost none at all), you get some seriously impressive pie. Might I say, brilliant pie. And if you want to eat it all right away, great. But if not, freeze it! I’m telling you, people. Wave of the future!
Ingredients
Instructions
- Preheat the oven to 350. Coat a 10-inch pie pan with cooking spray. Set aside.
- In a medium bowl, combine the melted butter with the sugar, salt and vanilla until blended. Stir in the cocoa. Add the flour gradually and mix until a dough forms. If the dough is too soft, let it sit for a few minutes.
- Press the dough into the prepared pie pan, working it evenly along the bottom and up the sides. Bake for 15-20 minutes until firm and slightly puffy.
- While the dough is baking, make the ganache. In a microwave-safe bowl, melt the chocolate chips and heavy cream for one minute and 30 seconds. Stir until smooth.
- Pour the ganache into the baked pie shell, spreading it out evenly. Place in the refrigerator to set.
- While the ganache is setting, make the peanut butter caramel. In a medium saucepan over low heat, melt the peanut butter with the sweetened condensed milk until smooth and well blended.
- Pour the peanut butter caramel over the ganache and chill the entire pie until firm.
- Right before serving, sprinkle coarse sea salt over the top. Cut into wedges and serve!
]]>
This recipe is for all you kids (or dads) out there who can’t bake. Like, not at all. You wouldn’t know what to do with a spatula if it came up and kissed you on the nose.
Seriously, today’s class is called Pastry for Dummies. Or, as I like to call it, super-ridiculously-how-are-these-so-easy-to-make almond sweet rolls!
This tastes like an experienced person made it. Like it took hours to prepare. Like you belong in a bakery, making everything taste like happy. But in reality? Five minutes. Seriously. These take five minutes to make!
Mothers are important, and I think Mother’s Day exists because everyone is afraid of incurring Mom’s wrath. After all, when mothers get pissed off, the very heavens shake.
I have a great mom. We live close to one another and we talk a lot. I think she’s gotten used to me over time, considering how different we are. Like, she is not so into the baking. Or the reality TV. Or the copies of US Weekly hidden in the recycling.
Nope, my mom is into classical piano, gardening, and visiting art galleries. But we do have a lot in common past the surface, like a pretty strong work ethic. We both work our butts off. And we share the same core values, which is pretty much where it’s at.

The past few days, my mother and father watched our children so Kenny and I could have a getaway to Hershey, PA. We stayed in the resort and it was fabulous. I’ll post that one another day. But how could I not show my appreciation for parents like that?
So, these almond sweet rolls were inspired by my mom. She loves marzipan or anything almond, and when she ate these, she loved them enough to take a few with her. That’s saying a lot, because my mom has crazy willpower.
All you need here is four ingredients: crescent roll dough, almond paste, brown sugar, and an egg. You mix those last three ingredients up (preferably in a mixer) and then roll them up with the dough. It couldn’t be simpler. And the glaze is super easy, too. Take a look at the recipe and you’ll see!
This Mother’s Day, you have no excuse not to bake, even if you’re not a baker. I’ve taken care of that for you. So keep the mom in your life happy and make her something special!
Ingredients
Instructions
- Preheat the oven to 350. Line an 8-inch square pan with foil, leaving enough to hang over the sides. Coat with cooking spray. Set aside.
- On parchment paper or a silicone baking mat, roll out the crescent dough and press the triangle seams together. You want to wind up with one large rectangle.
- In the bowl of a stand mixer, beat the almond paste with the brown sugar and egg until well combined.
- Using a knife or spatula, evenly and liberally spread the almond mixture over the crescent dough, extending out nearly to each edge.
- Roll the dough up by the short end so you wind up with one long strip.
- Using a sharp serrated knife, cut the dough strip into equal pieces. It should make six even rolls.
- Place the rolls in the pan. They may not fill the pan. That's fine!
- Bake for 20-25 minutes until the rolls are turning golden on top. Remove from the oven to cool.
- In a small bowl, mix the glaze ingredients. Using a spoon, drizzle the glaze over the rolls.
- Serve warm or at room temperature. Store in an airtight container.
]]>
Sorry, but it’s still officially Pie Week here on Just About Baked. I see no reason to stop making pies. Why should I? As long as I’ve got breath in me, I will bake pies!
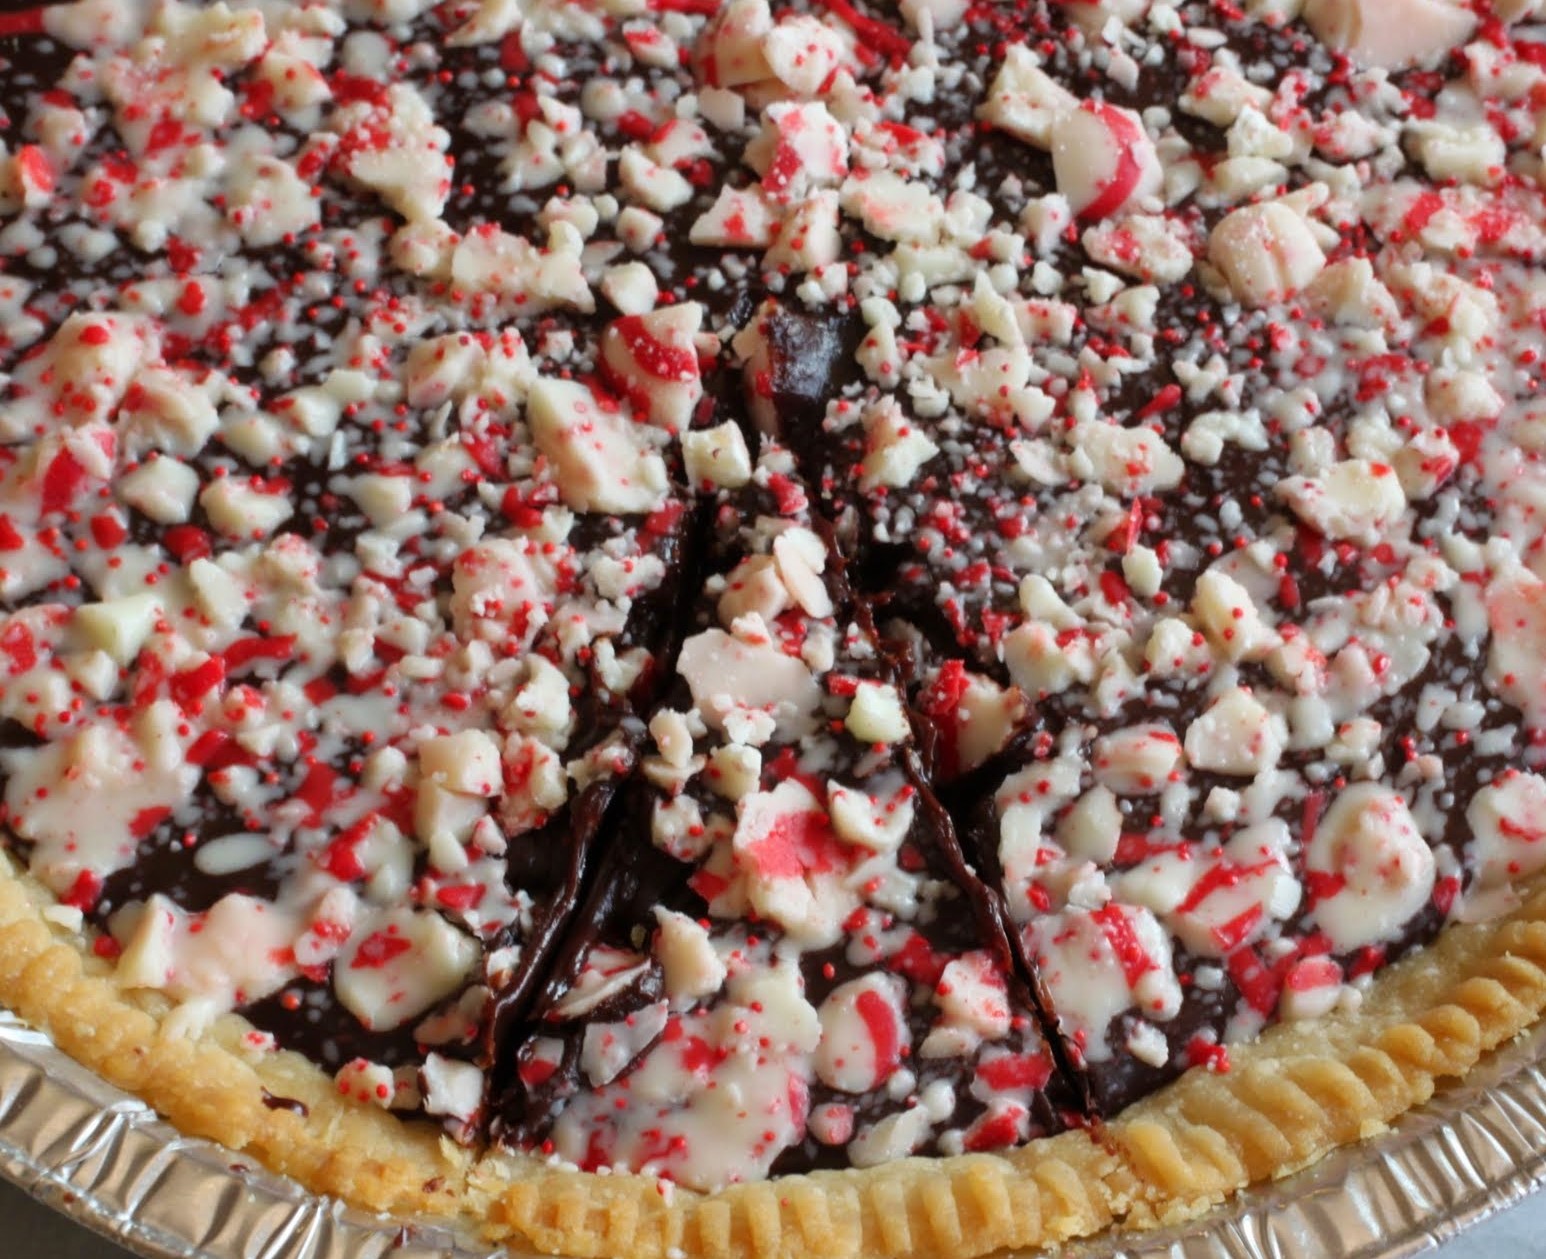
Don’t worry, this one is easy. And delicious. And holiday-esque. And gluten-free. And mint, which is highly rare on this blog. In case you missed it earlier, I’m not so fond of mint.

But heck, the things I do for my readers. You all seem to like mint, so with a shake of my head, I present you with this lovely ganache pie, rich and chocolatey and garnished with lots of crushed candy cane Hershey kisses. You are very welcome!
You see, since having kids, I’ve learned to put other people before me in every area, even dessert. My kids don’t always love the desserts I make, so I will compromise my better instincts and give them the packaged crap they prefer to homemade cookies. Why not?
It’s with that spirit that I give you this pie. Honestly, I had a few bites to test it, and considering that it’s mint, I was happy with it. That means I didn’t want to stop eating it. So for you people who really like mint, I can only imagine what this will do to you.
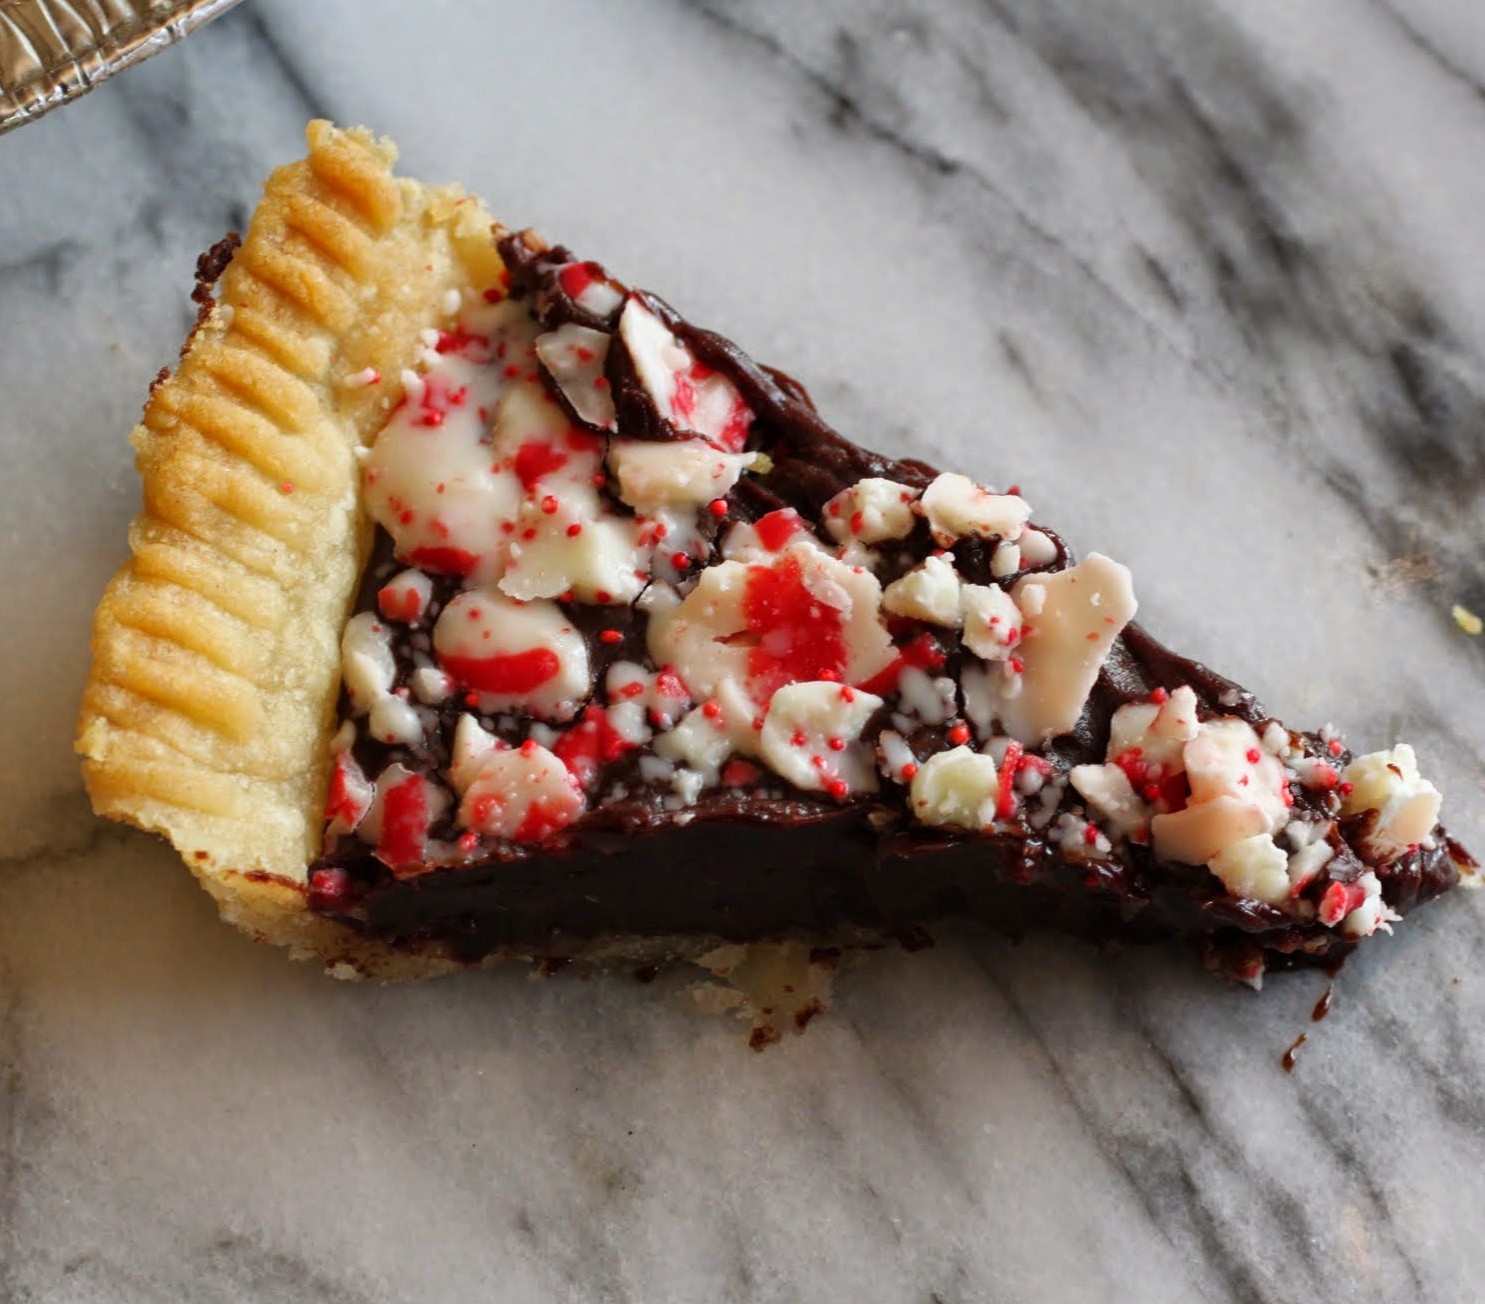
I used the gluten-free Pillsbury pie crust, which rolls out just as nicely as any pie crust I’ve ever used. It also tastes wonderfully flaky. The ganache balances it out perfectly, and the mint adds that welcome cool blast.
Speaking of, this pie needs to stay refrigerated, so just be aware. And also be aware that I will probably not make anything mint again until Girl Scout cookie season. This is my gift to you. Happy Holidays!
Ingredients
Instructions
- Preheat the oven to 350. Coat a 9-inch pie pan with cooking spray.
- Roll the pastry dough into a large circle after kneading according to package directions. Press the dough into the pie pan and use the tines of a fork to make a pattern along the edge.
- Prick the bottom of the crust with the fork. Bake the crust for about 20 minutes until golden.
- Make the ganache. In a microwave-safe bowl, heat the chocolate chips and heavy cream for 1 minute. Stir until smooth.
- Pour the ganache into the cooked pie crust. Sprinkle the chopped candy cane kisses on top.
- Chill for 3 hours to overnight. Slice into wedges and serve.