When it comes to my birthday, I still feel like a little kid. I want presents, parties, and many celebrations. Sometimes that means I’m setting myself up. Let’s face it: I’m a mom of three and nobody has thrown me a party since I was 25. That was a loooooong time ago. But still, I hold out hope!
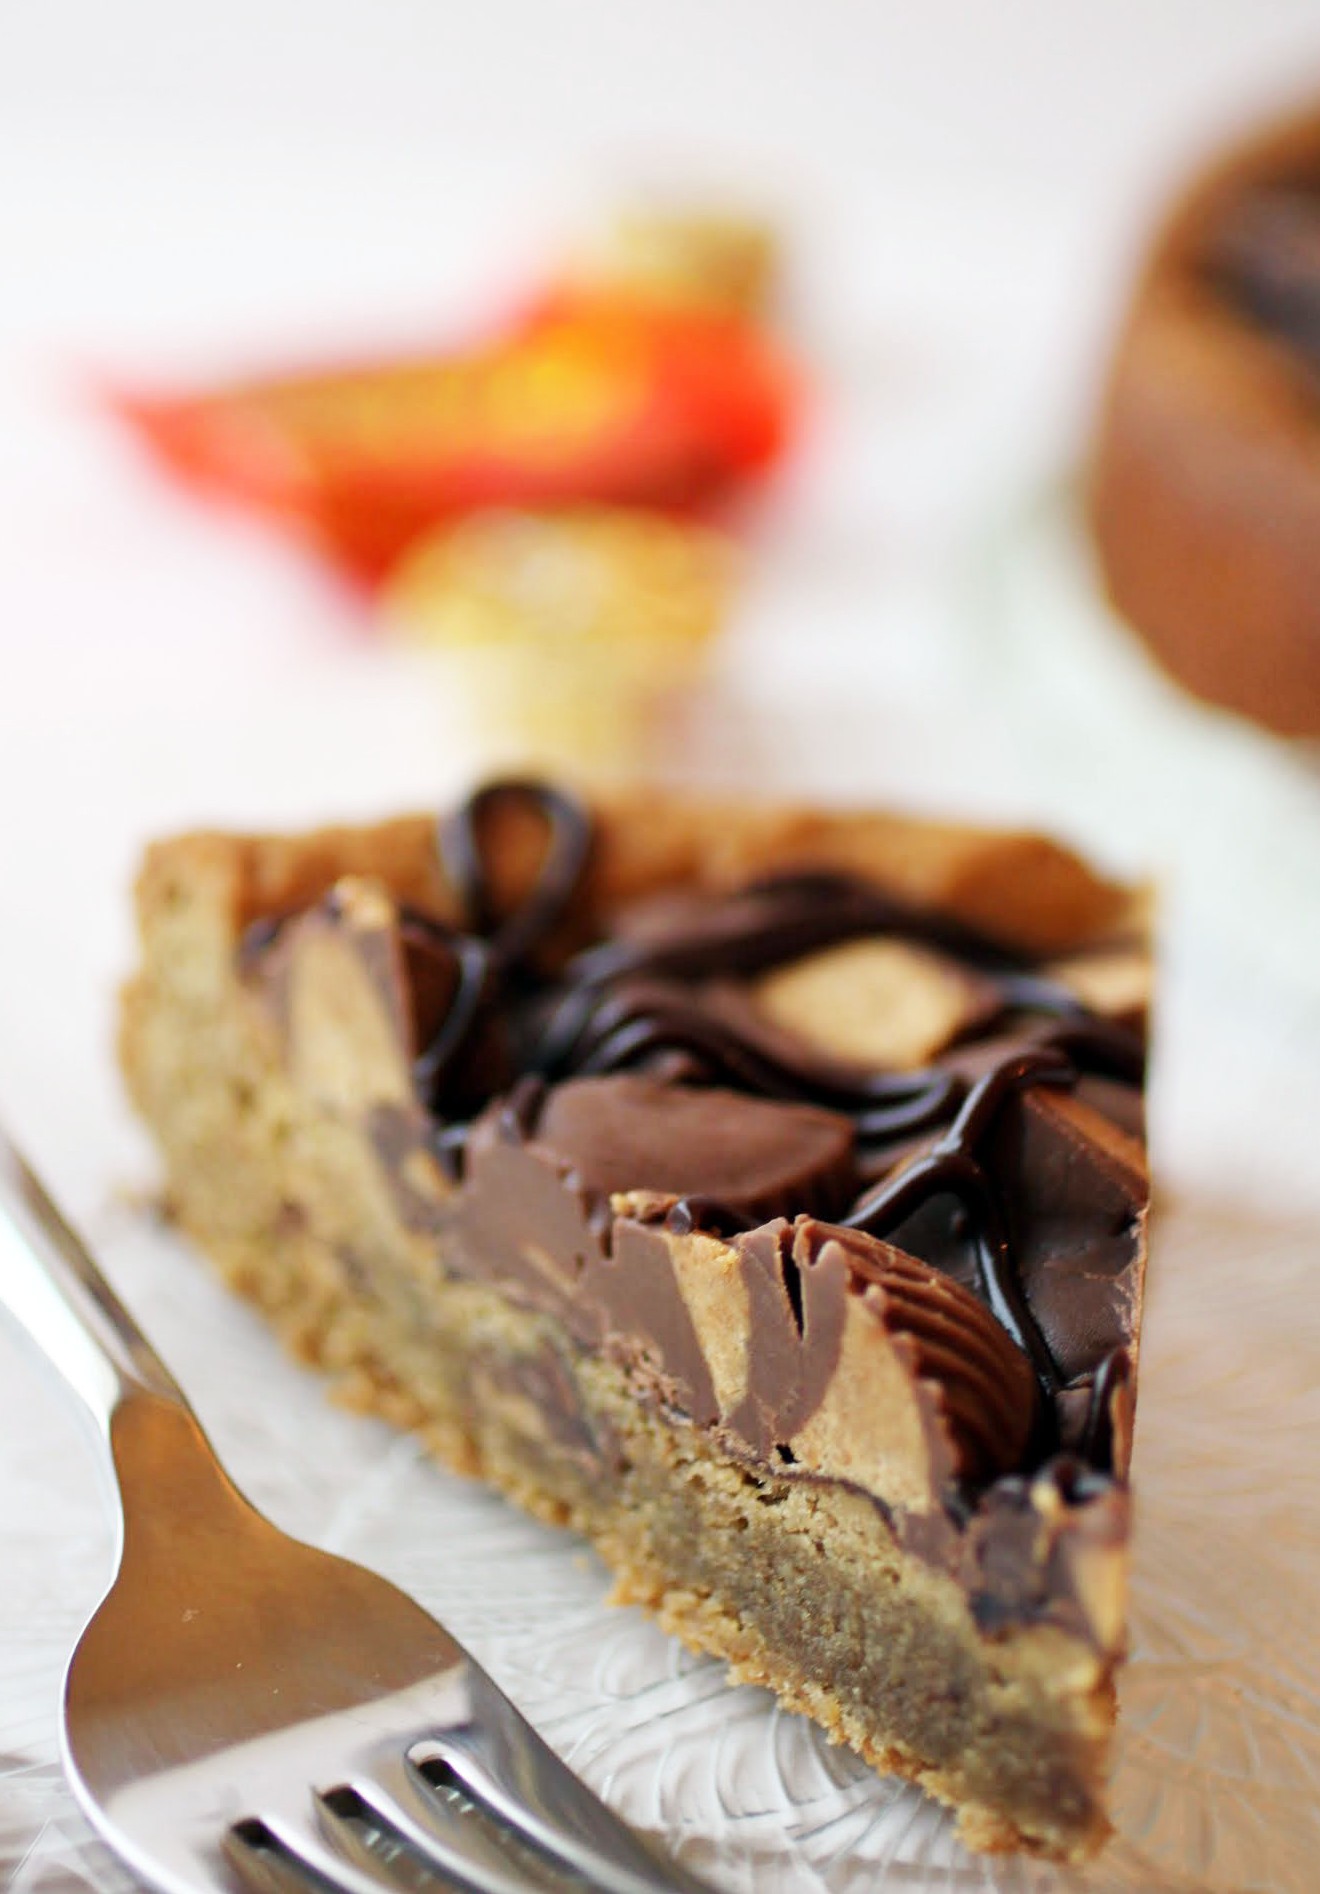
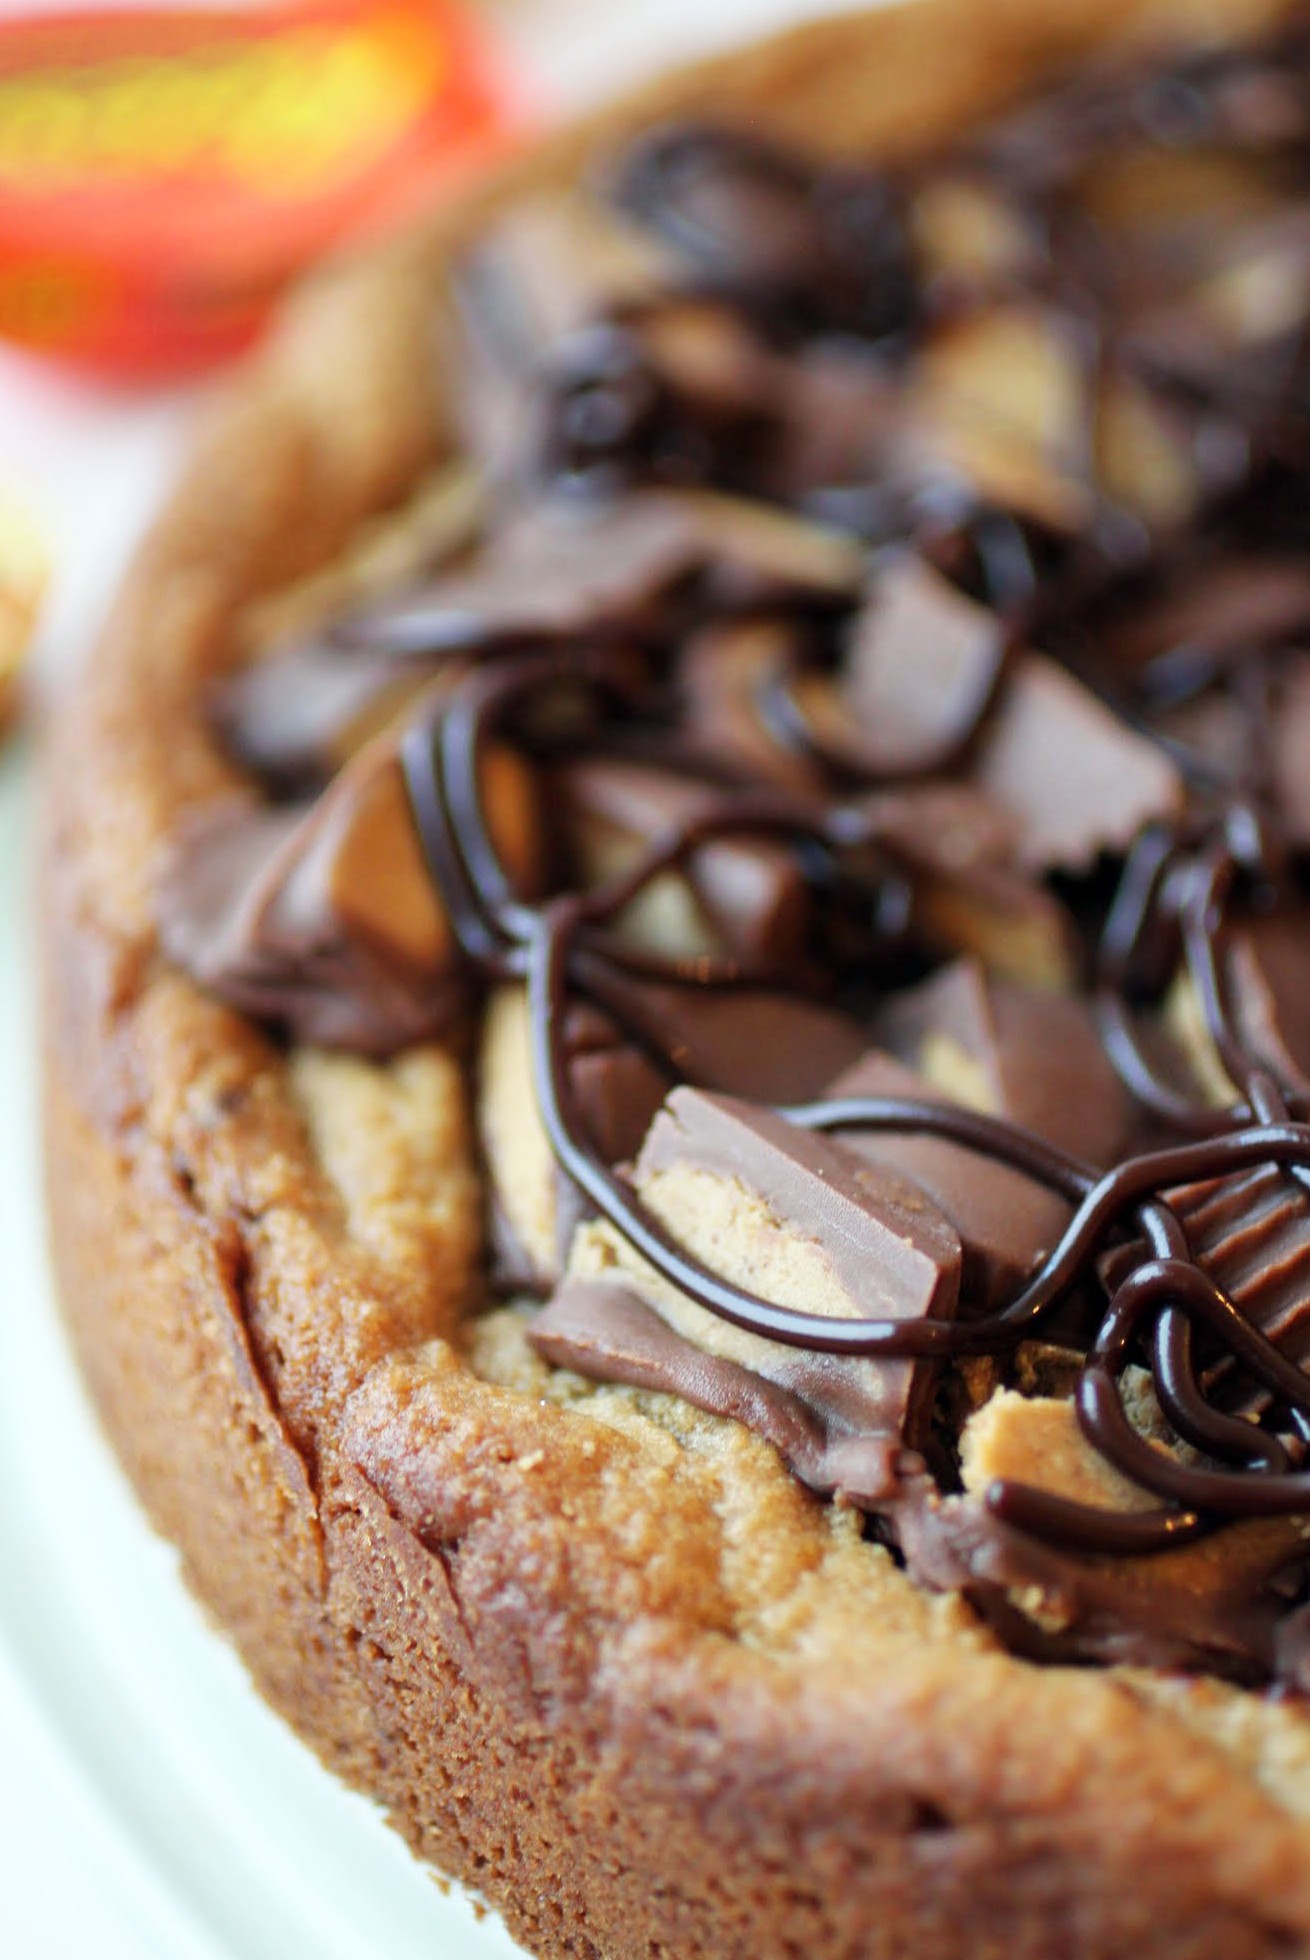
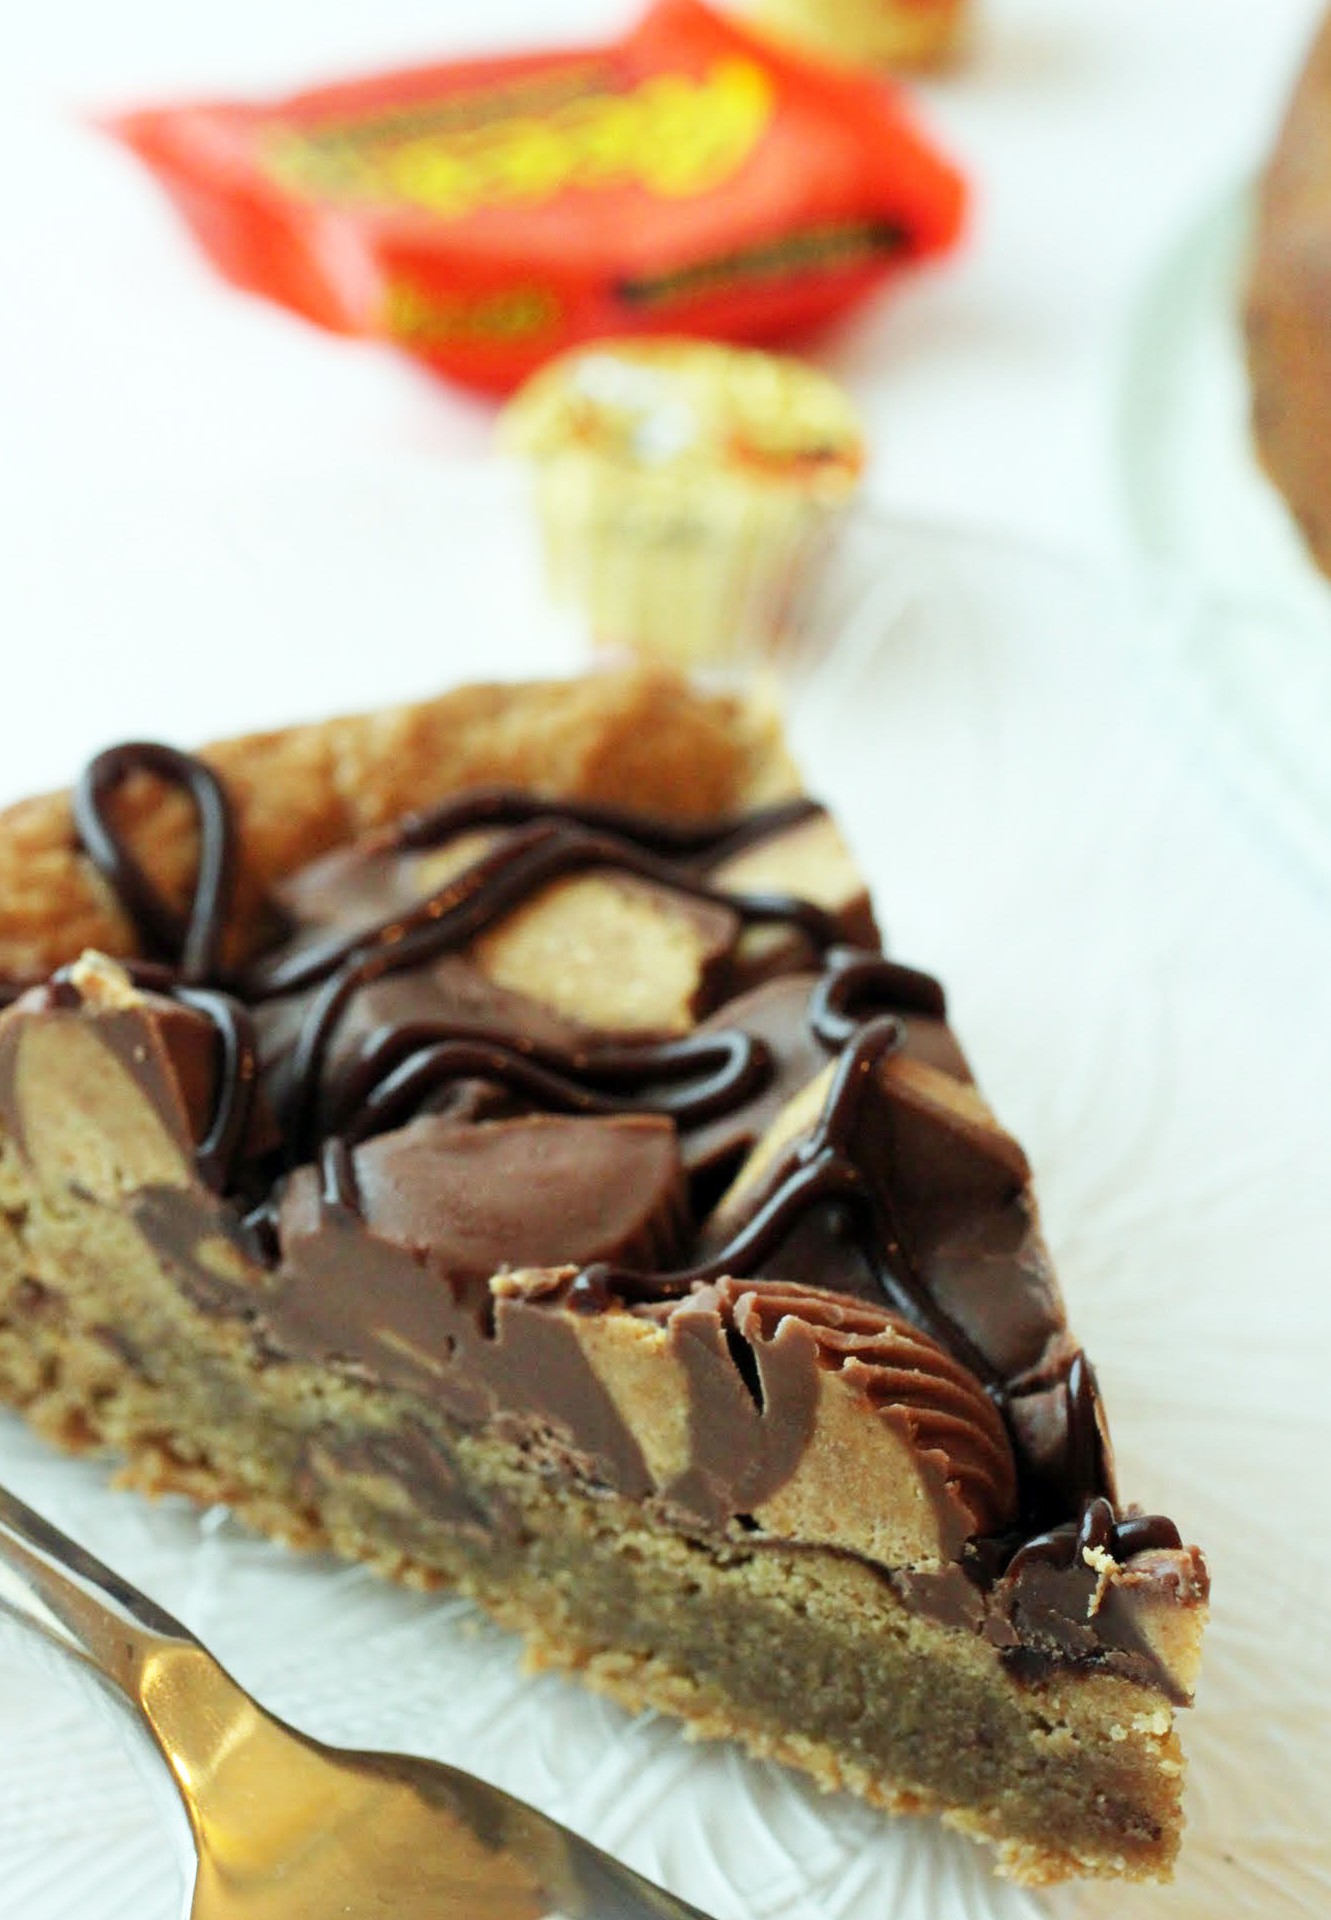
One thing I’ve learned to do is bake my own birthday treat. A few years ago, I baked this cookie cake for the first time. It was my favorite cookie cake ever, but my photo skills weren’t so great back then. Plus, I wanted to see if I could make the whole thing GF and a little easier. Done and done!
Now that I’m off the hook for jury duty (I didn’t get selected, but I did make it into a courtroom, so that’s always fun), I’m full steam ahead on getting ready for the school year ahead. That means a lot of organizing, cleaning, and decision-making.
When I changed schools earlier this summer, I left a very beautiful school building behind in exchange for one with a lot more history and age. My new work home is a lot older, but it’s kept up nicely and I’ve been feeling at home here.
The thing is, I’ve been getting this reaction from some people about my change of venue that is less than desired. People tend to set a lot of store by new and sparkly things. Hey, how can I blame them? New is usually very nice. But no matter how nice a space is, a school especially, the end result is what everyone makes of it.
Students make schools come alive, not awe-inspiring entryways or corporate-looking office spaces. This is a school, and it looks like one. Personally, I find that comforting.
Okay, end rant. Can I talk about this cookie cake now?

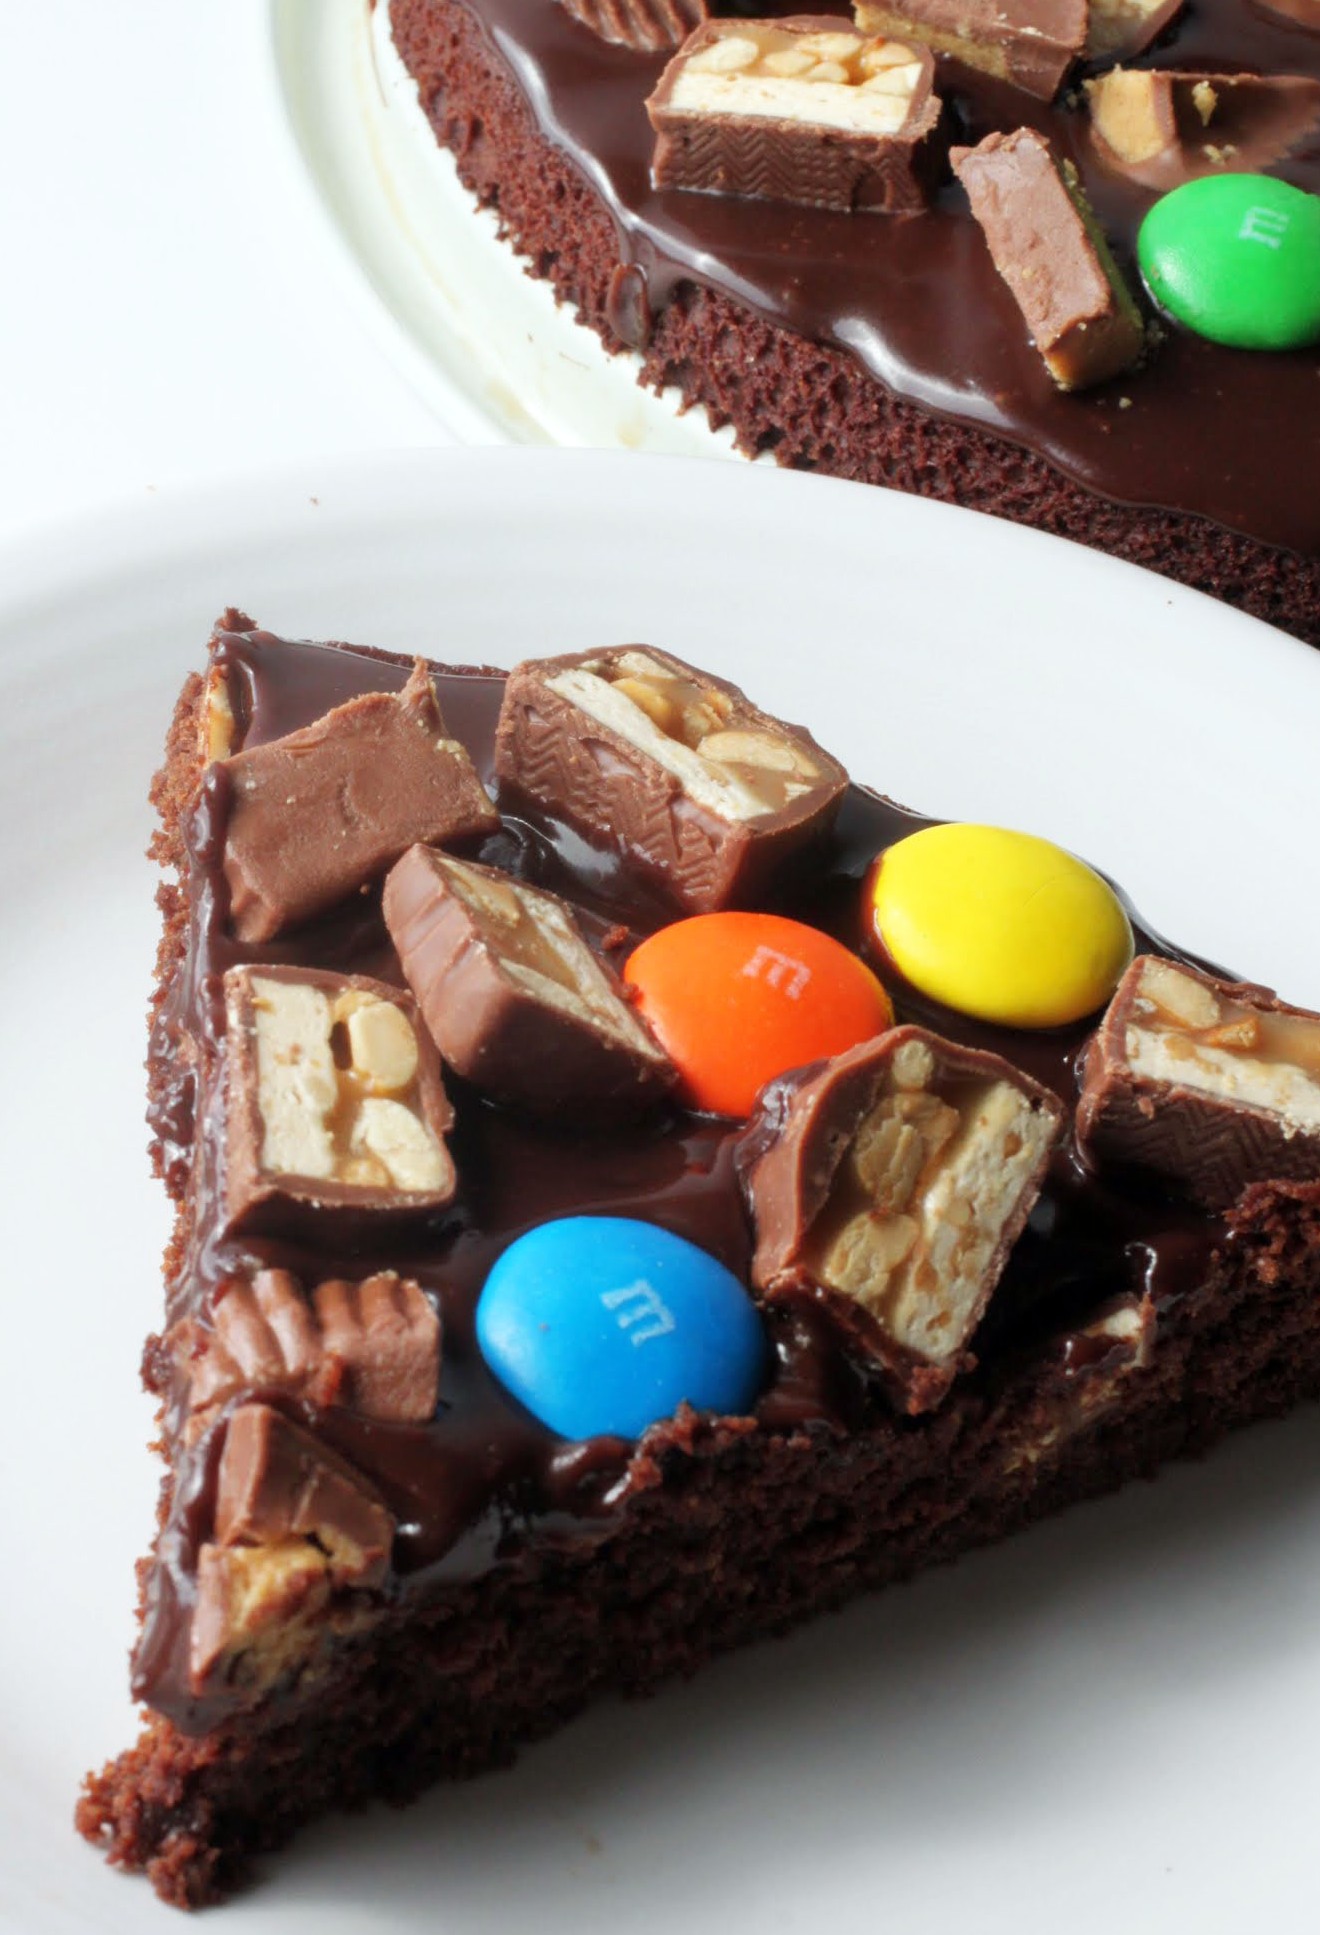
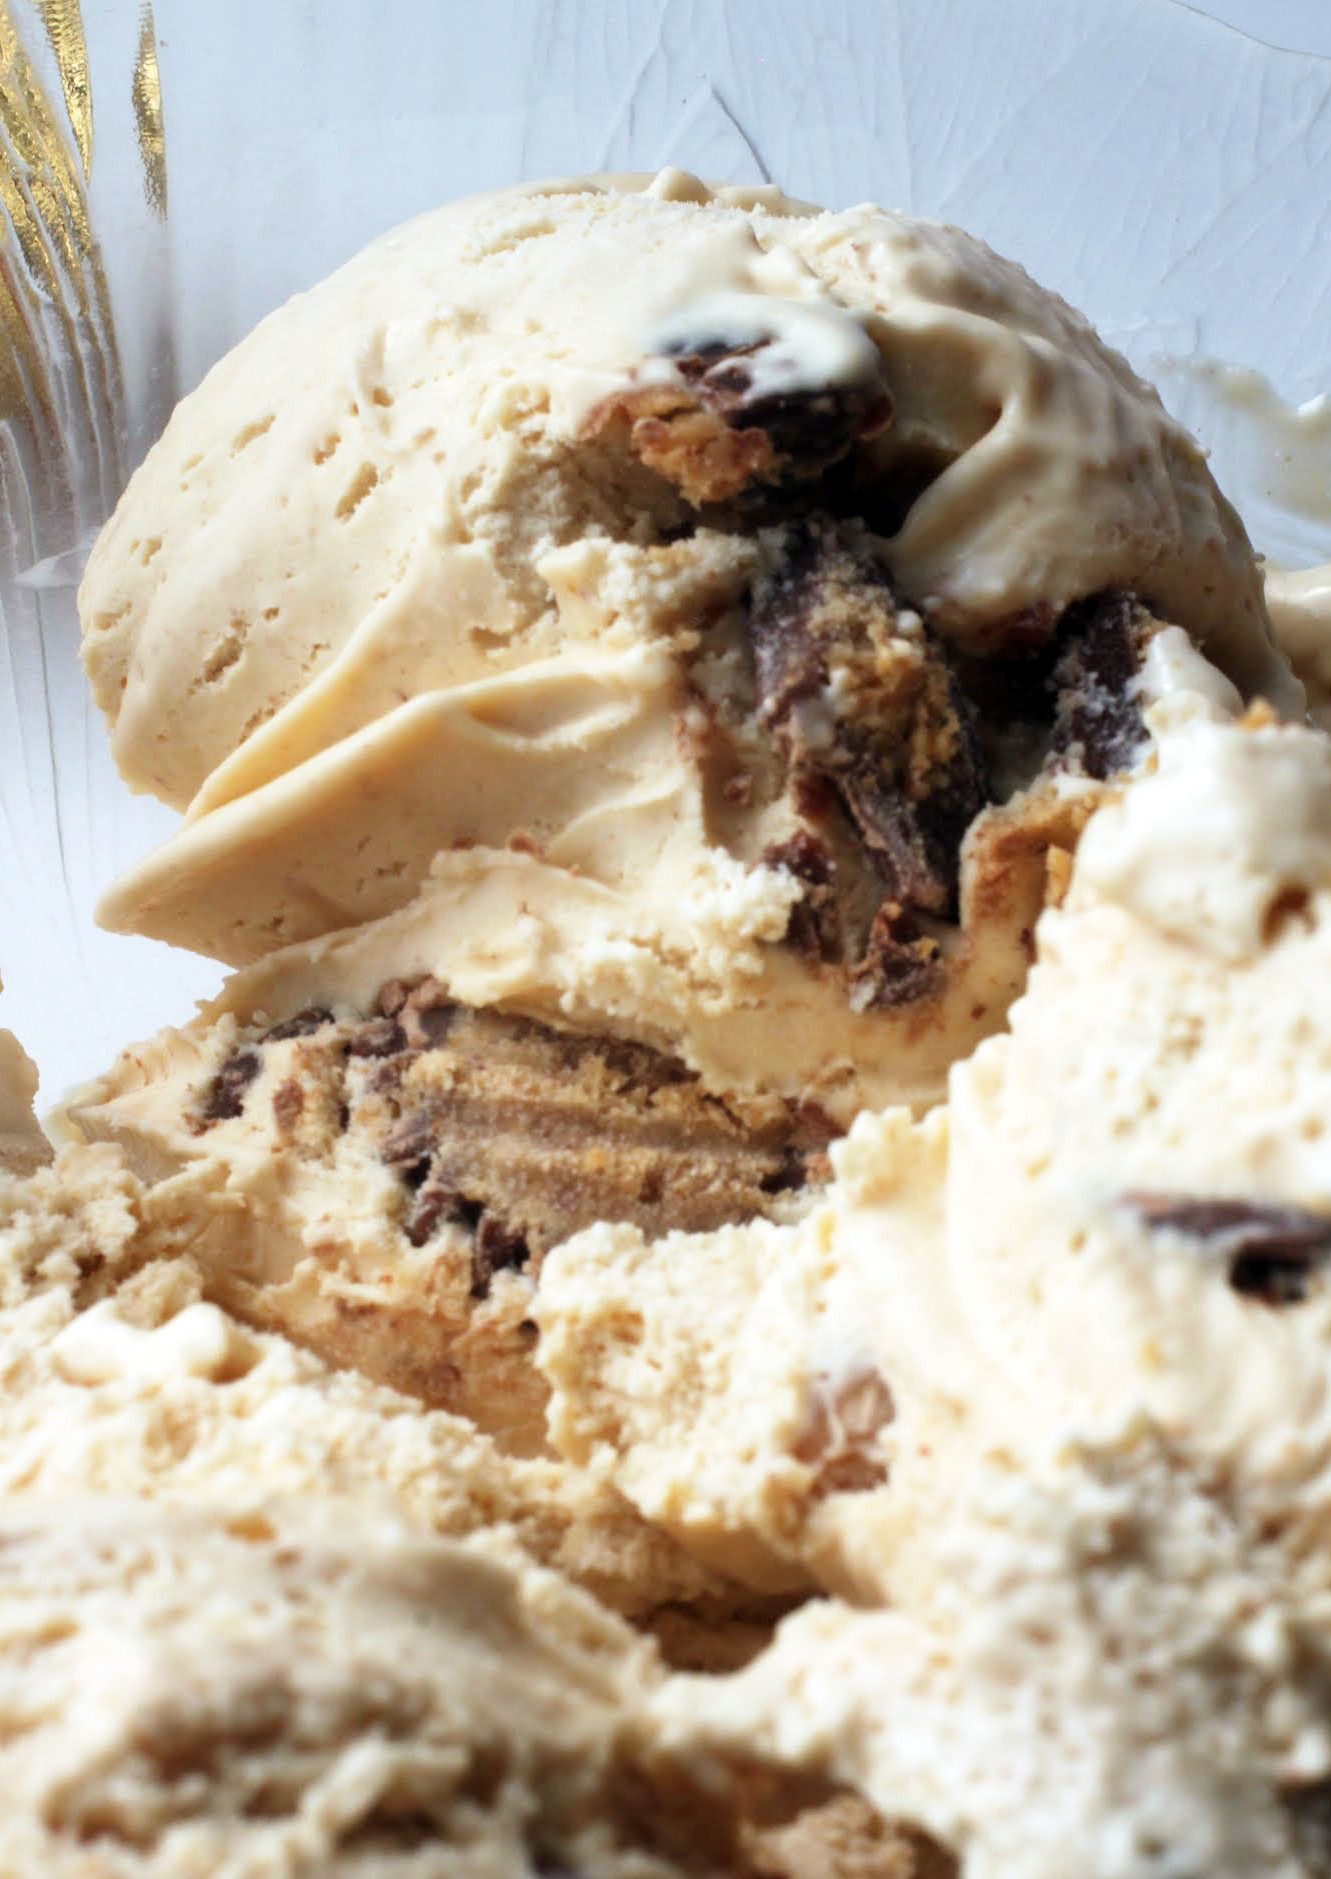
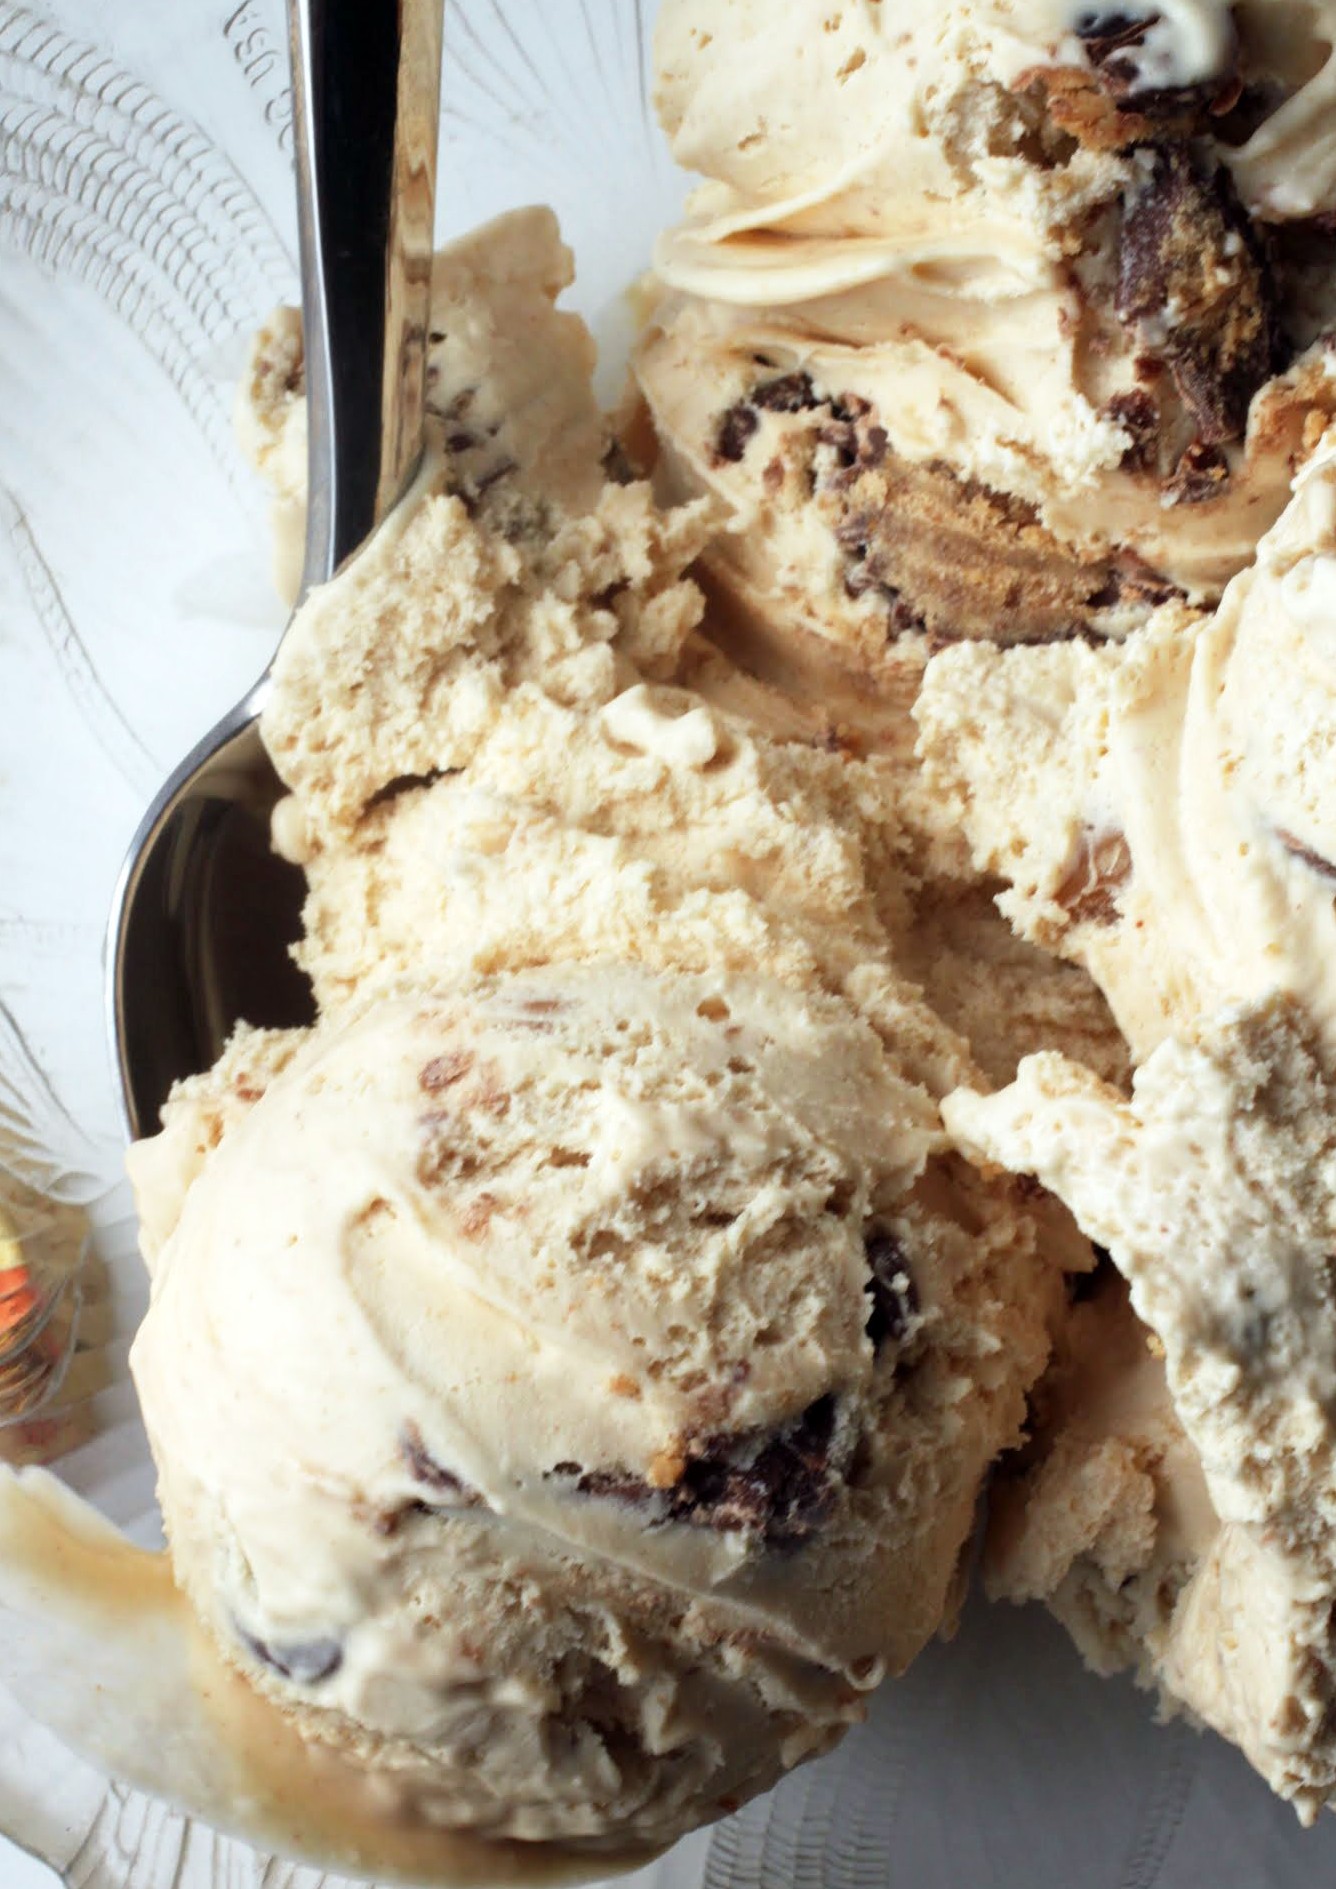
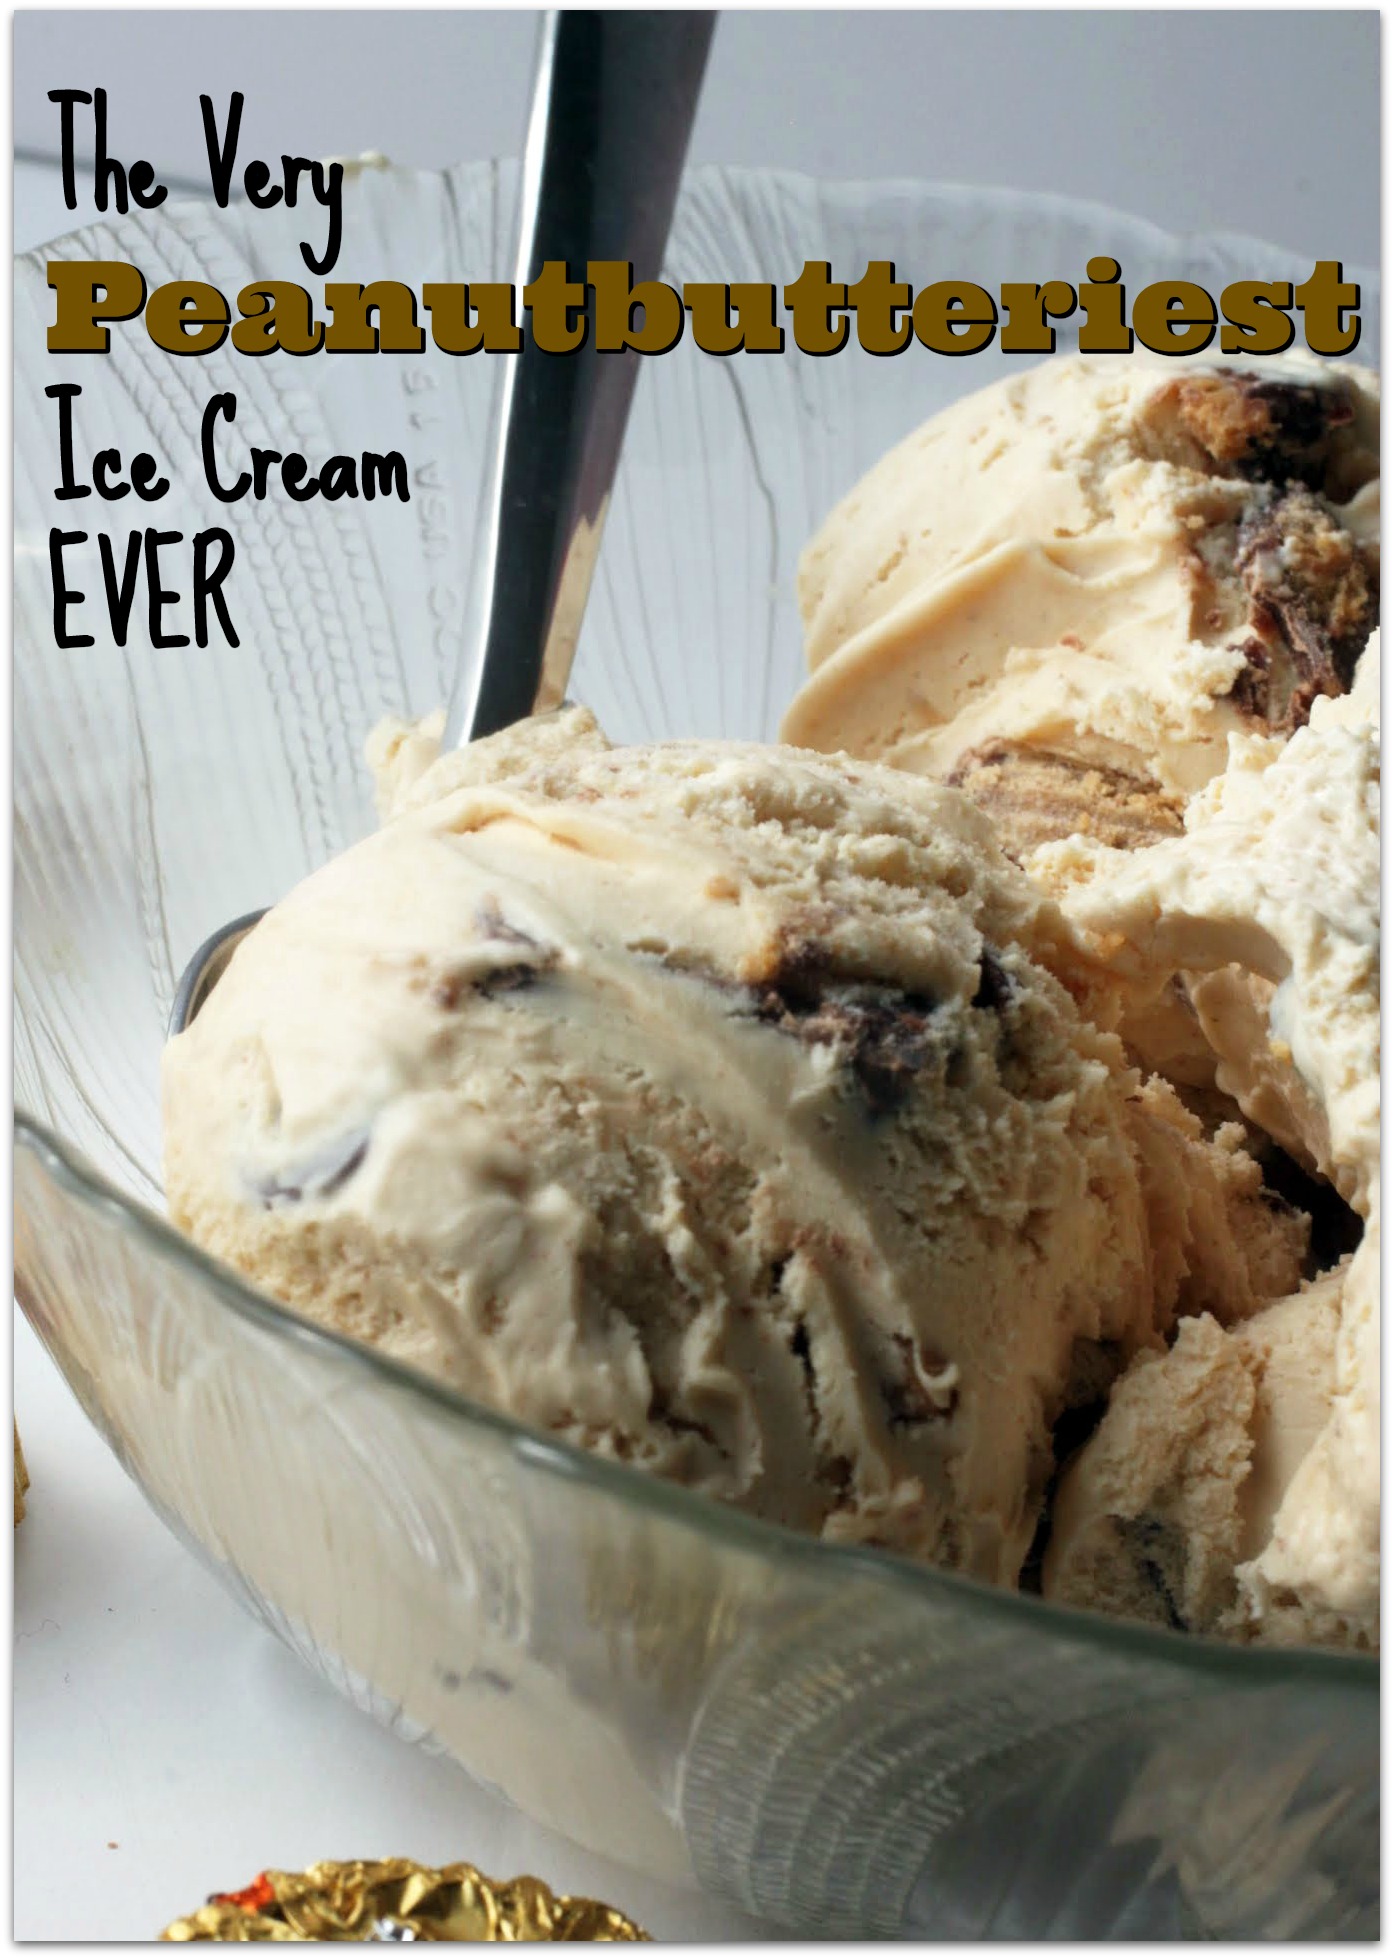
It’s chewy in the center and crispy at the edges, just like my favorite cookies are. There’s a layer of hot fudge that glues the peanut butter cups (both chopped up snack-sized and miniatures) to the top. And there are more chopped PB cups in the actual cookie.
Hey, it’s about to be my birthday. I want to do it up, and that means lots of peanut butter lover’s cookie cake for me. And if anyone wants to throw me a crazy wild party, just name the time and the venue. I’ll be there!
Ingredients
Instructions
- Preheat the oven to 350. Coat a 9-inch springform pan with cooking spray. Set aside.
- In the bowl of a stand mixer, beat the eggs, butter, peanut butter, vanilla, brown sugar and sugar until creamy.
- Add the dry ingredients and mix until just combined. Fold in the chopped peanut butter cups.
- Spread the batter evenly into the prepared pan. Bake for 25-30 minutes. Cool completely.
- When the cookie is cool, remove the sides of the springform pan.
- Heat the hot fudge for 30 seconds in the microwave. Spread a thin layer over the top of the cookie.
- Pile the peanut butter cups on top of the fudge layer, pressing down lightly to make sure they stick.
- If desired, pipe hot fudge over the top with a small round tip.
- Cut into wedges and serve!
]]>
Last week, I stopped by CVS for a quick trip to get some cleaning supplies. I’ve just moved into my new office space, and it was pretty dang dirty, so I needed to rush out right away and get cleaning spray, wipes, paper towels, the works. I was only going to pop in for a second.
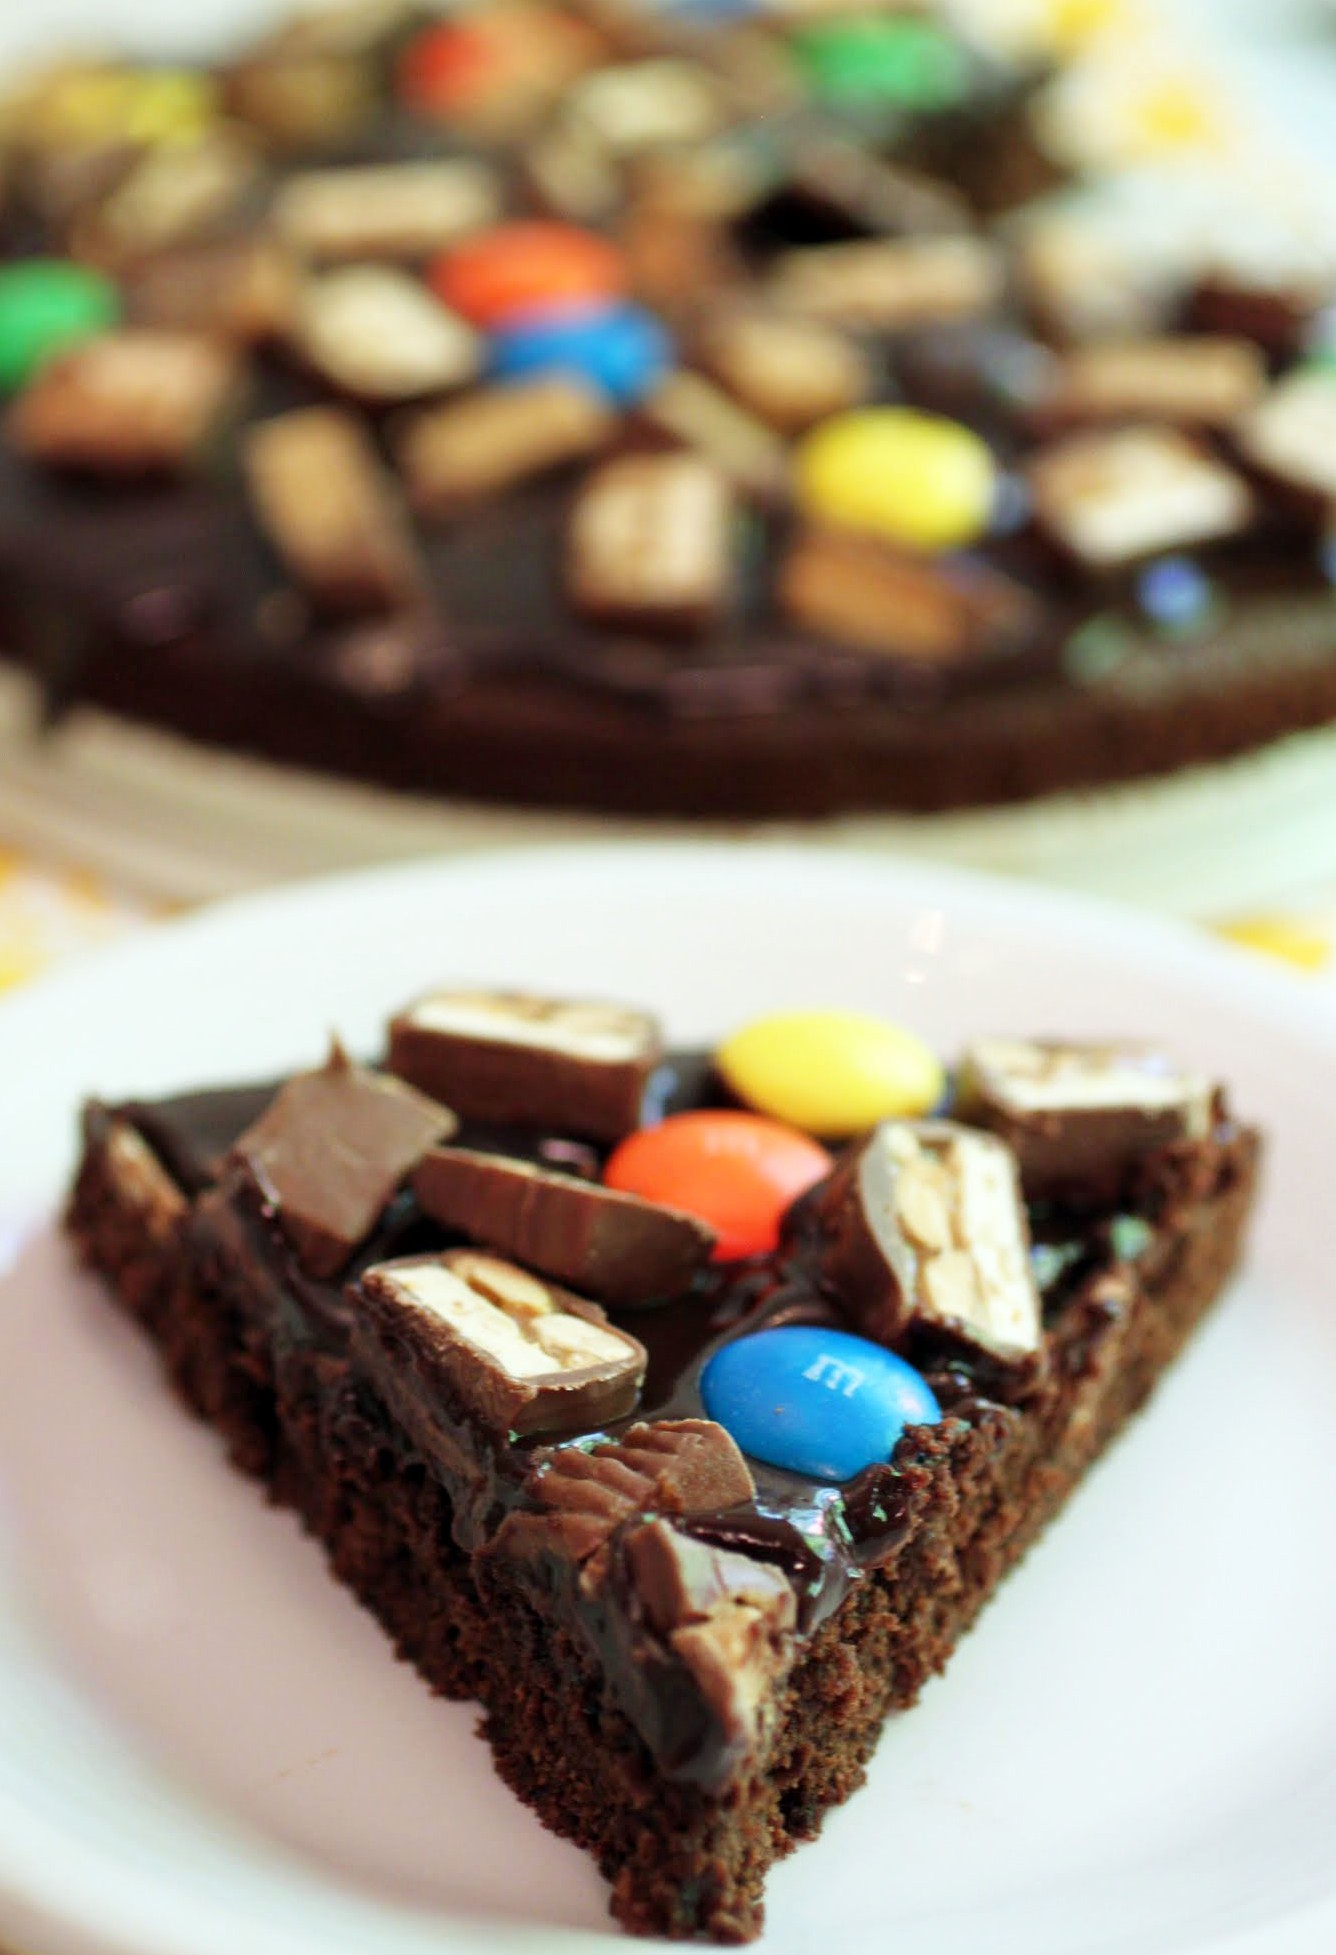
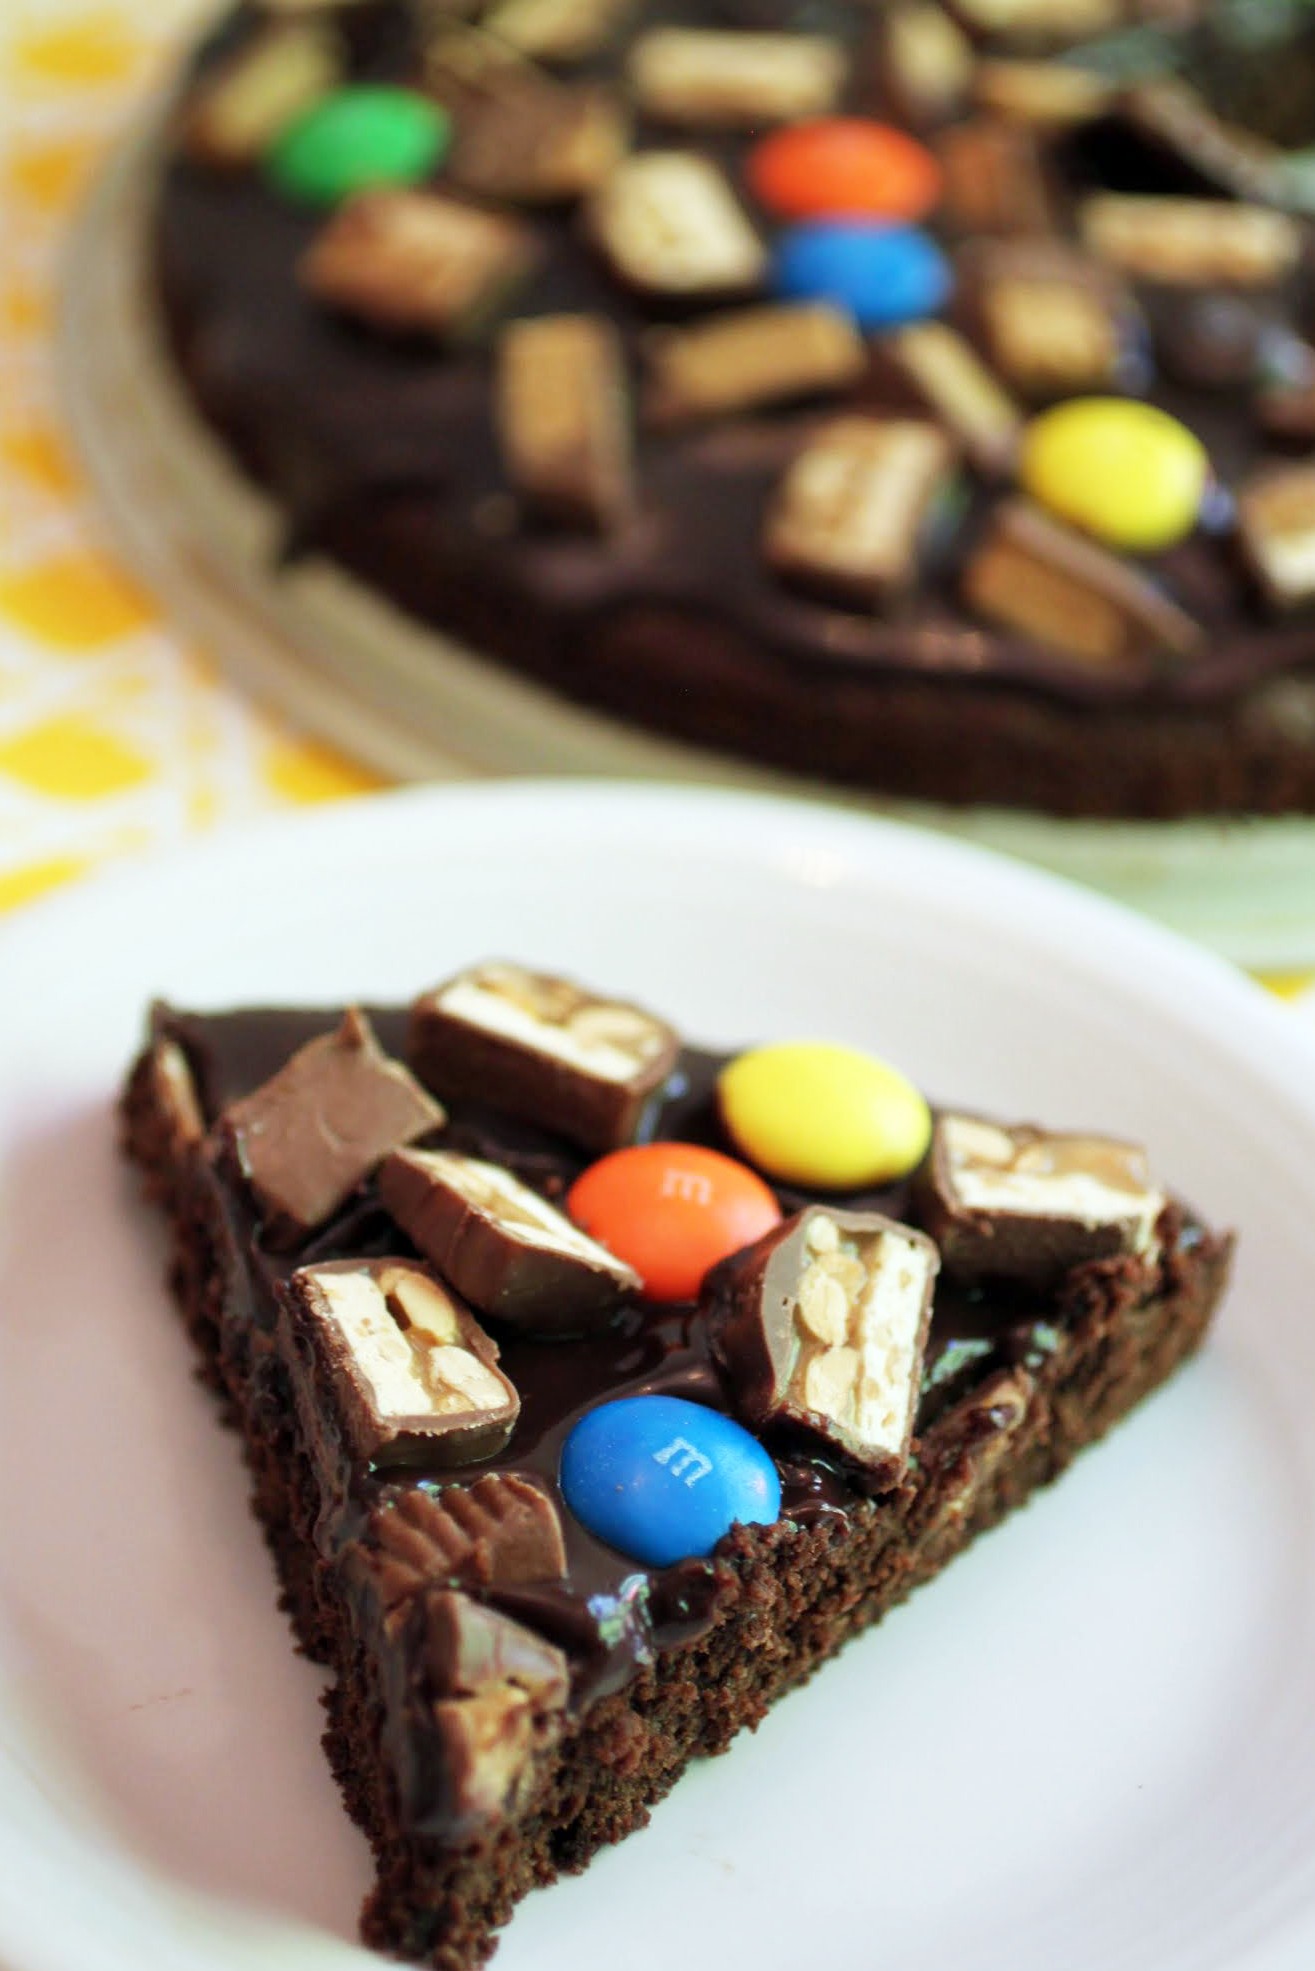
But you know, CVS has the best stuff. Makeup and hair stuff and gel pens, oh my. And have I mentioned the bags of candy? Yep, I walked out of there with snack-sized Reese’s, Mega M & Ms and yes, fun-sized Snickers. Rather than eat the entire contents of each bag immediately while I cleaned dried-up Jolly Ranchers off a desk in the office, I chose to save them and bake this candy bar brownie cake instead.
This past week, I went to cake decorating class. I originally signed up for this class before my job promotion when summer was supposed to be uneventful and relaxing, and now I just don’t know if I can do it. I was sitting in class at night trying to form a fondant and gum paste flower, and the table was making waves in front of me. I was about two seconds from face-planting onto my sugar daisy.

Fondant is a tricky beast, for those of you who work with it. It’s like play-doh, except it theoretically tastes a little better. I know it looks really nice, and I like making decorations with it. That said, I’ve never been the biggest fondant fan. For one thing, it doesn’t taste as good as frosting. For another, it really gets handled a lot. I know (or hope) that bakers are working with really clean hands, but the image of someone handling something that much before I put it in my mouth is a turnoff.
Also, the stuff cracks really easily, and once that happens, there’s no fix. I know we’re into this whole smooth cake trend, and it’s totally pretty. But I get frustrated sometimes at all the fondant cakes that look alike. Or maybe that’s just me looking for an excuse to drop cake decorating class so I can get more sleep.
For the first time this week, I’ll be making a tiered cake. I’ll let you know how that goes. Send me tips, okay? I’ve chosen to frost it as a mostly-naked cake to keep the work down to a minimum, but boy, I’m scared.
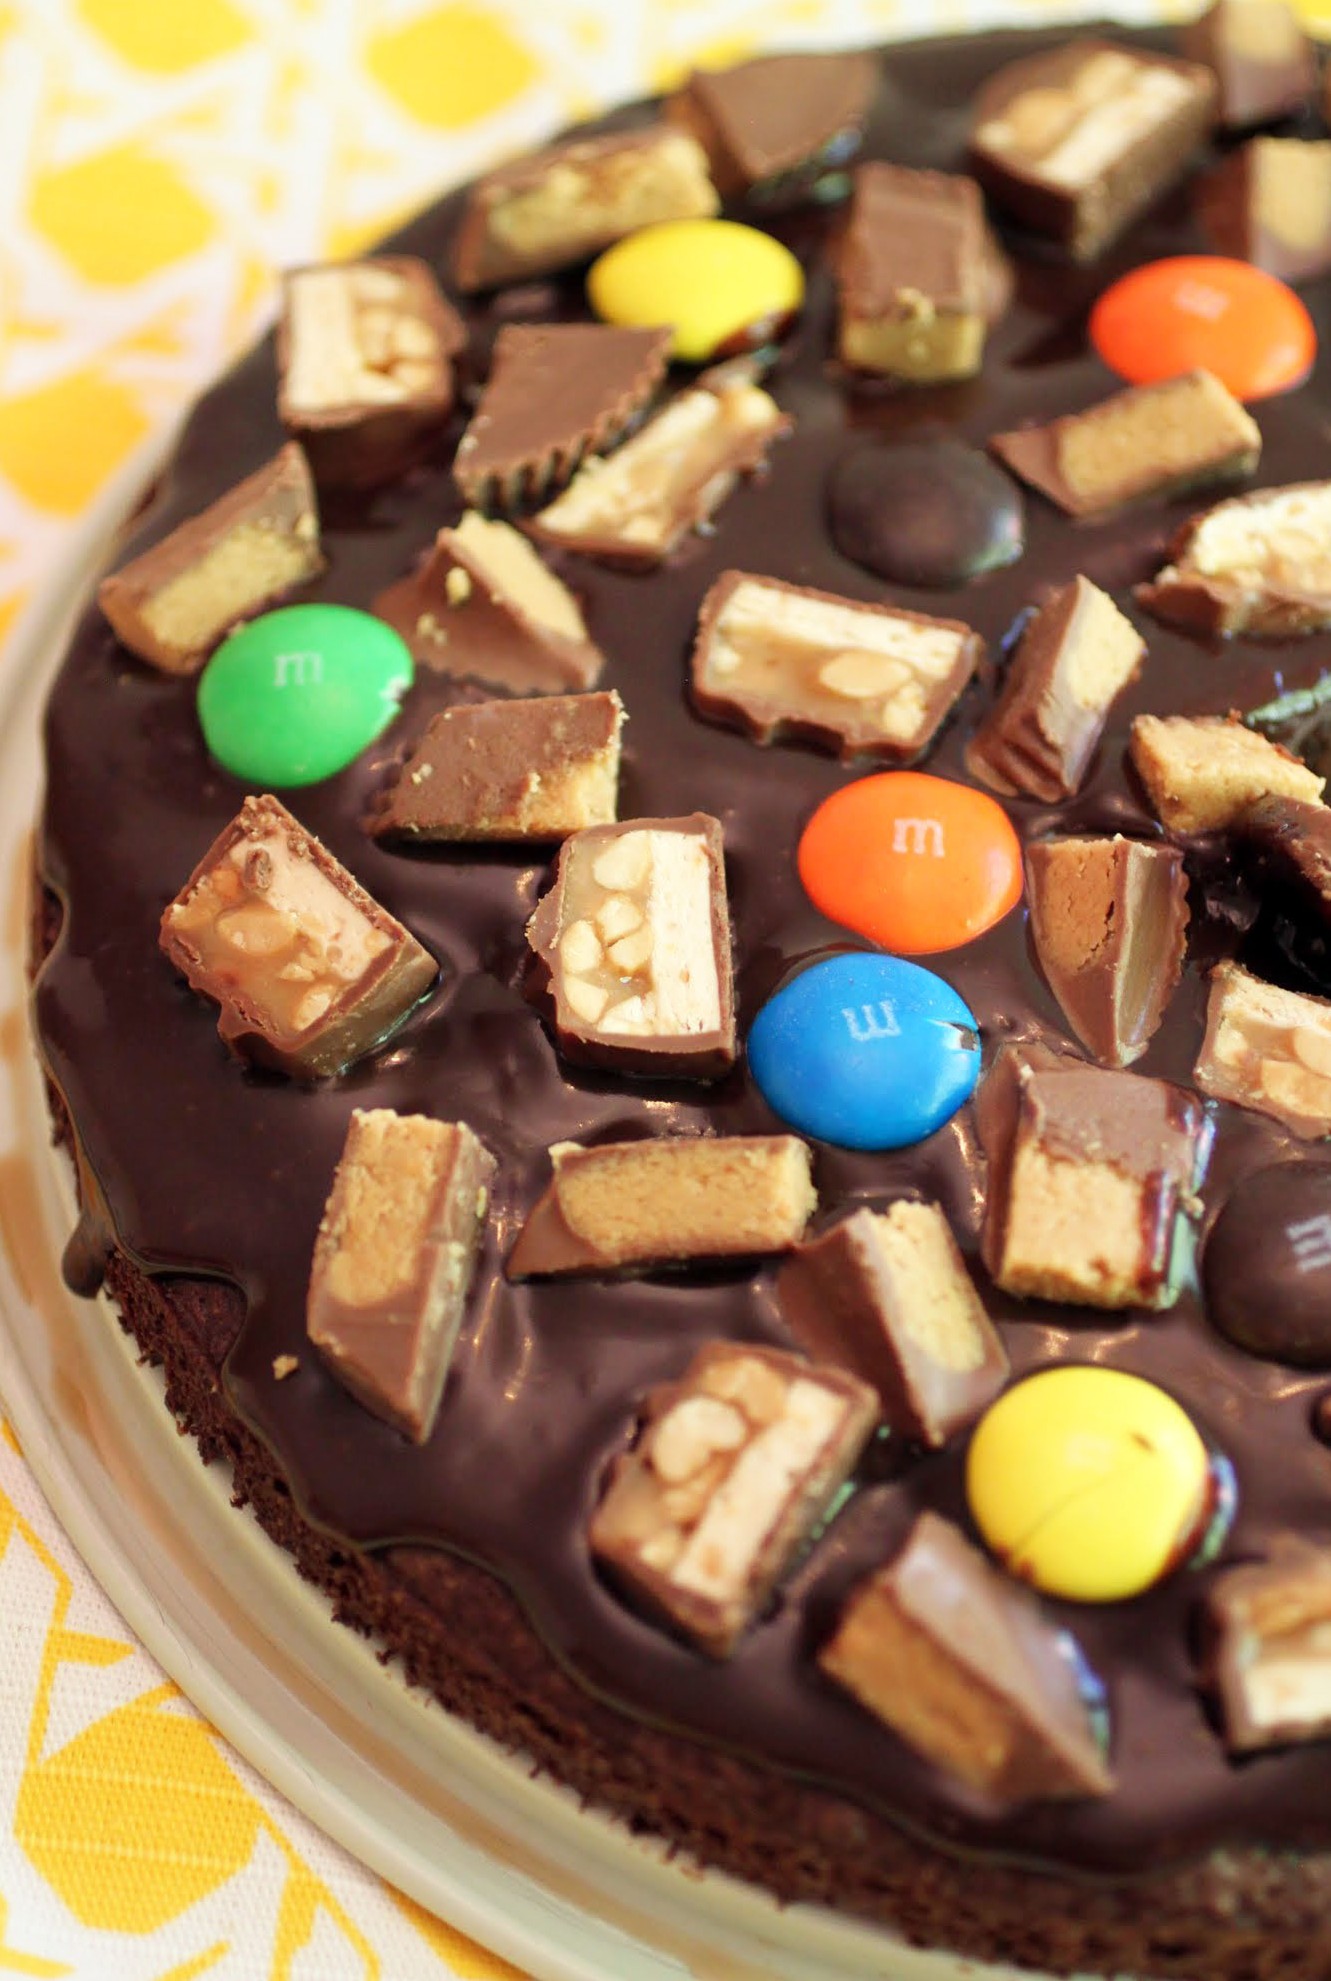
When I’m trying new things in the cake decorating world, it’s nice to make a dessert that it low-maintenance and no-fuss. This brownie cake is exactly that. The base is a fudgy brownie, covered with easy chocolate ganache and topped with my CVS collection of chocolate bars. Could life get any sweeter?
And now I’m off to try and dowel some cake. Wish me luck! I’ll be stopping by here for therapy if things don’t go well. Have a great start to your week, everyone!
Ingredients
Instructions
- Preheat the oven to 350. Coat a 9-inch springform pan with cooking spray. Set aside.
- In a medium-sized bowl, mix the cocoa into the melted butter until it dissolves. Add the sugar and stir again. When the sugar is incorporated, mix in the vanilla and eggs. Add the salt and flour, mixing until just combined.
- Pour the batter into the prepared pan and bake for 25-30 minutes until set. Cool completely.
- While the brownie cake is cooling, make the ganache.Heat the heavy cream and chocolate chips in the microwave for one minute. Stir until smooth.
- Release the cake from the springform sides. Slowly pour the ganache over the cake, edging it gently out to the perimeter of the cake. Stop when the cake is covered.
- Sprinkle the chopped candy bars on top.
- Chill for an hour until the ganache is set. Slice into wedges and serve, or store covered.
This summer, I’ve got the kids when I’m not working, and it’s great. But I need some hours in the day to get things done, so hello to camp! And hello to having a smidgen of peace and quiet.
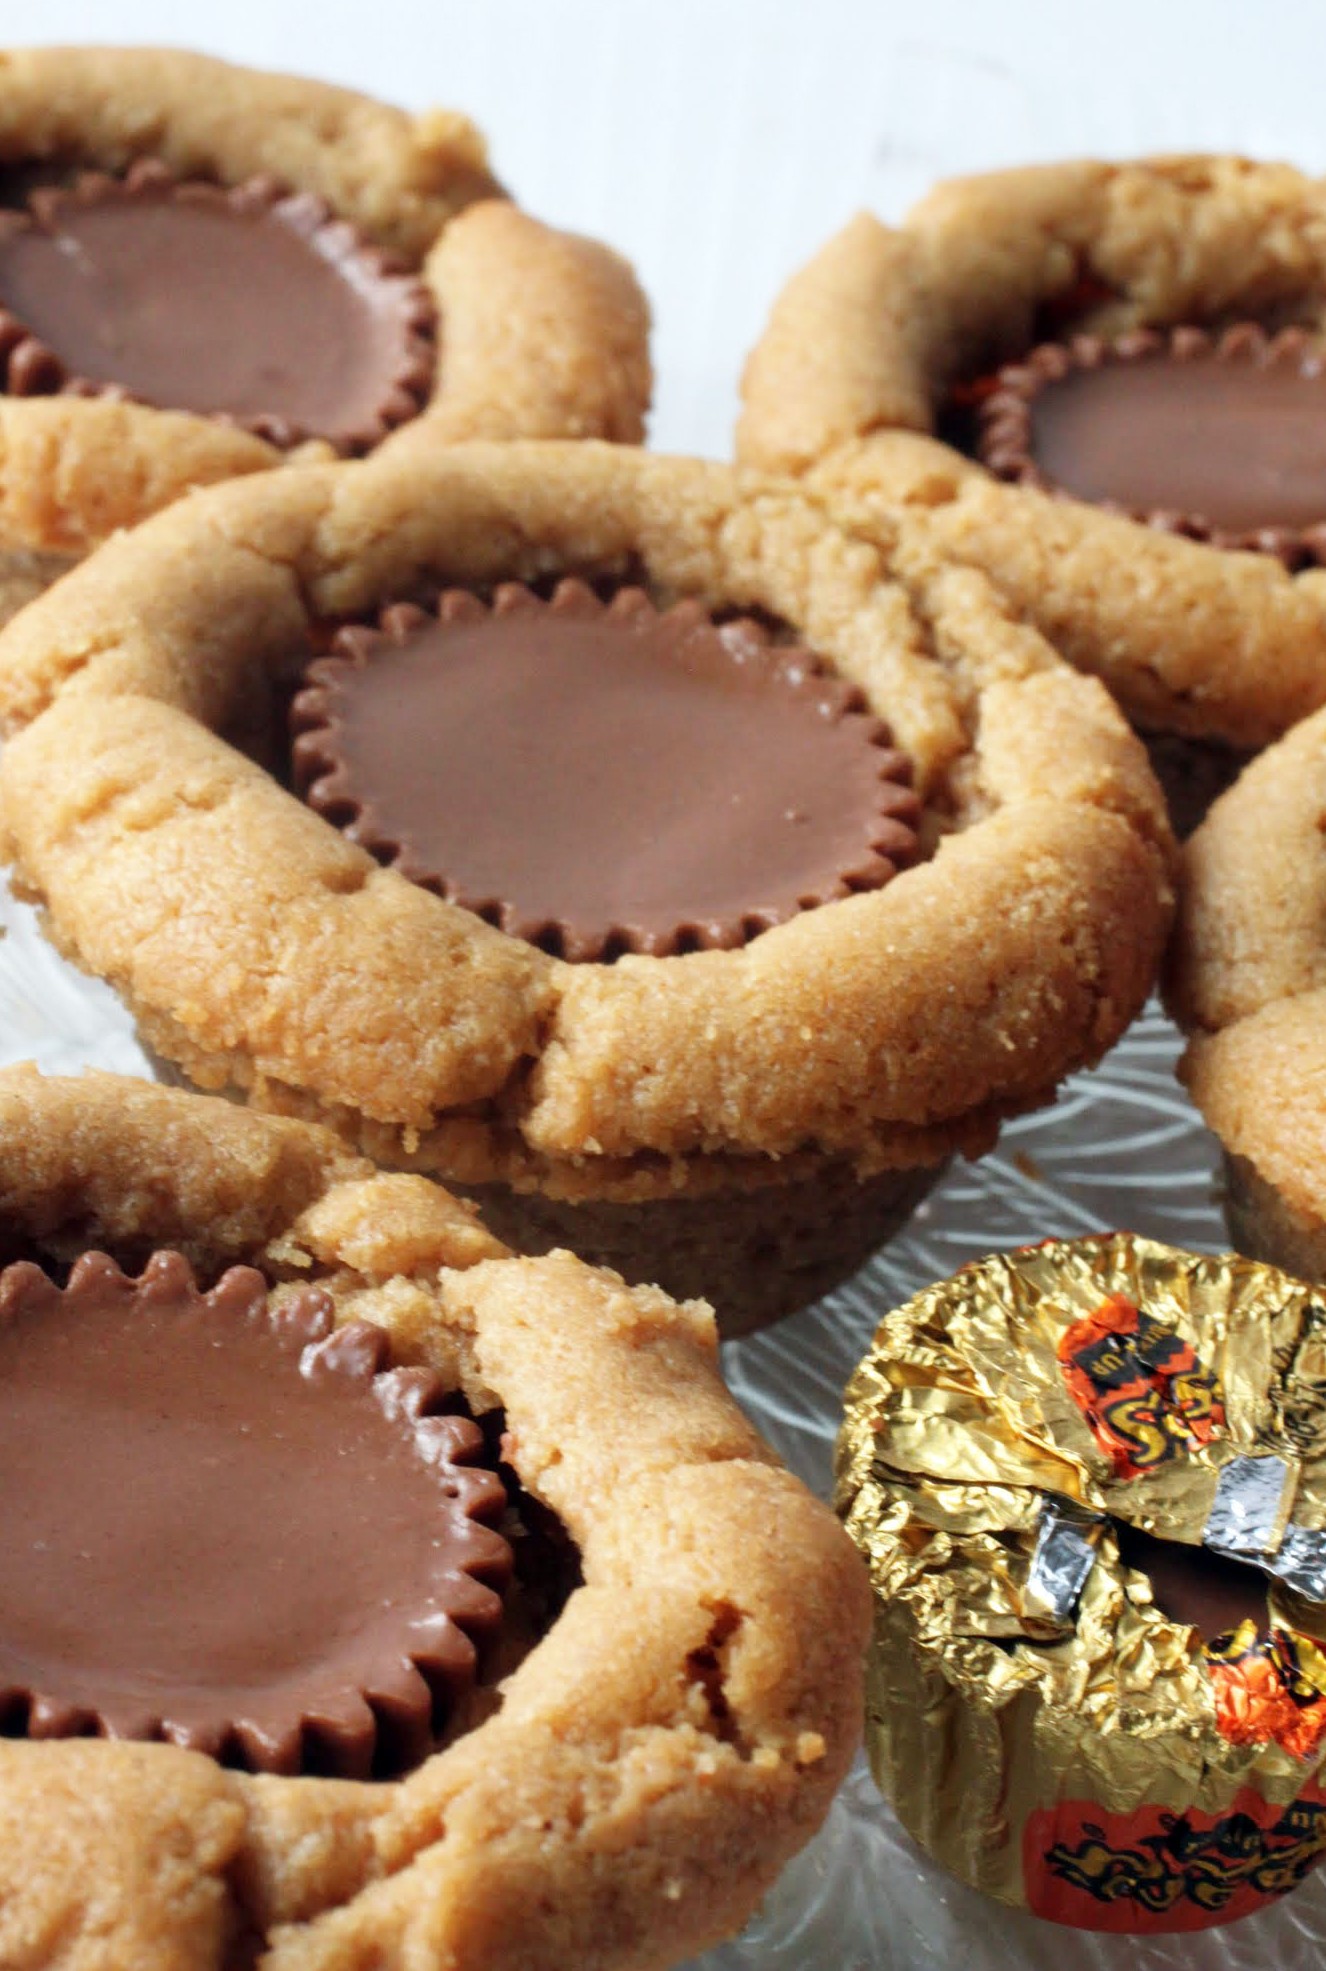
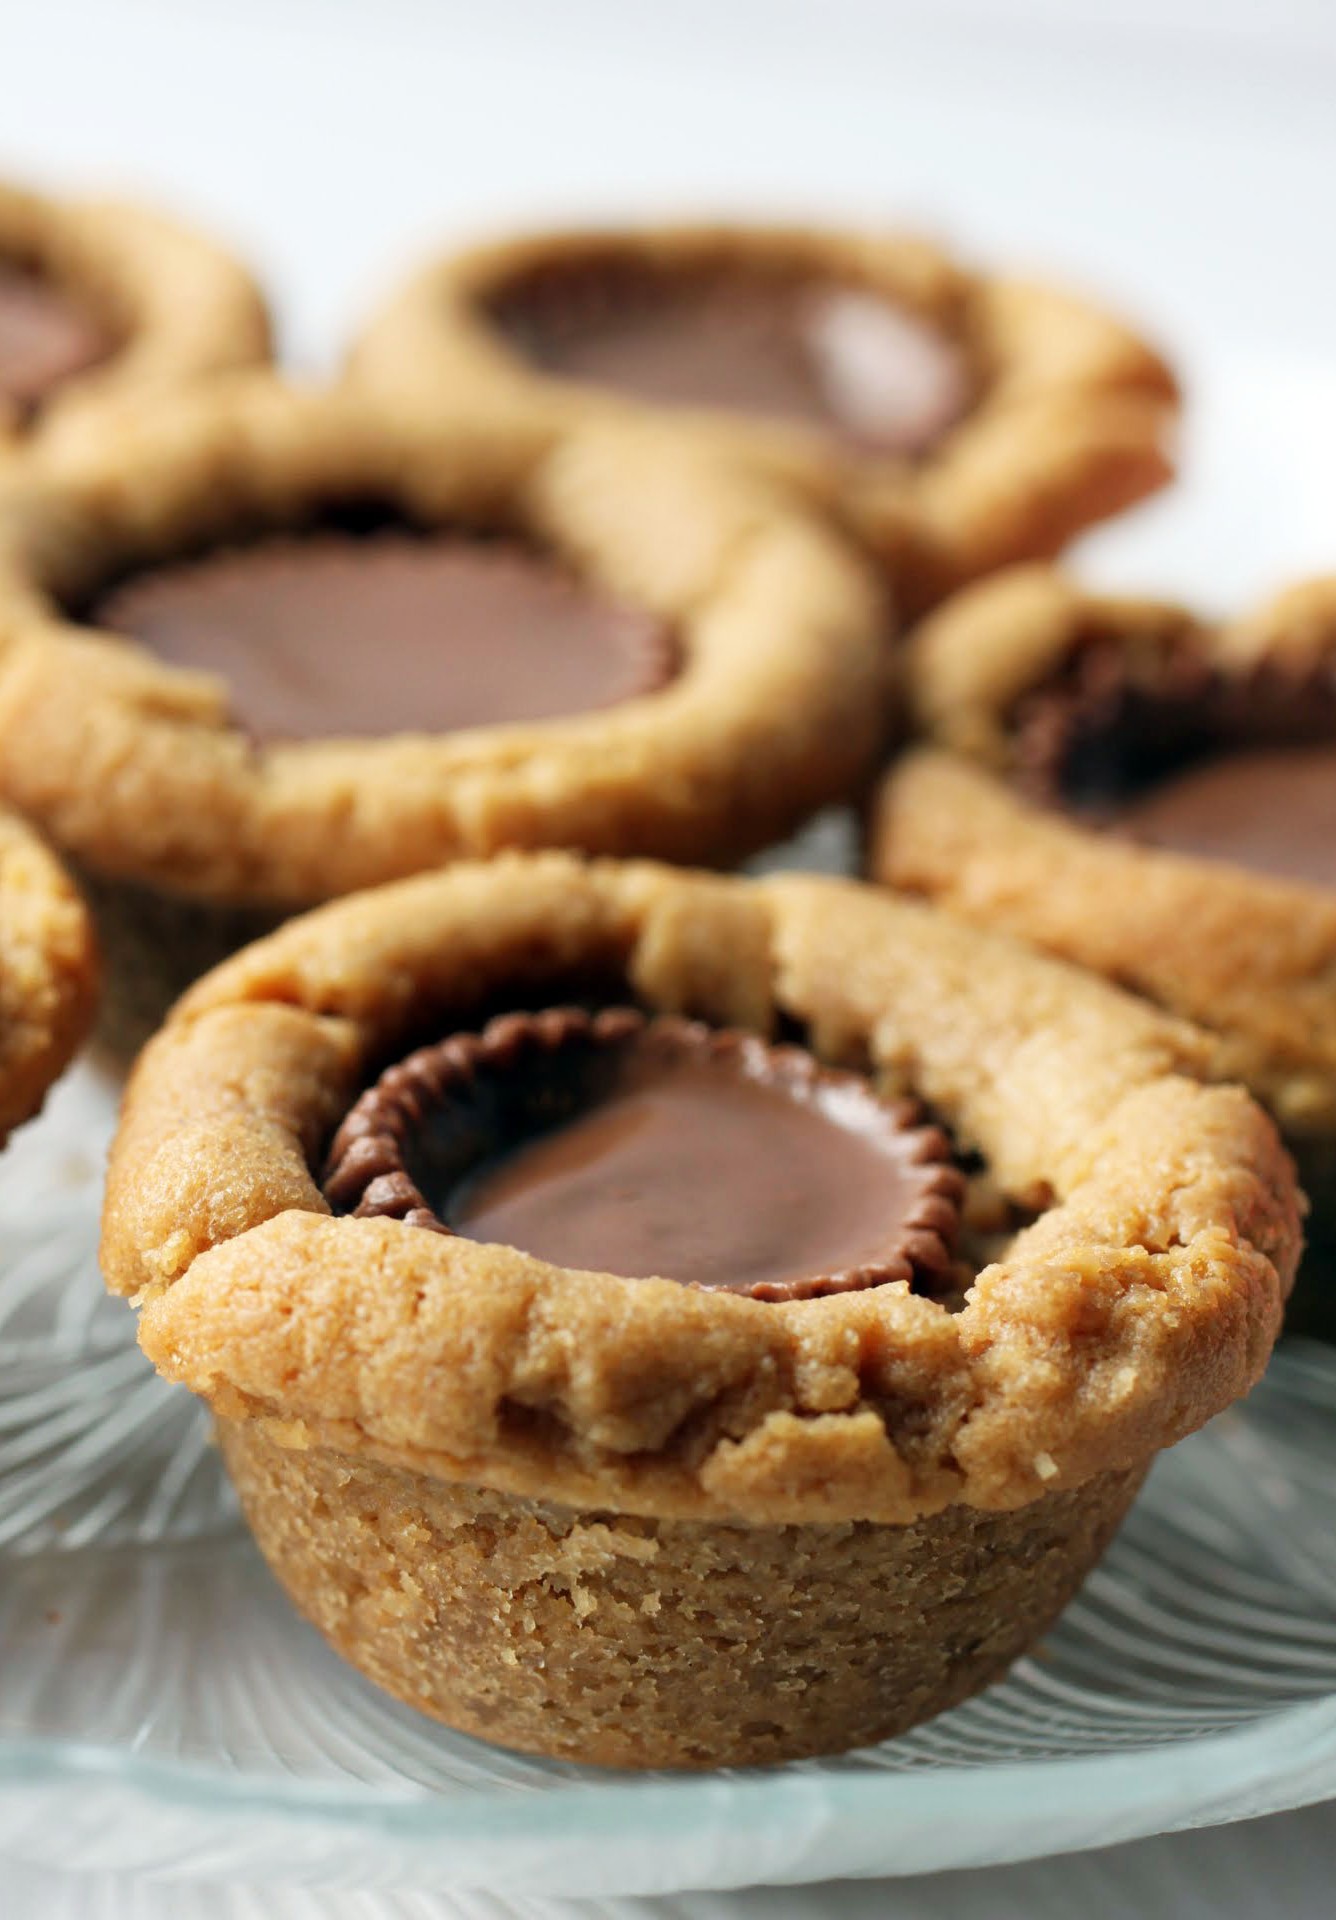
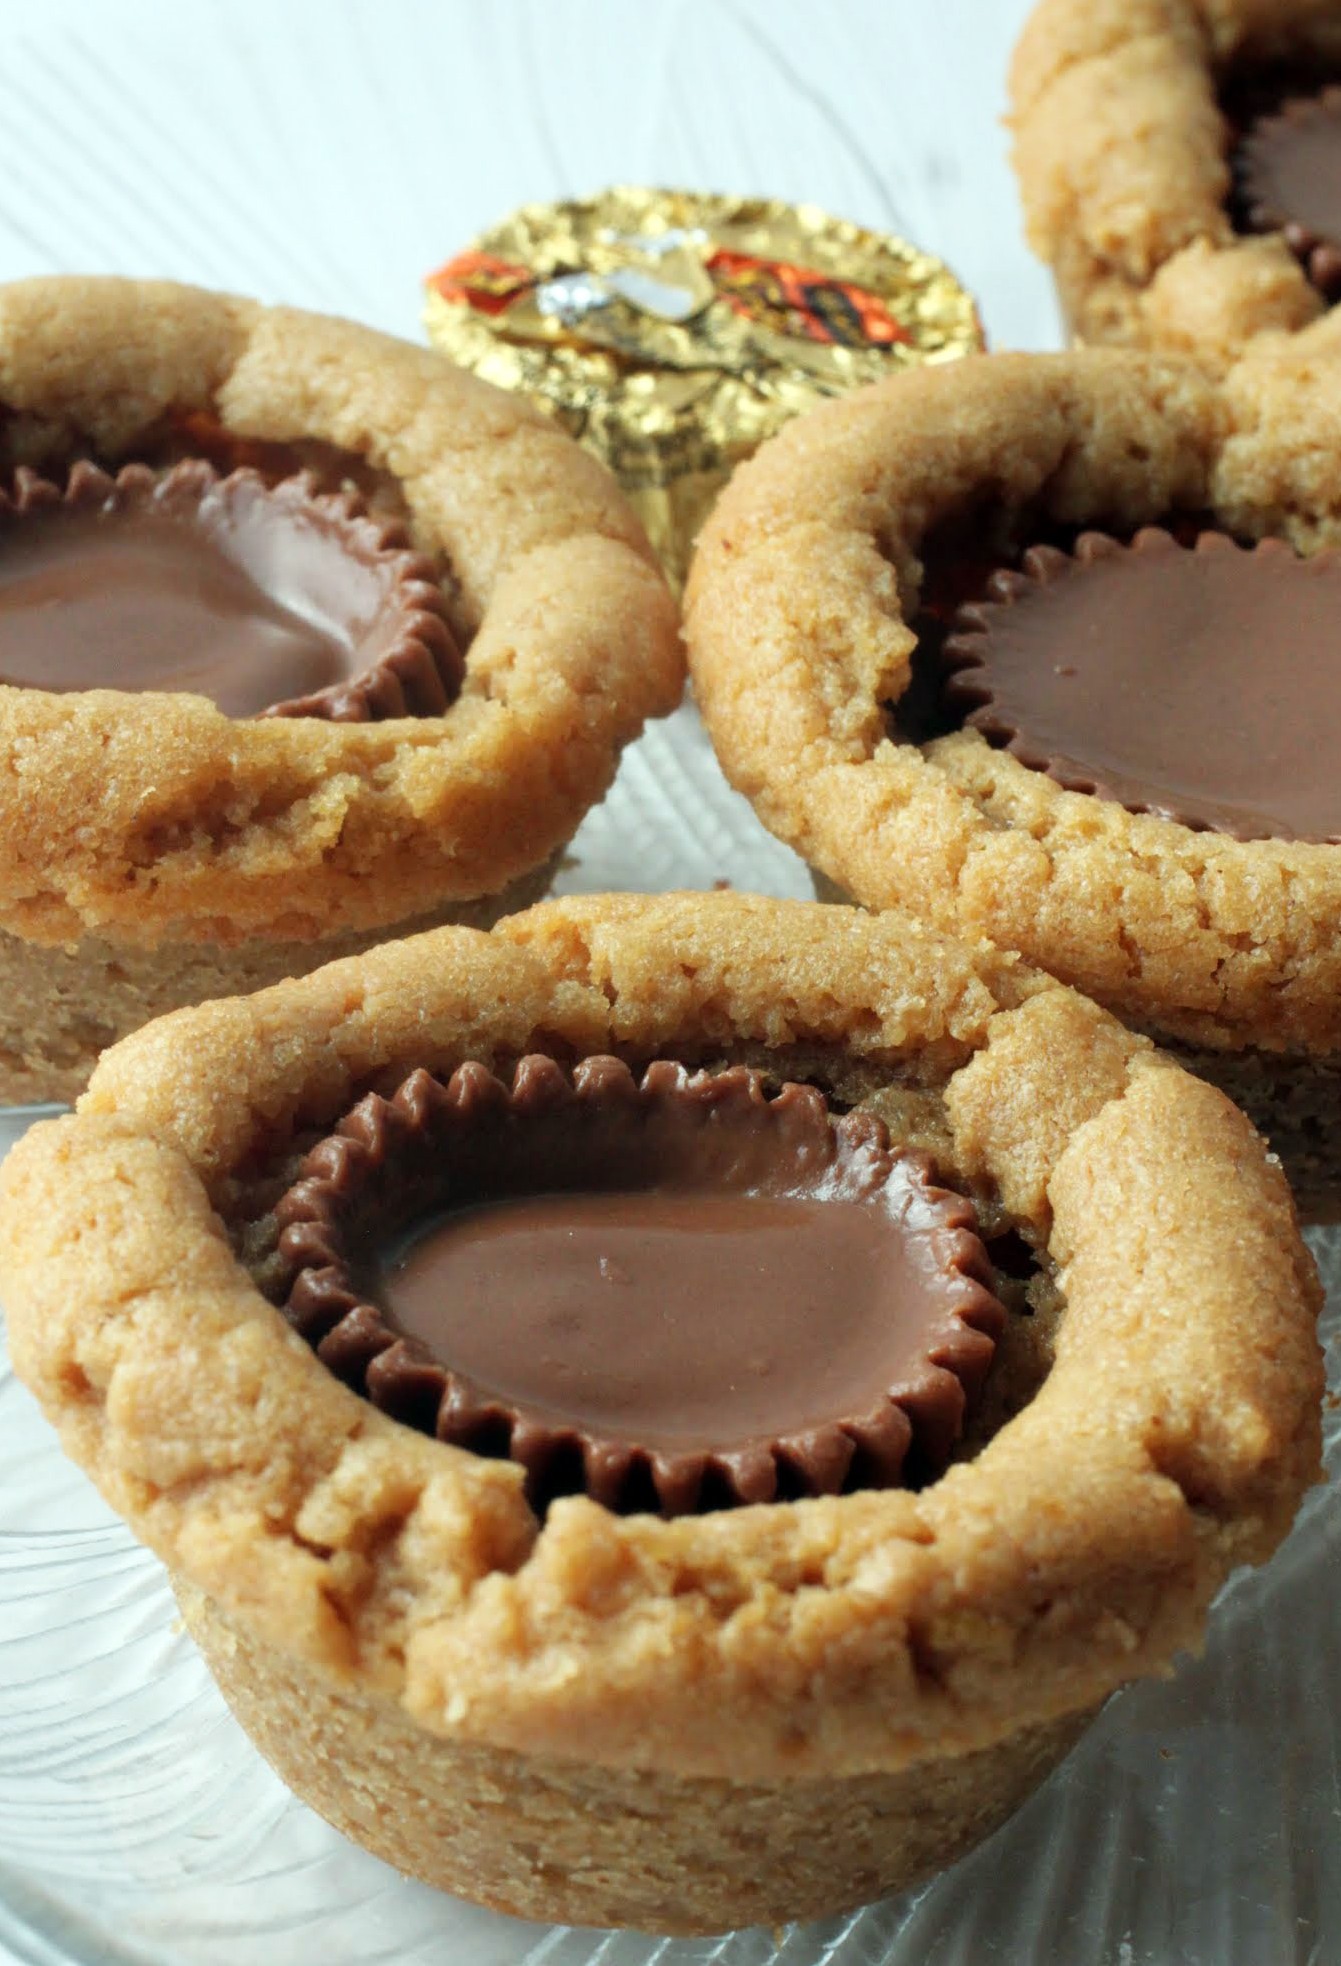
And hello to peanut butter cups! My favorite candy is back in these flourless PB cookie cups. They might not have any flour, but you won’t miss it at all with all this peanut butter goodness!
People don’t really understand what the summertime is like to a teacher, so I’ll try to explain as best I can. See, we are on overdrive for 10 months out of the year. We show up to work at crazily early times (I’m there around 5:45), get set up, and then we’re on. All day.
With teaching, you can rarely sit back. Checking e-mail is often impossible, as is using the bathroom. There is a constant flow of human interaction, ranging from pleasantries to several nonstop hours of active instruction.
Back when I was earning my certification in college, a professor told us that anyone entering the teaching profession would never have trouble sleeping at night. Boy, was he right. Every day, after running around and then running around some more, I crash as soon as the light goes off. It’s a nice perk, really.
In the summertime, our lives resemble other people’s. We can go to bed late (meaning 10 o’clock), we can have moments of leisure, and we can get some sunlight. It’s a totally different experience, and we love every moment of it. It’s a complete change of pace.
You can bet that during these months, I do a lot of baking. In addition to my two months of cake decorating class, I’m in the kitchen every day, testing recipes and trying out new things just for you! So be sure to stick with me during these lazy months as I bring you more dessert.
These are the way to start off a life of leisure. The cookie base is just peanut butter, two sugars, egg, baking soda, salt and vanilla. These ingredients get combined and chilled for a few hours, and then you put the dough into mini-muffin tins with a miniature PB cup pressed into the center. A few minutes later, you have the best cookie cup ever!
Hope your summer is filled with promise, just like mine. Can’t wait to share my adventures with you!
Ingredients
Instructions
- Preheat the oven to 350. Line an 8-inch square pan with foil and coat with cooking spray. Set aside.
- In a large bowl, combine all of the ingredients (except the peanut butter cups). The mixture will be thick and sticky.
- Refrigerate the dough anywhere from 3 hours to overnight.
- When you're ready to bake, coat a mini muffin pan with cooking spray.
- Roll the cookie dough into balls and place each ball in a mini muffin spot. Press a peanut butter cup into the center of each ball of dough.
- Bake for 10-12 minutes until golden at the edges. Cool completely. Store in an airtight container.
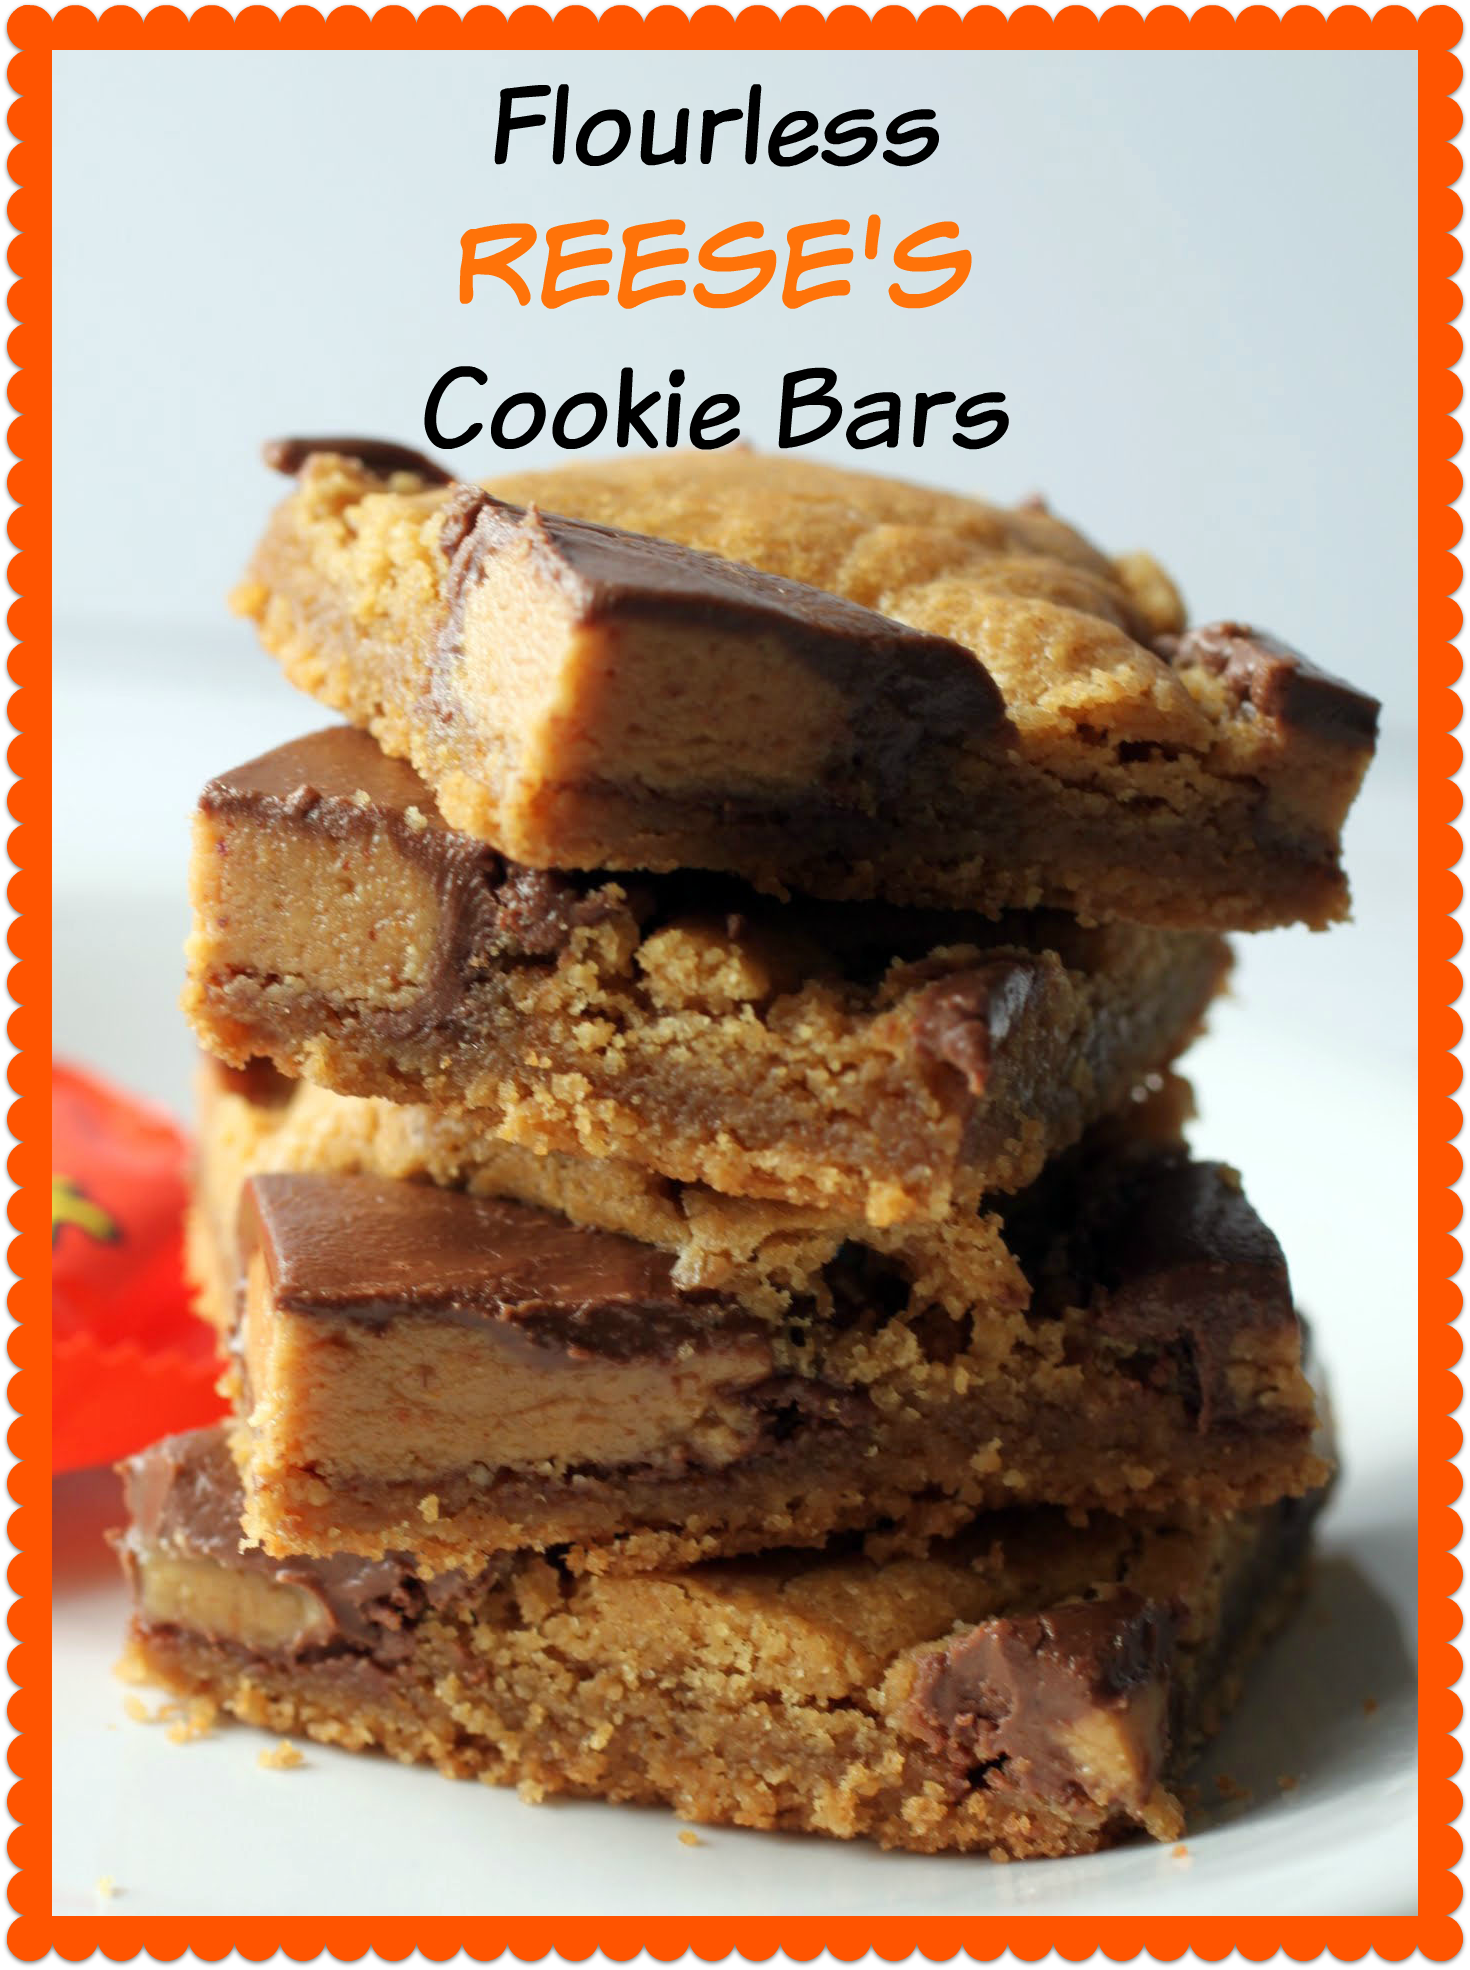
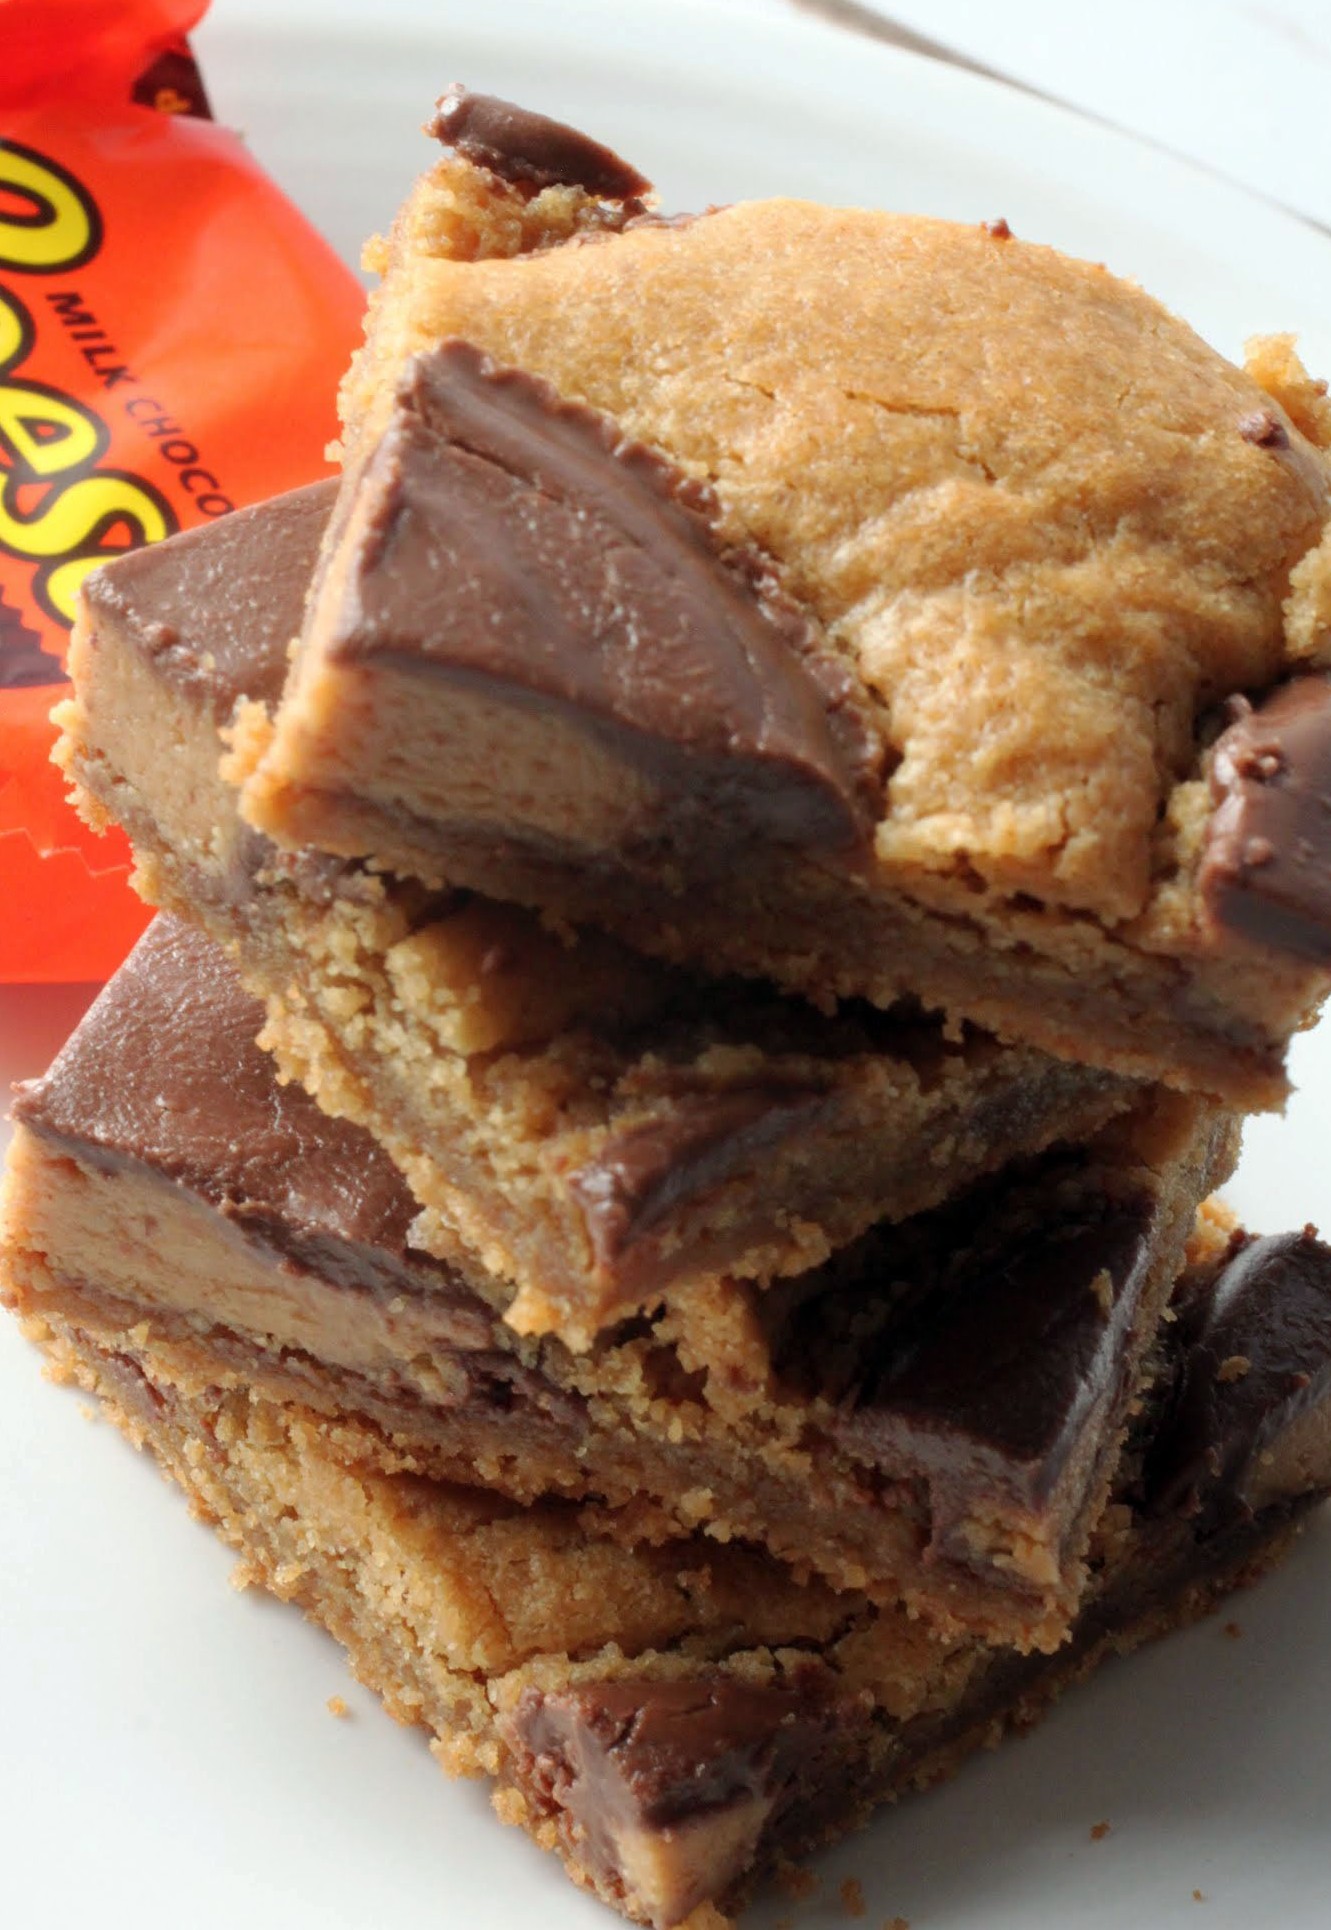
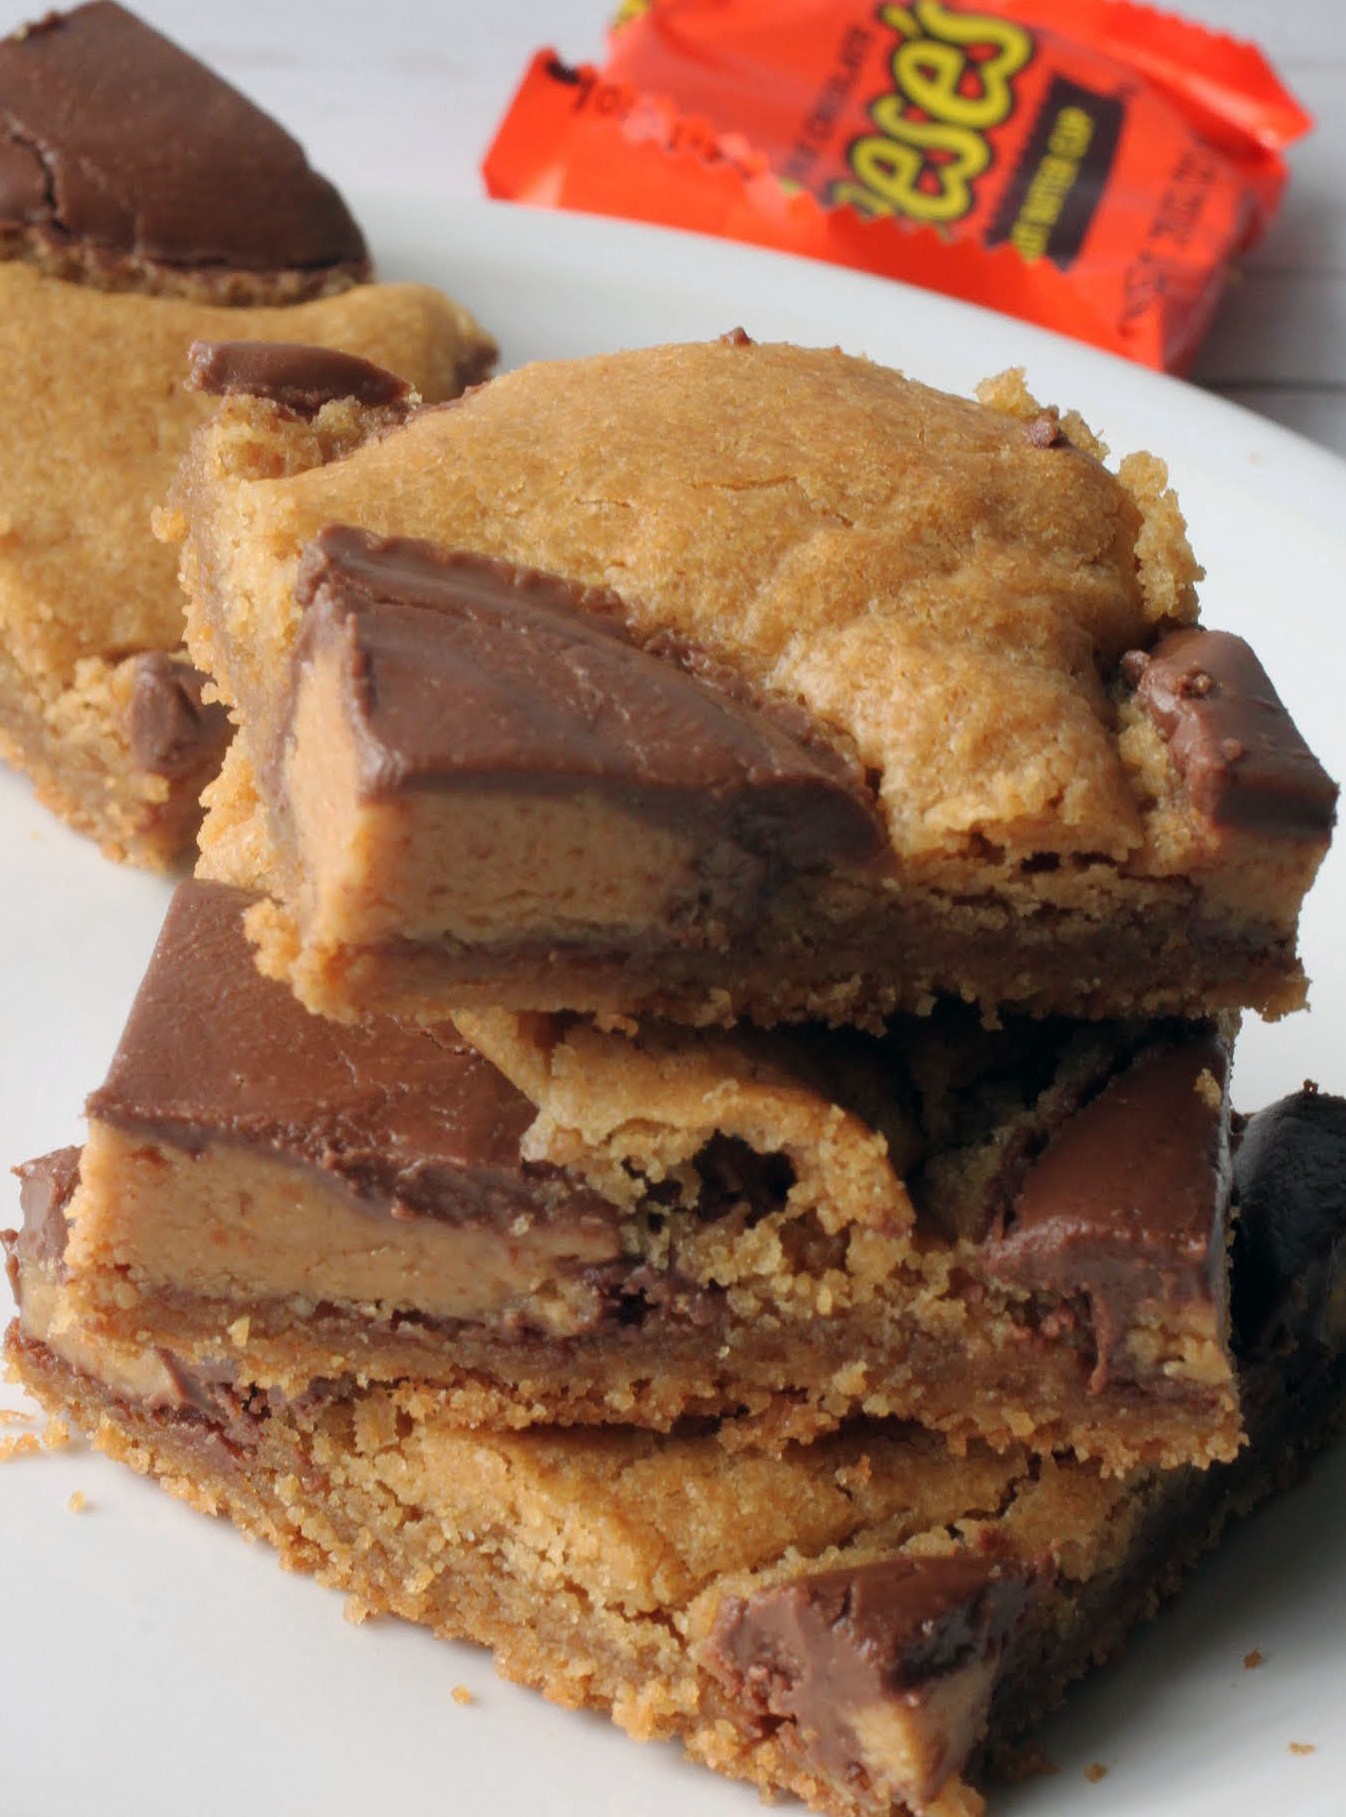
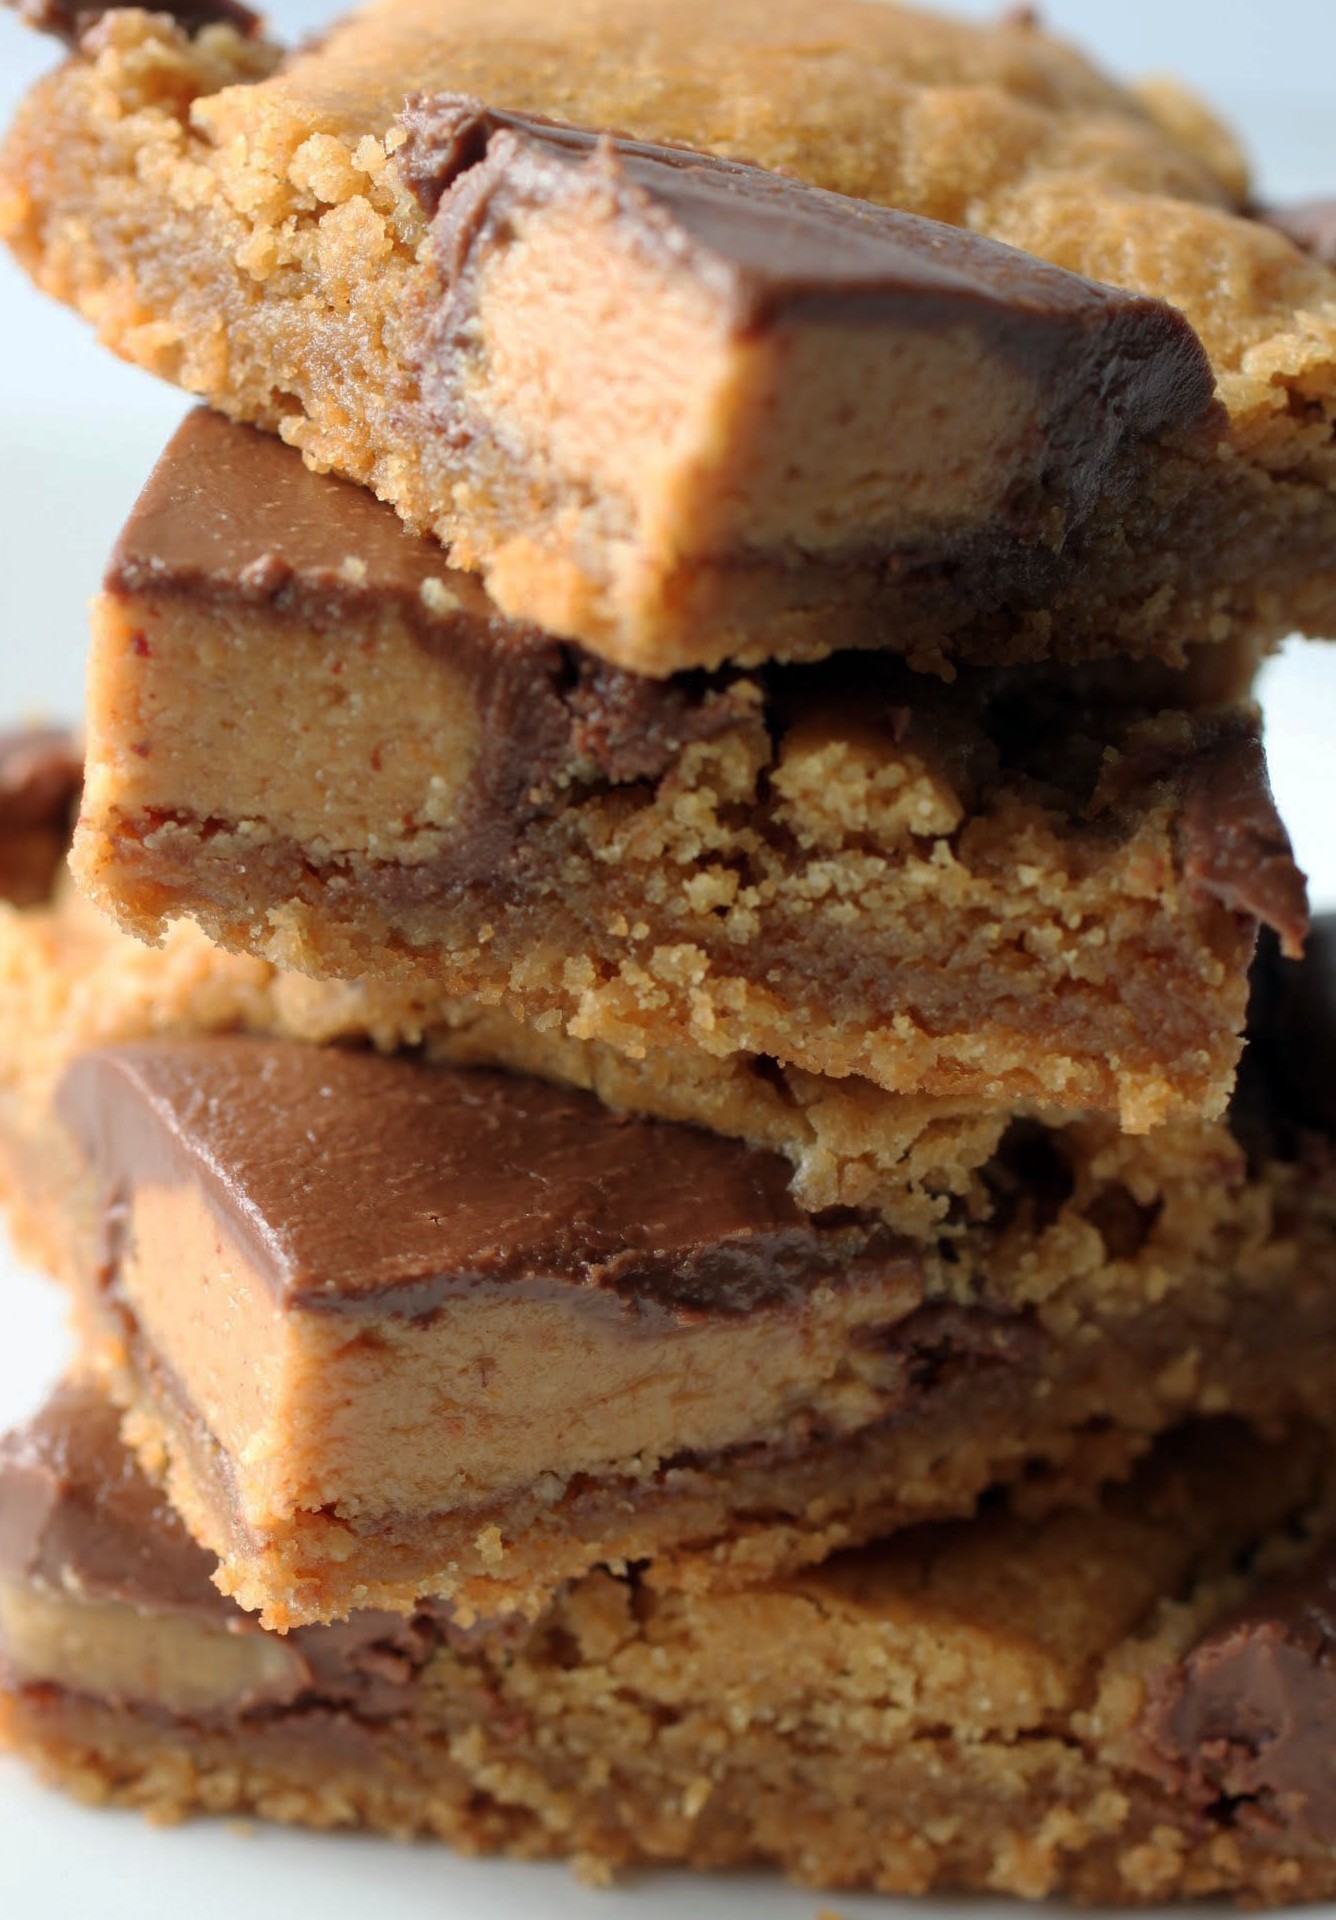
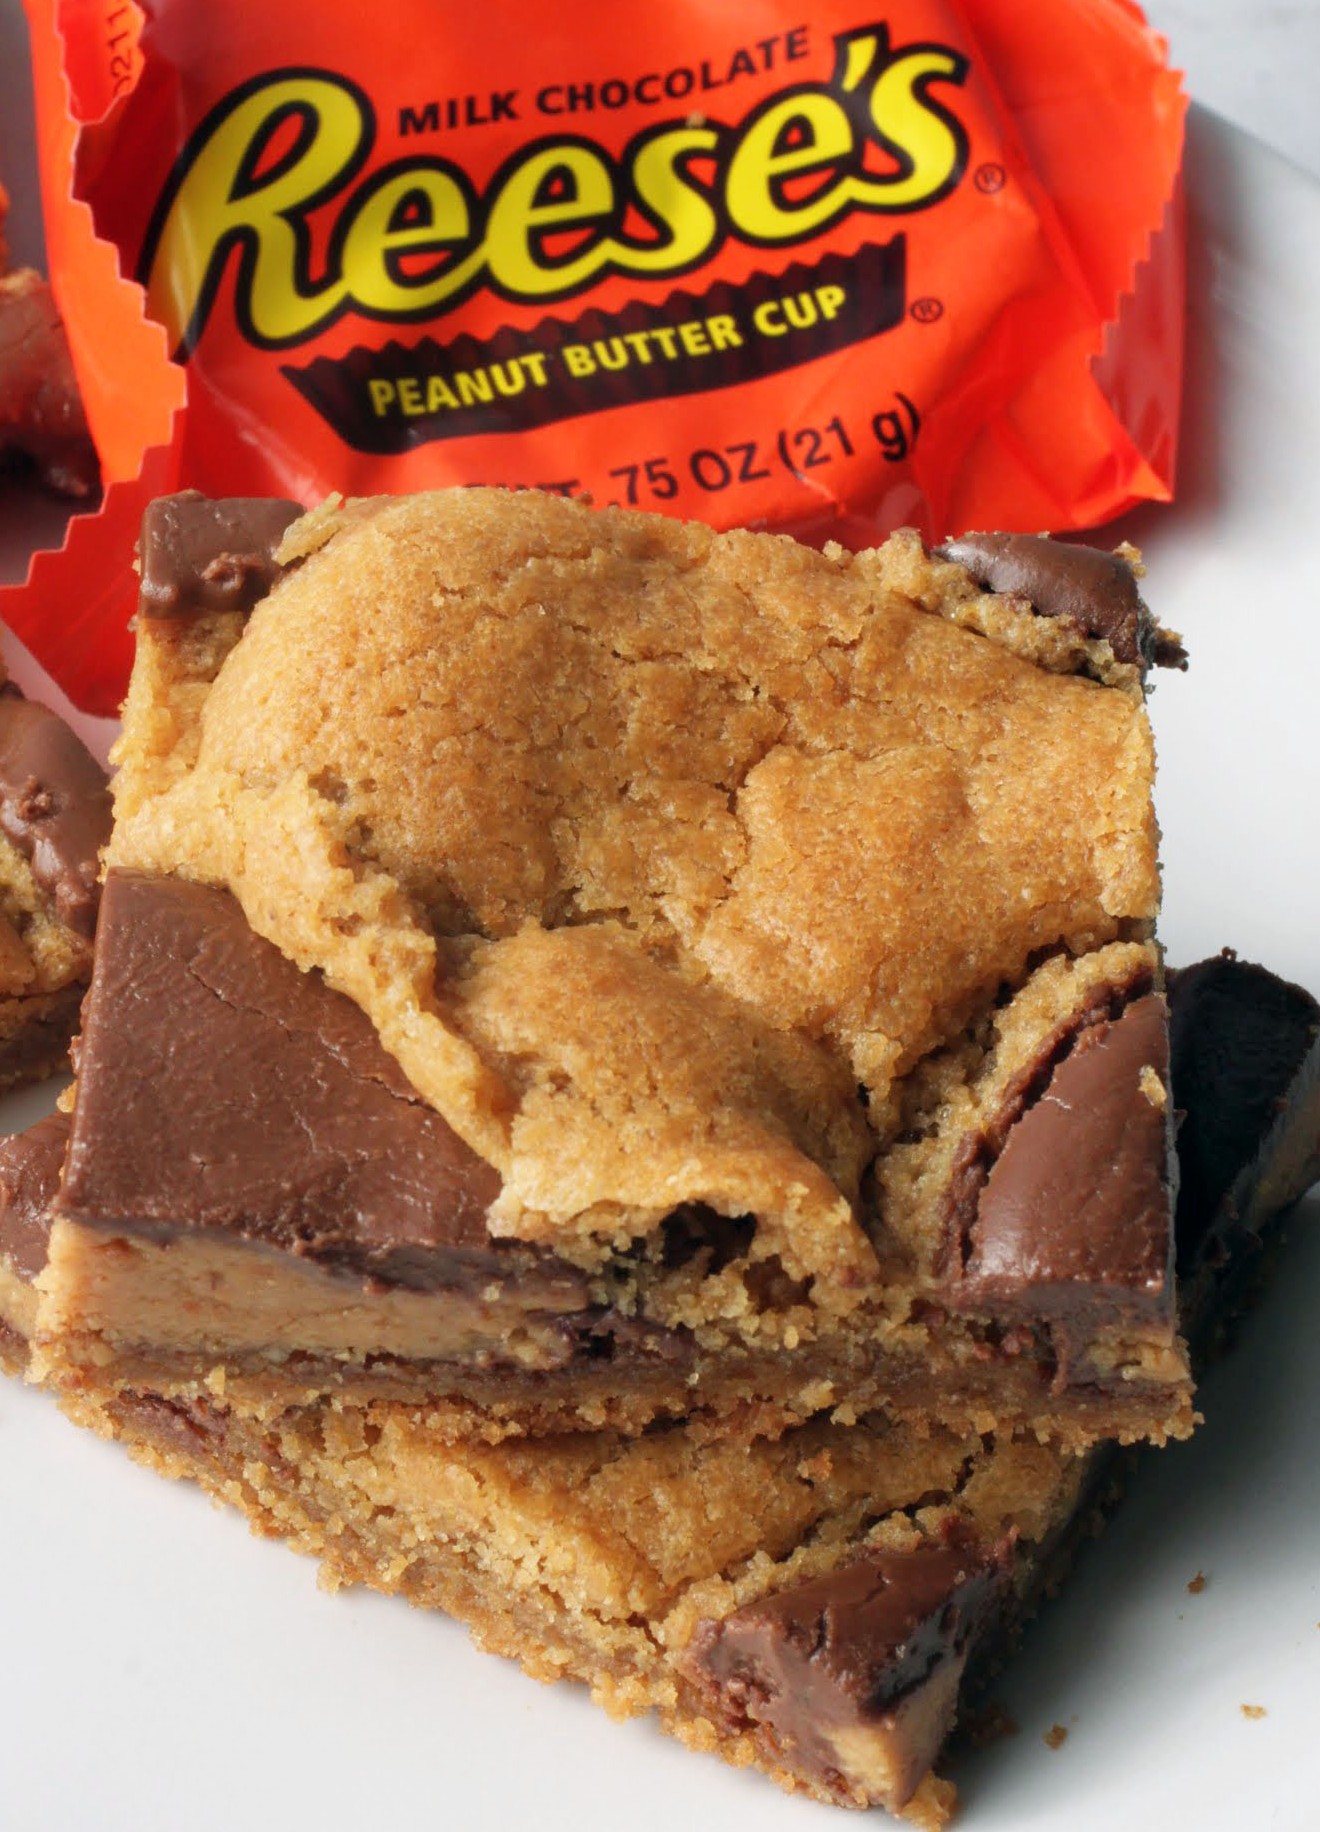
You all know that I have a passion for bar cookies, and I have an equally great passion for chocolate and peanut butter. In my world, no snack beats a Reese’s peanut butter cup. In fact, the absence of PB cups in life is a really good reason to never give up on sugar.
These are dense, chewy, peanut buttery, and flourless. That’s right. Why do you need flour when these bar cookies are decked out with enough peanut butter cup goodness to satisfy even the biggest fanatic?
To put this in perspective, my son ate these. One of my favorite bloggers in the whole universe, Dorothy, has a category for food her husband actually ate. I should institute a similar category for my own son, because he usually turns his nose up at my baked goods and opts to eat rice cakes instead. No, I am not kidding.
He ate these yesterday, and then he had seconds, and then he asked for more later in the day. #success #victoryismine
Of course, he needed some extra TLC after a particularly violent fight with his little sister. Here’s how it went down:
Boy: (screeching at top volume)
Me: What happened?!
Boy: (exhibiting red arm) She pinched me!
Girl: (also crying at top volume) No!
Me: (to Girl) Why are you crying?
Girl: It was sort of an accident!
She maintained that injuring her brother was “sort of” an accident and I never got more details. So I “sort of” punished her by sending her to her room in floods of tears while my son nursed his arm and talked me into giving him more of these bars.
On my trip to Hershey’s Chocolate World a year ago, I learned the secret to baking with peanut butter cups by observing their baked goods and methodology. In my field, that’s the best kind of research. Anyway, I noticed that they use the snack-sized (i.e. regular-sized) Reese’s in their baked goods, which makes so much sense. It packs a more powerful PB punch. So now I try to use them when I can.
The cookie base is simple: peanut butter, egg, sugar, baking soda, salt and vanilla. The baking soda and egg help these bars to rise, and the absence of flour makes the texture super dense and chewy. These are perfection.
If you’re a peanut butter fan, these bars are for you. No Reese’s addict can resist!
Ingredients
Instructions
- Preheat the oven to 350. Line an 8-inch square pan with foil and coat with cooking spray. Set aside.
- In a large bowl, combine all of the ingredients (except the peanut butter cups). The mixture will be thick and sticky.
- Using a spatula, press the mixture evenly into the prepared pan. At even intervals, press the peanut butter cups in rows over the surface of the bars.
- Bake for 25-30 minutes until golden brown. Cool completely.
- Cut into squares. Store in an airtight container.
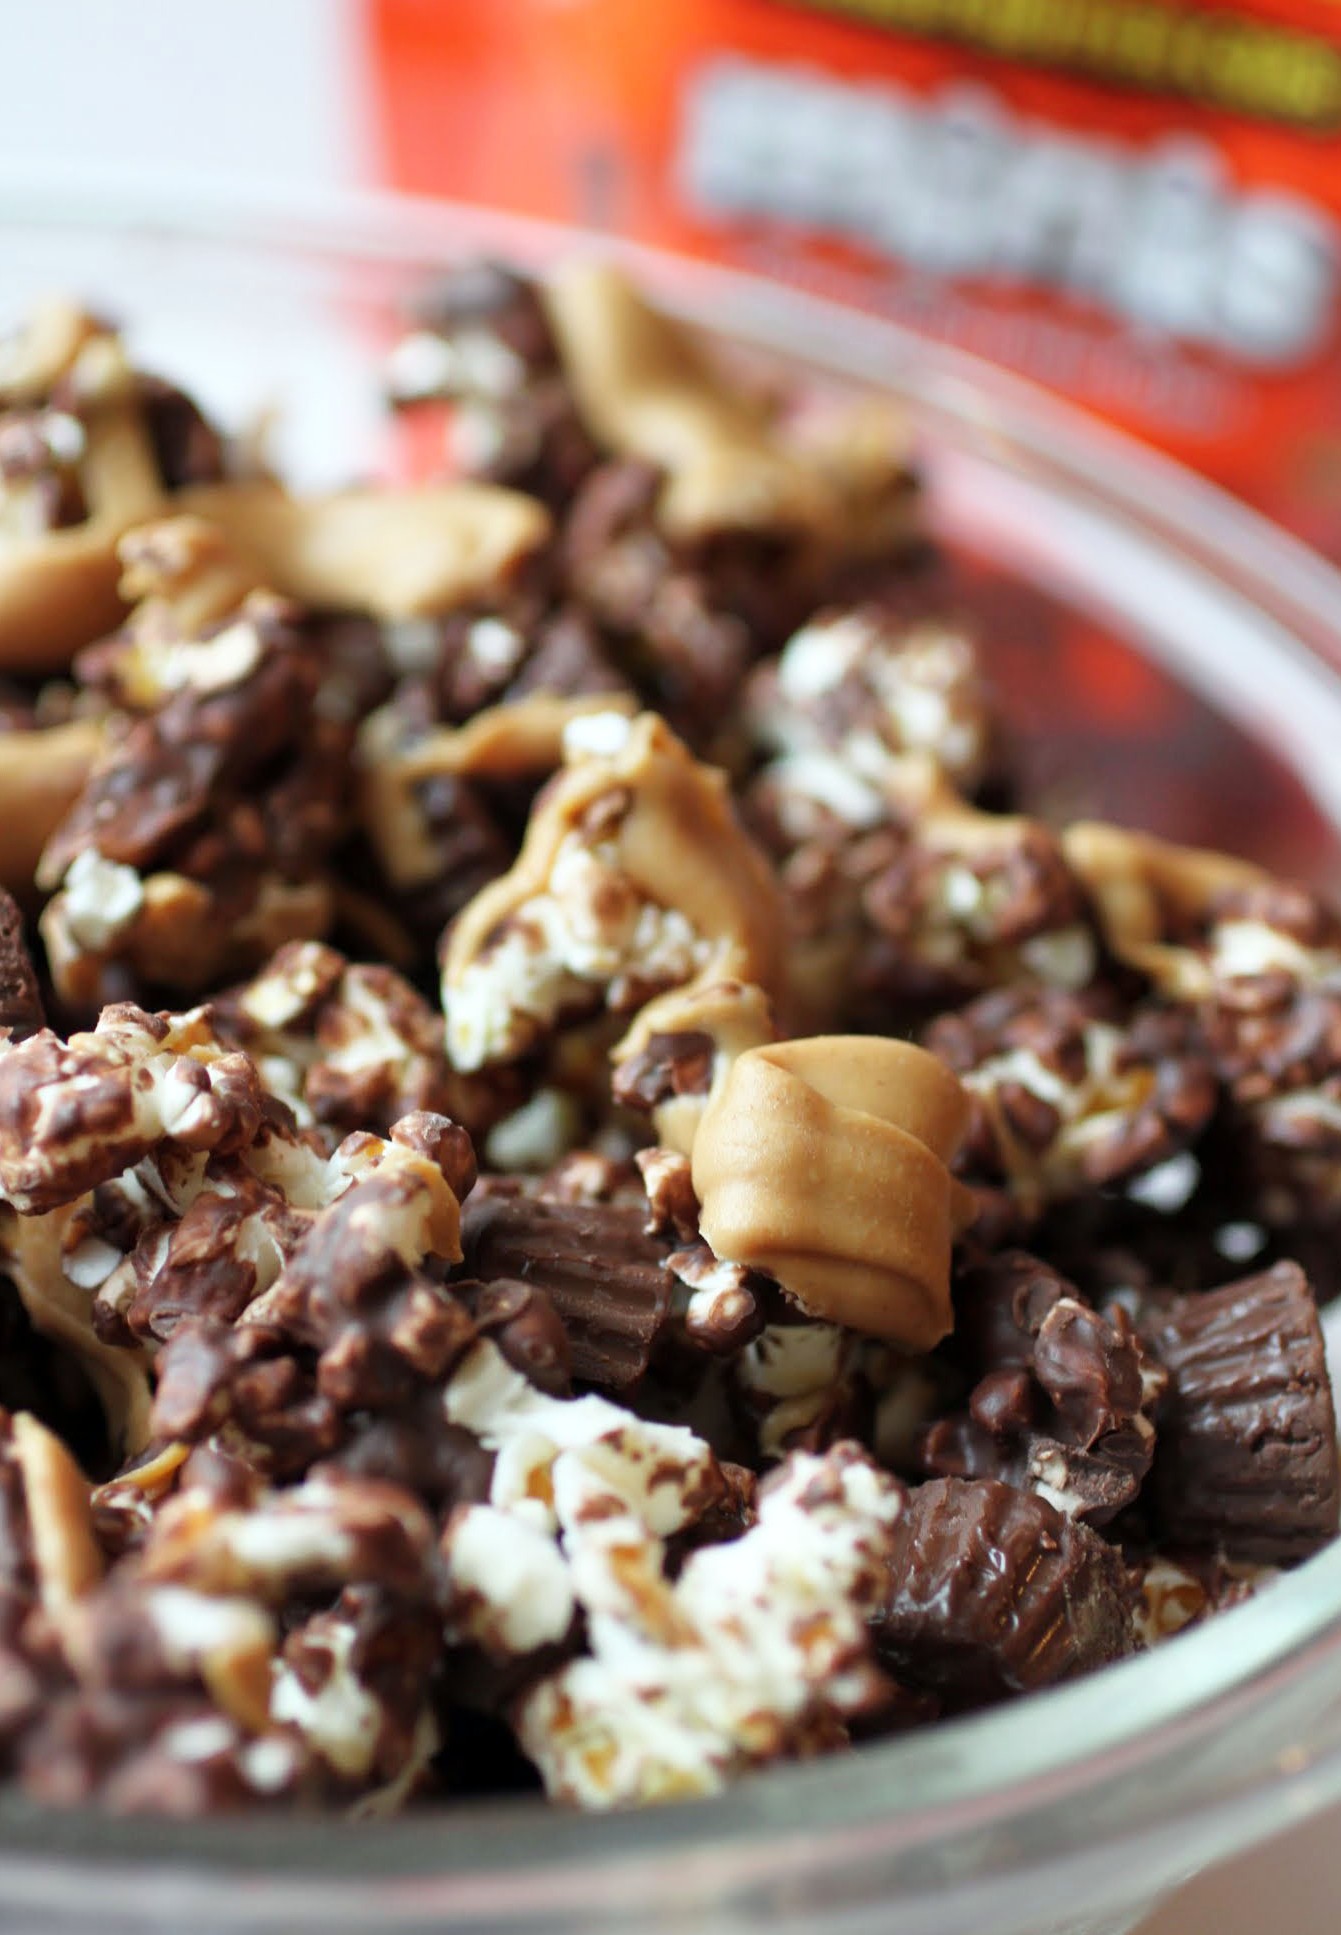
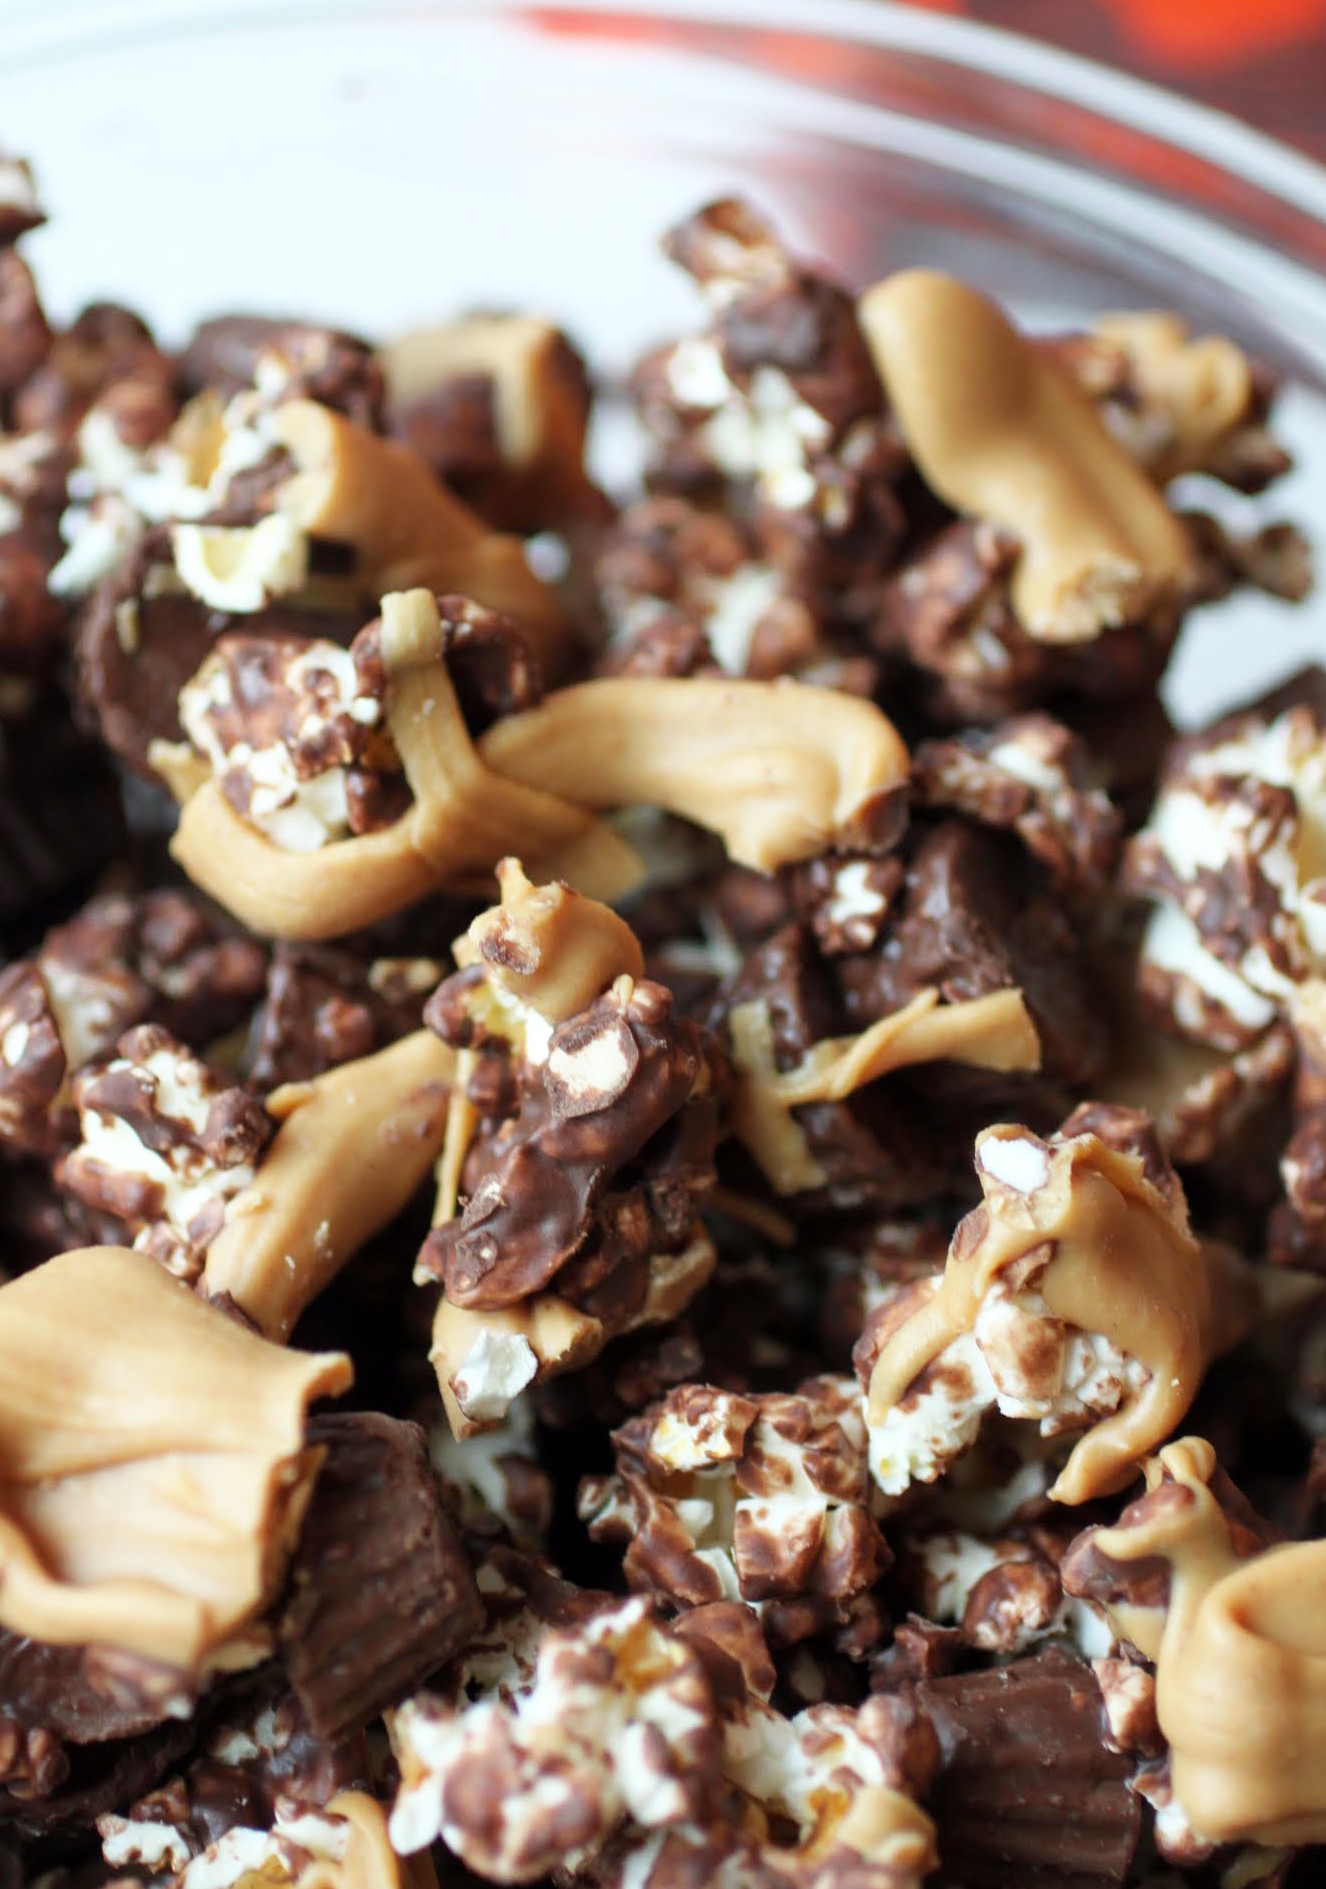
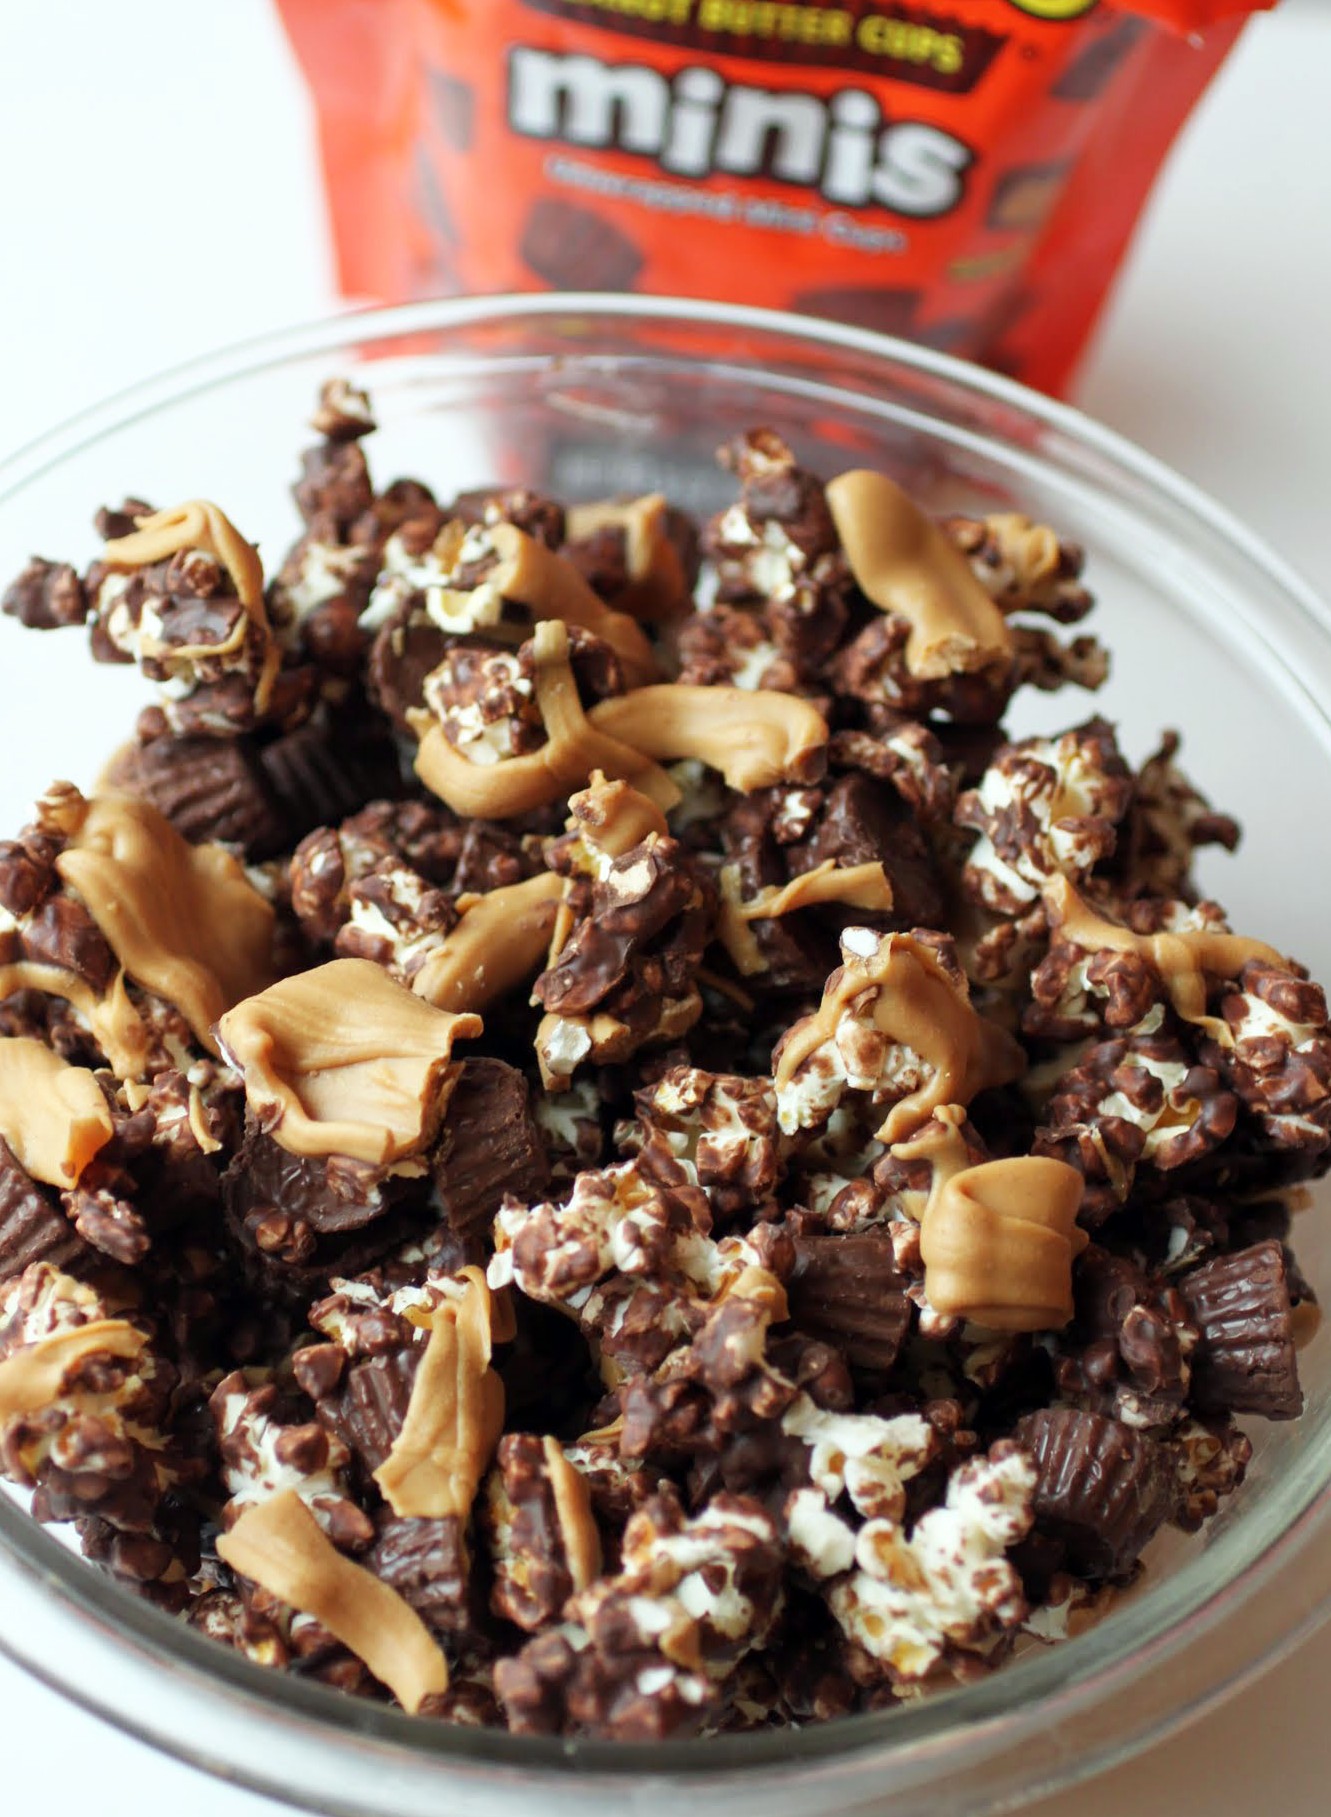
I used to take regular pilgrimages to NYC before the kids came along, and back then, there was a Popcorn, Indiana store in Times Square. I’d go there and order popcorn slathered in chocolate, have them pack it up in a big bag, and eat it on the train ride home.
Like all great stores, that one closed down, but I learned my lesson: always dress up your popcorn as much as you can. This one is covered in chocolate, mixed with Reese’s minis, and finished off with dollops of melted Reese’s chips. No trip to New York necessary for all of this madness!
Spring is such a transitional season. It’s when we feel the itch to do new things, see new places, have new experiences. It’s when we see hope that we can rejuvenate and find ways to make our lives even more meaningful. Or is that just me?
This time of year, the world looks totally different. The dark skies are light by 5:30 in the morning, the breezes are gentle, and people begin to daydream more, looking forward to beach getaways or lazy afternoons by the pool.
Maybe it’s just that I work in a school, but the focus here is definitely shifting. The same things that would have bothered me in October aren’t getting to me nearly as much right now. It’s the magic of springtime!
I wish I were as easygoing at home. It’s almost like an opposing force is at play. Yesterday, I walked by the backpack that I’d asked my daughter to put away five times. It was still in the middle of the hallway in a place seemed almost designed to make someone sprawl face-first onto the floor. Gotta be honest here: I didn’t use my patient voice this time.
But then I made it up to her by giving her some of this popcorn, and all was right with the world again. See? #goodparenting
The best part about making blinged-out popcorn is that it takes almost no time. Typically, I like to use kettle corn because it’s both sweet and salty, which gives the end result more dimension. You can use a microwaveable kettle corn, or many groceries sell really good ones as well. Popcorn, Indiana makes the BEST kettle corn. And no, they’re not sponsoring this post. I wish.

Once you have the popcorn, you mix chocolate candy melts and Reese’s minis into it, which melt ever so slightly. And don’t forget that thick ribbon of melted peanut butter chips!
Spring is here and everything is in transition. The only constant is change, but this time, the change is warmer weather and green leaves on trees. I’ll take it!
Ingredients
Instructions
- Place the kettle corn in a large bowl. Set aside.
- Line a cookie sheet with parchment paper or a silicone baking mat. Set aside.
- Heat the chocolate candy melts according to package directions. Once they're melted, stir the candy melts into the popcorn. Add the Reese's minis and stir again until they're well distributed. Don't overdo it, though, or the minis will melt.
- Spread the popcorn onto the prepared baking sheet to dry. Set aside.
- In a microwave-safe bowl, heat the peanut butter chips in 30-second intervals, stirring after each interval until melted and smooth.
- Using a spoon, generously drizzle the melted peanut butter chips over the popcorn, being sure to get the drizzle in as many places as possible.
- Let the popcorn set. Break into pieces.
- Store in an airtight container.
You know that I can’t go more than a week or so without doing something PB-related. It’s the ABCs of me, baby, and I’ve embraced it. Just like I’ve embraced the role of sugar in my life. More on that in a bit.
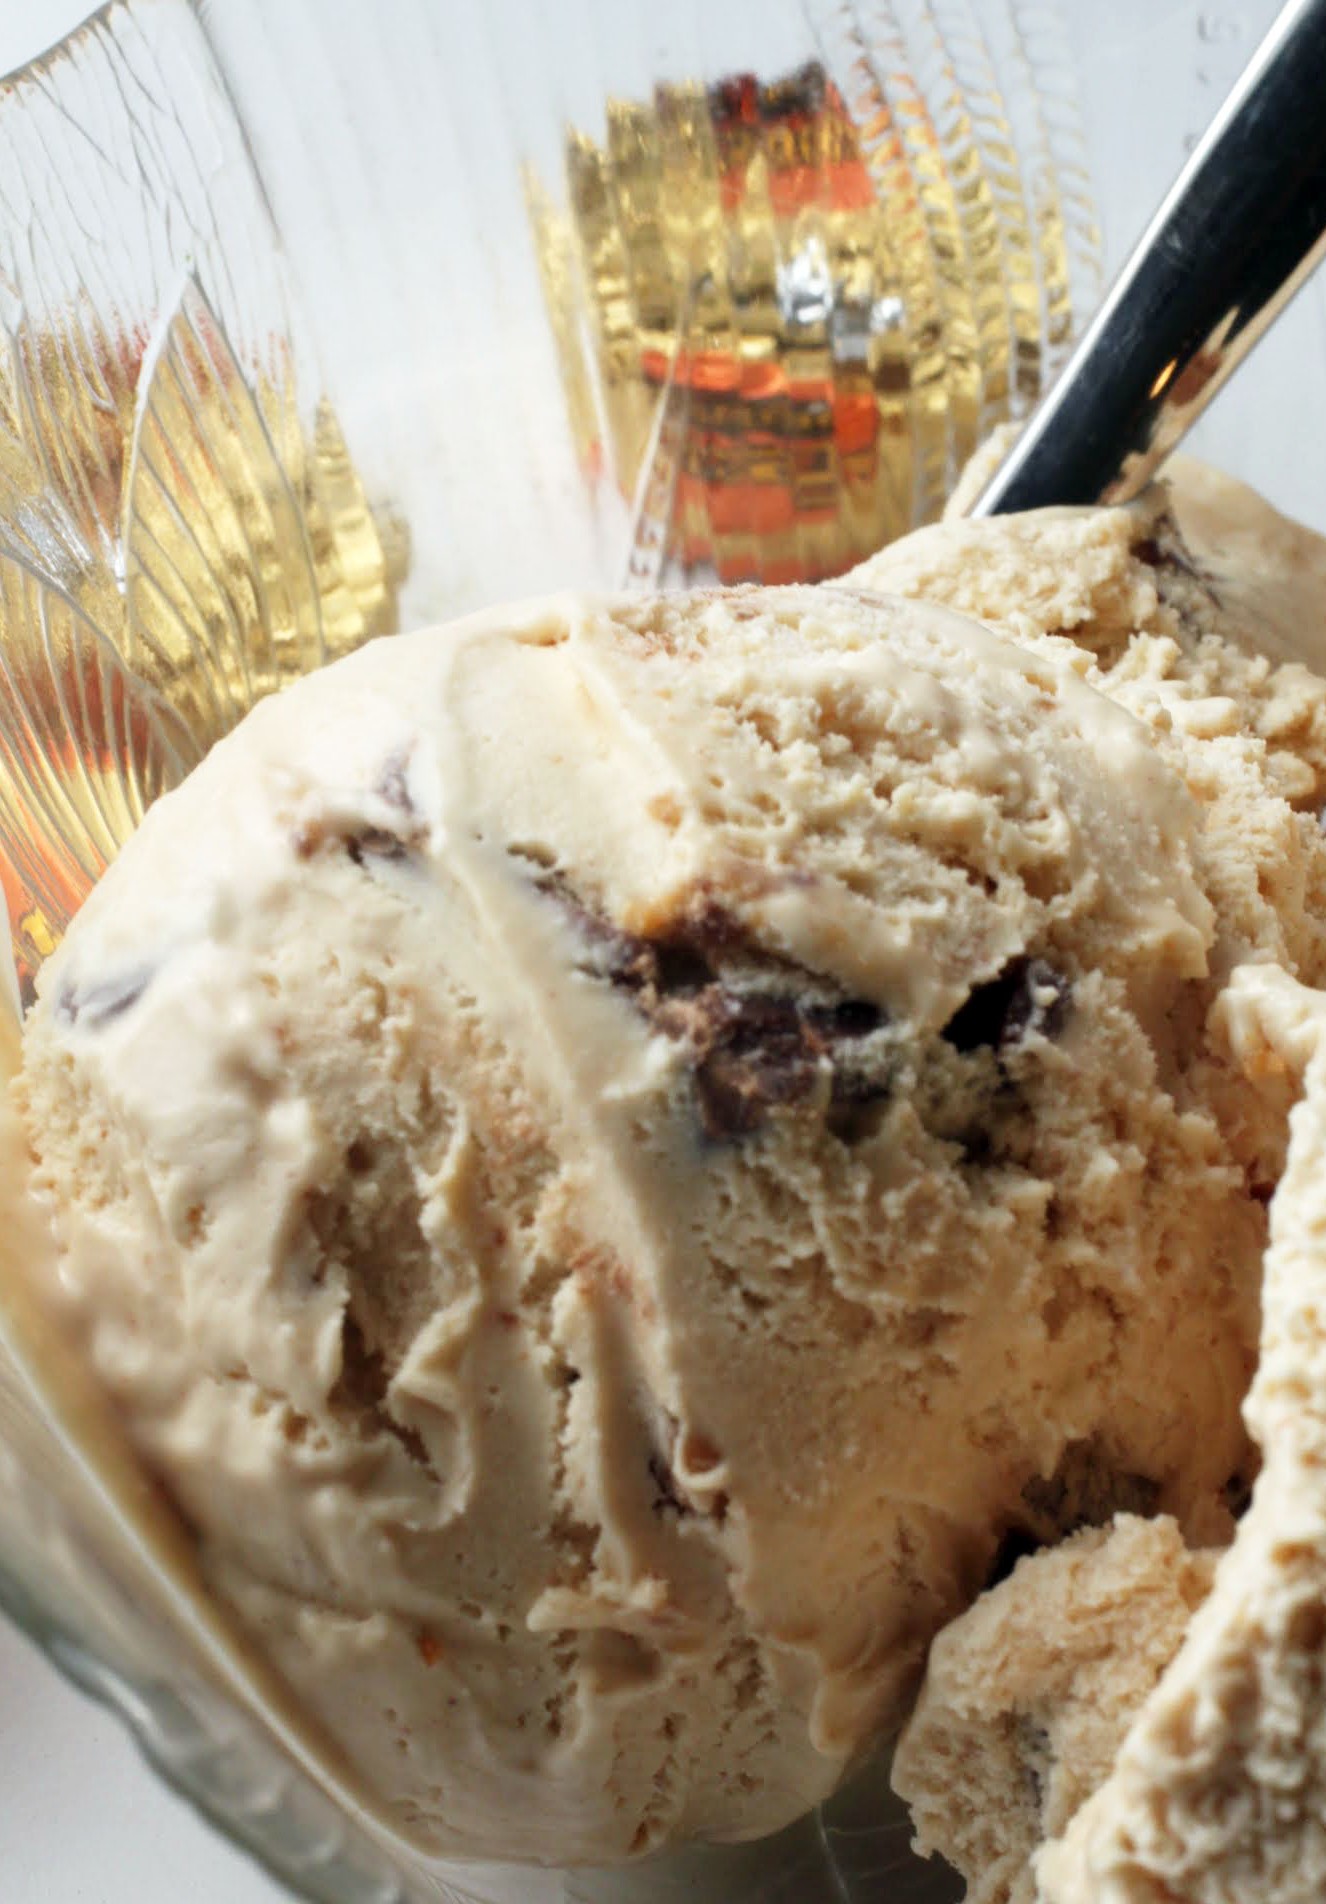
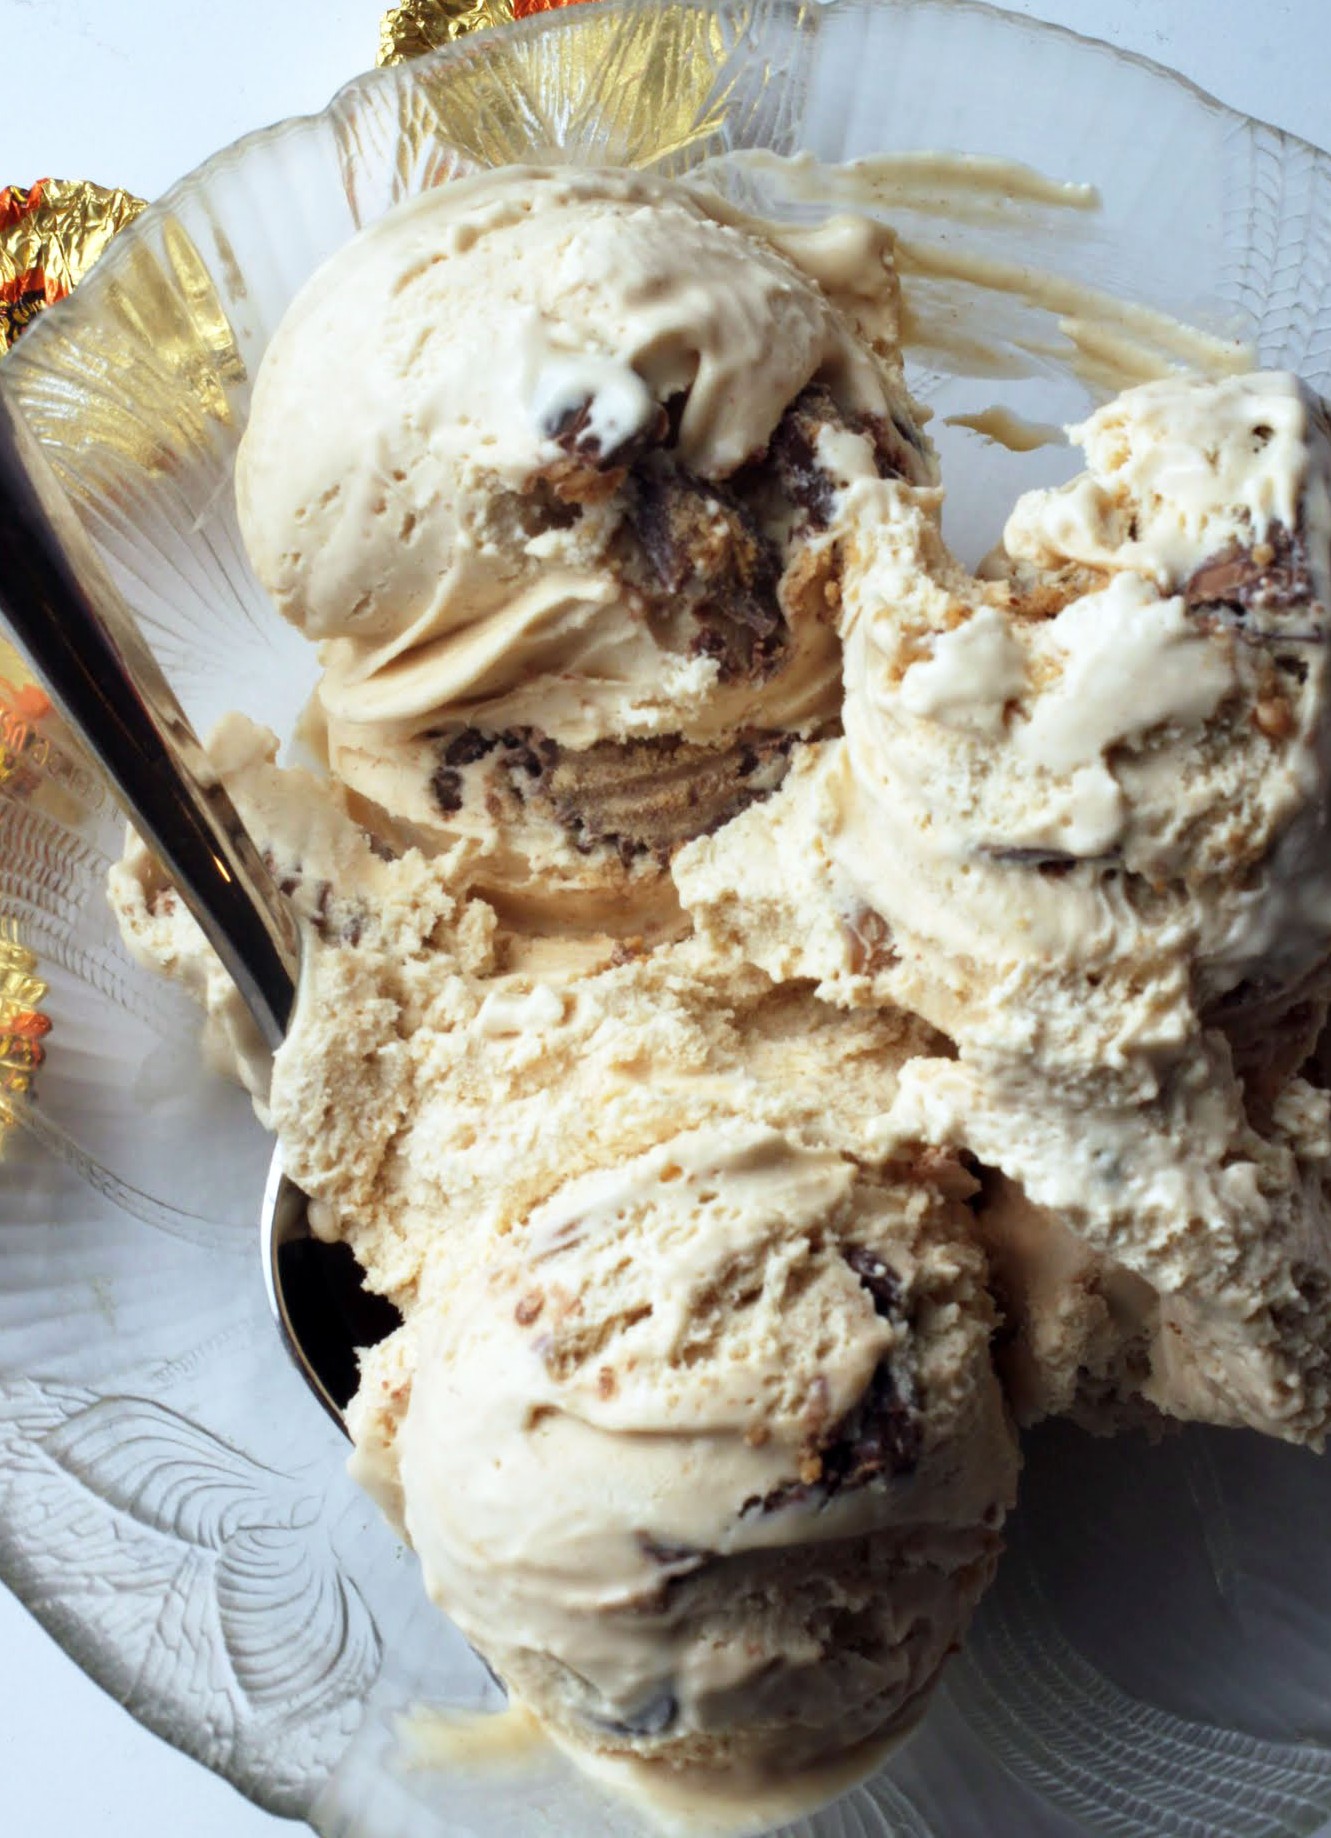
If you get frustrated because your peanut butter ice cream isn’t peanut buttery enough, or because it doesn’t include enough mix-ins, look no further. This no-churn option will satisfy all of your frozen peanut butter dreams!
I’m tired of the war on sugar. Yes, I realize I’m a baking blogger and so my credibility is lessened here, but I’m going to be very real with you.
First of all, a qualifier: the following thoughts do not apply to anyone who cannot have sugar for medical reasons or anyone who has disordered eating habits. I’m not a doctor or a nutritionist (clearly), so the following thoughts are just opinion.
A few years ago, after reading endless articles about the evils of sugar, I tried it cutting out. To call it a disaster would be fair. It’s not that I had withdrawal (I didn’t, shockingly) or any other noticeable symptoms. People told me I’d feel better, and that didn’t happen. I felt no different. Life was a little more boring, and I had to say no a lot, but that was about it.
What prompted the disaster was a lot of sudden weight loss. I’ve always been petite, and I have always worn sizes in the low range of the spectrum. But with the cancellation of sugar, I quickly lost 20 pounds and became very obsessed with maintaining what I now see was an unsustainable diet. I spent a lot of time chopping veggies, eating lean protein, and feeling virtuous.
Along with that came insecurity, doubt, a constant nagging hunger and the desire to eat everything in sight. I didn’t realize it at the time because it all seemed so healthy, but I was depriving my body of essential nutrients. What looked like fitness and health was really dysfunction.
Thankfully, I pulled myself back from the brink. As a result of this experience, I refuse to cut out food groups anymore. Did I put the weight back on? Yes. And I’m grateful for it, for my muscles (thanks, barre workouts!) and for whatever curves I like to think that I have.
When I see people turning sugar into the enemy, I get angry. It’s not sugar that’s the problem. It’s the extreme approach to food and the lack of emphasis our society puts on balance. I haven’t mastered balance, and I might not ever. But I’m sure gonna keep trying.
There’s your PSA. Now let’s get our sugar on!
This ice cream is full of it, not gonna lie. It’s got peanut butter, sweetened condensed milk, and whipped cream. You can be lazy and use Cool Whip (no judgement), but I like the less chemical taste of the whipped cream. And then I loaded the whole thing down with peanut butter cups, peanut butter chips and milk chocolate chips.
Suffice it to say, I’ll be eating a lot of this ice cream later. Probably a little more than I should. But you know, that’s life. And I’m happy that I don’t have to say no to anything anymore!
Ingredients
Instructions
- In a large bowl, combine the condensed milk, vanilla and peanut butter until smooth.
- In the bowl of a stand mixer using the whisk attachment, beat the whipping cream on high until stiff peaks form.
- Fold the whipped cream into the peanut butter mixture gradually, making sure that no streaks are left in the mixture. Gently add the mix-ins and stir again.
- Place in a freezer-safe container or pan and freeze overnight.
- Store covered in the freezer.
]]>
Nothing will please a crowd faster than chocolate cake, and when you add a rich chocolate glaze and cover the cake with all kinds of candy bars, you’re basically asking people to come to your house and never leave. If that sounds okay to you, proceed!
After all, nothing will fill a house full of visitors faster than baked goods. I find that when there’s a candy assortment in the mix, you just have to get used to having privacy invaded on a regular basis.
That’s not really a problem for me, but for Kenny, it’s awful. He’s an introvert, and our house is very loud for him already. Our three monsters make a ton of hullabaloo, and when their little monster friends come over, it’s even worse. I try to hide the chocolate during any and all play dates.
It’s kind of tough when an extrovert marries an introvert. I charge my batteries by being with other people, and I’ve had to really cut that back now that I see what it can do to Kenny. He would never complain, but I know that spending the day around people is not his thing at all.
Whenever we do get together with friends, I have a really great time. But I can usually tell from Kenny’s body language that he’s dying to get home and lie on the couch. I mean, that does sound nice, for maybe an hour or so. Then I really want to get out there again and hang out with people.
Our society really gives introverts a bad rap. We make it harder for them to get ahead in the workplace, we misinterpret their preference for quiet as hostile or unfriendly, and we refuse to acknowledge that it’s okay for some people to prefer to be alone to get their energy. It doesn’t mean that they don’t have friends, or want to do well at work, or anything else. It’s just a different way of seeing the world.
It gets to the point where introverts force themselves uncomfortably out of their natural preferences, and it shows. My mom is an introvert, but she values the qualities that extroverts exhibit, so she goes out of her way to be very social. I admire her for putting herself out there, but as a natural extrovert (not to mention her daughter), I can tell when she’d rather be at home getting some downtime.
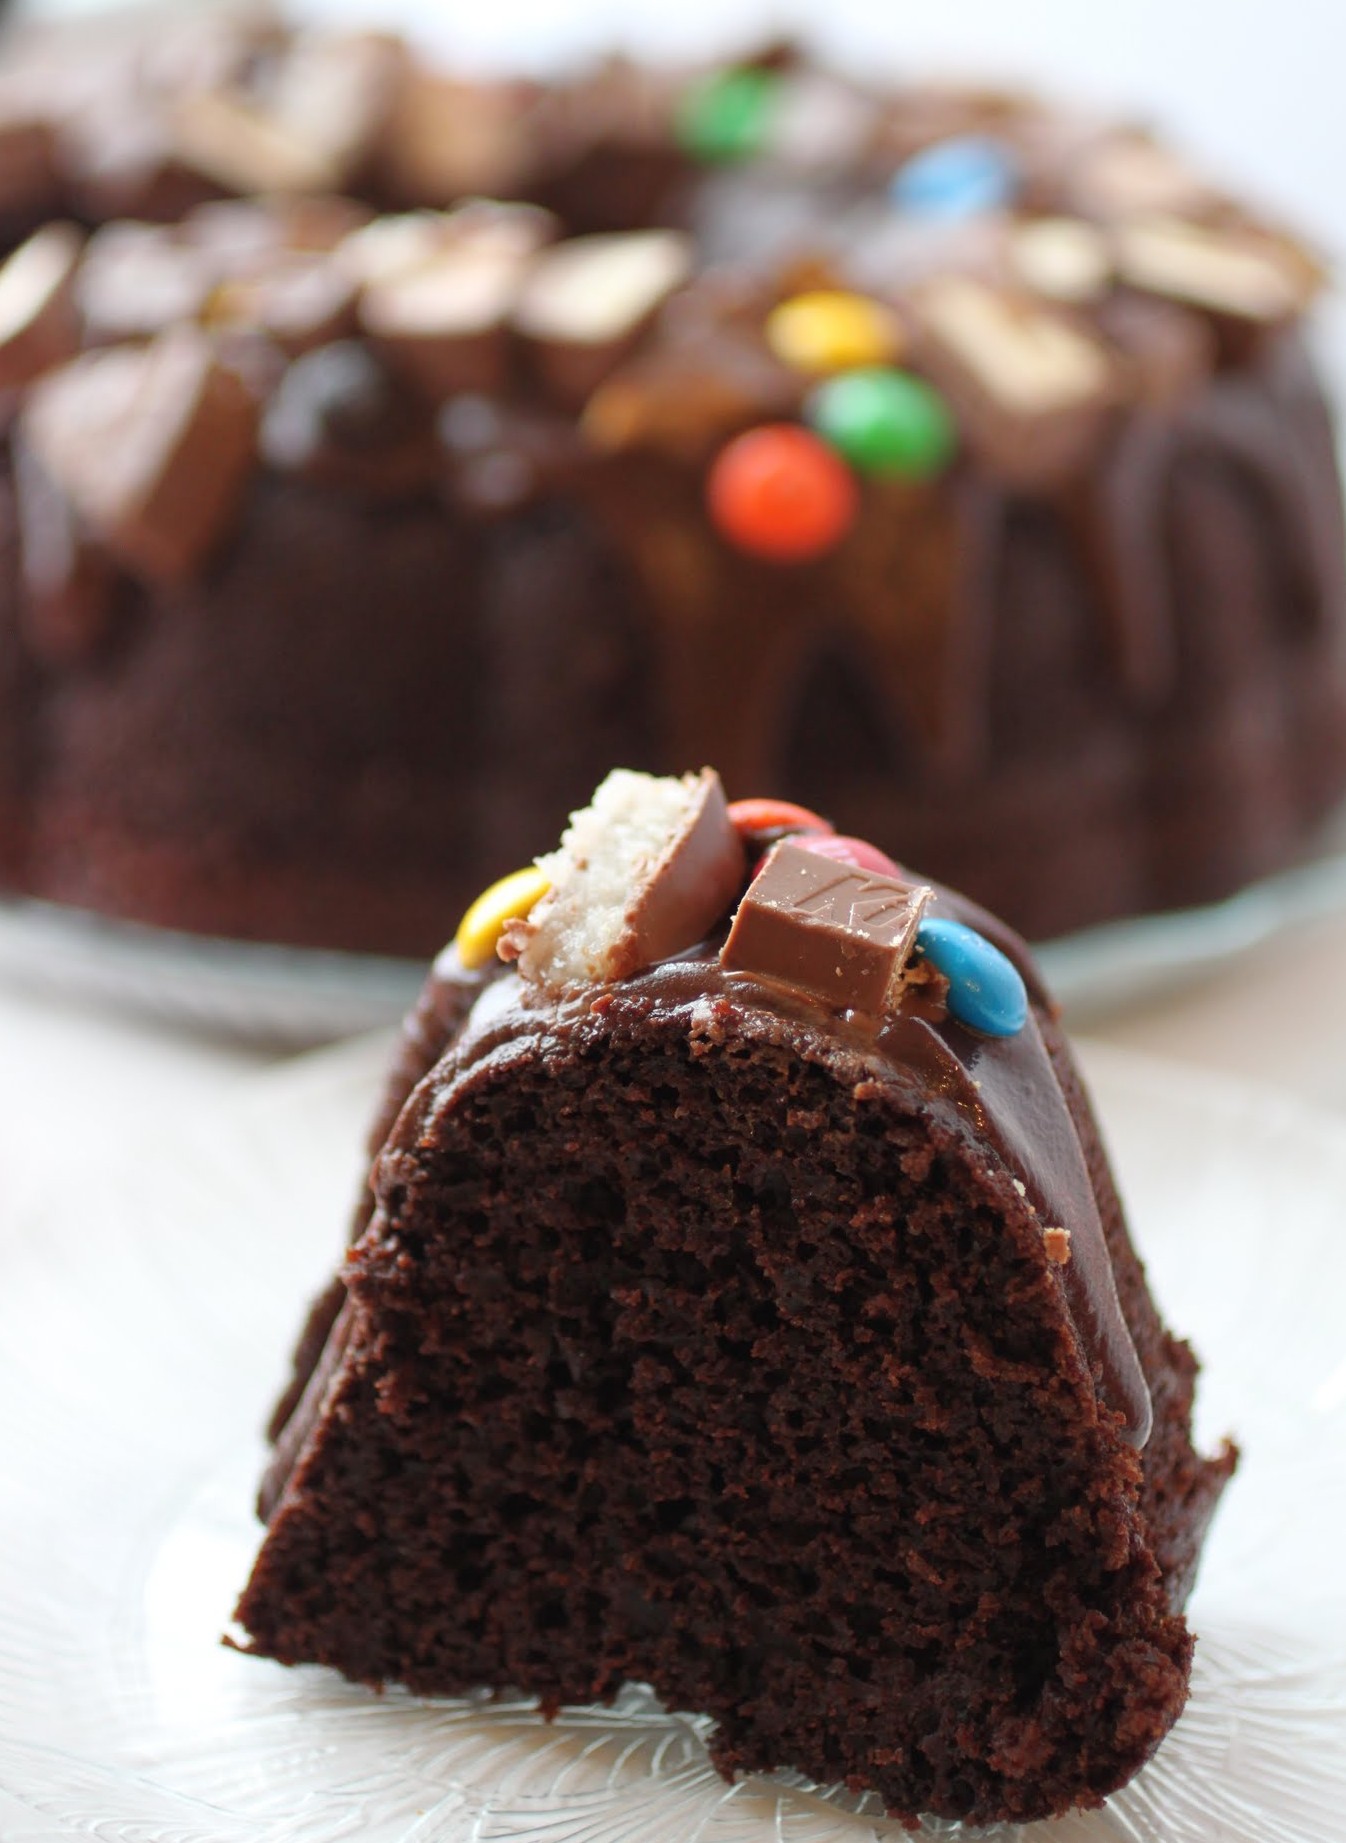
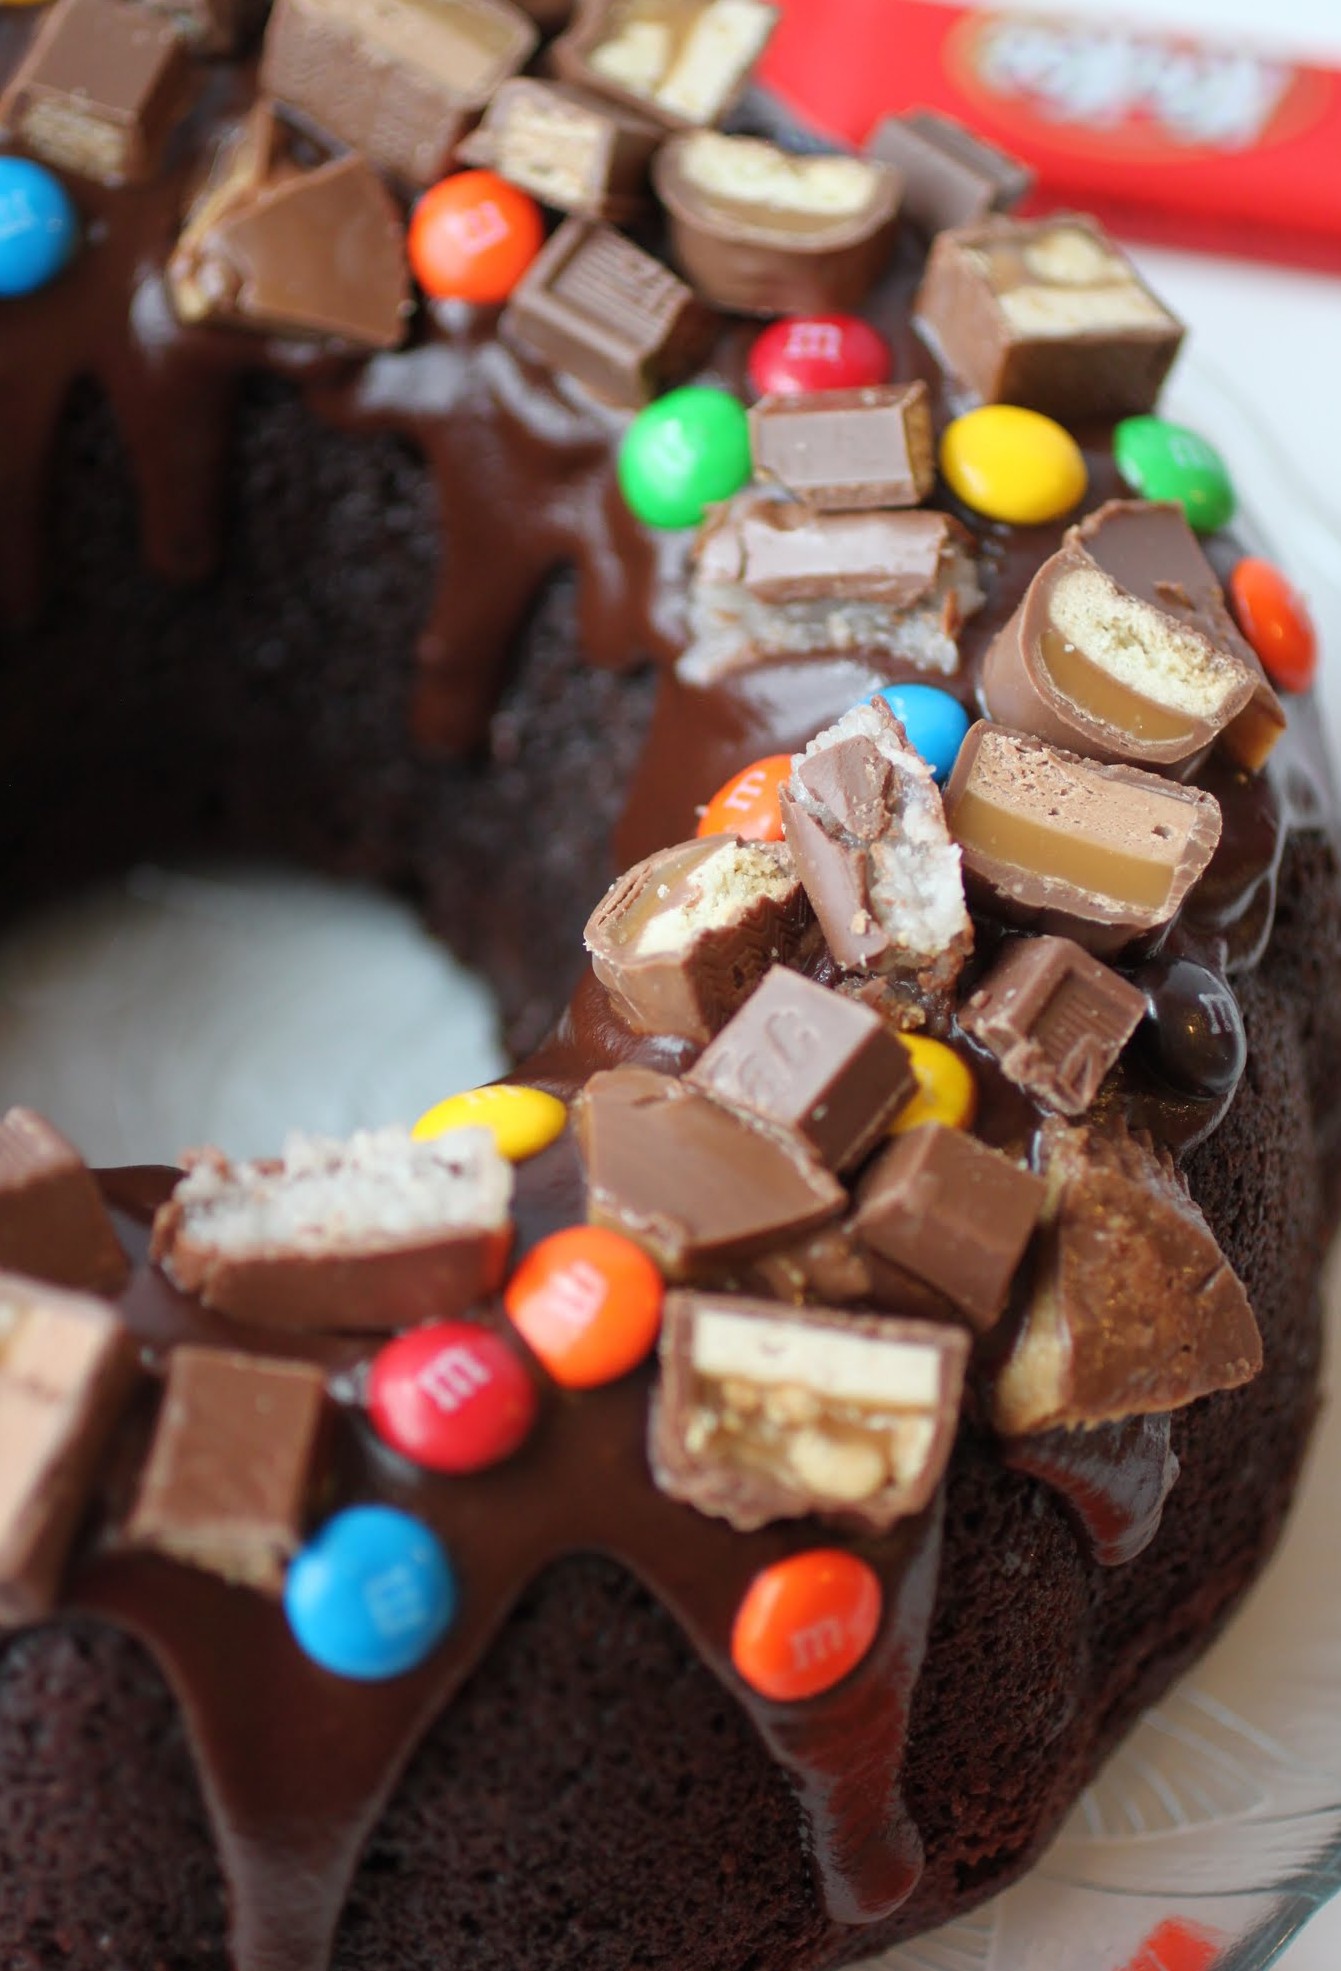
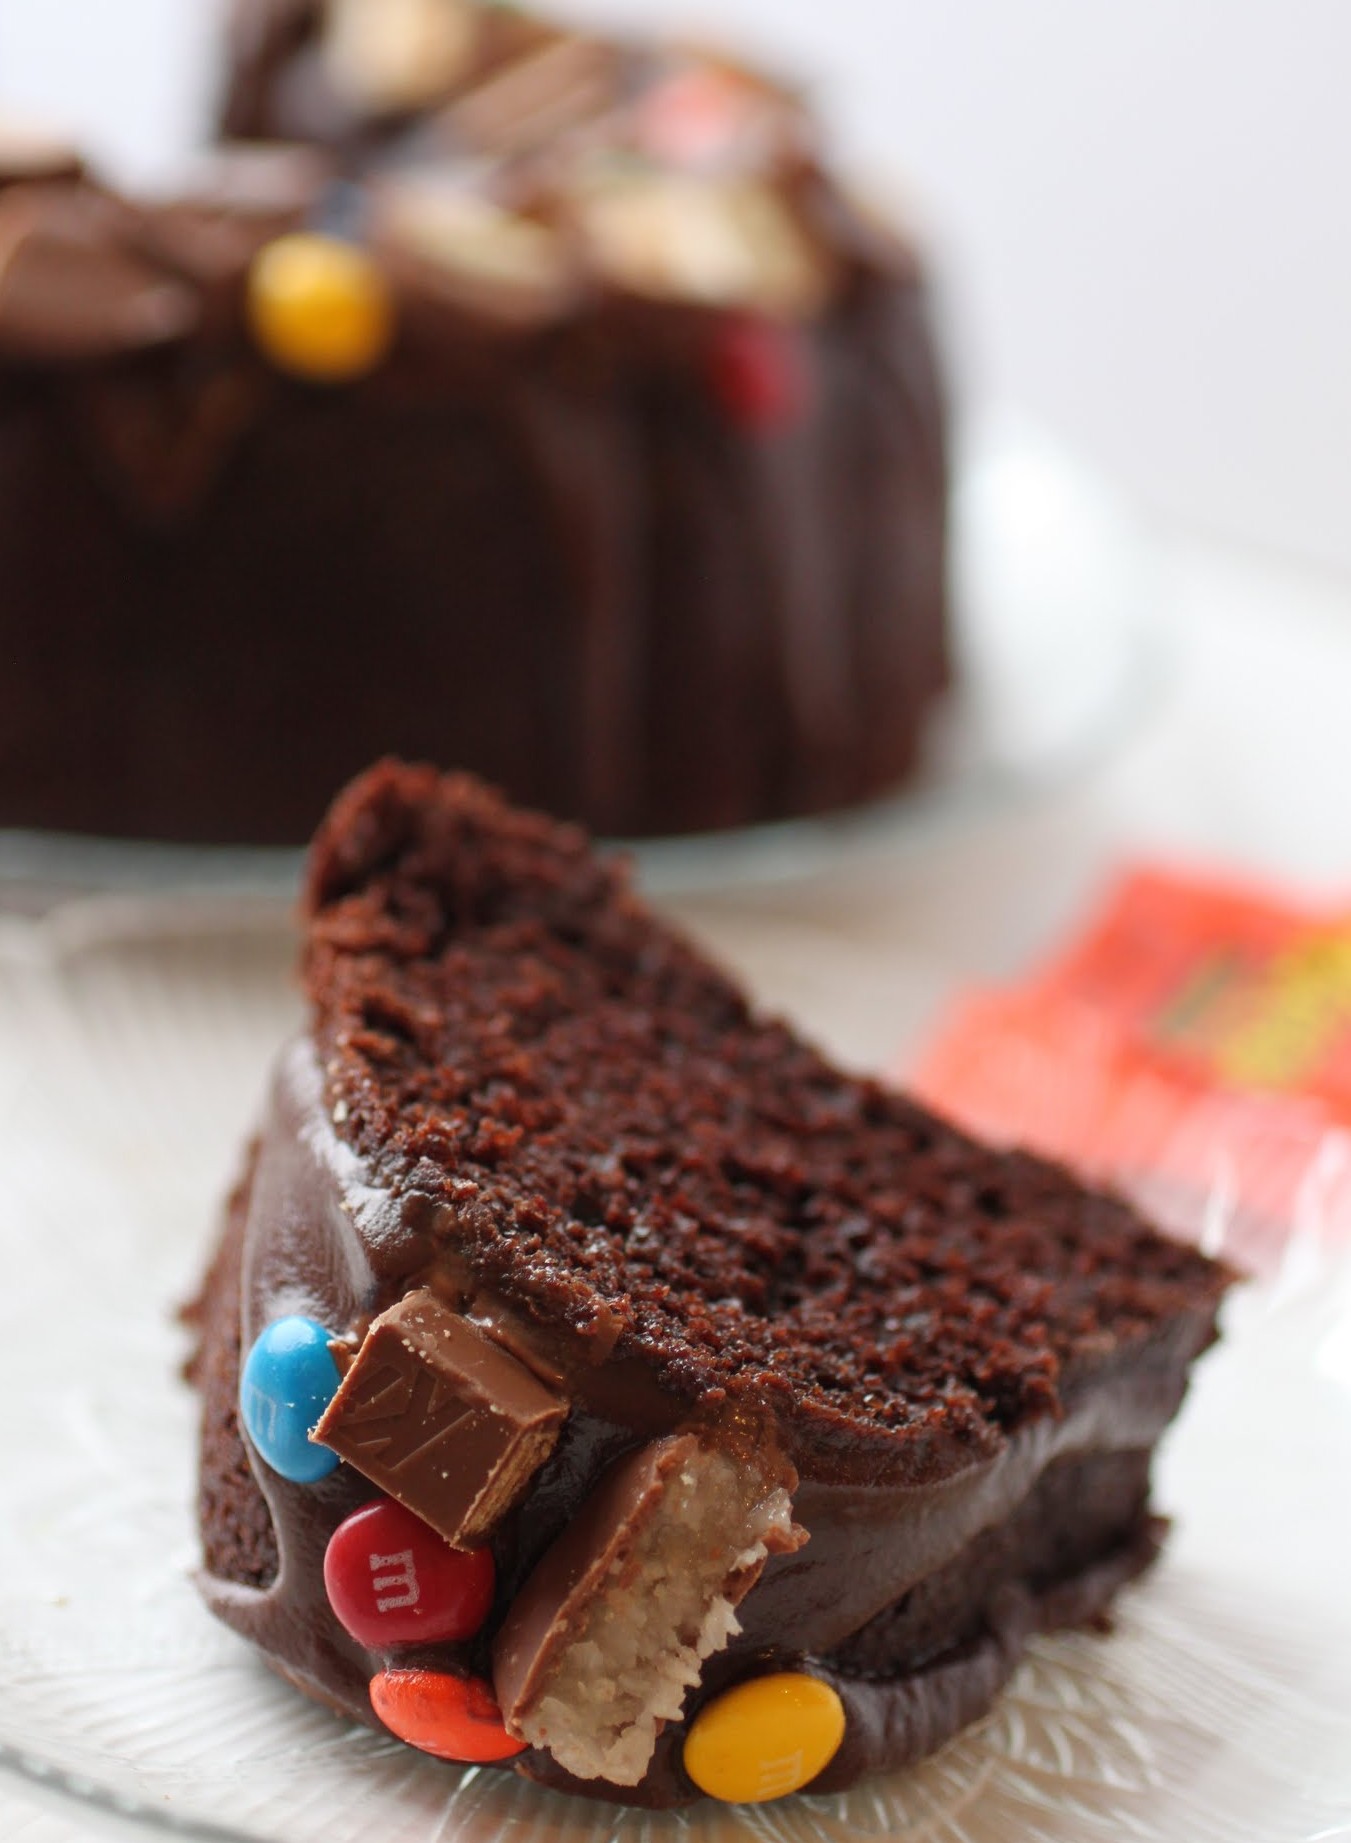
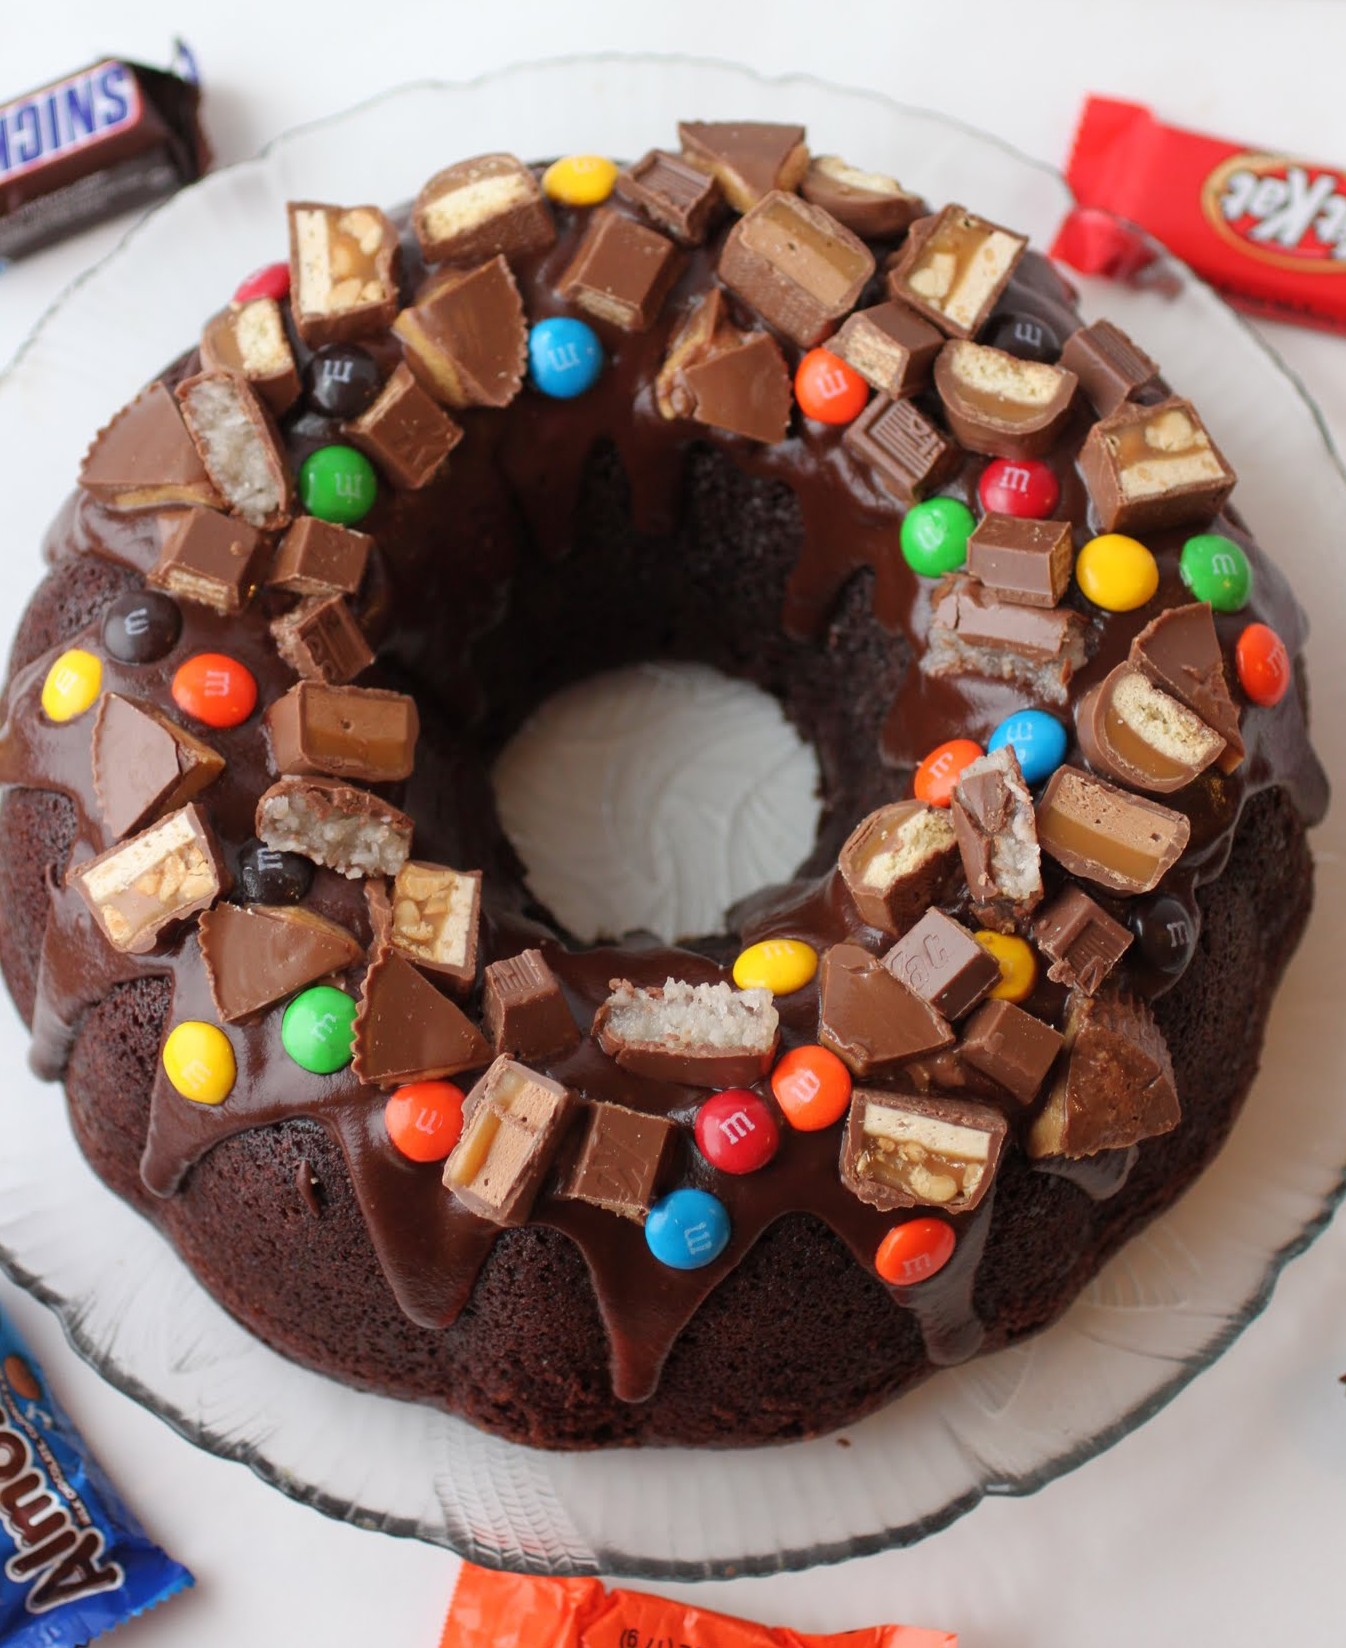
Regardless of social preference, we can all agree that a candy bar chocolate bundt cake is a good way to unwind and recharge after a long and stressful day. I made sure to pile this high with as many candy bars as I could: we’ve got Almond Joy, Snickers, Milky Way, Twix, Reese’s, Kit Kats, Nestle Crunch and M & Ms. And have I mentioned the thick chocolate glaze? I think I did, but it bears repeating.
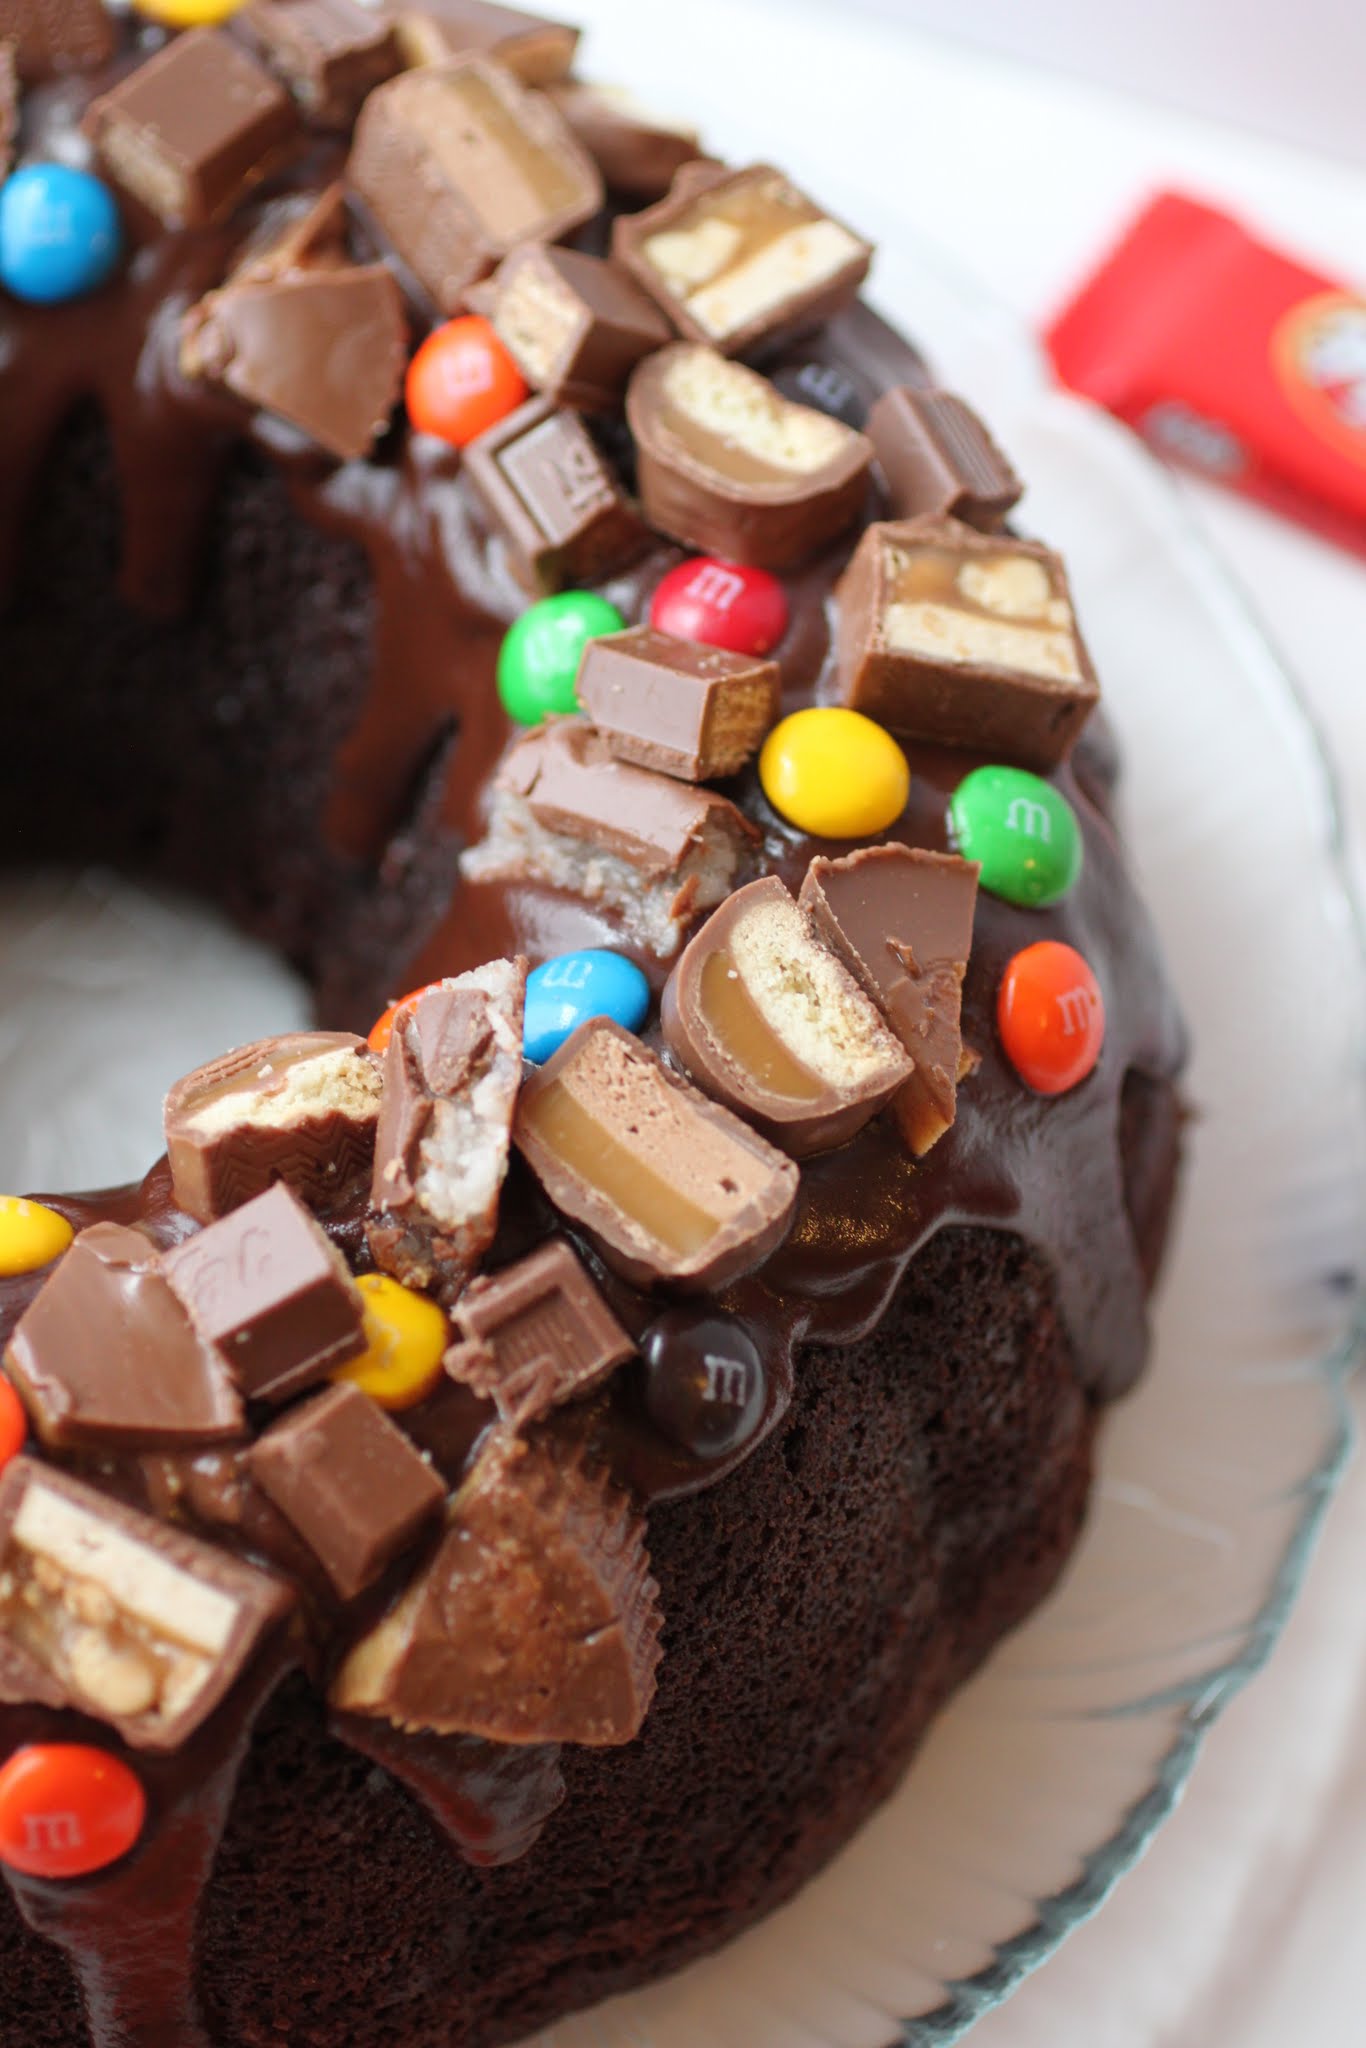
As long as I keep baking cakes like this, people will drop by on any old pretext to share a slice. I love it, and as for Kenny, well, he’s getting used to it. But I don’t want him to change, and we’ll keep meeting somewhere in the middle. Introvert or extrovert, we can all bond over a big slice of cake at the end of the day.
Ingredients
Instructions
- Preheat the oven to 350. Coat a bundt pan with cooking spray. Set aside.
- Combine the sugar, oat flour, cocoa, baking soda, baking powder and salt in a bowl.
- Stir in the milk, oil, vanilla and eggs, mixing until smooth.
- Fold in the boiling water carefully.
- Pour the batter into the prepared pan. Bake for 35-45 minutes until a toothpick inserted comes out clean.
- Allow the cake to cool completely. When the cake is cool, prepare the glaze. Combine the ingredients in a microwave-safe bowl and heat at 30-second intervals, stirring after each interval until smooth and glossy.
- Spoon the glaze over the cake. Carefully press the chopped candy bars all over the glaze. Allow the top to set.
- Slice and serve!
]]>
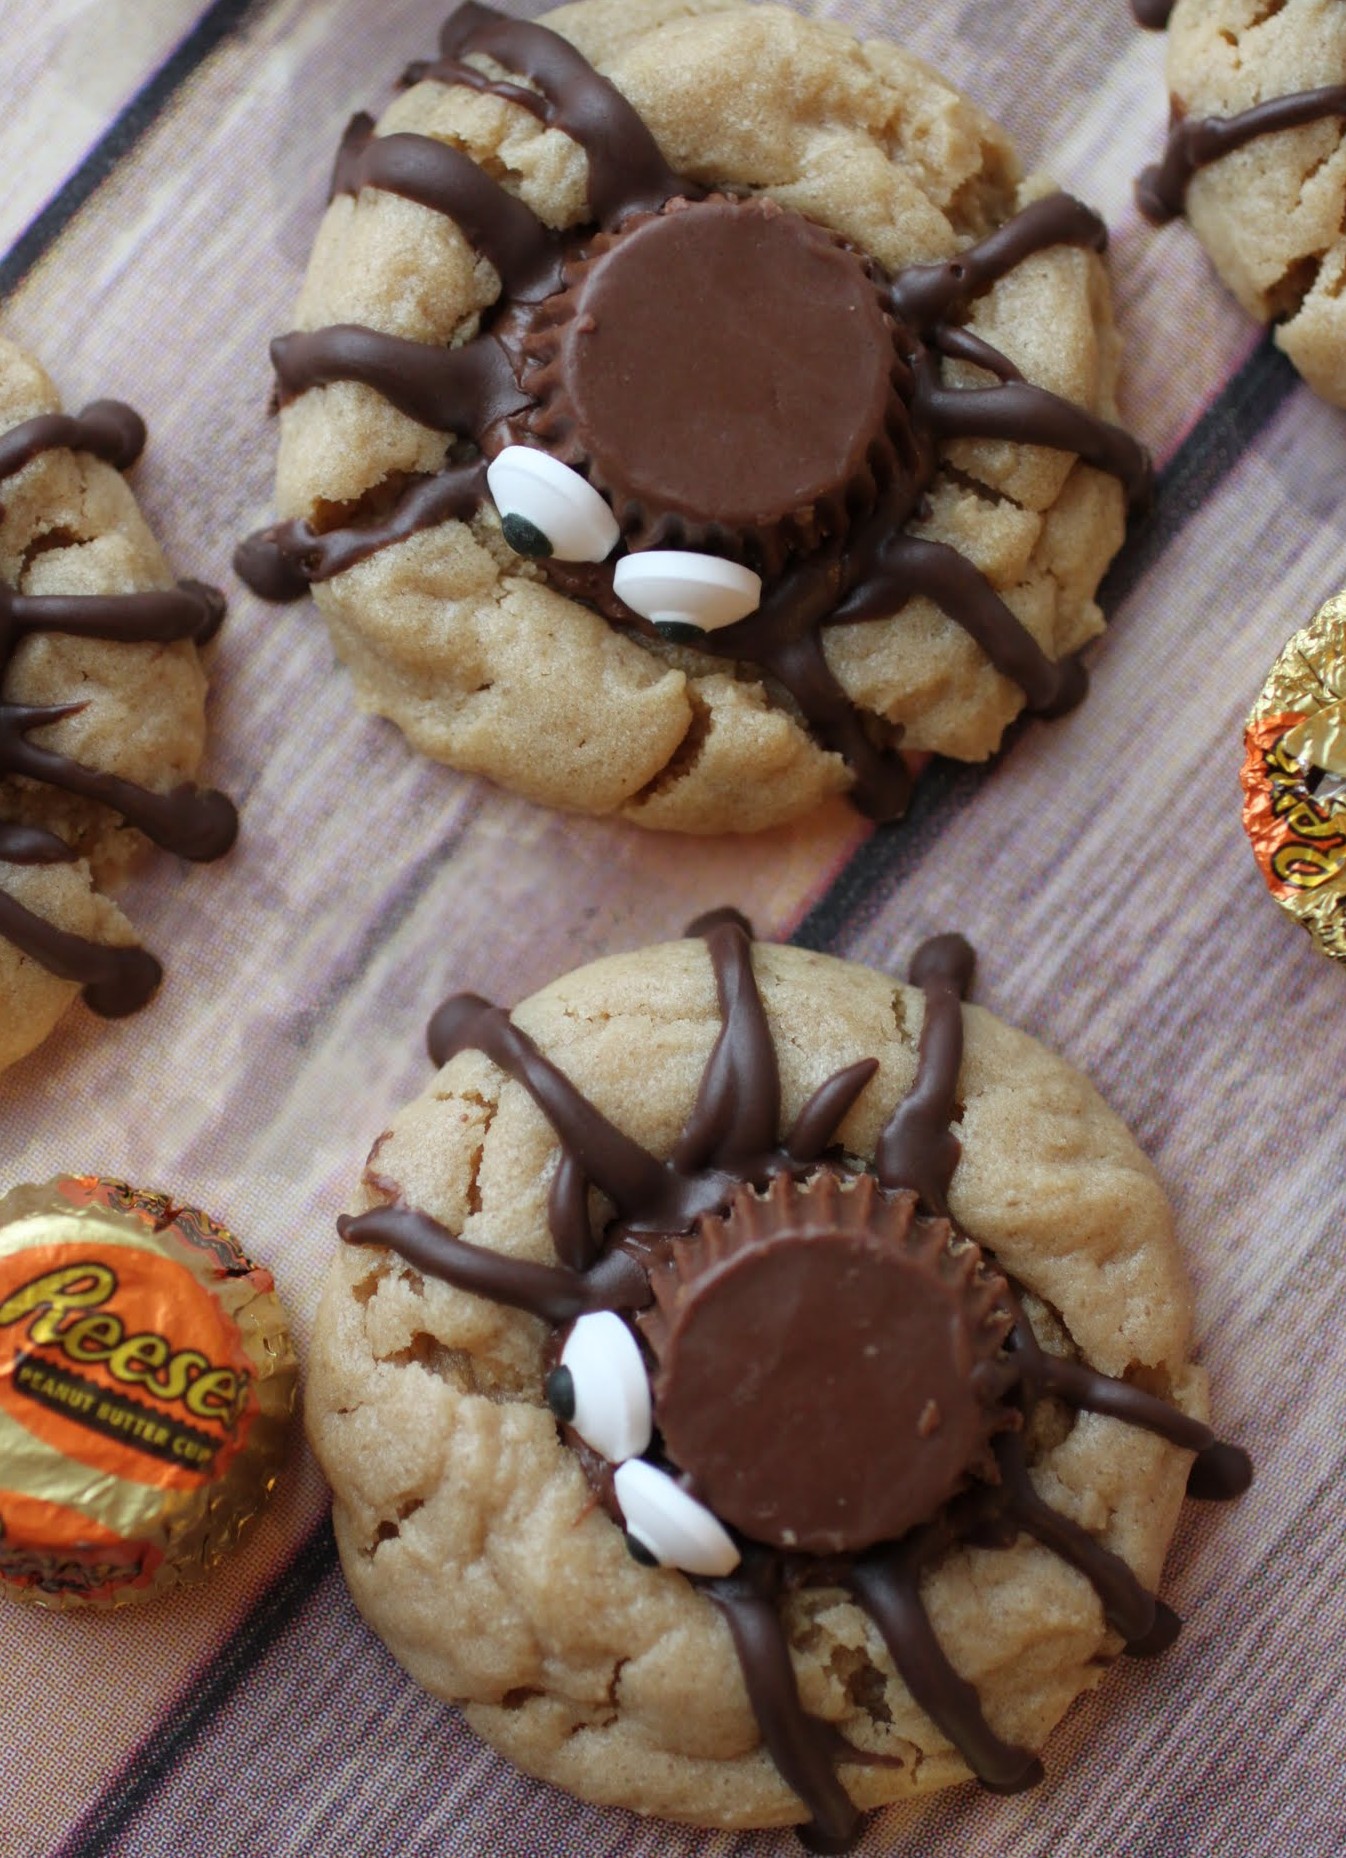
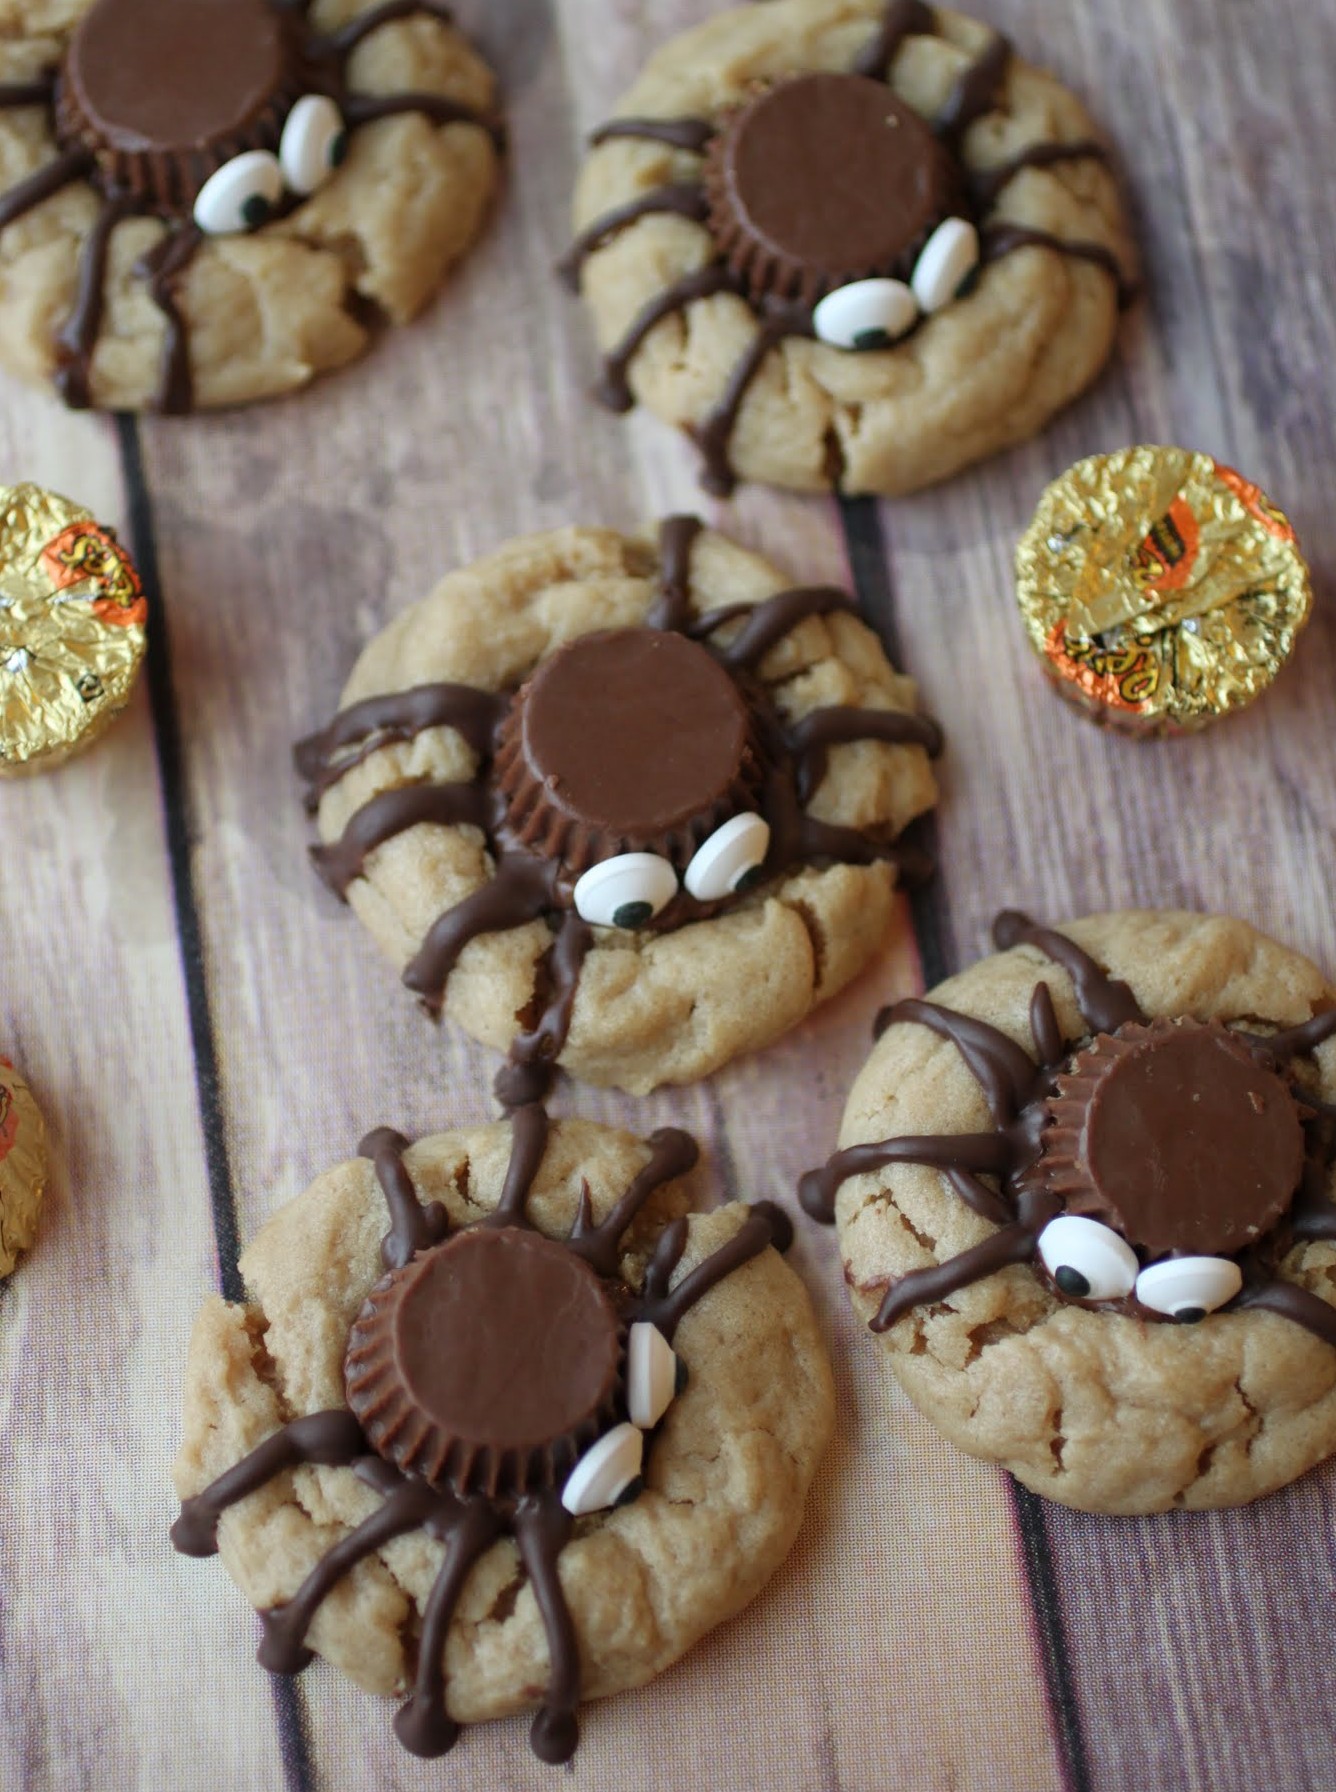
I’m totally down with spiders. For one thing, they eat mosquitoes. That makes them awesome. And I took care of a tarantula named Pinky back in high school, and he was a real sweetheart. So I have very positive associations and all.
This is my favorite peanut butter cookie recipe all dressed up for Halloween. Is it me, or are creepy treats mainly just adorable? Must be the candy eyes.
In the midst of all this creepiness, I have to admit that Halloween scares me. It really does. I do not like opening the door to people dressed in costumes that are intended to be terrifying. I don’t care how old they are. It’s just not cool.
One year, instead of candy, my mom gave out crayons. I will never forget the humiliation. I was 100% sure that some unruly trick-or-treaters would bust into the house and steal all our food. I mean, I’d be pretty mad if I got crayons instead of candy. The only thing worse would be toothbrushes.
Let’s face it: Halloween is a scary time of year. The sky is often eerily cloudy, and with people moving around at night like ghosts, it’s not exactly reassuring.
Plus, I teach high school, which means that kids come in costume on the closest day to Halloween and we have to figure out which costumes are crossing the line. I really have no desire to see students dressed in short, tight costumes, or in a worst-case scenario from a couple of years back, like a giant condom. It’s so tacky.
The opposite of tacky is cute Halloween treats. And these little guys just make me happy.
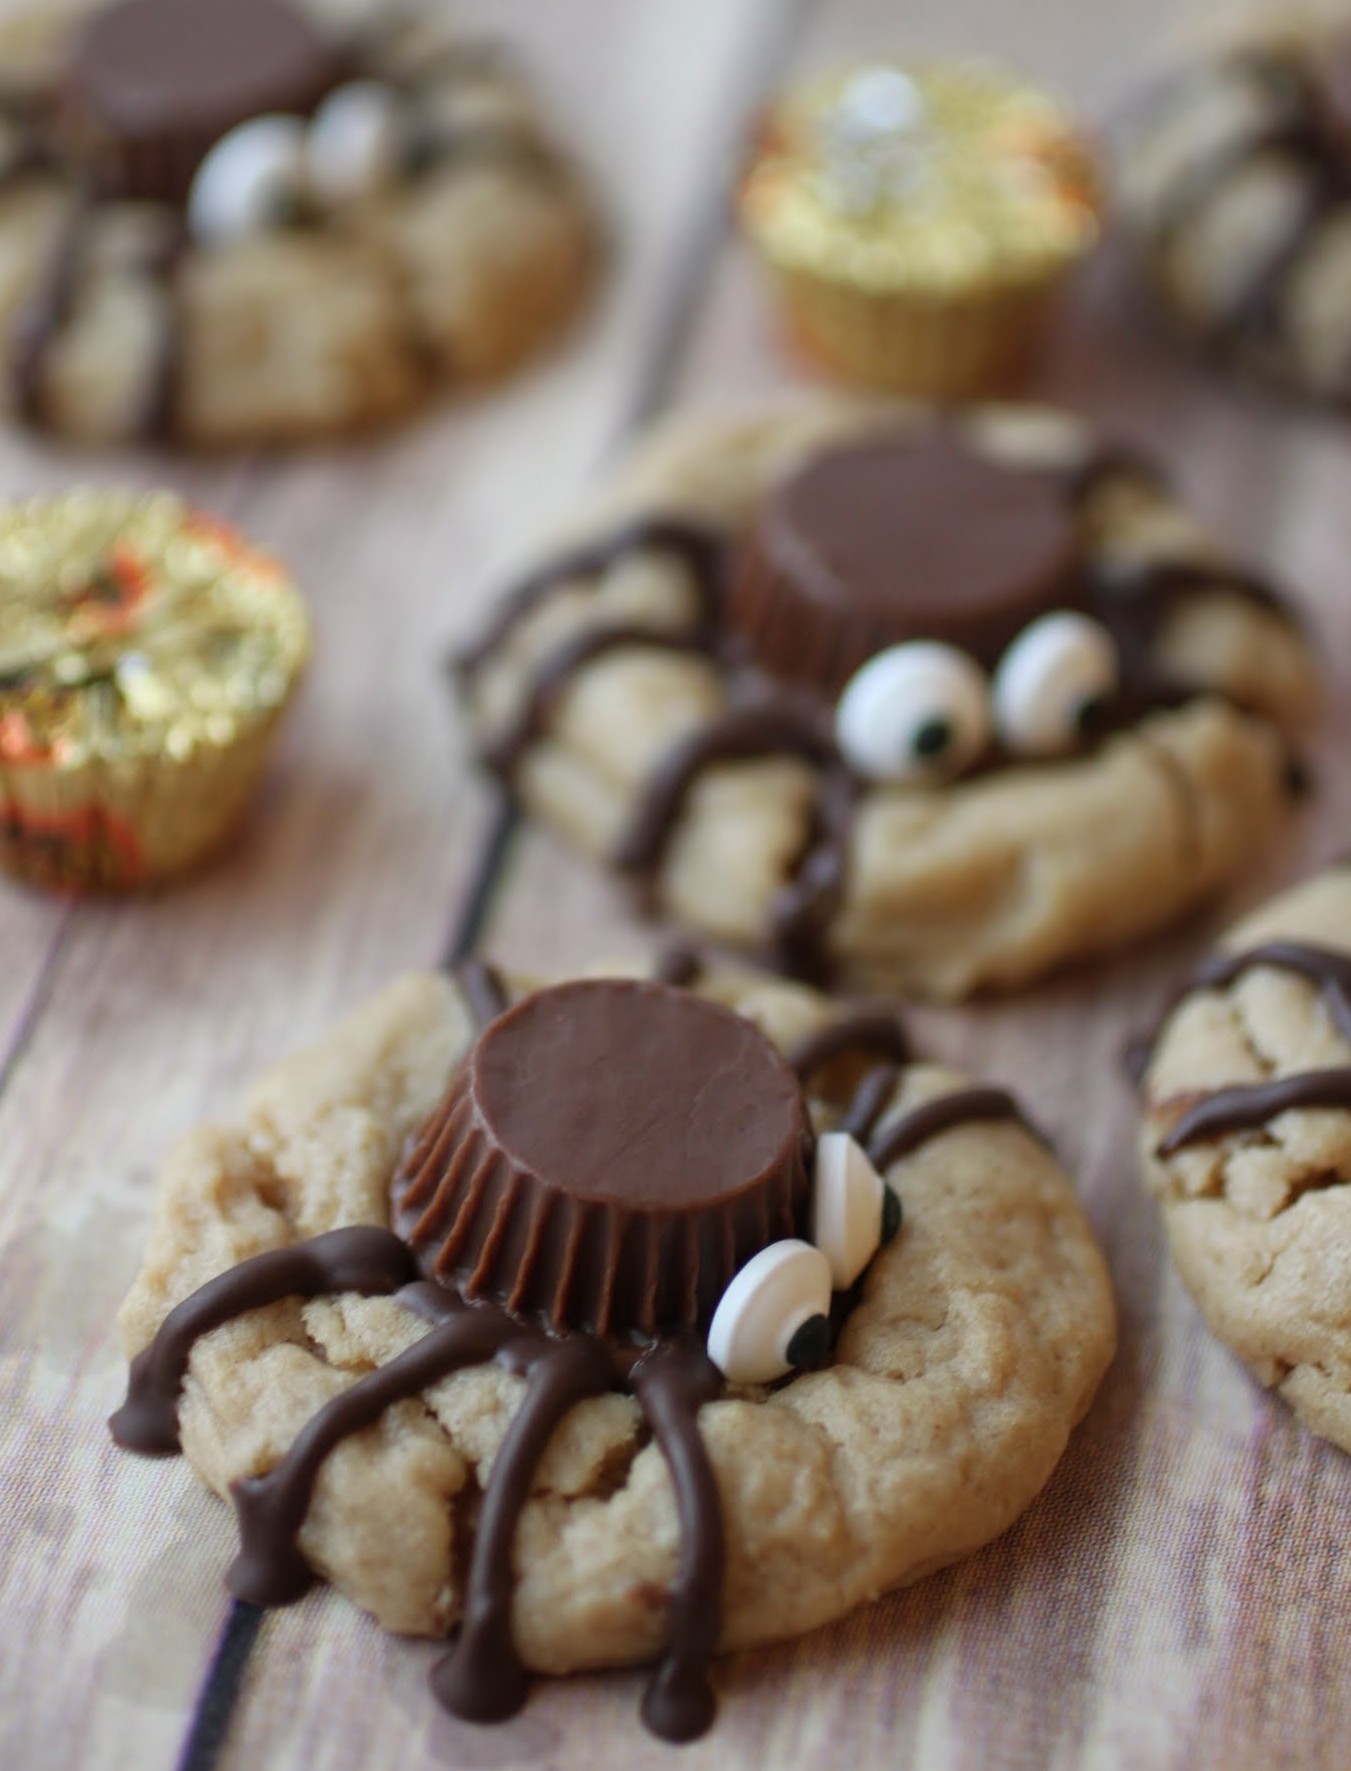
This cookie recipe is so good that my oldest son loves it. That might not mean much to you, but the boy eats about two things in life, and I’m not really exaggerating. The fact that he begged me to bake these again after the first time I made them means a lot. Just believe me on that one.

Once the cookie is baked, you press a frozen Reese’s miniature peanut butter cup into the center. Wait for it to harden, and then pipe on legs using chocolate melts. I also used those melts to stick the candy eyes to the spider’s body, i.e., the peanut butter cup. It’s cute, right? Not gross?
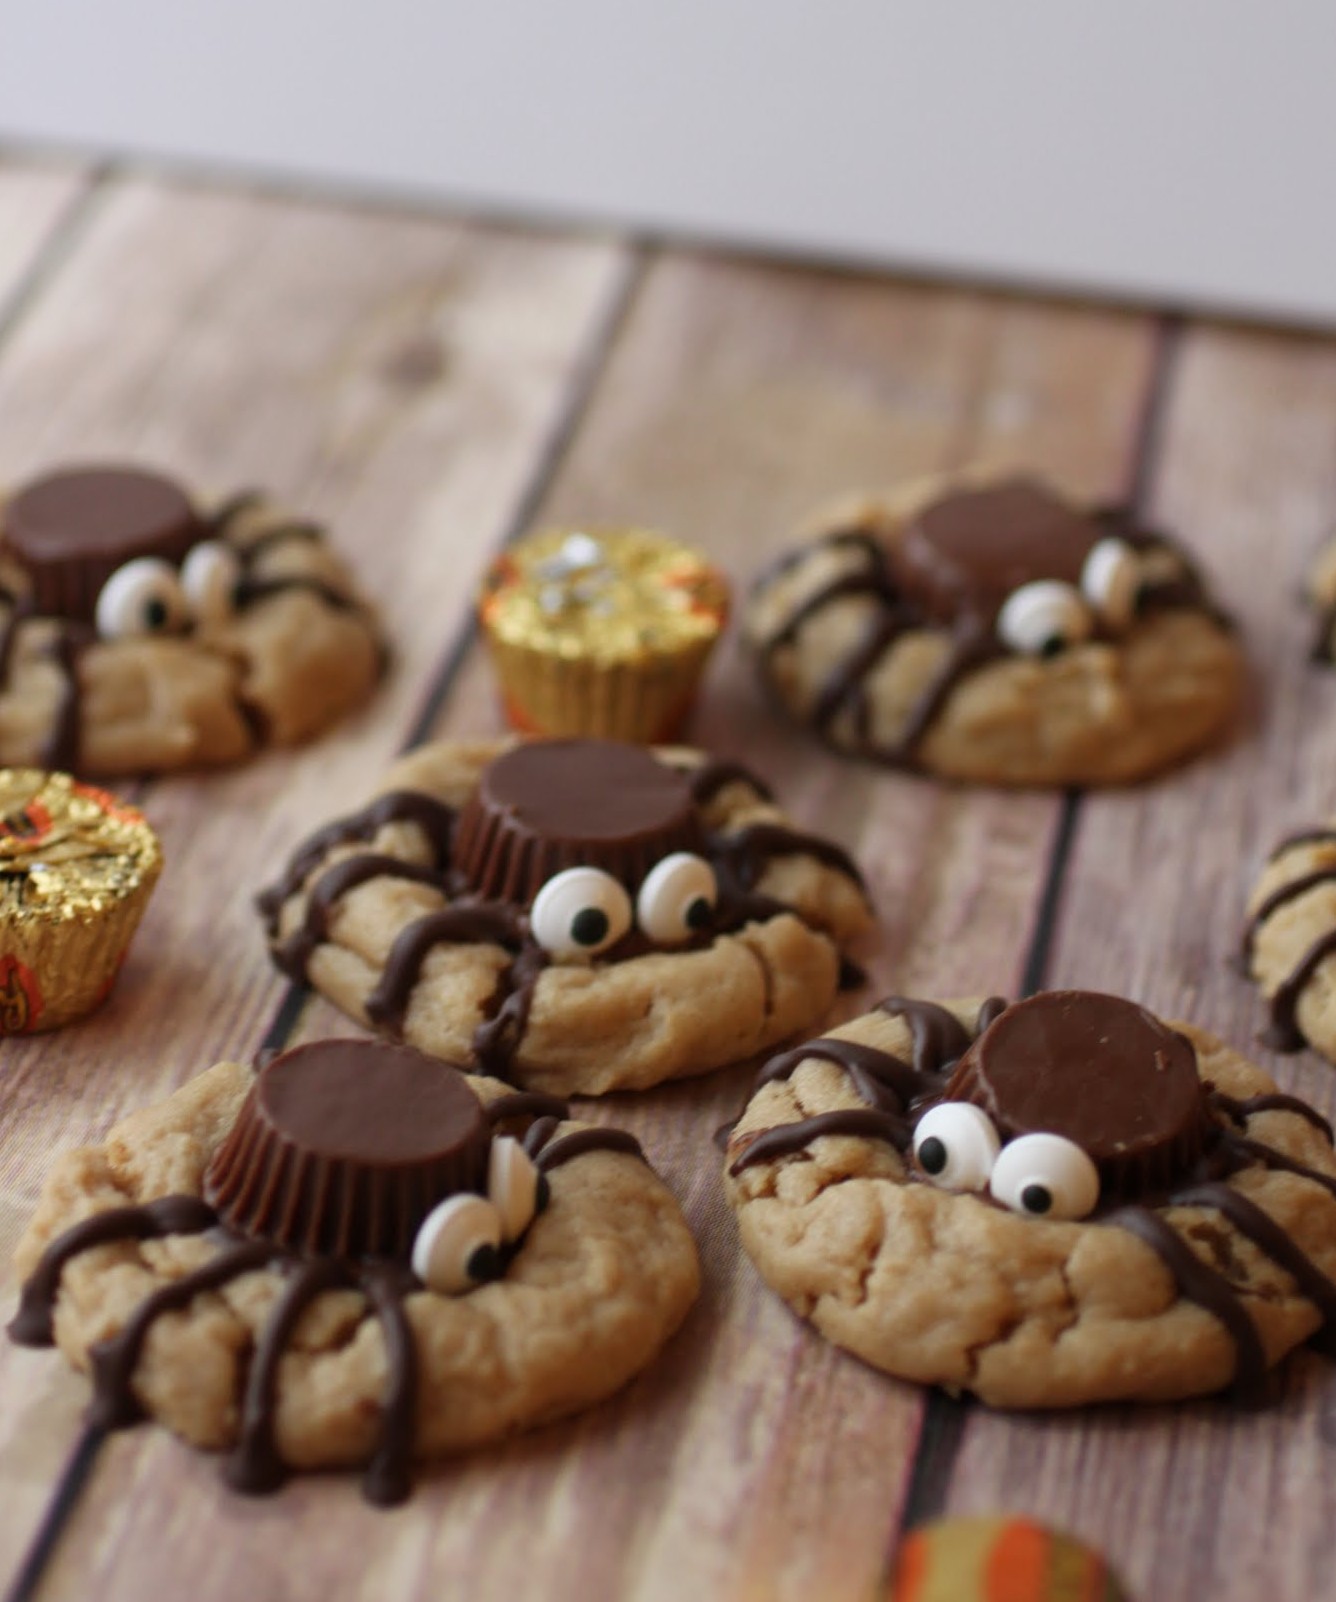
I might not like Halloween, but I do love the treats and all the fun you can have with making scary into cute. Spiders might not be as happy an association for you as they are for me, but how about giving them a try? Just this once!
Ingredients
Instructions
- In the bowl of a stand mixer, beat the eggs, butter, peanut butter, vanilla, brown sugar and sugar until creamy.
- Add the dry ingredients and mix until just combined.
- Line two cookie sheets with parchment paper or silicone baking mats. Roll the peanut butter cookie dough into balls that are about one inch in diameter. Place the cookies on the prepared cookie sheets about two inches apart.
- Cover the cookies with plastic wrap and chill for at least three hours.
- When you're ready to bake, preheat the oven to 350. Bake the cookies for 9-10 minutes, no longer. They will not look done.
- Immediately press a frozen peanut butter cup into the center of the cookie. Cool completely until the peanut butter cups are hardened.
- Heat the chocolate melts according to package directions. Using a piping bag with a small round tip, pipe four legs onto each side of the cookie. The chocolate will be very drippy, so be careful. Allow the chocolate to harden.
- Pipe a dot of chocolate onto the back of each candy eye and affix it immediately to the peanut butter cup as eyes, two for each cookie.
- Allow to set. Enjoy!
]]>
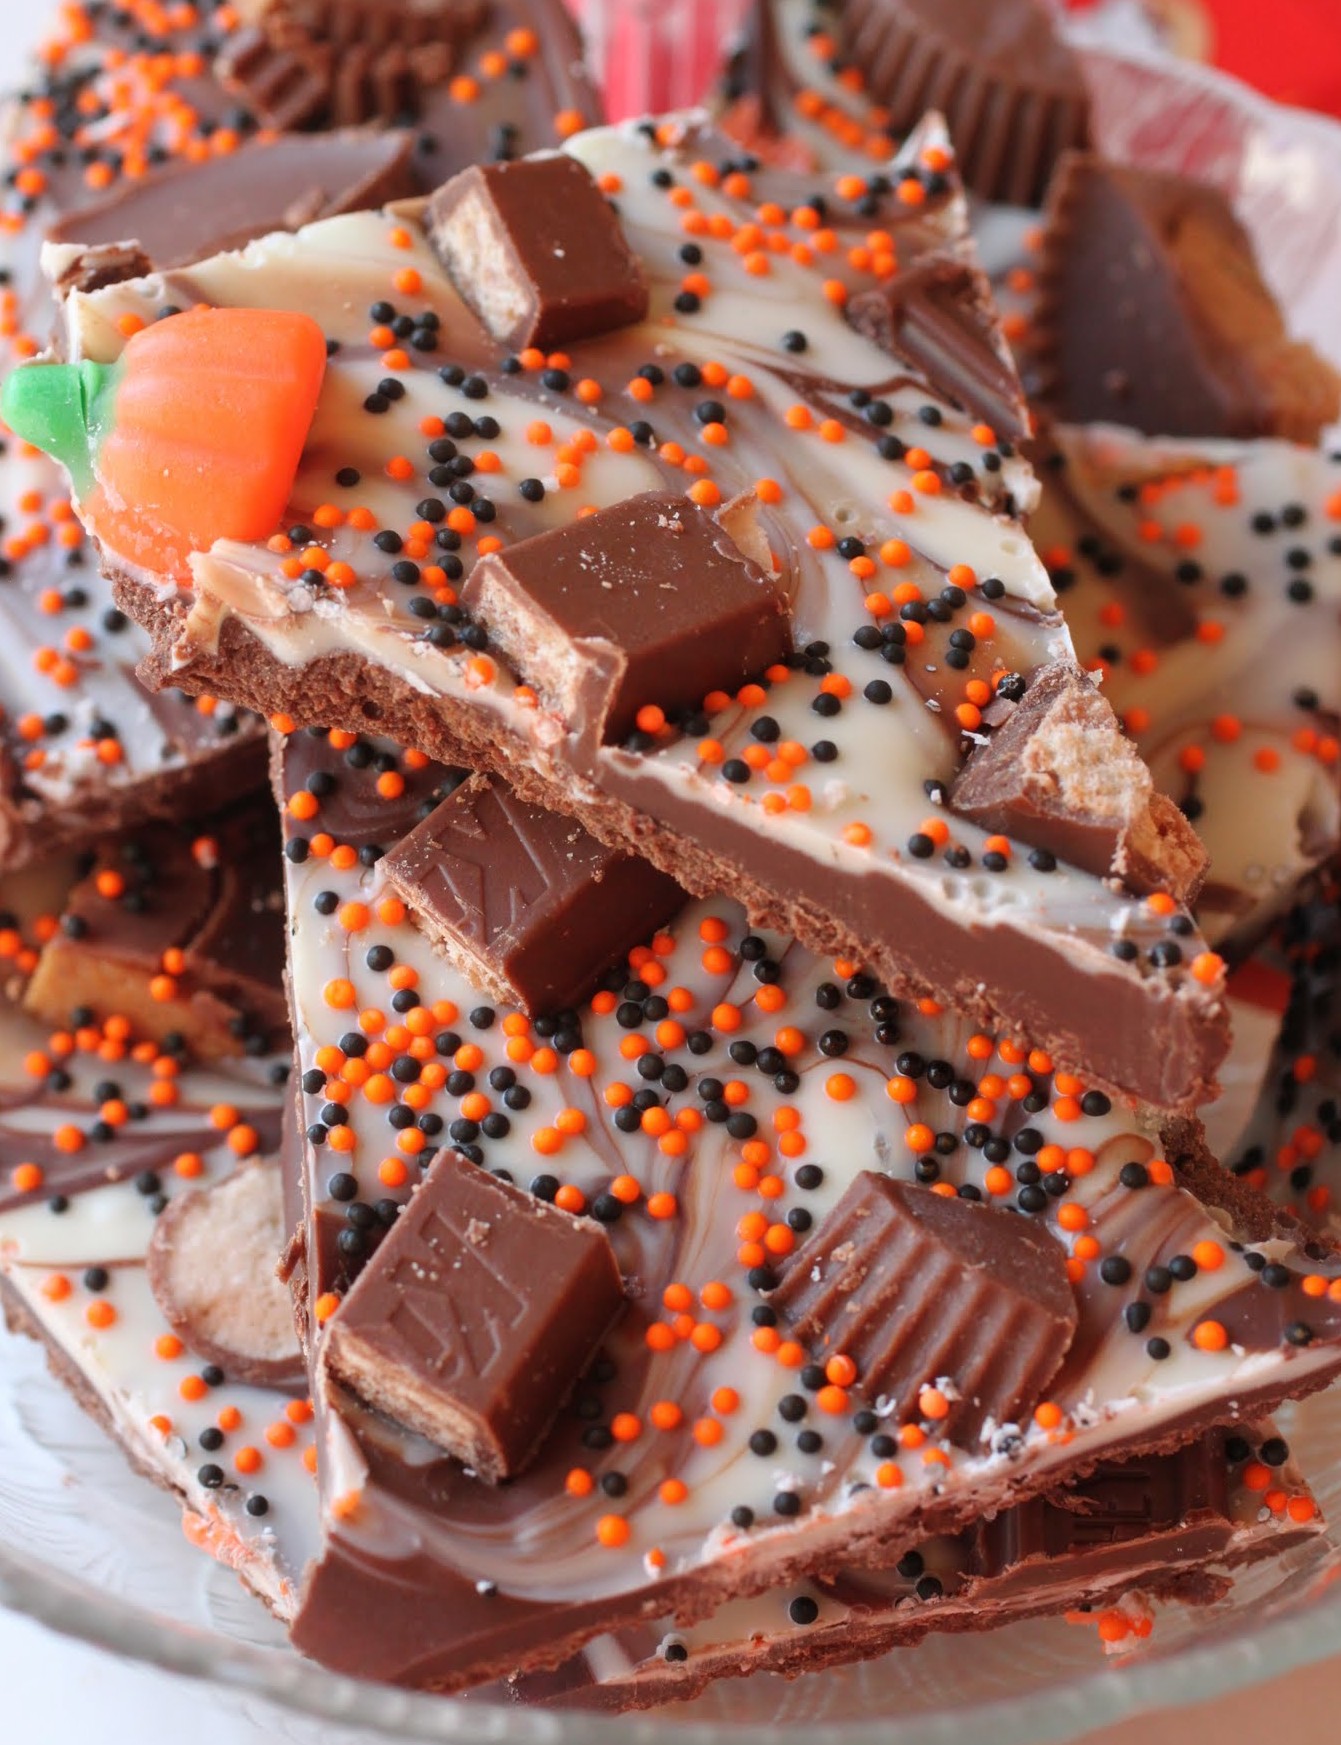
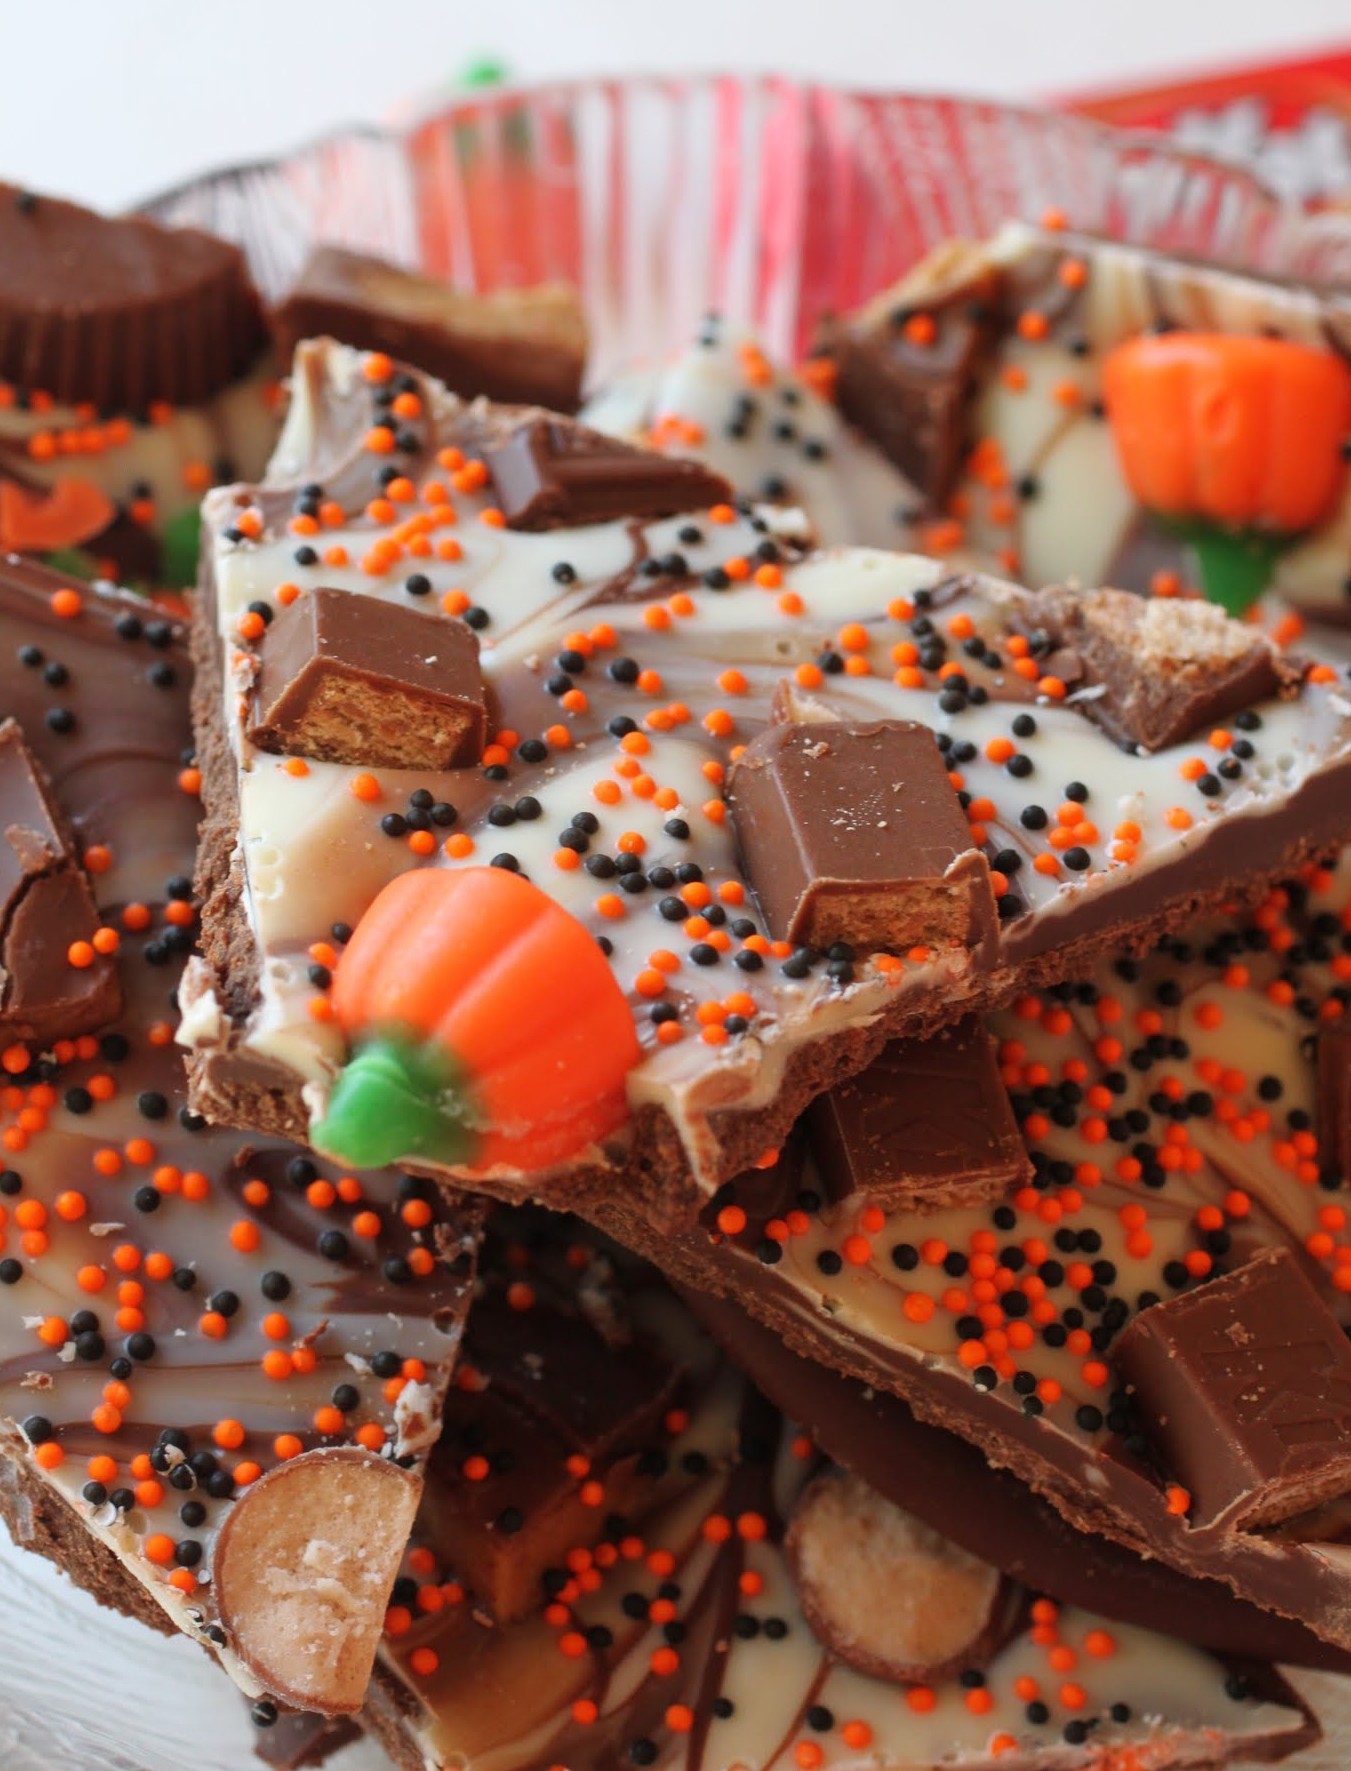
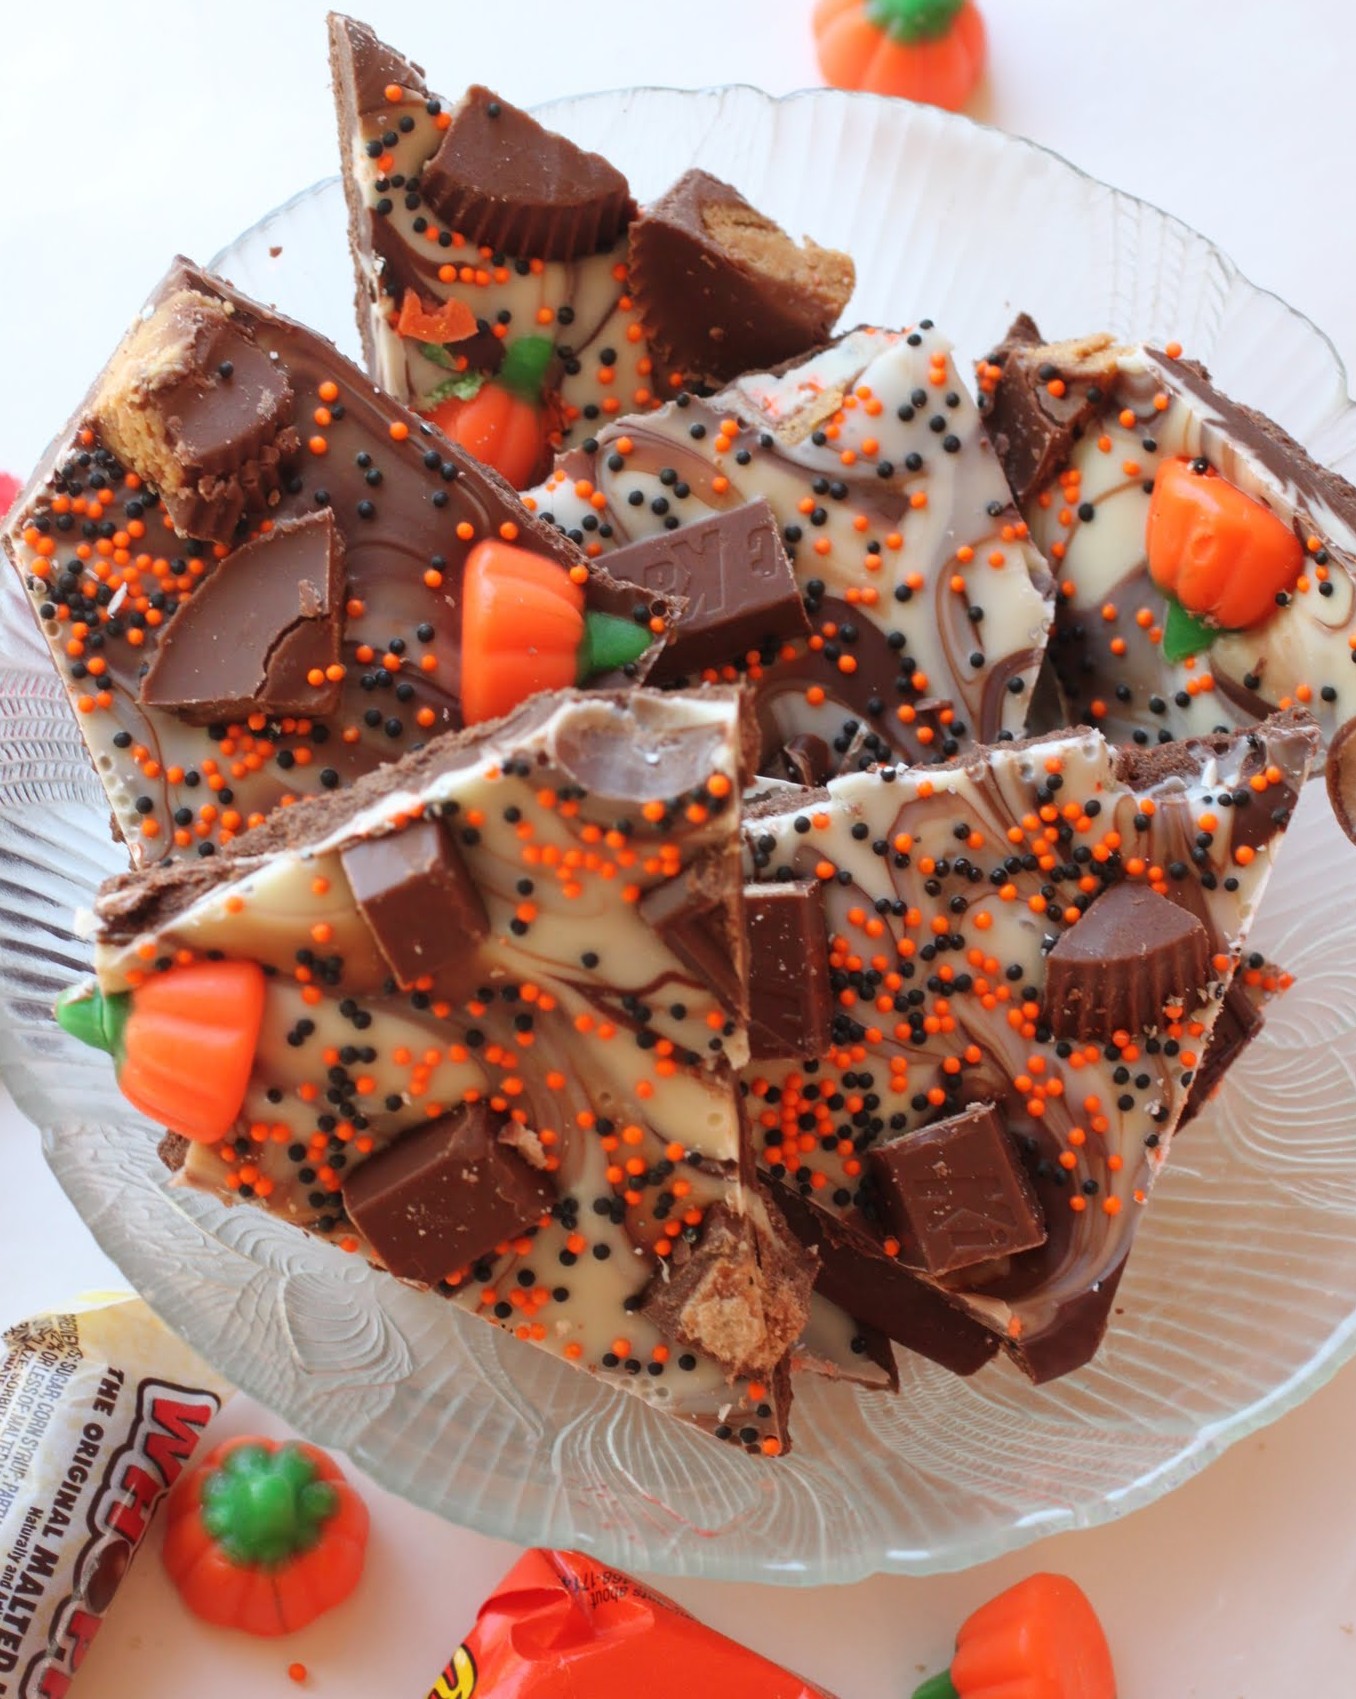
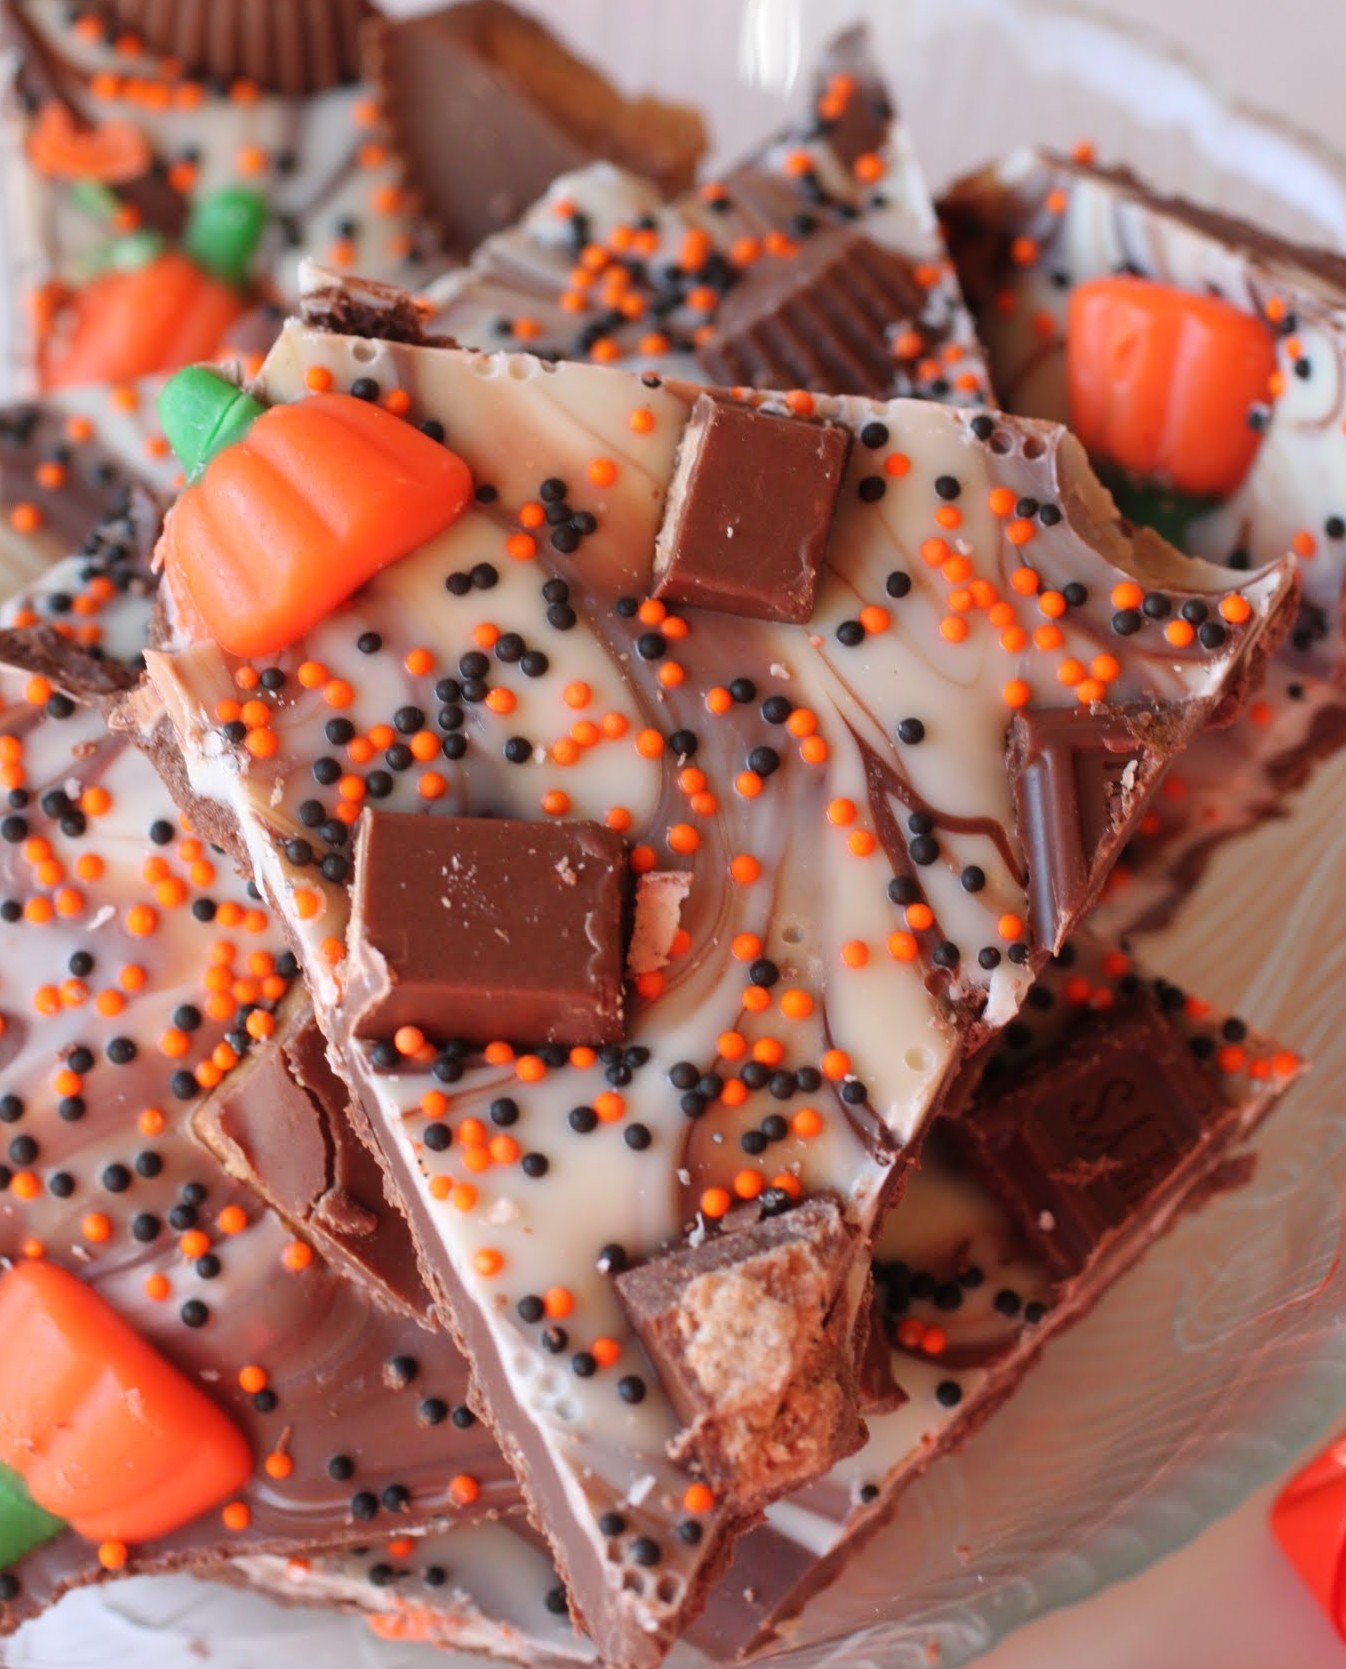
But if you use Halloween as an excuse, up the ante with some fabulous bark. It’s easy to make, not to mention easier to eat. And it’s full of Halloween candy!
Yep, you’ve got that right. Candy pumpkins, check. Kit Kats, check. Reese’s PB cups, check. Hershey bars, check. Whoppers, check. Oh, and let’s not forget about the lovely sprinkles. Or the milk and white chocolate swirly base. Now do I have your attention?
My attention has been wandering of late. It’s kind of hard to stay focused on any one thing. I read an article a few years back that tried to prove that while men like to focus on one thing at a time, women are more cognitively apt to try and do many things at the same time. In other words, women are natural multitaskers. Which means that as I’m writing this, I have a pie in the oven, a pile of laundry next to me that I fold between sentences, and a child asking me questions in my right ear that I may or may not be answering.
Any number of experts will inform us that when we try to do several things at the same time, none of them get done well. Those experts can kiss my a$$. Ask them how daily to-do lists can get accomplished by doing one thing at a time, and see what they say. Unless your daily list has about three items on it, I don’t see how that can work.

Before we had children (i.e., B.C.), Kenny and I would talk around 11:30 each workday morning. Our phone conversations would go like this:
Kenny: How’s your day going?
Mir: It’s cool. I’m getting a ton done. I’m so tired.
Kenny: Really? It’s only 11:30!
Mir: It’s my lunchtime. I’ve already taught for four straight hours, paid the bills and made a doc appointment. What are you up to?
Kenny: Um…I took a shower.
Yep, those were the days. But Kenny, in all his manly glory, never felt bad about easing into his day and not getting each item duly checked off the to-do list that, admittedly, I created for him. And he still doesn’t really mind. I’m pretty jealous.
One thing I wonder about is whether doing so many things at one time is bad for the attention span. I do know that I’m very guilty of only half-listening to anything a child of mine is asking at any given time. Which is why these conversations happen:
Boy, Age Seven: Mommy, can I take the bag of lollipops upstairs to my room?
Mir: (absently) Sure, honey. (a minute passes) Wait, what?!
See? Not paying full attention is dangerous. Or if you’re my kid, it’s pretty great. The Boy had a whole bag of Dum-Dums up in his room (and was partway into his second) before I realized I’d been checked out.
Whenever I eat dessert, though, I try to make mindfulness a priority. I really focus on whatever is going into my mouth, and then it’s an even better experience. To be completely clear, I had no trouble whatsoever focusing on this Halloween candy bark. How could I think about anything else?
The base of this bark is milk chocolate (my personal favorite, so my apologies to you foodies who love the 90% dark), swirled with some white chocolate. On top, I piled all of my favorite chocolate bar goodness, plus those cute little candy pumpkins. I can never resist adorable.
Bark is a really great solution to the question, “I’ve got five minutes and fifty things to do, and I need to produce a treat for my kid’s class/my office party/my own sanity. What can I bake?”
In other words, this stuff comes together fast. Chill time is another matter, but 30 minutes in the fridge and you’re good to go.
My older daughter just walked up to me and asked me for tape. I have no idea why she wanted tape, but I was distracted, so I gave it to her. Why do I feel like my divided attention is going to result in my getting very upset in just a few minutes’ time? But that’s the price of multitasking!
At least I can focus on dessert. That’s really the important thing, anyway. Everything else can get done with little bits of my focus. It’s all about priorities!
Ingredients
Instructions
- Line a cookie sheet with parchment paper or a silicone baking mat. Set aside.
- In a microwave-safe bowl, heat the chocolate chips for one minute. Stir. If not smooth and melted, heat an additional 20 seconds. Stir until smooth.
- Spread out the milk chocolate to about 1/2-inch thickness. Don't go too thin, or the bark won't be as good.
- In a separate bowl, heat the white chocolate chips for 40 seconds. Stir, and if not melted, heat an additional 20 seconds. Stir until smooth.
- Drop the white chocolate by spoonfuls gently onto the milk chocolate. Using a knife, swirl the melted white chocolate gently into the milk chocolate. Do not overdo it, or your bark will become one uniform muddy color.
- Sprinkle the chopped candy bars evenly over the bark, being sure to distribute each kind of candy bar equally over the top. Add the sprinkles.
- Chill the bark for 30 minutes. Break into pieces. Store in an airtight container. If you're worried about melting, keep it in the refrigerator until shortly before serving.
]]>
Um…everything. Anything. Whatever you want. Therein lies the glory and the danger. But the best treats in the world are a little bit dangerous.
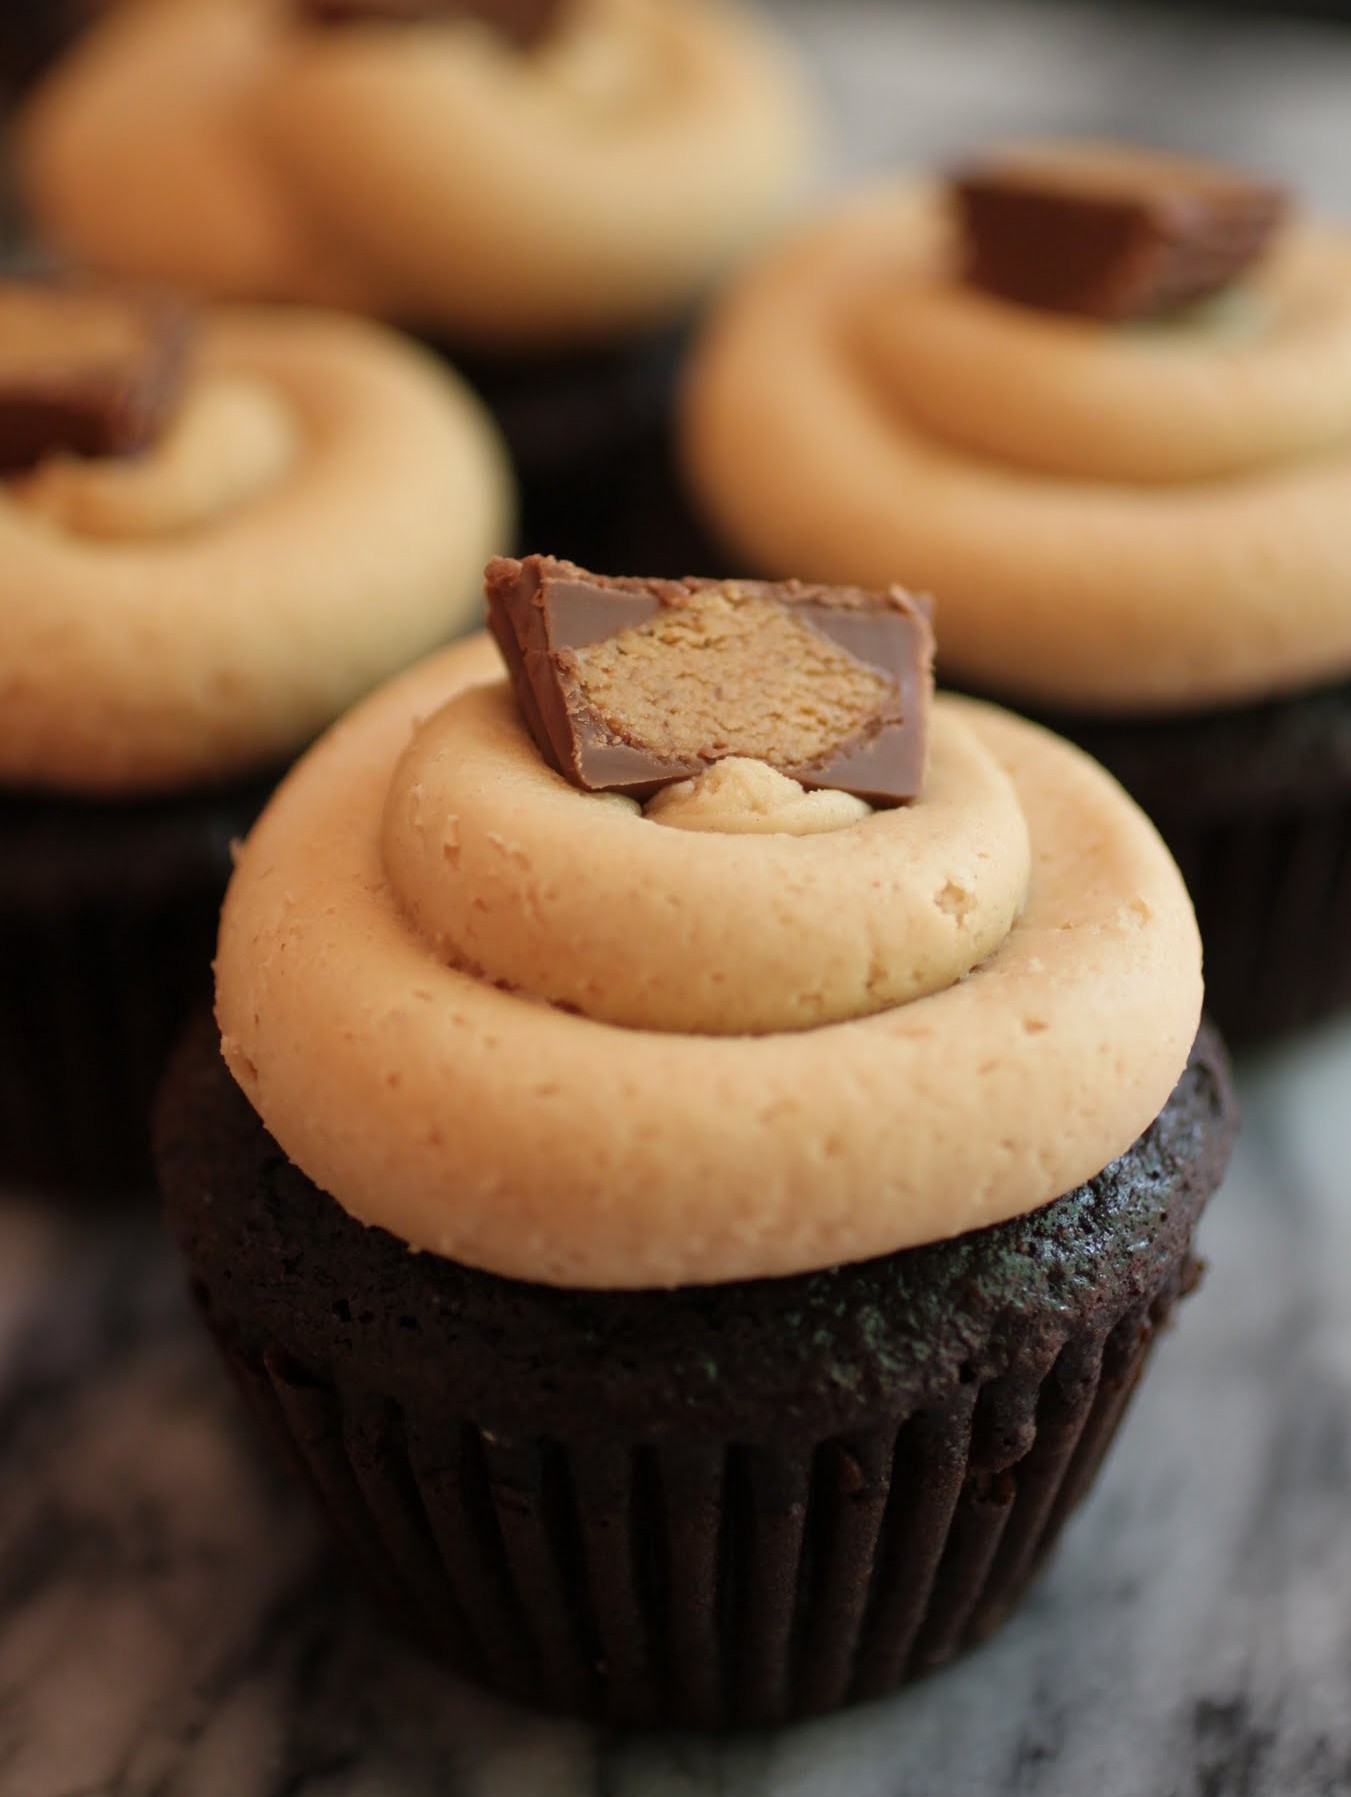
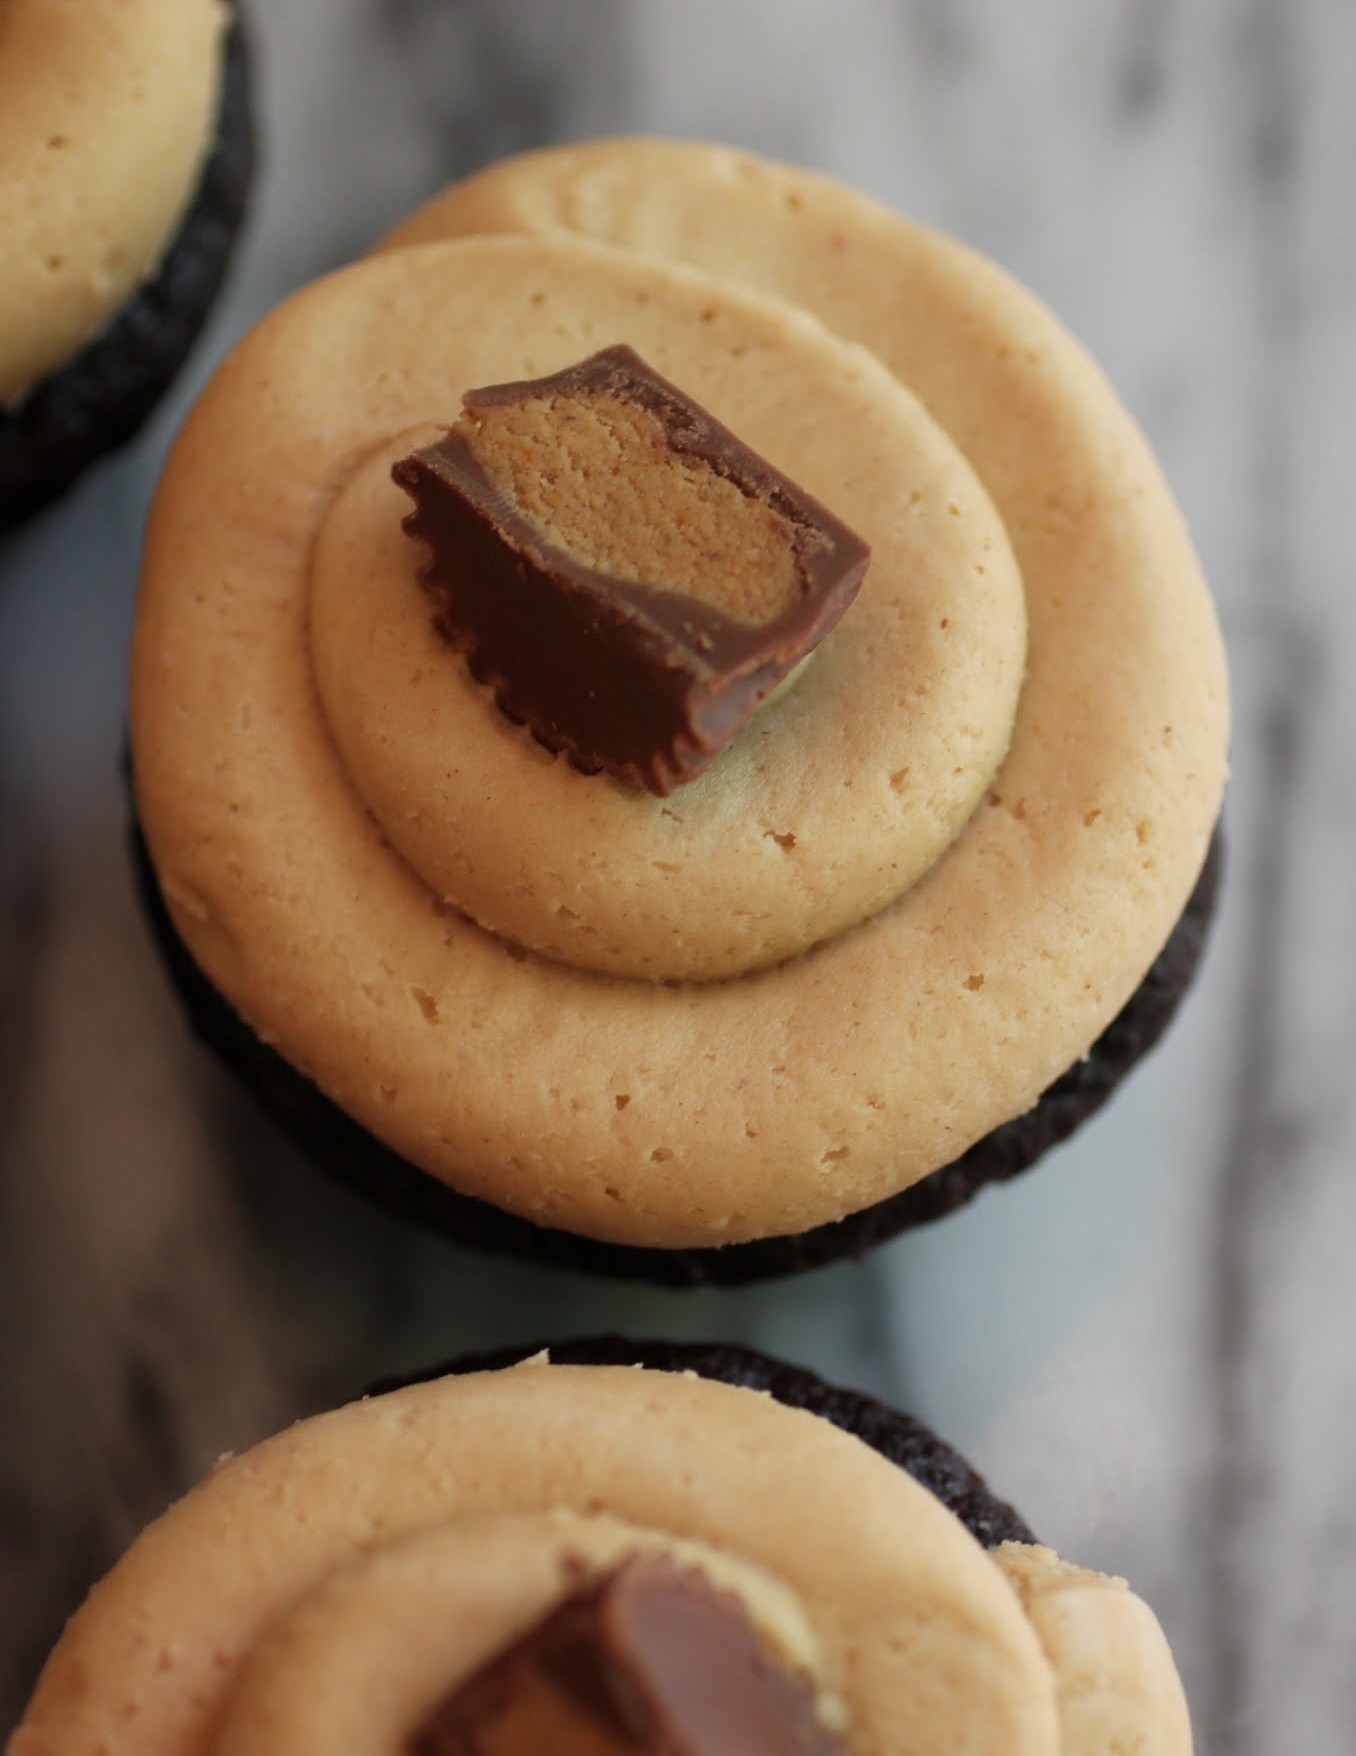
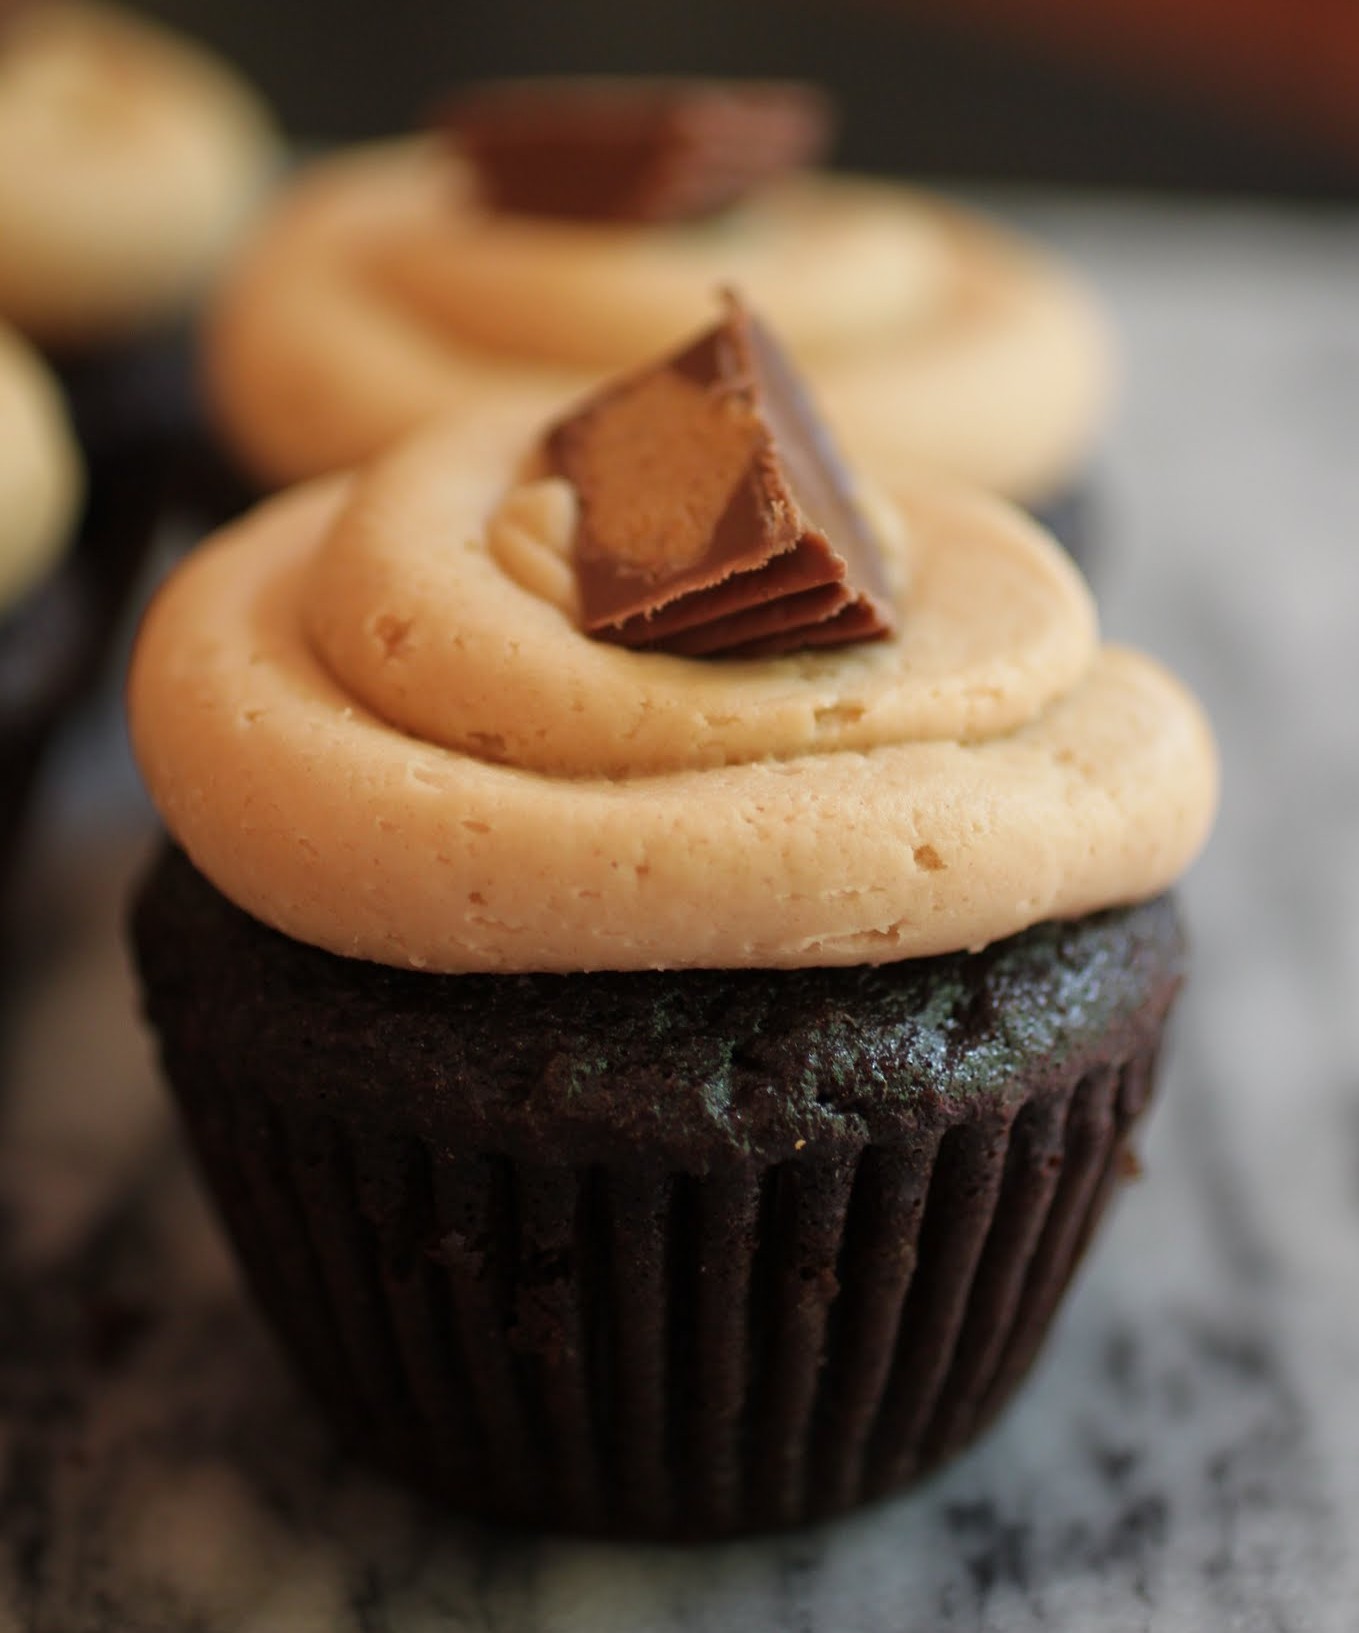
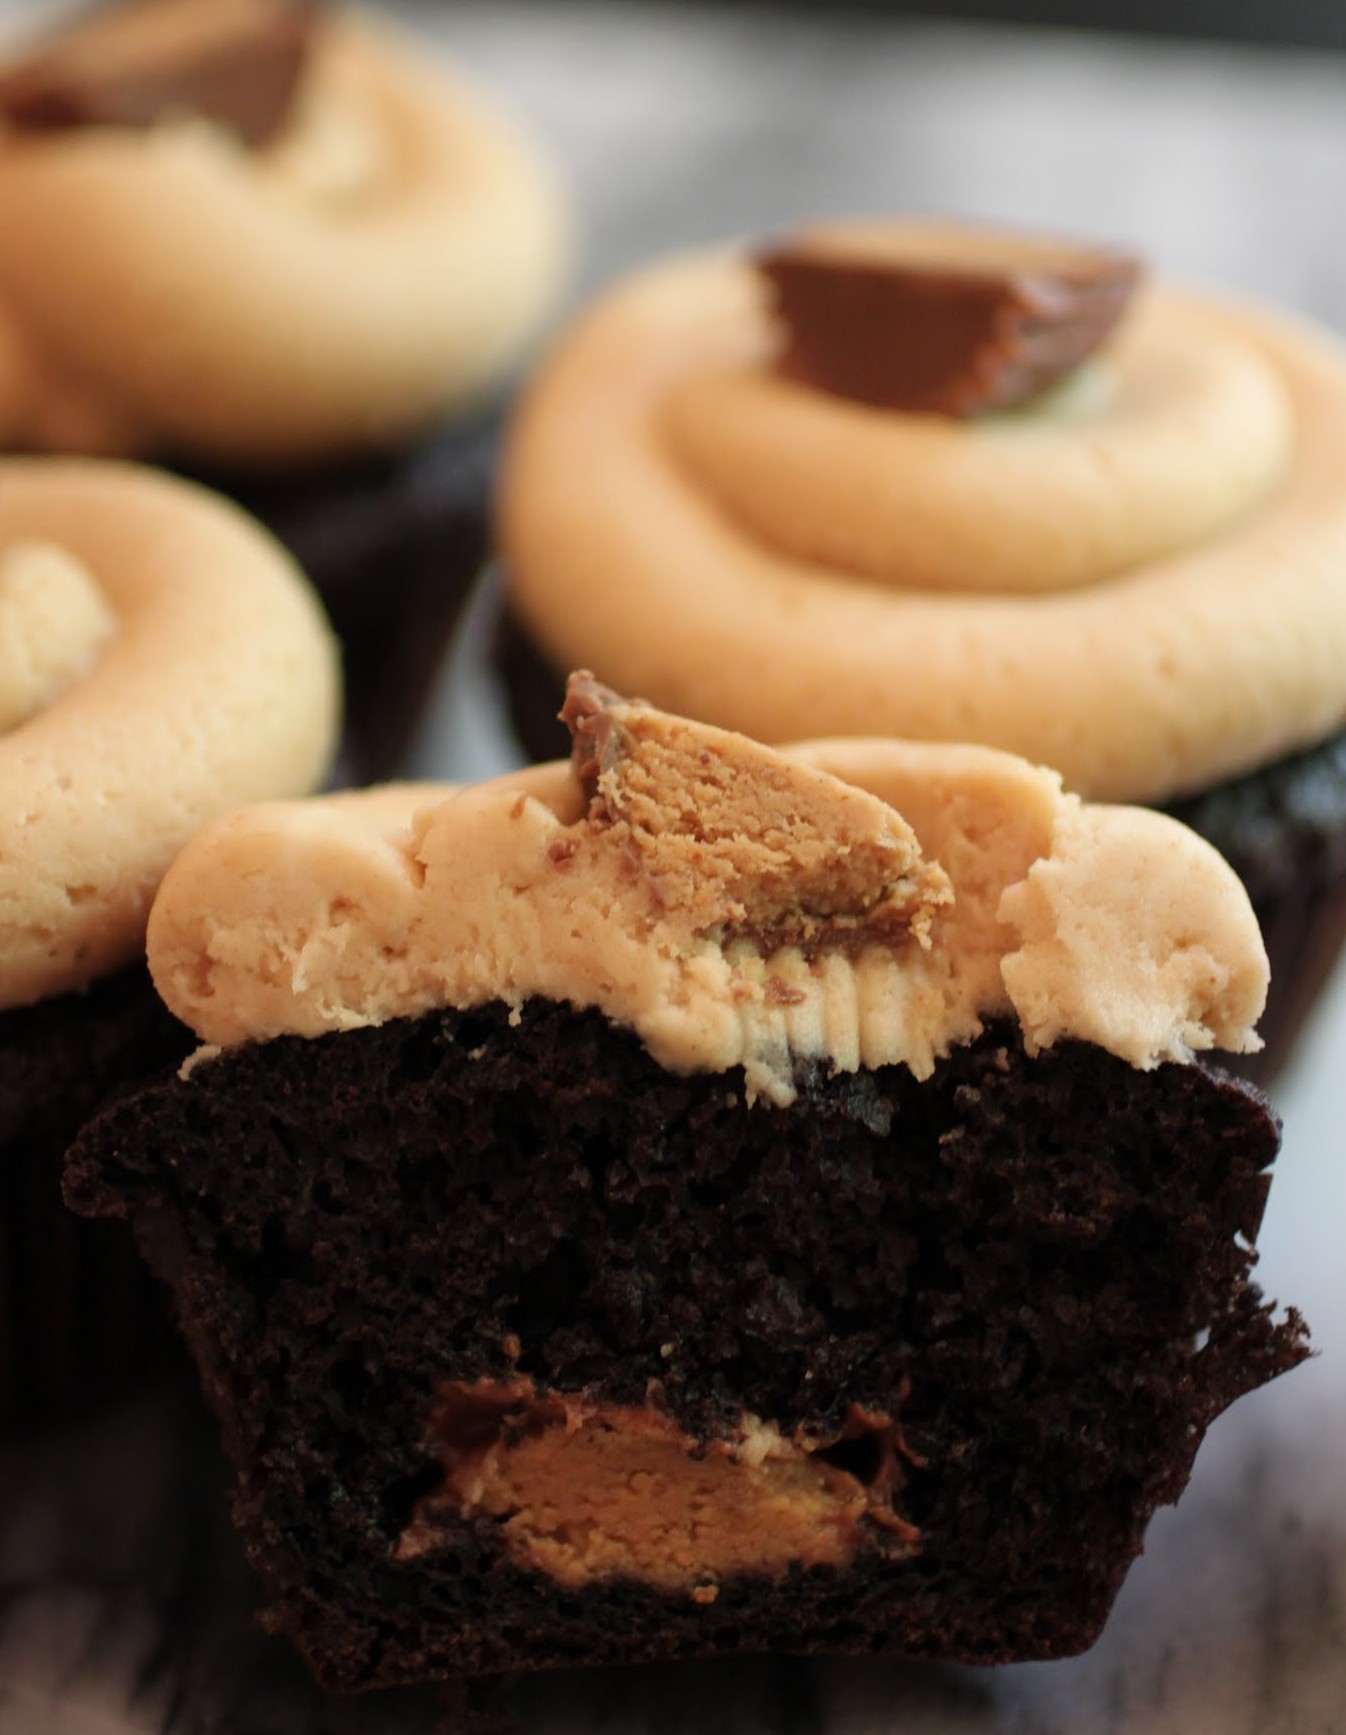
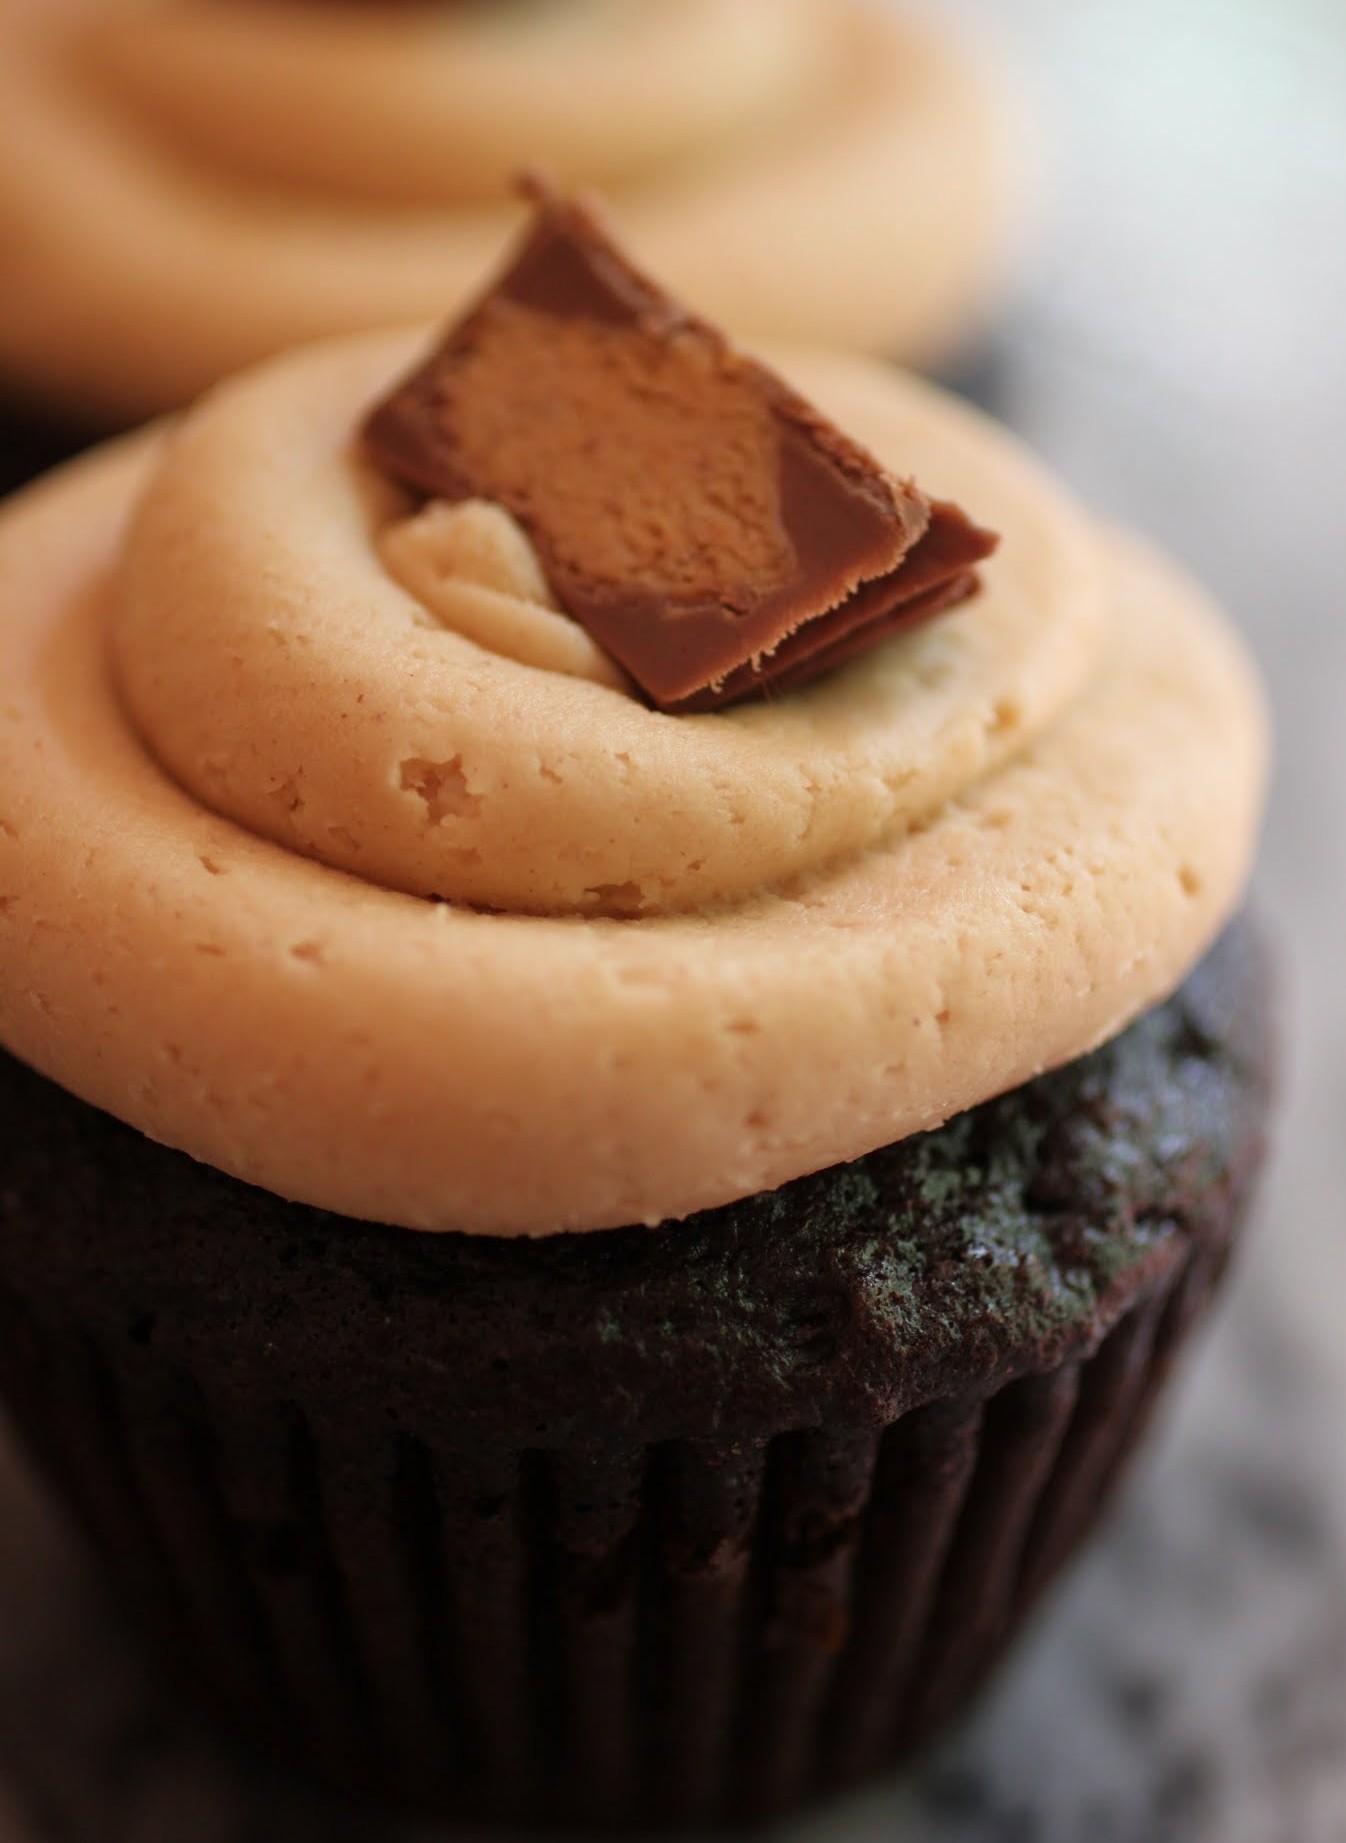
I’m not sure if the cupcake craze is over yet (it’s definitely calmed down), but I hope your own personal cupcake craze reignites when you see these chocolate cupcakes. They have a peanut butter cup surprise inside and a healthy dollop of peanut butter pumpkin spice frosting! And, of course, some more peanut butter cup for bling. If you’re gonna make a cupcake, make a dang cupcake.
I’m not sure if extreme thinking works all the time the way it does for cupcakes, but it’s good to try and keep your fears under control. Whenever I’m equally eager to give something a shot and terrified that it won’t work out, I know I have to just go for it, no matter what happens.
Two years ago, when I’d just started playing the guitar, my then-teacher made me do my first open mic night. Part of me really wanted to do it while the other part was just in the horrors. I could barely play. How was that going to work out?
I still remember how scary it was waiting for my turn to play and sing. Everyone was just so good, and they’d clearly done the open mic thing a zillion times. I was nowhere near that skill level, and I remember really hating my teacher for forcing me to humiliate myself in front of everyone.
But you know, while it wasn’t the best performance ever (I played a bunch of wrong notes and my voice was all wobbly), it wasn’t terrible. I learned that people are really nice and encouraging, and that they just want you to do well. If you can let go of the fear, then just trying something new is the success story. You don’t have to be amazing to avoid failure.
One of my colleagues has an expression she uses on our students. When they’re fearful about doing anything, she says, “You gotta shut up and participate.” In other words, quit whining and worrying and just do whatever is causing all the drama to build up inside your head. It’s great advice, and I try to live by it some of the time. It’s not always possible to conquer every fear.
But it’s totally possible to make pumpkin spice peanut butter into the #bestfrostingever. If you haven’t seen Jif’s line of whipped PB in the grocery store, go look for it. When you mix it into vanilla frosting, it makes a perfect, easy cupcake finisher. If you want to make your own vanilla frosting first, you can. But I went easy and bought some from my local bakery. Sometimes it just works to skip a step.
Hey, I’m not afraid to admit that I take shortcuts sometimes, and I’m also not afraid to tell you that it makes me feel a little guilty. But who has time for making frosting every day? It’s much better to spend that time doing something new that utterly terrifies you. I dare you!
Ingredients
Instructions
- Preheat the oven to 350. Fill a muffin tin with cupcake liners. Set aside.
- Combine the sugar, flour, cocoa, baking soda, baking powder and salt in a bowl.
- Stir in the milk, oil, vanilla and eggs, mixing until smooth.
- Fold in the boiling water carefully.
- Using an ice cream scoop, portion out the cake batter into each muffin liner until it's filled up three-quarters of the way. Press an unwrapped Reese's cup into each batter-filled liner.
- Bake until the cupcakes spring back when touched, about 20 minutes. You will probably have to bake more than one batch.
- Cool completely.
- Make the frosting. Combine the vanilla frosting and peanut butter, combining until no streaks are visible. The frosting will be somewhat stiff.
- Using a large round tip, pipe a swirl of frosting onto each cupcake, starting at the edge and working toward the center.
- If you have peanut butter cups left over, cut in half and use as a cupcake garnish.