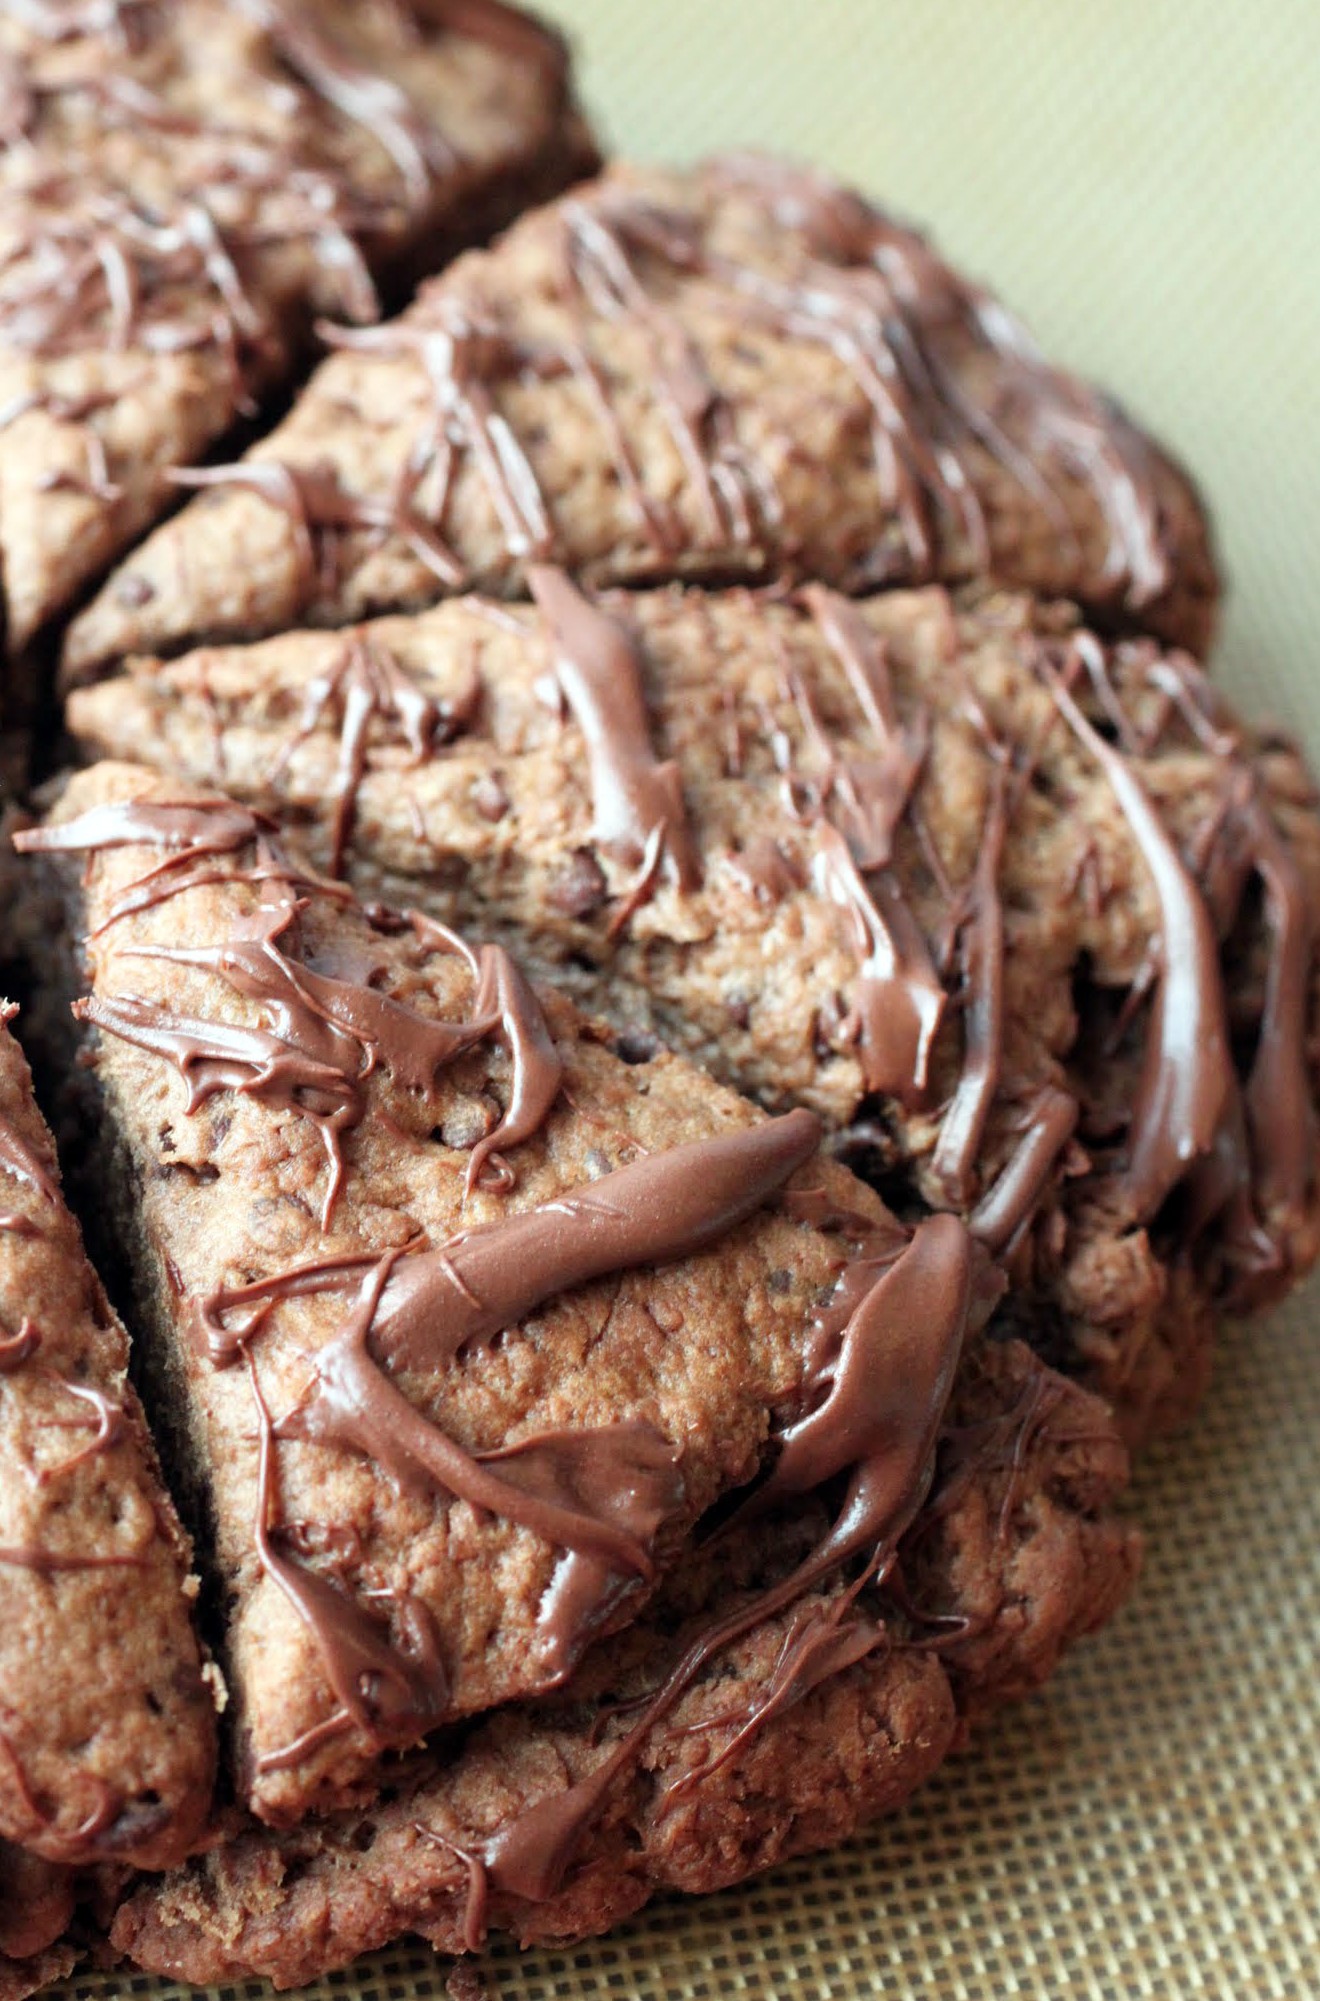
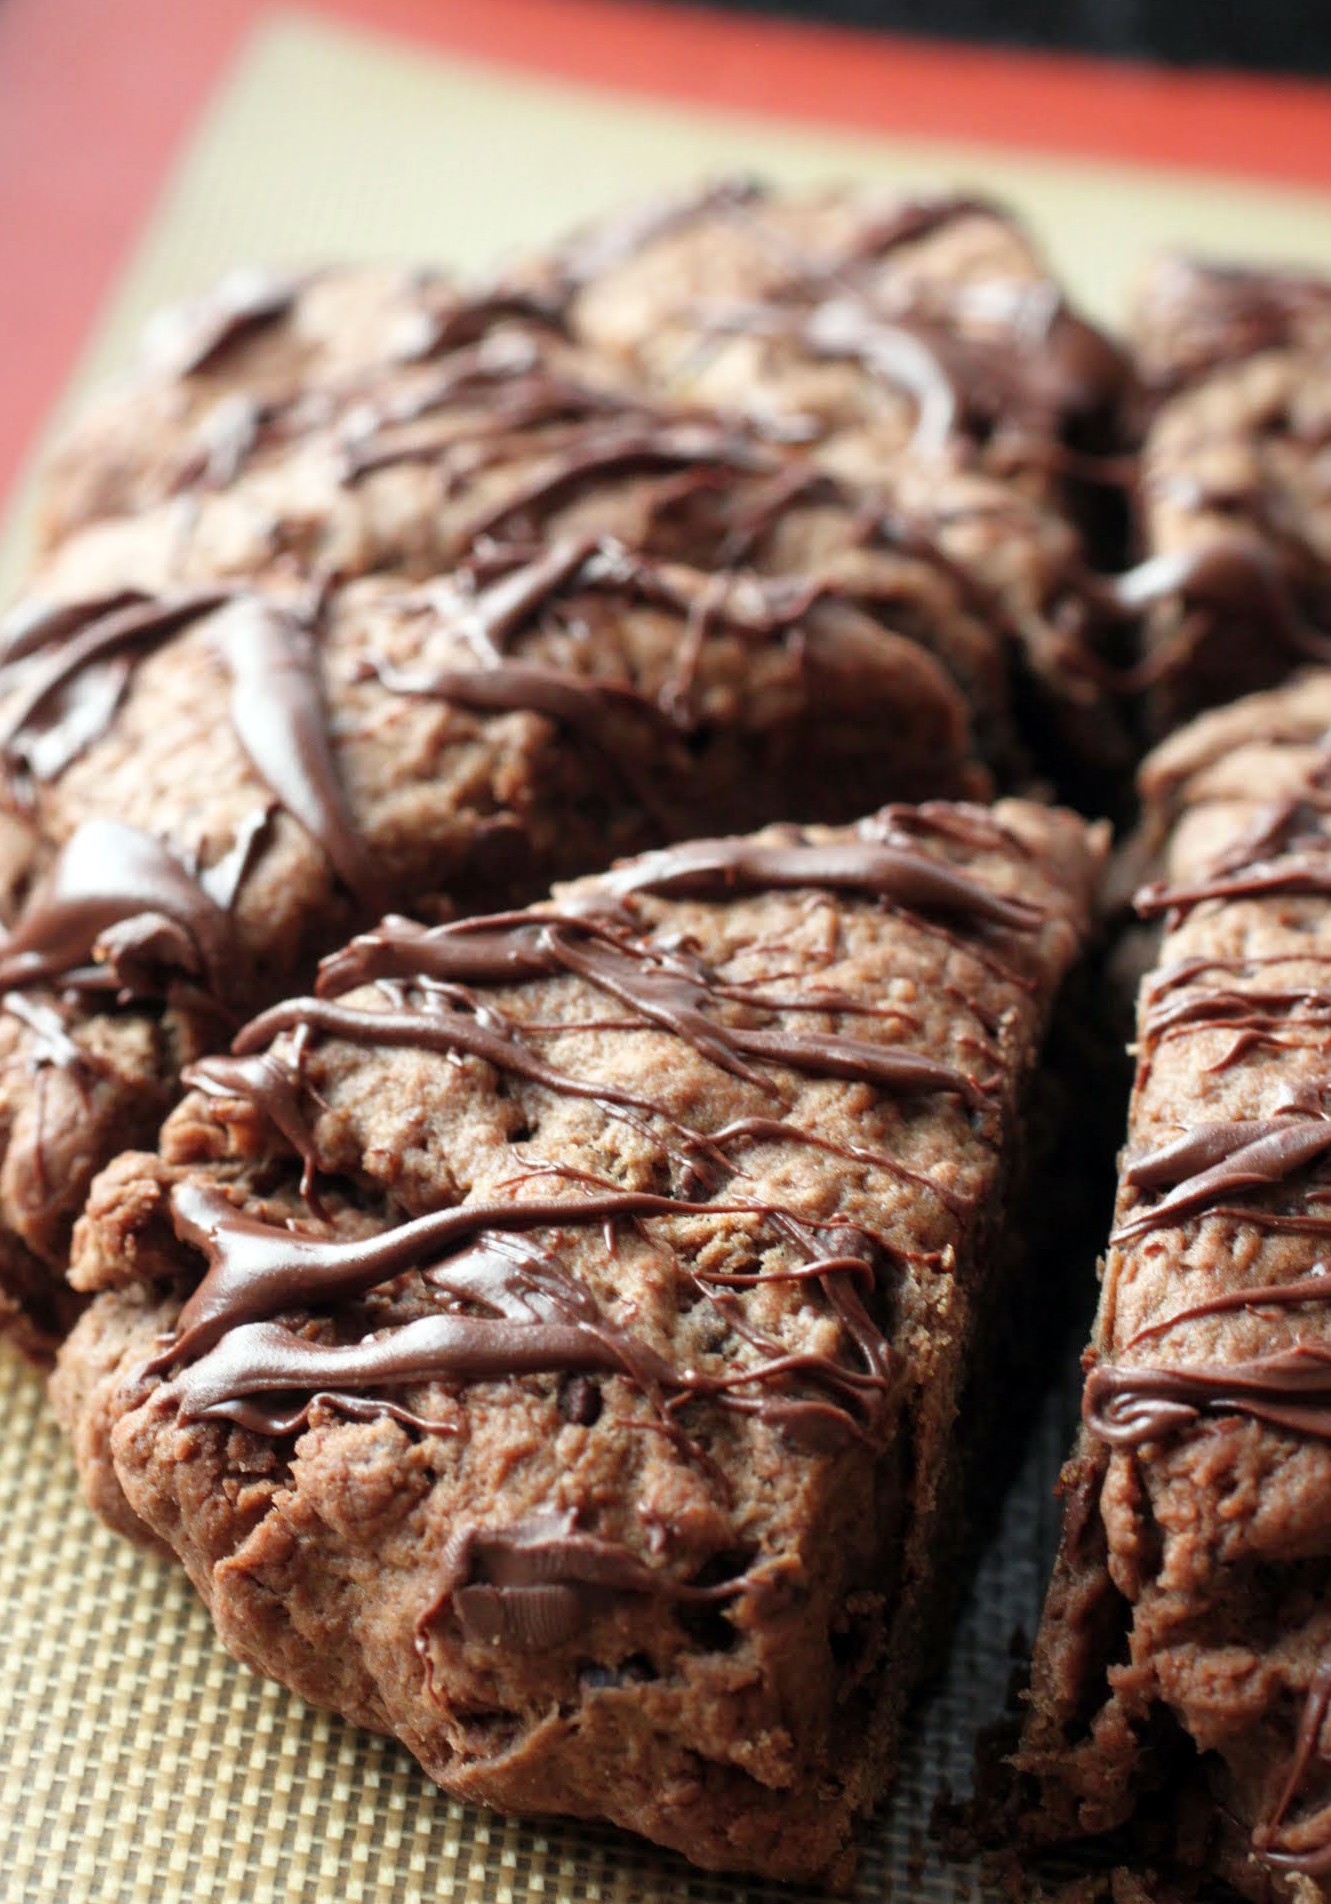
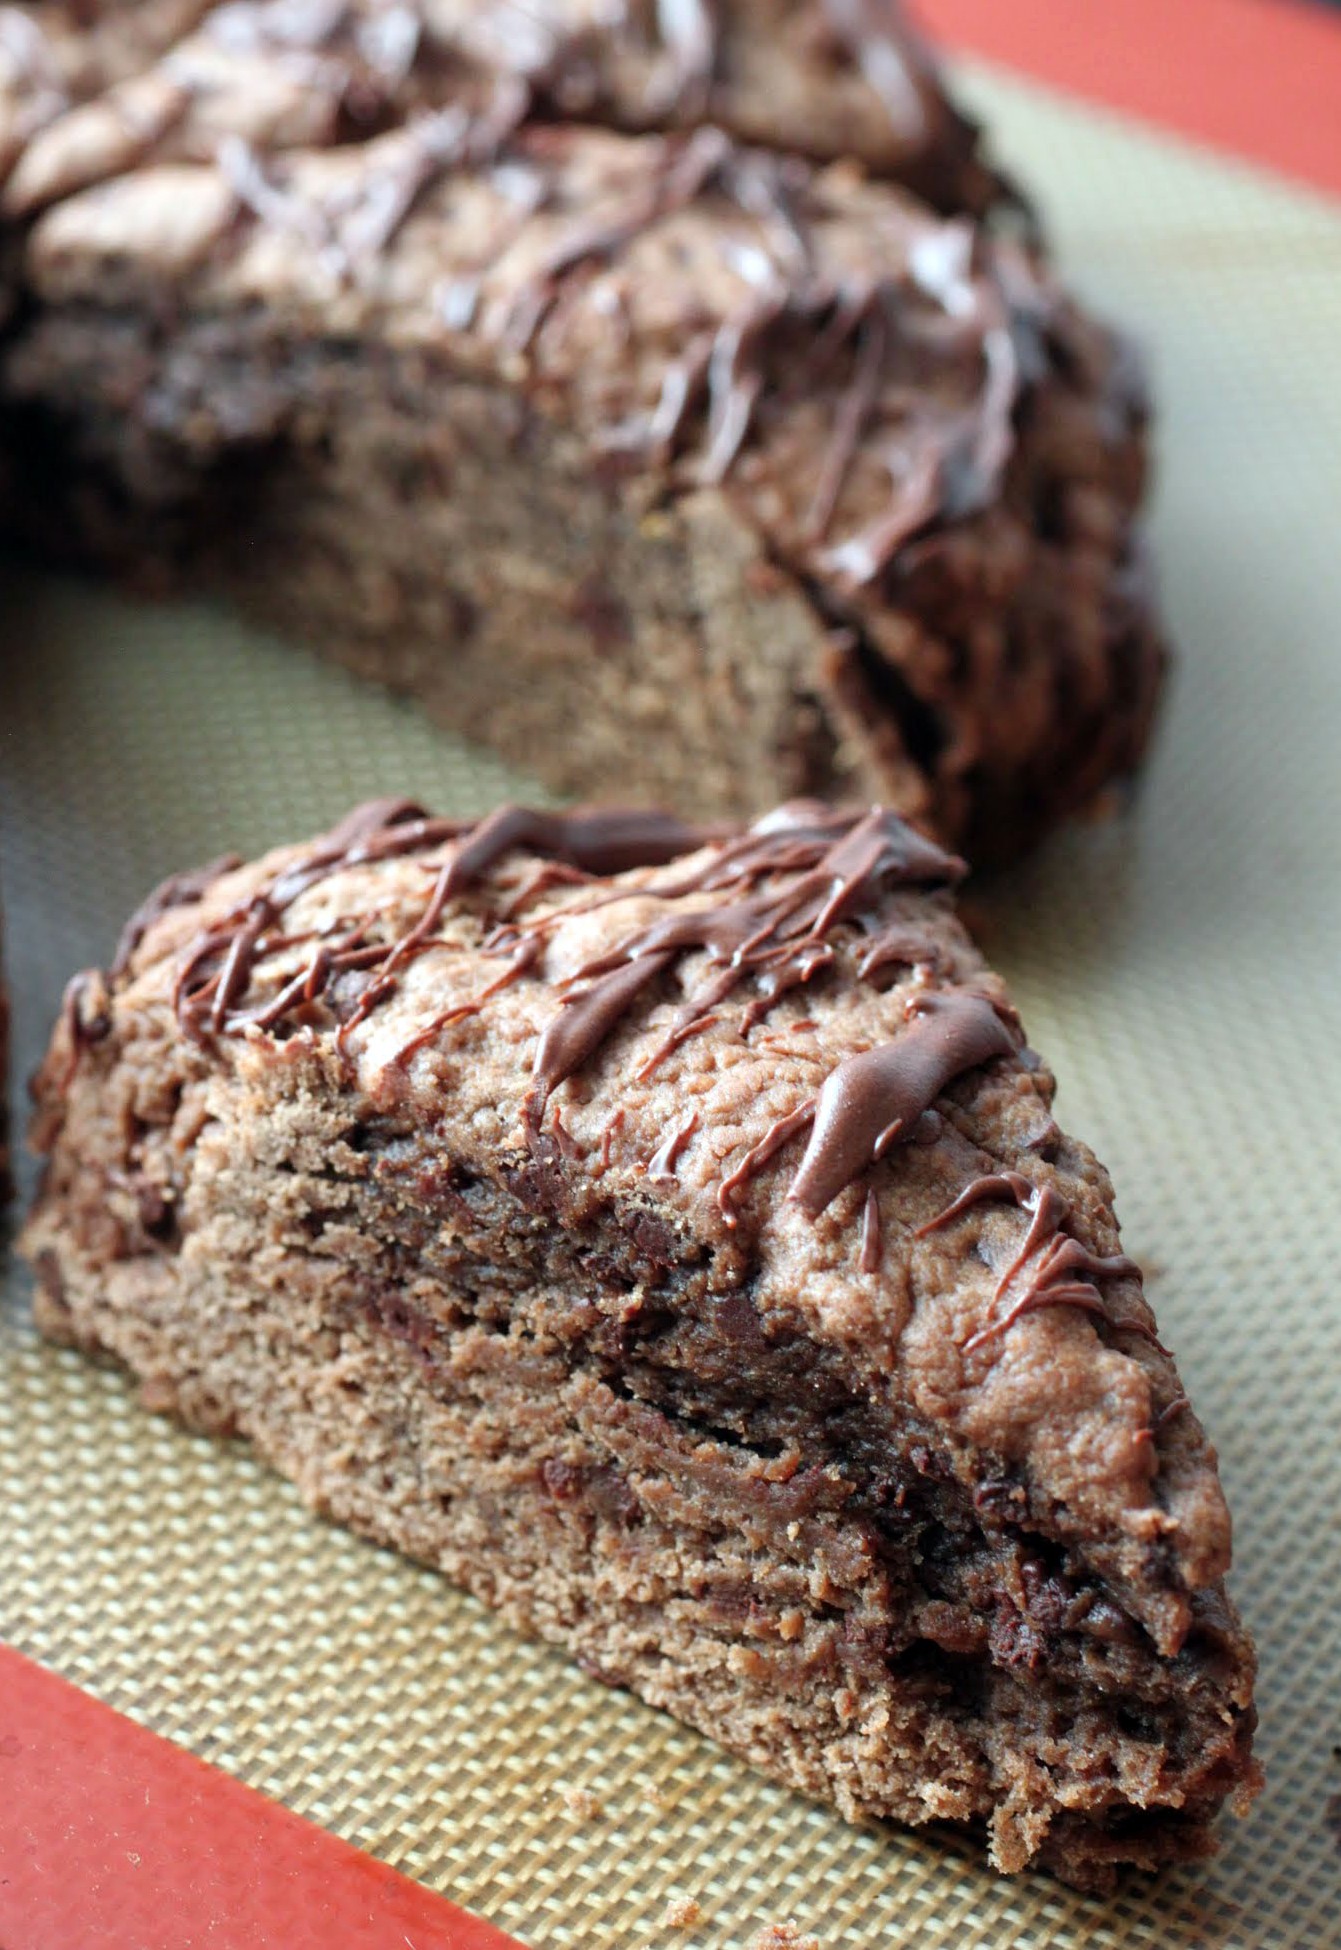
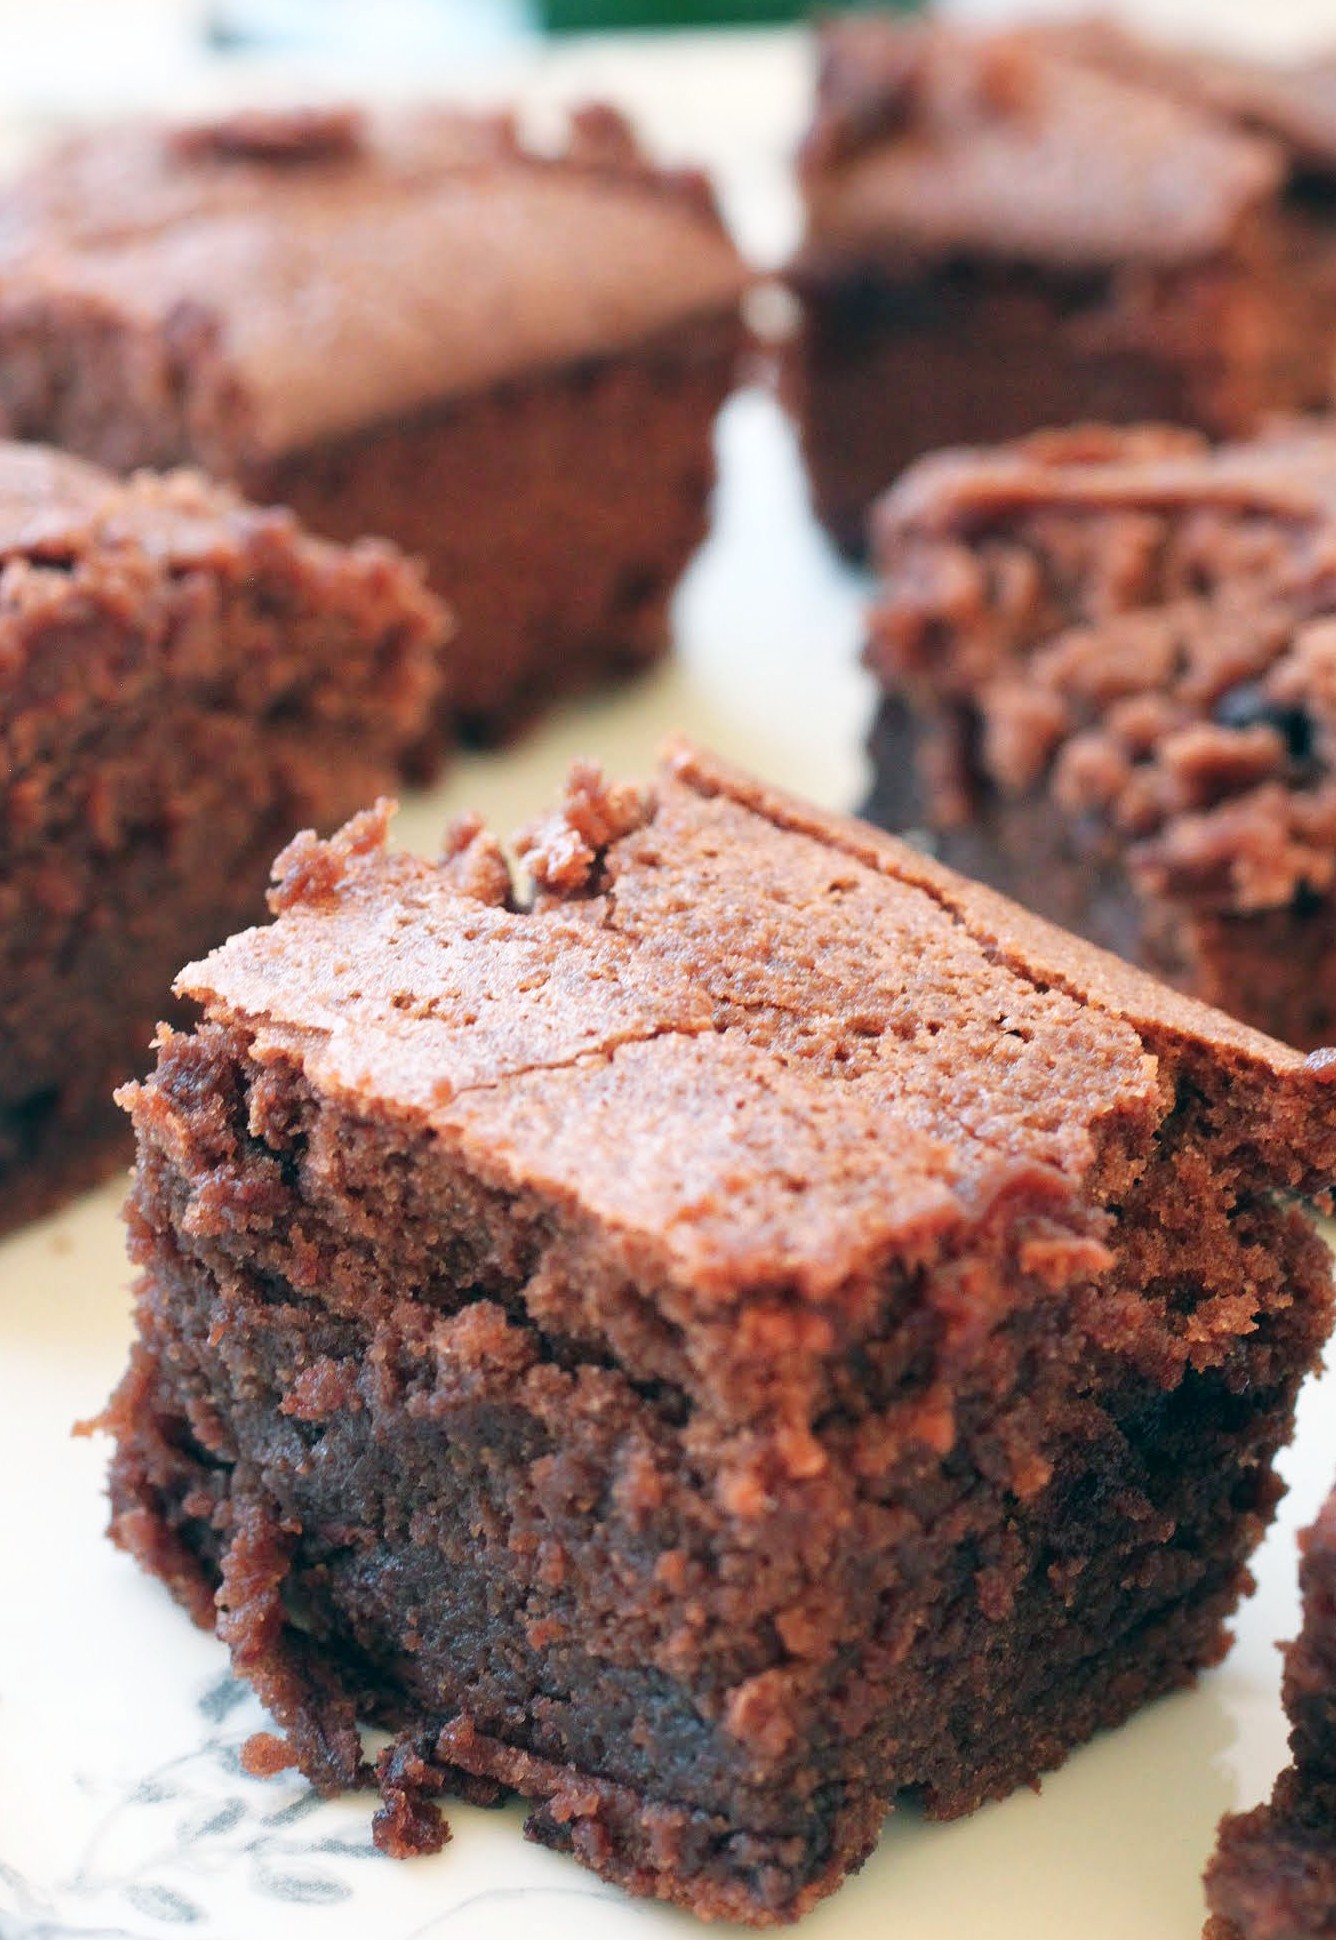
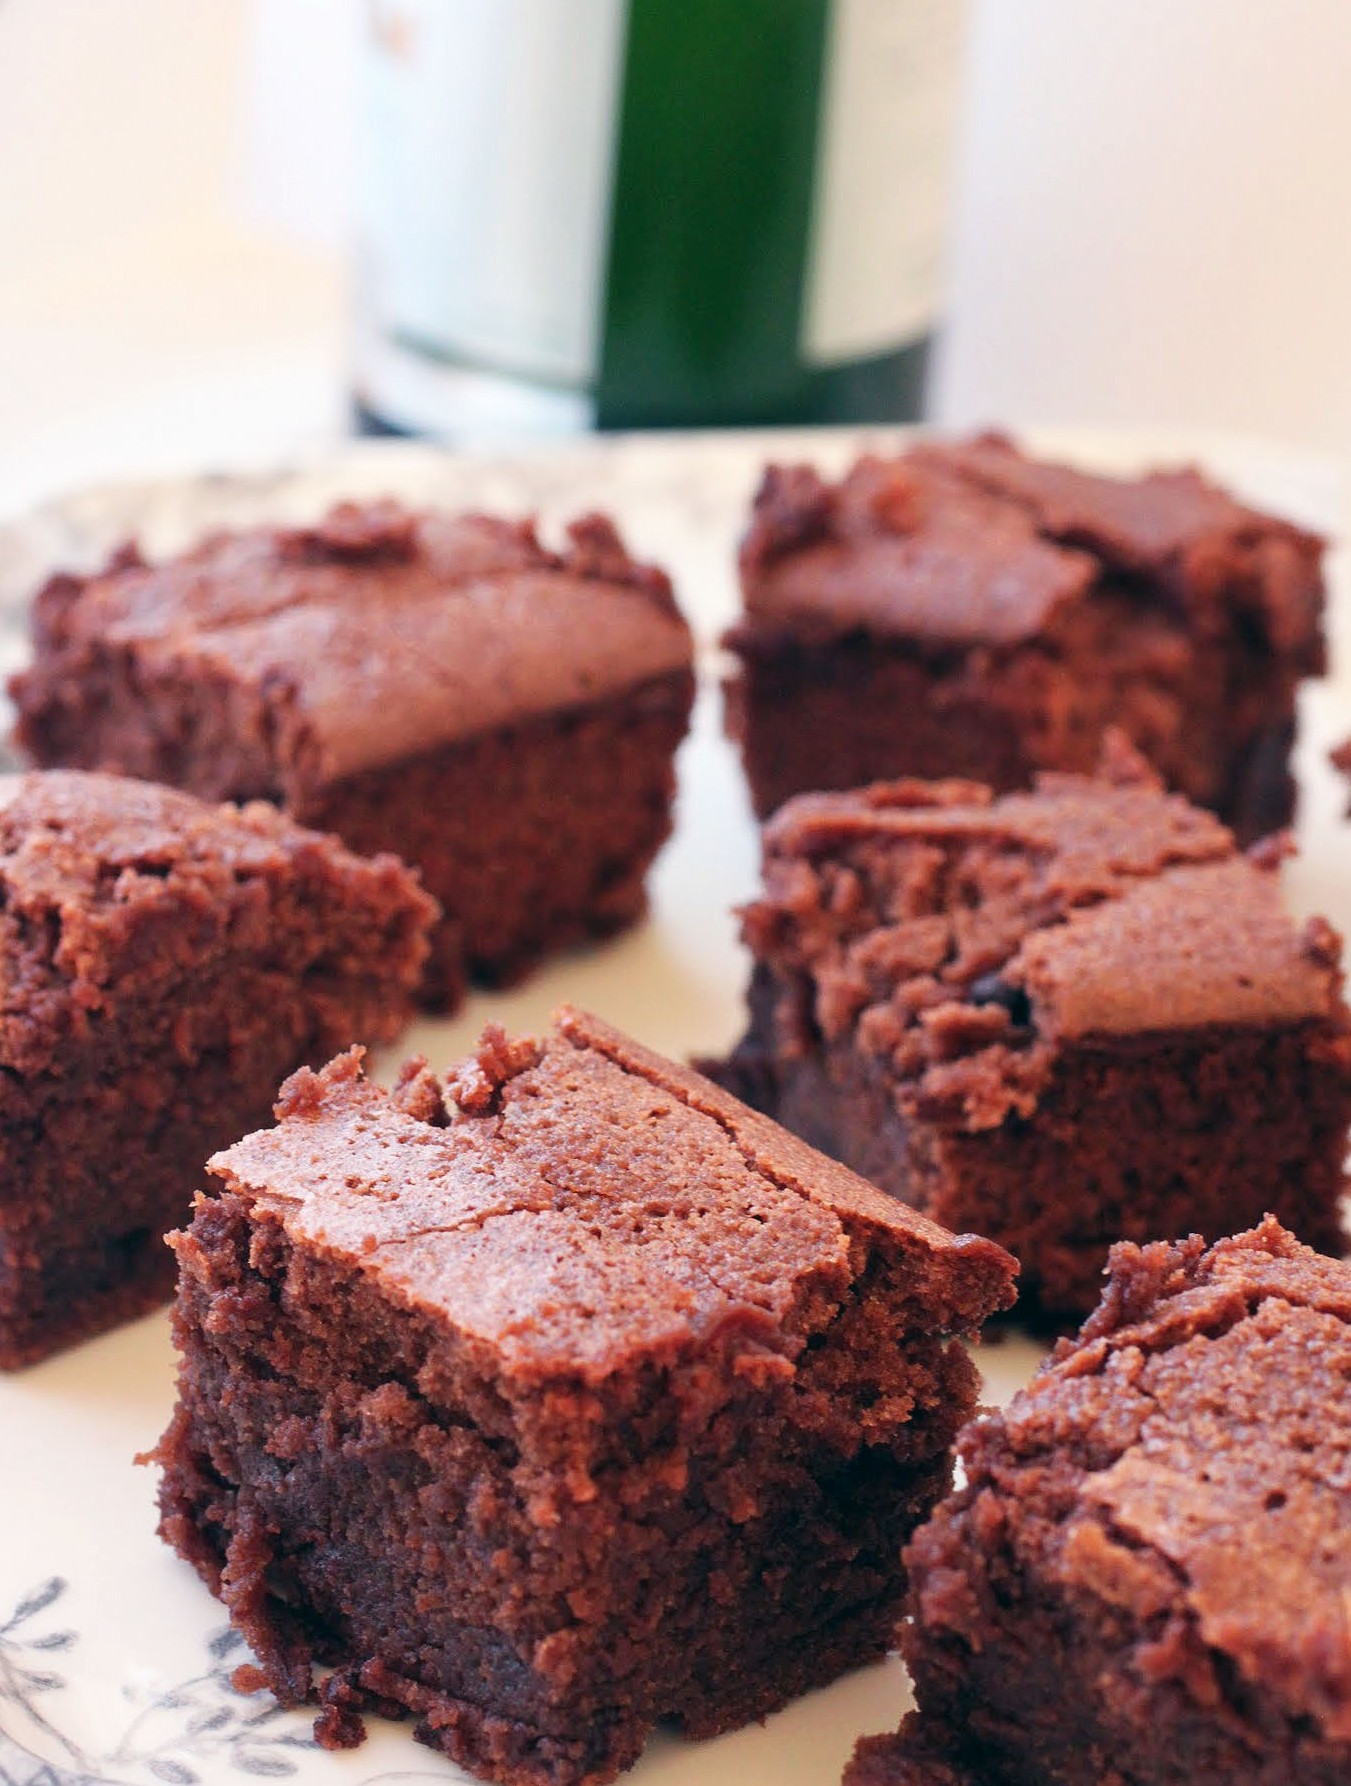
Perhaps my British friends don’t do triple chocolate scones often, if ever. But there’s a first time for everything, and these deserve a lot of attention.
The base for these scones is cream, which works with butter to make these light as a feather while still full of rich chocolate flavor. Maybe people are out barbecuing this Labor Day weekend, but we’re having tea and scones instead!
Since I always approach my blog with pure honesty, it’s time to get real here: I’ve been struggling ever since I started my new job back in July.
As I watch my blog numbers and stats drop, I know exactly what’s going on. I just don’t have time anymore for a lot of the social networking and publicity piece that JAB needs to get more readers. It’s been hard enough to keep the posts going in the face of running a department, and I’m just trying to keep my head above water while being pulled in a million different directions every day. During my work day, I can’t work on the blog, and my hours are now a lot longer. So the blog has to be done either early in the morning or late at night.
For now, I’m holding onto JAB because I love it. And while I feel bad that my Facebook and Twitter shares are pretty paltry, and that I’m commenting less on my friends’ blogs, I don’t really see another way. Unless I want to work around the clock and ignore my children, my husband and my sleep, this is where we’re at right now. It’s not ideal, but I’m learning to live with less than perfect. It’s hard, because I’m a perfectionist. But I figure that holding onto JAB any way I can is better than giving it up entirely.
How could I give up the motivating force for baking scones, after all? These are super special.

The base has unsweetened cocoa, and the mini chocolate chips sprinkle more bursts of chocolate flavor throughout. And of course, these have to be topped with chocolate drizzle. The best baked goods have drizzle!
While many baking bloggers are die-hard frozen shaved butter fans when it comes to scones, I really dislike working with frozen butter. Cold butter does the trick just as nicely, and takes all the hard work out of making these. Scones are a one-bowl, mix with your hands kind of dessert. Anyone can do this!
As I navigate a life that is way too hectic and leaves no room for anything but work and family time, I will try to bring you the best I can. I’m sorry if it’s not perfect, or even close to perfect. But for now, it’s all I can do!
Ingredients
Instructions
- Preheat the oven to 400. Line a cookie sheet with a silicone baking mat or parchment paper. Set aside.
- In a medium-sized bowl, combine the flour, cocoa, sugar, baking powder and salt. Add the cold butter and using the tips of your fingers, pinch the butter into the dry mixture until crumbs of varying sizes form.
- Add the egg and cream, using a fork to stir them in until a dough forms. You can use your hands or the fork to knead lightly until the dough is fully formed.
- Gently mix in the mini chocolate chips with your hands.
- Turn the dough out onto your prepared cookie sheet, pressing it into a circle that is about six inches in diameter.
- Cut the dough into six wedges. Bake for around 20 minutes until the scones are crispy at the edges.
- Melt the 1/4 cup mini chocolate chips carefully in the microwave in 30-second intervals, being careful not to overheat them. Using a spoon, drizzle the melted chocolate over the scones.
- Cool the scones until the chocolate hardens. Serve or store in an airtight container.
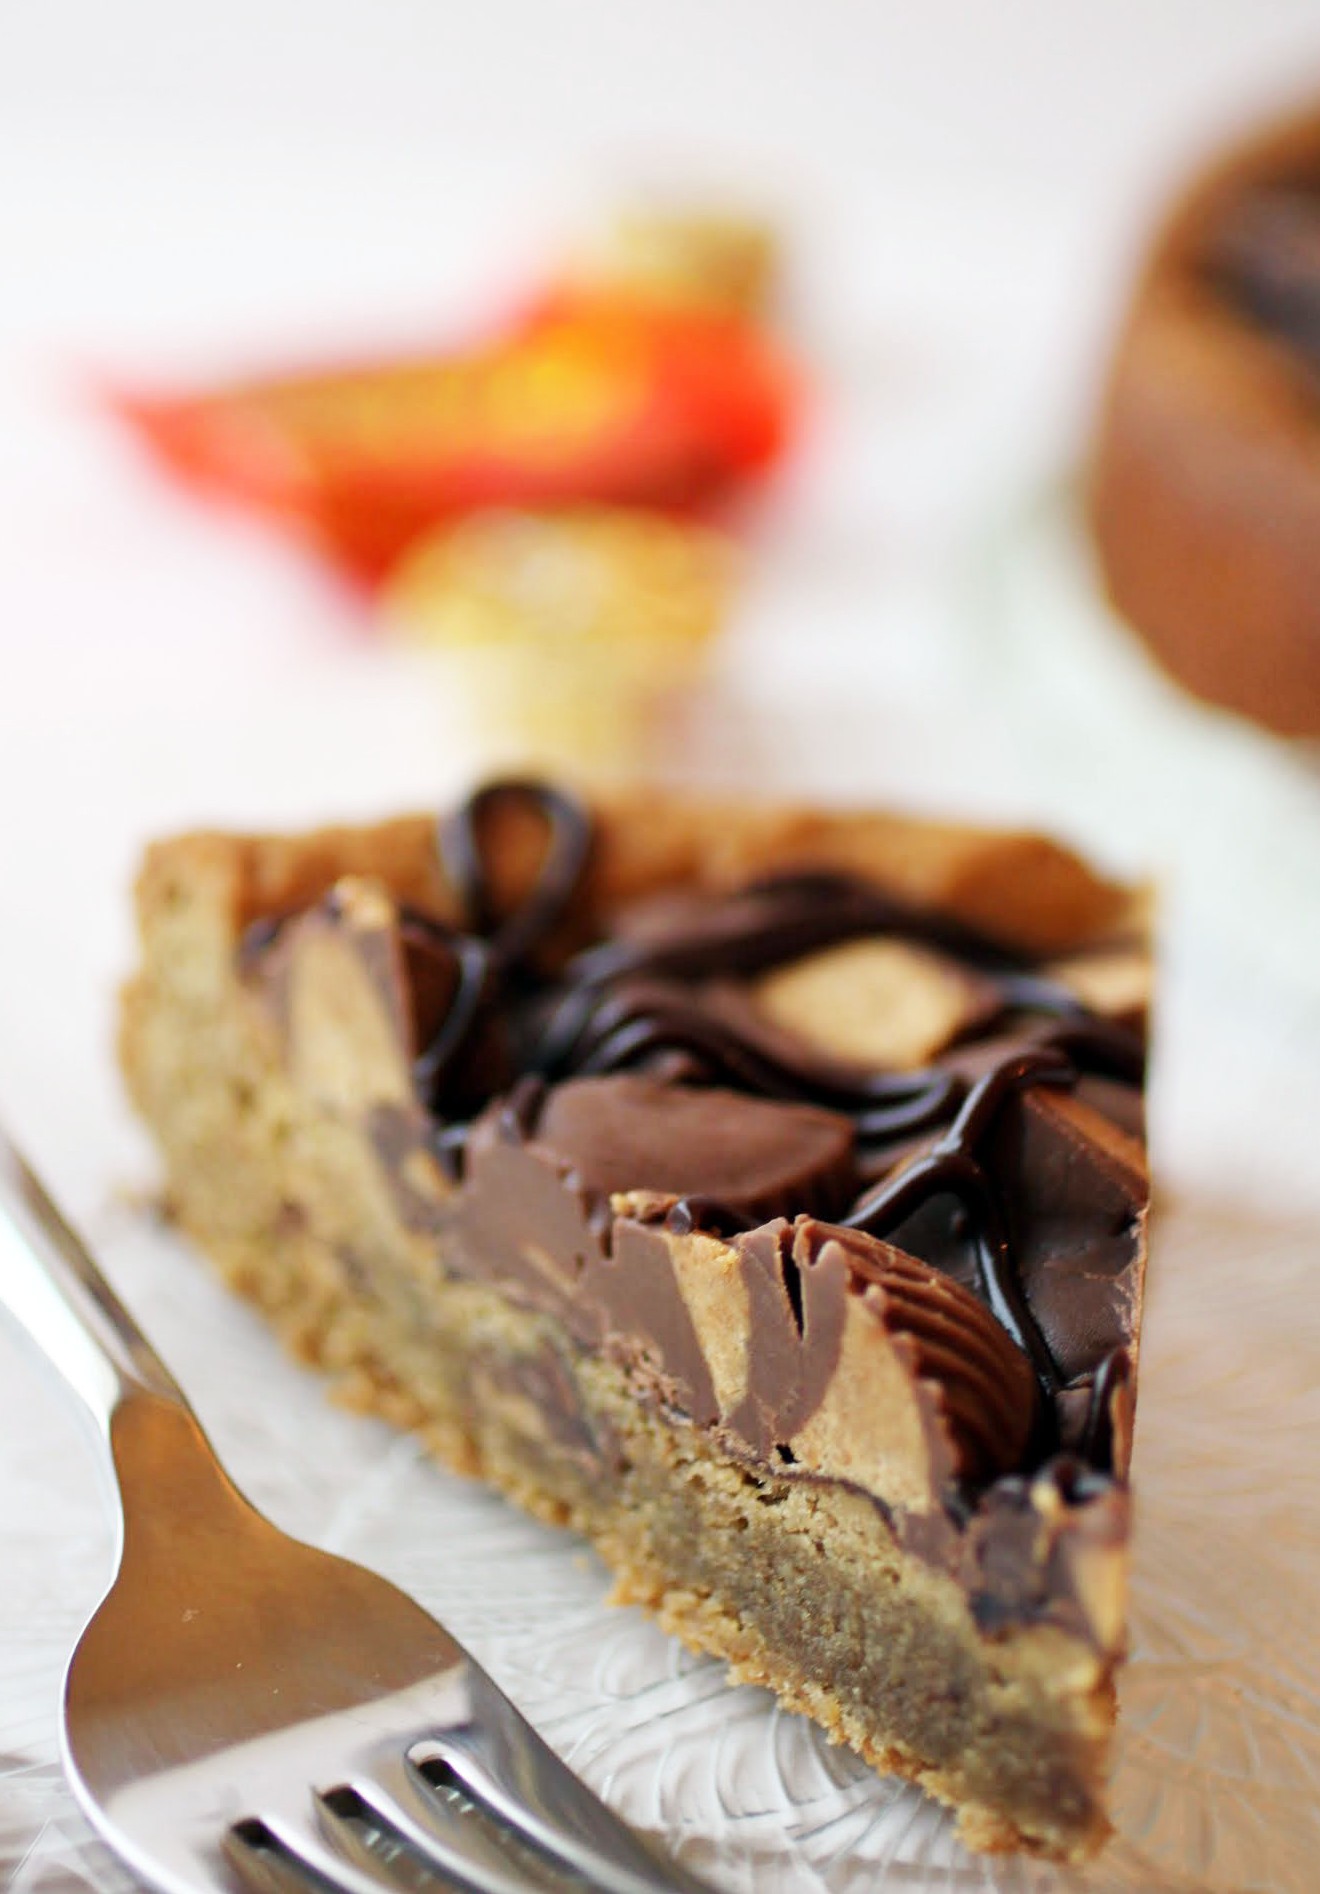
When it comes to my birthday, I still feel like a little kid. I want presents, parties, and many celebrations. Sometimes that means I’m setting myself up. Let’s face it: I’m a mom of three and nobody has thrown me a party since I was 25. That was a loooooong time ago. But still, I hold out hope!
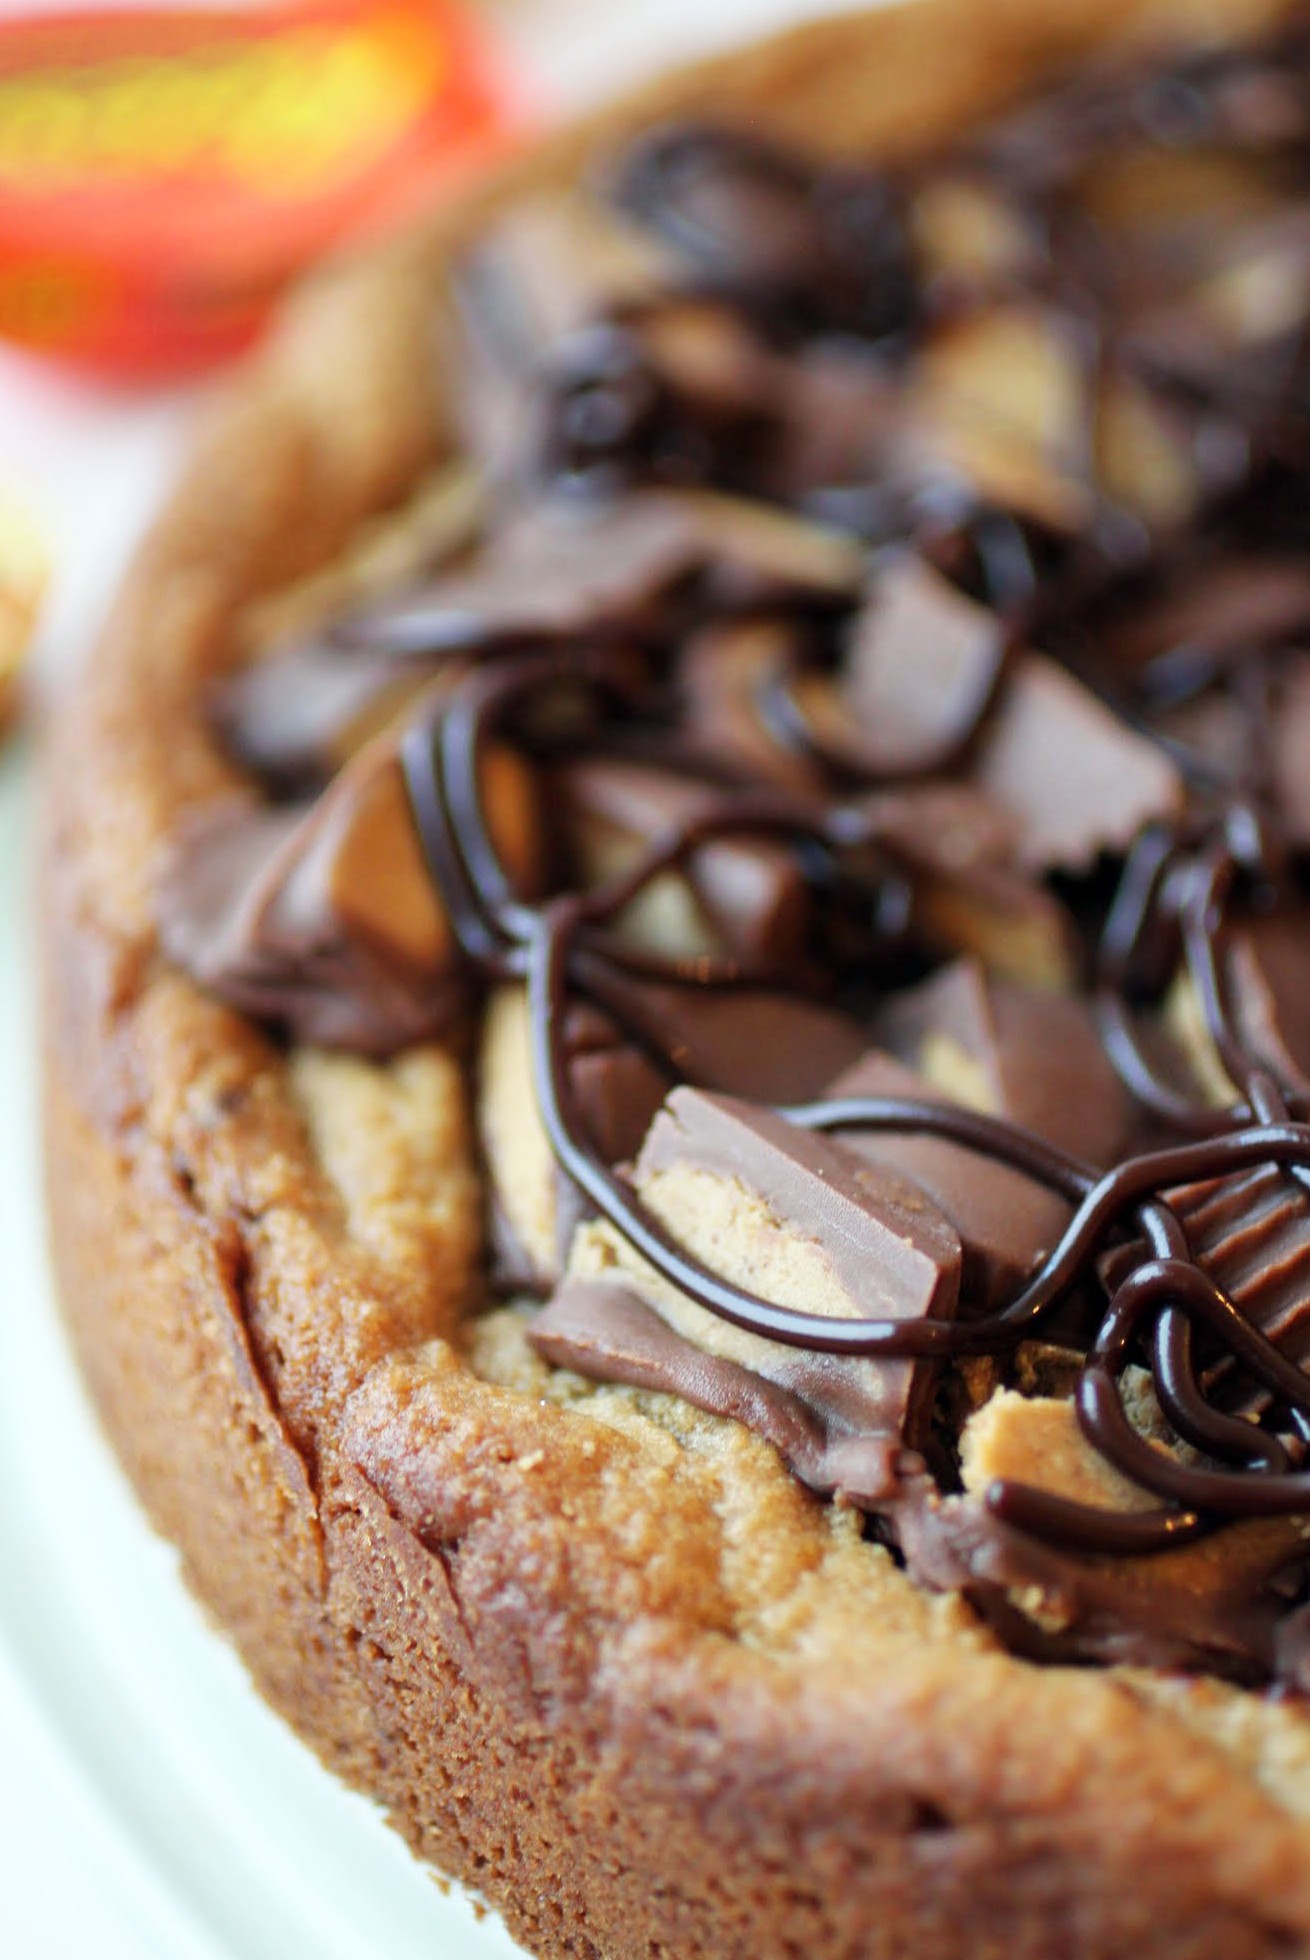
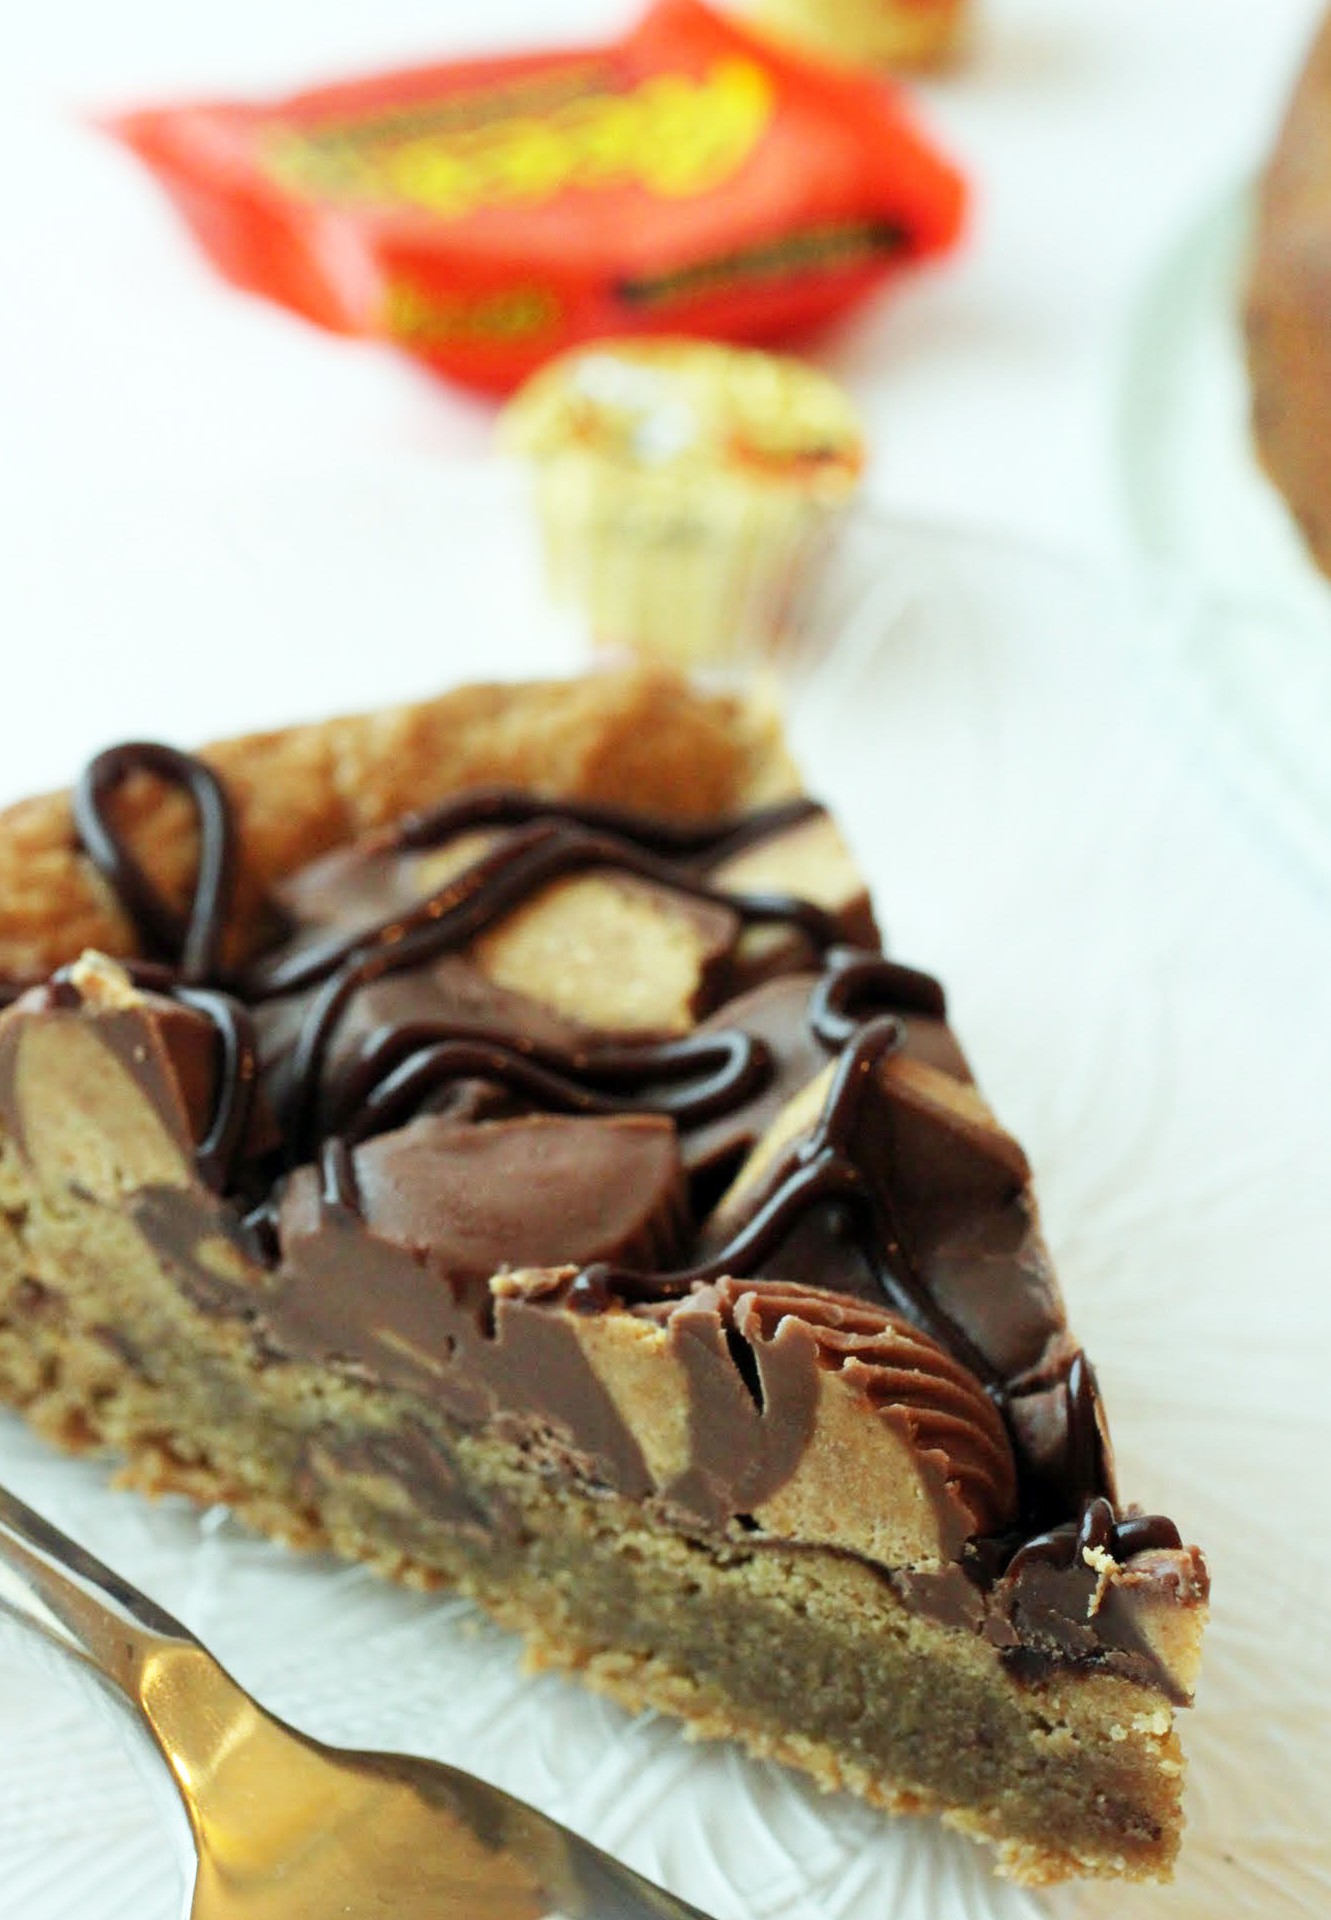
One thing I’ve learned to do is bake my own birthday treat. A few years ago, I baked this cookie cake for the first time. It was my favorite cookie cake ever, but my photo skills weren’t so great back then. Plus, I wanted to see if I could make the whole thing GF and a little easier. Done and done!
Now that I’m off the hook for jury duty (I didn’t get selected, but I did make it into a courtroom, so that’s always fun), I’m full steam ahead on getting ready for the school year ahead. That means a lot of organizing, cleaning, and decision-making.
When I changed schools earlier this summer, I left a very beautiful school building behind in exchange for one with a lot more history and age. My new work home is a lot older, but it’s kept up nicely and I’ve been feeling at home here.
The thing is, I’ve been getting this reaction from some people about my change of venue that is less than desired. People tend to set a lot of store by new and sparkly things. Hey, how can I blame them? New is usually very nice. But no matter how nice a space is, a school especially, the end result is what everyone makes of it.
Students make schools come alive, not awe-inspiring entryways or corporate-looking office spaces. This is a school, and it looks like one. Personally, I find that comforting.
Okay, end rant. Can I talk about this cookie cake now?

It’s chewy in the center and crispy at the edges, just like my favorite cookies are. There’s a layer of hot fudge that glues the peanut butter cups (both chopped up snack-sized and miniatures) to the top. And there are more chopped PB cups in the actual cookie.
Hey, it’s about to be my birthday. I want to do it up, and that means lots of peanut butter lover’s cookie cake for me. And if anyone wants to throw me a crazy wild party, just name the time and the venue. I’ll be there!
Ingredients
Instructions
- Preheat the oven to 350. Coat a 9-inch springform pan with cooking spray. Set aside.
- In the bowl of a stand mixer, beat the eggs, butter, peanut butter, vanilla, brown sugar and sugar until creamy.
- Add the dry ingredients and mix until just combined. Fold in the chopped peanut butter cups.
- Spread the batter evenly into the prepared pan. Bake for 25-30 minutes. Cool completely.
- When the cookie is cool, remove the sides of the springform pan.
- Heat the hot fudge for 30 seconds in the microwave. Spread a thin layer over the top of the cookie.
- Pile the peanut butter cups on top of the fudge layer, pressing down lightly to make sure they stick.
- If desired, pipe hot fudge over the top with a small round tip.
- Cut into wedges and serve!
]]>
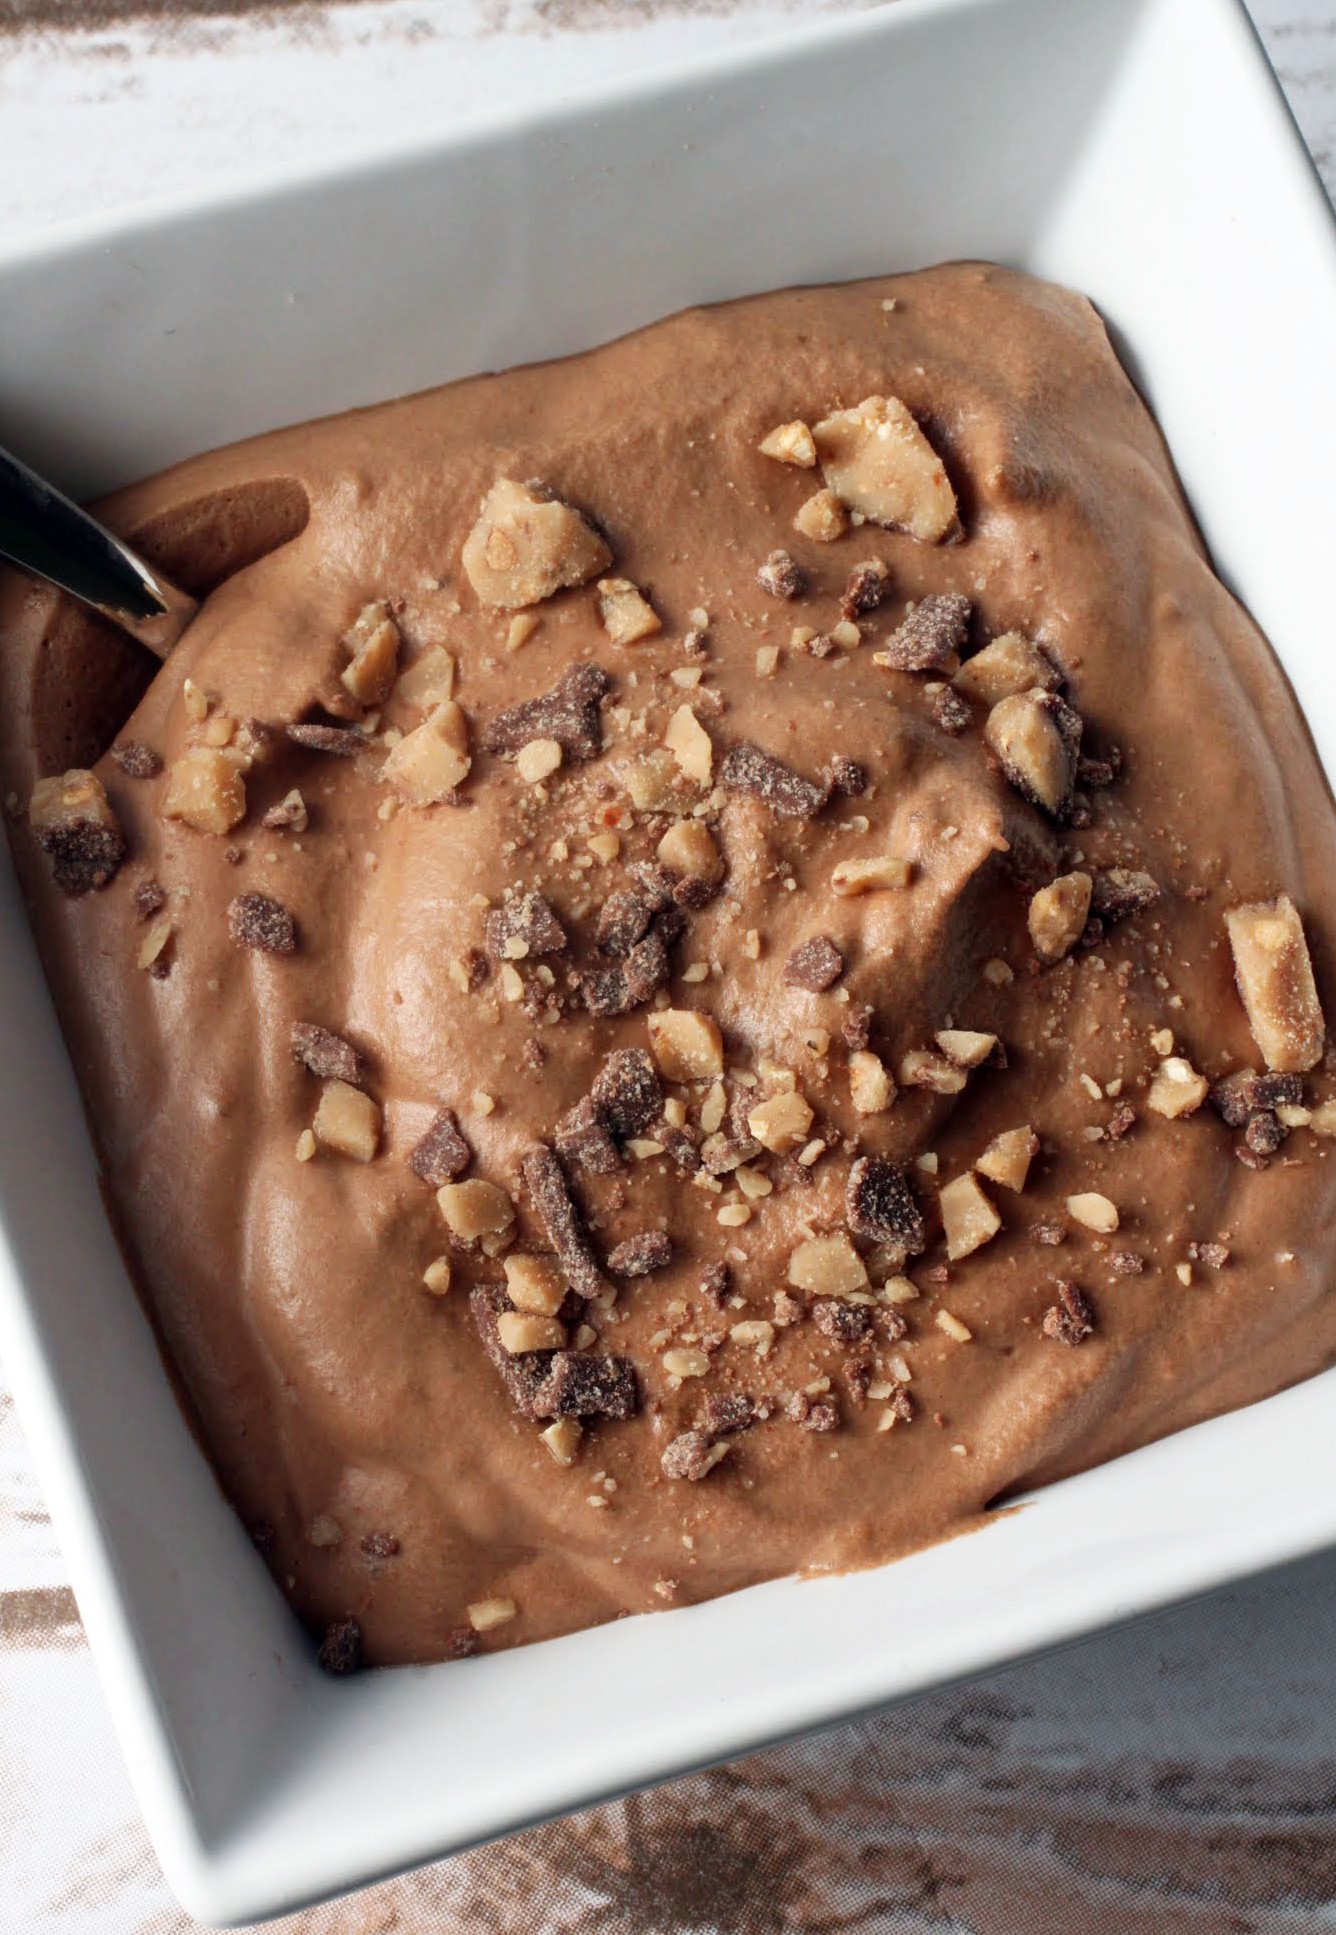
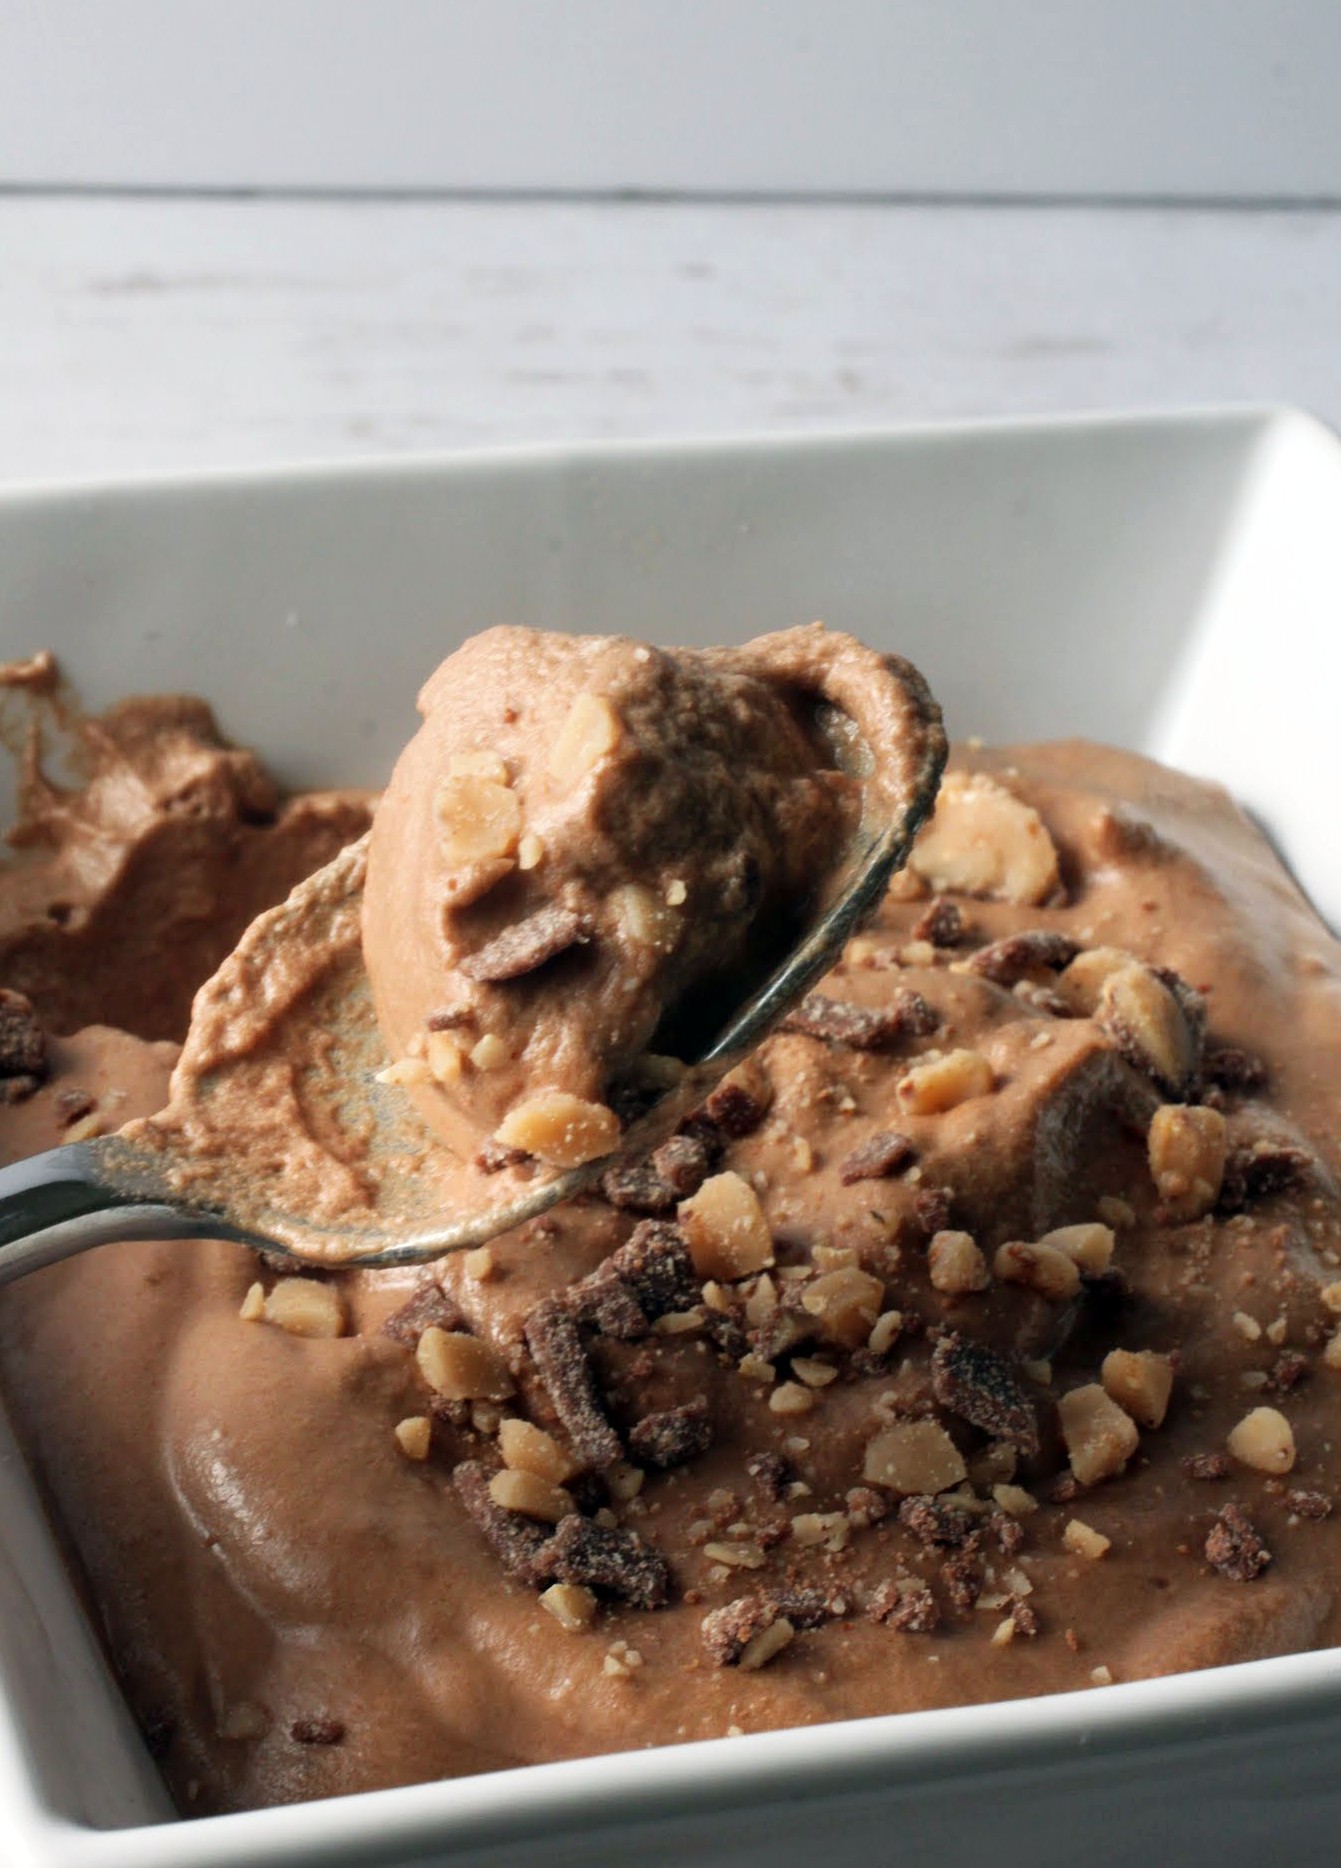
The other day, I was really worn out. But since I’m not a coffee drinker, I did the next best thing: I gave myself a shot of this mousse. It’s not alcoholic, but it sure is caffeinated. Be still my heart. Nope, it’s beating too fast for that.
Not only is this the epitome of coffee and chocolate goodness, but there are also chocolate Heath bits through and through. Mousse has never tasted so incredible!
Mousse is definitely a sensitive topic in my family. When I was growing up, one of my brothers didn’t put such a high premium on staying out of trouble. To make matters worse, he had this really bad habit of laughing at my parents whenever they were trying to punish them. I always told him that was a dumb move, but he didn’t seem to care that much.
On the rare occasions when my brother wasn’t wreaking havoc, my mother would reward him by making chocolate mousse. My mom didn’t bake often, so this was quite a treat. He loved chocolate mousse and I guess it was supposed to be a behavior incentive, but it didn’t work in the long term because, you know, kids.
Anyway, I have another brother who always a model of kindness and goodness. He was in trouble, oh, never. So all these years later, he’s still kind of amazed that while the majority of my mother’s children behaved well and never received mousse, my brother got it for being good now and then. It seemed like a great injustice.
And, well, I guess it was. But I’ve learned that it’s impossible to treat your children the same way. They’re different people, and it’s inevitable that they can’t always have the same things. It might come across as unfair, but I think it’s unavoidable.
Besides, my brother can have all the mousse he wants now, because I’ll make it for him! I’ll even make it for the one who didn’t behave. I love them both.
This takes almost no time to whip up, and it’s so nice and cool and light for these hot days. The toffee bits give a delightful crunch amid all the mocha creaminess, and you’ll be very happy. Plus, if you put this mousse in elegant glassware, it becomes the best company dessert ever!
If you want to stall some family squabbles this holiday weekend (or anytime, really), give mousse a try. It might make your kids behave, anyway…for about ten seconds!
Ingredients
Instructions
- Dissolve the instant coffee in the cold water.
- In a microwave-safe bowl, combine the coffee and the chocolate chips. Heat at 30-second intervals, stirring each time, until everything is melted and smooth. Set aside.
- In the bowl of a stand mixer, whip the heavy cream until stiff peaks form. Do not overdo it!
- Gently fold the chocolate mixture into the heavy cream until a uniform color (no streaks!) appears.
- Gently fold the toffee pieces into the mousse.
- Spoon the mousse into glasses or cups. It will set on its own. Sprinkle more toffee bits on top for garnish.
- If not serving immediately, store in the refrigerator.
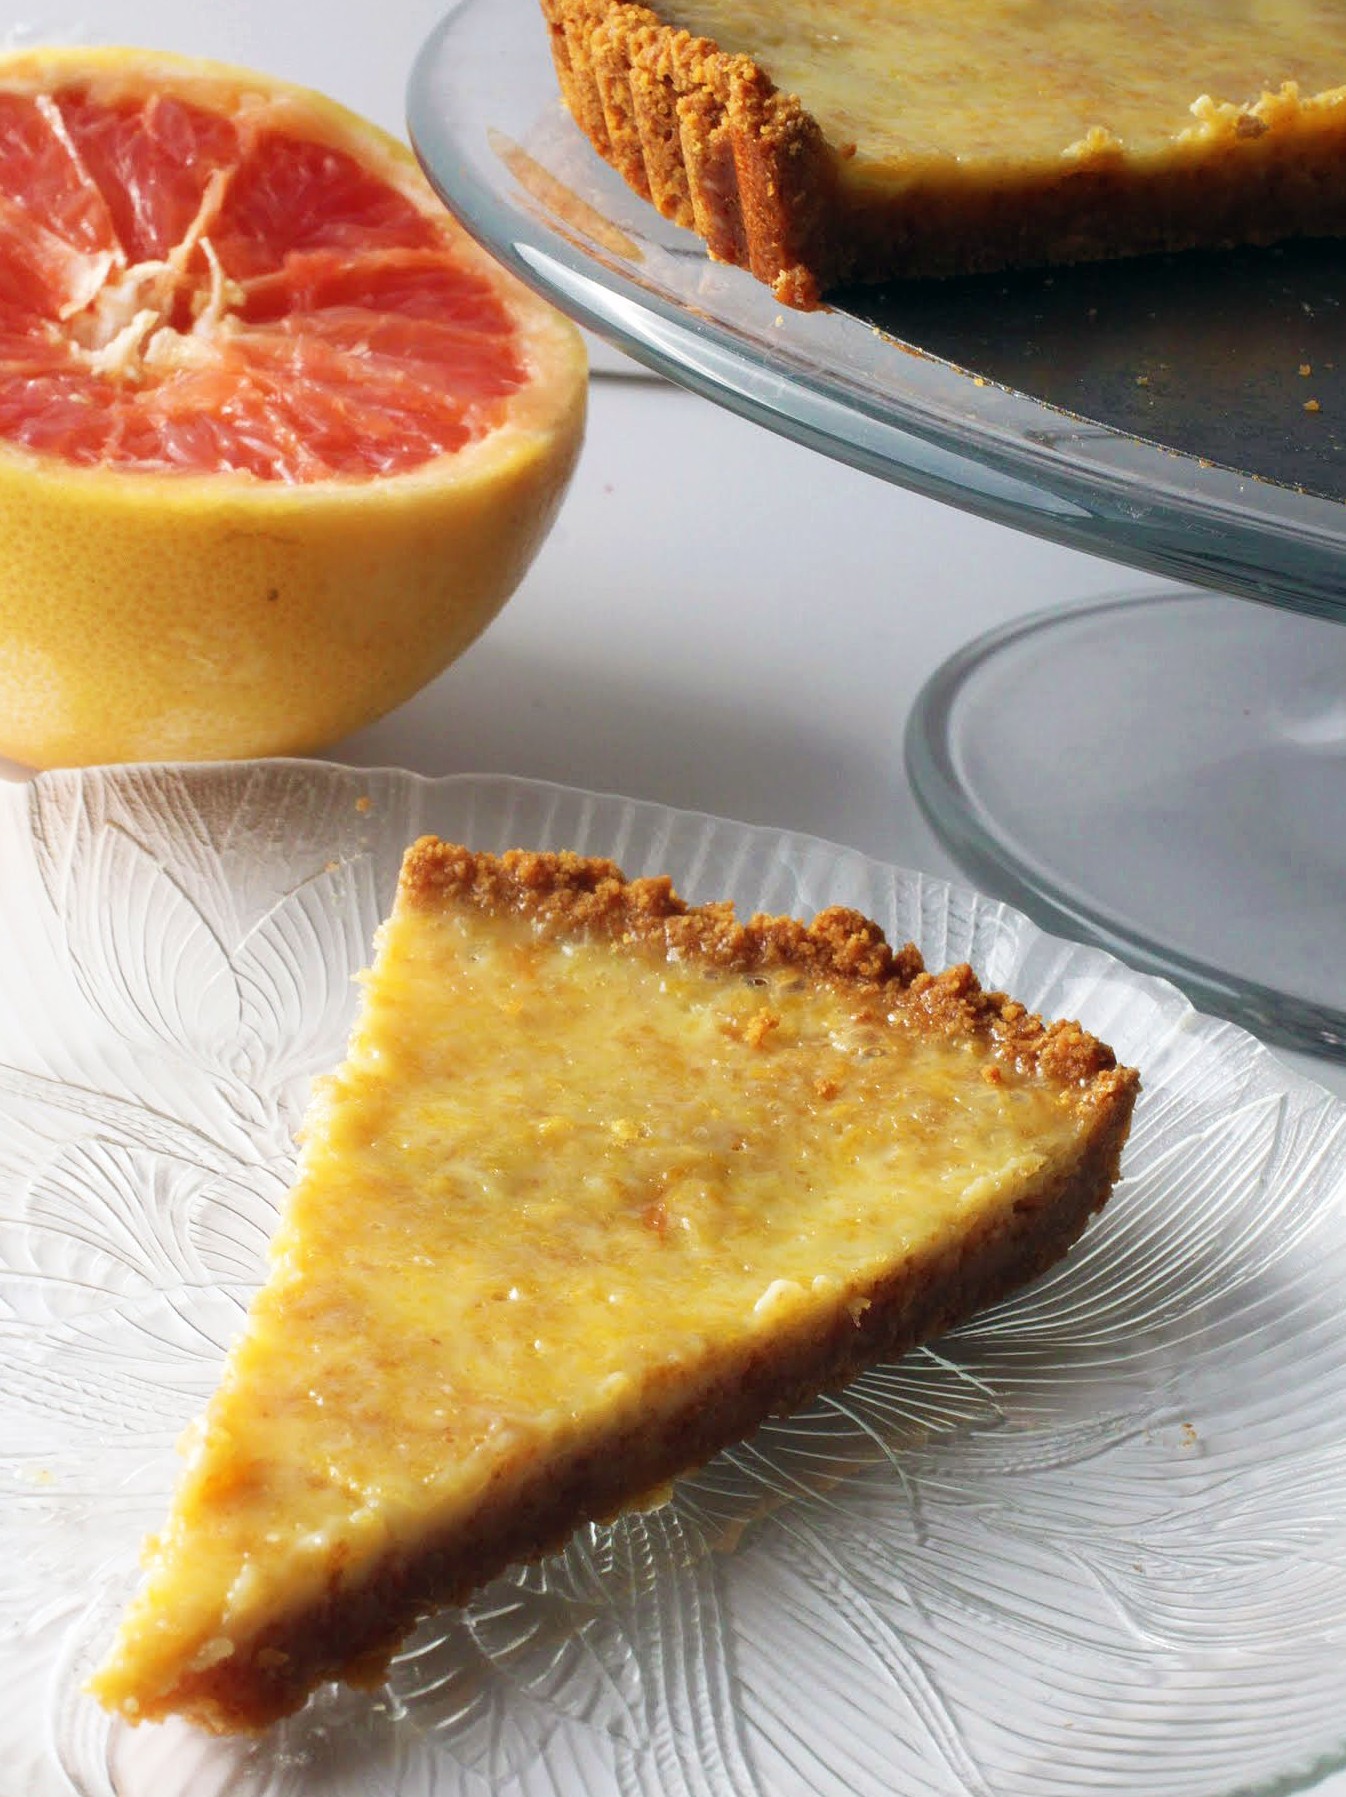
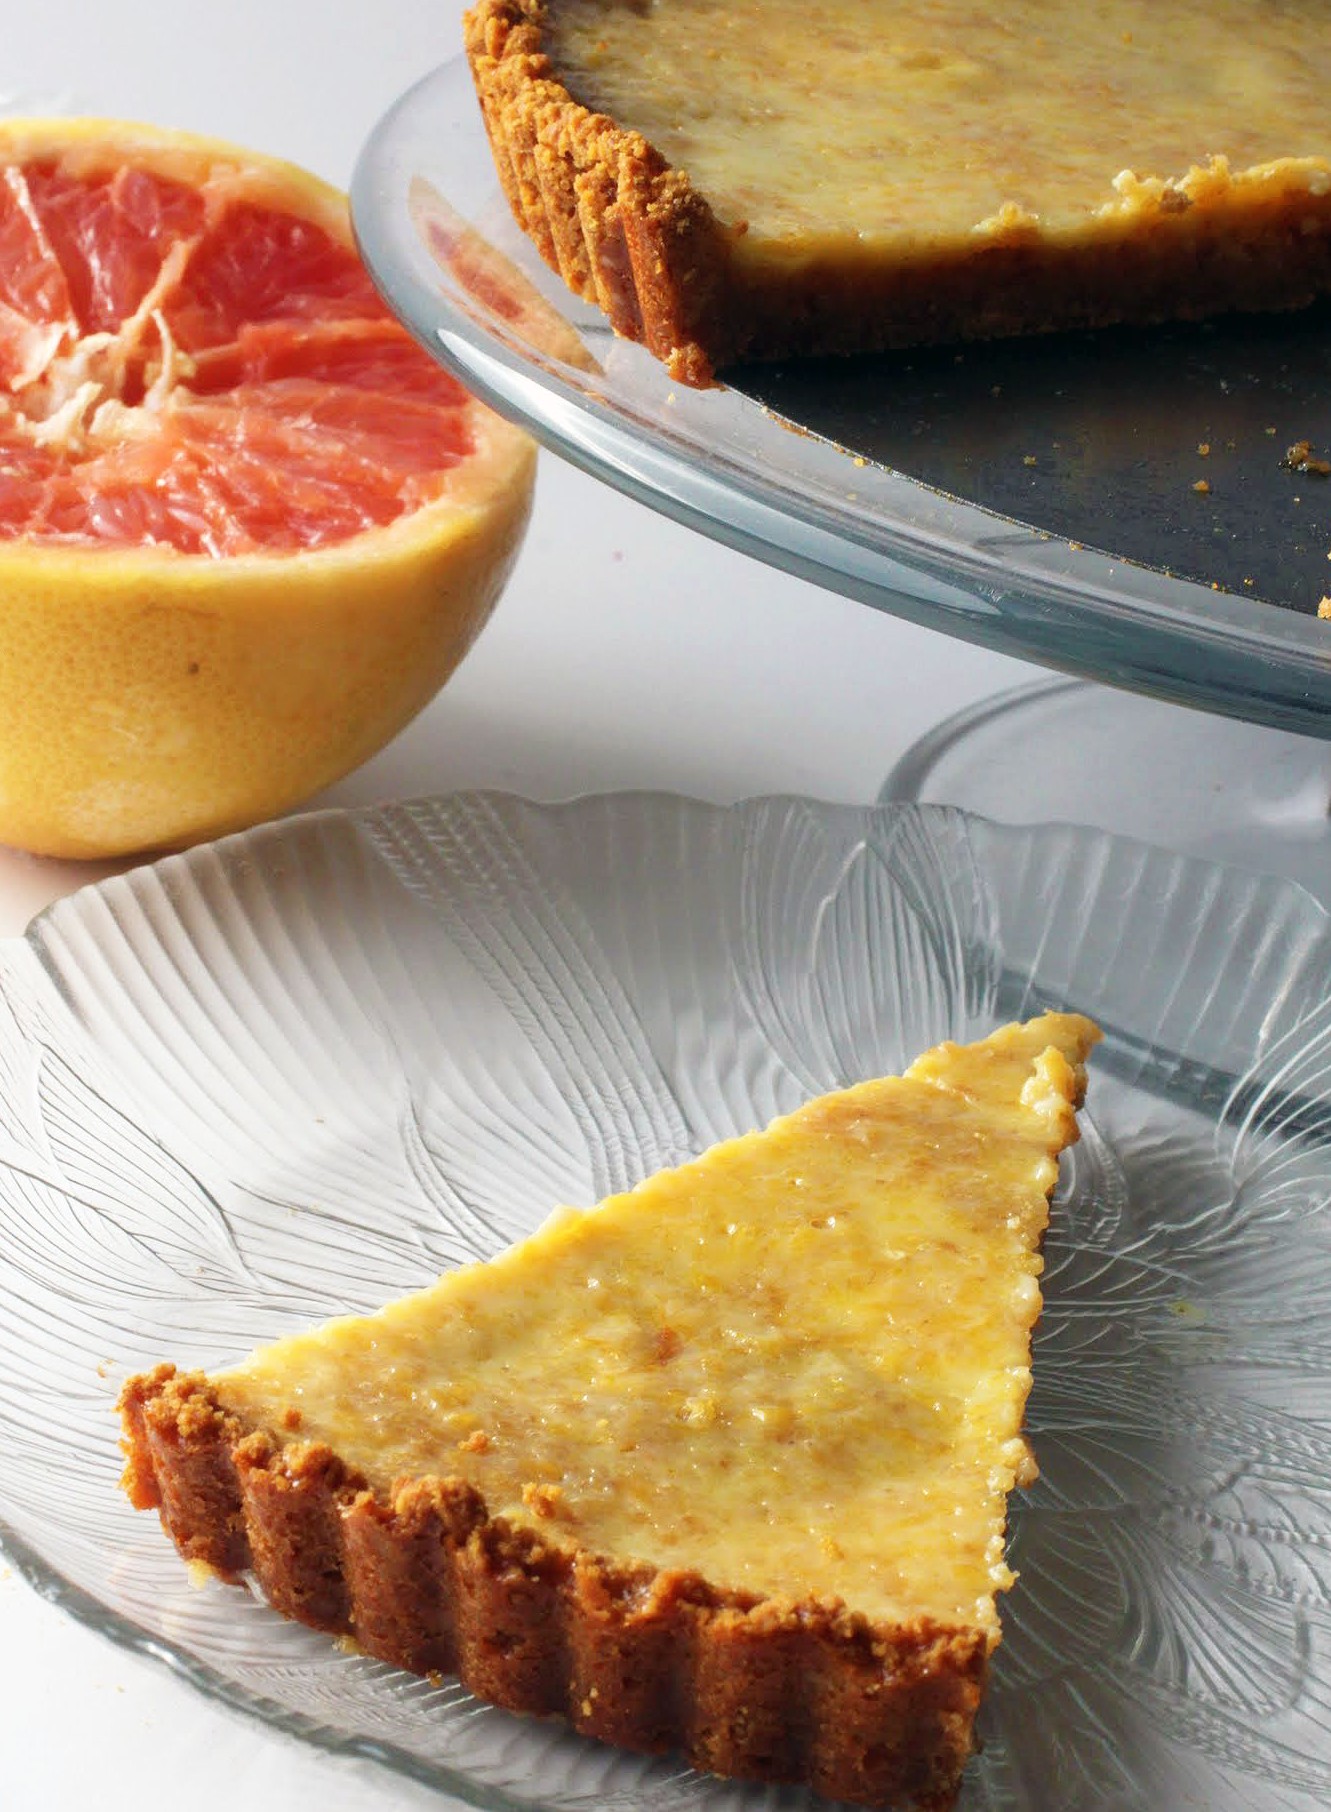
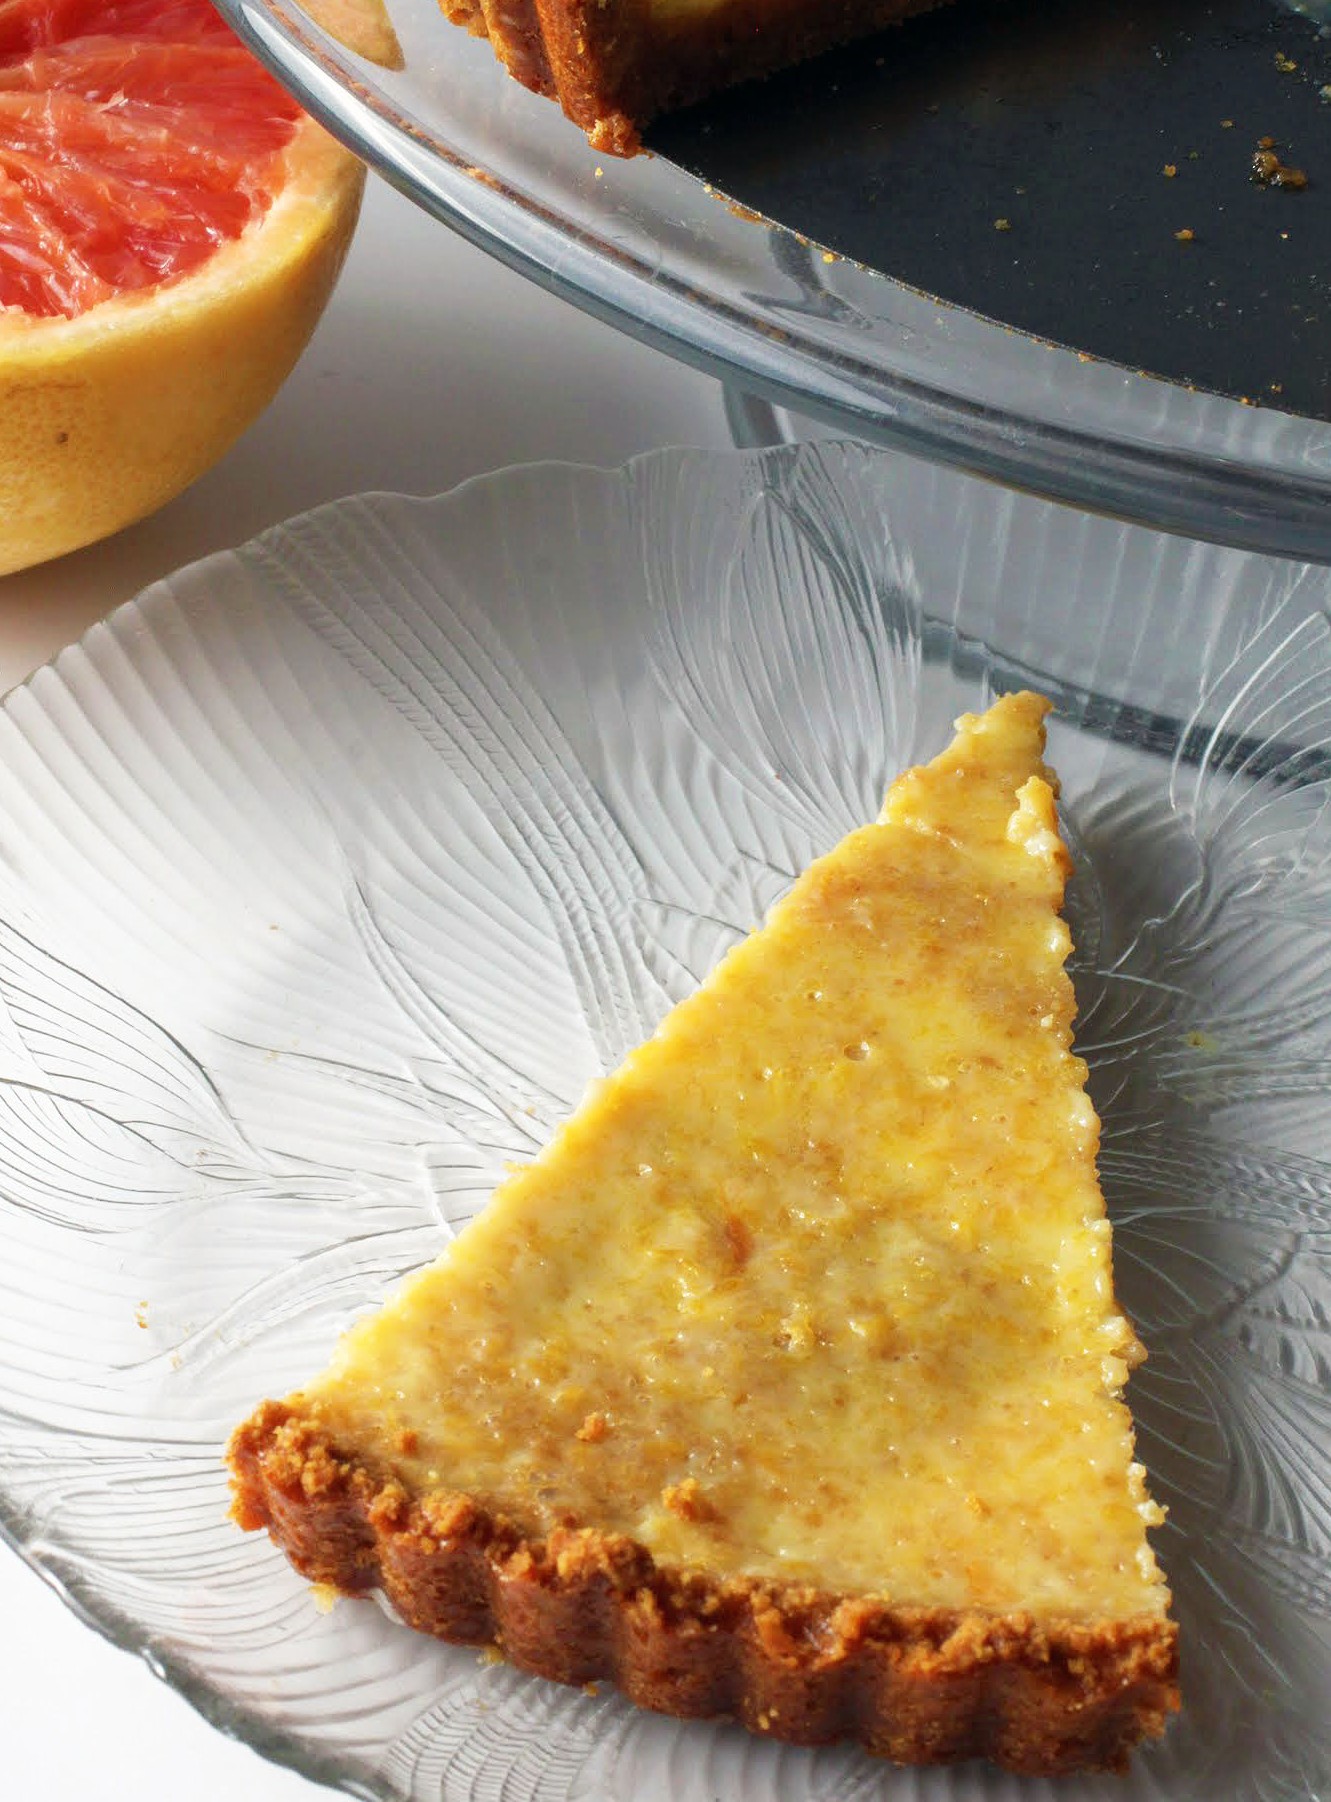
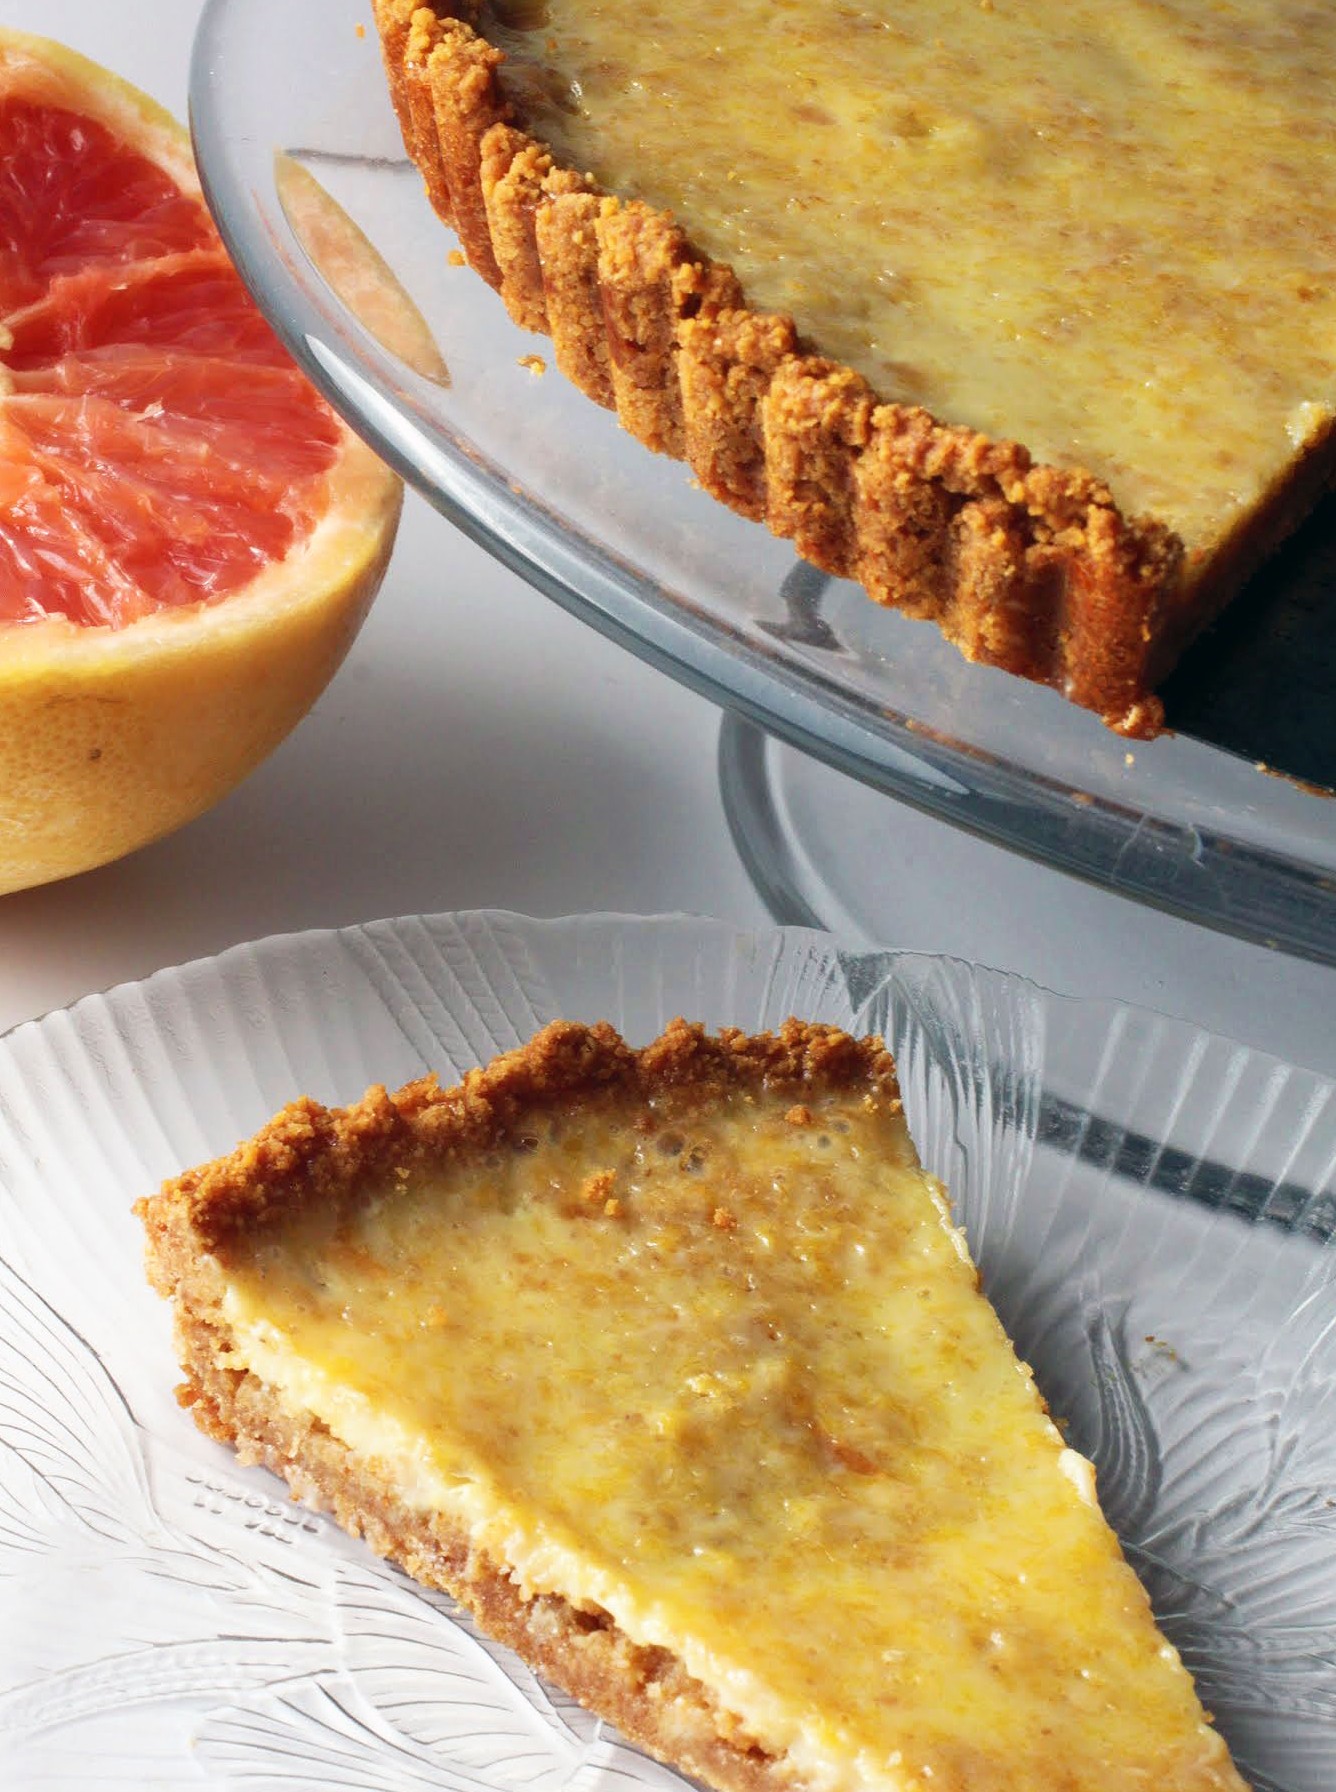
I. Love. Grapefruit. I know it must come as a shock that a sugar-addicted fiend like me actually eats fruit, but my diet is reasonably healthy. And I eat half a grapefruit every day.
In fact, I love grapefruit so much that I’ve specifically avoided going on a medication because it would ban grapefruit from my diet with some awful chemical reaction. I can’t do that. Every day I need my fix, and if I bake it into a tart, well, so much the better. This is a tart for the ages! You’re going to love it.
A few days ago I wrote a post complaining about my body aches and pains, and I’m happy to report that I can once again move my head from side to side. Last week my neck and shoulders went, and I had to go through my day moving like a robot. My students found it hilarious. Well, until I reminded them that if they continued to mock me, I’d have my revenge when I was all better. That stopped them pretty quick.
The act of staying healthy is a delicate balance, one that most of us struggle with. It’s not just about what you eat, or how much you move. It’s about how you see yourself. And I gotta say, mass media is working against women pretty strongly these days.
Before I had daughters, I would mindlessly read magazines on weekends, enjoying the endless (and repetitive) tips they offered up each month: how to be happy, why eating breakfast is so important, ways to organize my life, and the ever-present cover headline: drop five pounds in two weeks! Or something along those lines.
I never used to think about magazines or their covers much, but now that I have girls, I’m paying attention. I’ve gone through life being far too much of a perfectionist about my own physique, and I don’t want to pass that on to my girls. I’m careful on all sorts of levels on that front, and one way to make positive change is to get the magazines out of the house.
Really. Next time you’re in a grocery store line, read the covers. They’re demeaning. And despite the fact that the magazine industry claims to be embracing more realistic body types, they’re still classifying women in a healthy weight range as plus-sized, and associating that with shame. And their cover models are still unrealistically photoshopped.
I’d like to put this tart on a magazine cover. That’s how splendid it is, and how opposite of anything horrible I find it to be. This is one of those times that I get obsessed by my own dessert. It doesn’t happen all the time, so when it does, you can bet I’ll tell you.

It’s so easy to make, too. The base is my white chocolate graham cracker crust, and the filling is just a mixture of fresh ruby red grapefruit juice, condensed milk, zest, and egg yolks. That’s all, folks.
Trying to raise kids with a healthy self-image is really hard. Trying to be a balanced, healthy eater is also hard. So make it as easy as you can on yourself, and incorporate some of those lovely fruits into dessert. They make for real showstoppers!
Ingredients
Instructions
- Preheat the oven to 350. Coat a tart pan that has a removable bottom with cooking spray and set aside.
- In a microwave-safe bowl, melt the butter and white chocolate for one minute. Stir until smooth. Mix in the graham cracker crumbs and brown sugar until the crumbs are moist. Press the crumb mixture into the bottom and up the sides of the prepared tart pan, being sure that you pack the crust tightly with your fingers or the back of a measuring cup.
- Bake the crust for 5-10 minutes until set.
- While the crust is baking, prepare the filling. Combine the zest, grapefruit juice, and egg yolks. Stir in the condensed milk and mix until thoroughly combined. Pour the filling into the crust and bake for 15-20 minutes until set.
- Allow the tart to cool completely. Refrigerate overnight. When you’re ready to serve, slice into wedges!
]]>
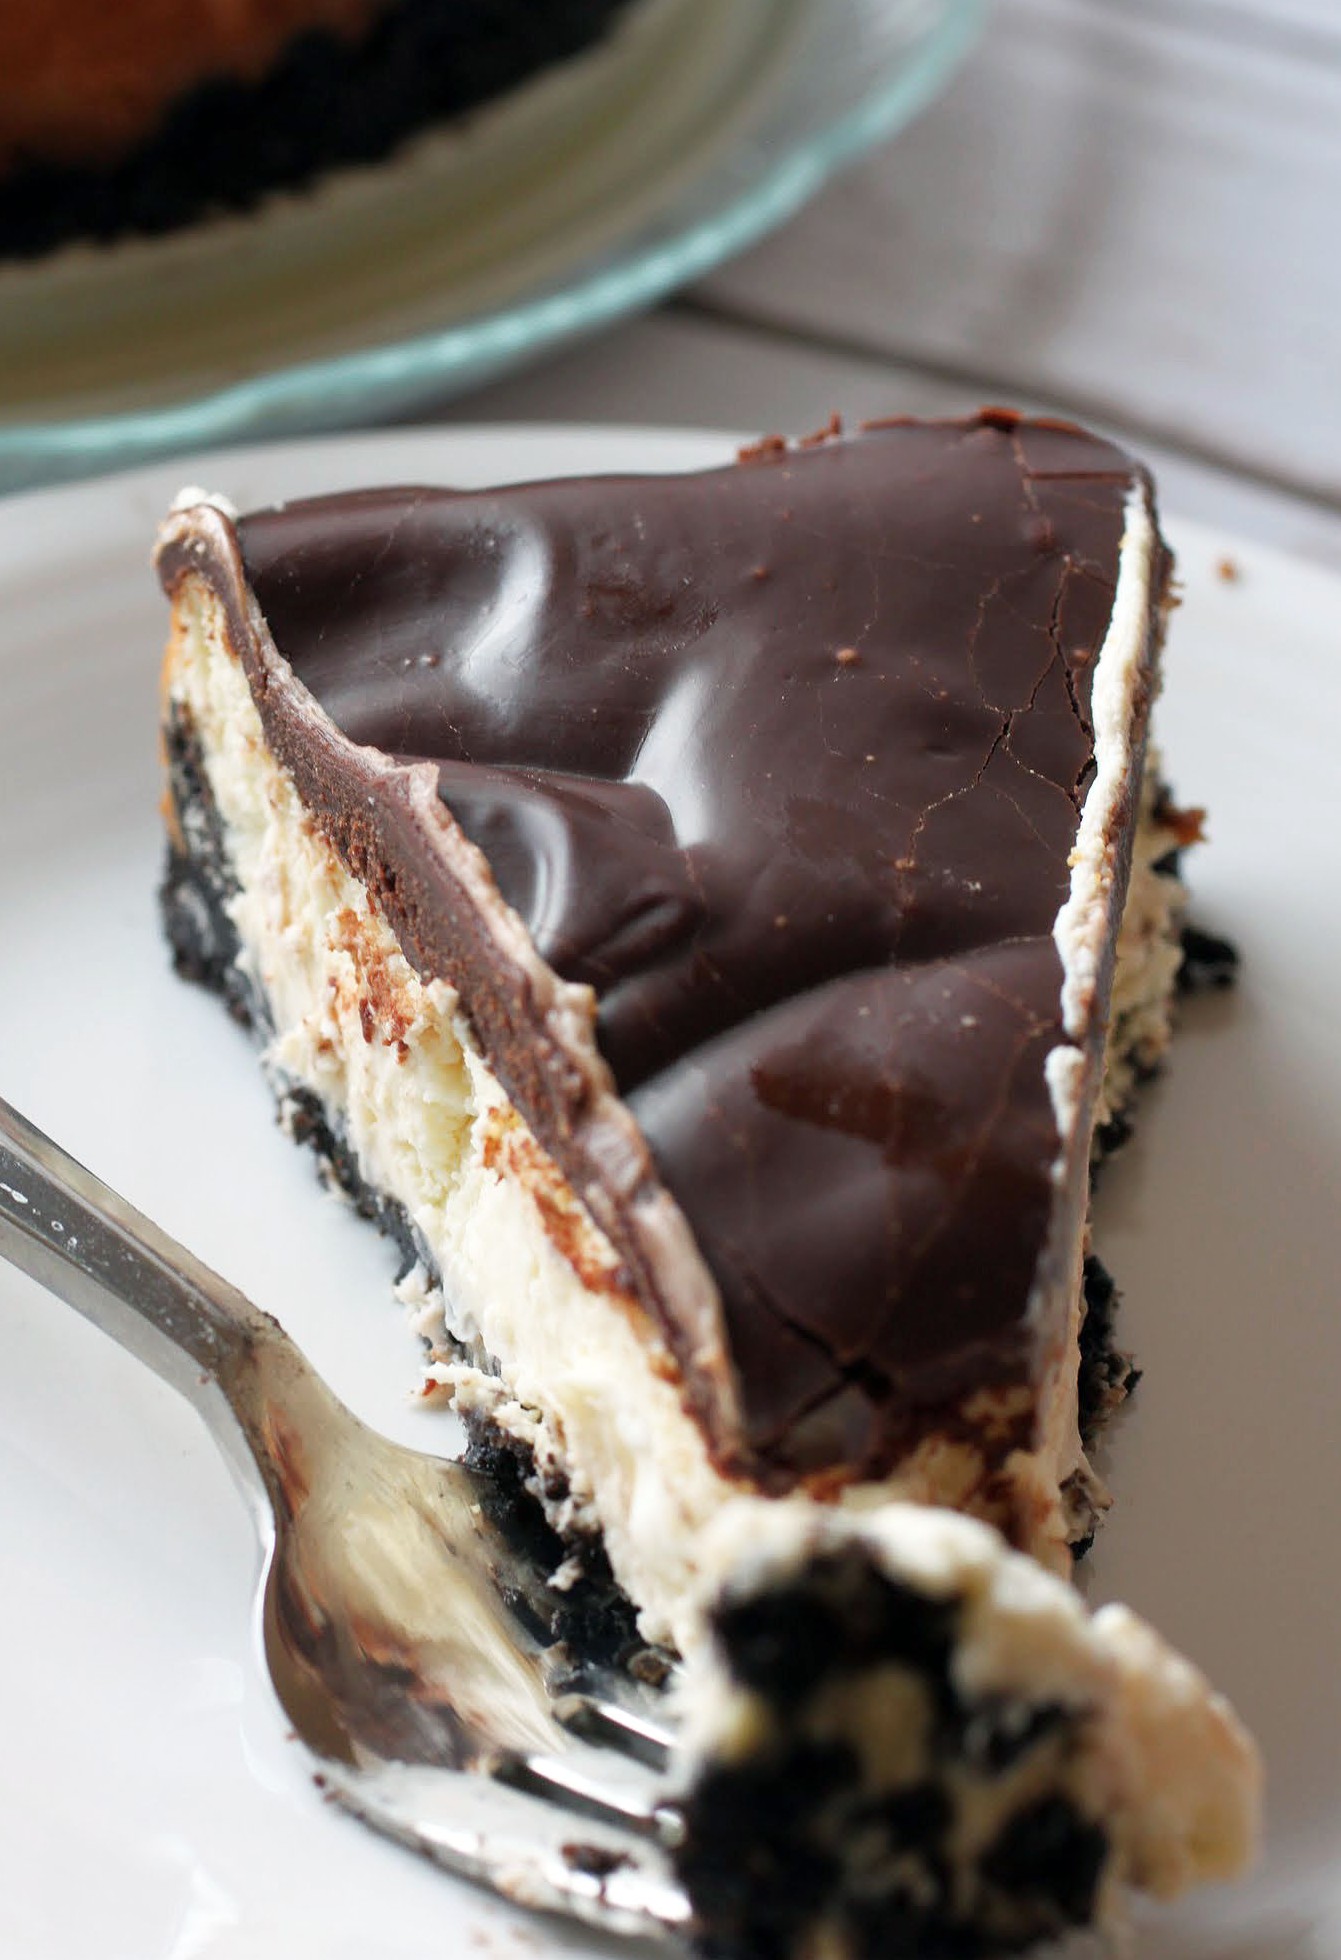
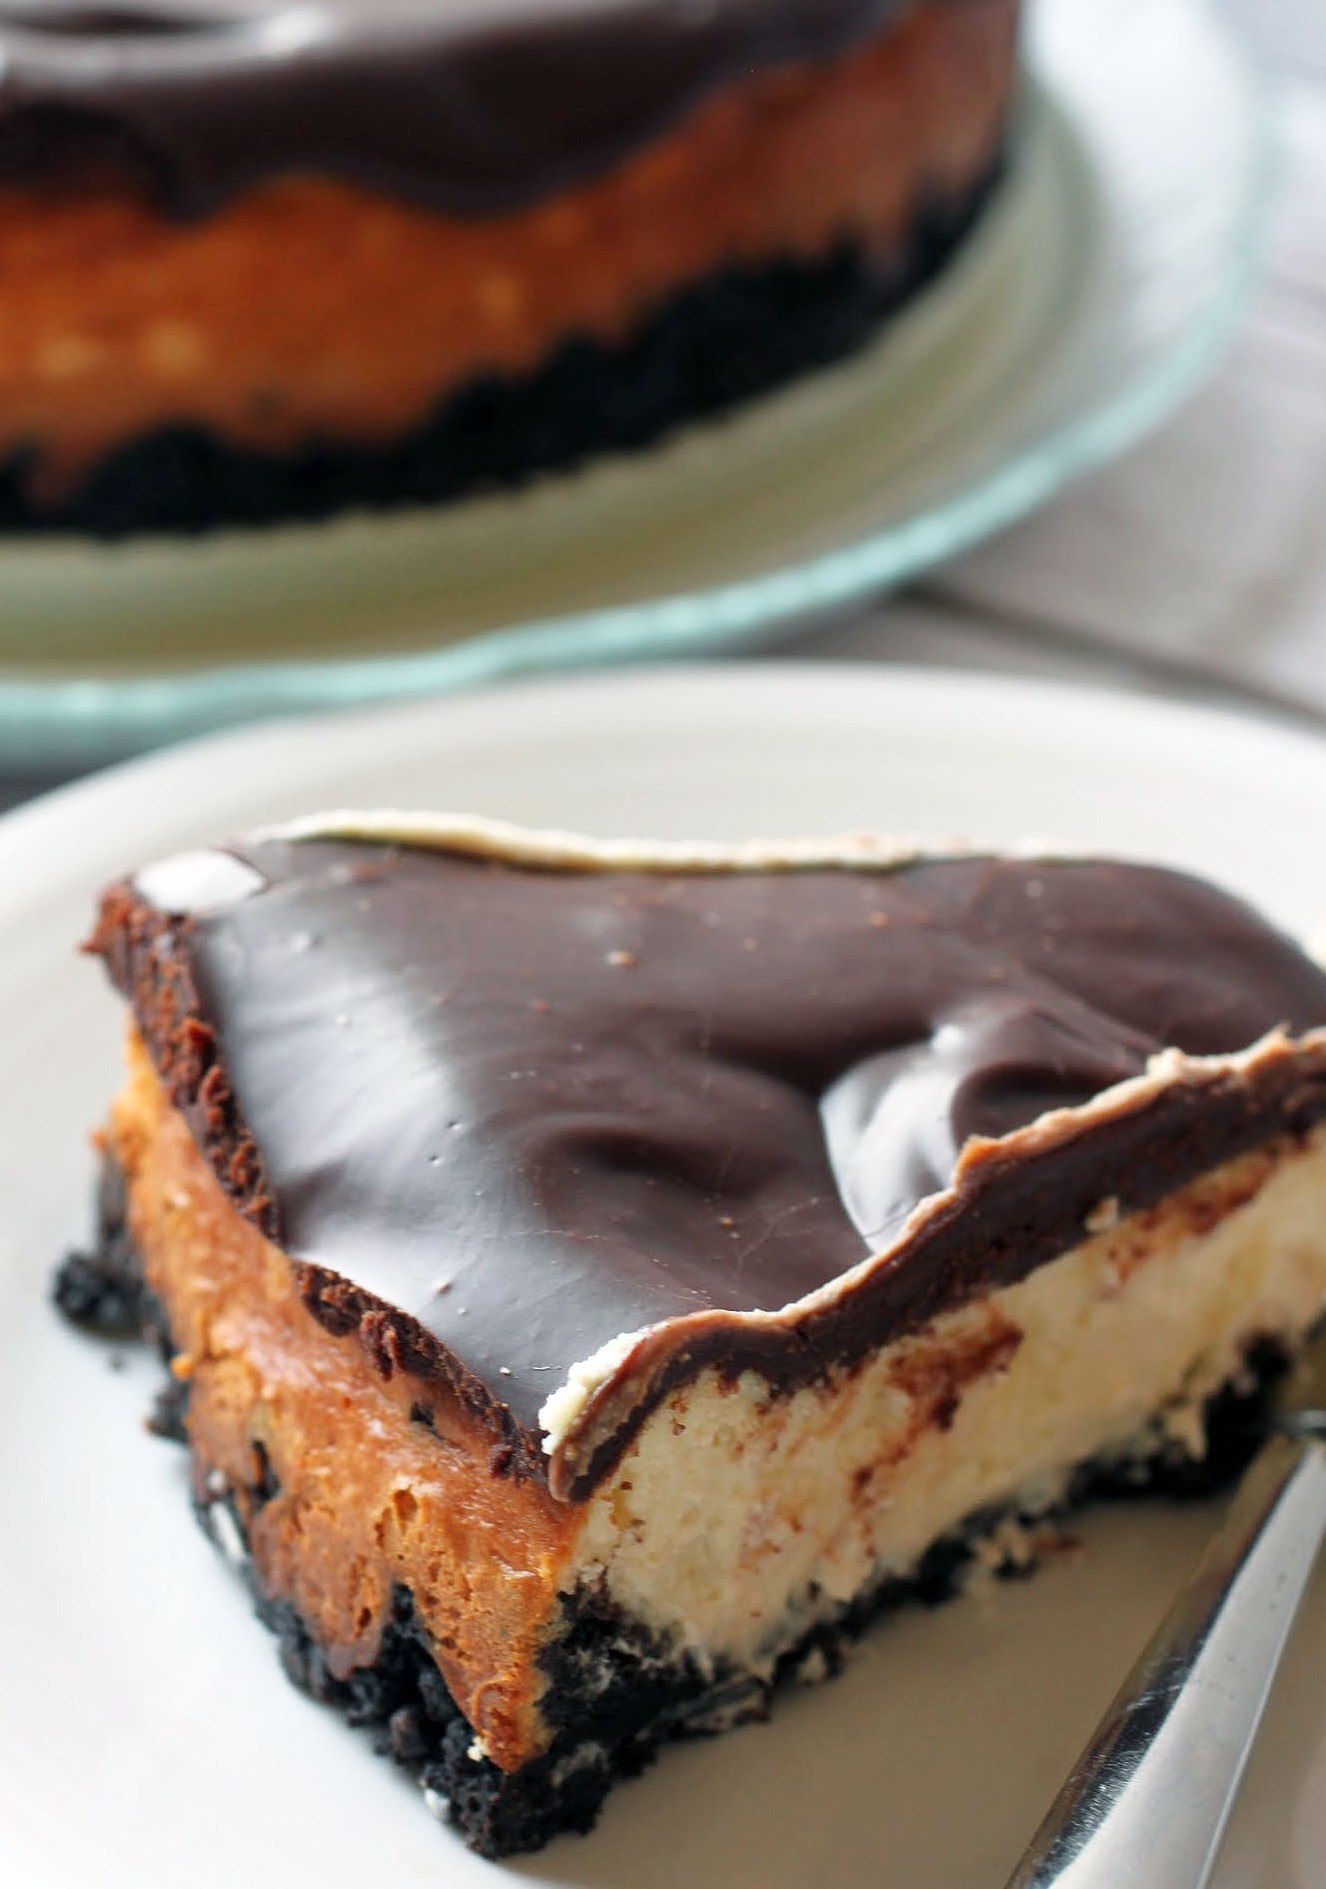
Neither, apparently, does closed captioning. I’m one of those weird people who likes to read my TV, so I always have the closed captioning turned on. In the movie Chocolat (one of my all-time favorites, by the way), one of the characters tells another to prepare the ganache. Instead of that word, closed captioning came up with “knish,” which is a pastry similar to an empanada. And as I type this, the word “ganache” keeps getting underlined in red, while the “knish” remains untouched by spell check. Go figure.
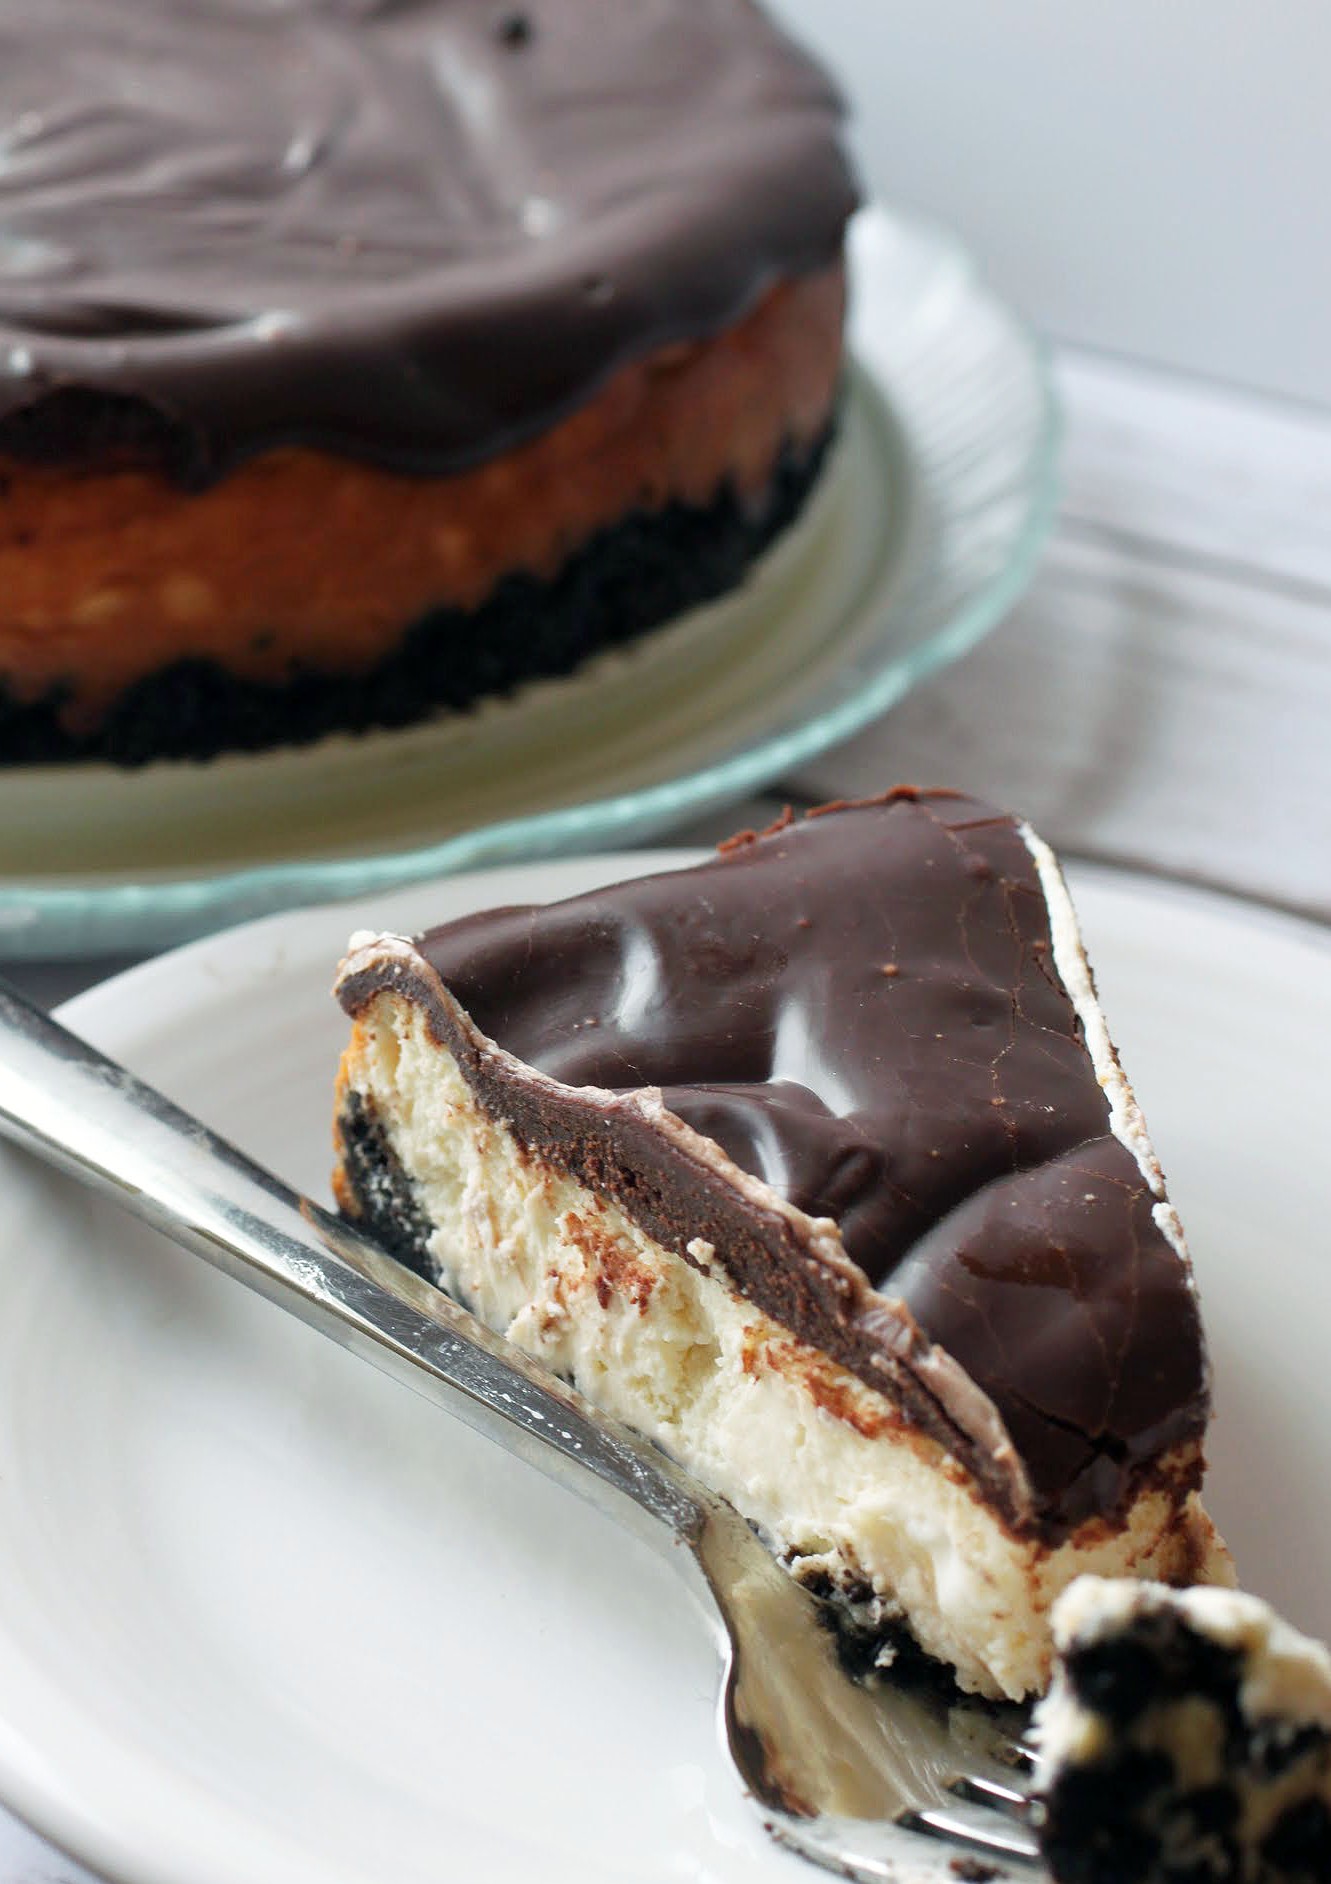
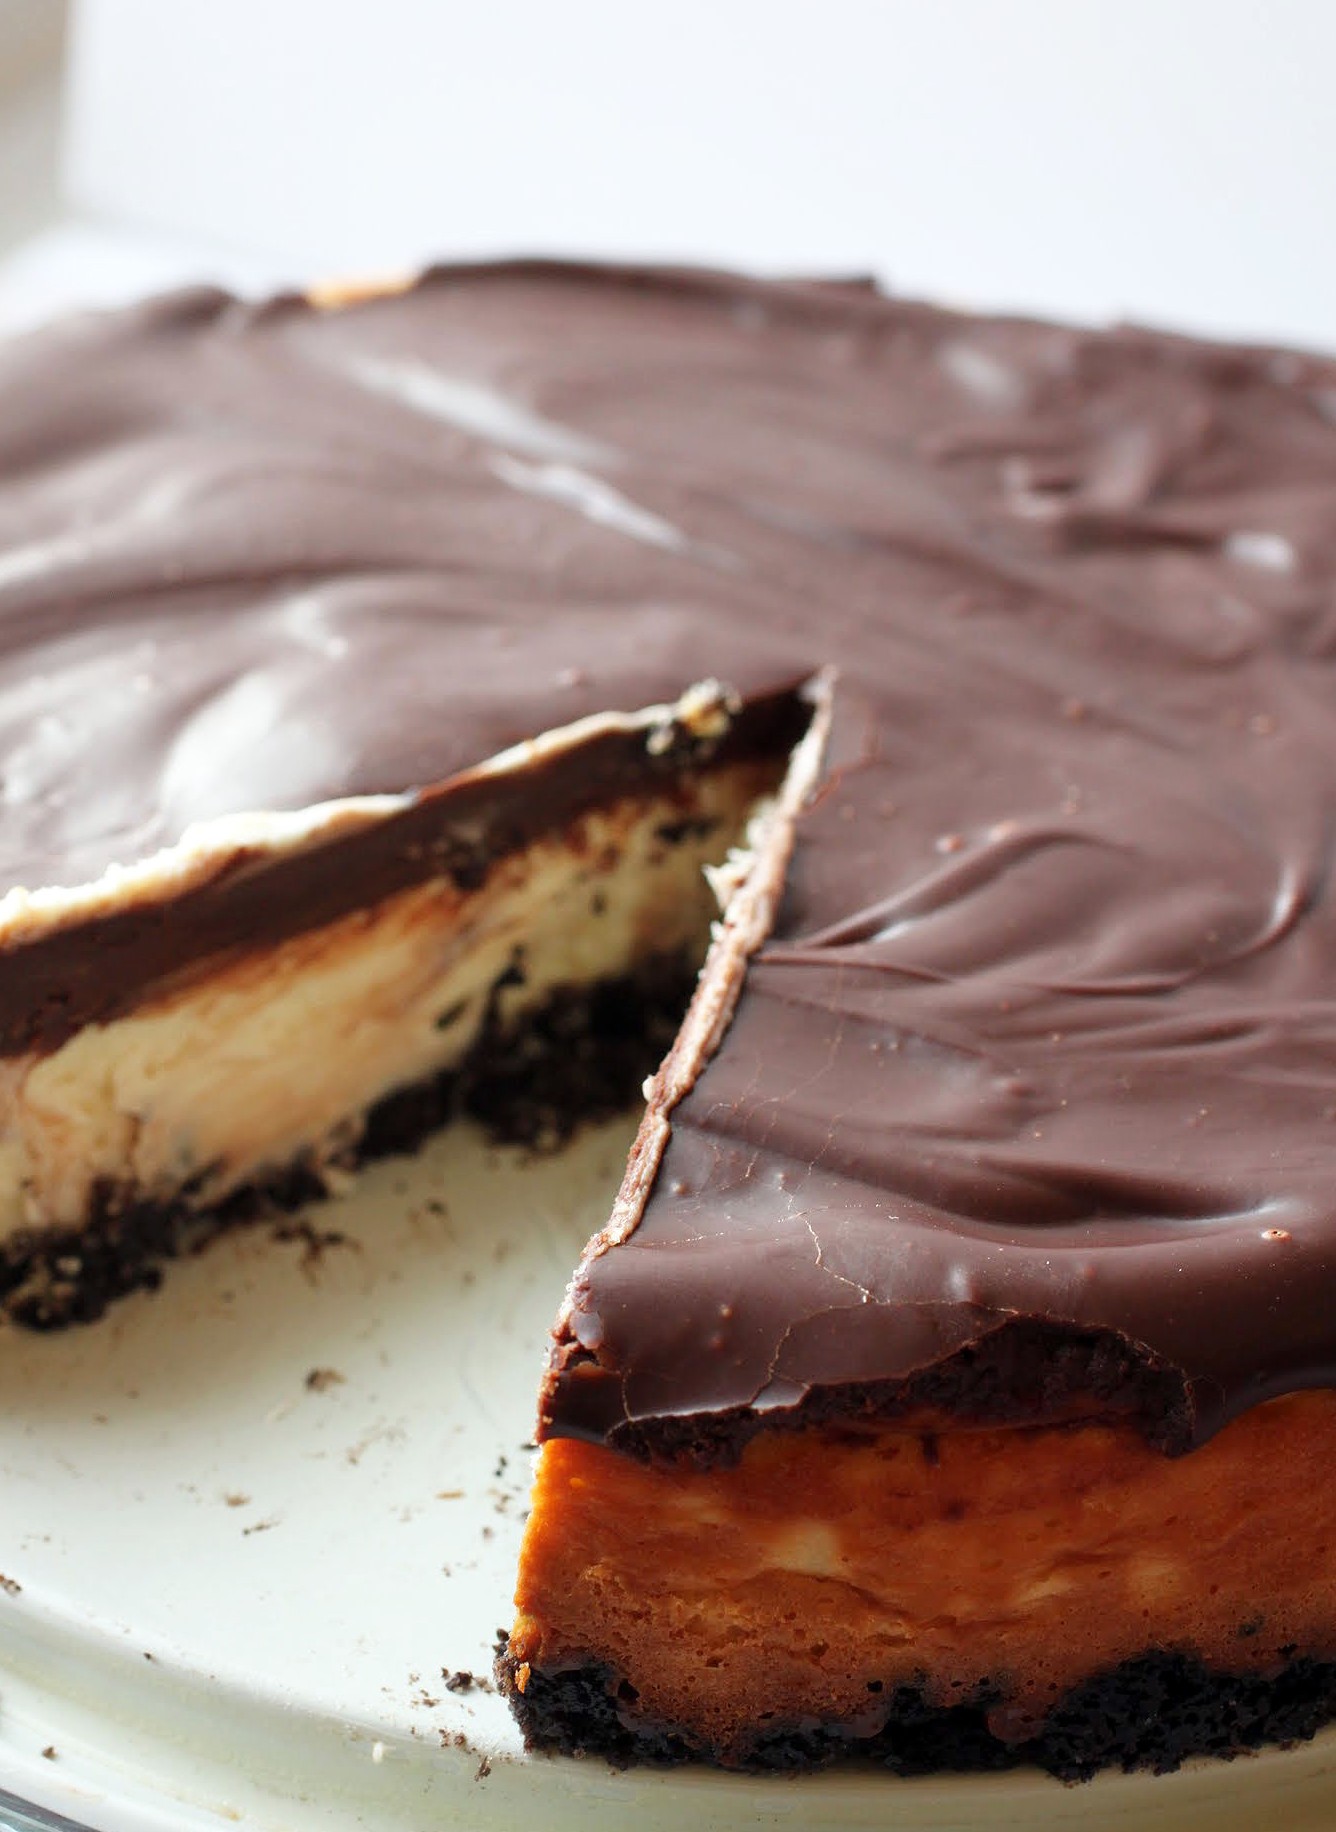
At least spell check knows what cheesecake is, and boy, is this ever a good one. It’s got an Oreo crust and a thick layer of ganache on top, and it’s perfect for Valentine’s Day. Or just, you know, for a Monday. You decide!
I’ve been thinking a lot about mothers this weekend. A few days ago, my favorite advice column (Ask Caroyln, she rocks!) ran a letter from a woman whose mother died when she was young, and she wanted to know how anyone goes about dealing with the fact that a mother will never be there to answer some of life’s basic questions about, well, anything.
Carolyn basically said that there is no dealing with it: you just have to soldier on and do your best and live with the loss. That answer really made me wonder about what my life would be like if I hadn’t been able to run some serious questions by my own mother, whom I talk to nearly every day. We live near one another, and she knows almost as much about my life as I do. What if I didn’t have that?
A few years ago, I was in my office talking to a colleague who was complaining about her mother. All of a sudden, another teacher walked by and said, “My mother has been dead for 15 years. I would give anything to have one more conversation with her.”
At the time, I was too startled to do much but watch my colleague apologize and awkwardly get up and go about her day. I thought about it a lot afterward, though, and I remember thinking a few things. I didn’t think that embarrassing someone who was doing what most people do was necessary, but I also felt for the woman who would give anything to be able to complain about her own mother with such a cavalier attitude.
I have no conclusions here, but I do stop from time to time and think about how good it is that I can call my mother when I want to to tell her things, and how life would feel without that. While we should all ideally spend every moment of our interactions with loved ones being grateful, it’s not a realistic expectation. Still, as long as we remember how lucky we are, that’s the most important thing.
As long as we’re busy being grateful, can we take a moment for cheesecake? Great. Thanks!
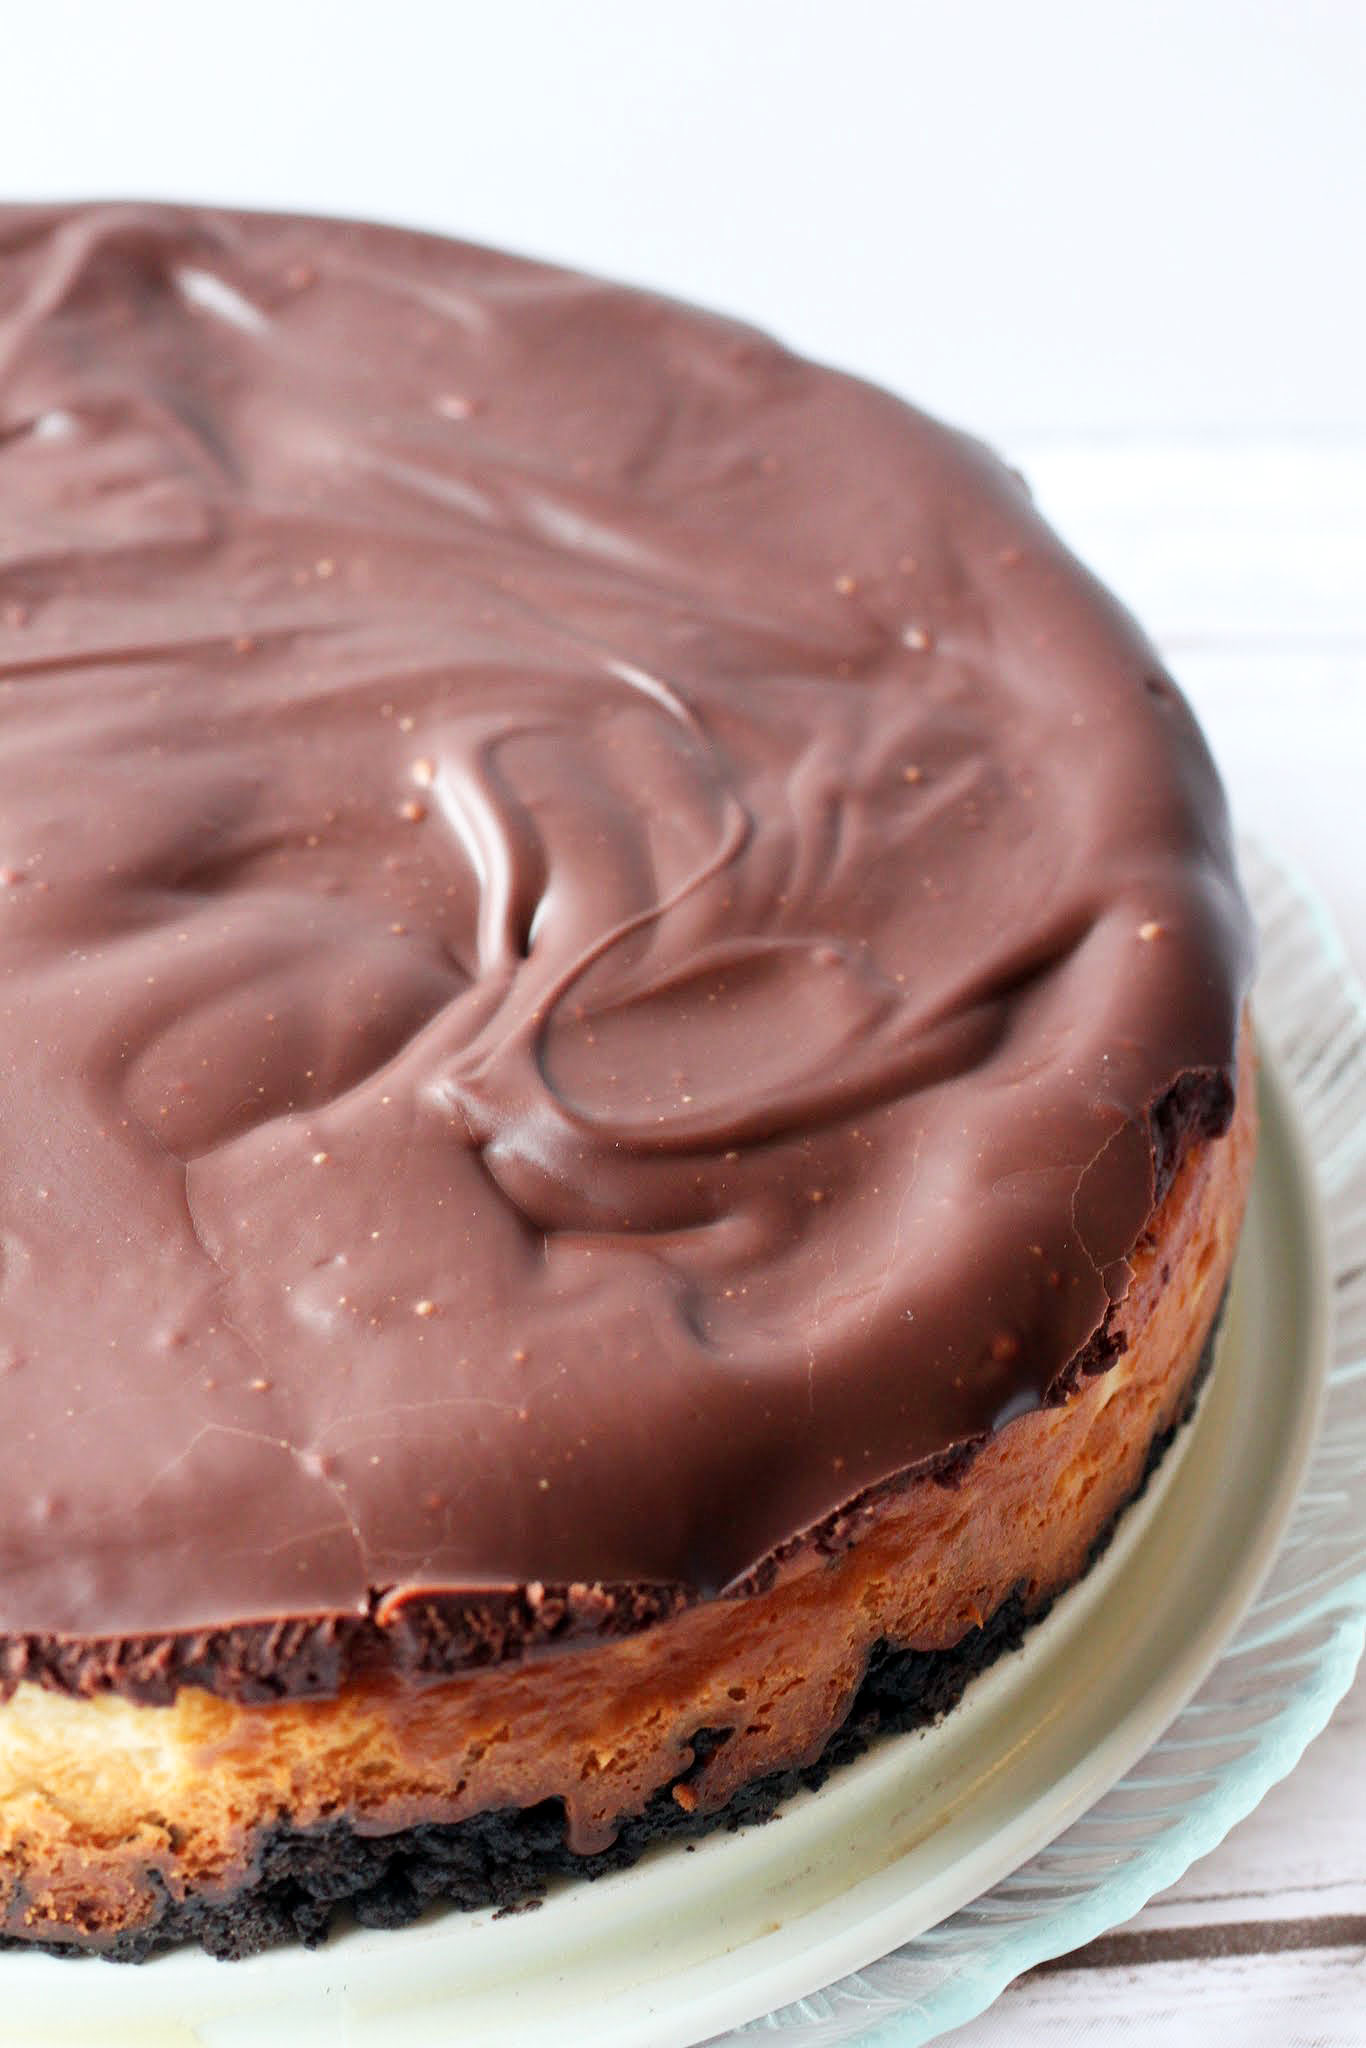
This one is already in my all-time favorites category. It’s that irresistible layer of ganache on top coupled with the Oreo crust. There’s nothing on this cheesecake that I have a hope of resisting.
While people like to think that cheesecake baking is tough, it’s actually pretty simple. Even this one. The ganache comes together very quickly, too, and has the added benefit of covering any potential cracks on the cheesecake’s surface.
Let’s spend time being grateful, when we remember it. Everything is fleeting, from that slice of cheesecake on your plate to the people who surround us with love. Savor everything!
Ingredients
Instructions
- Preheat the oven to 350. Coat a 9-inch springform pan with cooking spray. Set aside.
- In a medium bowl, combine the crushed Oreos and melted butter until the crumbs are moistened. Press the crumb mixture into the prepared pan, pressing firmly into the bottom and slightly up the sides.
- Bake the crust for 15 minutes,
- While the crust is baking, beat the cream cheese and sugar in the bowl of a stand mixer until creamy. Add the yogurt and vanilla and beat again. Finally, add the eggs and beat until just incorporated.
- Pour the filling into the crust and bake for 50 minutes. Do not open the oven door while baking.
- When the cheesecake is done, turn the oven off and crack the oven door. When the oven has cooled, remove the cheesecake and let it cool completely.
- Once the cheesecake is cooled, make the ganache. Heat the heavy cream and chocolate chips in the microwave for one minute. Stir until smooth.
- Pour the ganache over the cake. Do not remove the sides of the springform pan.
- Chill the cheesecake overnight.
- Cut into wedges. Store chilled.
There used to be something romantic about snowstorms too, but now that I’m watching Kenny dig us out from two-plus feet of snow while my children destroy the house, I’m not really that into it. I’d much rather have clean streets and be at work, thank you very much.
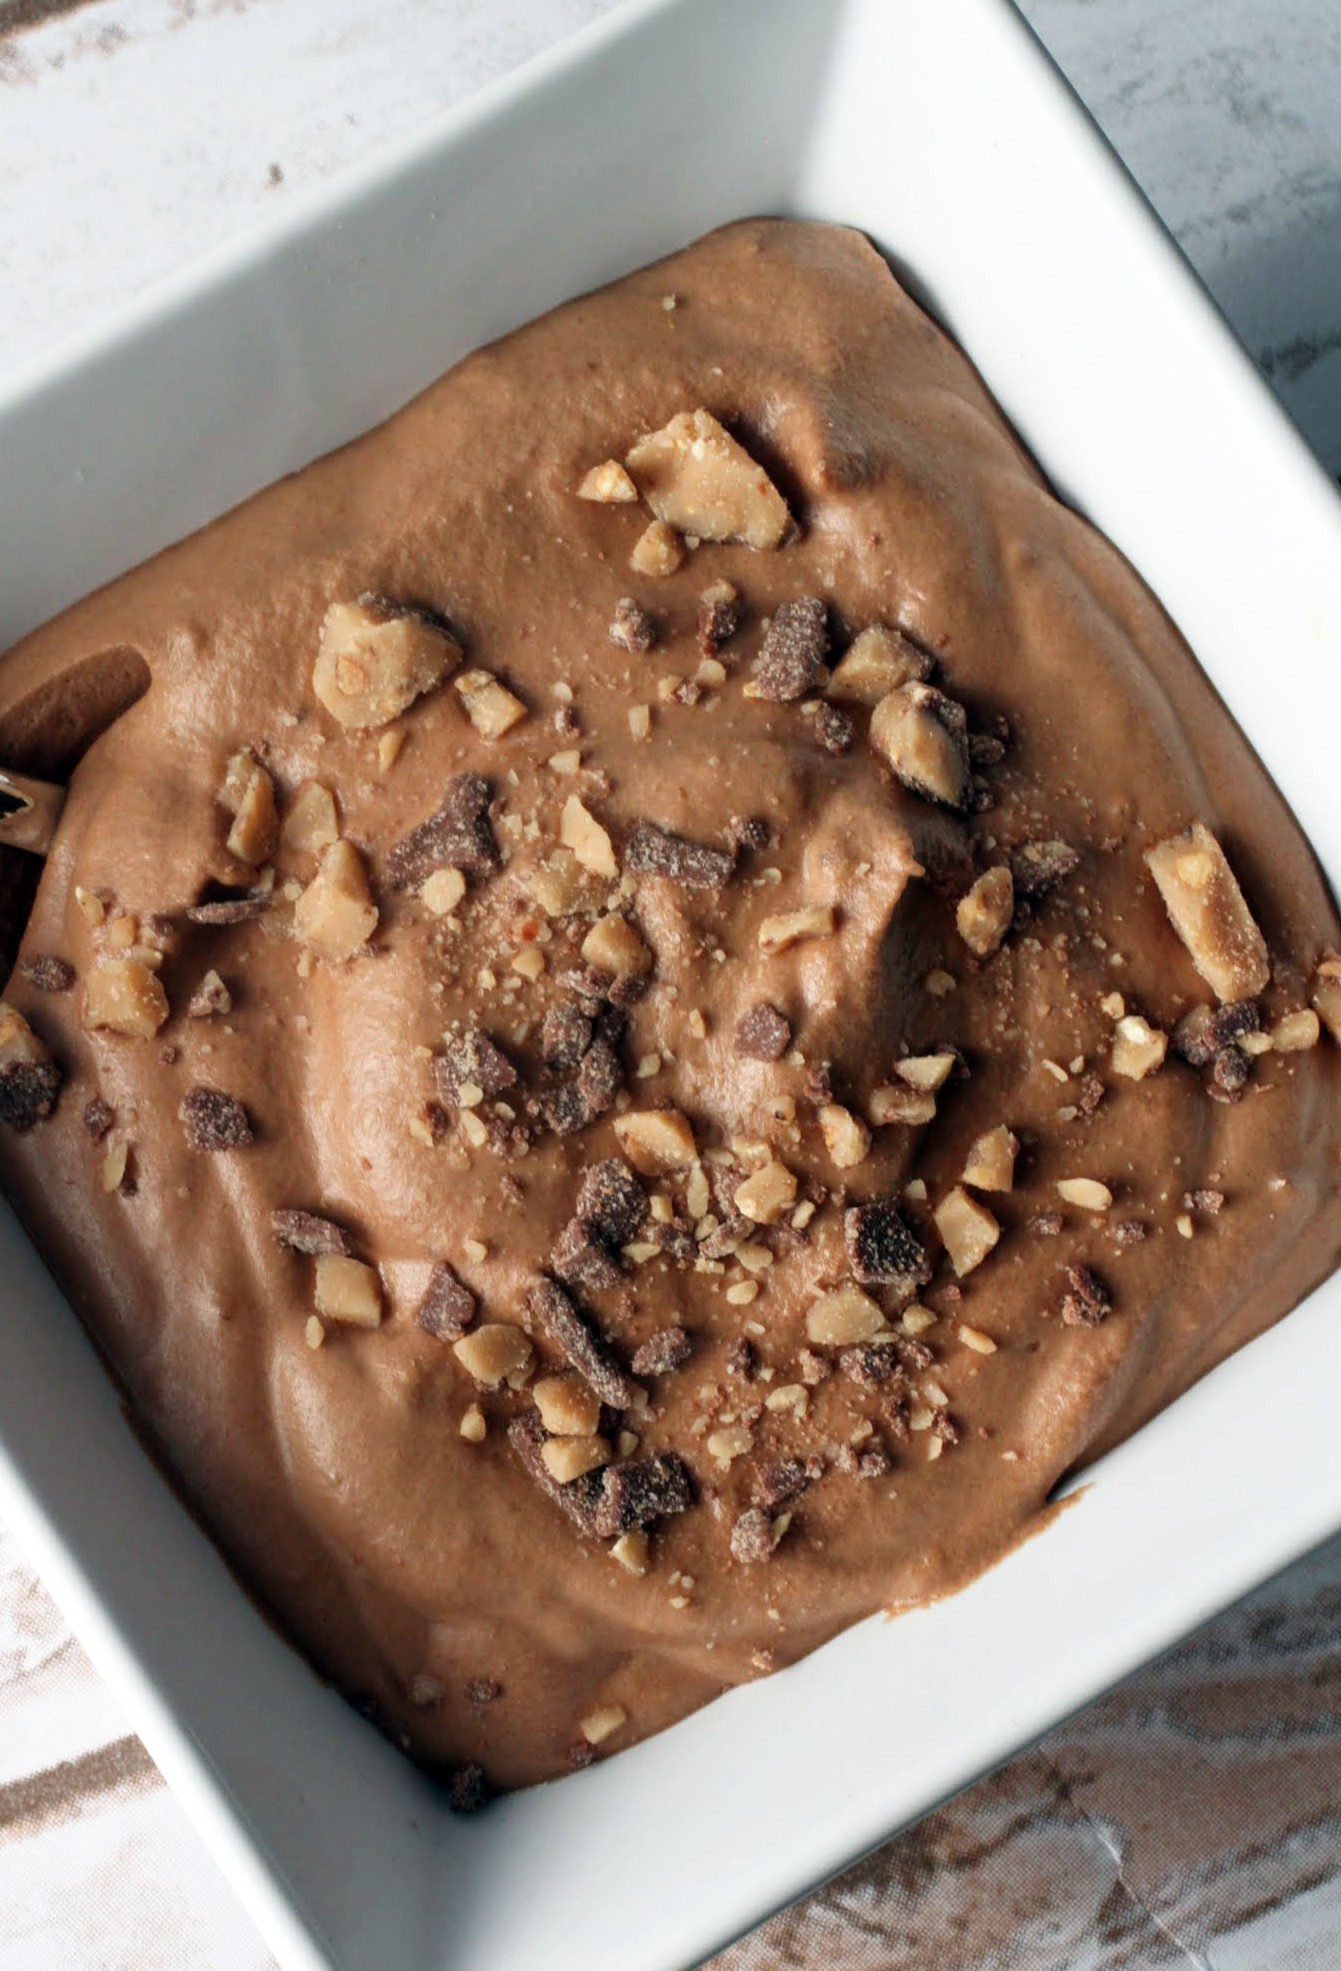
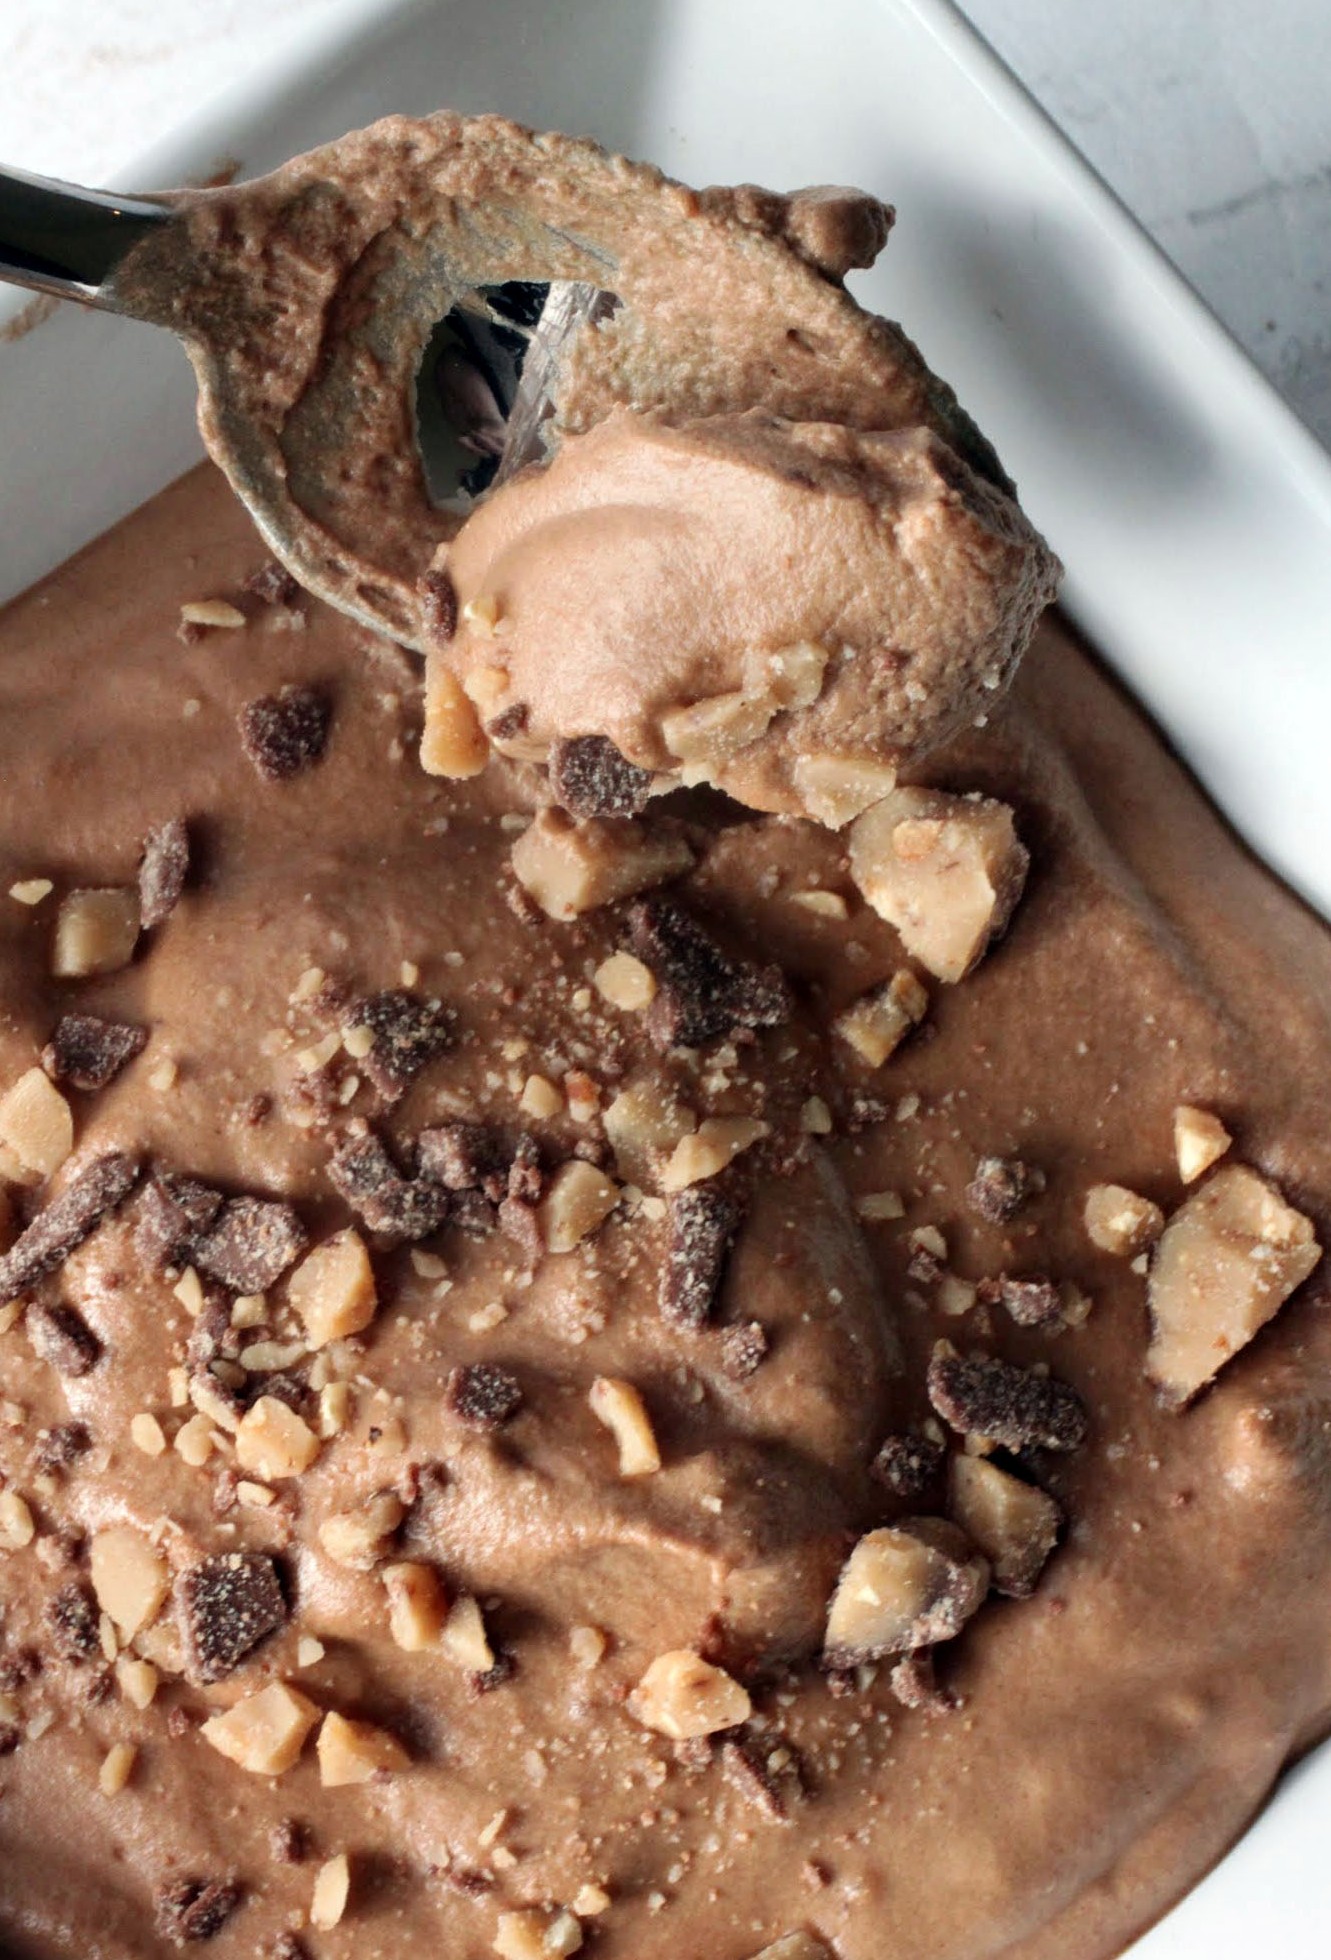
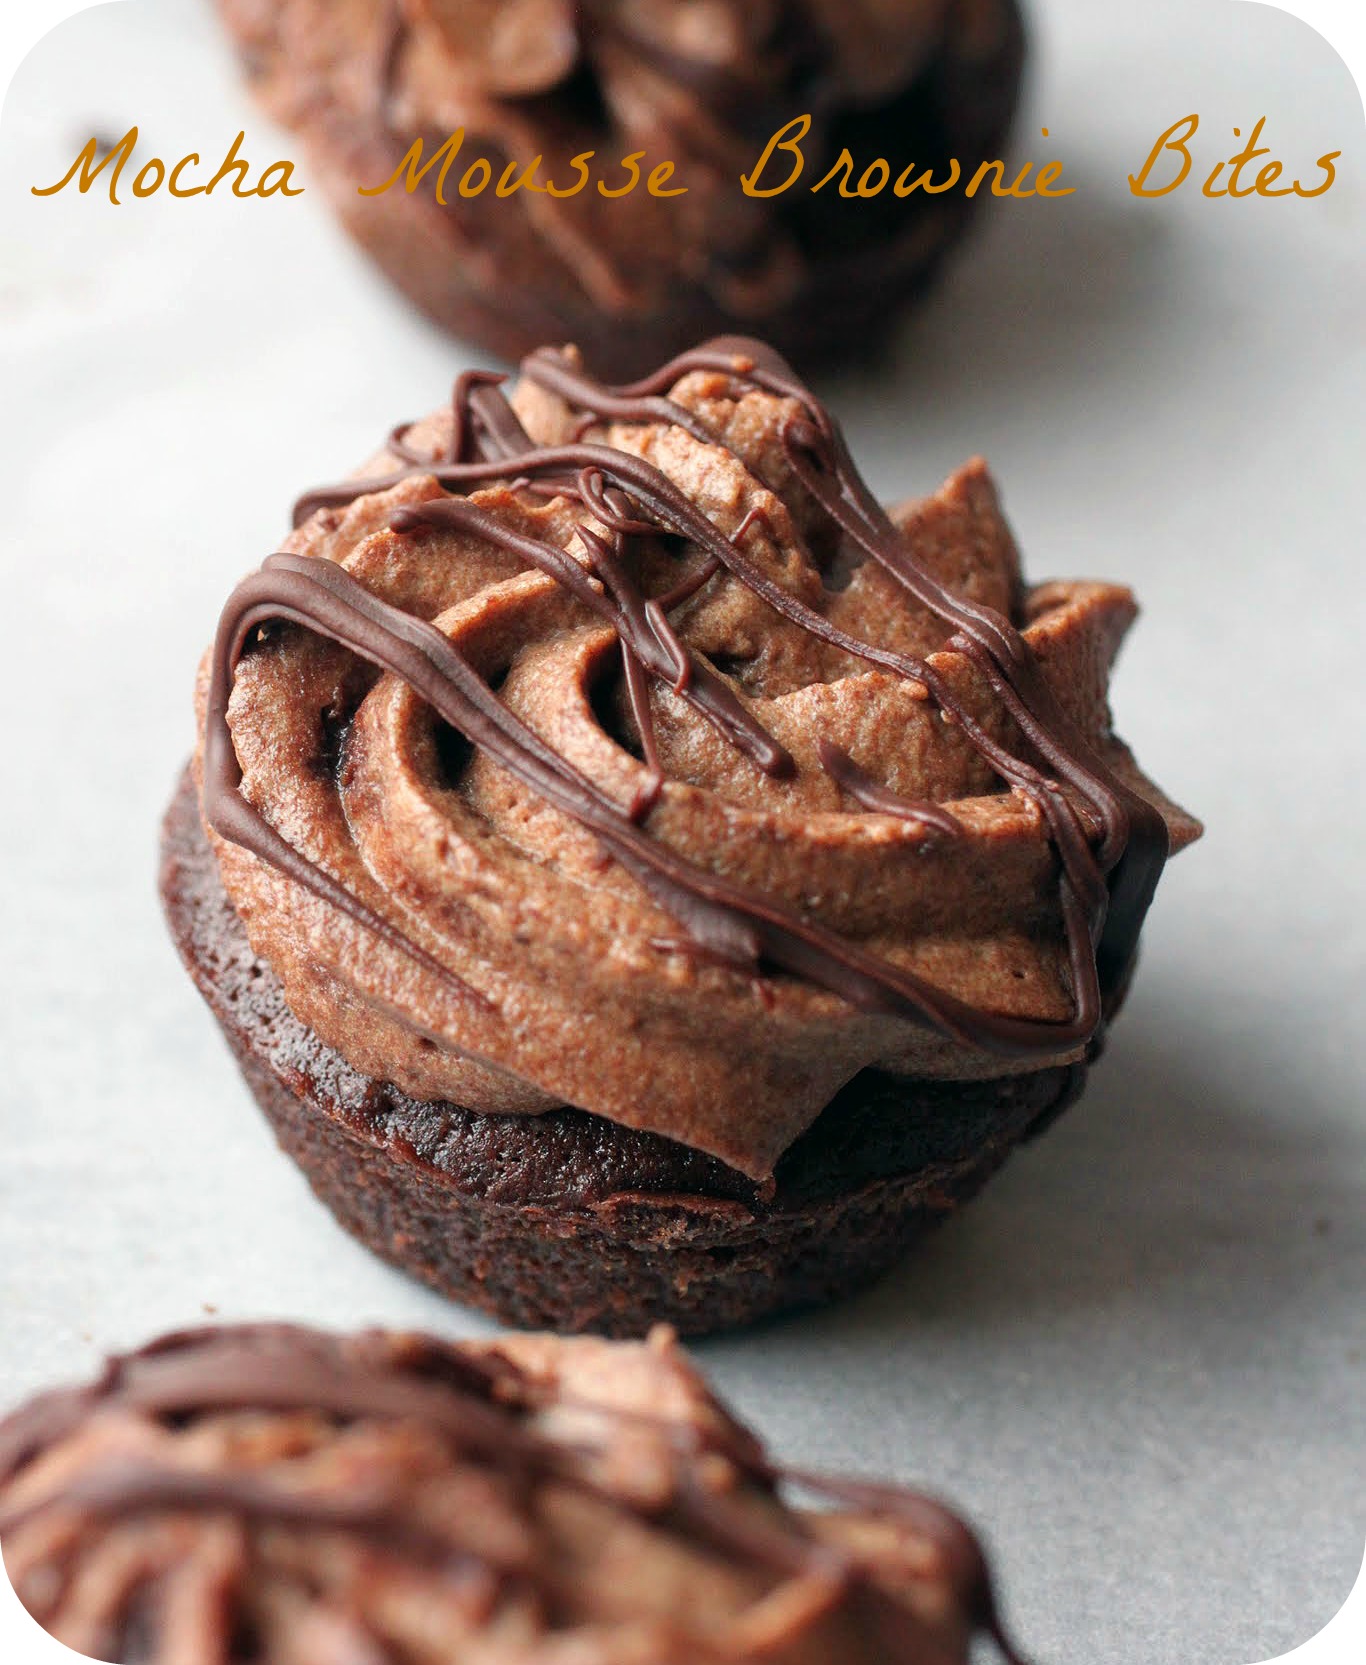
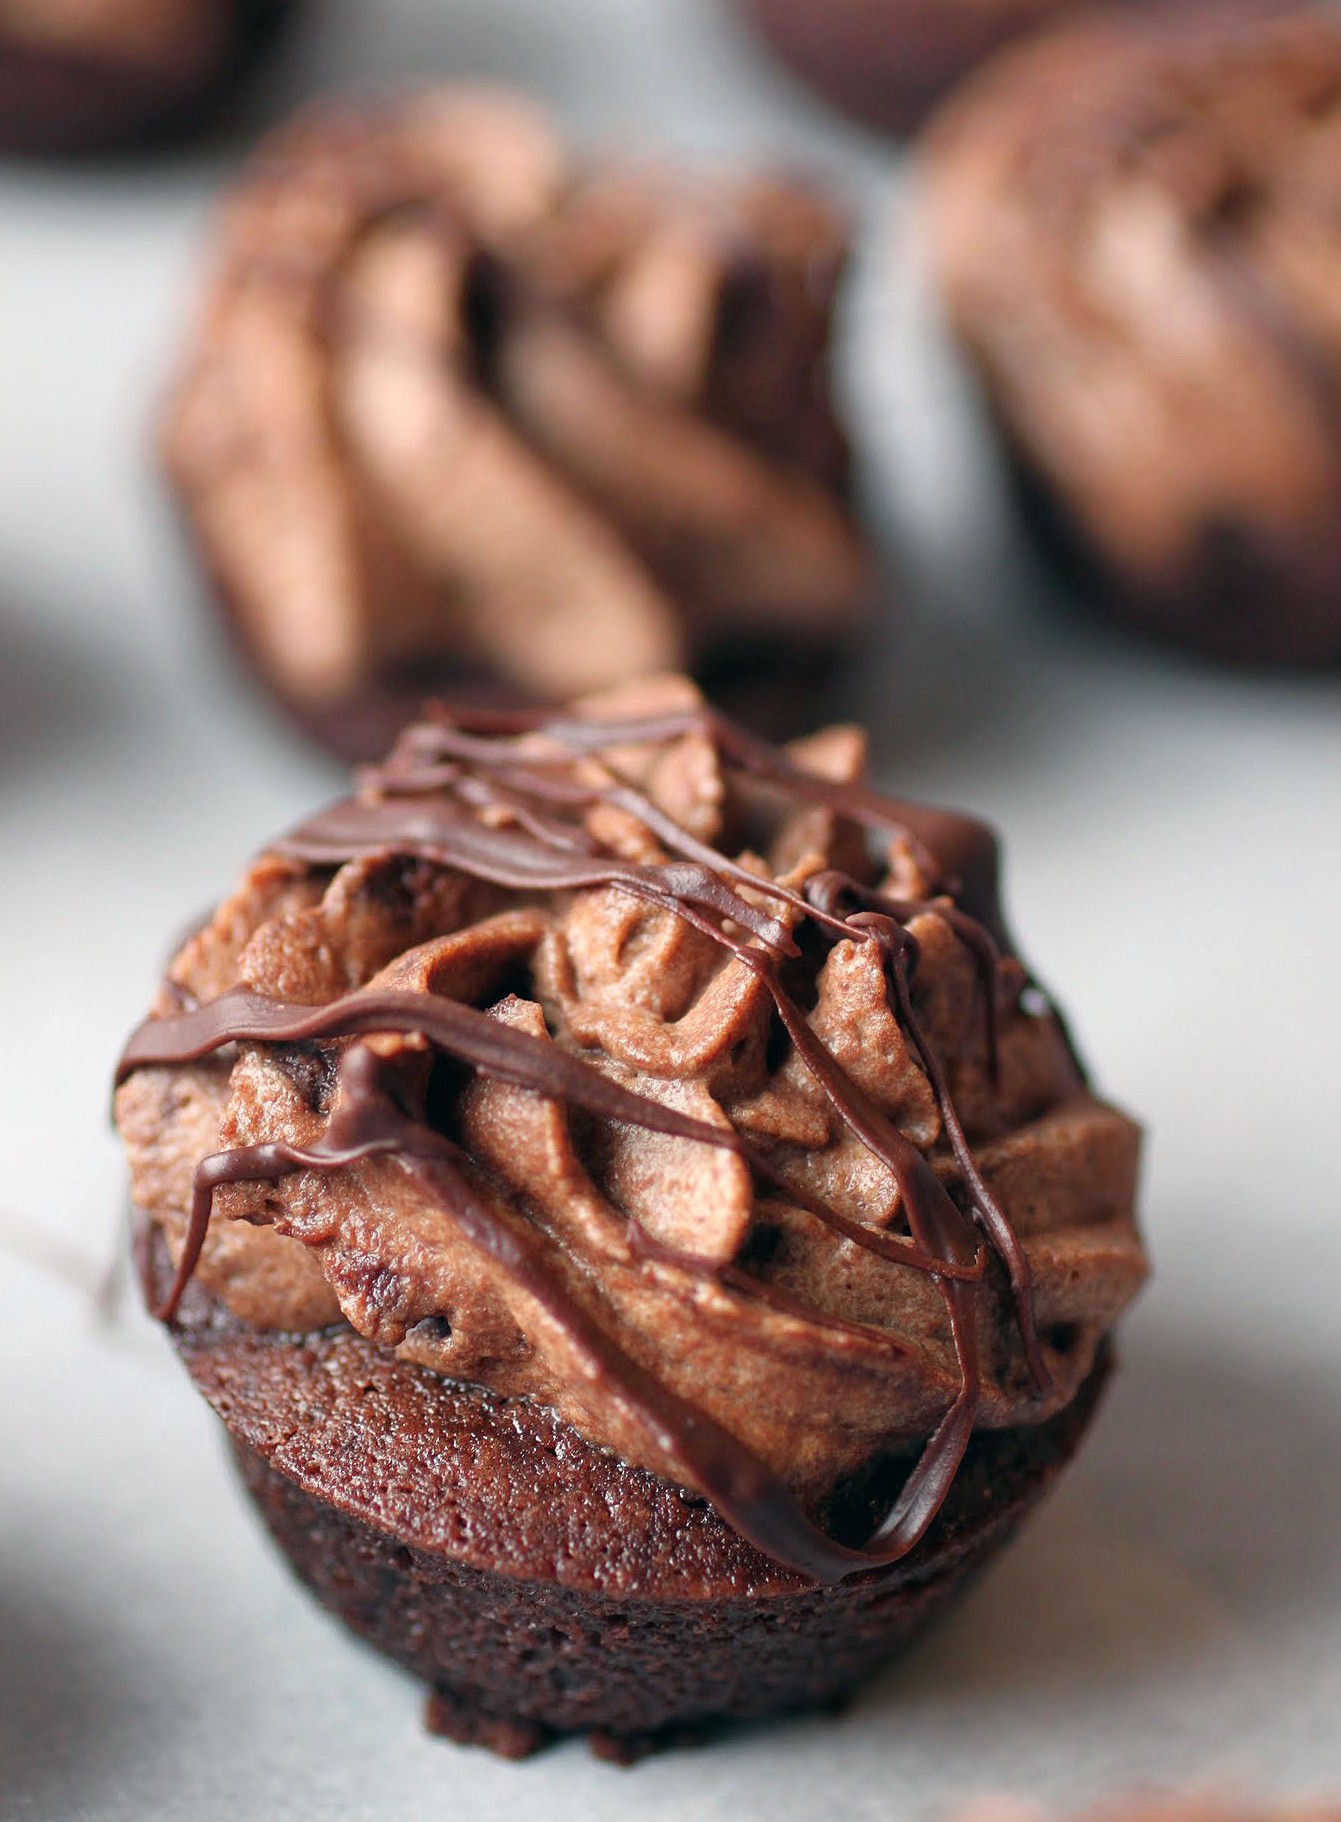
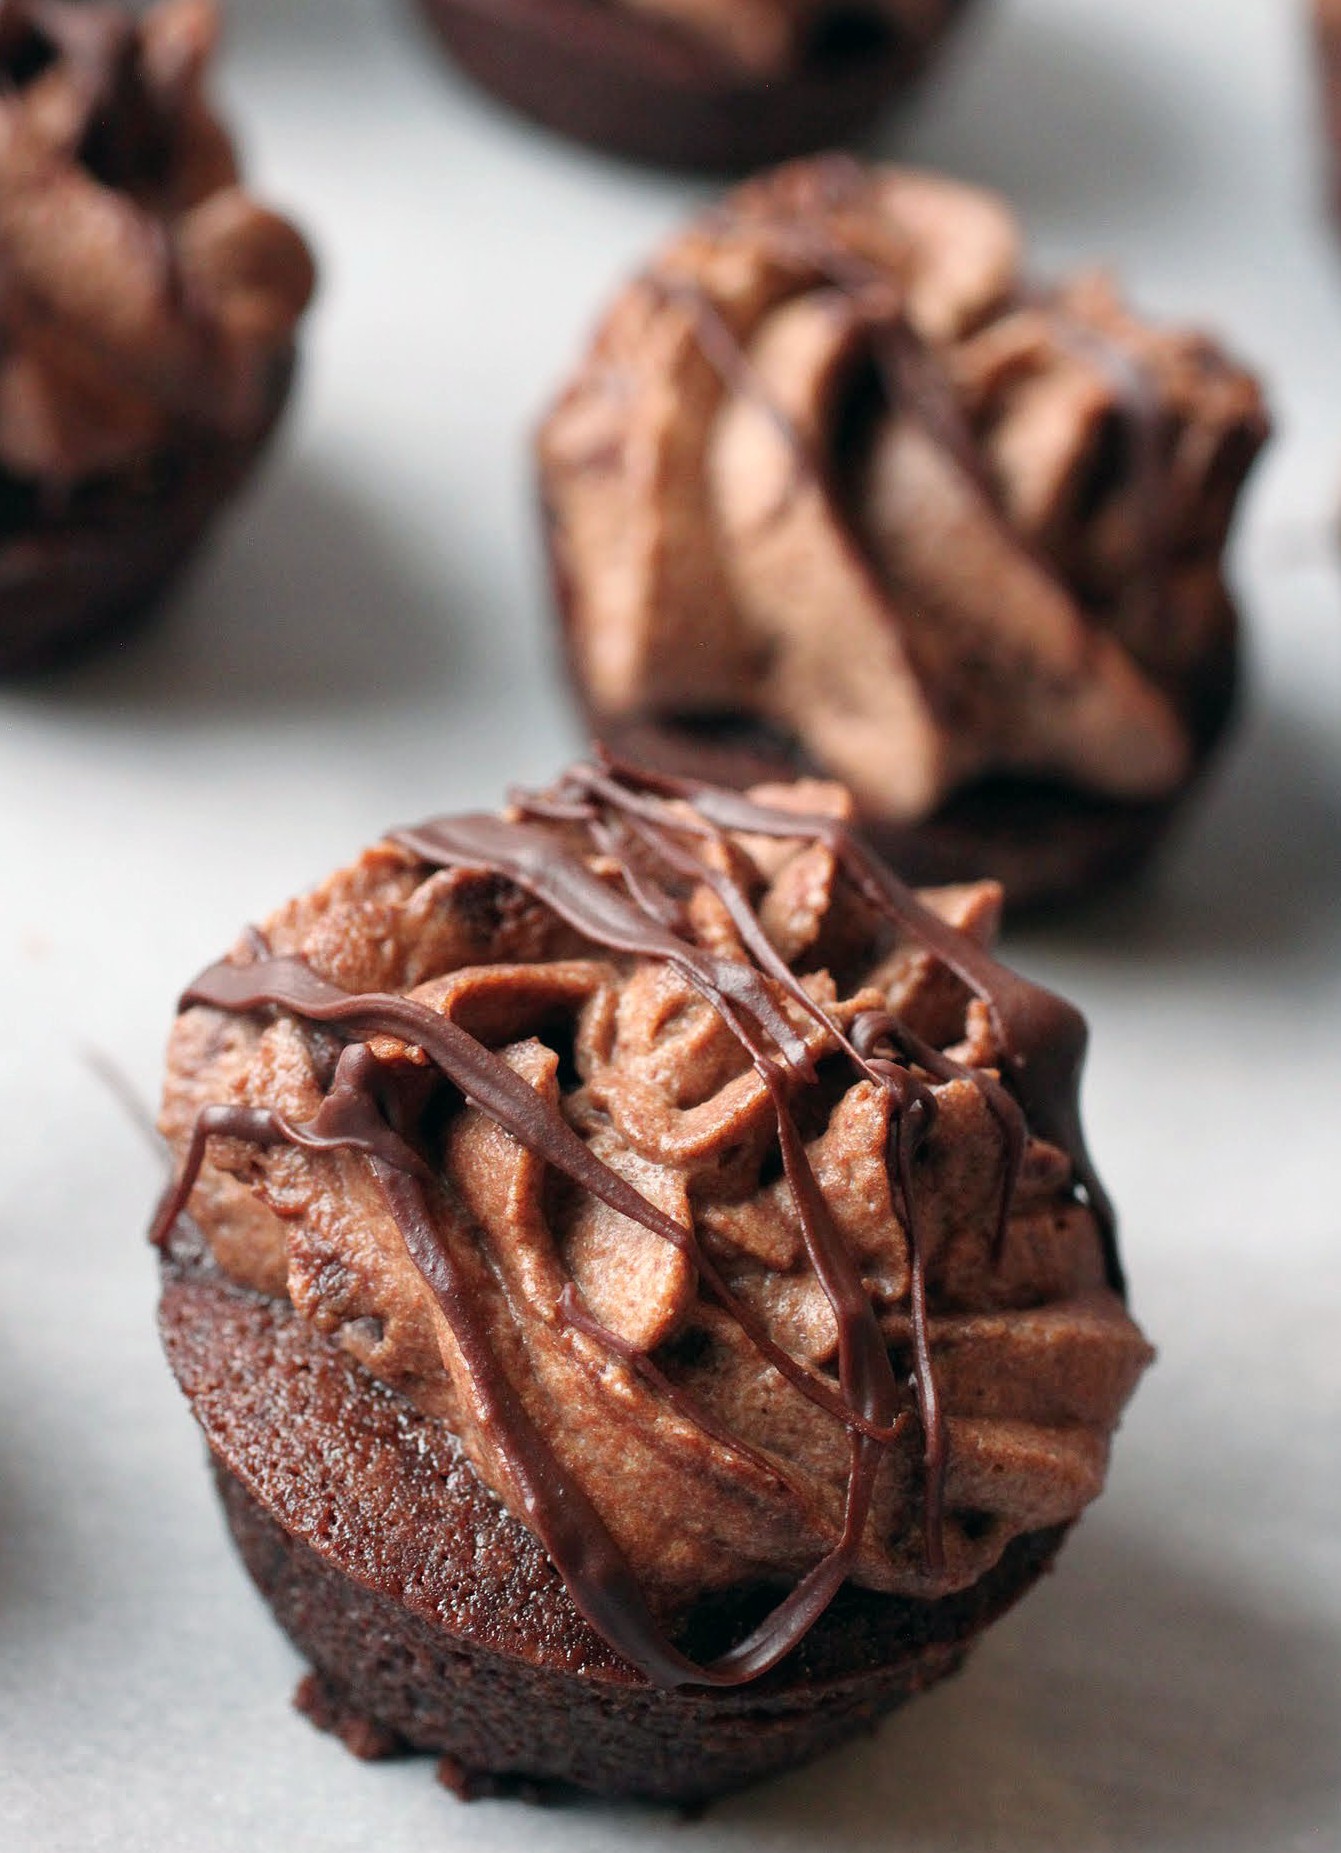
The good news is, I’ve got these mocha mousse brownie bites to keep me company as the snow refuses to melt and the winds die down. These are pretty much my idea of a perfect Valentine’s dessert. These rich, fudgy brownie bites are topped with a mocha mousse and drizzled with chocolate. If you think it’s rich, you’re right! That’s how I do.
In the D.C. area, people aren’t used to snow. When I first moved here, I was shocked at how a simple dusting could immobilize the entire region for hours, so you can imagine what this huge snowstorm (dubbed Snowzilla in these here parts) has done for the area.
It all began Friday night, and we have yet to see a single snowplow. Our cul de sac is still dusted with twentysomething inches of fresh powder, untouched by person or machine. I’d like to think we’ll be plowed out at some point, but I really have no clue when. In the meantime, the task falls upon me to keep the three little monsters happy. Lucky Kenny gets to go back to work tomorrow in our basement, since he teleworks.
So, any suggestions? I’m looking for snow day ideas that aren’t crazy messy or difficult. We’ll have our baking time, our yoga/fitness time, our movie time, our snow time. But what else can I do? Help me, please. PLEASE.
In exchange, I will bake you marvelousness if you ever come through DC. Really. It’s the least I can do for keeping everyone sane in the big bad storm aftermath.

These bites of decadence might be helping with that sanity a bit, too. When things get rough, I can hide in the closet with a stack of these and a thermos full of Riesling. That’s a pretty good coping strategy, in case you needed one.
If you’ve never made mousse using cream, it’s the easiest and safest way to go without resorting to Cool Whip. Instead of a mousse packed with raw egg, this requires whipping cream until stiff peaks form. Then the mocha gets mixed in (hellooooo, coffee and chocolate) and once the mousse is chilled, you can pipe it onto the brownie bites. It’s elegant as well as satisfying!
Stay tuned, because if they don’t plow us out by Wednesday’s post, I’ll either need more snow day ideas from you or some serious therapy. In the meantime, the digging begins as Valentine’s Day looms ever nearer. Stay warm, everyone!
Ingredients
Instructions
- Preheat the oven to 350. Coat a mini-muffin pan with cooking spray. Set aside.
- In a medium-sized bowl, mix the cocoa into the melted butter until it dissolves. Add the sugar and stir again. When the sugar is incorporated, mix in the vanilla and eggs. Add the salt and flour, mixing until just combined.
- Spoon the batter into the prepared pan, filling each cavity most of the way. Bake for 15-20 minutes until the brownie bites are set. Set aside and cool completely.
- While the brownie bites are baking and cooling, make the mocha mousse. Dissolve the instant coffee in the cold water.
- In a microwave-safe bowl, combine the coffee and the chocolate chips. Heat at 30-second intervals, stirring each time, until everything is melted and smooth. Set aside.
- In the bowl of a stand mixer, whip the heavy cream until stiff peaks form. Do not overdo it!
- Gently fold the chocolate mixture into the heavy cream until a uniform color (no streaks!) appears.
- Chill the mousse for one hour in the refrigerator.
- When the brownie bites are cool and the mousse is chilled, place the mousse into a piping bag with a large star tip. Pipe the mousse quickly into swirls over the brownie bites.
- For garnish, melt the chocolate chips in the microwave until smooth in 30-second intervals. Drizzle the melted chocolate over the piped mousse.
- Store the brownie bites chilled and covered loosely.
]]>
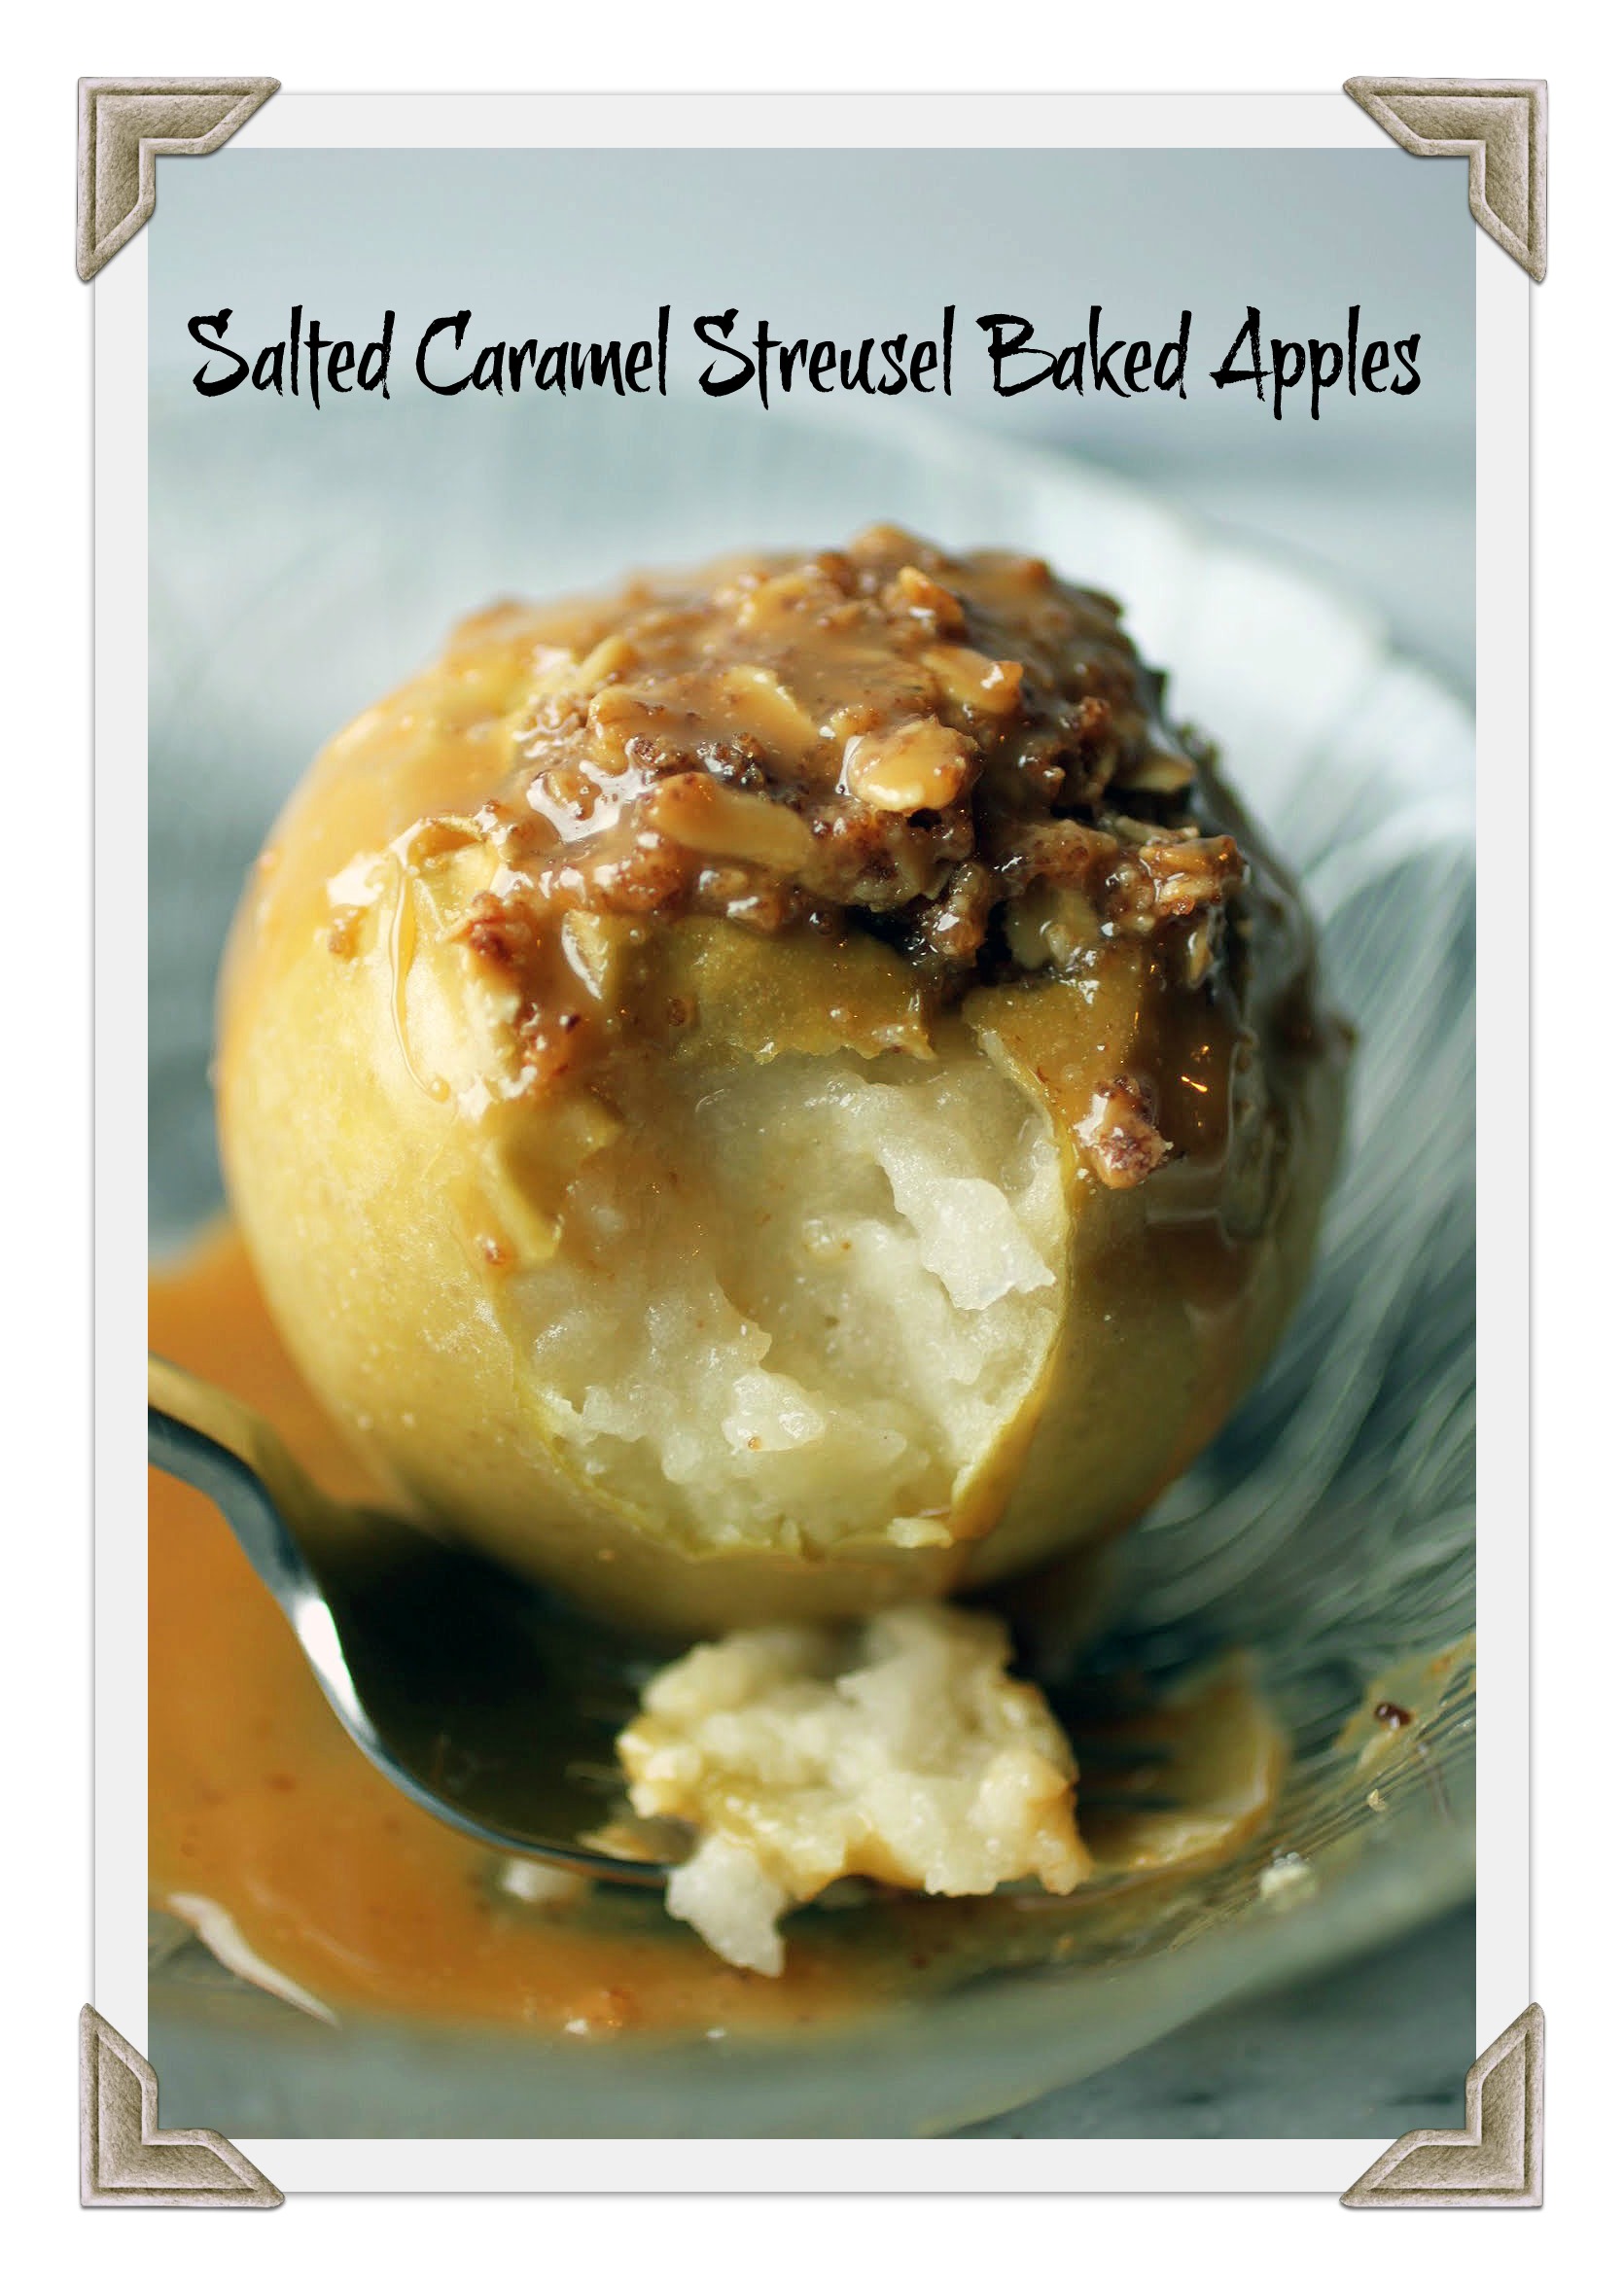
Baked apples are a classic American dessert, but I’ve upped the ante by coring them, filling them with a simple streusel, and drizzling (pouring, maybe?) salted caramel on top. And we can totally call this a healthy dessert because, you know, apple. Right? Hey, it’s fruit!
This is a fireside kind of dessert, the kind that you share with family members on game night or some equally idyllic situation. These are impossible not to love, unless you have no soul. I’m feeling very objective today.
This past weekend, Kenny and I had a night by the fire. It was a redo of our New Year’s Eve, the first of which crashed and burned at eight o’clock when our son’s stomach virus erupted everywhere. Yes, I’m being literal. Nobody wants a romantic dinner for two after cleaning that up.
It’s getting harder and harder to stay awake long enough to last through date night. Back in the day, I could guzzle drinks with the smug knowledge that I had nowhere to go and nothing to do in the morning. But when you have kids, that whole game changes suddenly and irrevocably.
Not only have I not owned an alarm clock since 2008, but I have also not awakened past 6:30. And that’s on the very best of days. There are too many children and even more viruses at play to count on a later wake-up time. As a result, my body is hardwired to wake up on weekends at 5:30. Any date nights need to take that little hitch into account.

Take last night, for example. Our youngest is ready for a real bed, but she really loves her crib. We’ve tried to move her out to no avail, and last night she seemed eager to move. So into her older sister’s room she went into a twin bed that swallowed her tiny body whole. Around 12:45, she freaked out because her sister went to the bathroom and she thought she would be alone forever. And at 2 A.M., she started screaming that she wanted to “go back to my room.” And back in her crib she went. I know, I know, I’m weak. But she was screeching the house down, and nobody was getting any sleep.

When Kenny is awakened by children (which happens less for him because he just doesn’t hear them), he can immediately fall back asleep. I, on the other hand, will lie awake in a state of pure tension waiting for someone to wake up again, unable to stop my mind from racing. I wish that I could make my brain stop, but it’s just not possible. So nights like that mean no sleep for Mir. And that means I don’t drink on date night, and I sure don’t stay up past 10. It’s a shame, but what are you gonna do?

Eat a healthier-than-usual dessert, that’s what. The hardest part of this recipe is coring the apples, so I’d recommend having a corer or melon baller around if you’re not handy with a knife. But once you’ve done that, the rest is easy.
The oat-based streusel in each apple takes seconds to prepare, and you drizzle prepared salted caramel topping over the baked apple. It’s such a cozy dessert. I think it’s kind of required to eat this while wrapped in a fuzzy blanket while wearing equally fuzzy slippers.
If you’re about getting healthy this season, this dessert is the one. It’s healthy with just a splash of decadence, making it a perfect choice. Whether you have an early wake-up call or a chance to sleep in late, this will make your evening worthwhile!
Ingredients
Instructions
- Preheat the oven to 425.
- In a bowl, combine the melted butter with the flour, brown sugar and rolled oats. Use your hands to form crumbs.
- Press the crumbs into each cored apple, making sure the crumbs get piled down to the bottom.
- Place all of the filled apples in a 9-inch round baking pan.
- In a small bowl, combine the apple juice, honey and cinnamon. Pour the mixture into the bottom of the pan.
- Bake the apples for 25-30 minutes until tender. Don't bake them too long, or they'll begin to fall apart.
- Spoon the salted caramel sauce over the apples. Serve warm.
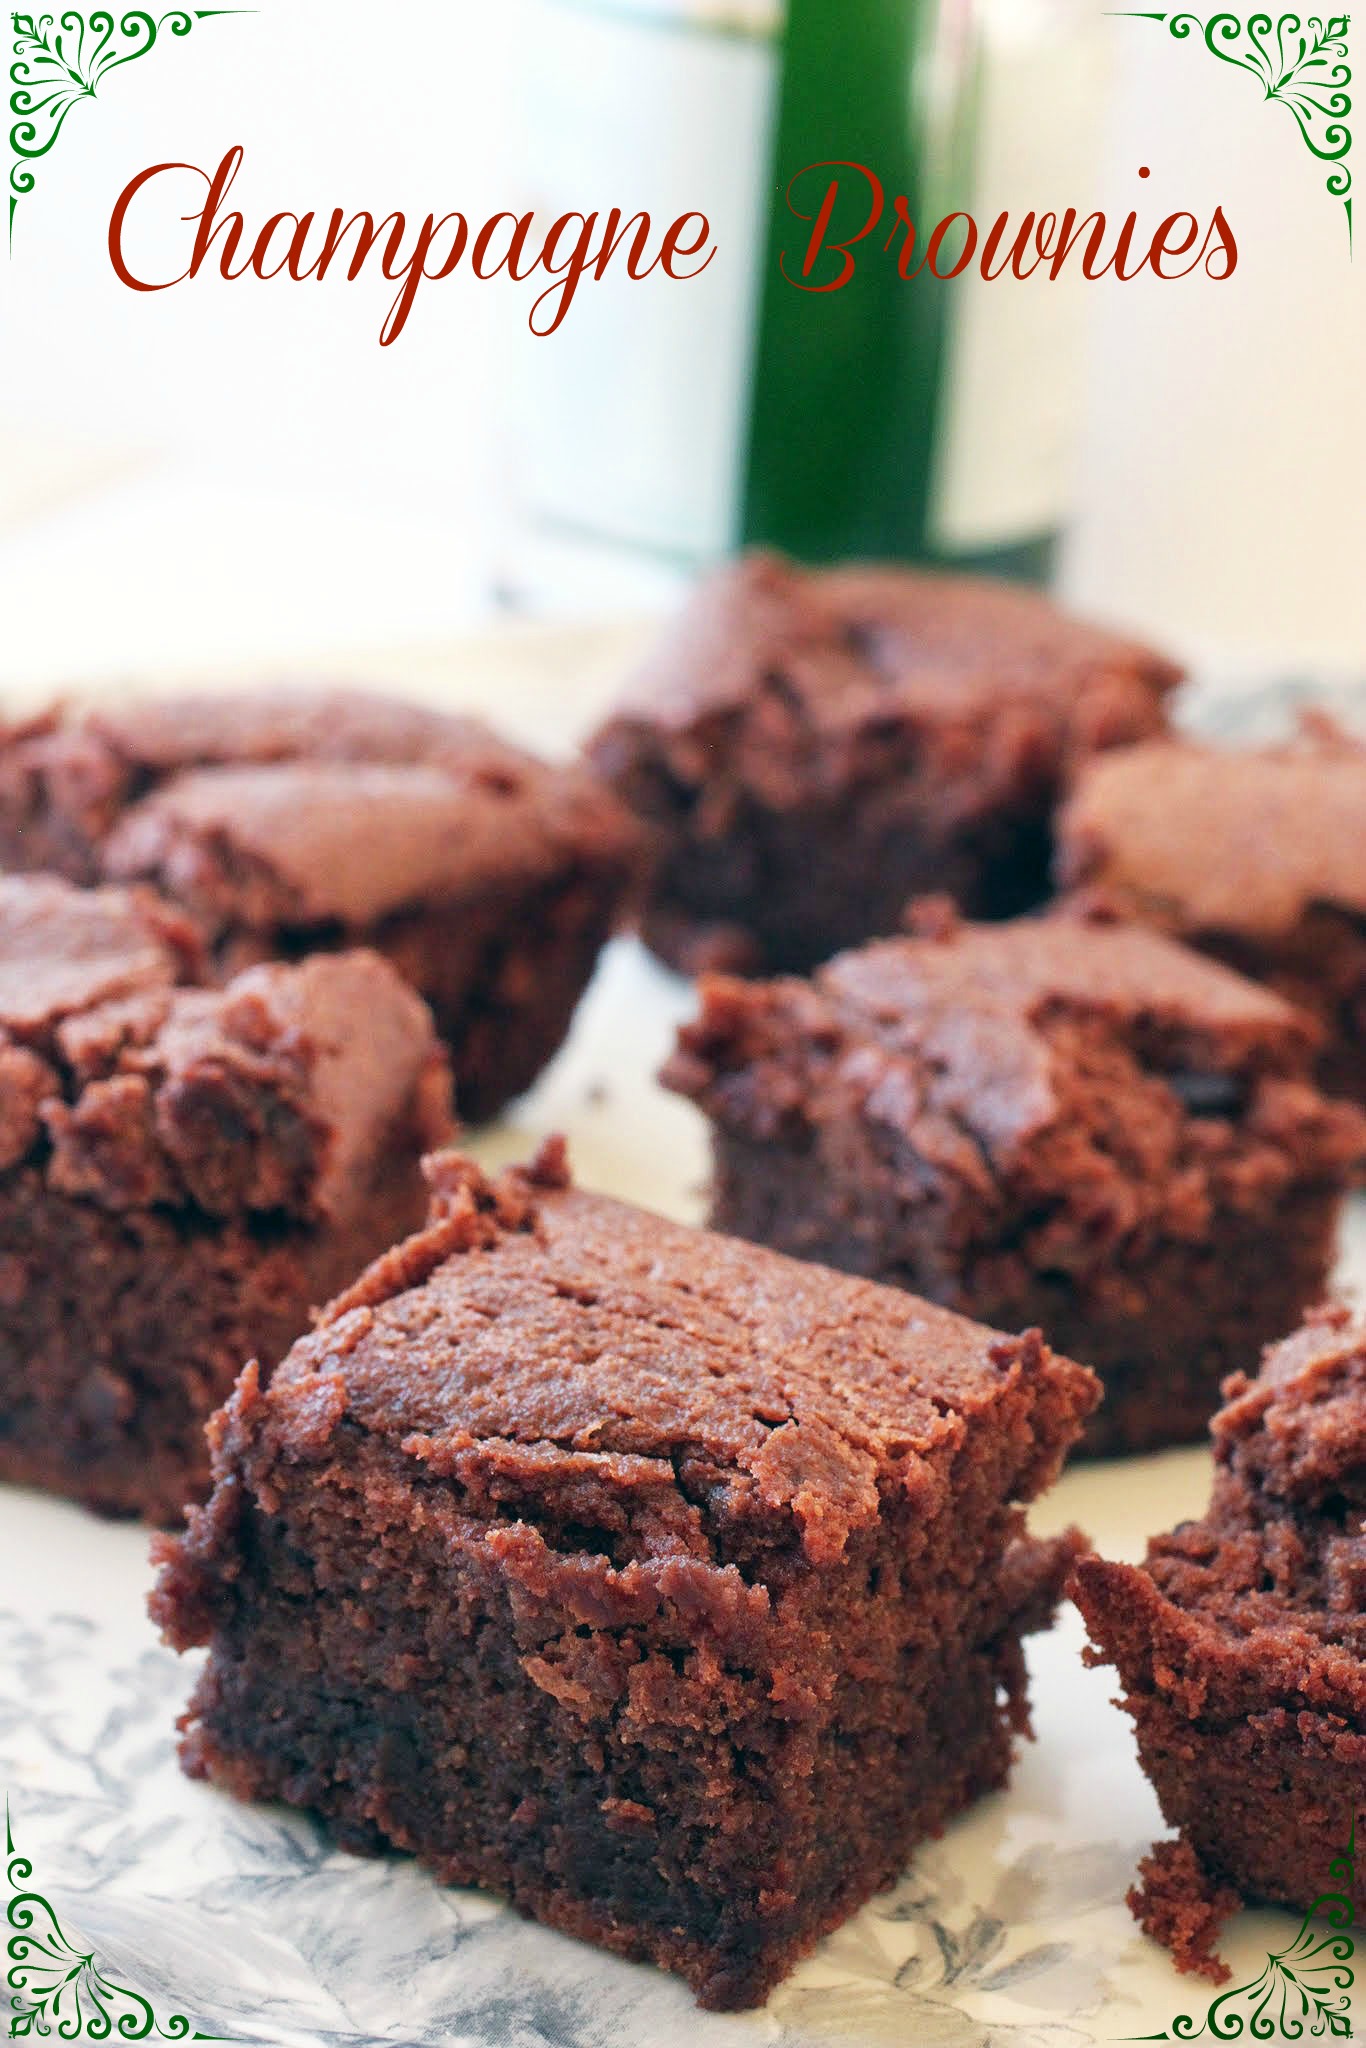
Bubbly is pretty popular this time of year, but as I explain in my newest video below, I also like to eat my champagne. Why not get really festive with one of the coolest brownie recipes ever?
These are full of champagne and chocolate, and the bubbly is what makes them stand so tall. I never cease to love how carbonated beverages aerate baked goods, making for even more fun and games!
With New Year’s approaching, these brownies will definitely be on the menu. It’s typically a very quiet night. Kenny and I put the kids to bed, make fondue (both cheese and chocolate), and drink champagne while we eat and watch movies. It’s kind of my idea of the perfect night.
And to show you how these brownies are done, I’ve made you a new video! I’m in this one, and nobody likes to see themselves on camera. So I’m cringing, but I hope you enjoy:
There! Whew. Glad that’s over. Now you can actually make these!
Unlike so many of the recipes I share with you, I didn’t make this one up. I’ve seen it in multiple places on the vastness of the Internet, and I had to give it a shot. The most seductive element for me is that champagne glaze. You boil champagne and sugar on the stove for one minute and then brush the mixture all over the brownies. It soaks in and, yep. Quite the champagne flavor punch! I was convinced that eating these would give me a buzz, even though the alcohol likely all cooks out.
And the texture of the brownies is one-of-a-kind. When I saw how much these rose I thought I was going to have a cakey brownie, which I loathe. But that didn’t happen. These were still crazy fudgy, but tall. I’ve honestly never seen that happen before, but I like it! More brownie to love.
The underlying champagne flavor will send you rushing back for more of these guys. Next week, I’ll be putting them onto a fondue platter to show you how Kenny and I like to do it up on New Year’s Eve. In the meantime, good luck with your holiday prep and remember to have a glass of champagne nearby. It really makes everything so festive!
Ingredients
Instructions
- Preheat the oven to 350. Line an 8-inch square pan with foil and coat with cooking spray, or you can use a silicone insert like the one in the video. Set aside.
- Melt the chocolate and butter in the microwave. Stir. If not melted, heat an additional 20 seconds and stir again until smooth. Add the sugar, salt and vanilla, mixing until well incorporated. Add the eggs and mix again. Stir in the flour until the batter is smooth.
- Carefully, stir in the champagne. The batter will be thinner than typical brownie batter, but the color and texture should be uniform.
- Pour the batter into the prepared pan and bake for 45-55 minutes until a toothpick inserted into the center comes out with moist crumbs.
- Make the glaze. Boil the champagne and sugar together for one minute and remove from the heat. Brush the glaze liberally over the brownies. It will soak in.
- Cool completely and cut into squares. Serve!
]]>
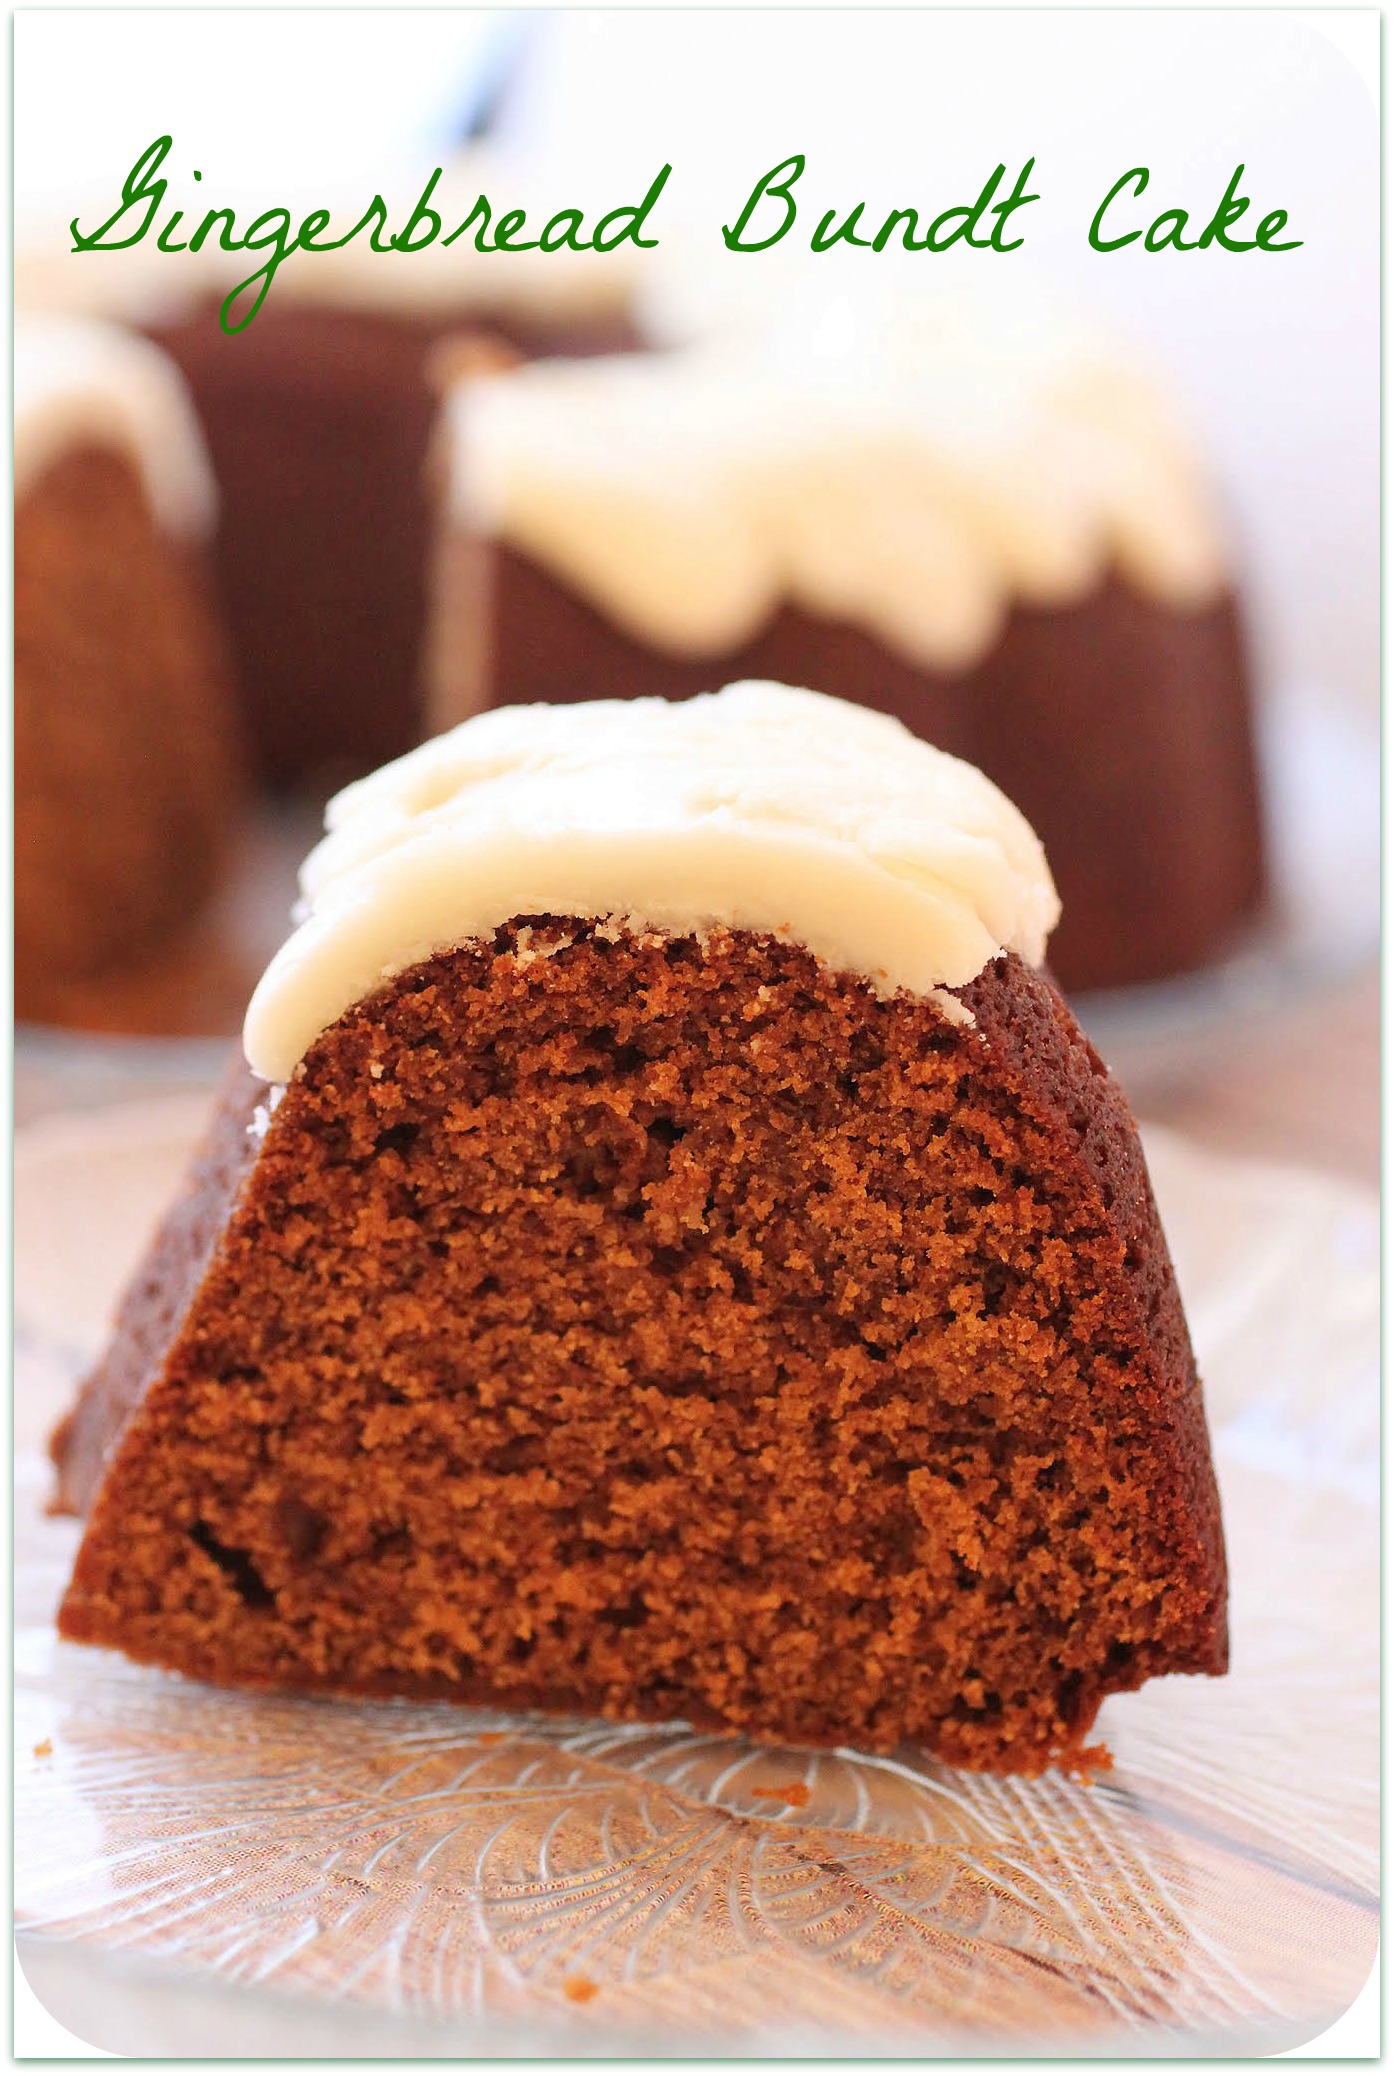
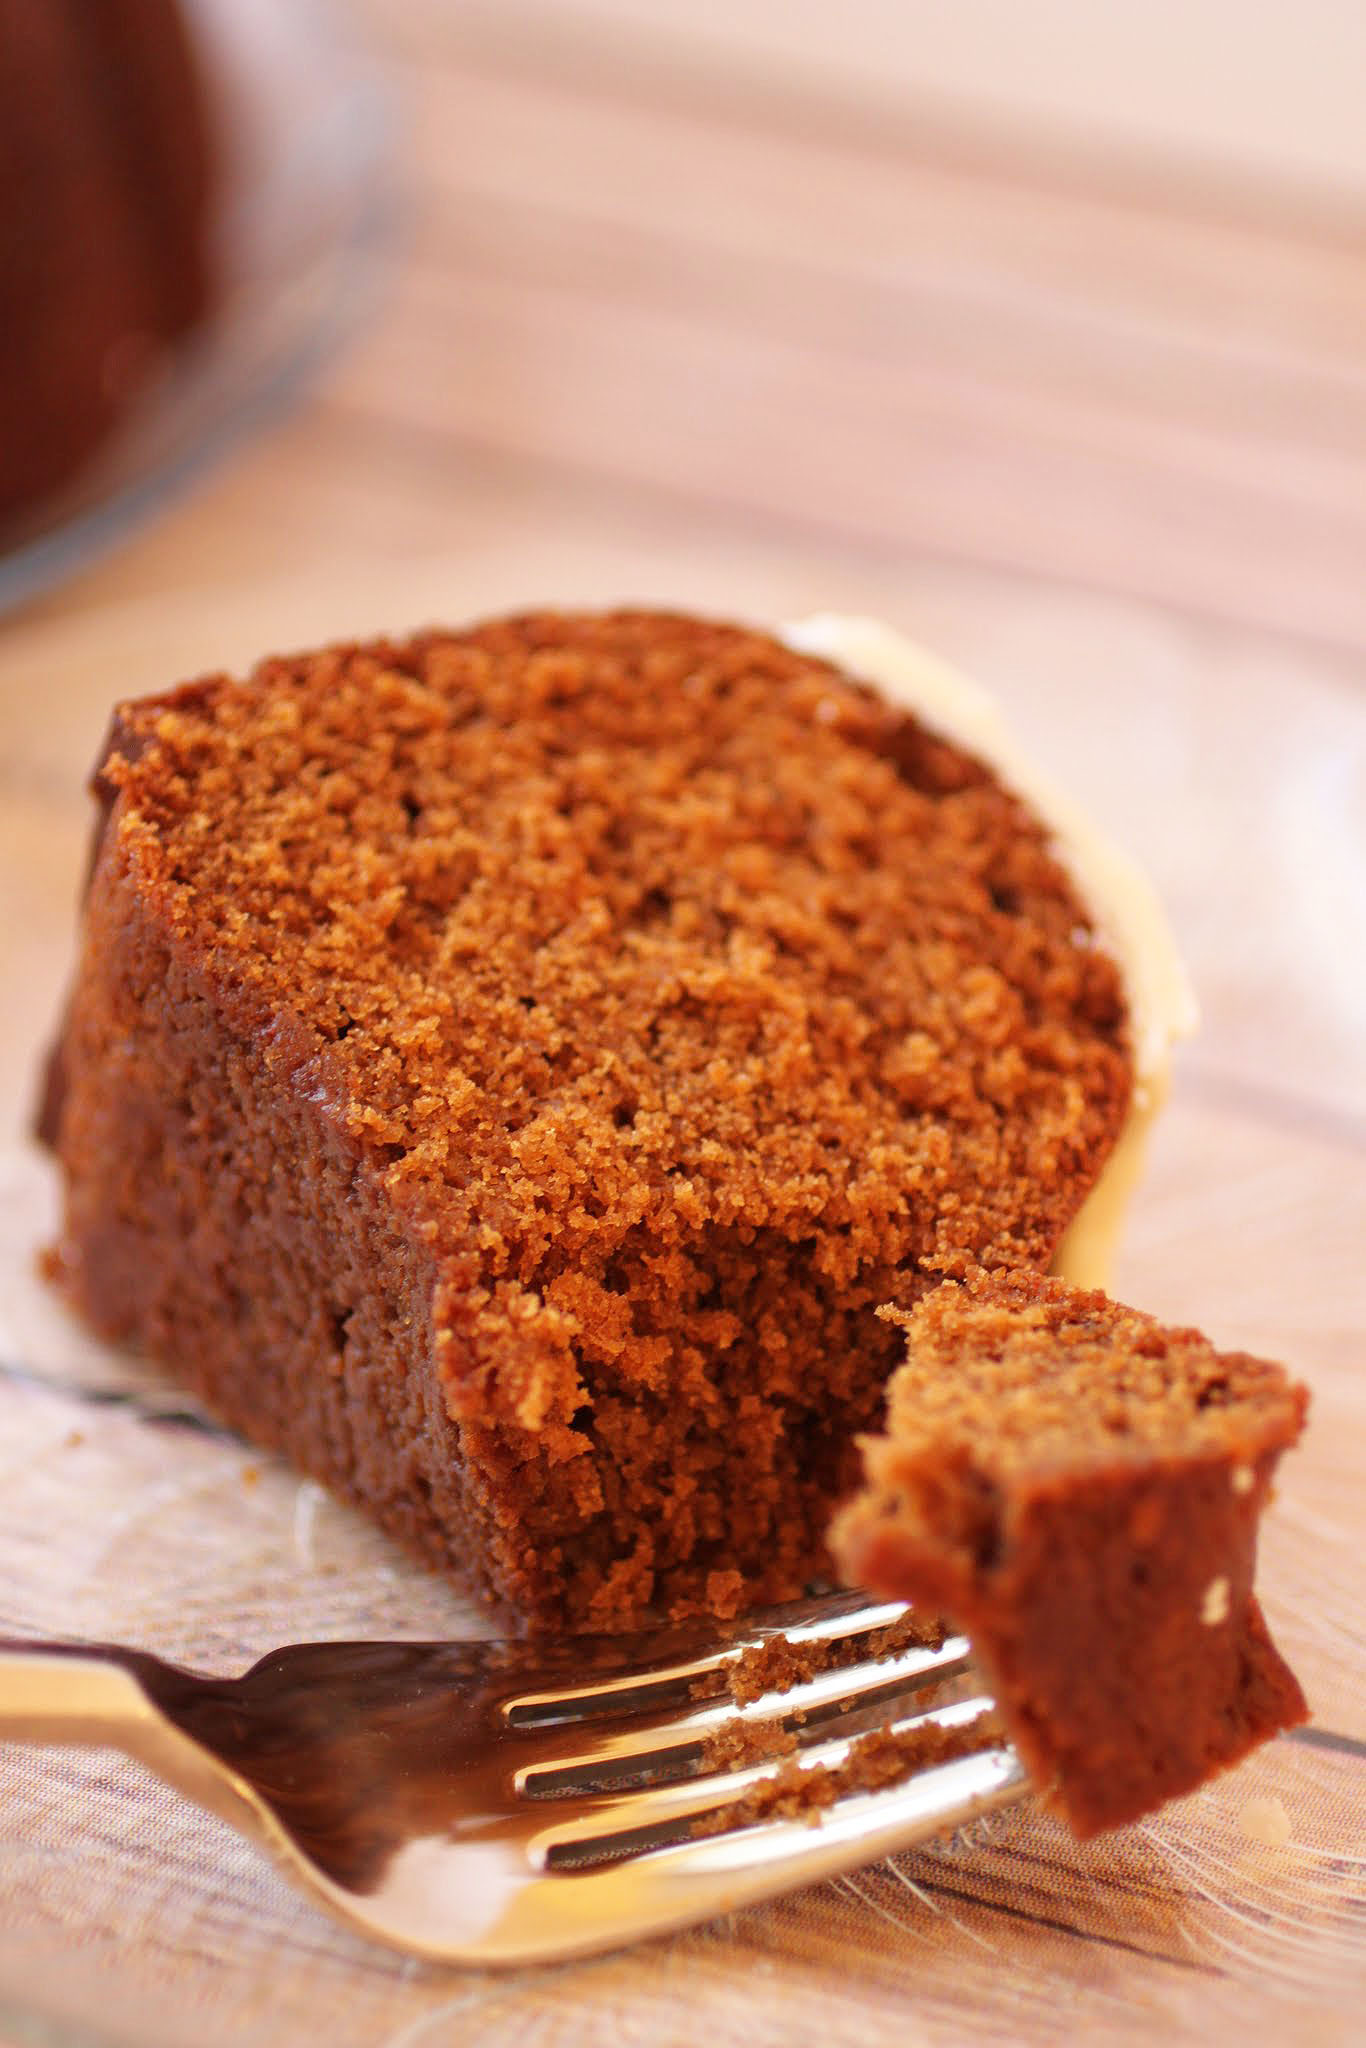
This gingerbread bundt cake is a winter spice wonder. It’s moist, soft, and oh so perfect for Christmas. And since I don’t do Christmas, I’ll just eat it all anyway.
As a perk, this cake is finished off with brown butter icing. It’s pretty much the best cake ever. No bias here, of course!
I’m working on cozy holiday plans, and I’m very excited to curl up with my kids by the fire later this week while we watch movies. It’ll be great.
Just as exciting, the D.C. area is poised for 75-degree temps this Christmas Eve. Heck yeah! If we don’t get a white Christmas, can we get a tropical one instead? I’m down with that. It might be global warming, but let’s not talk about that right now.
This week, I’m still chugging away at work. Most school districts all over the country are on winter break, but my school system is insisting on three days of instruction this week, which means I will work through Wednesday and then run for the hills. It’s not that bad, except that people keep asking me how much I’m enjoying vacation, and I have to tell them that nope, not there yet. Gone are the days when winter break was two weeks long!
Okay, enough kvetching. I’ll talk about cake instead. Glorious, glorious cake.
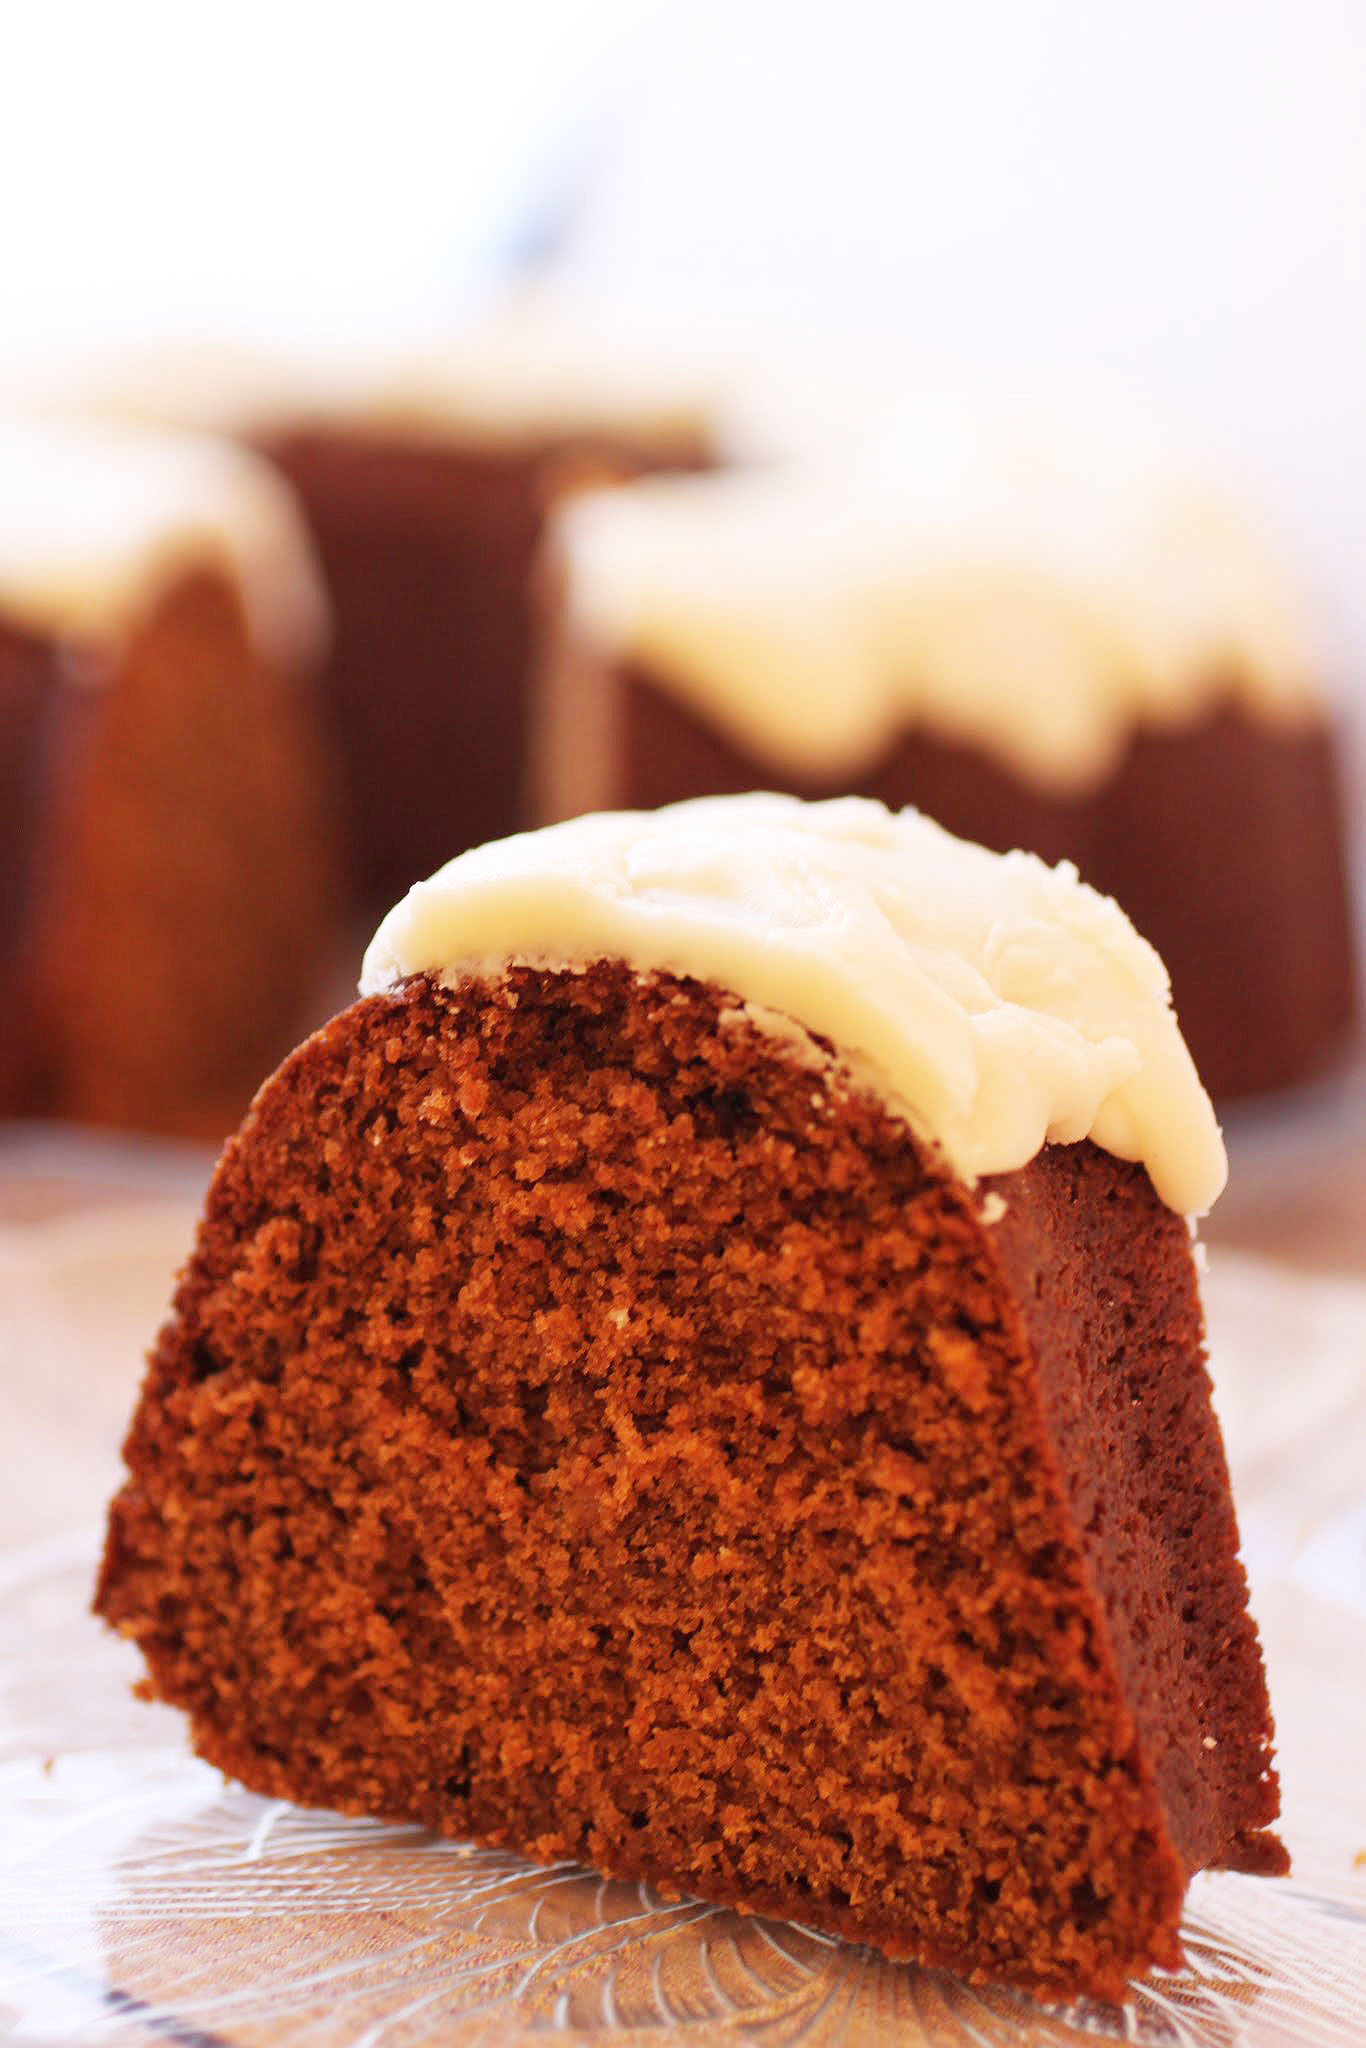
This cake has all the elements of gingerbread: molasses, cinnamon, ginger, and lots of love. But it’s a cake, and it’s way too easy to eat about three slices at once. I don’t have gingerbread often, but when I do, I take it very seriously.
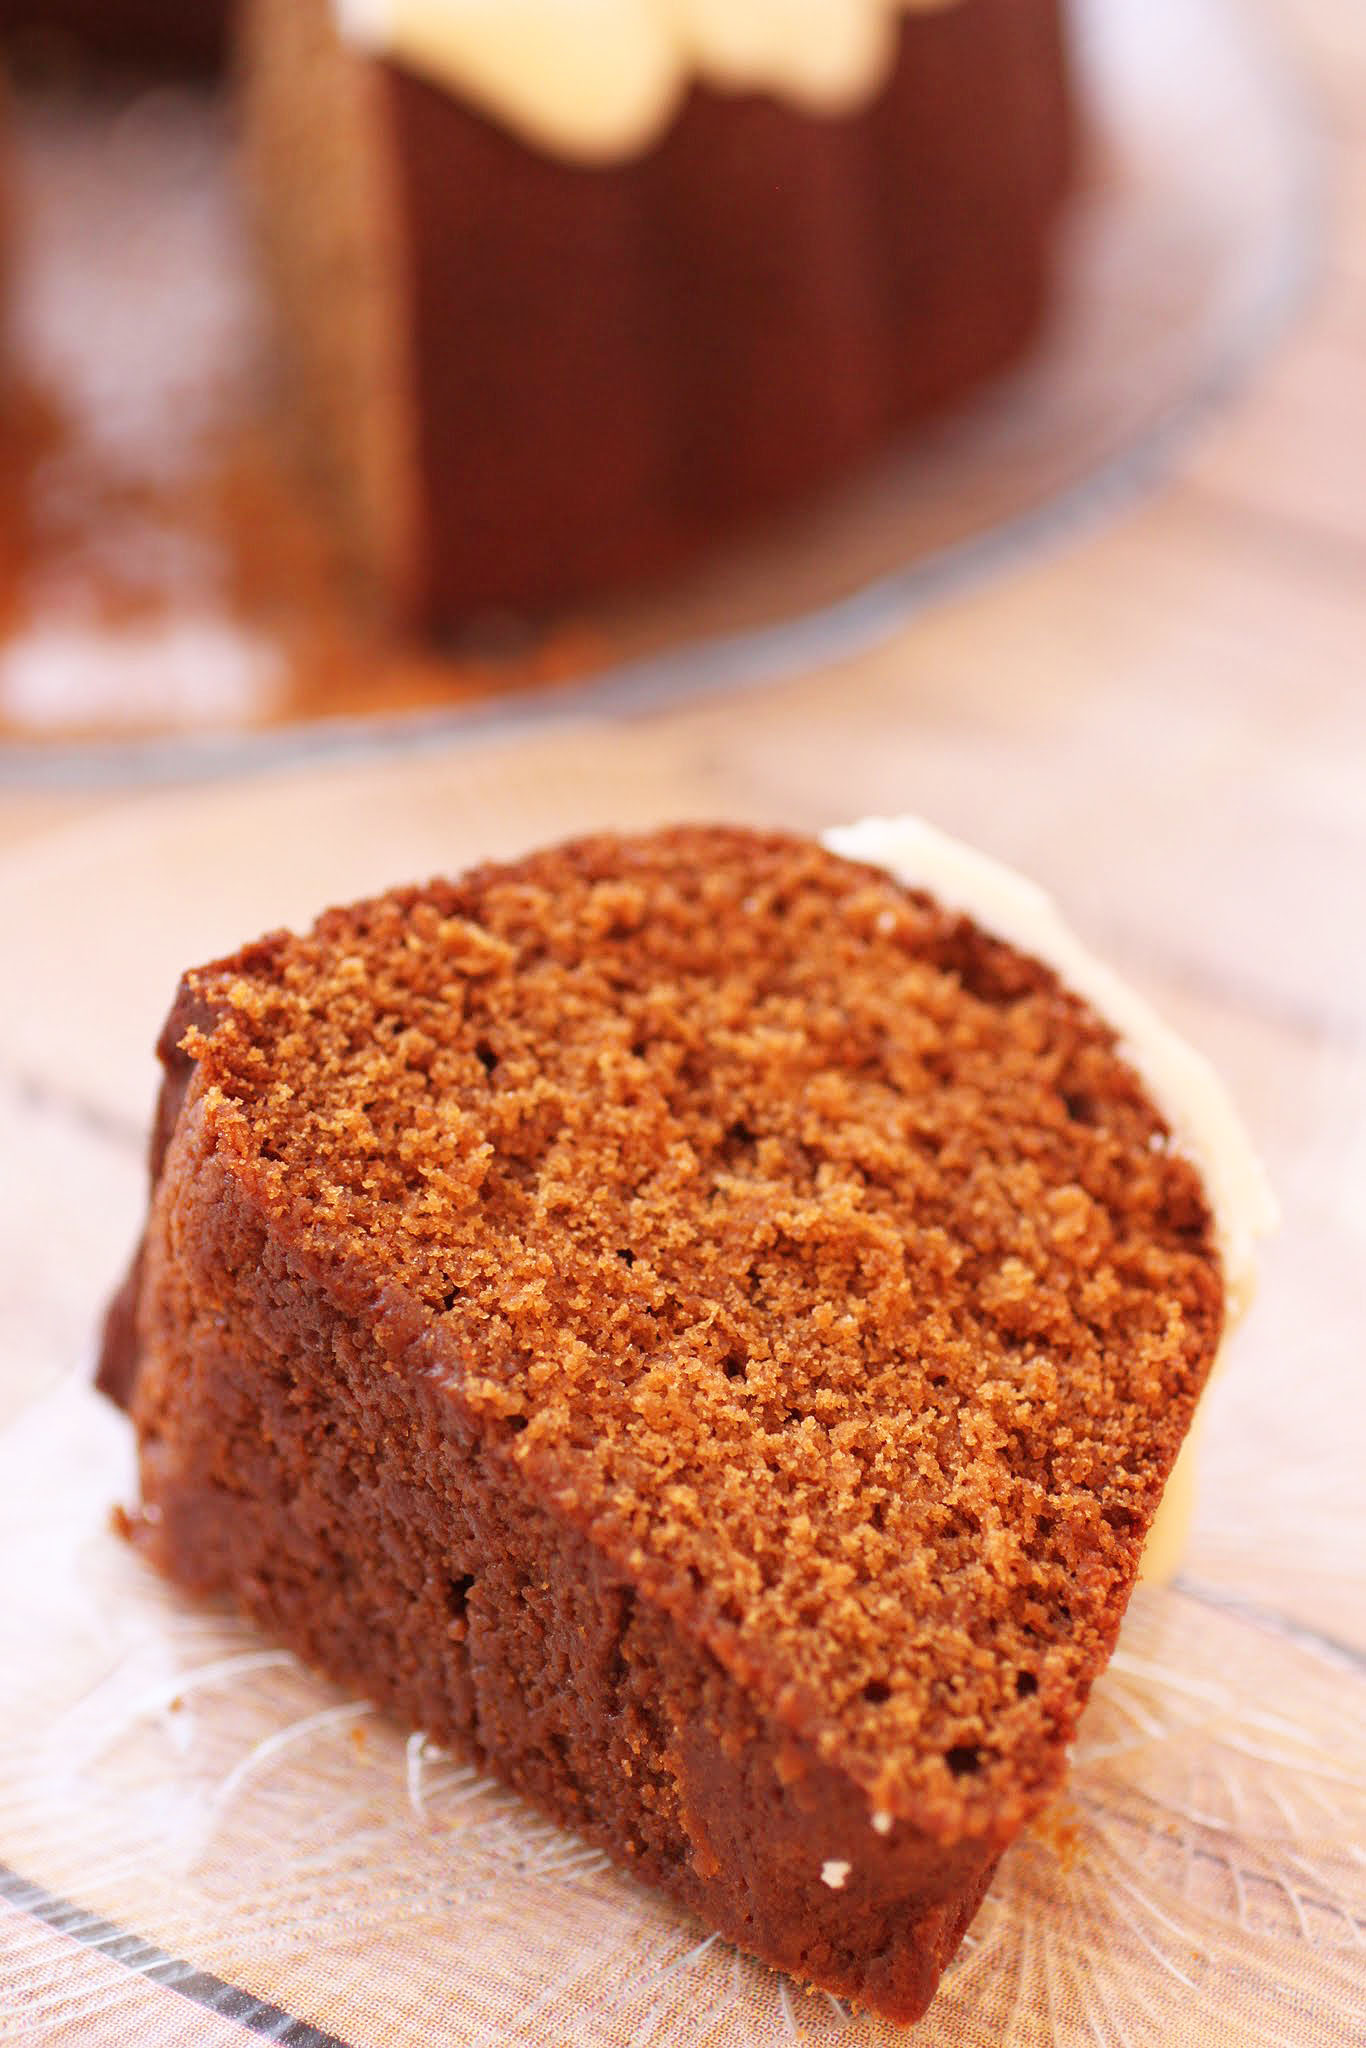
The brown butter icing takes just a few minutes to make, and it’s the perfect rich accompaniment to a dark, spicy cake. I can’t recommend it enough!
Stay tuned tomorrow for my next foray into food film. Until then, enjoy all the holiday sugar you can!
Ingredients
Instructions
- Preheat the oven to 350. Coat a bundt pan with cooking spray and dust with flour. Set aside.
- In a bowl, combine the flour, salt, baking soda, and spices. Set aside.
- In the bowl of a stand mixer, cream the butter and brown sugar until light and fluffy. Add the egg and beat until smooth. Mix in the molasses until blended. Working alternately, beat in the flour and milk until all ingredients are incorporated and smooth.
- Bake for 45-55 minutes until a toothpick inserted into the center comes out clean.
- Cool for 10 minutes, and then invert onto a plate. Cool completely.
- When the cake is cool, make the brown butter icing. In a saucepan over medium heat, melt the butter and let it cook until golden in color, anywhere from 3-5 minutes. Remove the pan from the heat.
- Stir in the powdered sugar and vanilla and gradually add the milk until the mixture becomes spreadable. If the mixture is too thin, add more powdered sugar. If it's too thick, add more milk.
- Spread the icing over the cooled cake. Let it set.
- Slice and serve!
]]>
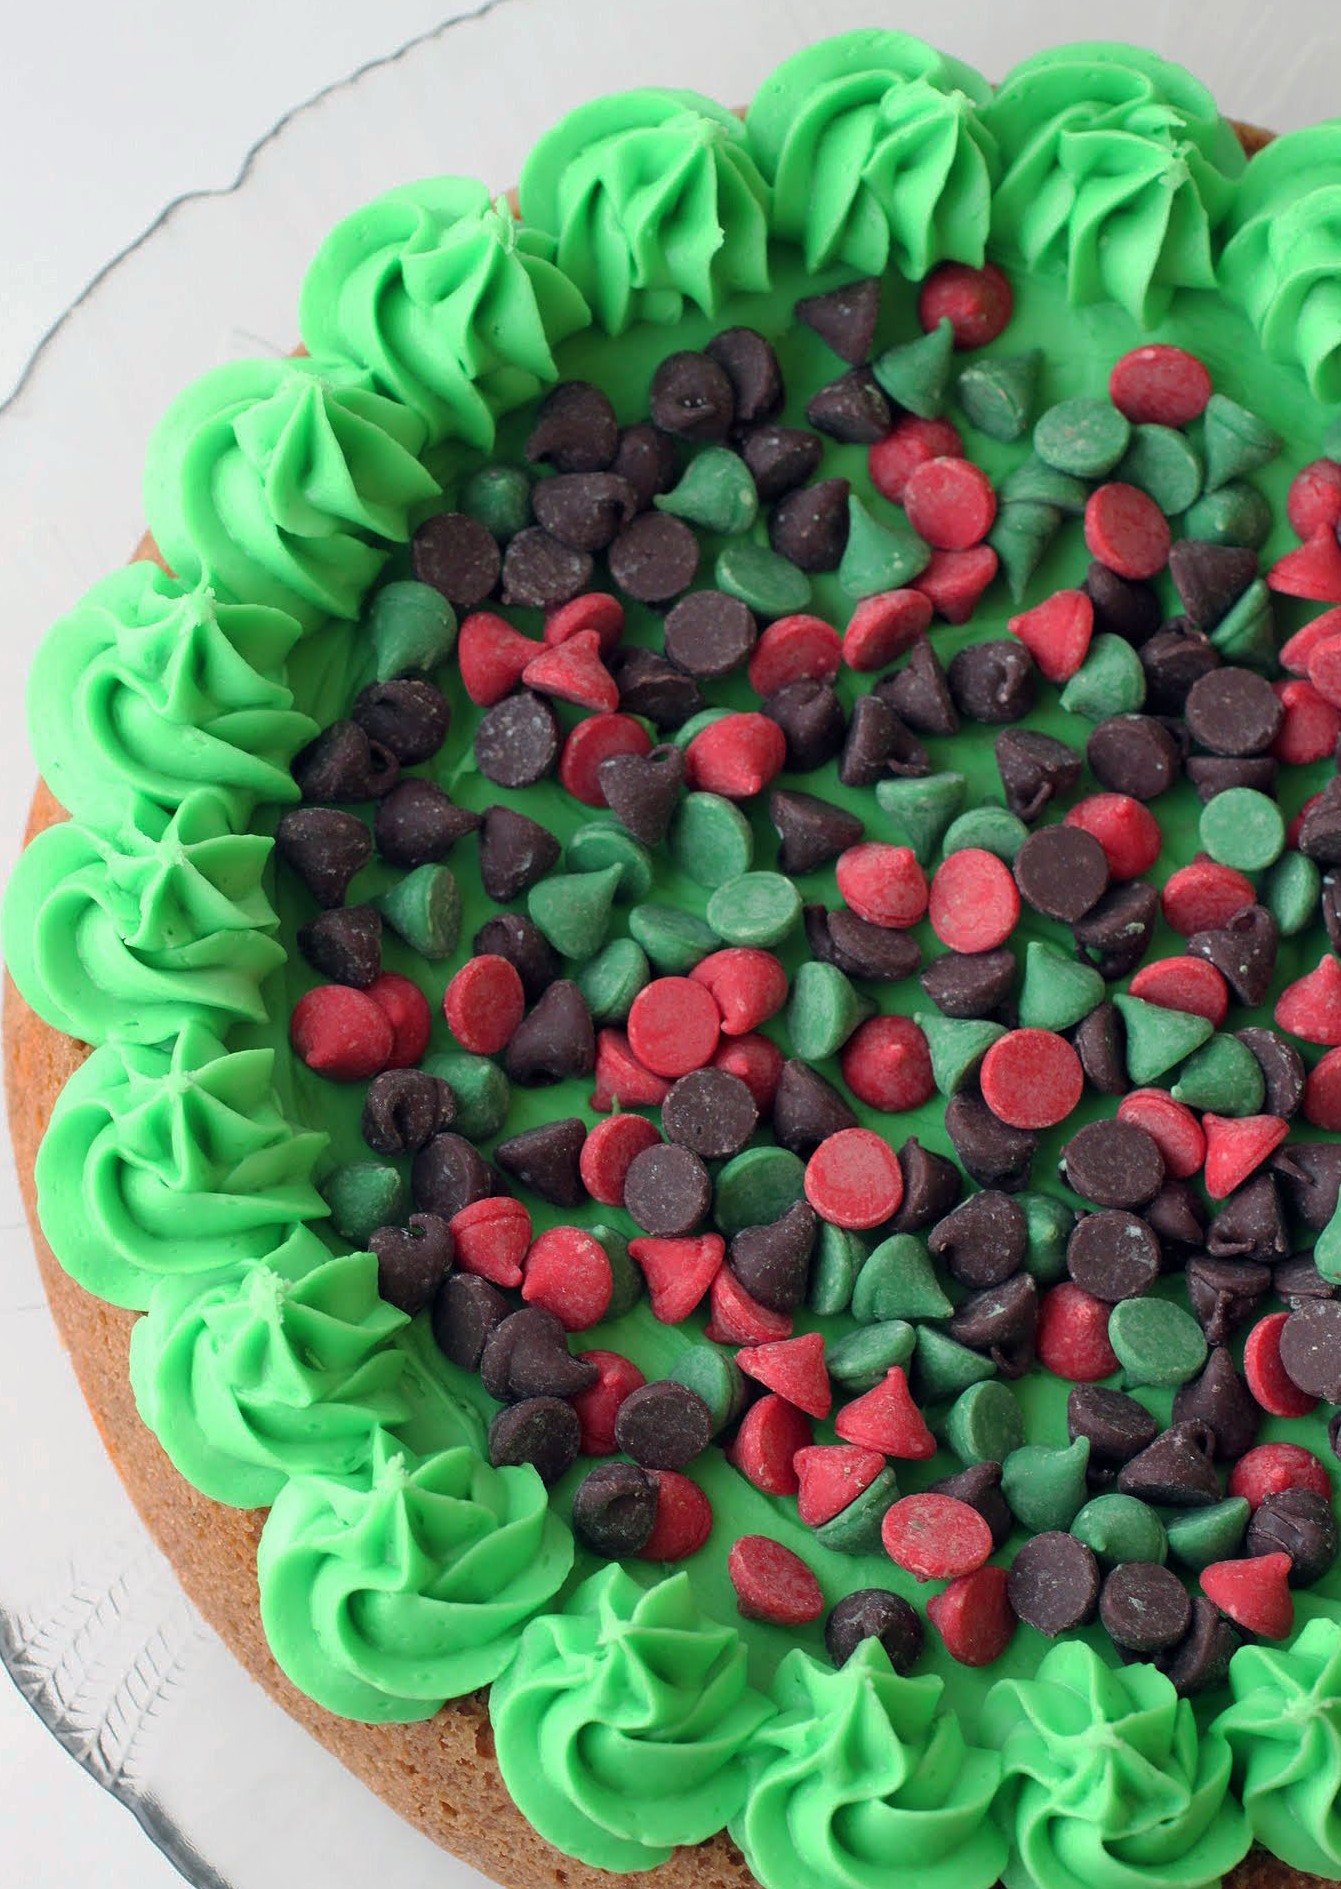
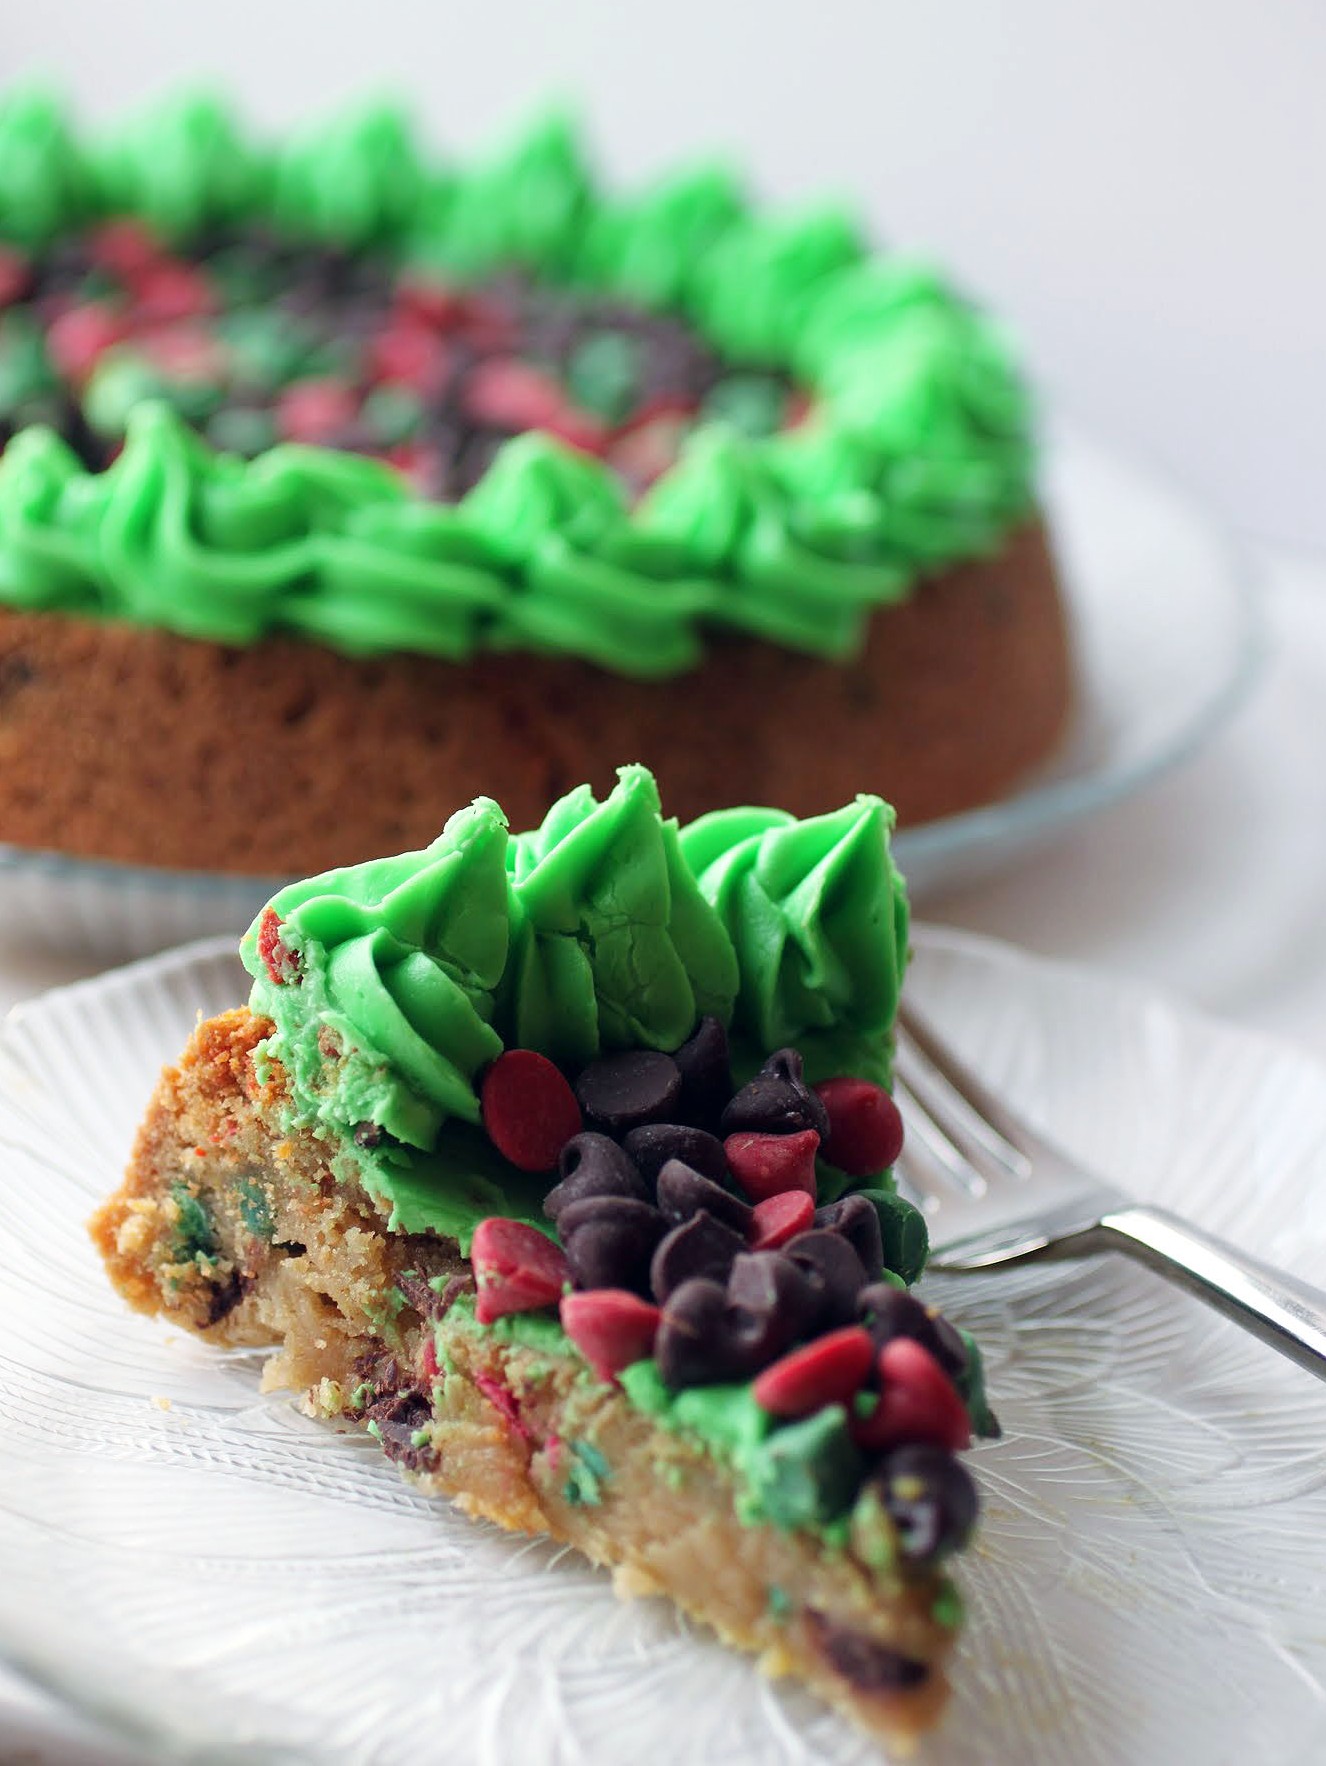
Honestly, I’m drawn to cookie cakes. When I’m in the grocery store, I can’t help but walk by the giant chocolate chip cookie cakes covered in frosting and drool. But then I remember that it’s pretty easy to make one right here at home.
This cookie dough is soft and full of both holiday chips and chocolate chips. The frosting is definitely an added bonus. There’s nothing here to hate on, friends!
Recently, I bought a book on cake decorating, which is light reading in my universe. I mean, I spend the day teaching Shakespeare, so my nights are taken up with Us Weekly and cake decorating books. Every time I read these books, I’m astonished at what people can do with bags of frosting and piping tips.
I’m not one of those people. Not yet. I’ve taken classes and read books, but I have a day job and several children at home, both of which stop me from being a decorating whiz. But it’s a dream, people. It’s a dream.

Nurturing dreams is important. I’ve met too many people who claim to be “too old” for something, from “I’m too old to wear jeans” or “I’m too old to join a band” to “I’m too old to fight for human rights.” It doesn’t really matter. The point is, you’re not too old. It’s a shoddy excuse for not doing what your inner voice is telling you to do.
I don’t believe in limits. I mean, I know they exist, and they painfully obtrude upon my life at times. But I try and look at the possibilities as being larger than they are, and then if reality bites, well then, it does. At least I tried. At least hope didn’t die.
So someday, I’ll be a whiz cake decorator. For now, I’m happy piping swirls. I love swirls.
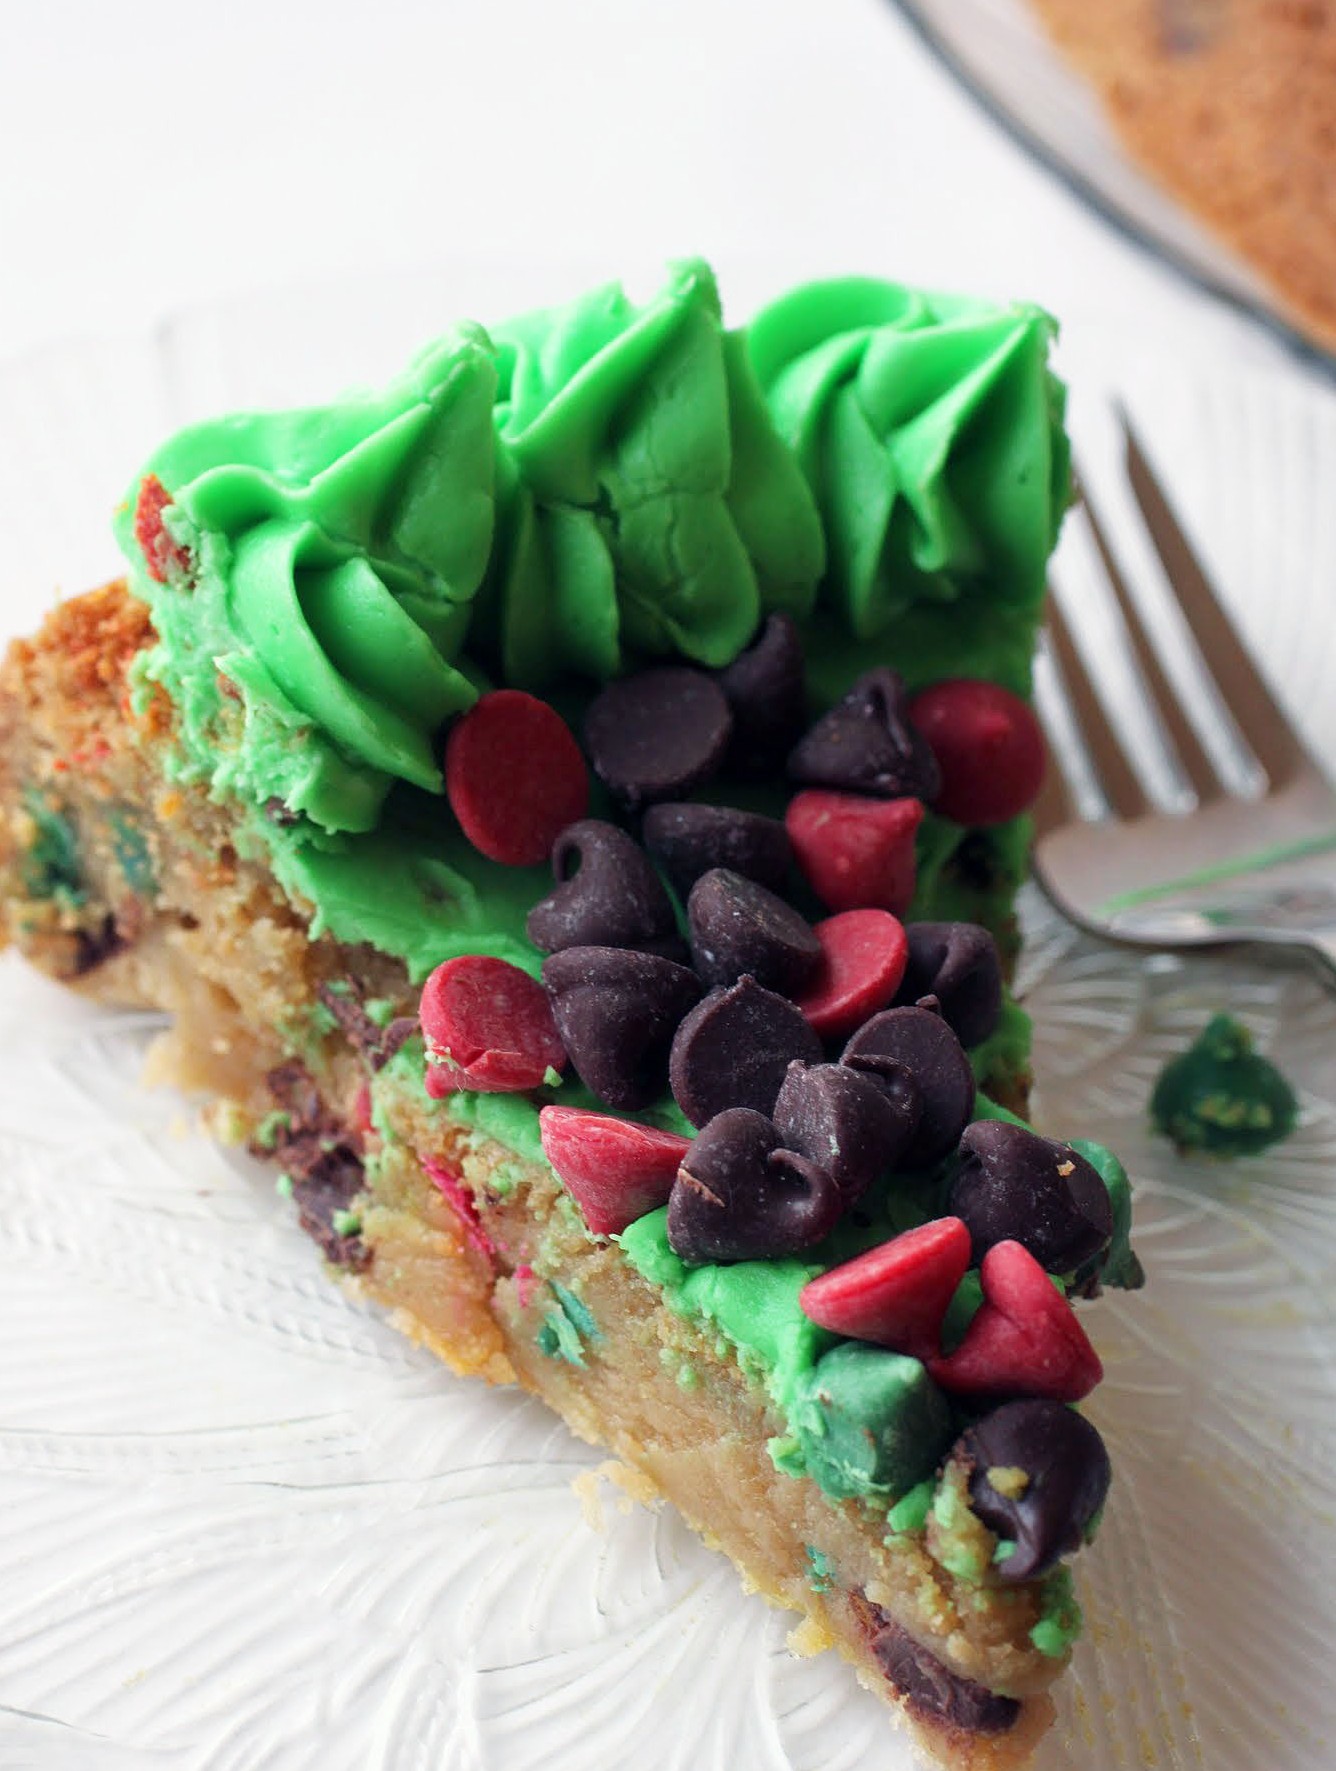
And of course, I love cookie cake. The key to a good cookie cake is to take it out of the oven before it fully bakes. It will set as it cools, and then the slices will be the perfect texture. Overdoing cookie dough is such a sad, sad mistake.
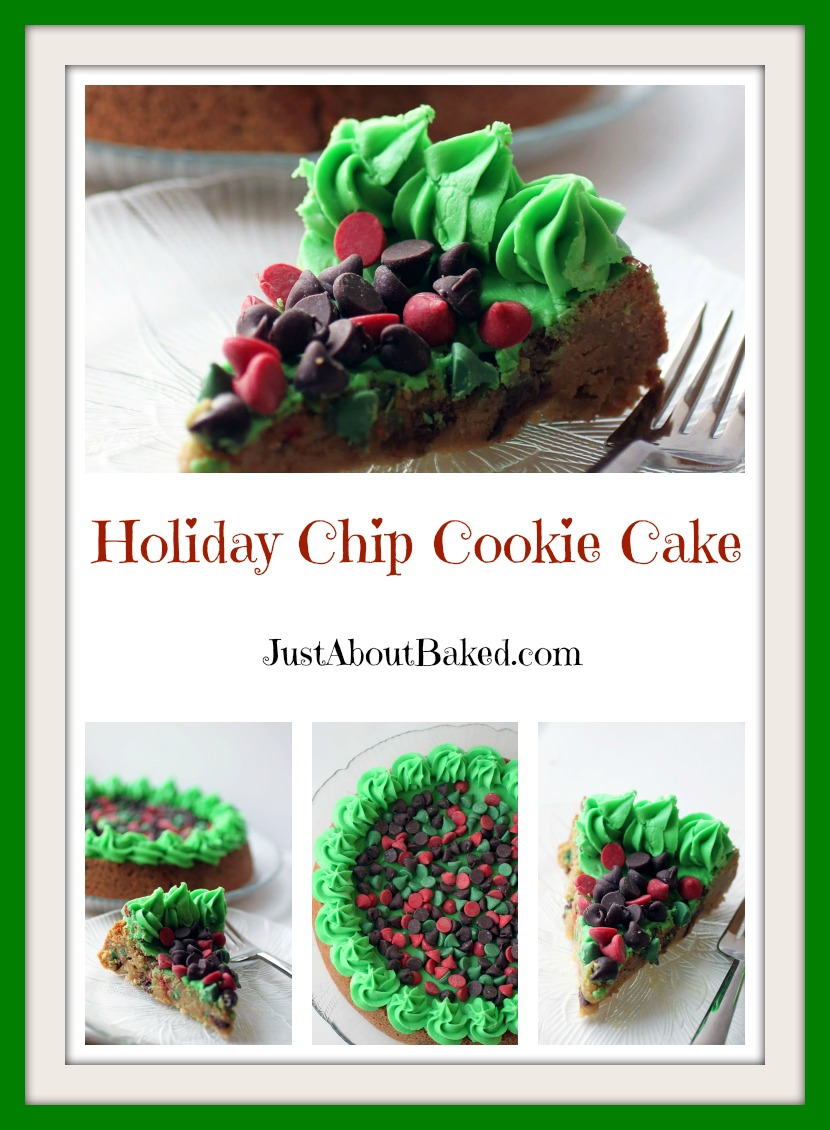
This cookie cake is covered in frosting and holiday chips. It’s a holiday extravaganza! So grab your piping bags and have fun. You don’t have to be an expert to make your dreams of deliciousness come true!
Ingredients
Instructions
- Preheat the oven to 350. Line the bottom of a 9-inch round pan with parchment paper and spray with pan release spray.
- Combine the melted butter, brown sugar, and white sugar together until the mixture is smooth. Stir in the egg and the egg yolk, incorporating both fully. Finally, add the vanilla.
- In a small bowl, combine the dry ingredients. Add the mixture to the wet ingredients and mix well. Fold in the holiday chips.
- Press the batter evenly into the cake pan and bake for 25-30 minutes until the center is set.
- Cool the cookie cake and invert onto a plate.
- While the cookie cake is cooling, make the frosting. Cream the softened butter and shortening. Gradually add the powdered sugar, beating after each addition. Finally, add the vanilla and milk. Let the mixer go for about 5 minutes to really combine and whip the frosting.
- Add the green food gel coloring until you get the desired color. With green, it can take a lot, so be prepared to mix and mix again until the color you want appears uniformly.
- Spread a thin layer of the frosting onto the cookie cake surface. Using a tip of your choice, pipe a border around the cookie cake. Pile the remaining holiday chips into the center.
- Cut into wedges and serve.